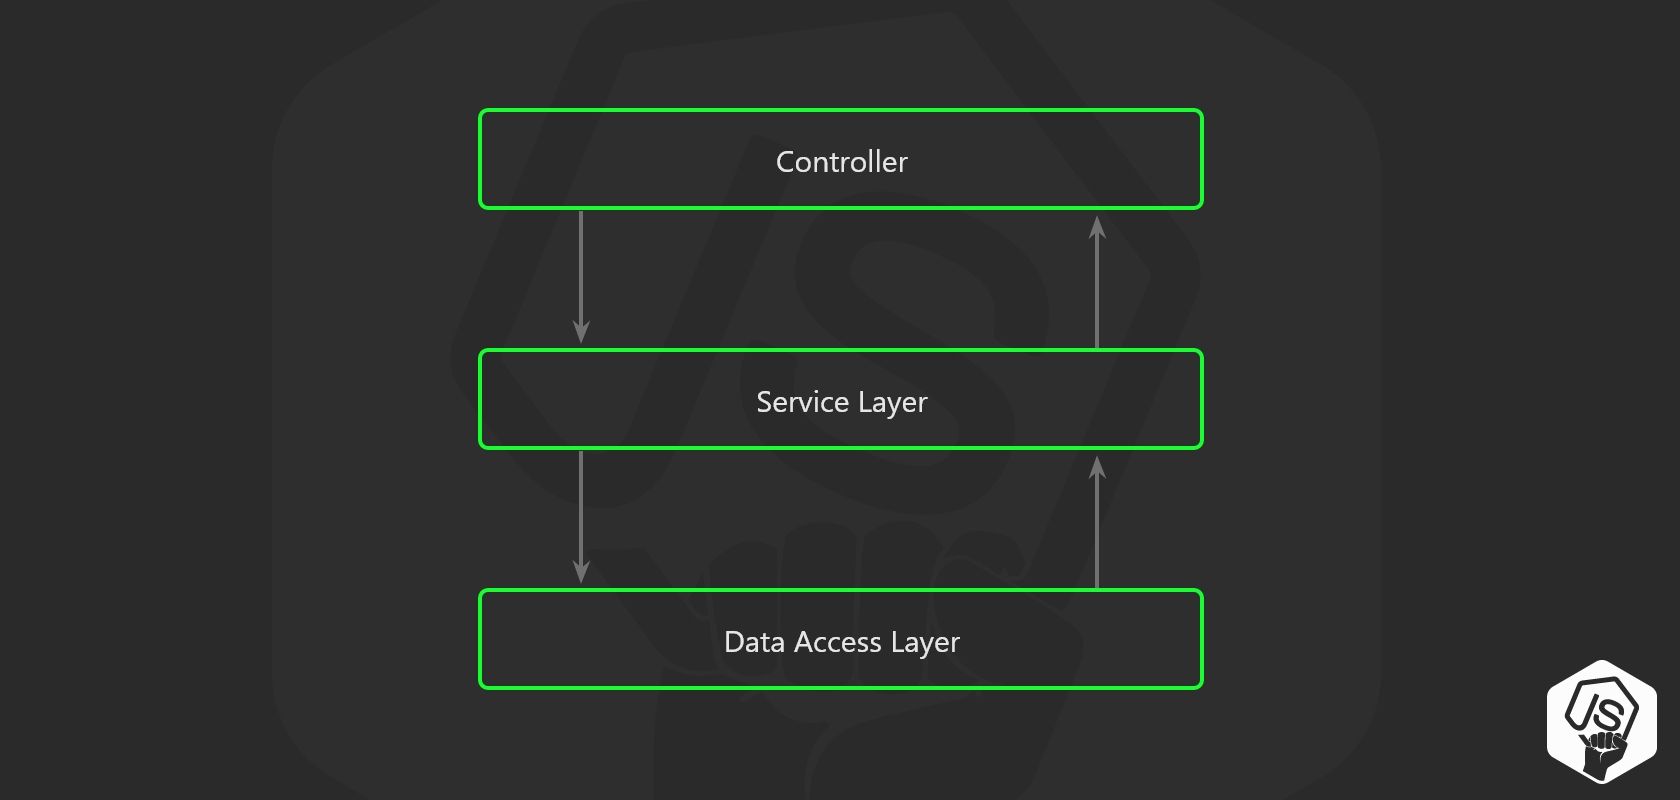
레이어드 패턴 (Layered Pattern)
레이어드 패턴은 각 기능들을 단방향 의존성을 가지는 3개의 계층으로 나눈다. 이를 통해 상위의 계층에 대해 독립적이게 되고, 각 레이어의 역할에 맞는 기능만 수행하게 된다.
3 계층
- Presentation Layer
- Business Layer
- Persistence Layer
각 레이어는 하위의 레이어에 의존적이고 상위의 레이어로부터는 독립적이다.
레이어드 패턴의 장점
- 각 레이어가 서로 독립적이고 역할이 분명하므로 서로에게 끼치는 영향을 최소화하면서 확장하거나 수정할 수 있다.
- 각 레이어가 완벽하게 분리가 되어 있고 역할이 명확하므로 가독성이 높아진다.
- 재사용 가능성도 높아진다. 예를 들어, business layer는 독립적이므로 여러 다른 presentation layer에 적용될 수 있다.
- 테스트 코드를 구현하기도 더 수월하다.
Node.js의 레이어드 패턴 적용
파이썬에서 레이어드 패턴을 학습하고, 진행하던 Node.js 프로젝트에도 적용해봤지만 생각보다 잘 되지는 않았다. 그러던 중 이와 관련한 글을 찾게 되어 읽고 정리하게 되었다.
3계층은 Node.js에 다음과 같이 적용할 수 있다.
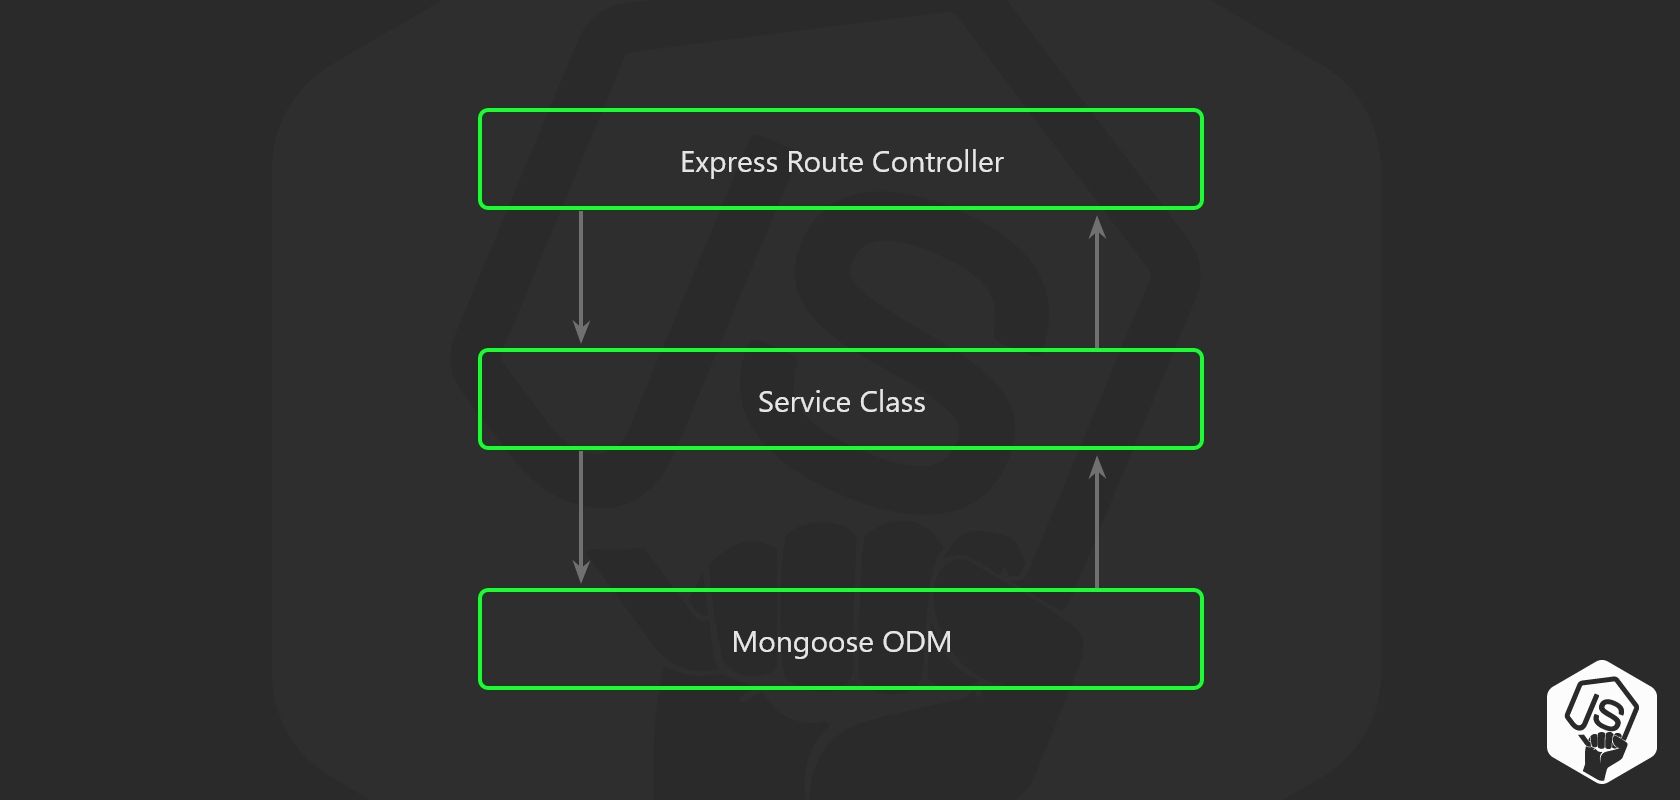
비지니스 로직은 controller가 아니라 꼭 Service 계층에 넣자
express.js controllers에 애플리케이션의 비지니스 로직을 구현하게 되면 스파게티 코드가 되기 십상이다. 유닛 테스트를 작성하다 보면 수없이 많은 express.js req/res 오브젝트를 다뤄야 하기 때문이다.
다음은 하지 말아야 할 예시이다.
사실 여기 나온 대부분의 실수를 저지르고 있었다..
route.post('/', async (req, res, next) => {

  // This should be a middleware or should be handled by a library like Joi.
  const userDTO = req.body;
  const isUserValid = validators.user(userDTO)
  if(!isUserValid) {
    return res.status(400).end();
  }

  // Lot of business logic here...
  const userRecord = await UserModel.create(userDTO);
  delete userRecord.password;
  delete userRecord.salt;
  const companyRecord = await CompanyModel.create(userRecord);
  const companyDashboard = await CompanyDashboard.create(userRecord, companyRecord);

  ...whatever...


  // And here is the 'optimization' that mess up everything.
  // The response is sent to client...
  res.json({ user: userRecord, company: companyRecord });

  // But code execution continues :(
  const salaryRecord = await SalaryModel.create(userRecord, companyRecord);
  eventTracker.track('user_signup',userRecord,companyRecord,salaryRecord);
  intercom.createUser(userRecord);
  gaAnalytics.event('user_signup',userRecord);
  await EmailService.startSignupSequence(userRecord)
});
비지니스 로직은 service 계층으로, SQL query 형태의 코드는 data access layer로 분리해야 한다.
- express.js router에 모든 코드를 적지 말자.
- service 레이어에는 req와 res 객체 전달하지 않는다.
- 상태 코드, 헤더와 같은 HTTP 전송 계층과 관련된 것들은 반환하지 말자.
// controller
route.post('/',
  validators.userSignup, // this middleware take care of validation
  async (req, res, next) => {
    // The actual responsability of the route layer.
    const userDTO = req.body;

    // Call to service layer.
    // Abstraction on how to access the data layer and the business logic.
    const { user, company } = await UserService.Signup(userDTO);

    // Return a response to client.
    return res.json({ user, company });
  });
// service
import UserModel from '../models/user';
import CompanyModel from '../models/company';
export default class UserService {
async Signup(user) {
const userRecord = await UserModel.create(user);
// needs userRecord to have the database id
const companyRecord = await CompanyModel.create(userRecord);
// depends on user and company to be created
const salaryRecord = await SalaryModel.create(userRecord, companyRecord);
...whatever
await EmailService.startSignupSequence(userRecord)
...do more stuff
return { user: userRecord, company: companyRecord };
}
}Pub-Sub 모델도 사용하자
pub-sub(발행-구독) 패턴은 3계층 구조의 범위를 넘어서긴 하지만 매우 유용하다.
간단한 node.js API 앤드포인트에서 사용자를 생성한 뒤, third-party 서비스를 호출하거나, 서비스 분석을 시도하거나, 이메일 전송과 같은 작업을 하고 싶을 수 있다. 그런데 이러다 보면 금세 간단한 create 작업이 여러 가지 일을 하기 시작하고, 하나의 함수 안에 1000줄이 넘어가는 코드가 생길 것이다.
이는 단일 책임 원칙(principle of single responsibility)를 위배한다.
처음부터 책임들을 분리하면 코드를 간결하게 유지 관리 할 수 있다.
// 다른 service 호출
import UserModel from '../models/user';
import CompanyModel from '../models/company';
import SalaryModel from '../models/salary';

export default class UserService {

  async Signup(user) {
    const userRecord = await UserModel.create(user);
    const companyRecord = await CompanyModel.create(user);
    const salaryRecord = await SalaryModel.create(user, salary);

    eventTracker.track(
      'user_signup',
      userRecord,
      companyRecord,
      salaryRecord
    );

    intercom.createUser(
      userRecord
    );

    gaAnalytics.event(
      'user_signup',
      userRecord
    );

    await EmailService.startSignupSequence(userRecord)

    ...more stuff

    return { user: userRecord, company: companyRecord };
  }

}
하지만 독립적인 서비스들을 직접적으로 호출하는 것보다 이벤트를 발생시키는 것이 더 좋은 접근 방법이다.
이제는 리스너들이 이러한 역할을 책임지게 된다.
import UserModel from '../models/user';
import CompanyModel from '../models/company';
import SalaryModel from '../models/salary';

export default class UserService {

  async Signup(user) {
    const userRecord = await this.userModel.create(user);
    const companyRecord = await this.companyModel.create(user);
    this.eventEmitter.emit('user_signup', { user: userRecord, company: companyRecord }) // publish
    return userRecord
  }
}
이제 이벤트 핸들러/리스너를 여러 파일로 나눌 수 있다.
// Listener
eventEmitter.on('user_signup', ({ user, company }) => {

  eventTracker.track(
    'user_signup',
    user,
    company,
  );

  intercom.createUser(
    user
  );

  gaAnalytics.event(
    'user_signup',
    user
  );
})
// Listener
eventEmitter.on('user_signup', async ({ user, company }) => {
  const salaryRecord = await SalaryModel.create(user, company);
})
// Listener
eventEmitter.on('user_signup', async ({ user, company }) => {
  await EmailService.startSignupSequence(user)
})
의존성 주입 (Dependency Injection)
의존성 주입(D.I), 또는 제어 역전(IoC, Inversion of Control)은 코드 구조화에 많이 사용하는 패턴으로, 생성자를 통해 클래스와 함수의 의존성을 전달한다.
호환 가능한 의존성(compatible dependency)을 주입함으로써 유연하게 코드를 유지할 수 있다. 이는 service에 대한 유닛 테스트를 작성하거나, 다른 context에서 코드를 사용할 때 도움이 된다.
// 의존성 주입을 사용하지 않을 때
import UserModel from '../models/user';
import CompanyModel from '../models/company';
import SalaryModel from '../models/salary';
class UserService {
  constructor(){}
  Sigup(){
    // Caling UserMode, CompanyModel, etc
    ...
  }
}
// 직접 의존성 주입을 사용할 때
export default class UserService {
constructor(userModel, companyModel, salaryModel){
this.userModel = userModel;
this.companyModel = companyModel;
this.salaryModel = salaryModel;
}
getMyUser(userId){
// models available throug 'this'
const user = this.userModel.findById(userId);
return user;
}
}// 다음과 같이 커스텀된 의존성(salaryModelMock)을 주입해서 사용할 수 있다.
import UserService from '../services/user';
import UserModel from '../models/user';
import CompanyModel from '../models/company';
const salaryModelMock = {
calculateNetSalary(){
return 42;
}
}
const userServiceInstance = new UserService(userModel, companyModel, salaryModelMock);
const user = await userServiceInstance.getMyUser('12346');typedi
하지만 서비스가 가질 수있는 종속성의 양은 무한하고 새 인스턴스를 추가 할 때 서비스의 모든 인스턴스화를 리팩터링하는 것은 지루하고 오류가 발생하기 쉬운 작업이기 때문에, 의존성 주입 프레임워크를 쓰면 좋다. 클래스에서 필요한 의존성을 선언하고, 그 의존성 클래스 인스턴스가 필요하면 Service Locator를 호출하기만 하면된다.
npm 라이브러리 typedi는 node.js에서 의존성 주입을 쓸 수 있게 해준다.
// typescript 예시입니다!
import { Service } from 'typedi';
@Service()
export default class UserService {
  constructor(
    private userModel,
    private companyModel,
    private salaryModel
  ){}

  getMyUser(userId){
    const user = this.userModel.findById(userId);
    return user;
  }
}
이제 typedi가 UserService가 필요로 하는 의존성을 알아서 해결한다.
import { Container } from 'typedi';
import UserService from '../services/user';
const userServiceInstance = Container.get(UserService);
const user = await userServiceInstance.getMyUser('12346');