우분투에서 MFC-J5910DW 설치하기
본가에서 놀던 브라더 프린터를 줍줍해서 집에 옮겨놓았다. 공유기에 물려서 우분투에서 사용하는 것이 목표이다.
우선 브라더 홈페이지에서 Linux용 드라이버를 설치해주자.
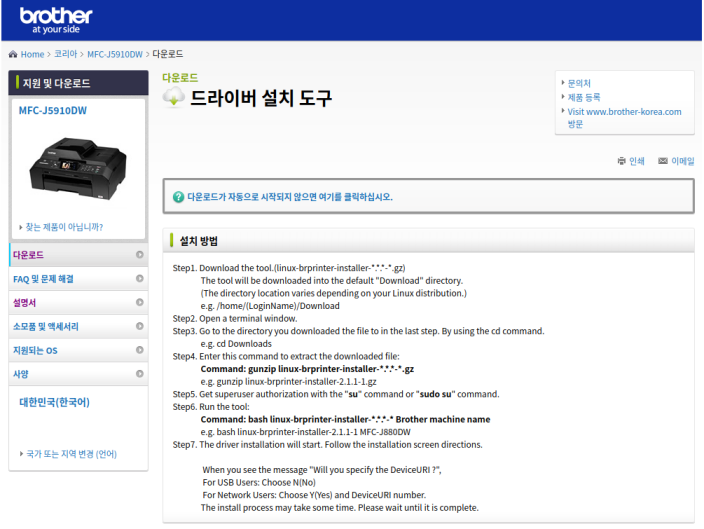
해당 페이지에 친절하게 설치 방법도 적혀있다. 보고 따라하면 된다.
설치 방법
- Download the tool.(linux-brprinter-installer-..-.gz)
The tool will be downloaded into the default "Download" directory.
(The directory location varies depending on your Linux distribution.)
e.g. /home/(LoginName)/Download- Open a terminal window.
- Go to the directory you downloaded the file to in the last step. By using the cd command.
$ cd Downloads- Enter this command to extract the downloaded file:
$ gunzip linux-brprinter-installer-*.*.*-*.gz- Get superuser authorization with the "su" command or "sudo su" command.
- Run the tool:
$ sudo bash linux-brprinter-installer-*.*.*-* Brother machine name- The driver installation will start. Follow the installation screen directions.
When you see the message "Will you specify the DeviceURI ?",
For USB Users: Choose N(No)
For Network Users: Choose Y(Yes) and DeviceURI number.
The install process may take some time. Please wait until it is complete.
나는 usb 포트가 아닌 네트워크를 통해 사용하고자 하므로 7번에서 Y를 눌러줬다. 그러면 DeviceURI number를 선택하라고 나온다.
Will you specify the Device URI? [Y/n] ->

0: socket
1: ipps
2: http
3: ipp
4: https
5: beh
6: cups-brf:/
7: lpd
8: hp
9: smb
10: hpfax
11 (I): Specify IP address.
12 (A): Auto. (usb://dev/usblp0)

select the number of destination Device URI. ->
공유기에서 프린터에 할당한 IP 주소를 사용해 연결해주자
select the number of destination Device URI. ->11

enter IP address ->192.168.0.29

lpadmin -p MFCJ5910DW -v socket://192.168.0.29 -E

Test Print? [y/N] ->y
테스트 결과 출력이 잘 됬고, 스캔도 문서 스캐너 앱을 실행시키면 프린터를 인식해 잘 작동하는 것을 확인했다.