1. 장애대응 필요성
장애가 일어난 시점에 빠르게 대응해서 서비스 손실과 이어지는 사용자 이탈률을 줄이는데 목적으로 한다.
2. 장애 상황 선정
2.1 시스템의 정상적인 사용이 어려운 경우
가. 서비스가 불능이고 이것은 리소스 낭비로 이어지므로 즉각적인 대응이 필요하다고 판단하여 장애 알림 대상으로 선정
3. 각 상황별 장애 판단 방법
3.1 시스템의 정상적인 사용이 어려운 경우
가. 각 서비스가 완전히 다운되는 경우
- 헬스체크를 시도하여 생존 여부 판단
- 헬스체크 실패시 서비스 완전 다운 알람 클라우드 및 해당 담당 개발자들에게 전송
나. 서비스 응답이 자꾸 실패하는 경우 (5xx error 기준)
- 5분간 100명의 동시요청중 5~9명까지는 응답이 실패해도 재요청으로 처리하고 장애 경고 알람만 보내는 것으로 결정
- 10% 이상부터는 문제상황이라고 인지하고 장애 확정 알림을 보내 해당 서비스 개발자들 및 엔지니어가 즉시 조치 혹은 롤백 예정
| 알림 유형 | 오류율 | 근거 | 추적 |
|---|---|---|---|
| 장애 경고 알림 | 5~9% | MVP1에서 100명의 동시요청중 5~9명까지는 응답이 실패해도 해당 사용자 환경에 문제가 있다고 판단, 나머지 90명이 잘 활동하는것이 그 증거 | 추후 해당 수치를 유지한채로 서버를 운영하였을 때, 사용자 이탈률을 추적해 다음 MVP 때 오류율 검토에 반영 예정 |
| 장애 확정 알림 | 10% 이상 | 사용자 체감 불편 발생 가능, 재요청으로 해결되지 않는 비율 | 추후 해당 수치 장애 |
4. 장애 알람
4.1 헬스체크 실패 알람
- 인스턴스 자체의 헬스체크
1분간격 헬스체크 1번 실패시 아래의 같은 디스코드 봇이 알람을 보내게 설정, 자세한 구현 방식은 바로 아래 4.2 참고
4.2 서비스 응답 5xx 10% 이상 알람
5분간격으로 모아진 에러들의 10%가 5xx일 경우 아래 사진과 같이 디스코드 알림 계획
EC2 인스턴스에 CloudWatchAgentServerPolicy 정책이 포함된 IAM Role 삽입
나. Nginx 로그 분리
- nginx sites-available/default 수정
...
# 프론트 서버(Next.js 서버)
    location ^~ /api/ {
        access_log /var/log/nginx/fe_access.log json_log;
        error_log /var/log/nginx/fe_error.log;
        proxy_pass http://127.0.0.1:3000;
        proxy_http_version 1.1;

        proxy_set_header Host $host;
        proxy_set_header X-Forwarded-Host $host;
        proxy_set_header X-Forwarded-Proto $scheme;
        proxy_set_header X-Forwarded-Port $server_port;
        proxy_set_header X-Forwarded-For $proxy_add_x_forwarded_for;

        proxy_redirect http://localhost:3000 https://$host;
        proxy_redirect http://127.0.0.1:3000 https://$host;
    }

    # 백엔드 API (Spring Boot)
    location ^~ /server/  {
        access_log /var/log/nginx/be_access.log json_log;
        error_log /var/log/nginx/be_error.log;
        proxy_pass http://127.0.0.1:8080/;
    }

    # AI 서버 (FastAPI)
    location /ai/ {
        access_log /var/log/nginx/ai_access.log json_log;
        error_log /var/log/nginx/ai_error.log;
        proxy_pass http://127.0.0.1:8000/;
    }

    # 프론트 (Next.js SSR)
    location / {
        access_log /var/log/nginx/fe_access.log json_log;
        error_log /var/log/nginx/fe_error.log;
        proxy_pass http://127.0.0.1:3000;
        proxy_http_version 1.1;

        proxy_set_header Host $host;
        proxy_set_header X-Forwarded-Host $host;
        proxy_set_header X-Forwarded-Proto $scheme;
        proxy_set_header X-Forwarded-Port $server_port;
        proxy_set_header X-Forwarded-For $proxy_add_x_forwarded_for;

        proxy_redirect http://localhost:3000/ /;
        proxy_redirect https://localhost:3000/ /;
        proxy_redirect http://127.0.0.1:3000/ /;
        proxy_redirect https://127.0.0.1:3000/ /;
    }
}

...- 전체 코드
##
# You should look at the following URL's in order to grasp a solid understanding
# of Nginx configuration files in order to fully unleash the power of Nginx.
# https://w.nginx.com/resources/wiki/start/
# https://www.nginx.com/resources/wiki/start/topics/tutorials/config_pitfalls/
# https://wiki.debian.org/Nginx/DirectoryStructure
#
# In most cases, administrators will remove this file from sites-enabled/ and
# leave it as reference inside of sites-available where it will continue to be
# updated by the nginx packaging team.
#
# This file will automatically load configuration files provided by other
# applications, such as Drupal or Wordpress. These applications will be made
# available underneath a path with that package name, such as /drupal8.
#
# Please see /usr/share/doc/nginx-doc/examples/ for more detailed examples.
##

# Default server configuration
#
#server {
#       listen 80 default_server;
#       listen [::]:80 default_server;

        # SSL configuration
        #
        # listen 443 ssl default_server;
        # listen [::]:443 ssl default_server;
        #
        # Note: You should disable gzip for SSL traffic.
        # See: https://bugs.debian.org/773332
        #
        # Read up on ssl_ciphers to ensure a secure configuration.
        # See: https://bugs.debian.org/765782
        #
        # Self signed certs generated by the ssl-cert package
        # Don't use them in a production server!
        #
        # include snippets/snakeoil.conf;

#       root /var/www/html;

        # Add index.php to the list if you are using PHP
#       index index.html index.htm index.nginx-debian.html;

#       server_name _;

#       location / {
                # First attempt to serve request as file, then
                # as directory, then fall back to displaying a 404.
#               try_files $uri $uri/ =404;
#       }

        # pass PHP scripts to FastCGI server
        #
        #location ~ \.php$ {
        #       include snippets/fastcgi-php.conf;
        #
        #       # With php-fpm (or other unix sockets):
        #       fastcgi_pass unix:/run/php/php7.4-fpm.sock;
        #       # With php-cgi (or other tcp sockets):
        #       fastcgi_pass 127.0.0.1:9000;
        #}

        # deny access to .htaccess files, if Apache's document root
        # concurs with nginx's one
        #
        #location ~ /\.ht {
        #       deny all;
        #}
#}

# Virtual Host configuration for example.com
#
# You can move that to a different file under sites-available/ and symlink that
# to sites-enabled/ to enable it.
#
#server {
#       listen 80;
#       listen [::]:80;
#
#       server_name example.com;
#
#       root /var/www/example.com;
#       index index.html;
#
#       location / {
#               try_files $uri $uri/ =404;
#       }
#}

#server {

        # SSL configuration
        #
        # listen 443 ssl default_server;
        # listen [::]:443 ssl default_server;
        #
        # Note: You should disable gzip for SSL traffic.
        # See: https://bugs.debian.org/773332
        #
        # Read up on ssl_ciphers to ensure a secure configuration.
        # See: https://bugs.debian.org/765782
        #
        # Self signed certs generated by the ssl-cert package
        # Don't use them in a production server!
        #
        # include snippets/snakeoil.conf;

#       root /var/www/html;

        # Add index.php to the list if you are using PHP
#       index index.html index.htm index.nginx-debian.html;
 #   server_name imymemine.kr; # managed by Certbot

#       location / {
                # First attempt to serve request as file, then
                # as directory, then fall back to displaying a 404.
#               try_files $uri $uri/ =404;
#       }

        # pass PHP scripts to FastCGI server
        #
        #location ~ \.php$ {
        #       include snippets/fastcgi-php.conf;
        #
        #       # With php-fpm (or other unix sockets):
        #       fastcgi_pass unix:/run/php/php7.4-fpm.sock;
        #       # With php-cgi (or other tcp sockets):
        #       fastcgi_pass 127.0.0.1:9000;
        #}

        # deny access to .htaccess files, if Apache's document root
        # concurs with nginx's one
        #
        #location ~ /\.ht {
        #       deny all;
        #}

 #   listen [::]:443 ssl ipv6only=on; # managed by Certbot
  #  listen 443 ssl; # managed by Certbot
   # ssl_certificate /etc/letsencrypt/live/imymemine.kr/fullchain.pem; # managed by Certbot
   # ssl_certificate_key /etc/letsencrypt/live/imymemine.kr/privkey.pem; # managed by Certbot
    #include /etc/letsencrypt/options-ssl-nginx.conf; # managed by Certbot
   # ssl_dhparam /etc/letsencrypt/ssl-dhparams.pem; # managed by Certbot

#}
#server {
#    if ($host = imymemine.kr) {
#        return 301 https://$host$request_uri;
#    } # managed by Certbot

#       listen 80 ;
#       listen [::]:80 ;
#    server_name imymemine.kr;
#    return 404; # managed by Certbot

#}

# /etc/nginx/sites-available/default

# 80 -> 443 리다이렉트 (+ 선택: ACME 챌린지)
server {
    listen 80;
    listen [::]:80;

    server_name imymemine.kr www.imymemine.kr;

    # (선택) HTTP-01 챌린지를 명시적으로 유지하고 싶으면
    location ^~ /.well-known/acme-challenge/ {
        root /var/www/certbot;
    }

    location = /robots.txt {
        root /var/www/html;
        access_log off;
        log_not_found off;
    }

    location / {
        return 301 https://$host$request_uri;
    }
}

# HTTPS reverse proxy
server {
    listen 443 ssl;
    listen [::]:443 ssl;

    server_name imymemine.kr www.imymemine.kr;

    ssl_certificate     /etc/letsencrypt/live/imymemine.kr/fullchain.pem;
    ssl_certificate_key /etc/letsencrypt/live/imymemine.kr/privkey.pem;

    include /etc/letsencrypt/options-ssl-nginx.conf;
    ssl_dhparam /etc/letsencrypt/ssl-dhparams.pem;

    location = /robots.txt {
        root /var/www/html;
        access_log off;
        log_not_found off;
    }

    # 공통 프록시 헤더
    proxy_set_header Host $host;
    proxy_set_header X-Real-IP $remote_addr;
    proxy_set_header X-Forwarded-For $proxy_add_x_forwarded_for;
    proxy_set_header X-Forwarded-Proto $scheme;

    # Next가 외부 origin 추론할 때 도움되는 헤더
    proxy_set_header X-Forwarded-Host $host;
    proxy_set_header X-Forwarded-Port $server_port;

    # Swagger(FastAPI)
    location = /openapi.json {
        access_log /var/log/nginx/ai_access.log json_log;
        error_log /var/log/nginx/ai_error.log;
        proxy_pass http://127.0.0.1:8000/api/v1/openapi.json;
    }

    location = /api/v1/openapi.json {
        access_log /var/log/nginx/ai_access.log json_log;
        error_log /var/log/nginx/ai_error.log;
        proxy_pass http://127.0.0.1:8000/api/v1/openapi.json;
    }

    # Swagger/OpenAPI docs endpoints (springdoc 기본)
    location ^~ /v3/api-docs/ {
        access_log /var/log/nginx/be_access.log json_log;
        error_log /var/log/nginx/be_error.log;
        proxy_pass http://127.0.0.1:8080/v3/api-docs/;
    }

    location = /v3/api-docs {
        access_log /var/log/nginx/be_access.log json_log;
        error_log /var/log/nginx/be_error.log;
        proxy_pass http://127.0.0.1:8080/v3/api-docs;
    }

    location = /v3/api-docs/swagger-config {
        access_log /var/log/nginx/be_access.log json_log;
        error_log /var/log/nginx/be_error.log;
        proxy_pass http://127.0.0.1:8080/v3/api-docs/swagger-config;
    }

    # 프론트 서버(Next.js 서버)
    location ^~ /api/ {
        access_log /var/log/nginx/fe_access.log json_log;
        error_log /var/log/nginx/fe_error.log;
        proxy_pass http://127.0.0.1:3000;
        proxy_http_version 1.1;

        proxy_set_header Host $host;
        proxy_set_header X-Forwarded-Host $host;
        proxy_set_header X-Forwarded-Proto $scheme;
        proxy_set_header X-Forwarded-Port $server_port;
        proxy_set_header X-Forwarded-For $proxy_add_x_forwarded_for;

        proxy_redirect http://localhost:3000 https://$host;
        proxy_redirect http://127.0.0.1:3000 https://$host;
    }

    # 백엔드 API (Spring Boot)
    location ^~ /server/  {
        access_log /var/log/nginx/be_access.log json_log;
        error_log /var/log/nginx/be_error.log;
        proxy_pass http://127.0.0.1:8080/;
    }

    # AI 서버 (FastAPI)
    location /ai/ {
        access_log /var/log/nginx/ai_access.log json_log;
        error_log /var/log/nginx/ai_error.log;
        proxy_pass http://127.0.0.1:8000/;
    }

    # 프론트 (Next.js SSR)
    location / {
        access_log /var/log/nginx/fe_access.log json_log;
        error_log /var/log/nginx/fe_error.log;
        proxy_pass http://127.0.0.1:3000;
        proxy_http_version 1.1;

        proxy_set_header Host $host;
        proxy_set_header X-Forwarded-Host $host;
        proxy_set_header X-Forwarded-Proto $scheme;
        proxy_set_header X-Forwarded-Port $server_port;
        proxy_set_header X-Forwarded-For $proxy_add_x_forwarded_for;

        proxy_redirect http://localhost:3000/ /;
        proxy_redirect https://localhost:3000/ /;
        proxy_redirect http://127.0.0.1:3000/ /;
        proxy_redirect https://127.0.0.1:3000/ /;
    }
}
- nginx.conf 수정
...

        #  CloudWatch용 JSON 포맷 추가
        log_format json_log escape=json '{'
                '"time":"$time_iso8601",'
                '"remote_addr":"$remote_addr",'
                '"status":$status,'
                '"request":"$request",'
                '"request_time":$request_time,'
                '"upstream_response_time":"$upstream_response_time",'
...- 전체 코드
ubuntu@ip-172-31-39-74:/etc/nginx$ cat nginx.conf
user www-data;
worker_processes auto;
pid /run/nginx.pid;
error_log /var/log/nginx/error.log;
include /etc/nginx/modules-enabled/*.conf;

events {
        worker_connections 768;
        # multi_accept on;
}

http {

        map $http_upgrade $connection_upgrade {
            default upgrade;
            ''      close;
        }
        ##
        # Basic Settings
        ##

        sendfile on;
        tcp_nopush on;
        types_hash_max_size 2048;
        # server_tokens off;

        # server_names_hash_bucket_size 64;
        # server_name_in_redirect off;

        include /etc/nginx/mime.types;
        default_type application/octet-stream;

        ##
        # SSL Settings
        ##

        ssl_protocols TLSv1 TLSv1.1 TLSv1.2 TLSv1.3; # Dropping SSLv3, ref: POODLE
        ssl_prefer_server_ciphers on;

        ##
        # Logging Settings
        ##
        log_format main
                '$remote_addr - $remote_user [$time_local] '
                '"$request" $status $body_bytes_sent '
                '"$http_user_agent" '
                'request_time=$request_time '
                'upstream_time=$upstream_response_time';

        # ✅ (halo) CloudWatch용 JSON 포맷 추가
        log_format json_log escape=json '{'
                '"time":"$time_iso8601",'
                '"remote_addr":"$remote_addr",'
                '"status":$status,'
                '"request":"$request",'
                '"request_time":$request_time,'
                '"upstream_response_time":"$upstream_response_time",'
                '"body_bytes_sent":$body_bytes_sent'
        '}';

        access_log /var/log/nginx/access.log main;

        ##
        # Gzip Settings
        ##

        gzip on;

        # gzip_vary on;
        # gzip_proxied any;
        # gzip_comp_level 6;
        # gzip_buffers 16 8k;
        # gzip_http_version 1.1;
        # gzip_types text/plain text/css application/json application/javascript text/xml application/xml application/xml+rss text/javascript;

        ##
        # Virtual Host Configs
        ##

        include /etc/nginx/conf.d/*.conf;
        include /etc/nginx/sites-enabled/*;
}

#mail {
#       # See sample authentication script at:
#       # http://wiki.nginx.org/ImapAuthenticateWithApachePhpScript
#
#       # auth_http localhost/auth.php;
#       # pop3_capabilities "TOP" "USER";
#       # imap_capabilities "IMAP4rev1" "UIDPLUS";
#
#       server {
#               listen     localhost:110;
#               protocol   pop3;
#               proxy      on;
#       }
#
#       server {
#               listen     localhost:143;
#               protocol   imap;
#               proxy      on;
#       }
#}
ubuntu@ip-172-31-39-74:/etc/nginx$
다. CloudWatch EC2에 설치
rm amazon-cloudwatch-agent.deb*
wget https://s3.amazonaws.com/amazoncloudwatch-agent/ubuntu/arm64/latest/amazon-cloudwatch-agent.deb
sudo dpkg -i amazon-cloudwatch-agent.deb
라. CloudWatch Agent config 구성
/opt/aws/amazon-cloudwatch-agent/etc/config.json
{
  "logs": {
    "logs_collected": {
      "files": {
        "collect_list": [
          {
            "file_path": "/var/log/nginx/fe_access.log",
            "log_group_name": "/nginx/fe",
            "log_stream_name": "{instance_id}"
          },
          {
            "file_path": "/var/log/nginx/be_access.log",
            "log_group_name": "/nginx/be",
            "log_stream_name": "{instance_id}"
          },
          {
            "file_path": "/var/log/nginx/ai_access.log",
            "log_group_name": "/nginx/ai",
            "log_stream_name": "{instance_id}"
          }
        ]
      }
    }
  }
}
마. CloudWatch Log Group 확인
로그 그룹 확인 가능
바. 지표 필터 등록
-
BE-5XX-Filter : 500이상 에러들 필터링하는 지표 필터
-
BE-Total-Filter : 모든 에러를 필터링하는 지표 필터
-
5xx 에러 필터 패턴 예시
사. 경보 추가
위의 두개의 필터 BE-5XX-Filter 및 BE-Total-Filter로 걸러진 필터들의 총 합계 비율을 퍼센트로 환산하였을 때, 10%가 넘으면 작동하는 경보 추가
아. 람다로 경보랑 디스코드 연동
- 디스코드 훅 연동
- 람다.py 작성
DISCORD_WEBHOOK_URL에 디스코드 봇 훅 링크 삽입
import json
import urllib.request

DISCORD_WEBHOOK_URL = [훅 링크]

LOG_LINKS = {
    "BE": "https://ap-northeast-2.console.aws.amazon.com/cloudwatch/home?region=ap-northeast-2#logsV2:log-groups/log-group/$252Fnginx$252Fbe",
    "FE": "https://ap-northeast-2.console.aws.amazon.com/cloudwatch/home?region=ap-northeast-2#logsV2:log-groups/log-group/$252Fnginx$252Ffe",
    "AI": "https://ap-northeast-2.console.aws.amazon.com/cloudwatch/home?region=ap-northeast-2#logsV2:log-groups/log-group/$252Fnginx$252Fai"
}

def lambda_handler(event, context):
    sns_message = event['Records'][0]['Sns']['Message']

    try:
        alarm = json.loads(sns_message)
        alarm_name = alarm.get('AlarmName', 'Unknown')
        new_state = alarm.get('NewStateValue', 'Unknown')
        reason = alarm.get('NewStateReason', '')

        if new_state == 'ALARM':
            emoji = '🚨'
            color_text = 'ALERT'
        elif new_state == 'OK':
            emoji = '✅'
            color_text = 'OK'
        else:
            emoji = '⚠️'
            color_text = new_state

        error_rate = ''
        if 'datapoints' in reason:
            start = reason.find('[') + 1
            end = reason.find(' (')
            if start > 0 and end > 0:
                error_rate = reason[start:end]

        server_type = 'BE'
        if 'FE' in alarm_name:
            server_type = 'FE'
        elif 'AI' in alarm_name:
            server_type = 'AI'

        log_link = LOG_LINKS.get(server_type, LOG_LINKS['BE'])

        content = emoji + " **[" + color_text + "] " + alarm_name + "**\n"
        if error_rate:
            content += "Error Rate: **" + str(round(float(error_rate), 1)) + "%**\n"
        content += "Log: " + log_link

    except:
        content = "Alert: " + sns_message[:500]

    discord_message = {"content": content}

    req = urllib.request.Request(
        DISCORD_WEBHOOK_URL,
        data=json.dumps(discord_message).encode('utf-8'),
        headers={
            'Content-Type': 'application/json',
            'User-Agent': 'AWS-Lambda-SNS-Discord'
        },
        method='POST'
    )

    urllib.request.urlopen(req)

return {'statusCode': 200}- 트리거 연동
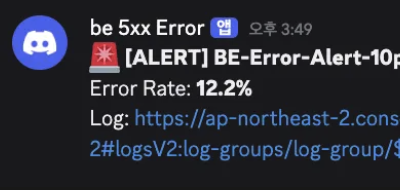
자. 알람 확인
- 500에러 발생
- 디스코드 알람
5. 장애 대응 방법
- 디스코드 알람에서 로그를 확인한 후 로그 링크를 클릭
- 로그스트림 클릭
- 로그이벤트 검색
- 검색 창에 입력
해당 페이지에서 어떤 API가 어느시간대에 500에러가 떳는지 확인할 수 있다.{ $.status >= 500 }
- 3번에서 얻은 에러 api와 시간 정보를 가지고 백엔드 서버 로그에서 500에러뜬 api 및 확인
6. 개선 필요 사항
가. 현재 5번 프로세스가 개발자 입장에서는 너무 복잡함
현재 EC2로그에 들어가서 500발생 시간대와 API를 가지고 로그 검색을 하기에는 로그가 너무 많아 어려운 상황이기 때문에 로그 분석 환경을 별도로 만들어 개발자들에게 제공할 필요성이 있다.