RFC에서 RSC 톺아보기
시작하며
최근 원티드 챌린지 과제와 회사 프로젝트 세팅을 하던 중 지속적으로 노출되는 기술인 RSC(리액트 서버 컴포넌트)에 대해 정리하기 위해 작성합니다.
처음에는 클라이언트 컴포넌트와 서버 컴포넌트의 비교와
기존 SSR 방식(nextjs pages)과 서버 컴포넌트와의 비교으로 이루어지며
이후에는 리액트 RFC에서 가져온 내용을 바탕으로 특징을 나열합니다.
서버 컴포넌트란?
말그대로 서버에서 렌더링되는 컴포넌트로 기존 SSR의 방식과 다르게 html을 파싱하여 hydrate가 이루어지는 방식이 아닌 직렬화를 통해 서버 사이드에서 렌더링이 이루어지는 컴포넌트입니다.
기존 클라이언트 컴포넌트
오로지 클라이언트 측에서만 이루어지며 기존 jsx를 통해 jsx -> 가상돔 -> 재조정 과정 -> DOM 업데이트로 이루어지는 과정을 가집니다.
import { createElement } from 'react';

function Greeting({ name }) {
  return createElement(
    'h1',
    { className: 'greeting' },
    'Hello ',
    createElement('i', null, name),
    '. Welcome!'
  );
}

export default function App() {
  return createElement(
    Greeting,
    { name: 'Taylor' }
  );
}
// Slightly simplified
{
$$typeof: Symbol.for("react.element"), // Tells React it's a JSX element (e.g. <html>)
type: 'html',
props: {
children: [
{
$$typeof: Symbol.for("react.element"),
type: 'head',
props: {
children: {
$$typeof: Symbol.for("react.element"),
type: 'title',
props: { children: 'My blog' }
}
}
},
{
$$typeof: Symbol.for("react.element"),
type: 'body',
props: {
children: [
{
$$typeof: Symbol.for("react.element"),
type: 'nav',
props: {
children: [{
$$typeof: Symbol.for("react.element"),
type: 'a',
props: { href: '/', children: 'Home' }
}, {
$$typeof: Symbol.for("react.element"),
type: 'hr',
props: null
}]
}
},
{
$$typeof: Symbol.for("react.element"),
type: 'article',
props: {
children: postContent
}
},
{
$$typeof: Symbol.for("react.element"),
type: 'footer',
props: {
/* ...And so on... */
}
}
]
}
}
]
}
}서버 컴포넌트
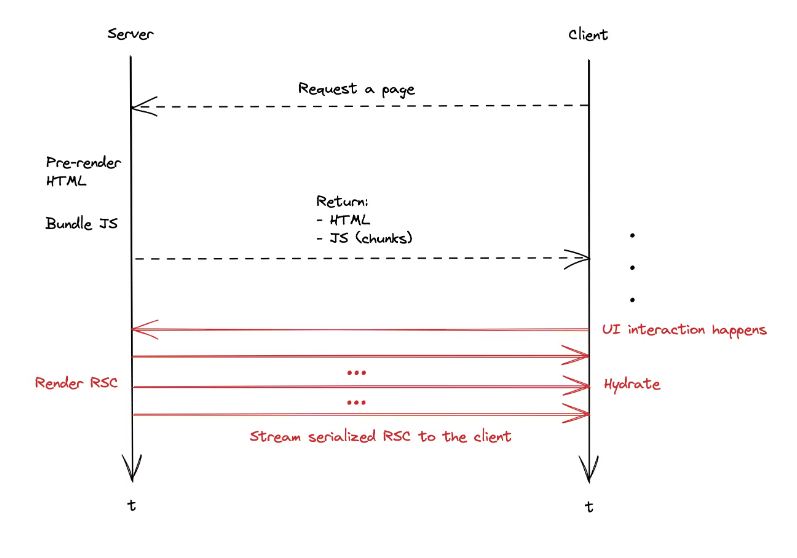
ReadableStream으로 이루어진 직렬화 객체를 렌더링해 서버사이드 서버와 클라이언트로 전달합니다.
기존 클라이언트 컴포넌트는 DOM을 렌더링하는데 반해, 서버 컴포넌트는 직렬화 객체(가상돔)만 전달하고 DOM 렌더링 역할은 프레임워크의 서버사이드 서버와 클라이언트에 전가합니다.
Next.js github
let RSCStream: ReadableStream<Uint8Array>
  const createRSCStream = (props: Props) => {
    if (!RSCStream) {
      RSCStream = ComponentMod.renderToReadableStream(
        <ComponentToRender {...(props as any)} />,
        clientReferenceManifest.clientModules,
        {
          context: serverContexts,
          onError: serverComponentsErrorHandler,
        }
      )
    }
    return RSCStream
}-
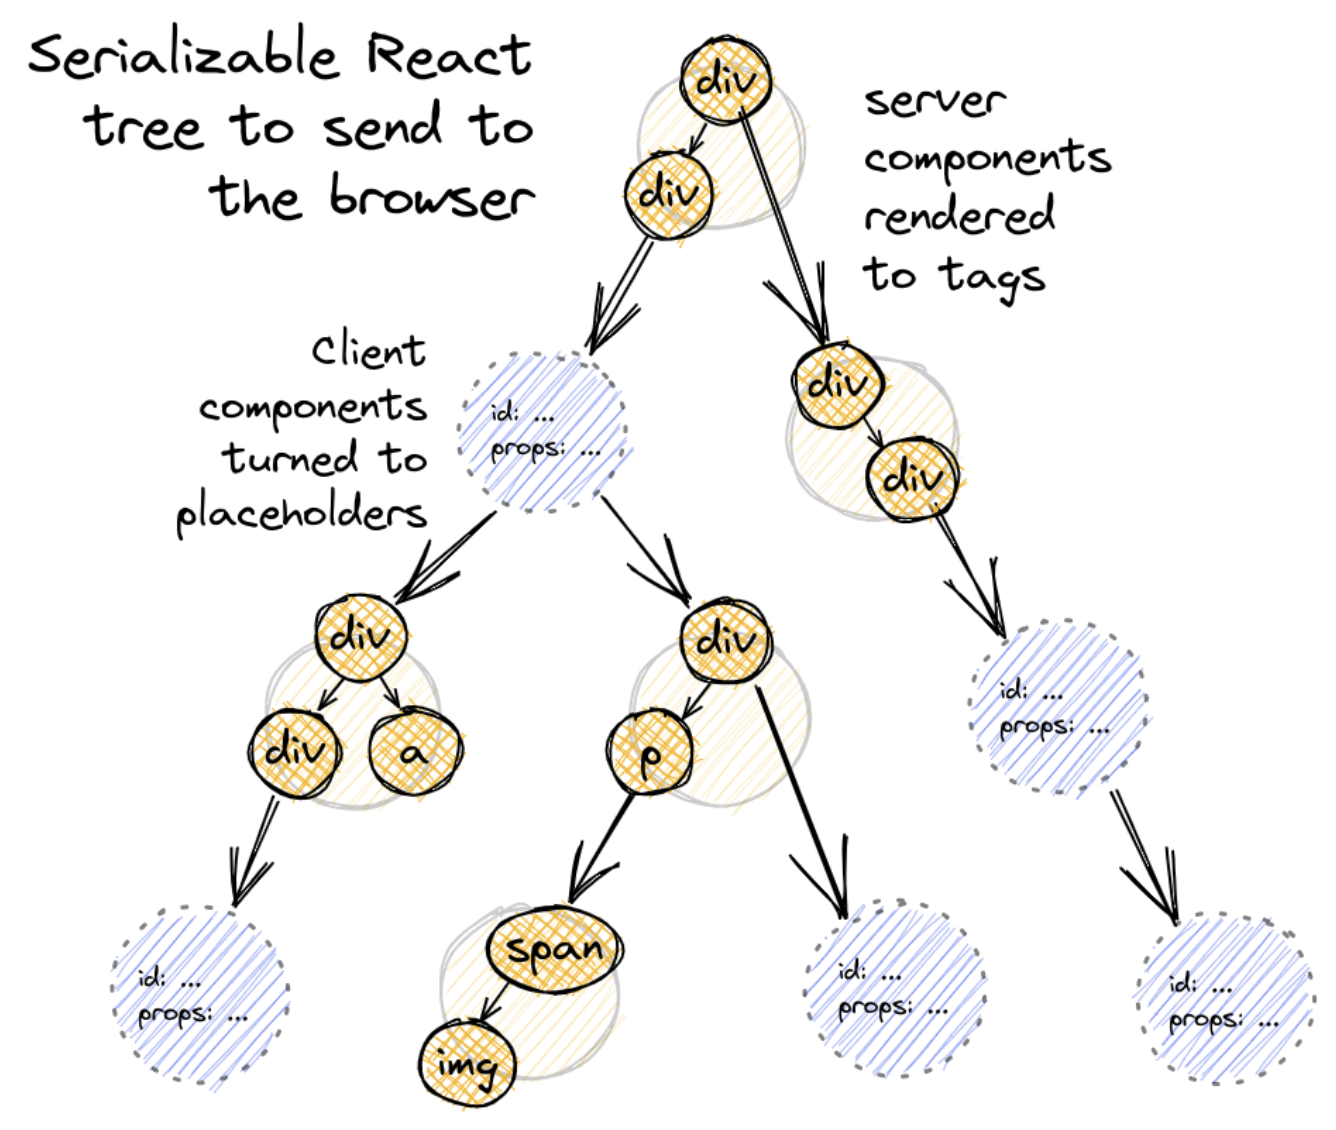
직렬화 작업이 마친 JSON Tree
아래의 그림에서 클라이언트 컴포넌트는 빈공간으로 유지되고, 이후 클라이언트에서 받아 이 빈공간을 채워 렌더링이 된 뒤 클라이언트의 화면으로 최종적으로 가게 됩니다.
-
ReadableStream의 조각화 된 JSON Tree chunk
M1:{"id":"./src/SearchField.client.js","chunks":["client5"],"name":""}
M2:{"id":"./src/EditButton.client.js","chunks":["client1"],"name":""}
S3:"react.suspense"
J0:["$","div",null,{"className":"main","children":[["$","section",null,{"className":"col sidebar","children":[["$","section",null,{"className":"sidebar-header","children":[["$","img",null,{"className":"logo","src":"logo.svg","width":"22px","height":"20px","alt":"","role":"presentation"}],["$","strong",null,{"children":"React Notes"}]]}],["$","section",null,{"className":"sidebar-menu","role":"menubar","children":[["$","@1",null,{}],["$","@2",null,{"noteId":null,"children":"New"}]]}],["$","nav",null,{"children":["$","$3",null,{"fallback":["$","div",null,{"children":["$","ul",null,{"className":"notes-list skeleton-container","children":[["$","li",null,{"className":"v-stack","children":["$","div",null,{"className":"sidebar-note-list-item skeleton","style":{"height":"5em"}}]}],["$","li",null,{"className":"v-stack","children":["$","div",null,{"className":"sidebar-note-list-item skeleton","style":{"height":"5em"}}]}],["$","li",null,{"className":"v-stack","children":["$","div",null,{"className":"sidebar-note-list-item skeleton","style":{"height":"5em"}}]}]]}]}],"children":"@4"}]}]]}],["$","section","null",{"className":"col note-viewer","children":["$","$3",null,{"fallback":["$","div",null,{"className":"note skeleton-container","role":"progressbar","aria-busy":"true","children":[["$","div",null,{"className":"note-header","children":[["$","div",null,{"className":"note-title skeleton","style":{"height":"3rem","width":"65%","marginInline":"12px 1em"}}],["$","div",null,{"className":"skeleton skeleton--button","style":{"width":"8em","height":"2.5em"}}]]}],["$","div",null,{"className":"note-preview","children":[["$","div",null,{"className":"skeleton v-stack","style":{"height":"1.5em"}}],["$","div",null,{"className":"skeleton v-stack","style":{"height":"1.5em"}}],["$","div",null,{"className":"skeleton v-stack","style":{"height":"1.5em"}}],["$","div",null,{"className":"skeleton v-stack","style":{"height":"1.5em"}}],["$","div",null,{"className":"skeleton v-stack","style":{"height":"1.5em"}}]]}]]}],"children":["$","div",null,{"className":"note--empty-state","children":["$","span",null,{"className":"note-text--empty-state","children":"Click a note on the left to view something! 🥺"}]}]}]}]]}]
M5:{"id":"./src/SidebarNote.client.js","chunks":["client6"],"name":""}
J4:["$","ul",null,{"className":"notes-list","children":[["$","li","1",{"children":["$","@5",null,{"id":1,"title":"Meeting Notes","expandedChildren":["$","p",null,{"className":"sidebar-note-excerpt","children":"This is an example note. It contains Markdown!"}],"children":["$","header",null,{"className":"sidebar-note-header","children":[["$","strong",null,{"children":"Meeting Notes"}],["$","small",null,{"children":"12/30/20"}]]}]}]}],["$","li","2",{"children":["$","@5",null,{"id":2,"title":"A note with a very long title because sometimes you need more words","expandedChildren":["$","p",null,{"className":"sidebar-note-excerpt","children":"You can write all kinds of amazing notes in this app! These note live on the server in the notes..."}],"children":["$","header",null,{"className":"sidebar-note-header","children":[["$","strong",null,{"children":"A note with a very long title because sometimes you need more words"}],["$","small",null,{"children":"12/30/20"}]]}]}]}],["$","li","3",{"children":["$","@5",null,{"id":3,"title":"I wrote this note today","expandedChildren":["$","p",null,{"className":"sidebar-note-excerpt","children":"It was an excellent note."}],"children":["$","header",null,{"className":"sidebar-note-header","children":[["$","strong",null,{"children":"I wrote this note today"}],["$","small",null,{"children":"12/30/20"}]]}]}]}],["$","li","4",{"children":["$","@5",null,{"id":4,"title":"Make a thing","expandedChildren":["$","p",null,{"className":"sidebar-note-excerpt","children":"It's very easy to make some words bold and other words italic with Markdown. You can even link to React's..."}],"children":["$","header",null,{"className":"sidebar-note-header","children":[["$","strong",null,{"children":"Make a thing"}],["$","small",null,{"children":"12/30/20"}]]}]}]}],["$","li","6",{"children":["$","@5",null,{"id":6,"title":"Test Noteeeeeeeasd","expandedChildren":["$","p",null,{"className":"sidebar-note-excerpt","children":"Test note's text"}],"children":["$","header",null,{"className":"sidebar-note-header","children":[["$","strong",null,{"children":"Test Noteeeeeeeasd"}],["$","small",null,{"children":"11/29/22"}]]}]}]}],["$","li","7",{"children":["$","@5",null,{"id":7,"title":"asdasdasd","expandedChildren":["$","p",null,{"className":"sidebar-note-excerpt","children":"asdasdasd"}],"children":["$","header",null,{"className":"sidebar-note-header","children":[["$","strong",null,{"children":"asdasdasd"}],["$","small",null,{"children":"11/29/22"}]]}]}]}]]}]
서버 컴포넌트 렌더링과 관련해 더 자세히 알아보고 싶다면 dan의 서버 컴포넌트 scratch
서버 컴포넌트 Detailed Design
클라이언트 컴포넌트와 서버 컴포넌트의 차이
기존 SSR과의 차이
SSR
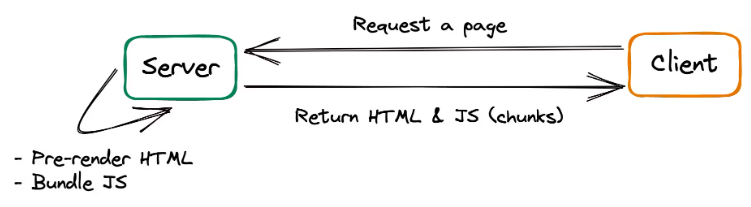
기존 SSR은 기본적으로 최상단의 페이지에서만 SEO 및 초기 렌더링 개선을 위해 서버렌더링이 사용되었으며, 반드시 html로만 파싱되어 가져올 수 있습니다. 서버 렌더링이 이루어지는 기본 단위(granularity)는 단 하나입니다.
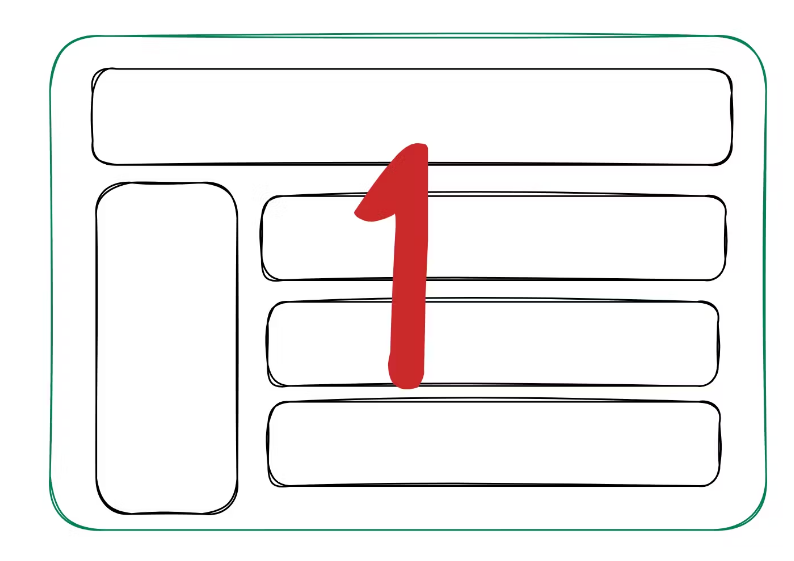
- 기존 SSR의 서버 렌더링 단위
- 기존 SSR의 웹사이트 렌더링 과정
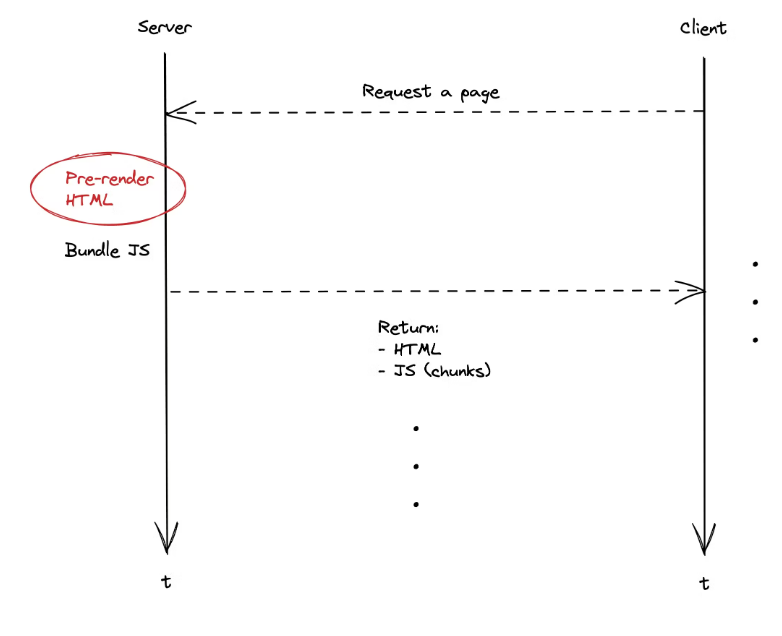
- 기존 SSR의 서버 데이터 사용법
export async function getServerSideProps(context) {
	return {
    	props: {},
    }
}
RSC
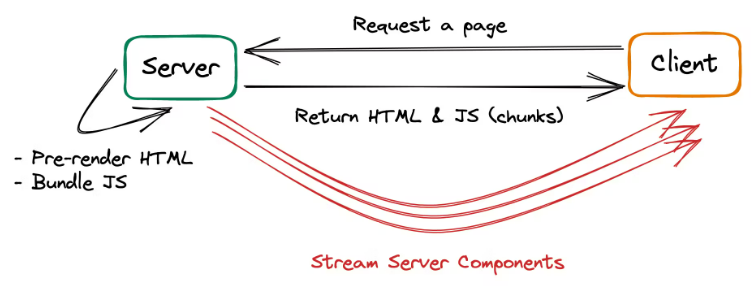
여기서 주의 해야 할것은 dan이 말하길 RSC와 SSR은 매우 다른 두가지 라는 점에 유의해야 한다고 합니다.
It is important note that RSC and SSR are two very different things (that tend to be used together).
RSC는 서버에서 리액트가 읽을 수 있는 가상돔 객체로 만드는 컴포넌트이고, html로 파싱하여 초기 렌더링 시 html을 보내는건 SSR 서버의 역할입니다.
- RSC의 서버 렌더링 기본 단위
RSC의 서버 렌더링 기본 단위는 기존 SSR보다 같거나 더 큽니다.
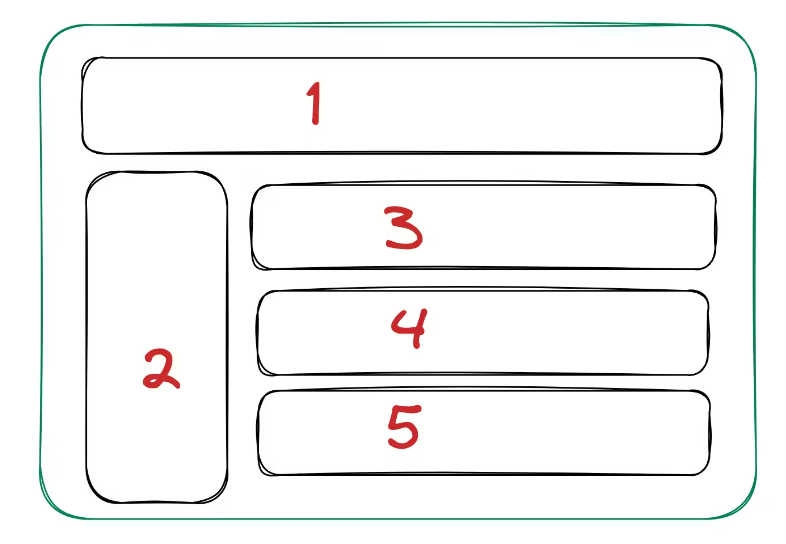
- RSC를 사용했을 때 웹사이트 렌더링 과정
- 사용법
next.js의 app dir 기능을 사용하면 app dir의 모든 컴포넌트가 기본적으로 서버 컴포넌트로 이루어지며, 바깥의 컴포넌트 파일이나'use client'를 컴포넌트 파일 상단에 작성 할 시 클라이언트 컴포넌트로 사용할 수 있습니다.
=> 즉 기존의getServerSideProps는 사용되지 않습니다.
클라이언트 컴포넌트 예시
'use client';
import { useState } from 'react';
function Button({ children, onClick }) {
// ...
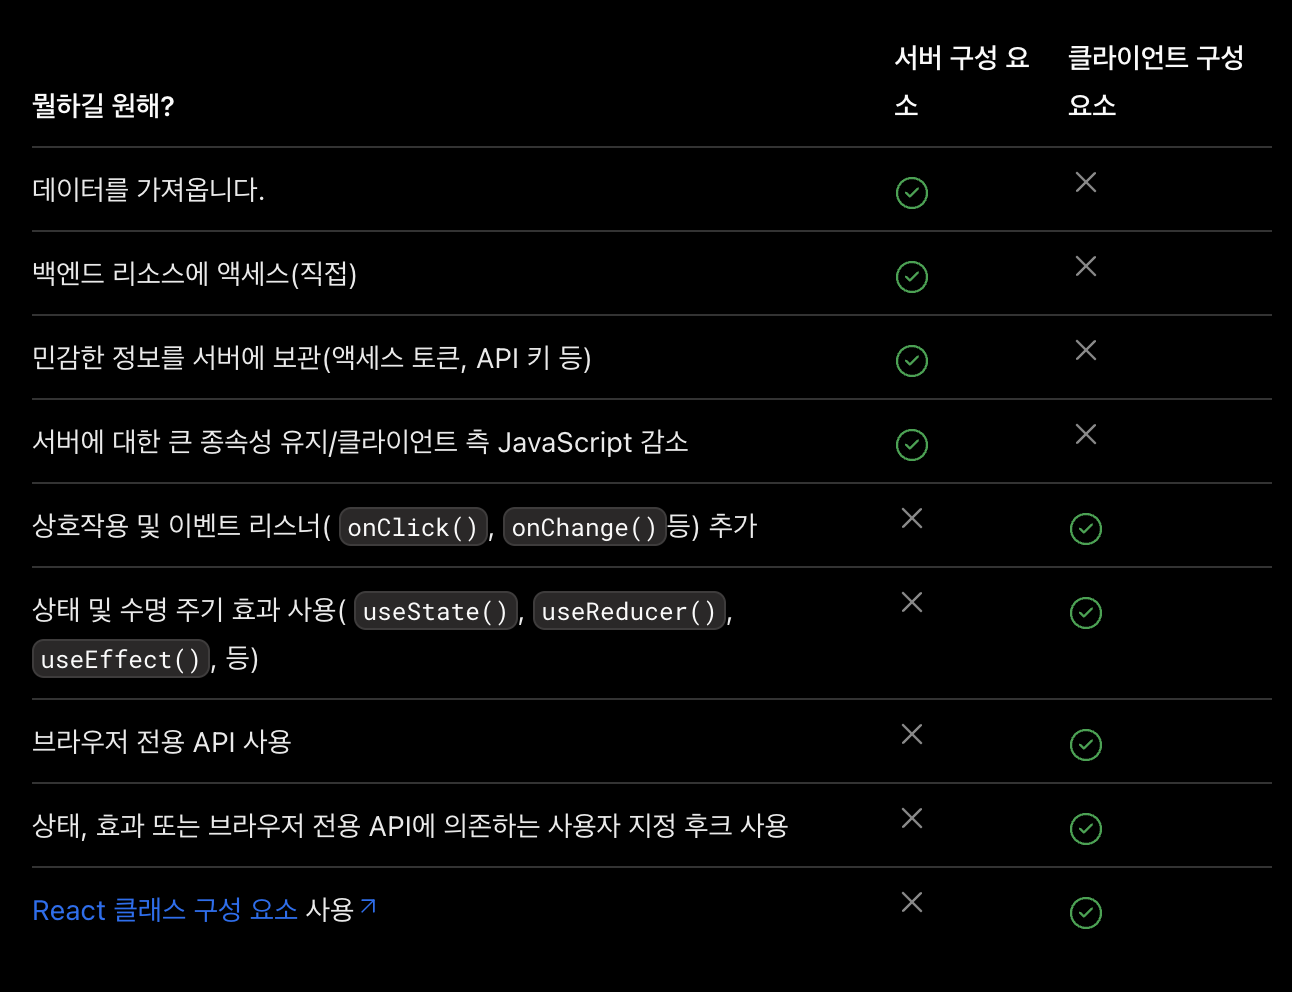
}서버 컴포넌트의 특징
제로-번들-사이즈 컴포넌트
서버 컴포넌트는 서버에서만 실행되며 번들 크기에 전혀 영향을 미치지 않습니다. 해당 코드는 클라이언트에 다운로드되지 않으므로 번들 크기를 줄이고 시작 시간을 개선하는 데 도움이 됩니다. - React RFC
개발자들은 서드파티 패키지를 사용할건지 계속 많은 고민을 해야합니다. 패키지를 사용하는 것은 편리하지만 코드 번들링 사이즈가 커지고, 사용자에게는 성능 저하를 초래합니다.
이를 해결하기위해 직접 코드를 작성하면 많은 시간 소요와 오류라는 단점이 발생합니다.
트리 쉐이킹 같은 고급 기능을 사용하면 어느정도 도움은 되지만 결국 더 많은 추가 코드를 제공해야 합니다.
// NOTE: Server Components 이전

import marked from 'marked'; // 35.9K (11.2K gzipped)
import sanitizeHtml from 'sanitize-html'; // 206K (63.3K gzipped)

function NoteWithMarkdown({text}) {
  const html = sanitizeHtml(marked(text));
  return (/* render */);
}
게시판에서, 이와 같은 마크다운 디테일페이지 같은 페이지는 대부분 업데이트할 필요가 없습니다.
아래와 같은 서버 컴포넌트를 사용하면 번들 크기에 전혀 영향을 주지 않으면서 서드파티 패키지를 자유롭게 사용할 수 있습니다
// Server Component === zero bundle size

import marked from 'marked'; // zero bundle size
import sanitizeHtml from 'sanitize-html'; // zero bundle size

function NoteWithMarkdown({text}) {
  // same as before
}
백엔드로의 완전한 접근
서버 컴포넌트는 데이터베이스, 파일 시스템 또는 (마이크로)서비스와 같은 서버 측(백엔드) 데이터 소스에 액세스할 수 있습니다. - React RFC
- fs
import fs from 'fs';

async function Note({id}) {
  const note = JSON.parse(await fs.readFile(`${id}.json`));
  return <NoteWithMarkdown note={note} />;
}- db 접근
import db from 'db';

async function Note({id}) {
  const note = await db.notes.get(id);
  return <NoteWithMarkdown note={note} />;
}
이와 같은 async/await 방법 외에 새로운 훅인 use(RFC)도 프로미스 기반으로 데이터를 가져오는데에 쓰일 수 있습니다.
차이점으로는 use는 클라이언트 컴포넌트에서도 사용될 수 있다는 점이 있지만 기본적으로 추천되지 않으며 react-query나 swr와 같은 서드파티 패키지를 추천한다고 합니다. Next Data Fetching 페이지 참고
function Note({id}) {
  // This fetches a note asynchronously, but to the component author it looks
  // like a synchronous operation.
  const note = use(fetchNote(id));
  return (
    <div>
      <h1>{note.title}</h1>
      <section>{note.body}</section>
    </div>
  );
}
자동 코드 분할
서버 컴포넌트는 렌더링할 클라이언트 컴포넌트를 동적으로 선택할 수 있으므로 클라이언트는 페이지를 렌더링하는 데 필요한 최소한의 코드만 다운로드할 수 있습니다. - React RFC
서버 컴포넌트 이전에는 React.lazy를 통해 명시적으로 코드 상에서 사용하여 코드를 나눌 곳을 비교 했습니다.
// PhotoRenderer.js
// NOTE: *before* Server Components

import { lazy } from 'react';

// one of these will start loading *when rendered on the client*:
const OldPhotoRenderer = lazy(() => import('./OldPhotoRenderer.js'));
const NewPhotoRenderer = lazy(() => import('./NewPhotoRenderer.js'));

function Photo(props) {
  // Switch on feature flags, logged in/out, type of content, etc:
  if (FeatureFlags.useNewPhotoRenderer) {
    return <NewPhotoRenderer {...props} />;
  } else {
    return <OldPhotoRenderer {...props} />;
  }
}
서버 컴포넌트에서 클라이언트 컴포넌트를 import 할 시 이 부분을 코드를 나눠야 할 수 있는 부분으로 인식합니다.
프레임워크에서 기본적으로 앱의 전송을 최적화 하게하고, 개발자는 더 자연스러운 코드 작성을 통해 앱에 더 집중 할 수 있습니다.
// PhotoRenderer.js - Server Component

// one of these will start loading *once rendered and streamed to the client*:
import OldPhotoRenderer from './OldPhotoRenderer.js';
import NewPhotoRenderer from './NewPhotoRenderer.js';

function Photo(props) {
  // Switch on feature flags, logged in/out, type of content, etc:
  if (FeatureFlags.useNewPhotoRenderer) {
    return <NewPhotoRenderer {...props} />;
  } else {
    return <OldPhotoRenderer {...props} />;
  }
PHP/JSP 와 다른점
또한 개발자는 서버와 클라이언트 간에 코드를 공유하여 단일 컴포넌트를 사용하여 한 경로에서는 서버에서 일부 콘텐츠의 정적 버전을 렌더링하고 다른 경로에서는 클라이언트에서 해당 콘텐츠의 편집 가능한 버전을 렌더링할 수 있습니다. - React RFC
애플리케이션 개발의 역사는 '얇은' 클라이언트와 '두꺼운' 클라이언트 사이에서 엎치락뒷치락하는 일련의 과정이였습니다.
그러나 현실적으로 모든 앱의 일부는 상호작용이 필요없고 즉각적인 데이터 일관성이 필요하지 않은 '정적'인 반면, 다른 일부는 상호작용이 필요하고 즉각적인 응답성이 필요한 '동적'인 부분도 있습니다.
순수 서버 렌더링이나 순수 클라이언트 렌더링 모두 모든 상황에 이상적인 것은 아닙니다. 서버 컴포넌트를 기존 클라이언트 컴포넌트와 결합하면 개발자가 가장 적합한 접근 방식을 사용하여 앱의 각 부분을 작성할 수 있으며, 단일 언어와 프레임워크를 공유하고 서버와 클라이언트 간에 코드를 공유할 수도 있습니다.
참고 자료
https://github.com/reactjs/rfcs/blob/main/text/0188-server-components.md#summary
https://www.webscope.io/blog/server-components-vs-ssr
https://tech.kakaopay.com/post/react-server-components/#%EC%8B%9C%EC%9E%91%ED%95%98%EB%A9%B0
https://ui.toast.com/weekly-pick/ko_20210119
https://leetrue-log.vercel.app/rsc-ssr
https://velog.io/@2ast/React-%EC%84%9C%EB%B2%84-%EC%BB%B4%ED%8F%AC%EB%84%8C%ED%8A%B8React-Server-Component%EC%97%90-%EB%8C%80%ED%95%9C-%EA%B3%A0%EC%B0%B0
https://velog.io/@glassfrog8256/%EB%B2%88%EC%97%AD-RSC-From-Scratch.-Part-1-Server-Components