FCM, APNS, Expo's Push API 를 사용하지 않고 APP 에서 Device로 바로 Notification을 생성하는 예시입니다.
1. 설치
expo install expo-notifications
2. 알림을 누르면 수행할 동작 지정하기: setNotificationHandler()
앱이 foreground에 있을 때, 알람을 누르면 수행할 동작을 지정합니다.
이것을 설정하지 않으면 4번 동작을 수행해 트리거를 해도 알람이 뜨지 않습니다.
일반적으로 App.js 혹은 App.ts에 넣습니다.
import * as Notifications from 'expo-notifications';

Notifications.setNotificationHandler({
  handleNotification: async () => ({
    shouldShowAlert: true,
    shouldPlaySound: false,
    shouldSetBadge: false,
  }),
});
3. 알람 발생시키기 (트리거 시키기): scheduleNotificationAsync()
알람을 발생시키는 가장 간단한 함수입니다.
특정 시간 이후에 알람을 발생시킵니다.
import * as Notifications from 'expo-notifications';

...
<Button
  onPress={() => {
    Notifications.scheduleNotificationAsync({
      content: {
        title: "Time's up!",
        body: 'Change sides!',
      },
      trigger: {
        seconds: 60, //onPress가 클릭이 되면 60초 뒤에 알람이 발생합니다.
      },
    });
  }}
> ...
여기까지 한 뒤, Expo Go 앱에서 동작시켜 알람을 발생시켜봅시다.
그러면, 1분 뒤, 아래와 같은 형태로 알람이 뜨게 됩니다.
저는 7시 27분에 한번, 32분에 3번 발생시켜보았습니다.
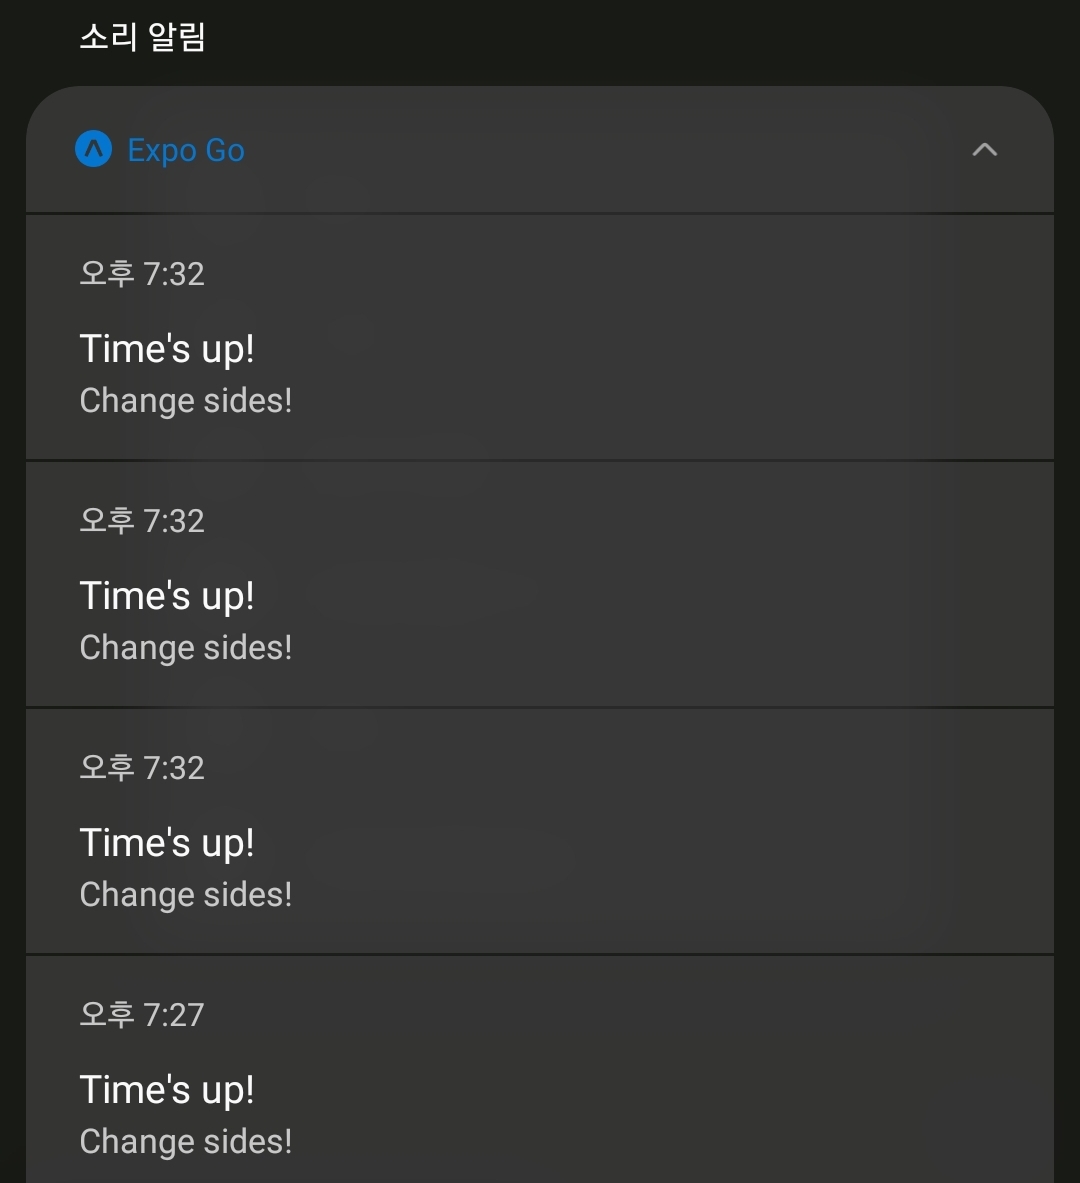
클릭할 경우, Expo Go 를 통해 앱이 켜집니다.
4. Build 된 App에서 알람 발생시키기
Production Mode에서 다른 설정없이 알람을 발생시킬경우, 아래와 비슷한 형태로 나타납니다.
(예시 이미지입니다.)
- 정말 기본적인 형태로 뜹니다.
- 알람 아이콘은 앱 아이콘 모양이 크기만 작아져서 그대로 보이며, 이름도 앱 이름으로 보입니다.
- 기본 글자 색상값은 회색빛 하늘색? (무슨 색인지 정확히는 모르겠는데, 시스템 기본값으로 보임)
- 클릭시 앱이 켜집니다.
5. Notification에 뜨는 icon 혹은 색상을 변경하려면
app.json 에서 notification.icon and notification.color 를 설정할 수 있습니다.
{
  "expo": {
    ...
    "notification": {
      "icon": "./assets/icon.png", //96 x 96 png
      "color": "#59ff59"
    }
}
만일 EAS Build 를 사용하는 경우 아래와 같이 app.json 혹은 app.config.js 설정을 이용하여 아이콘, 색, 모드 뿐 아니라, 소리도 직접 설정할 수 있습니다.
{
  "expo": {
    ...
    "plugins": [
      [
        "expo-notifications",
        {
          "icon": "./local/path/to/myNotificationIcon.png",
          "color": "#ffffff",
          "sounds": ["./local/path/to/mySound.wav", "./local/path/to/myOtherSound.wav"],
          "mode": "production"
        }
      ]
    ],
  }
}- icon: 96 x 96 투명도를 지원하는 png
- color: (안드로이드 전용) 푸시 알림 이미지의 색조 색상
- sounds: 사용자 지정알림 사운드로 사용할 수 있는 사운드파일(wav 권장)
- mode: (ios 전용) development, production 모드 중 선택. 기본값은 development
6. Notification을 클릭하면 특정화면으로 이동하고 싶은 경우
우선 이동시키는 기능 자체는 Deep Link가 수행합니다.
React Navigation에 Deep link를 설정하는 부분은 다음 링크를 참고해주세요
https://velog.io/@hamster/Expo%EC%97%90%EC%84%9C-React-Navigation%EA%B3%BC-DeepLink
여기서는 알람에 url을 설정하는 부분만 설명하겠습니다
Notifications 의 내용 부분인 content.data.url 필드를 아래와 같이 추가하면 deep link에 사용할 url path를 지정할 수 있습니다.
이후 React Navigation에 deep link 설정을 하면 알람 클릭즉시 원하는 screen으로 이동하게 됩니다.
import * as Notifications from 'expo-notifications';

...
<Button
  onPress={() => {
    const prefix = Linking.createURL("/"); // path 앞부분
    Notifications.scheduleNotificationAsync({
      content: {
        title: "Time's up!",
        body: 'Change sides!',
        data: {
          url: `${prefix}room/${room.id}`, // 여기가 path를 설정하는 부분입니다.
        },
      },
      trigger: {
        seconds: 60, //onPress가 클릭이 되면 60초 뒤에 알람이 발생합니다.
      },
    });
  }}
>
...
여기까지가 아주 기본적인 Expo 푸시알림으로 Local에 알림을 발생시키는 방법입니다.
*. 기타 개념
-
Notification Category 라는 것이 있습니다.
단순한 푸시알림을 제공하는 것이 아닌, 사용자와 상호작용이 가능한 푸시알림창을 띄우는 기능입니다. -
Android에서는 알림에 있어
Channel과Group의 개념이 있습니다.
- 특정
APP의 알람 자체를 끌 수도 있지만, 특정 채널의 알림을 개별적으로 on/off 설정할 수 있도록 하는 안드로이드의 알람 설정 기능입니다. - 각 채널은
ChannelGroup에 속할 수 있습니다. - 이 개념은 안드로이드
설정 > 알림에 들어가서 앱을 하나씩 눌러보면 의외로 손쉽게 이해됩니다.예시
-카카오톡의 경우, 1개 그룹 안에 약 10개의 채널이 있습니다.
(새 메시지 알림, 통화, 게시판, 톡서랍 등)-유투브의 경우 1개의 그룹 안에, 약 10개의 채널이 있습니다.
(구독, 맞춤동영상, 댓글 및 답글 등)-인스타그램의 경우 3개의 그룹(Direct, Instagram, IGTV) 안에
각각 4개, 20개, 3개씩 채널이 있습니다-트위터의 경우, 계정 당 그룹이 생성되며, 각 10개씩 채널이 존재합니다 - 역시 익명 SNS...
- 일반 안드로이드 앱은 이것을 설정하지 않으면 알람이 뜨지 않습니다만...
- Expo로 개발하는 경우, 채널을 설정하지 않으면 기본값으로
Miscellaneous이라는 이름을 가진 채널이 생성됩니다.
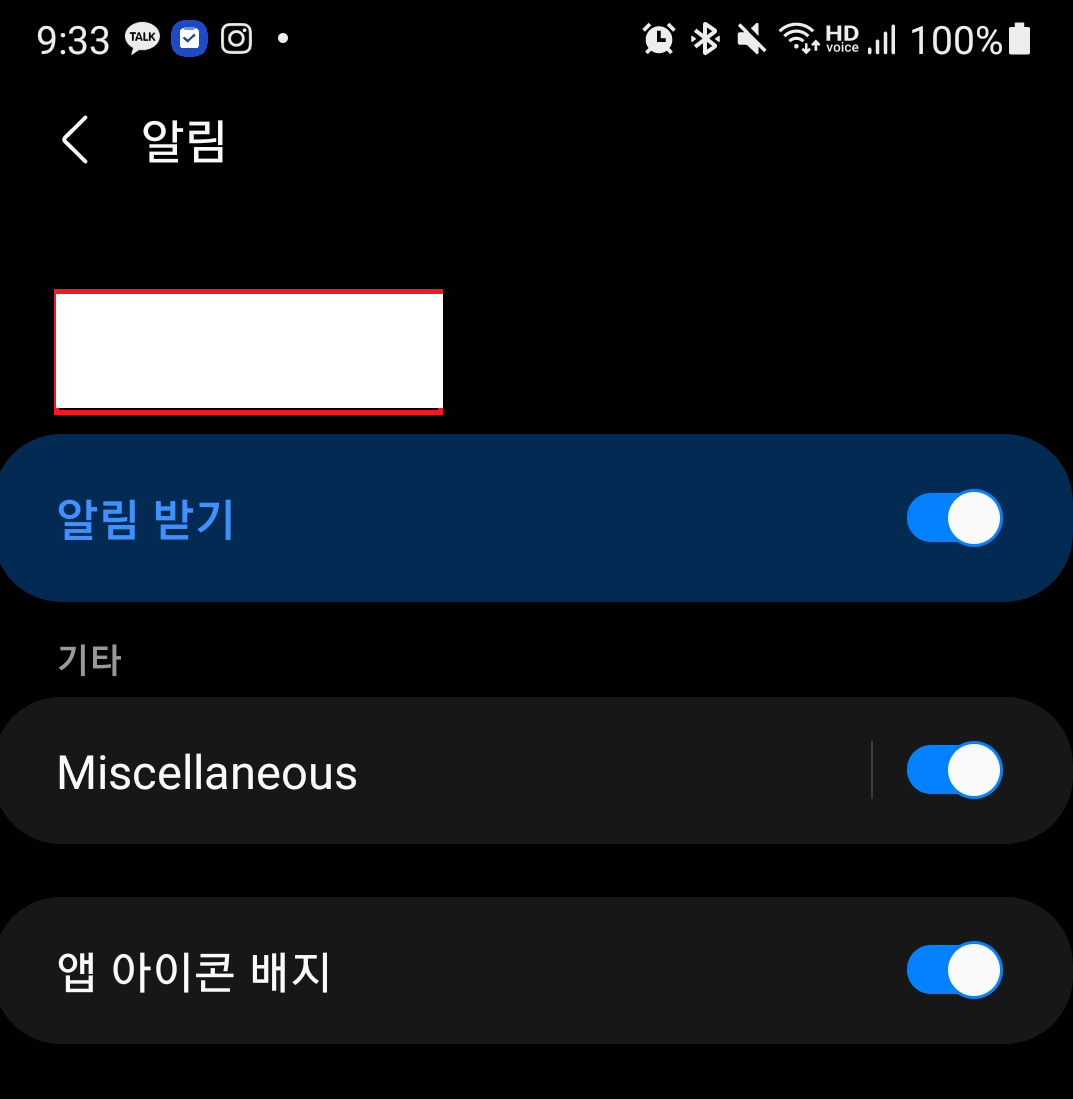
보기좋지 않죠. 이는 아래 함수를 이용해 설정이 가능합니다.- Notifications.setNotificationChannelGroupAsync()
- Notifications.deleteNotificationChannelAsync()
- Notifications.setNotificationChannelAsync()
여기서는 채널만 설정해 보겠습니다.
- 우선 아래와 같이
App.js파일에 아래 코드를 넣어 새 채널을 생성해보겠습니다.
id는default이고 name은new chat이라는 이름으로 설정해보겠습니다.
if (Platform.OS === "android") {
  Notifications.setNotificationChannelAsync("default", {
    name: "new chat",
    importance: Notifications.AndroidImportance.HIGH, //이것은 알람의 중요도를 설정합니다.
  });
}- 알람도
identifier항목으로default을 넣어 채널에 넣어야 할당이 됩니다.
<Button
  onPress={() => {
    const prefix = Linking.createURL("/"); // path 앞부분
    Notifications.scheduleNotificationAsync({
      content: {
        title: "Time's up!",
        body: 'Change sides!',
        data: {
          url: `${prefix}room/${room.id}`,
        },
      },
      trigger: {
        seconds: 60, //onPress가 클릭이 되면 60초 뒤에 알람이 발생합니다.
        channelId: 'default', //여기에서 channel을 지정할 수 있습니다.
      },
    });
  }}
>
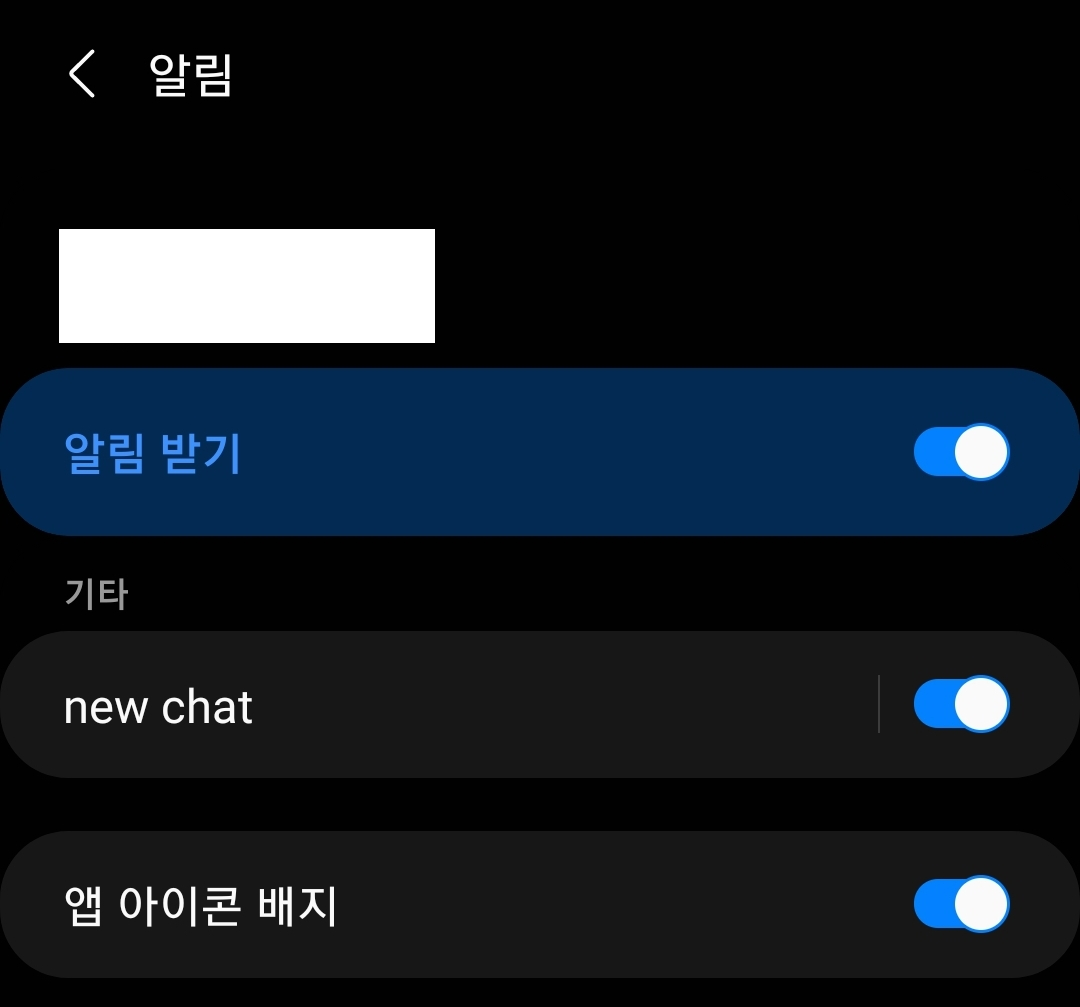
- 그러면 아래와 같이 알람탭에
new chat채널이 추가된 것을 확인할 수 있습니다.
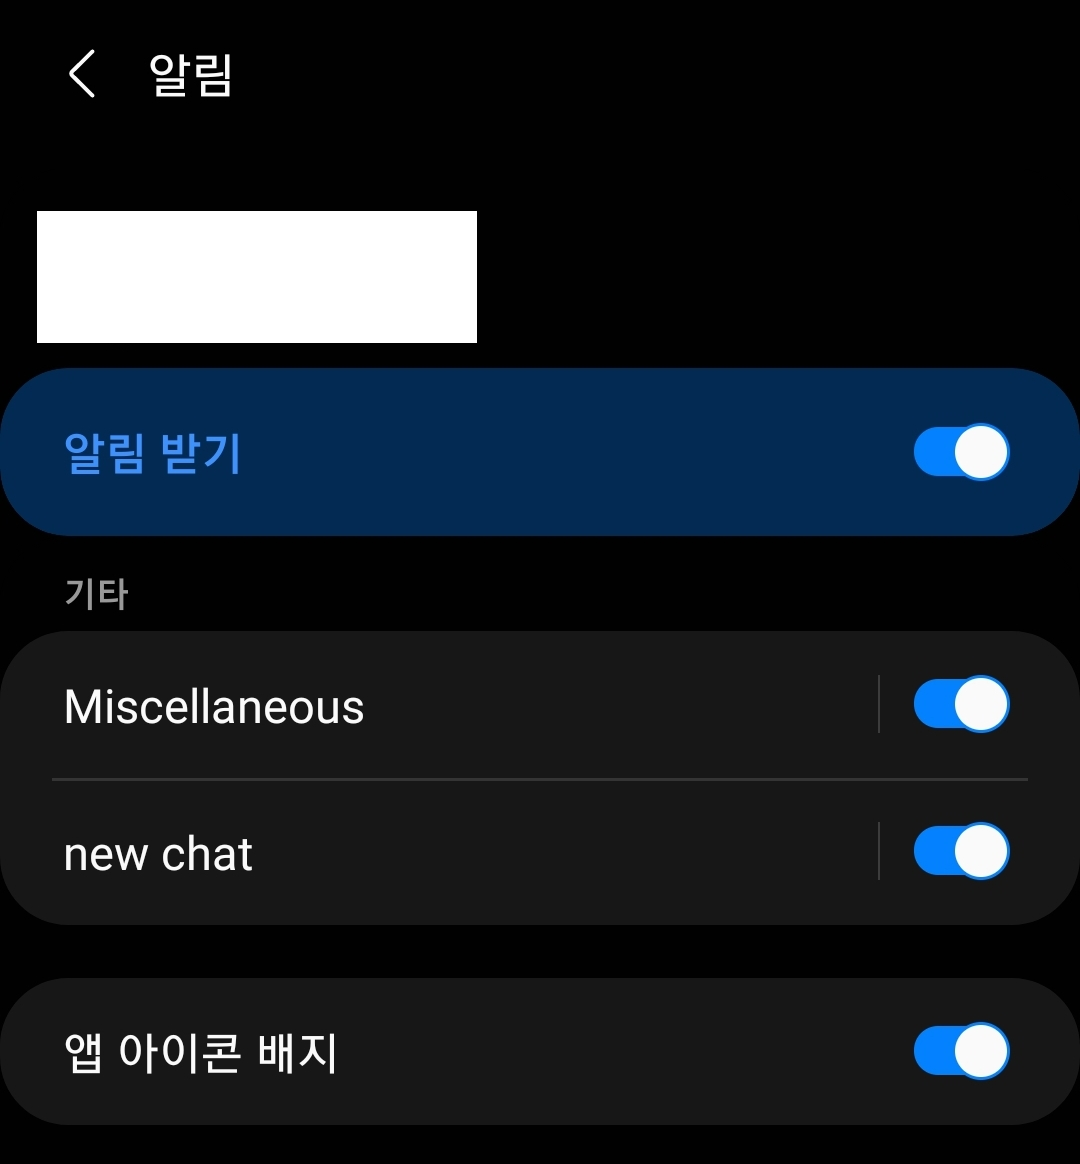
- 왜
Miscellaneous가 남아있나요? -> 한번 생성된 채널은 직접적으로 지워야 합니다.
Miscellaneous채널의id는expo_notifications_fallback_notification_channel입니다.
위에서 작성한 코드를 아래와 같이 수정해보겠습니다.
단 이와 같이 알람을 삭제할 경우, 기존에 발생시켰던 push 알림은 모두 사라지게 됩니다.
if (Platform.OS === "android") {
  Notifications.deleteNotificationChannelAsync("expo_notifications_fallback_notification_channel");
  Notifications.setNotificationChannelAsync("default", {
    name: "new chat",
    importance: Notifications.AndroidImportance.HIGH,
  });
}
Miscellaneous 가 깔끔히 삭제되었습니다.
그 외 테스트
- 알람을 설정한 뒤 앱을 꺼도 알람이 발생하나요? -> 네
- 알람을 설정한 뒤 스마트폰을 재시작해도 알람이 발생하나요? -> 네