들어가기전에
-
이전 포스트인 cub3D(1) 포스트를 참고하여
레이캐스트가 무엇인지?DDA알고리즘이 무엇인지? -
이전 포스팅 fractal 에서 사용한 그래픽라이브러리
mlx를 다시 활용하여 이미지를 표현해줍니다. -
삼각함수와백터,행렬에 대해 기본지식 탑재 필수 -
튜토리얼 해상 사이트를 참조하여 레이캐스팅의 큰 틀을 공부합니다.
-
텍스처로 사용될 이미지 파일은 .xpm, 맵 파일은 .cub 파일로 받습니다.
-
팀 프로젝트로 진행하였으며, 저는 실행파트를 맡았기 때문에 맵 파싱 부분은 간략하게 설명하고 넘어가겠습니다.
🖥️ Mandatory + 💻 Bonus
📌 Makefile
NAME = cub3D
CFLAGS = -I $(INCLUDES) -MMD -Wall -Wextra -Werror
LFLAGS = -Lmlx -lmlx -framework OpenGL -framework AppKit

SRCS_DIR = ./mandatory/
SRCS_B_DIR = ./bonus/
SRCS = main.c parse.c parse_map.c parse_elements.c run.c hook.c key.c paint.c loop.c free.c setting.c
SRCS_B = main_bonus.c parse_bonus.c parse_map_bonus.c parse_elements_bonus.c run_bonus.c hook_bonus.c key_bonus.c paint_bonus.c loop_bonus.c free_bonus.c minimap_bonus.c setting_bonus.c
SRCS_NAME = $(if $(filter bonus, $(MAKECMDGOALS)), $(addprefix $(SRCS_B_DIR), $(SRCS_B)), $(addprefix $(SRCS_DIR), $(SRCS)))

INCLUDES = ./includes/
SHELL = bash

OBJ_DIR = objs
OBJS = $(addprefix $(OBJ_DIR)/, $(notdir $(SRCS_NAME:.c=.o)))

DEPS = $(addprefix $(OBJ_DIR)/, $(notdir $(SRCS_NAME:.c=.d)))

vpath %.c $(SRCS_DIR) $(SRCS_B_DIR)

all : $(NAME)

bonus : $(NAME)

$(NAME) : $(OBJ_DIR) $(OBJS)
	@echo -n "Making game... "
	@make all -s -C libft
	@cc $(OBJS) $(CFLAGS) $(LFLAGS) ./libft/libft.a -o $@
	@echo -e "\033[32;1m"complete"\033[0m"
	@sleep 0.2

$(OBJ_DIR) :
	@mkdir $@

$(OBJ_DIR)/%.o : %.c
	@cc $(CFLAGS) -c $< -o $@

clean :
	@echo -n "Deleting object files : "
	@make clean -s -C libft
	@rm -rf $(OBJ_DIR)
	@echo -e "\033[31;1m"delete"\033[0m"
	@sleep 0.2

fclean : clean
	@echo -n "Deleting cub3D : "
	@make fclean -s -C libft
	@rm -f cub3D
	@echo -e "\033[31;1m"delete"\033[0m"
	@sleep 0.2

re :
	@make fclean
	@make all

.PHONY : all clean fclean re bonus

-include $(DEPS)
Makefile은 팀원이 작성했는데 저와는 완전 다른방식으로 작성하는 스타일이여서 인상깊었습니다.
📌 코드
# define TEXWIDTH 256
# define TEXHEIGHT 256
# define WIDTH 1920
# define HEIGHT 1080

// 파싱 파트의 헤더
typedef struct s_parse
{
	int		fd;
	char	*line;
	int		element_cnt;
	int		line_cnt;
	int		stop;
}				t_parse;

// 실행 파일의 해더
typedef struct s_map
{
	char		**grid; // 파싱으로 받은 맵 정보
    char		**minimap; // 미니맵을 사용하기 위한 2차원 배열
	int			width; // 맵 너비
	int			height; // 맵 높이
	int			map_x; // 맵에서의 플레이어 x위치
	int			map_y; // 맵에서의 플레이어 y위치
	int			side; // 벽면의 정보 x축과 수직인 면 = 0, y축과 수직인 면 = 1
}				t_map;

typedef struct s_key
{
	int		w;
	int		s;
	int		a;
	int		d; // 이동 방향키
	int		left;
	int		right; // 회전 방향키
}				t_key; // 방향키 입력값

typedef struct s_player
{
	double		x; // 플레이어의 x위치
	double		y; // 플레이어의 y위치
	double		dir_x; // 방향벡터 x
	double		dir_y; // 방향벡터 y
	double		plane_x; // 카메라 평면 x
	double		plane_y; // 카메라 평면 y
}				t_player;

typedef struct s_ray
{
	int			step_x; // x방향으로 이동할 때의 방향
	int			step_y; // y방향으로 이동할 때의 방향
	double		ray_dir_x; // 빛의 방향벡터 x
	double		ray_dir_y; // 빛의 방향벡터 y
	double		size_dist_x; // 플레이어의 x위치 시작점에서 벽까지의 첫 x면까지 거리
	double		size_dist_y; // 플레이어의 y위치 시작점에서 벽까지의 첫 y면까지 거리
	double		delta_dist_x; // 첫 x면에서 다음 x면까지의 거리
	double		delta_dist_y; // 첫 y면에서 다음 y축 까지의 거리
	double		wall_dist; // 벽까지 광선의 이동거리
}				t_ray;

typedef struct s_draw
{
	int		draw_height; // 그리는 부분의 높이
	int		draw_start; // 그리는 부분의 시작점
	int		draw_end; // 그리는 부분의 끝점
	int		color; // rgb 색상 값
	int		texture_number; // 4개의 텍스쳐 파일을 구분하기 위한 번호
	int		texture_x; // 텍스쳐의 x좌표
	double	wall_x; // x면에서 텍스쳐 x좌표 까지의 거리
}				t_draw;

typedef struct s_mlx
{
	void	*mlx;
	void	*win;
	void	*img;
	int		*addr;
	int		bits_per_pixel;
	int		line_length;
	int		img_width;
	int		img_height;
	int		endian;
}				t_mlx; // mlx정보

typedef struct s_game
{
	t_map		map; // 맵 정보
	t_player	player; // 플레이어 정보
	t_ray		ray; // 빛 정보
	t_draw		draw; // 그리기 위한 정보
	t_mlx		mlx; // mlx 정보
	t_key		key; // 방향키 누른 정보
	char		*tex_path[4]; // 이미지가 존재하는 경로
	int			*tex[4]; // 텍스쳐 xpm 정보
	int			floor_color; // 바닥 색상
	int			ceiling_color; // 천장 색상
	int			**arr_temp; // 임시로 color를 담을 배열
}				t_game;
다룰 인자들이 많아 헤더 구조체 양이 많습니다.
실행에서 활용하기 위해 맵 파일을 파싱 한 정보를 담은 t_map
플레이어의 좌표와 방향벡터, 그리고 화면에 보여줄 카메라 벡터를 담은 t_player
DDA 알고리즘을 활용하기 위한 빛의 정보를 담은 t_ray
위의 정보를 활용하여 이미지를 표현하기 위해 사용되는 t_draw
mlx를 활용하기 위해 내장 함수의 정보를 담은 t_mlx
다양한 구조체들이 있지만, 편하게 사용하기 위해 t_game 구조체 안에 담아서 해당 구조체만 인자로 가지고 다닙니다.
int	main(int acgc, char *argv[])
{
	t_game	cub;

	if (argc != 2) // 들어오는 인자 확인
		return (ft_putstr_fd("Error: invalid arguments\n", 2), EXIT_FAILURE);
	ft_memset(&cub, 0, sizeof(t_game));
	if (parse(argv[1], &cub)) // 파싱
		return (ft_putstr_fd("Error: wrong map\n", 2), EXIT_FAILURE);
	cub.mlx.mlx = mlx_init();  // mlx 생성
	setting_all(&cub); // 파싱받은 결과를 가지고 기본값 설정
	cub.mlx.win = mlx_new_window(cub.mlx.mlx, WIDTH, HEIGHT, "cub3d");
	cub.mlx.img = mlx_new_image(cub.mlx.mlx, WIDTH, HEIGHT);
	cub.mlx.addr = (int *)mlx_get_data_addr(cub.mlx.img,
			&cub.mlx.bits_per_pixel, &cub.mlx.line_length, &cub.mlx.endian);
	mlx_hook(cub.mlx.win, 17, 0, x_exit, &cub);
	mlx_hook(cub.mlx.win, 2, 1, key_press, &cub);
	mlx_hook(cub.mlx.win, 3, 2, key_release, &cub);
	mlx_loop_hook(cub.mlx.mlx, &loop, &cub); // loop 함수를 계속 반복합니다.
	mlx_loop(cub.mlx.mlx);
	return (EXIT_SUCCESS);
}
우선 인자가 2개가 아니면 에러를 리턴합니다.
제대로 된 값이 들어오면 argv[1]을 open 해서 맵 파일 정보를 파싱 해서 값을 전달받습니다.
파싱 받은 값을 t_map 구조체에 넣고 mlx_loop_hook 함수에 loop 함수를 인자로 넣어 해당 함수를 계속 반복합니다.
int	parse(char *file, t_game *game)
{
	t_parse	p;

	if (name_check(file)) // .cub 파일 형식으로 들어오는지 확인
		return (EXIT_FAILURE);
	p.fd = open(file, O_RDONLY);
	if (p.fd < 0 || read(p.fd, NULL, 0) < 0)
	{
		ft_putstr_fd("Error: fail to open\n", 2);
		exit(1);
	} // 파일을 열어줍니다.
	ft_memset(game->tex_path, 0, sizeof(char *) * 4);
	if (scan_map(&p, game)) // 맵 파일 안에 유효한 값들이 있는지 확인합니다.
		return (EXIT_FAILURE);
	game->map.grid = malloc(sizeof(char *) * (game->map.height + 1));
	if (!game->map.grid)
		exit(1);
	ft_memset(game->map.grid, 0, sizeof(char *) * (game->map.height + 1));
	if (parse_map(file, game, p.line_cnt)) // 제대로 파싱된 값을 t_game 안에있는 t_map 구조체에 넣습니다.
		return (free_map(game), EXIT_FAILURE);
	return (EXIT_SUCCESS);
}
우선 맵의 파일명을 확인합니다. 오직. cub 파일만 읽을 수 있으며, 다른 확장명의 파일이 들어온다면 에러를 출력해 줍니다.
제대로 된 파일이 들어올 경우, 해당 파일은 아래와 같은 형식으로 들어와야 합니다.
NO ./temp/eme.xpm
SO ./temp/iron.xpm
WE ./temp/coal.xpm
EA ./temp/diamond.xpm

F 144,144,144
C 128,128,128

        1111111111111111111111111
        1000000000110000000000001
        1011000001110000000000001
        100100000000000000E000001
111111111011000001110000000000001
100000000011000001110111111111111
11110111111111011100000010001
11110111111111011101010010001
11000000110101011100000010001
10000000000000001100000010001
10000000000000001101010010001
1100000111010101111101111000111
11110111 1110101 101111000001
11111111 1111111 111111111111
- 동, 서, 남, 북 텍스처의 경로가 담겨있어야 합니다.
- 바닥(Floor)와 천장(Ceiling)의 RGB 값이 담겨있어야 합니다.
- 맵은 0, 1, 플레이어 방향으로 이루어져 있고 반드시 벽을 나타내는 1로 둘러싸여 있어야 합니다.
- 맵 안에는 플레이어가 바라보는 방향 N, S, W, E 중 하나만 적혀있어야 합니다.
제대로 된 형식으로 들어왔으면 맵을 2차원 배열로 표현하여 t_map에 담고,
플레이어의 좌표와 방향벡터, 카메라 벡터 등은 t_player에 담아줍니다.
int	loop(t_game *cub)
{
	int	x;

	x = 0;
	mlx_clear_window(cub->mlx.mlx, cub->mlx.win); // 이미지 클리어
	painting_floor(cub); // 바닥, 천장 색상칠하기
	while (x < WIDTH) // x를 WIDTH가 될때까지 세로로 칠하기
	{
		ray_setting(cub, x); // 광선 셋팅
		ray_size_dist_setting(cub); // 광선 거리 셋팅
		hit_check(cub); // 벽에 광선이 닿았는지 확인
		draw_point_check(cub); // 그리는 지점 확인
		put_texture_color(cub, x); // 텍스쳐 입히는 위치 등 확인
		x++;
	}
	key_check(cub); // 키보드 입력값이 들어왔는지 확인
	painting(cub); // 그리기
	return (0);
}
실행부분에서는 해당 loop 함수를 반복합니다.

메인 동작전에 이미지를 초기화해주고 바닥과 천장 색상을 화면의 중간을 기준으로 위, 아래에 칠해줍니다.
x가 WIDTH값이 될 때까지 세로로 한 줄씩 그림을 그려줍니다.
전부 그렸으면 화면에 띄워주며 해당 동작을 계속 반복해 줍니다.
while() 내부의 동작들이 실행 파트의 핵심 부분입니다. 해당 반복문 안에서 모든 계산을 처리해 줍니다.
void	ray_setting(t_game *cub, int x)
{
	double	camera_x;

	camera_x = 2 * x / (double)WIDTH - 1; // 카메라 비율 조정
	cub->ray.ray_dir_x = cub->player.dir_x + cub->player.plane_x * camera_x;
	cub->ray.ray_dir_y = cub->player.dir_y + cub->player.plane_y * camera_x;
	cub->map.map_x = (int)cub->player.x; // double인 플레이어 위치를 int형으로 맵에 적어줍니다
	cub->map.map_y = (int)cub->player.y;
	if (cub->ray.ray_dir_x == 0) // 빛의 x축 방향벡터가 0이면 delta_x는 무한대까지 갑니다.
		cub->ray.delta_dist_x = DBL_MAX;
	else
		cub->ray.delta_dist_x = fabs(1 / cub->ray.ray_dir_x);
	if (cub->ray.ray_dir_y == 0)
		cub->ray.delta_dist_y = DBL_MAX;
	else
		cub->ray.delta_dist_y = fabs(1 / cub->ray.ray_dir_y);
}
우선 카메라 비율을 설정해 주기 위해 WIDTH의 길이를 -1 ~ 1까지의 값이 나오도록 비율을 조정해 줍니다.
빛의 방향벡터를 구하기 위해 플레이어의 방향벡터에 플레이어 평면 벡터에 카메라 비율을 적용한 값을 더해줍니다.
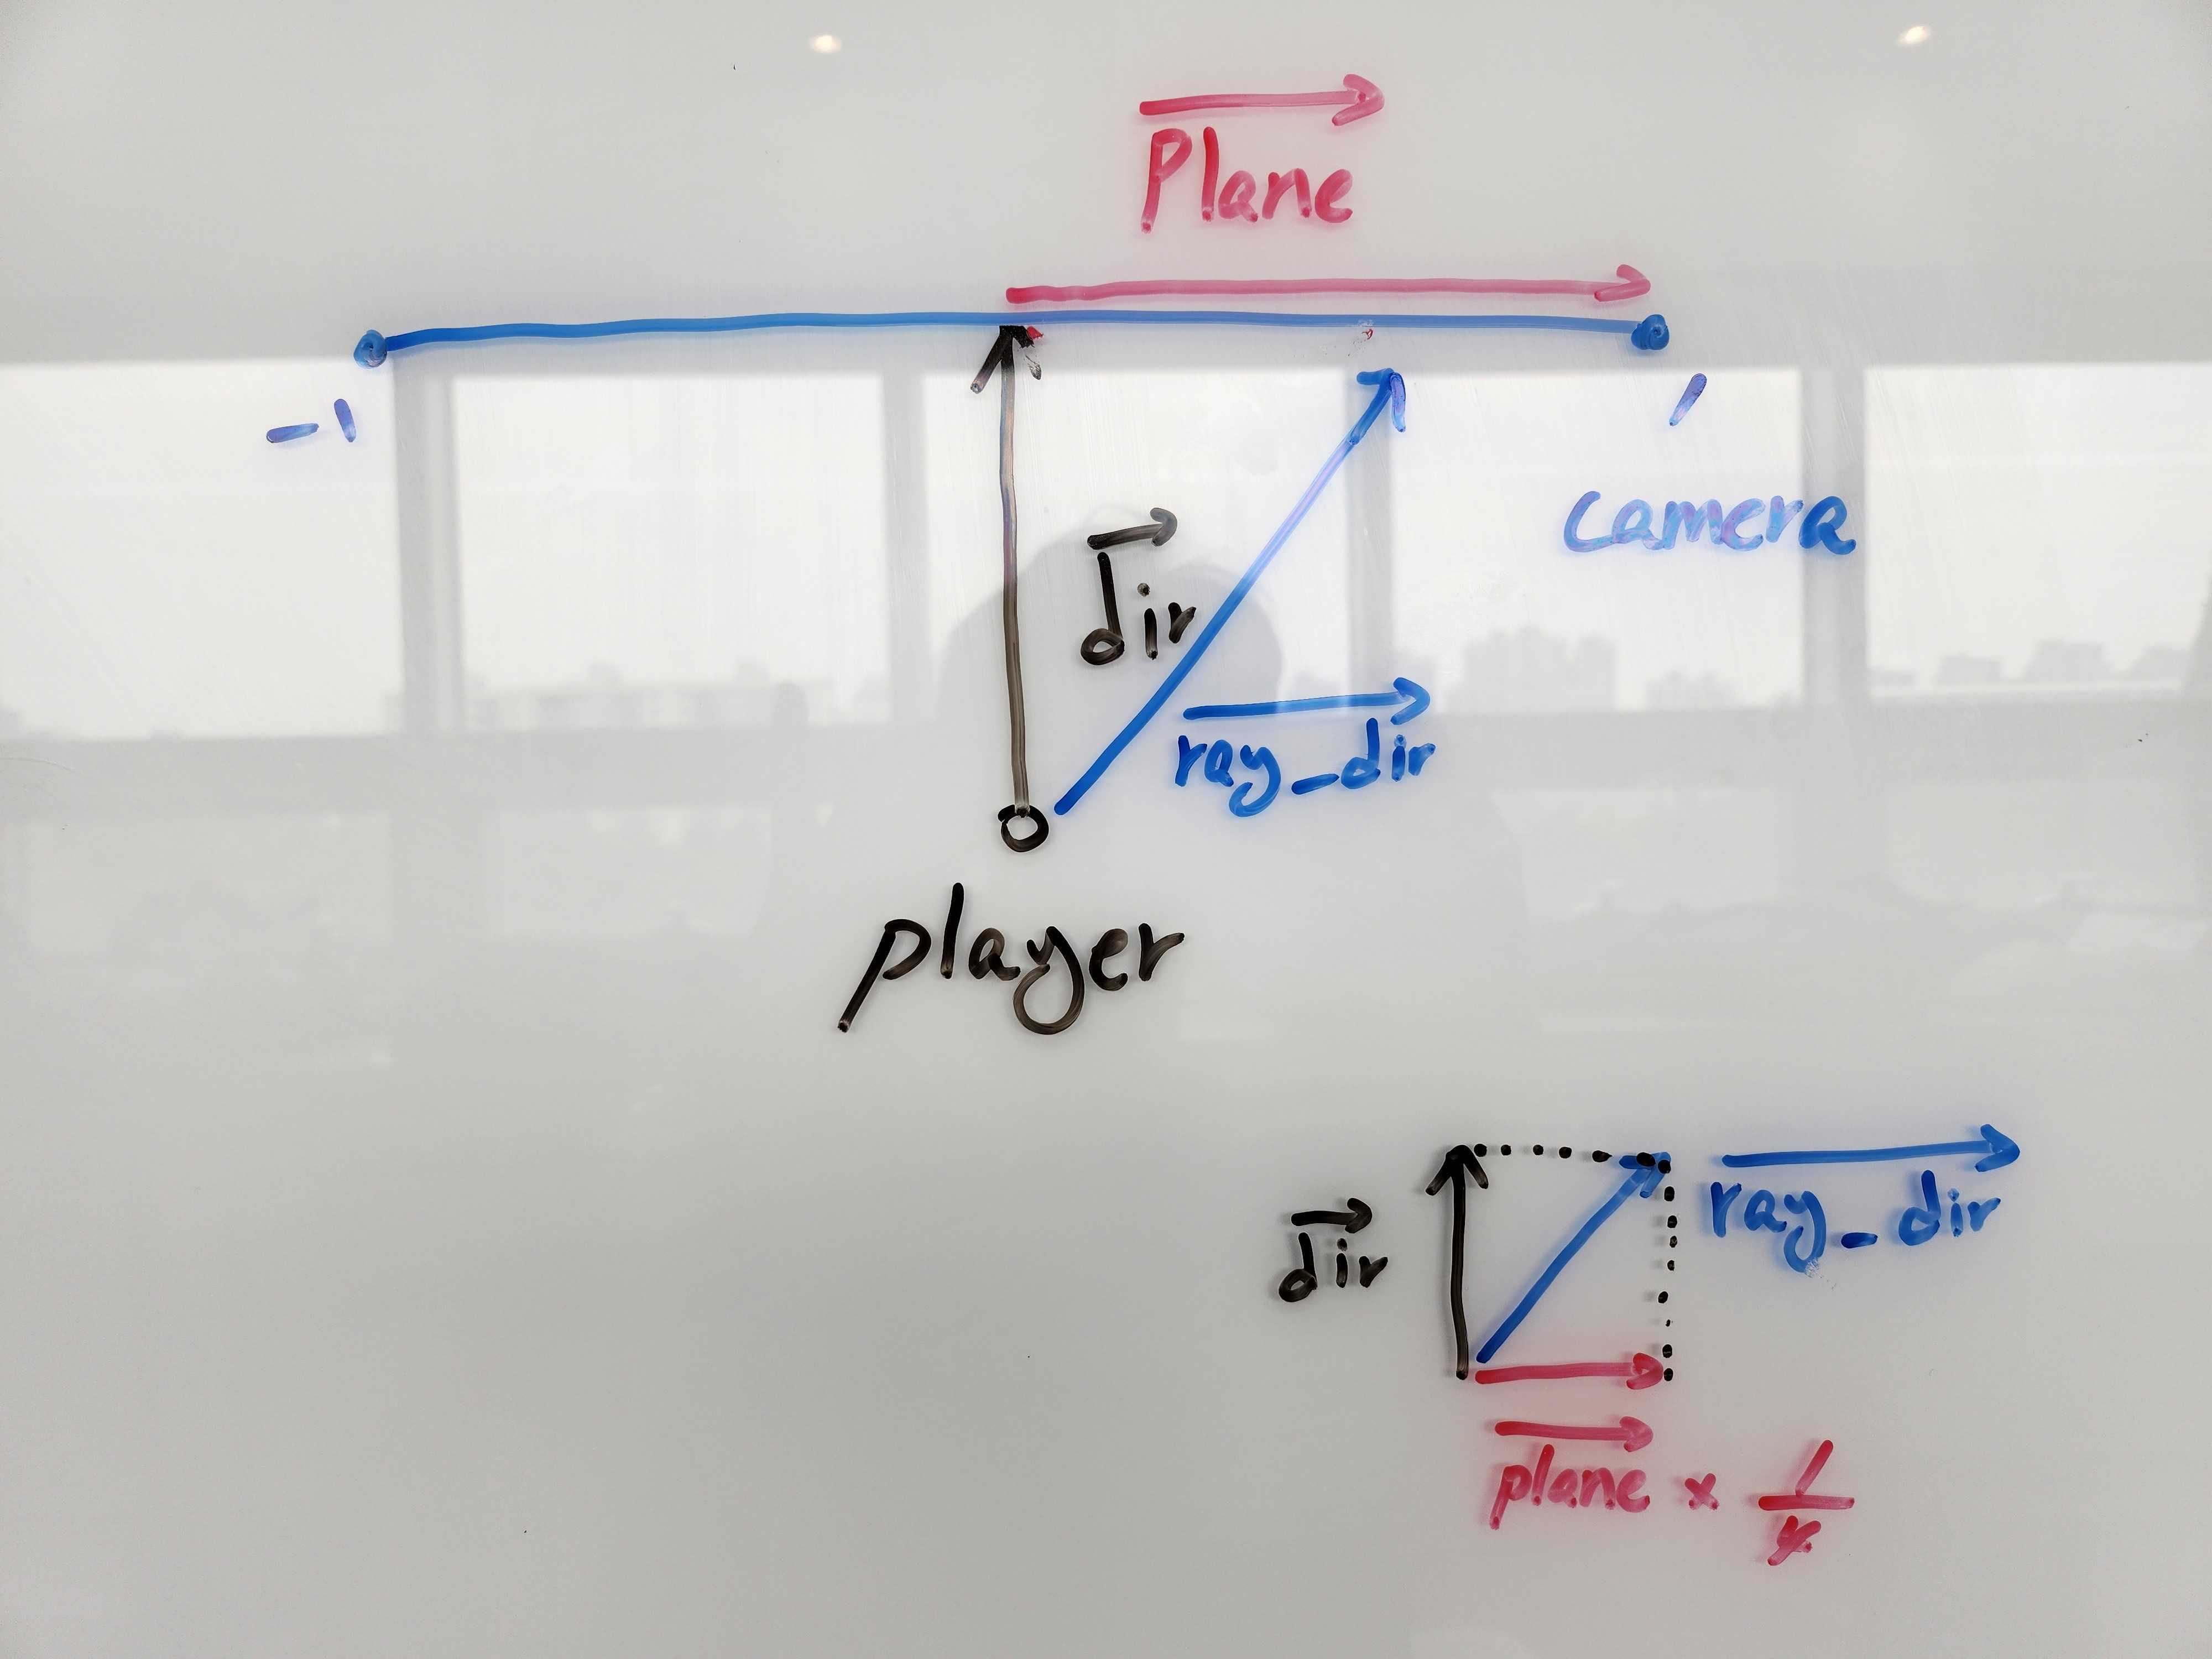
빛의 방향벡터는 위와 같은 식으로 구해줍니다.
map_x, map_y 는 플레이어의 좌표를 int로 변환한 값을 넣어줍니다.
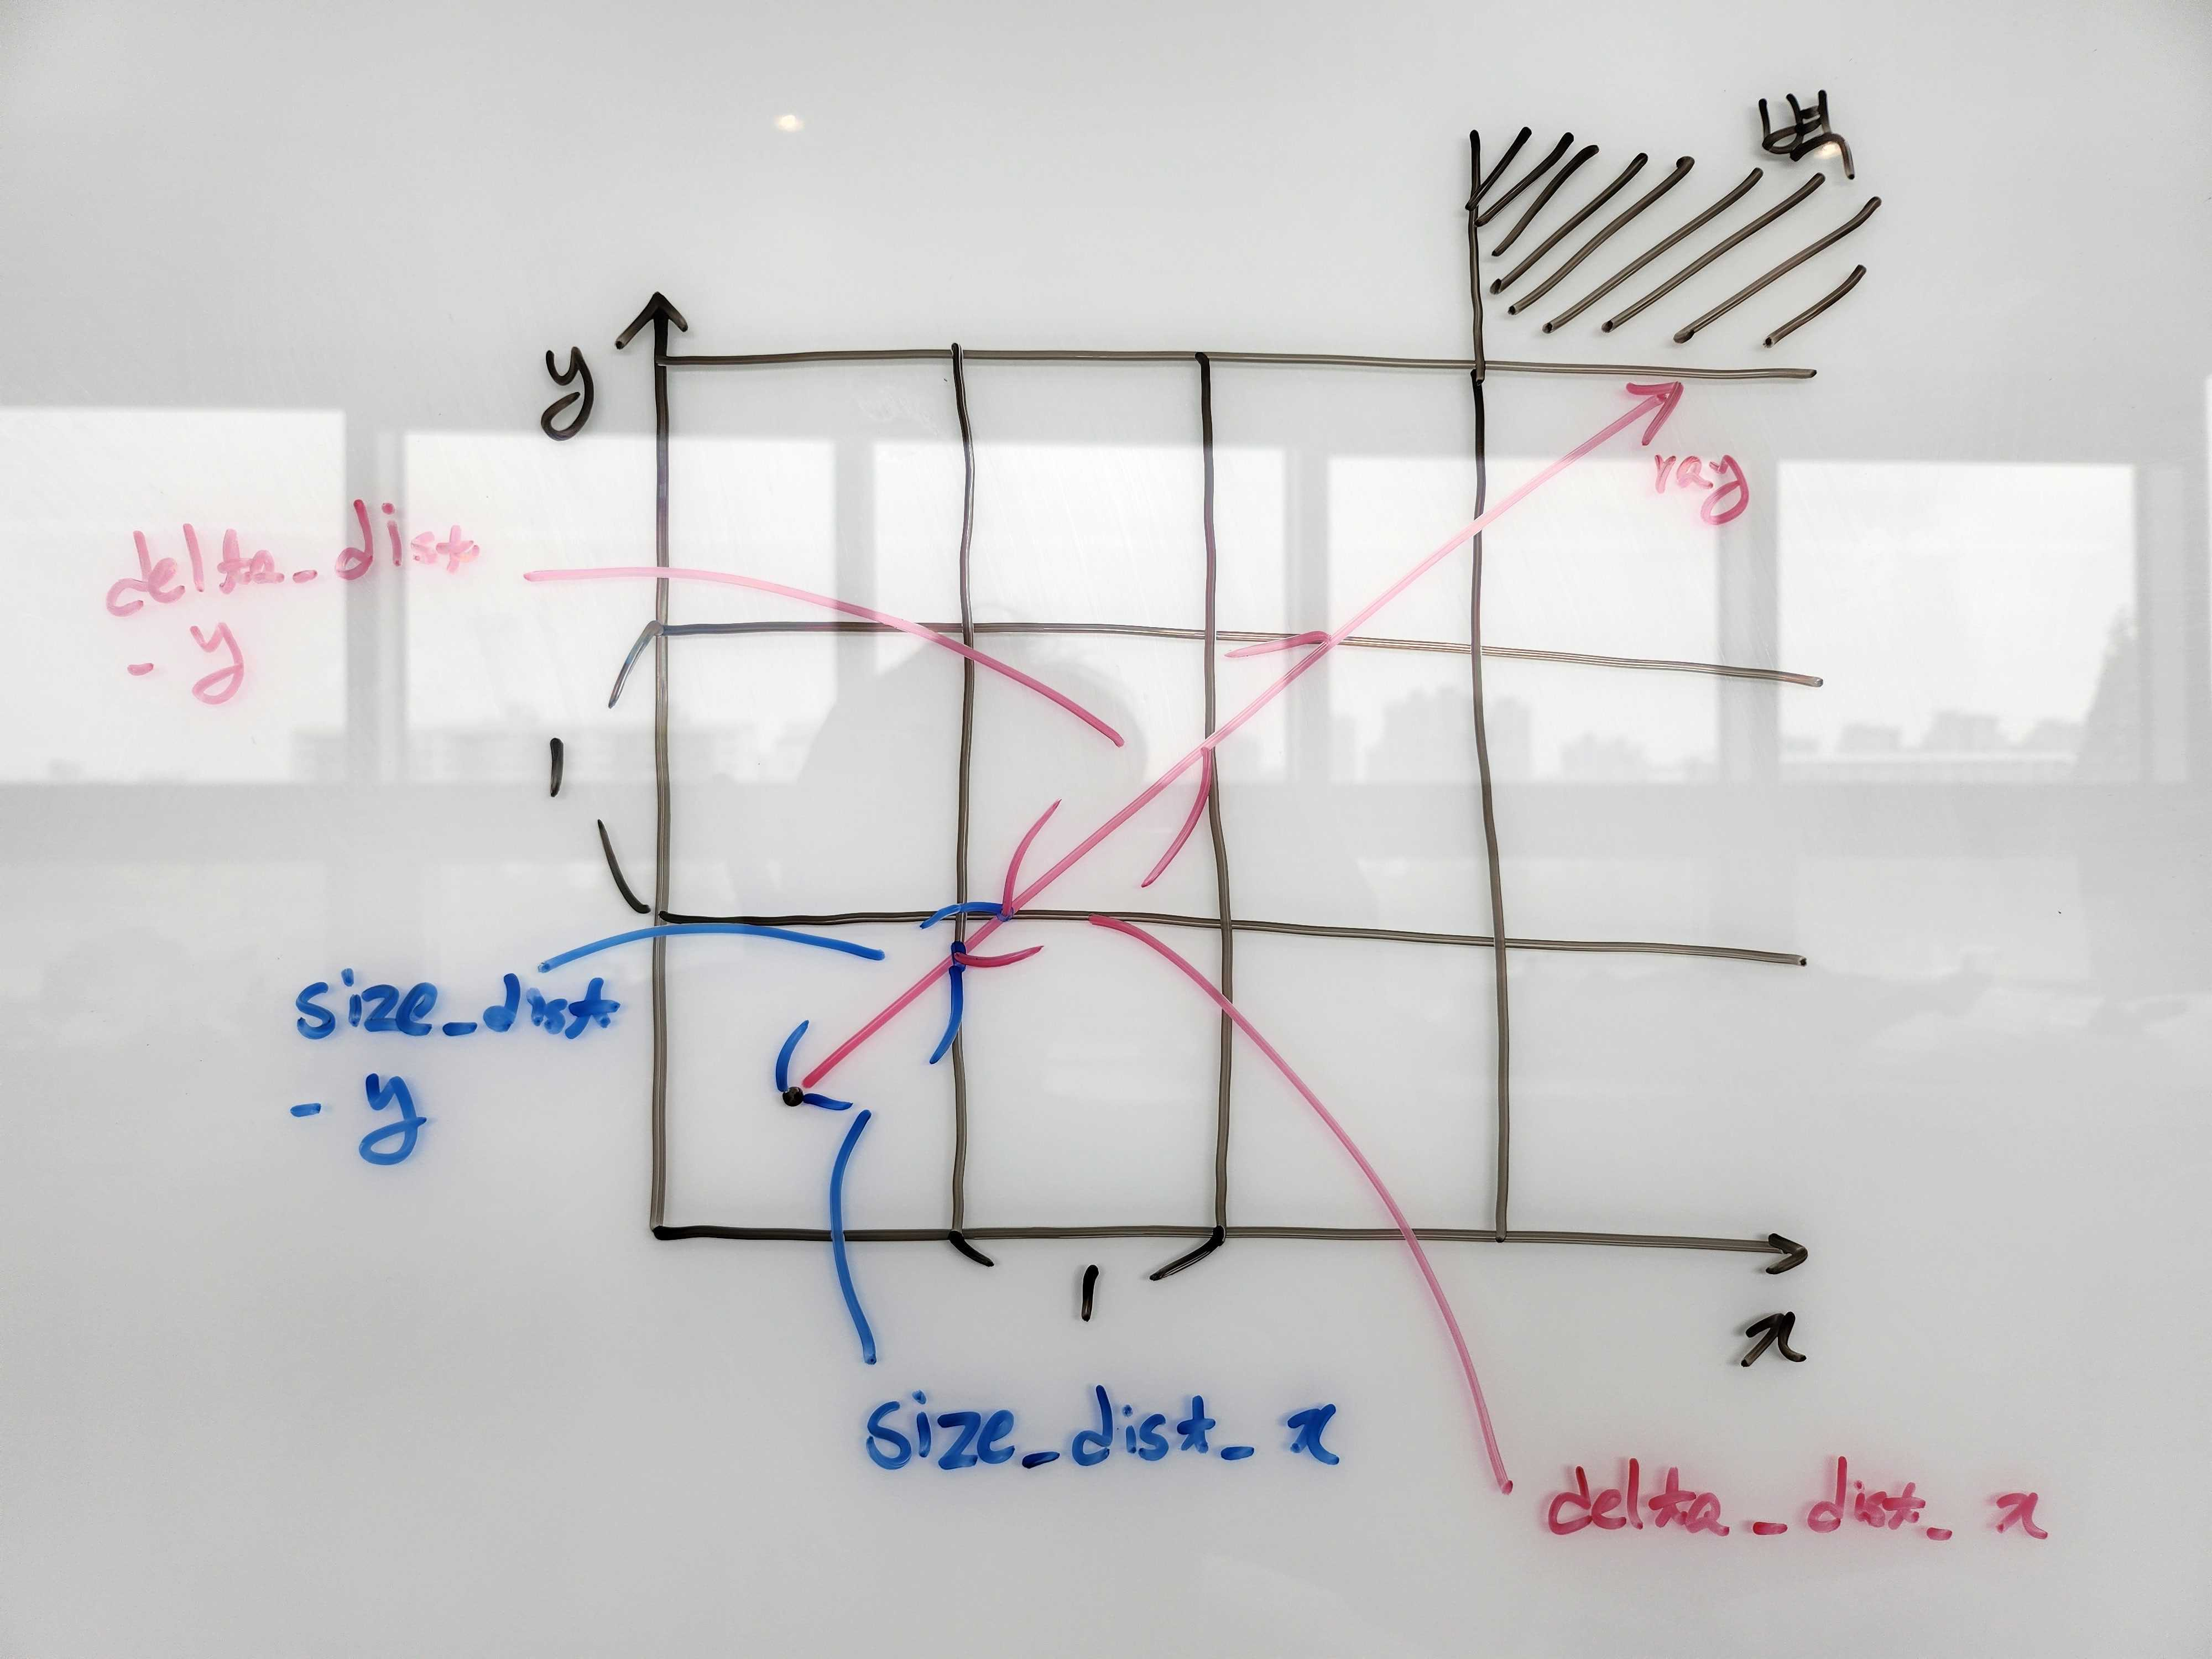
헤더에 주석을 달아놨지만 다시한번 설명드리자면
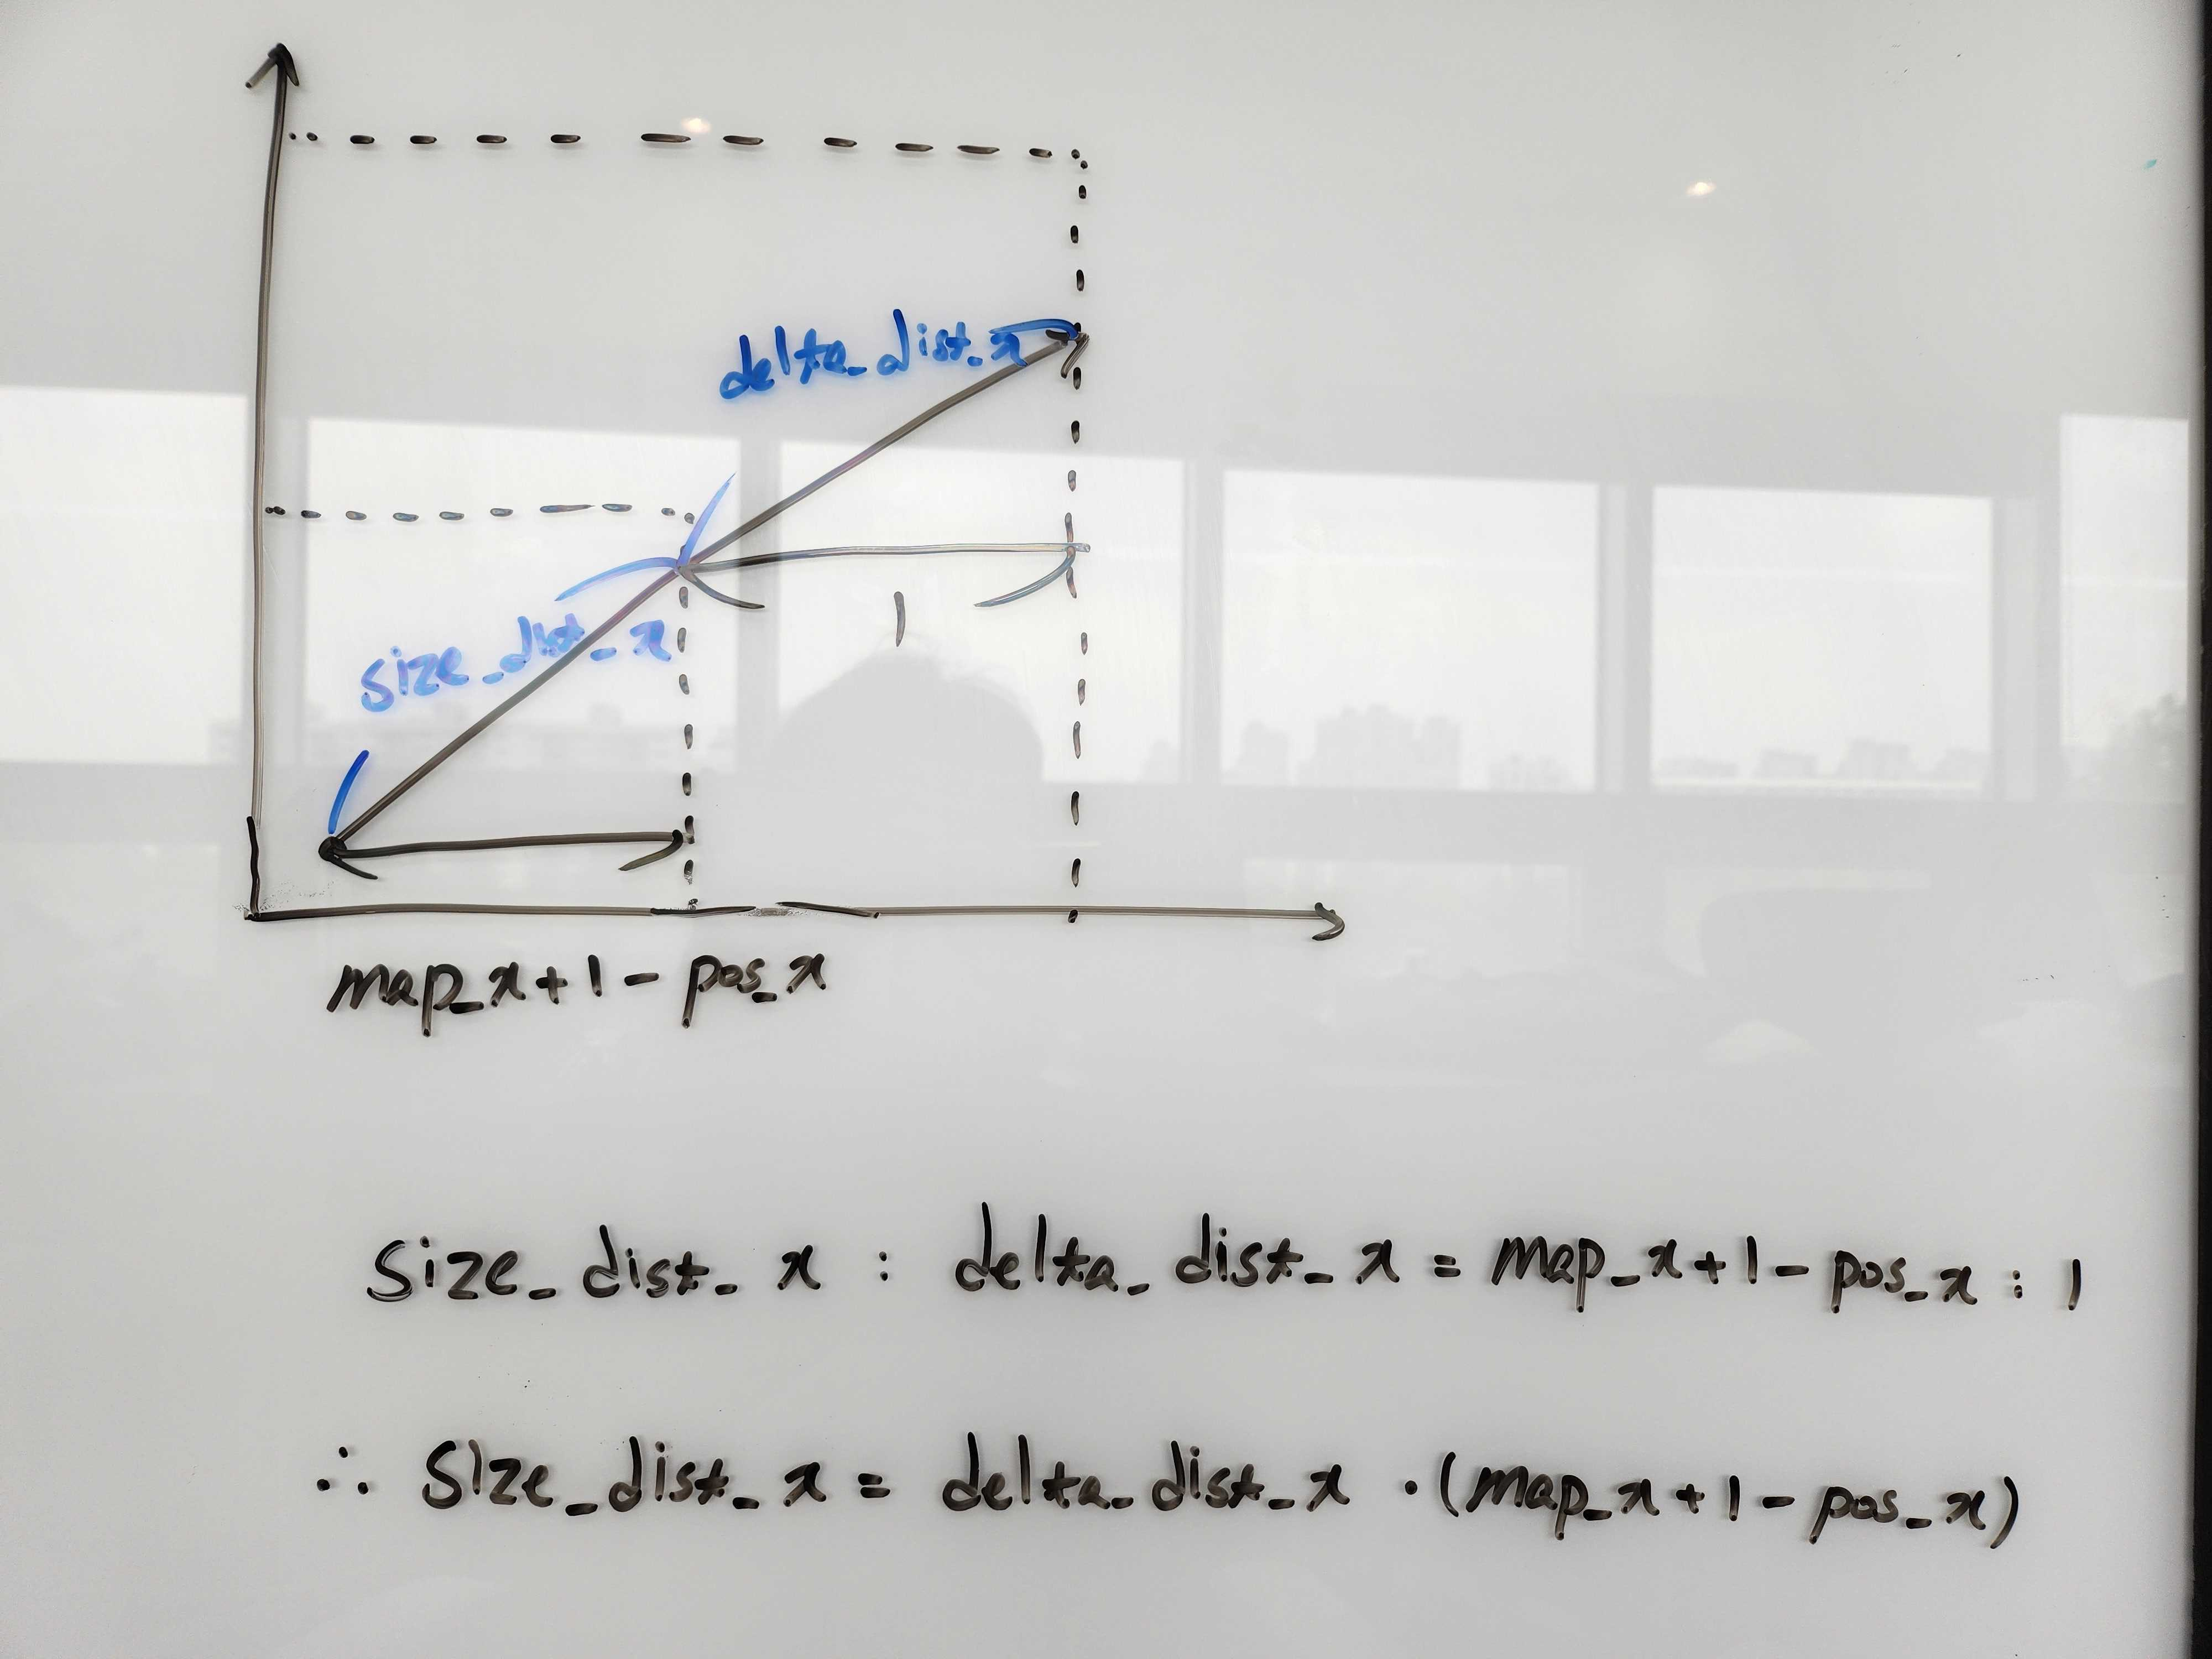
- size_dist_x : 플레이어의 x위치 시작점에서 벽까지의 첫 x면까지 거리
- size_dist_y : 플레이어의 y위치 시작점에서 벽까지의 첫 y면까지 거리
- delta_dist_x : size_dist_x에서 다음 x면까지의 거리
- delta_dist_y : size_dist_y에서 다음 y축 까지의 거리
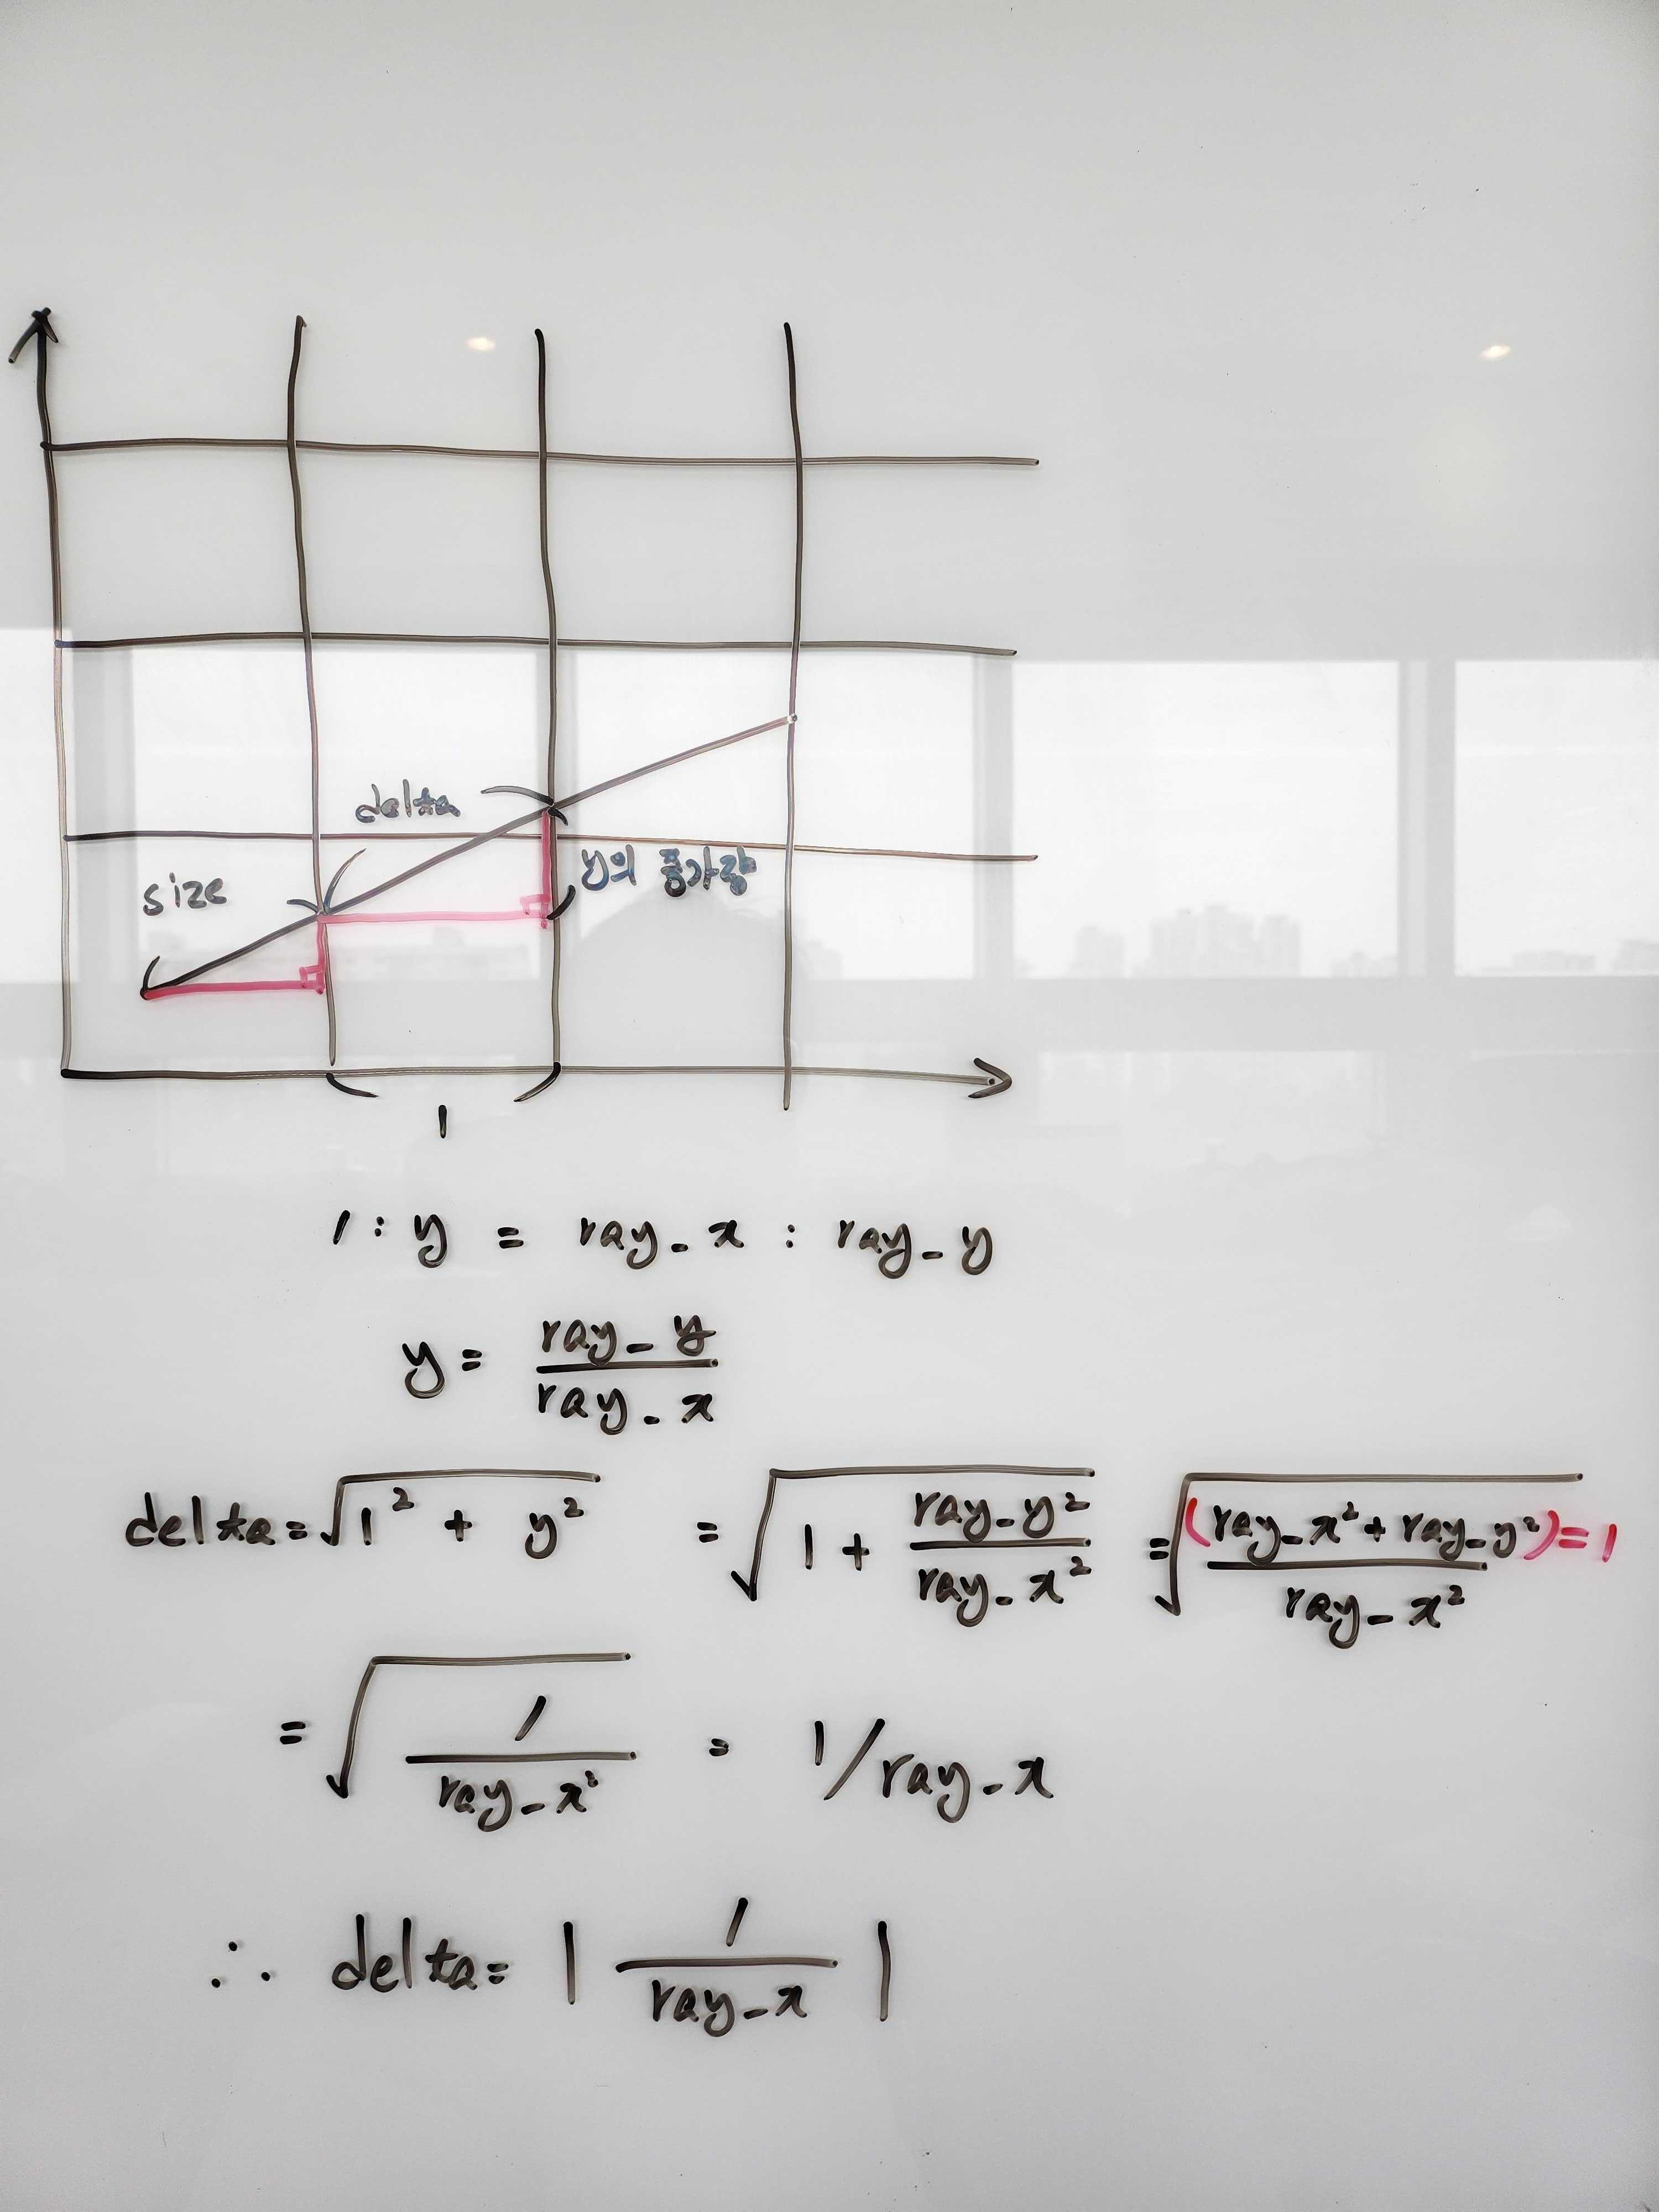
delta_dist를 구하는 식은 위와 같습니다. 삼각형의 비례를 활용하여 delta_dist_x를 기준으로 x길이가 1이라는 점을 활용하여 구하면 됩니다.
delta_dist_x = |1 / ray_dir_x|
void ray_size_dist_setting(t_game *cub)
{
if (cub->ray.ray_dir_x < 0)
{
cub->ray.step_x = -1; // x가 음수방향
cub->ray.size_dist_x = (cub->player.x - cub->map.map_x)
* cub->ray.delta_dist_x;
}
else
{
cub->ray.step_x = 1; // x가 양수방향
cub->ray.size_dist_x = (cub->map.map_x + 1.0 - cub->player.x)
* cub->ray.delta_dist_x;
}
if (cub->ray.ray_dir_y < 0)
{
cub->ray.step_y = -1; // y가 음수방향
cub->ray.size_dist_y = (cub->player.y - cub->map.map_y)
* cub->ray.delta_dist_y;
}
else
{
cub->ray.step_y = 1; // y가 양수방향
cub->ray.size_dist_y = (cub->map.map_y + 1.0 - cub->player.y)
* cub->ray.delta_dist_y;
}
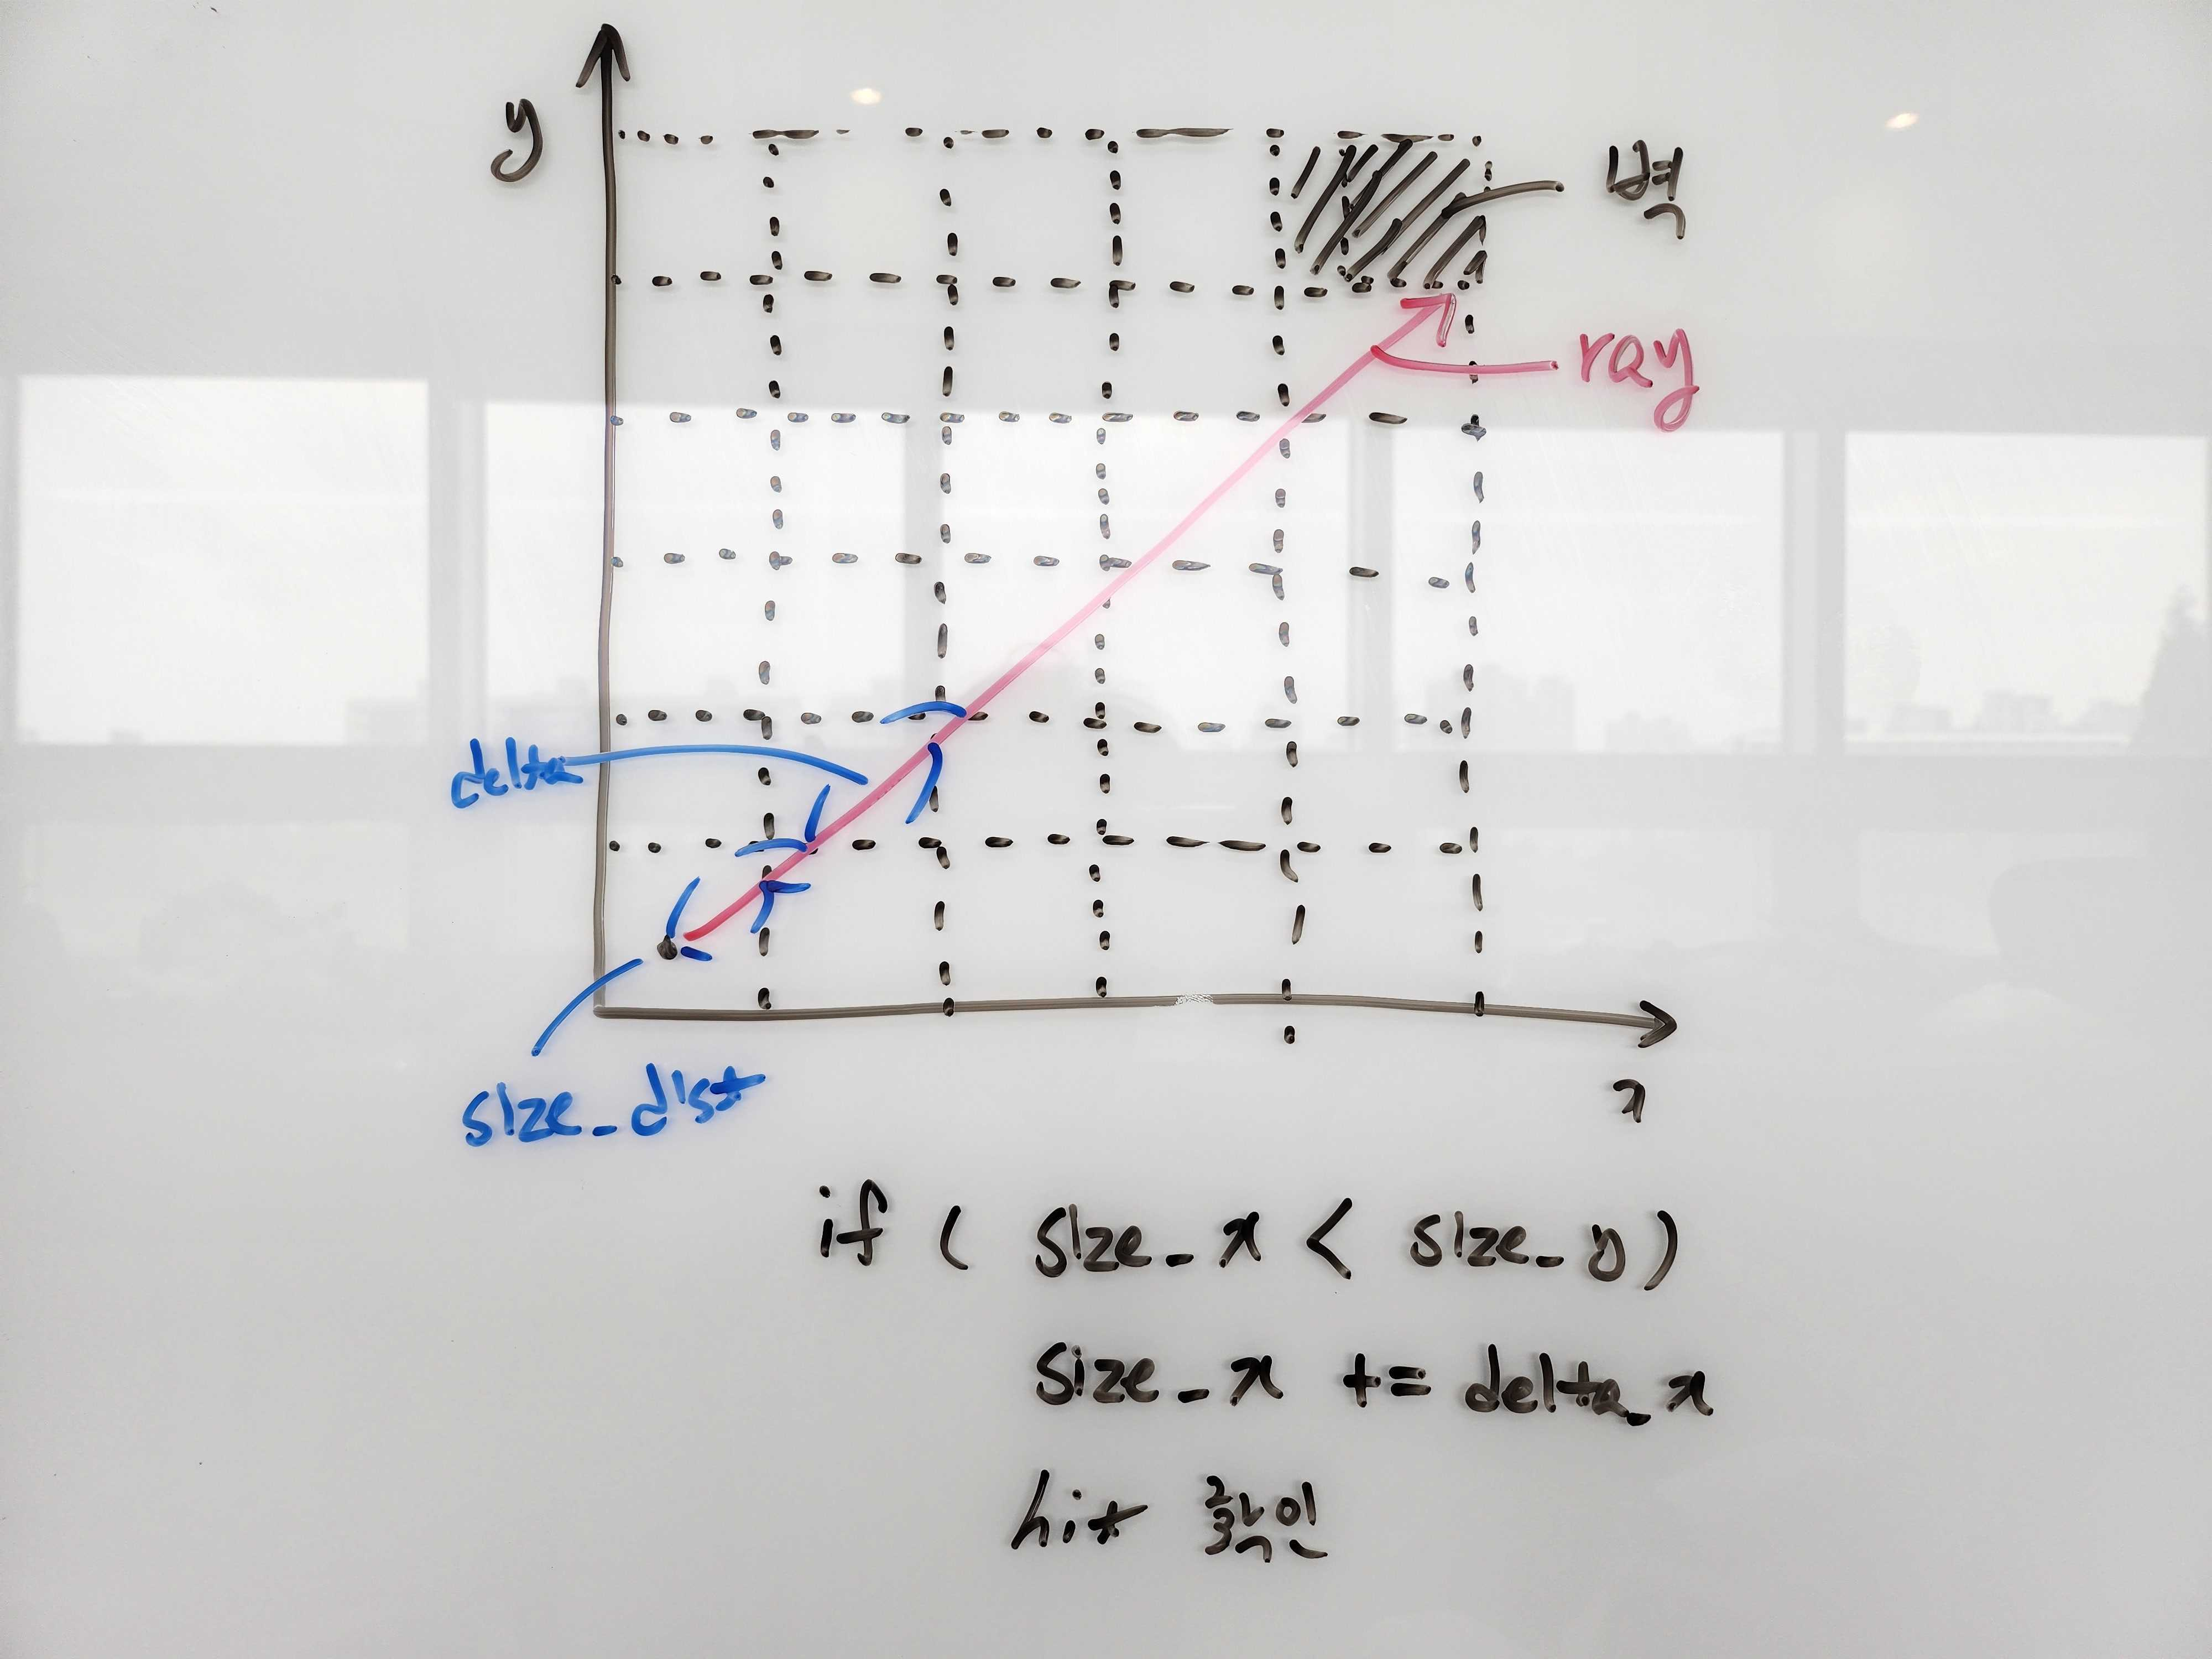
}size_dist는 광선이 나아가는 방향 (↖ ↗ ↘ ↙) 에 따라 결정됩니다
- step_x : x방향으로 이동할 때의 방향 -1과 1로 표현했습니다.
- step_y : y방향으로 이동할 때의 방향 -1과 1로 표현했습니다.
가장 이해하기 쉬운 step_x가 1인 방향으로 수식을 구하면 위 이미지처럼 구할 수 있습니다.
(보드에 수식을 증명할 때 코드를 안 보고 그리느라 pos_x 라 표현했는데 position으로 player_x로 봐주세요.)
void	hit_check(t_game *cub)
{
	while (1)
	{
		if (cub->ray.size_dist_x < cub->ray.size_dist_y)
		{
			cub->ray.size_dist_x += cub->ray.delta_dist_x; // size_dist에 delta_dist를 더하고 반복문
			cub->map.map_x += cub->ray.step_x; // 맵의 x좌표도 광선의 방향에 따라 값을 더해줍니다.
			cub->map.side = 0;
		}
		else
		{
			cub->ray.size_dist_y += cub->ray.delta_dist_y;
			cub->map.map_y += cub->ray.step_y;
			cub->map.side = 1;
		}
		if (cub->map.grid[cub->map.map_y][cub->map.map_x] == '1') // 벽인지 확인
			break ;
	}
	if (cub->map.side == 0) // y축의 벽일경우
		cub->ray.wall_dist = (cub->map.map_x - cub->player.x
				+ ((1.0 - cub->ray.step_x) / 2)) / cub->ray.ray_dir_x;
	else
		cub->ray.wall_dist = (cub->map.map_y - cub->player.y
				+ ((1.0 - cub->ray.step_y) / 2)) / cub->ray.ray_dir_y;
}
해당 코드에선 광선이 닿는 벽의 모든 면 을 검사하는 방법인 DDA알고리즘을 활용합니다.
size_dist_x와 size_dist_y를 비교하여 더 작은 size_dist에 delta_dist를 더해 해당 위치가 벽인지 아닌지 확인하는 방법입니다.
이렇게 x면과 y면을 한 칸 한 칸 벽인지 아닌지 확인하며 벽이 나타나면 반복문을 탈출하는 방식입니다.
if (cub->map.side == 0)
cub->ray.wall_dist = (cub->map.map_x - cub->player.x
+ ((1.0 - cub->ray.step_x) / 2)) / cub->ray.ray_dir_x;
else
cub->ray.wall_dist = (cub->map.map_y - cub->player.y
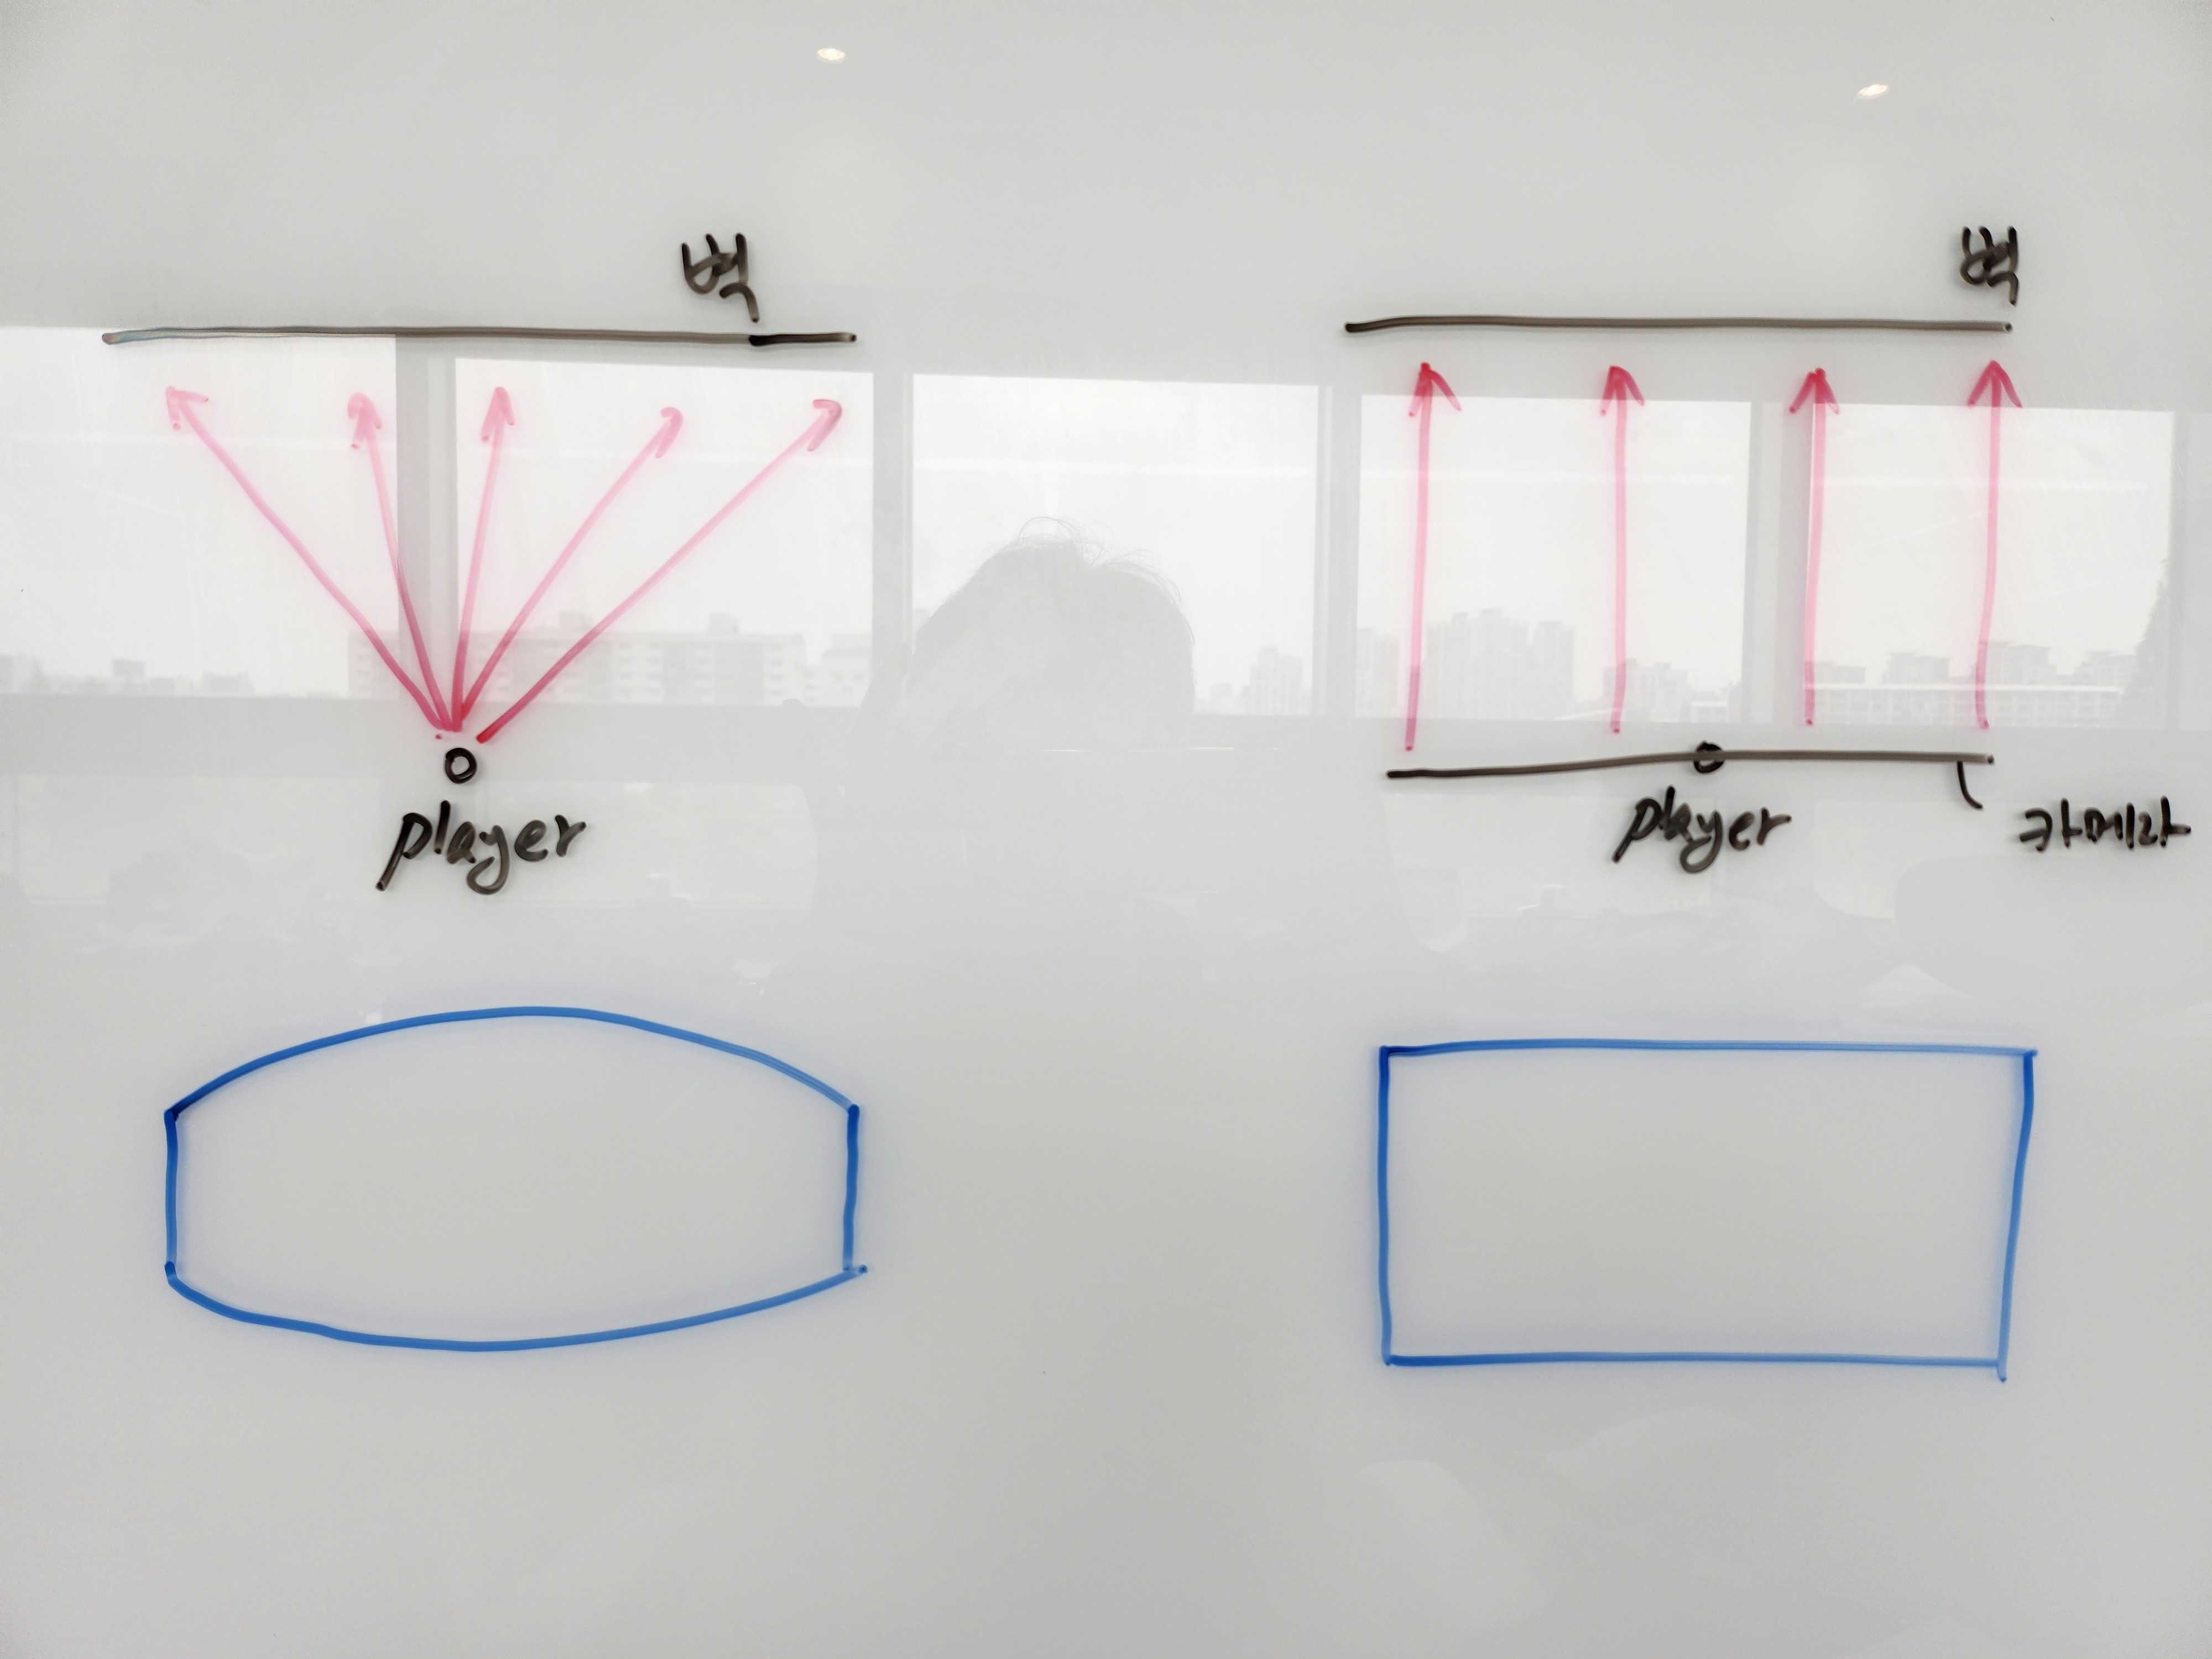
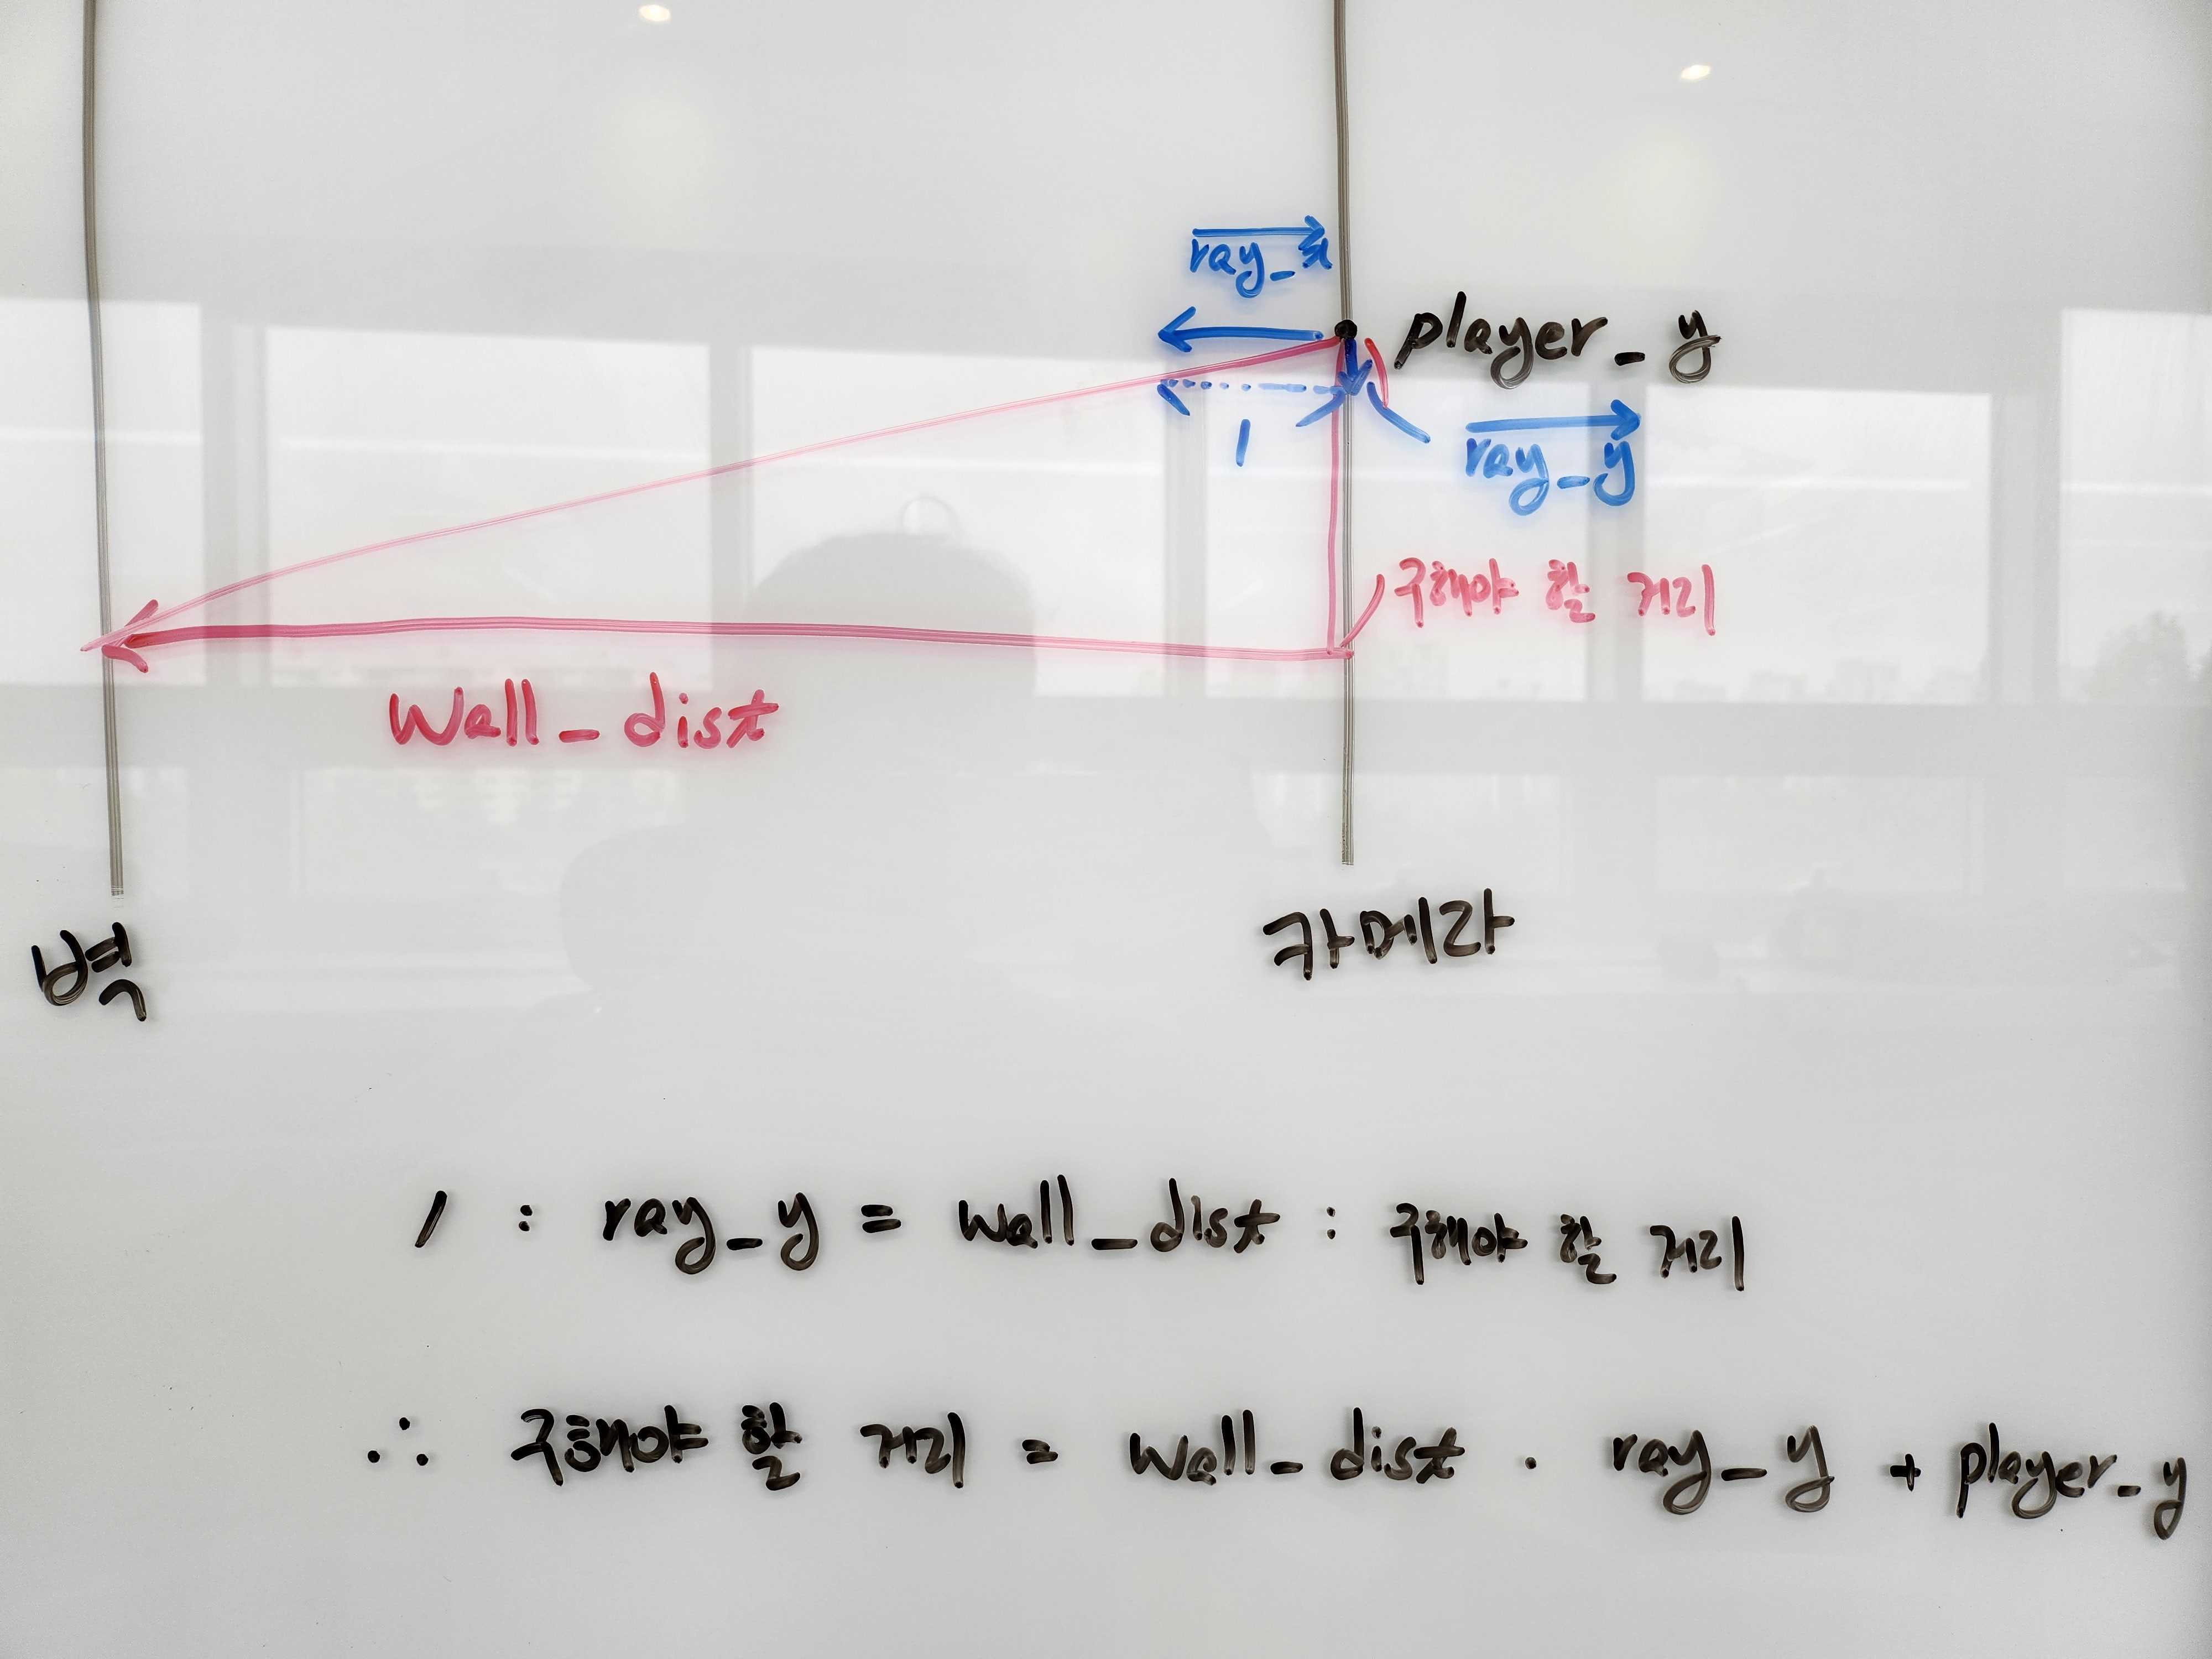
+ ((1.0 - cub->ray.step_y) / 2)) / cub->ray.ray_dir_y;wall_dist는 player 위치에서 벽을 확인하면 벽 끝점들은 광선의 길이가 길어져 왼쪽 파란색 그림과 같이 표현됩니다.
이를 어안렌즈 효과 (fisheye effect)라고 하며, 실제 거리 값을 사용했을 때 모든 벽이 둥글게 보여서 회전할 때 울렁거릴 수도 있는 현상을 말합니다.
이러한 어안렌즈 효과를 피해서 오른쪽 그림과 같이 표현하기 위해, 플레이어 위치까지의 유클리드 거리 대신 카메라 평면까지의 거리를 사용합니다.
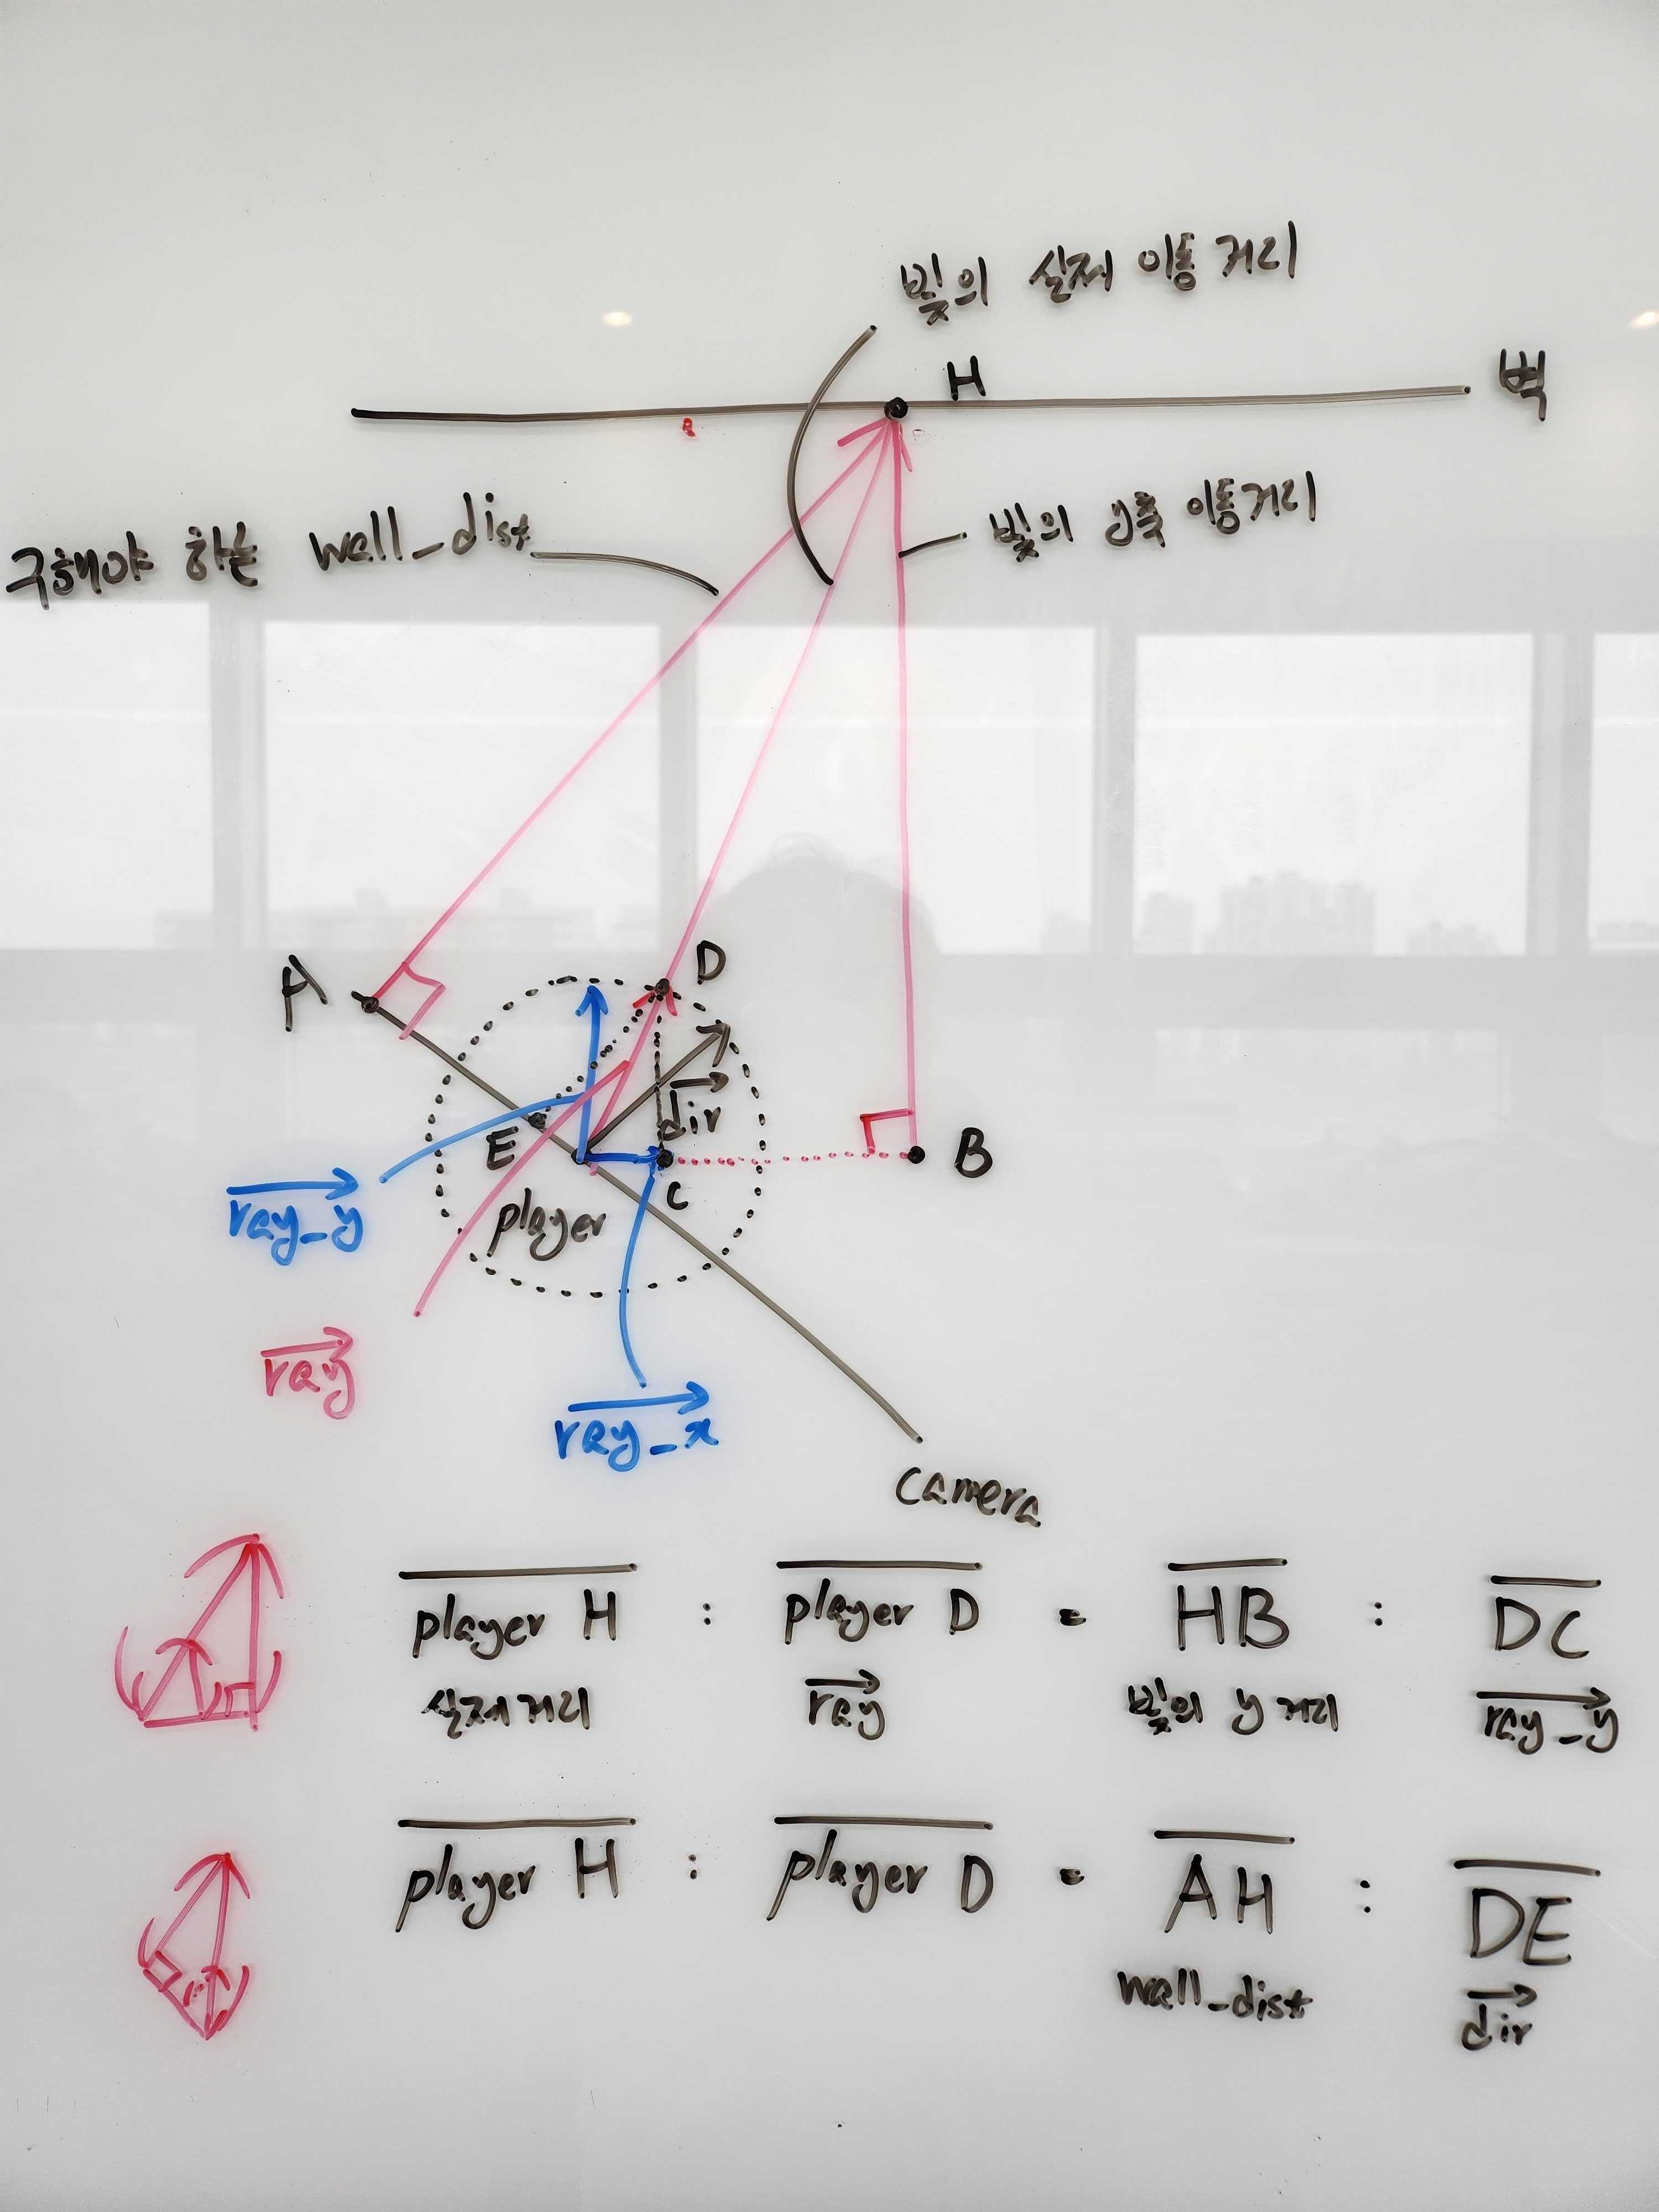
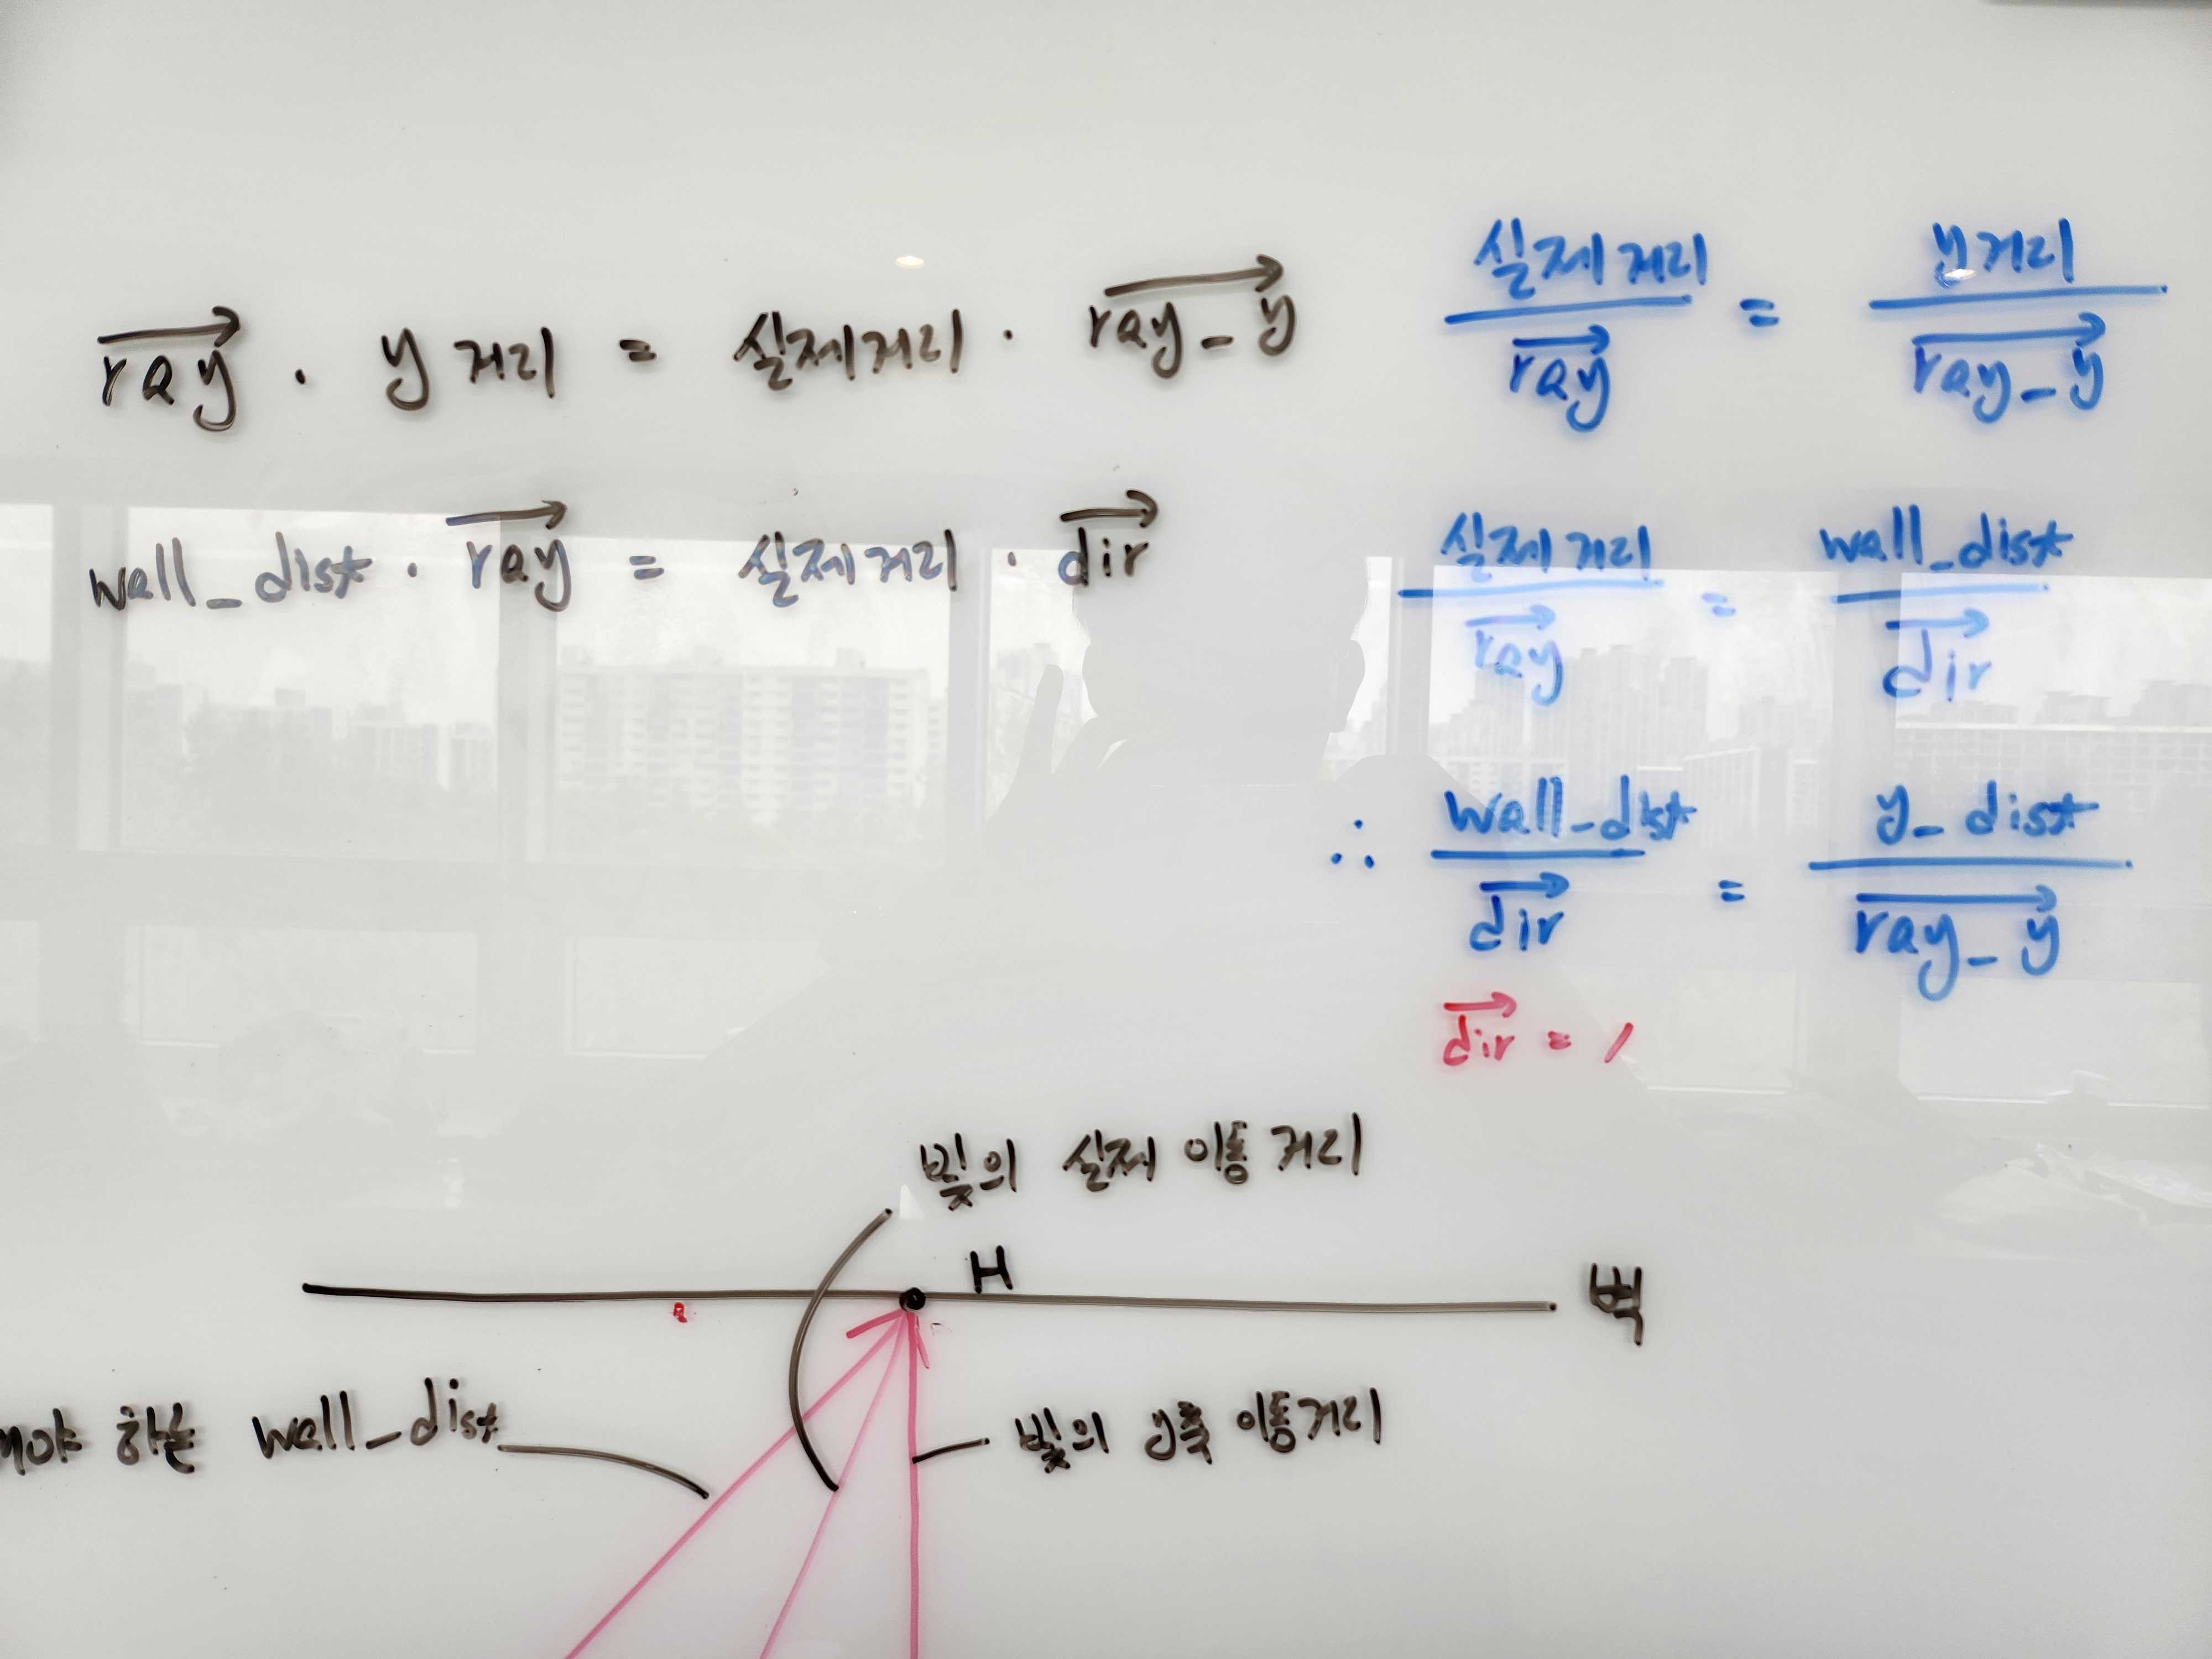
즉 플레이어에서 벽을 바라보는 유클리드 거리 Player -> H 가 아닌, A -> H로 표현을 할 겁니다.
해당 길이를 구하기 위해선 위와 같은 방법으로 수식을 도출했습니다.
void	draw_point_check(t_game *cub)
{
	cub->draw.draw_height = (int)(HEIGHT / cub->ray.wall_dist); // 맵의 높이와 거리의 비례로 계산합니다.
	cub->draw.draw_start = HEIGHT / 2 - cub->draw.draw_height / 2; // 그리기 시작점
	cub->draw.draw_end = HEIGHT / 2 + cub->draw.draw_height / 2; // 그리기 끝점
	if (cub->draw.draw_start < 0)
		cub->draw.draw_start = 0;
	if (cub->draw.draw_end >= HEIGHT)
		cub->draw.draw_end = HEIGHT - 1;
	if (cub->map.side == 1 && cub->ray.ray_dir_y < 0) // 동서남북에 따른 텍스쳐 flag
		cub->draw.texture_number = 0;
	else if (cub->map.side == 1 && cub->ray.ray_dir_y > 0)
		cub->draw.texture_number = 1;
	else if (cub->map.side == 0 && cub->ray.ray_dir_x < 0)
		cub->draw.texture_number = 2;
	else
		cub->draw.texture_number = 3;
	if (cub->map.side == 0) // 플레이어 위치에서 현재 wall_dist에 따른 텍스쳐의 위치를 구해줍니다.
		cub->draw.wall_x = cub->player.y + cub->ray.wall_dist * cub->ray.ray_dir_y;
	else
		cub->draw.wall_x = cub->player.x + cub->ray.wall_dist * cub->ray.ray_dir_x;
	cub->draw.wall_x -= floor(cub->draw.wall_x); // 내림으로 빼서 소수점만 구해줍니다.
}
광선이 벽의 어느 지점에 닿았는지 구해야 텍스쳐 상의 어떤 픽셀 색을 사용할지 알 수 있습니다.
텍스쳐의 크기에 비례해서 어느 지점의 색을 가져와야 하는지 계산하기 쉽기 때문에 벽이 1 X 1 크기라고 가정하여 비율로 계산합니다.
wall_x = player.x + wall_dist * ray_dir_x;
wall_x -= floor(wall_x);
구한 값에 내림해서 뺀 후 소수점만 얻습니다.
1 X 1 크기라고 가정했기 때문에 맞는 비율을 구하기 위한 과정입니다.
void	put_texture_color(t_game *cub, int x)
{
	int		temp;
	int		texture_y;
	double	step;
	double	texture_position;

	cub->draw.texture_x = (int)(cub->draw.wall_x * TEXWIDTH);
	if (cub->map.side == 0 && cub->ray.ray_dir_x > 0) // x면일 경우 보정
		cub->draw.texture_x = TEXWIDTH - cub->draw.texture_x - 1;
	if (cub->map.side == 1 && cub->ray.ray_dir_y < 0) // y면일 경우 보정
		cub->draw.texture_x = TEXWIDTH - cub->draw.texture_x - 1;
	step = (double)TEXHEIGHT / (double)cub->draw.draw_height; // 텍스쳐에서 색을 가져올 때 텍스쳐의 원래 크기를 실제 벽으로 나눈 값
	texture_position = (cub->draw.draw_start - (int)(HEIGHT / 2)
			+ (int)(cub->draw.draw_height / 2)) * step;
	temp = cub->draw.draw_start; // 임시로 그리기 시작점을 temp에 담아두고
	while (temp <= cub->draw.draw_end) // 그리기 끝점까지 반복문을 실행합니다.
	{
		texture_y = (int)texture_position & (TEXHEIGHT - 1);
		texture_position += step;
		cub->draw.color = cub->tex[cub->draw.texture_number] \
			[TEXHEIGHT * texture_y + cub->draw.texture_x]; // 색상에 현재 텍스쳐의 값을 넣어두고
		cub->arr_temp[temp][x] = cub->draw.color; // 임시 배열에 해당 색상을 담아줍니다.
		temp++;
	}
}
실제 텍스쳐의 값을 구하기 위해 위에서 얻은 비율을 활용합니다.
1 : wall_x = TEXWIDTH : texture_x
(가정한 텍스쳐의 가로 길이 '1' : 광선을 쏠 때 텍스쳐의 위치 = 실제 텍스쳐의 가로길이 : 구하고자 하는 위치)
위와 같은 수식으로 얻어낸 위치입니다.
cub->draw.texture_x = (int)(cub->draw.wall_x * TEXWIDTH)
반복문을 돌면서 그리는 과정에서 임시 배열 arr_temp에 담아두는 이유는 mlx 내장 pixel_put을 사용하면 너무 많은 작업으로 인해 처리 속도가 느려집니다.
이를 해결하기 위해 임시 배열에 담고 x가 WIDTH가 되어 전체 반복문이 끝났을 때 그리는 방식으로 동작합니다.
void	key_check(t_game *cub)
{
	double	move_speed;
	double	rotate_speed;

	move_speed = 0.03; // 방향키를 눌렀을때 해당 방향으로의 증가량
	rotate_speed = 0.03; // 삼각함수에 넣을 각도 (직관상 M_PI가 아닌 소수점 사용)
	key_w_and_s(cub, move_speed); // 앞뒤 움직임
	key_a_and_d(cub, move_speed); // 좌우 움직임
	key_left(cub, rotate_speed); // 왼쪽으로 회전
	key_right(cub, rotate_speed); // 오른쪽으로 회전
}

void	key_w_and_s(t_game *cub, double move_speed)
{
	if (cub->key.w) // w키로 앞으로 이동 가중치만큼 더해줍니다.
	{
		if (cub->map.grid[(int)cub->player.y][(int)(cub->player.x + (cub->player.dir_x * move_speed))] == '0')
			cub->player.x += cub->player.dir_x * move_speed;
		if (cub->map.grid[(int)(cub->player.y + (cub->player.dir_y * move_speed))][(int)cub->player.x] == '0')
			cub->player.y += cub->player.dir_y * move_speed;
	}
	if (cub->key.s) // s키로 뒤로 이동 가중치만큼 빼줍니다.
	{
		if (cub->map.grid[(int)cub->player.y][(int)(cub->player.x - (cub->player.dir_x * move_speed))] == '0')
			cub->player.x -= cub->player.dir_x * move_speed;
		if (cub->map.grid[(int)(cub->player.y - (cub->player.dir_y * move_speed))][(int)cub->player.x] == '0')
			cub->player.y -= cub->player.dir_y * move_speed;
	}
}

void	key_a_and_d(t_game *cub, double move_speed)
{
	if (cub->key.a) // a키로 왼쪽으로 이동 가중치만큼 빼줍니다.
	{
		if (cub->map.grid[(int)cub->player.y][(int)(cub->player.x - (cub->player.plane_x * move_speed))] == '0')
			cub->player.x -= cub->player.plane_x * move_speed;
		if (cub->map.grid[(int)(cub->player.y - (cub->player.plane_y * move_speed))][(int)cub->player.x] == '0')
			cub->player.y -= cub->player.plane_y * move_speed;
	}
	if (cub->key.d) // d키로 오른쪽으로 이동 가중치만큼 더해줍니다.
	{
		if (cub->map.grid[(int)cub->player.y][(int)(cub->player.x + (cub->player.plane_x * move_speed))] == '0')
			cub->player.x += cub->player.plane_x * move_speed;
		if (cub->map.grid[(int)(cub->player.y + (cub->player.plane_y * move_speed))][(int)cub->player.x] == '0')
			cub->player.y += cub->player.plane_y * move_speed;
	}
}

void	key_left(t_game *cub, double rotate_speed)
{
	double	temp_dir_x;
	double	temp_plane_x;

	if (cub->key.left)
	{
		temp_dir_x = cub->player.dir_x;
		cub->player.dir_x = cub->player.dir_x * cos(-rotate_speed)
			- (cub->player.dir_y * sin(-rotate_speed));
		cub->player.dir_y = temp_dir_x * sin(-rotate_speed)
			+ (cub->player.dir_y * cos(-rotate_speed));
		temp_plane_x = cub->player.plane_x;
		cub->player.plane_x = cub->player.plane_x * cos(-rotate_speed)
			- (cub->player.plane_y * sin(-rotate_speed));
		cub->player.plane_y = temp_plane_x * sin(-rotate_speed)
			+ (cub->player.plane_y * cos(-rotate_speed));
	}
}

void	key_right(t_game *cub, double rotate_speed)
{
	double	temp_dir_x;
	double	temp_plane_x;

	if (cub->key.right)
	{
		temp_dir_x = cub->player.dir_x;
		cub->player.dir_x = cub->player.dir_x * cos(rotate_speed)
			- (cub->player.dir_y * sin(rotate_speed));
		cub->player.dir_y = temp_dir_x * sin(rotate_speed)
			+ (cub->player.dir_y * cos(rotate_speed));
		temp_plane_x = cub->player.plane_x;
		cub->player.plane_x = cub->player.plane_x * cos(rotate_speed)
			- (cub->player.plane_y * sin(rotate_speed));
		cub->player.plane_y = temp_plane_x * sin(rotate_speed)
			+ (cub->player.plane_y * cos(rotate_speed));
	}
}
앞뒤로 움직일 때 행렬 y축 위치에 가중치만큼,
좌우로 움직일때는 행렬 x축 위치에 가중치만큼 움직입니다.
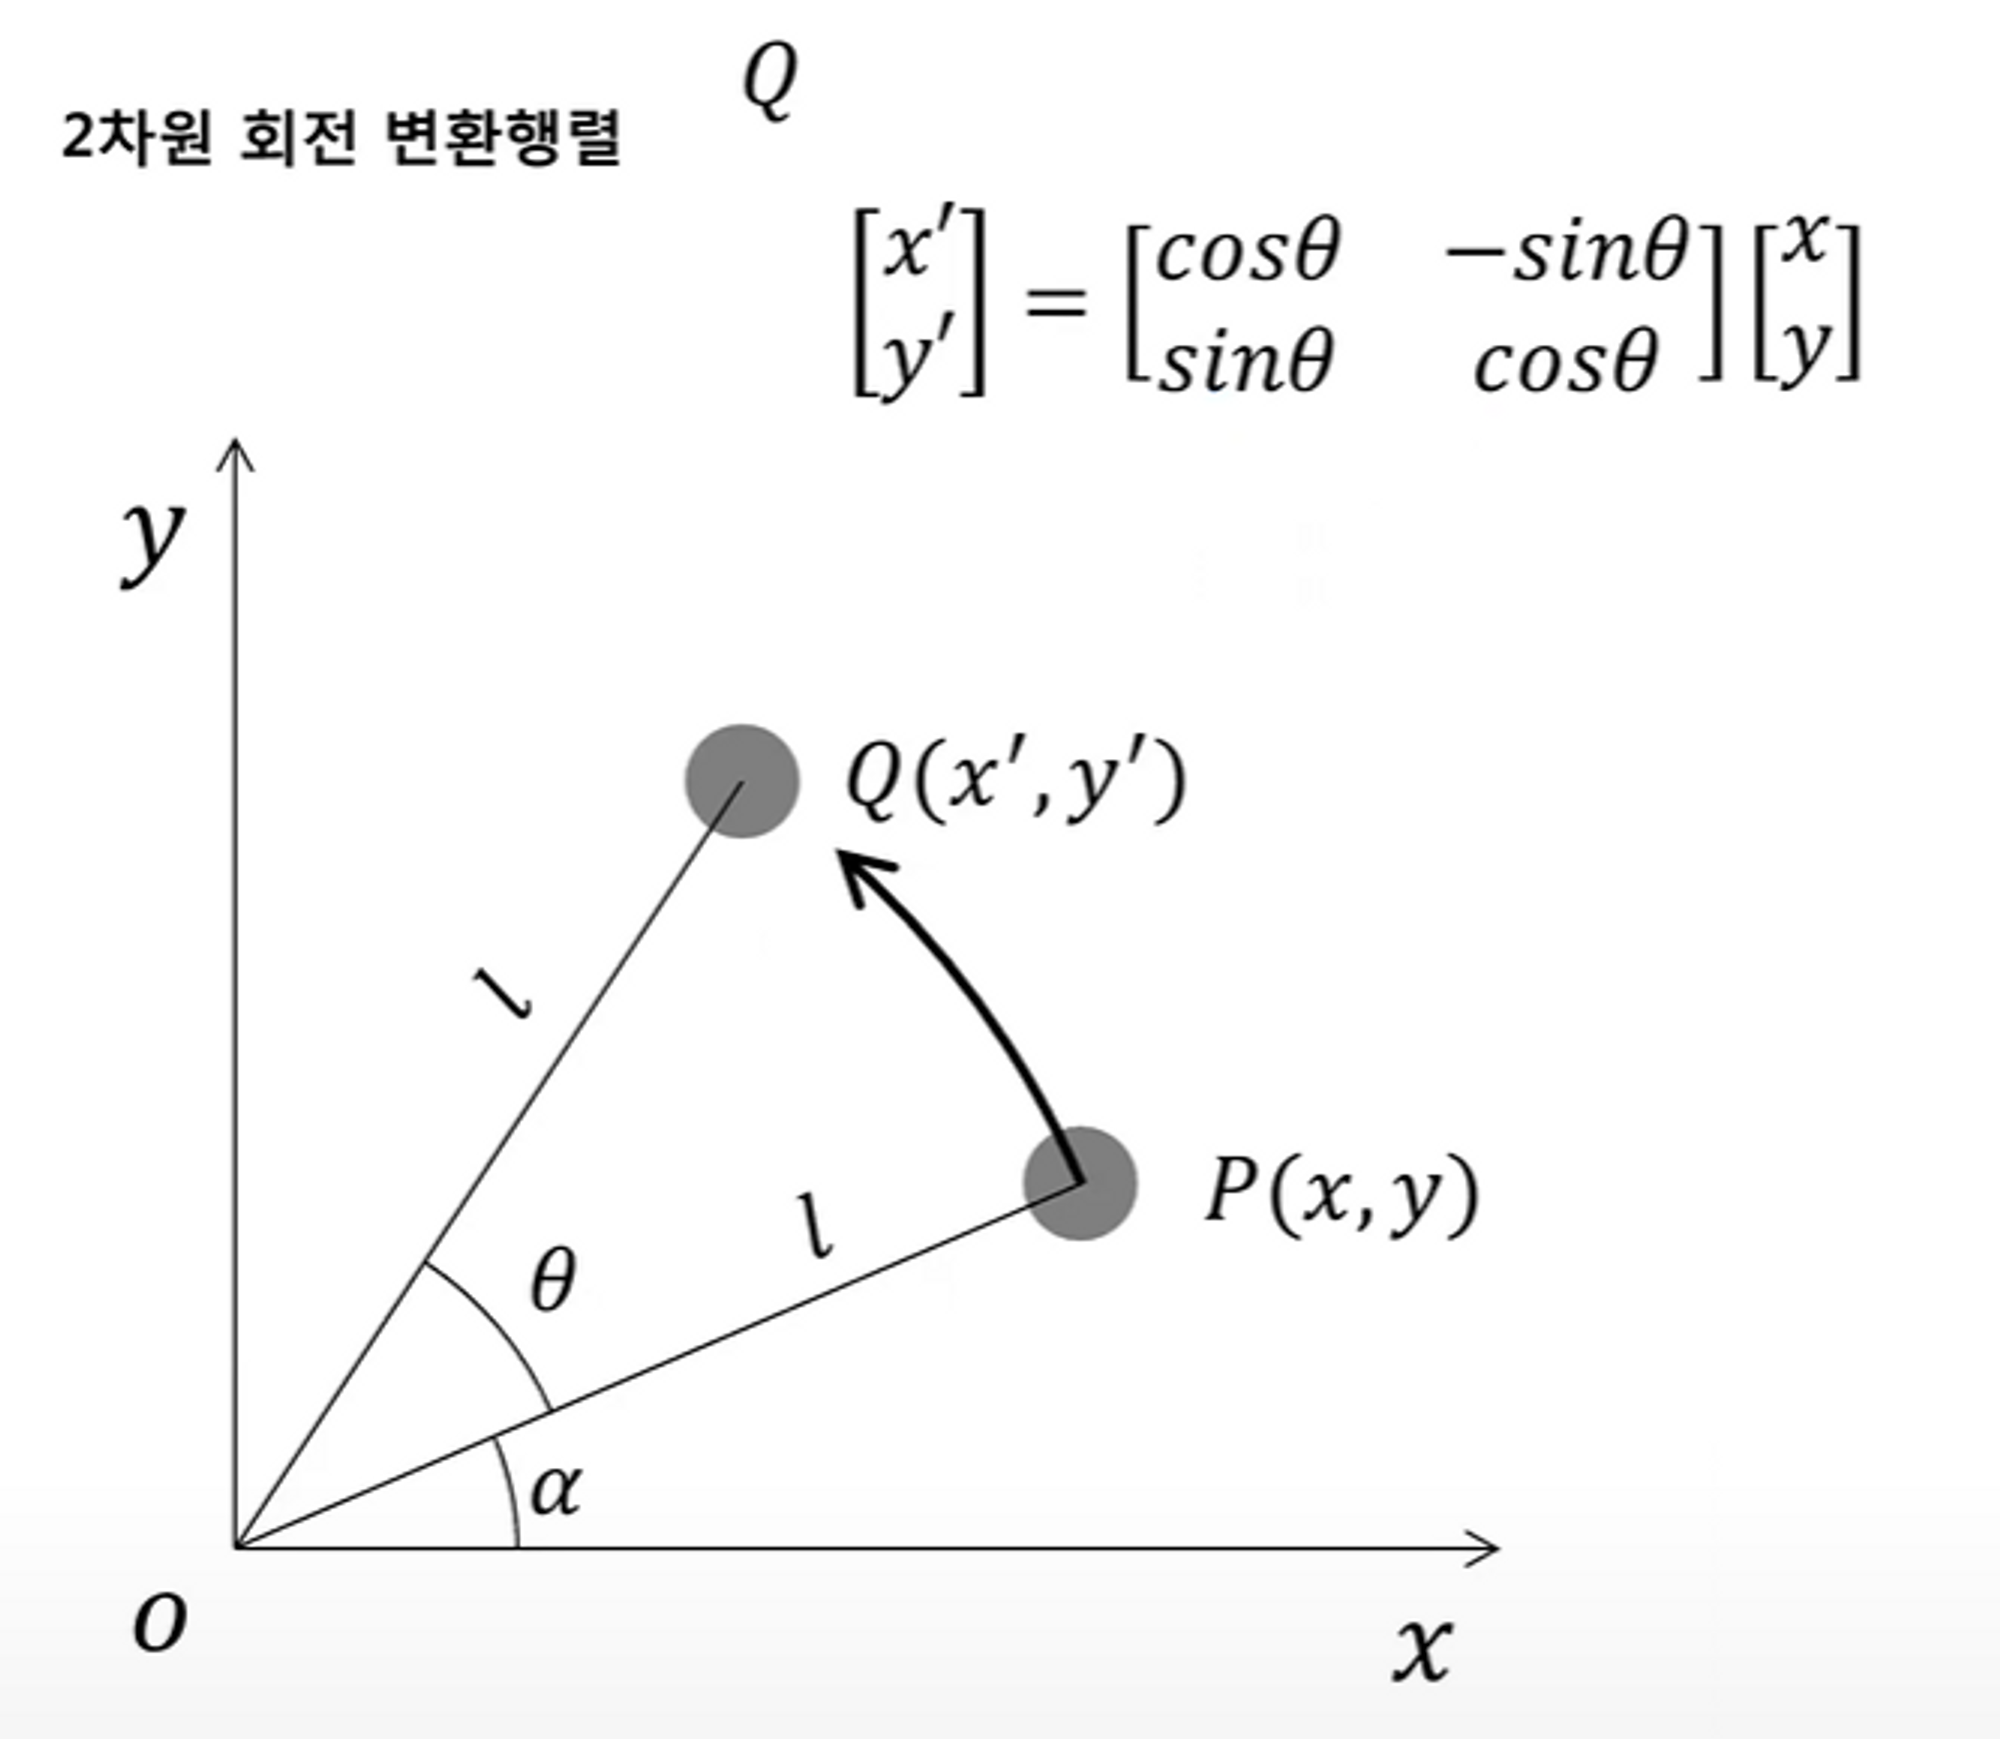
방향키로 회전을 할때는 이전 포스트에서 언급한 회전행렬을 적용해줍니다.
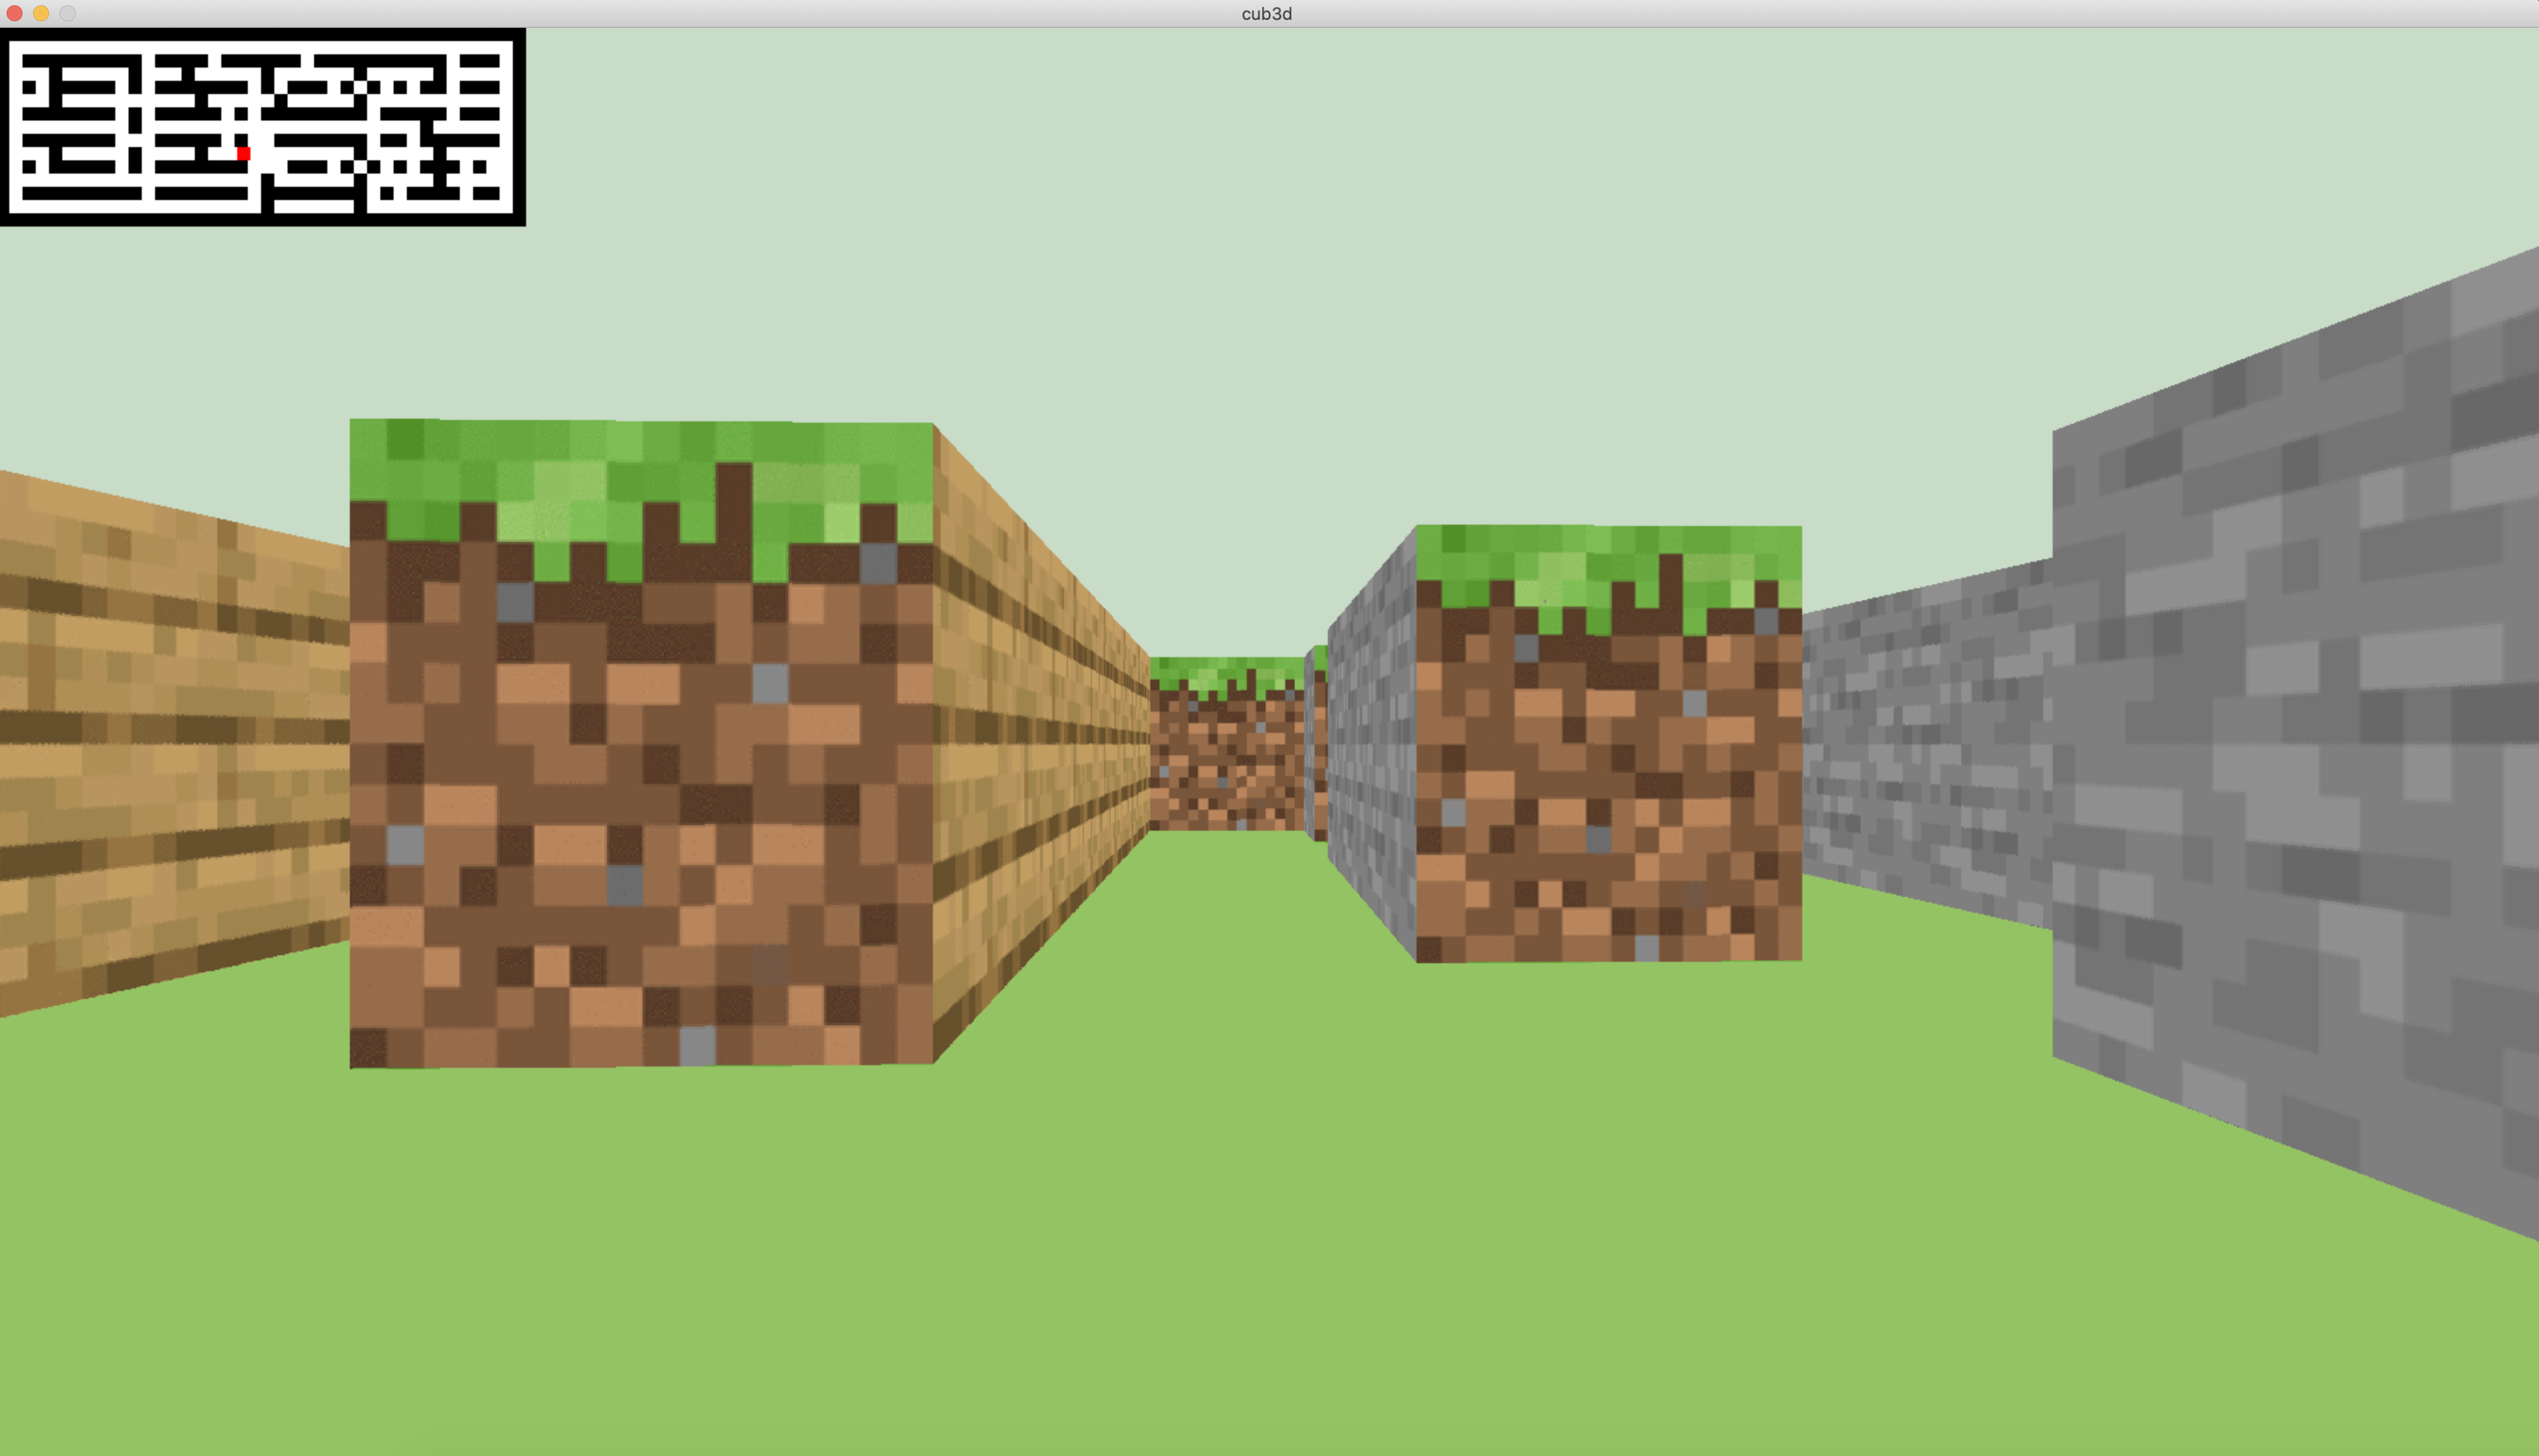
https://youtu.be/cub3D 실행 영상 - yeham
✅ 배운점
학부시절 배웠던 선형대수를 마음껏 쓸 수 있던 프로젝트였습니다.
직각 삼각형의 닮음, 삼각함수, 행렬과 벡터까지 예전에 배웠던 내용들을 보드에 직접 써가며 하나하나 수식을 증명하는 과정에서 수학적 지식을 늘렸습니다.
또한 맵 사이즈를 정하는 과정에서 메모리 누수 처리를 하기 싫어 지역변수로 배열을 만들었지만, 1920 x 1080등 큰 배열은 용량 초과로 오버플로우가 발생하여 어쩔 수 없이 동적할당하여 힙영역에서 동작시켰습니다.
위와 같은 시행착오와 팀원과의 잦은 소통을 통해 해당 프로젝트를 빠른 시간 안에 완성시켰고,
두 번의 팀 프로젝트를 진행하면서 다양한 방식의 협업을 배웠습니다.

안녕하세요, 질문이 있는데 드려도 될까요?