
과제 2
실행결과 :
https://hana78786.github.io/Study_hana/bostcourse_htmlcss/4-question2.html
스타일의 적용
h2요소에red-text클래스를 추가합니다.h2요소가 붉은색이 되도록 스타일을 수정합니다.- 첫 번째
p요소가 붉은색이 되도록 합니다. - 두 번째, 세 번째
p요소는 붉은색이 되면 안됩니다.
<html lang="ko">
<head>
<title>여러 요소에 스타일 적용하기</title>
<meta charset="utf-8">
<meta content="width=device-width, initial-scale=1" name="viewport">
<style>
/*여기에 스타일을 추가합니다.*/
</style>
</head>
<body>
<!--문제에 맞게 요소를 수정합니다.-->
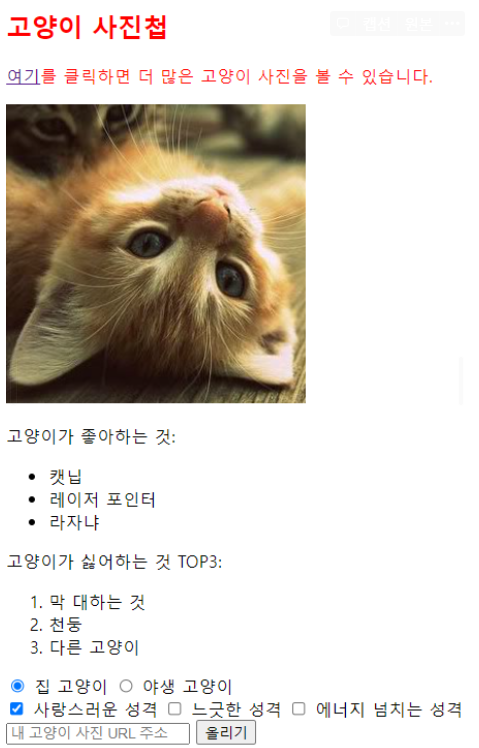
<h2>고양이 사진첩</h2>
<main>
<p><a href="#">여기</a>를 클릭하면 더 많은 고양이 사진을 볼 수 있습니다.</p>
<a href="#"><img src="https://cdn.freecodecamp.org/curriculum/cat-photo-app/relaxing-cat.jpg"
alt="바닥에 등을 대고 누워있는 주황색 고양이"></a>
<div>
<p>고양이가 좋아하는 것:</p>
<ul>
<li>캣닙</li>
<li>레이저 포인터</li>
<li>라자냐</li>
</ul>
<p>고양이가 싫어하는 것 TOP3:</p>
<ol>
<li>막 대하는 것</li>
<li>천둥</li>
<li>다른 고양이</li>
</ol>
</div>
<form action="https://freecatphotoapp.com/submit-cat-photo">
<label><input type="radio" name="indoor-outdoor" checked> 집 고양이</label>
<label><input type="radio" name="indoor-outdoor"> 야생 고양이</label><br>
<label><input type="checkbox" name="personality" checked> 사랑스러운 성격</label>
<label><input type="checkbox" name="personality"> 느긋한 성격</label>
<label><input type="checkbox" name="personality"> 에너지 넘치는 성격</label><br>
<input type="text" placeholder="내 고양이 사진 URL 주소" required>
<button type="submit">올리기</button>
</form>
</main>
</body>
</html>- 과제 목표에 따른 스타일의 변경
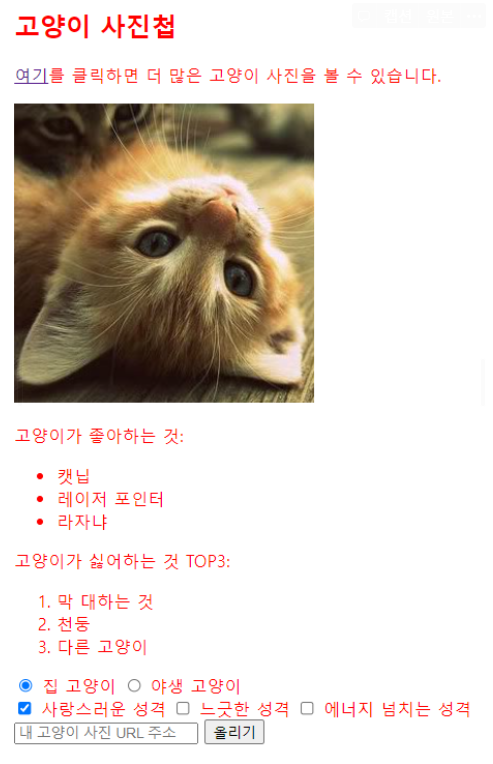
.red-text{color:red;}<h2 class="red-text">고양이 사진첩</h2>
<main>
<p class="red-text"><a href="https://pixabay.com/ko/images/search/cat/" target="_blank">여기</a>를 클릭하면 더 많은 고양이 사진을 볼 수 있습니다.</p>h2와 첫번째 p요소에 class “red-text”를 추가하고 style에 .red-text가 red가 되도록 선언하였다.
- div를 이용한 선언
이런 방식을 쓰지 않더라도 h2 이전에 첫번재 p끝까지 div로 class값을 입력해주어도 똑같은 효과가 가능하다.
<div class="red-text">
<h2 >고양이 사진첩</h2>
<main>
    <p><a href="https://pixabay.com/ko/images/search/cat/" target="_blank">여기</a>를 클릭하면 더 많은 고양이 사진을 볼 수 있습니다.</p>
</div>- 출력결과
- span을 이용한 선언
<span class="red-text">
<h2 >고양이 사진첩</h2>
<main>
    <p><a href="https://pixabay.com/ko/images/search/cat/" target="_blank">여기</a>를 클릭하면 더 많은 고양이 사진을 볼 수 있습니다.</p>
</span>
반대로 똑같은 의미가 없는 태그인 span을 사용하면 닫은 태그부분까지가 아니라 전체 색이 변경되는걸 확인할수 있다.
- 출력결과
지금까지 배운것들을 적용해 보았다.
링크 걸기
몇가지 포인트에 링크를 걸어보았다.
매번 링크를 클릭할때마다 원 페이지로 돌아오는것은 번거롭기 때문에 target은 _blank로 지정하였다.
<a href="https://pixabay.com/ko/images/search/cat/" target="_blank">여기</a>
<!--클릭시에 고양이 사진을 볼수 있도록 고양이 사진 주소를 넣었다.-->

<a href="https://cdn.freecodecamp.org/curriculum/cat-photo-app/relaxing-cat.jpg" target="_blank"><img src="https://cdn.freecodecamp.org/curriculum/cat-photo-app/relaxing-cat.jpg"
                     alt="바닥에 등을 대고 누워있는 주황색 고양이"></a>
<!--사진을 클릭하면 고양이 사진을 볼수 있도록 해주었다-->
<p>고양이가 좋아하는 것:</p>
        <ul>
            <li><a href="https://ko.wikipedia.org/wiki/%EA%B0%9C%EB%B0%95%ED%95%98" target="_blank">캣닙</a></li>
            <li><a href="https://ko.wikipedia.org/wiki/%EB%A0%88%EC%9D%B4%EC%A0%80_%ED%8F%AC%EC%9D%B8%ED%84%B0" target="_blank">레이저 포인터</a></li>
            <li><a title="고양이는 라자냐를 좋아하지 않아! 생선을 좋아해!">라자냐</a></li>
        </ul>
<!--고양이가 좋아하는 것을 클릭하면 위키로 연결된다, 라자냐의 경우는 이스터에그로 메세지가 뜨게 하였다-->
제목태그 구분하기
내용을 문단 3개로 구분하여 중요도에 따른 h태그를 부여하였다.
고양이 사진첩이라는 처음 문구는 h2태그를 유지하고 그 아래에 문단은 h3 태그를 주어 문단을 구분하였다
<h3>고양이가 좋아하는 것:</h3>
        <ul>
            <li><a href="https://ko.wikipedia.org/wiki/%EA%B0%9C%EB%B0%95%ED%95%98" target="_blank">캣닙</a></li>
            <li><a href="https://ko.wikipedia.org/wiki/%EB%A0%88%EC%9D%B4%EC%A0%80_%ED%8F%AC%EC%9D%B8%ED%84%B0" target="_blank">레이저 포인터</a></li>
            <li><a title="고양이는 라자냐를 좋아하지 않아! 생선을 좋아해!">라자냐</a></li>
        </ul>
        <h3>고양이가 싫어하는 것 TOP3:</h3>
        <ol>
            <li>막 대하는 것</li>
            <li>천둥</li>
            <li>다른 고양이</li>
        </ol>
    </div>
fieldset을 활용하여 체크리스트 구분하기
마지막단에는 체크리스트가 있기때문에 fieldset을 활용하여 구분지어주기로 했다.
<fieldset>
  <legend>고양이 사진 입력 정보</legend>
    <form action="https://freecatphotoapp.com/submit-cat-photo">
        <label><input type="radio" name="indoor-outdoor" checked> 집 고양이</label>
        <label><input type="radio" name="indoor-outdoor"> 야생 고양이</label><br>
        <label><input type="checkbox" name="personality" checked> 사랑스러운 성격</label>
        <label><input type="checkbox" name="personality"> 느긋한 성격</label>
        <label><input type="checkbox" name="personality"> 에너지 넘치는 성격</label><br>
        <input type="text" placeholder="내 고양이 사진 URL 주소" required>
        <button type="submit">올리기</button>
    </form>
  </fieldset>
이렇게 구분된 feldset은 고양이 사진 입력 정보란으로 감쌀수 있게 된다.
Style을 확인하여 꾸며주기
화면을 깔끔하게 보이게 하기 위해 글씨 색과 밑줄을 이용하여 간단한 구분을 지어주었다.
.red-text{color:red;}
/*과제 조건에 맞춰 red-text class는 red로 출력되게 하였다.*/
        a{
          color:skyblue;
          text-decoration: underline;
        }
/*a태그의 값은 skyblue로 출력되고 밑줄이 나오게 하였다*/

        a:visited {color:darkblue;}
/*방문한 사이트의 경우 darkblue색으로 바뀐다*/

        input:active {background-color: yellow; color:gray;}
/*input태그로된 text바를 선택할때는 배경은yellow 글자색은 gray가 된다.*/

        a:focus{background-color:black; color:silver;}
/*링크가 연결된 a태그를 선택하면 배경색은 검정 글자색은 silver가 된다*/

        h3{color : orange; border-bottom: 1px solid orange;}
/*h3태그의 글자색은 orange 그 밑에는 같은 색갈의 1px의 줄로 구분된다*/

        h2{border-bottom: 1px solid red;}
/*h2태그에는 글자색과 마찬가지로 1px의 red줄로 구분되게 만들어주었다*/
출력결과
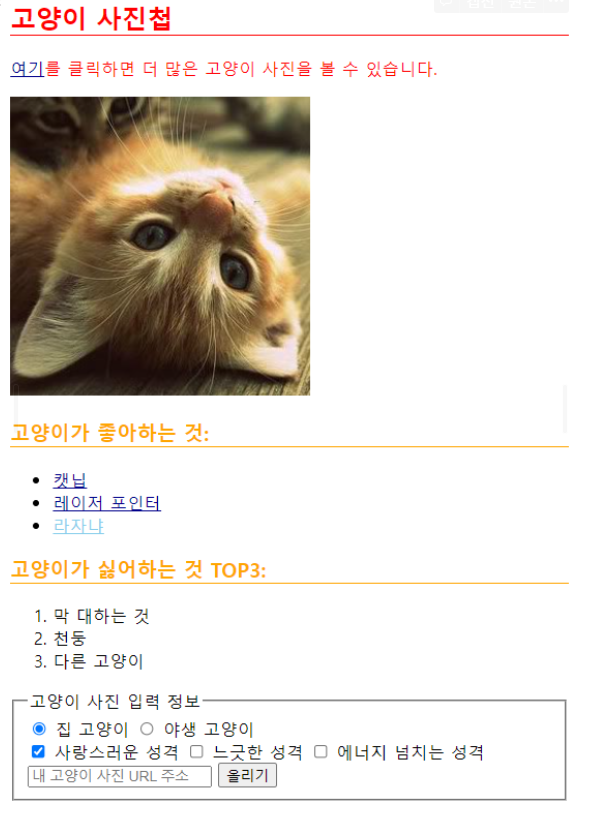
위 태그를 사용하면 이런식의 결과로 출력된다
태그 살펴보기
<p><a href="#">여기</a>를 클릭하면 더 많은 고양이 사진을 볼 수 있습니다.</p>a href의 주소를 #으로 입력하면 링크가 클릭은 되지만 아무것도 실행되지 않는다.
  <form action="https://freecatphotoapp.com/submit-cat-photo">
        <label><input type="radio" name="indoor-outdoor" checked> 집 고양이</label>
        <label><input type="radio" name="indoor-outdoor"> 야생 고양이</label><br>
        <label><input type="checkbox" name="personality" checked> 사랑스러운 성격</label>
        <label><input type="checkbox" name="personality"> 느긋한 성격</label>
        <label><input type="checkbox" name="personality"> 에너지 넘치는 성격</label><br>
        <input type="text" placeholder="내 고양이 사진 URL 주소" required>
        <button type="submit">올리기</button>
</form>- form action에 주소가 삽입되어있다.
- 실제로 이 폼안에서 고양이 사진을 업로드 하는 것은 불가능 하지만 폼을 실행시키고 submit로 제출하면 삽입된 주소로 연결되는 것을 확인할수 있다.
- input태그가 전부 label로 감싸져있는것을 확인할수 있다.
- label로 감싸진 텍스트까지 input태그 버튼으로 인식하여 체크된다.
- 이 태그 안에는 입력란을 작성하세요 라는 오류메세지에 관련퇸 태그가 없다.
<input type="text" placeholder="내 고양이 사진 URL 주소" required>안에 required가 이 메세지를 생성하는 것이라고 추측된다.
과제 3
실행결과 :
https://hana78786.github.io/Study_hana/bostcourse_htmlcss/4-question3.html
- 요소를 분홍색(pink)으로 만들어주는 CSS 클래스를 만듭니다.
h1요소에 1에서 만든 클래스를 추가하면 요소가 녹색(green)이 될지, 분홍색(pink)이 될 지 예상하고 그 이유를 적어봅니다.h1요소에 실제 1에서 만든 클래스를 추가해 예상에 맞는 결과가 나왔는지 확인합니다.
<!DOCTYPE html>

<html lang="ko">
<head>
    <title>구체성 이해하기</title>
    <meta charset="utf-8">
    <meta content="width=device-width, initial-scale=1" name="viewport">
    <style>
        body {
            background-color: black;
            font-family: monospace;
            color: green;
        }

        /*여기에 스타일을 추가합니다.*/

    </style>
</head>
<body>
<h1>Hello World!</h1>
</body>
</html>
과제의 실행
<head>
<style>
        body {
            background-color: black;
            font-family: monospace;
            color: green;
        }
        .pink {color:pink;}
    </style>
</head>
<body>
<h1 class="pink">Hello World!</h1>
</body>
h1태그 안에 class pink를 만들고 스타일에서 class pink에 color pink를 선언하였다
- 이 경우 스타일안에 body태그 선언은 0,0,0,0의 구체성을 갖는다
- .pink 선언은 0,0,1,0의 구체성을 갖게된다
그렇기에 구체성이 높은 class pink의 선언을 우선시 하여 color부분만 pink로 변경되게 된다.

.pink {
      color:pink;
      background-color: skyblue;
    }
        body {
            background-color: black;
            font-family: monospace;
            color: green;
        }
만약 이런식으로 backgrond-color를 pink class만 변경하였을때
body태그 안에 전체 배경색은 black태그를 유지 한 상태로 pink클래스 안에있는 배경만 skyblue로 바뀌게 된다

body {
            background-color: black;
            font-family: monospace;
            color: green;
        }
        .pink {
          color:pink;

        }
        #skyblue{
          color:skyblue;
}<h1 class="pink" id="skyblue">Hello World!</h1>- 이 경우 id skyblue의 구체성은 0,1,0,0이기때문에 id값의 구체성이 우선시되어 글자색이 skyblue로 바뀌게 된다.

inline과 !important
body {
            background-color: black;
            font-family: monospace;
            color: green;
        }
        .pink {
          color:pink;

        }
        #skyblue{
          color:skyblue;
        }

        h2{background-color: white !important;
        color: black
!important;}<h1 class="pink" id="skyblue" style= "color:white">Hello World!</h1>
<h2 class="pink" id="skyblue" style= "color:red">Hello World!</h2>- inline태그는 다른 스타일태그보다 우선시 되기 때문에 Hello world!의 색상은 white가 된다
- h2태그에 id나 class의 선언이나 inline태그보다 !important가 우선시 되기때문에 배경과 글시 색상이 h2스타일 선언에 의해 변경되었다
선언의 구체성
h1.red{background-color: red;}
        red{background-color: orange;}
<h1 class="red" id="skyblue" >Hello World!</h1>h1.red{background-color: red;}의 구체성은 0,0,1,1이다red{background-color: orange;}의 구체성은 0,0,1,0이다- 이에따라 똑같이 class의 구체성을 가지고 있어도 다른 태그를 병기한 쪽이 구체성이 높기때문에 태그와 클래스를 동시에 표기한 쪽이 우선시 되게 된다.
- 글자 색상은 위에 id skyblue선언에 의한 색으로 변경되었다.