Spring Colud Sleuth를 번역합니다.
Sampling
수집 및 보고된 데이터를 프로세스 외부에서 감소시키기 위해 샘플링을 사용할 수 있다. span이 샘플링되지 않으면 오버헤드(noop)가 추가되지 않는다.
데이터를 보고할것인지에 대한 결정은 추적의 첫 작업에서 이뤄지며 이는 다운 스트림으로 전파된다.
기본적으로 글로벌 샘플러는 모든 추적 작업에 동일한 속도를 적용한다. Tracer.Builder.sampler가 이 설정을 제어하고 기본적으로 모든 요청을 추적한다.
4.1. Declarative sampling
일부 어플리케이션은 자바 메소드 타입이나 어노테이션을 이용해 샘플링된다.
대부분의 사용자는 프레임워크 인터셉터를 사용해 이런 정책을 자동화한다.
@Autowired Tracer tracer;

// derives a sample rate from an annotation on a java method
// 자바 메소드의 어노테이션에서 샘플 속도를 가져온다.
DeclarativeSampler<Traced> sampler = DeclarativeSampler.create(Traced::sampleRate);

@Around("@annotation(traced)")
public Object traceThing(ProceedingJoinPoint pjp, Traced traced) throws Throwable {

  // 현재 진행 중인 trace가 없으면 어노테이션을 사용해 결정한다.
  Sampler decideUsingAnnotation = declarativeSampler.toSampler(traced);
  Tracer tracer = tracer.withSampler(decideUsingAnnotation);

  // 이 코드는 선언적 오버라이딩이 없는 것처럼 보인다.
  ScopedSpan span = tracer.startScopedSpan(spanName(pjp));
  try {
    return pjp.proceed(); // 실제 타깃의 메소드를 실행
  } catch (RuntimeException | Error e) {
    span.error(e);
    throw e;
  } finally {
    span.finish();
  }
}
❗️ NOTE
DeclarativeSampler자바 메소드에서 어노테이션을 사용해 요청을 추적할 것인지 결정하는 방식을 구현한 것이다.
aspect-oriented나 선언적 추적이 아니다.<Example>
예를 들어,{@code com.myco.Traced}라는 클래스에 어노테이션 정의를 추가하고 속도? 비율?? rate를 조회하는 함수를 정의한다. 인터셉터는 어노테이션으로 정의된 타겟이 호출될 때 샘플러를 사용한다. 이 때 새로운 trace를 시작해야하는지 여부가 결정된다.여기서는 런타임 파라미터가 고려되지 않았지만, 이를 사용해 매개 변수화된 샘플링을 활성화 시키는 것도 가능하다. 메서드가 요청 중 일부만 받아들이도록 주석이 달린 경우에
@Traced와 같은 사용자지정 어노테이션을 추가함으로써 하위 집합에 적용시킬 수 있다. 예를 들어, JAX-RS 메소드는 이미 메소드나 가능한 경로에 의해 적격이다. if you have a JAX-RS method, it is already qualified by method and likely path. 사용자는 자신의 그룹화된 어노케이션을 추가하고 검증함으로써 기본 rate를 재정의 할 수 있다.scene 아래에는 메소드 별 샘플러 맵이 유지된다. 이 맵의 크기는 선언된 메서드와 직접 관련 될 때 문제가 되지 않아야한다. 예를 들어 어노테이션이 런타임에 생성되고 일치하지 않는 경우 이는 유효하지 않다.
Custom sampling
어떤 작업을 수행하냐에 따라 다른 정책을 적용할 수 있다. 예를 들어, 이미지와 같은 정적 리소스를 요청하는 작업에는 trace를 생성하지 않거나, 새로운 api로 들어오는 모든 요청을 추적하게 할 수 있다.
대부분의 사용자는 프레임워크 인터셉터를 사용하여 이러한 종류의 정책들을 자동화한다. 다음은 내부적으로 작동하는 방법을 보여준다.
@Autowired Tracer tracer;
@Autowired Sampler fallback;

Span nextSpan(final Request input) {
  Sampler requestBased = Sampler() {
    @Override public boolean isSampled(long traceId) {
      if (input.url().startsWith("/experimental")) {
        return true;
      } else if (input.url().startsWith("/static")) {
        return false;
      }
      return fallback.isSampled(traceId);
    }
  };
  return tracer.withSampler(requestBased).nextSpan();
}
아마 Brave 버전이 낮은 듯
// in Tracer

 public <T> Span nextSpan(SamplerFunction<T> samplerFunction, T arg) {
    TraceContext parent = currentTraceContext.get();
    return _toSpan(parent, nextContext(samplerFunction, arg, parent));
  }

// SamplerFunction
public interface SamplerFunction<T> {
  /**
   * Returns an overriding sampling decision for a new trace. Returning null is typically used to
   * defer to the {@link brave.Tracing#sampler() trace ID sampler}.
   *
   * @param arg parameter to evaluate for a sampling decision. null input results in a null result
   * @return true to sample a new trace or false to deny. Null defers the decision.
   * @since 5.8
   */
  @Nullable Boolean trySample(@Nullable T arg);
Sampling in Spring Cloud Sleuth
샘플링은 Zipkin과 같은 추적용 백엔드에만 적용되며 Trace Id는 샘플링 비율에 관계없이 로그에 표시된다. 샘플링은 전체가 아닌 일부 요청만을 일관되게 추적하여 시스템의 과부하를 방지한다.
기본 비율은 초당 10개의 trace이다. 이는 spring.sleuth.sampler.rate 속성으로 제어할 수 있으며 Sleuth를 로깅 이외의 용도로 사용됨을 이해하고 있을 때 적용된다. 초당 100개의 trace 이상의 비율을 사용할 때는 추적 시스템에 과부하가 발생할 수 있으므로 주의하여 사용하도록 한다.
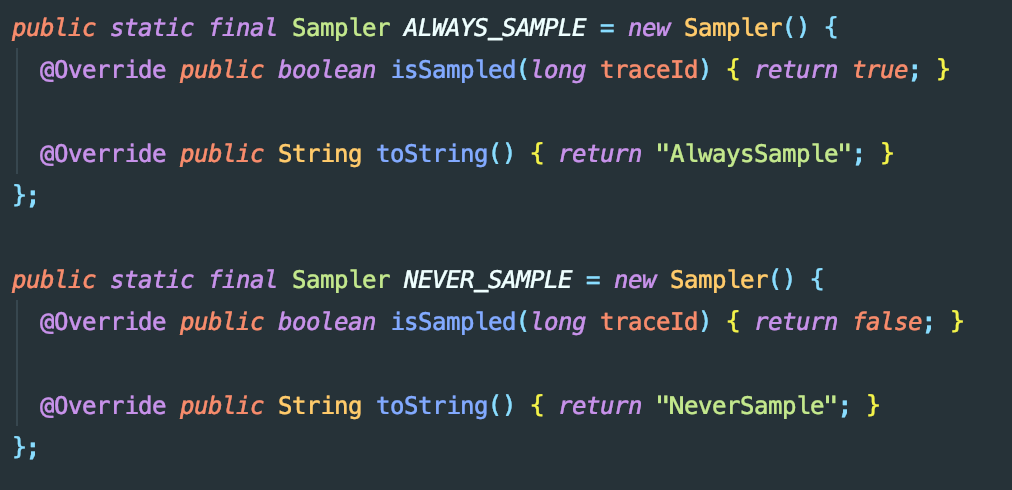
샘플러는 다음과 같이 Java Config로도 설정할 수 있다.
The sampler can be set by Java Config also, as shown in the following example:
@Bean
public Sampler defaultSampler() {
    return Sampler.ALWAYS_SAMPLE;
}
Sampler.ALWAYS_SAMPLE
Sampler.NEVER_SAMPLE
❗️ NOTE
SamplingFlasgpublic static final SamplingFlags EMPTY = new SamplingFlags(0); public static final SamplingFlags NOT_SAMPLED = new SamplingFlags(FLAG_SAMPLED_SET); public static final SamplingFlags SAMPLED = new SamplingFlags(NOT_SAMPLED.flags | FLAG_SAMPLED); public static final SamplingFlags DEBUG = new SamplingFlags(SAMPLED.flags | FLAG_DEBUG);
HTTP헤더
X-B3-Flags를1로 설정하거나, 메세징을 수행할 때spanFlags헤더를 1로 설정할 수 있다. 이렇게 하면 샘플링 구성에 상관없이 해당 트레이스가 강제로 샘플링된다.
Propagation
동일한 root에서 시작된 활동이 동일한 trace에서 함께 수집되도록 하기 위해 전파(Propagation)가 필요하다. 가장 일반적인 전파 방법은 RPC request를 서버로 전송하여 클라이언트의 trace context를 복사하는 것이다.
예를 들어 다운스트림 HTTP 호출이 생성되면, trace context는 request headers로 인코딩되어 함께 전송된다.
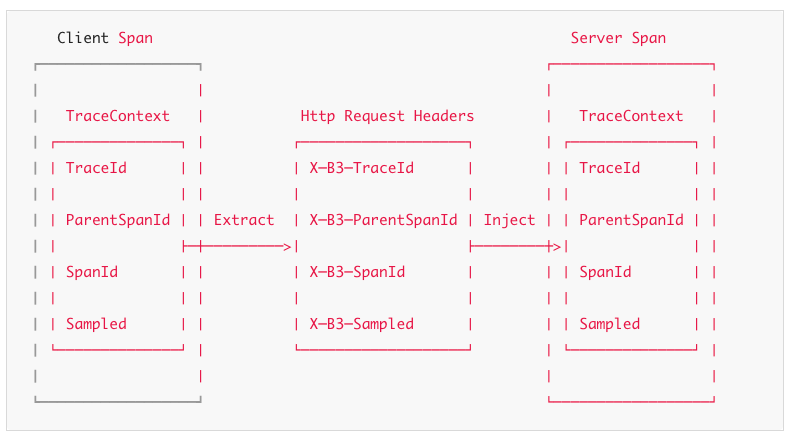
위에서 보이는 이름들은 B3 Propagation으로부터 온 것으로, 이는 Brave에 내장되어 있으며 여러 언어와 프레임워크로 구현되어있다.
대부분의 사용자는 framework interceptor를 사용하여 전파를 자동화한다. 다음 두 예제는 Client와 Server에서 어떻게 전파되는지 보여준다.
클라이언트 측 전파 :
@Autowired Tracing tracing;

// trace context를 request에 주입하는 함수를 구성한다.
injector = tracing.propagation().injector(Request.Builder::addHeader);

// request를 전달하기 전에 현재 span의 context를 추가한다.
injector.inject(span.context(), request);
서버 측 전파 :
@Autowired Tracing tracing;
@Autowired Tracer tracer;

// request로부터 trace context를 추출하는 함수를 구성한다.
extractor = tracing.propagation().extractor(Request::getHeader);

// 서버가 request를 받는 순간 합치거나 새로운 trace를 시작한다.
span = tracer.nextSpan(extractor.extract(request));
Propagating extra fields
종종 request ID나 대체용 trace context와 같은 추가적인 필드를 전파할 필요가 있을 것이다. 예를 들어, Cloud Foundry 환경에 있는 경우 다음처럼 request ID를 전달할 수 있다.
// Builder를 초기화할 때 전파되길 원하는 추가 필드를 정의한다.
Tracing.newBuilder().propagationFactory(
  ExtraFieldPropagation.newFactory(B3Propagation.FACTORY, "x-vcap-request-id")
);

// later, you can tag that request ID or use it in log correlation
requestId = ExtraFieldPropagation.get("x-vcap-request-id");
❗️ NOTE
현재 ExtraField 관련 클래스는 모두 Deprecated된 상태이므로 Baggage로 모든 값을 대체 중인지 확인할 필요가 있다.
사용하지 않은 trace context를 전파해야 할 수도 있다. 예를 들어 AWS 환경에 있지만 X-Ray에 데이터를 보고하지 않을 수도 있다. X-Ray가 올바르게 공존하도록 tracing header를 통과시키도록 한다.
tracingBuilder.propagationFactory(
  ExtraFieldPropagation.newFactory(B3Propagation.FACTORY, "x-amzn-trace-id")
);
Spring Cloud Sleuth에서 추적 빌더인
Tracing.newBuilder()의 모든 요소는 빈으로 정의된다. 따라서 커스텀 PropagationFactory를 전달하려면 해당 타입의 빈을 만드는 것으로 충분하며 우리는 이를Tracing빈에 설정할 것이다.
Prefixed fields
공통 패턴을 따르는 경우, 접두사를 지정할 수 있다. 다음 예제에서는 x-vcap-request-id 필드는 그대로 전파하지만 country-code 와 user-id 필드는 각각 x-baggage-country-code와 x-baggage-user-id로 전달된다.
Tracing.newBuilder().propagationFactory(
  ExtraFieldPropagation.newFactoryBuilder(B3Propagation.FACTORY)
                       .addField("x-vcap-request-id")
                       .addPrefixedFields("x-baggage-", Arrays.asList("country-code", "user-id"))
                       .build()
);
현재는 Deprecated된 클래스와 메소드이며, 굳이 baggage- 접두사를 붙이지 않아도 Baggage 화이트 리스트를 통해 감지되므로 더 이상 의미없는 코드이다. 따라서 추가적인 예제 코드가 더 있었으나 해석하지 않는다.
Baggage 엔트리를 tag로 추가하려는 경우, Baggage 항목을 통해 span을 검색 할 수 있도록 white list에 있는 baggage 키 목록과 함께spring.sleuth.propagation.tag.whitelisted-keys 속성의 값을 설정한다. 기능을 비활성화하려면 spring.sleuth.propagation.tag.enabled=false 속성을 전달한다.
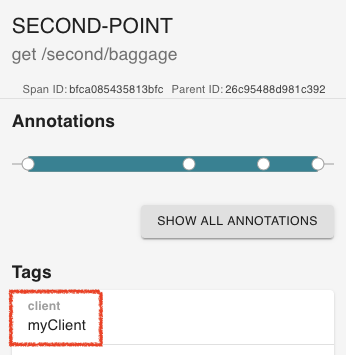
spring.sleuth.baggage.remote-fields=client
spring.sleuth.propagation.tag.whitelisted-keys=client
위와 같이 설정한 경우, client라는 Tag가 생성되고 Second-point까지 전파된 것을 확인할 수 있다.
| FIRST-POINT | SECOND-POINT |
|---|---|
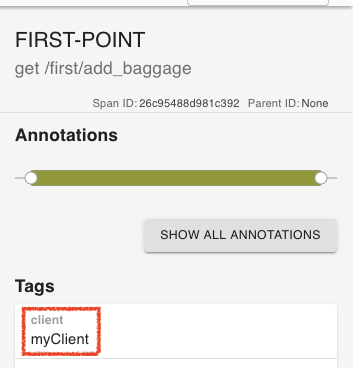 |  |
Extracting a Propagated Context
TraceContext.Extractor<C\>는 들어오는 요청이나 메세지로부터 추적 식별자 및 샘플링 상태를 읽는다. 전달되는 것은 주로 요청 오브젝트나 헤더이다.
이 유틸리티는 HttpServletHandler와 같은 표준 계측에서 사용되지만 커스텀 RPC나 메세징 코드에도 사용할 수 있다.
TraceContextOrSamplingFlags는 클라이언트와 서버간에 span ID를 공유하지 않는 한 일반적으로 Tracer.nextSpan(extracted)에서만 사용된다.
❗️ Note
TraceContext.Extractor 인터페이스가 가지는 유일한 메소드는TraceContextOrSamplingFlags extract(R request);이다.
TraceContextOrSamplingFlags는 Sampling 수준을 뜻하는 SamplingFlags를 변수로 가진다.
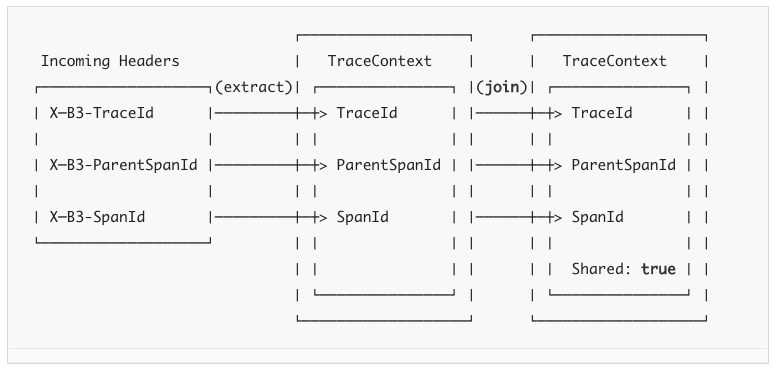
Sharing span IDs between Client and Server
일반적인 계측 패턴은 RPC의 서버 측을 나타내는 span을 만드는 것이다. Extractor.extract는 들어오는 클라이언트 요청에 적용될 때 완전한 trace context를 반환한다. Tracer.joinSpan는 (context가) 지원되는 경우에는 동일한 spanId를 사용하고 그렇지 않은 경우 하위 span을 생성하여 추적을 지속한다. spanId가 공유되면 보고되는 데이터는 이를 알리는 플래그(아래 예제에서 Shared: true 부분)를 포함하게 된다.
다음은 B3 전파의 예를 보여준다.
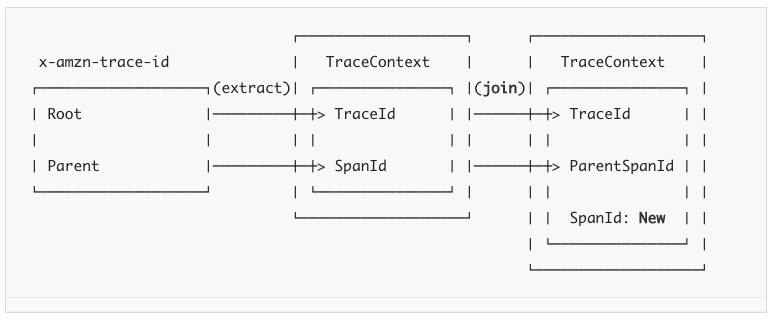
일부 전파 시스템은 Propagation.Factory.supportsJoin() == false인 경우에만 감지된 부모 span ID를 전달한다. 이 경우 새로운 span Id가 항상 프로비저닝(할당)되고 수신 context(감지된 부모 spanID)가 상위 ID를 결정한다.
다음은 AWS 전파의 예이다.
❗️ NOTE
일부 span 리포터는 span ID를 공유하지않는다. 예를 들어,Tracing.Builder.spanReporter(amazonXrayOrGoogleStackdrive)를 설정한 경우에는Tracing.Builder.supportsJoin(false)를 셋팅함으로써 join을 비활성화 시켜야한다. 이렇게 할 경우Tracer.joinSpan()에 새 자식 span이 강요된다.
Some span reporters do not support sharing span IDs. For example, if you set Tracing.Builder.spanReporter(amazonXrayOrGoogleStackdrive), you should disable join by setting Tracing.Builder.supportsJoin(false). Doing so forces a new child span on Tracer.joinSpan().
Implementing Propagation
TraceContext.Extractor<C\>는 Propagation.Factory에 의해 구현된다. 내부적으로 이 코드는 다음 중 하나를 사용하여 union type인 TraceContextOrSamplingFlags를 생성한다.
TraceContext: trace와 span Id가 없는 경우TraceIdContext: trace Id는 있지만 span Id가 없는 경우SamplingFlags: 식별자가 없는 경우
일부 Propagation 구현체는 추출 지점(유입 헤더를 읽는 등)으로부터 주입(나가는 헤더에 쓰기 등)까지 추가 데이터를 전달한다. 예를 들어 request Id가 전달될 수 있다. 구현체에 추가적인 데이터가 있다면 다음과같이 처리된다.
TraceContext가 추출되는 경우TraceContext.extra()로 추가 데이터를 추가한다.- 그렇지 않으면,
Tracer.nextSpan이 처리하는TraceContextOrSamplingFlags.extra()에 이를 추가한다.