Component Lifecycle
리액트 컴포넌트는 탄생부터 죽음까지 여러 지점에서 개발자가 작업이 가능하도록 메소드를 오버라이딩할 수 있게 해줍니다. 이러한 과정에서 중요한 것이 라이프사이클이며, 이에 대한 자세한 설명은 Vue 라이프사이클 훅에서 다루었으니 참고 부탁드립니다.
다만, 해당 내용은 16.3 버전 이전의 내용을 다루고 있습니다. 이에 대한 내용을 바탕으로 새로운 버전에 대한 내용은 추후 다룰 예정입니다.
라이프사이클 (v16.3 이전)
라이프사이클에 대한 기본적인 개념은 위의 링크에서 확인하시길 바라며, 리액트의 라이프사이클에 대해 배워보도록 합시다.
1. Component 생성 및 마운트
- constructor
- componentWillMount
- render(최초 렌더)
- componentDidMount
1.1 코드 예시
class App extends React.Component {
  state = {
    age: 33,
  };
  constructor(props) {
    super(props);

    console.log("constructor", props);
  }
  render() {
    console.log("render");
    return (
      <div>
        <h2>
          Hello {this.props.name} - {this.state.age}
        </h2>
      </div>
    );
  }

  componentWillMount() {
  console.log("componentWillMount");
  }

  componentDidMount() {
  console.log("componentDidMount");
  }
}

ReactDOM.render(<App name="Orosy" />, document.querySelector("#root"));
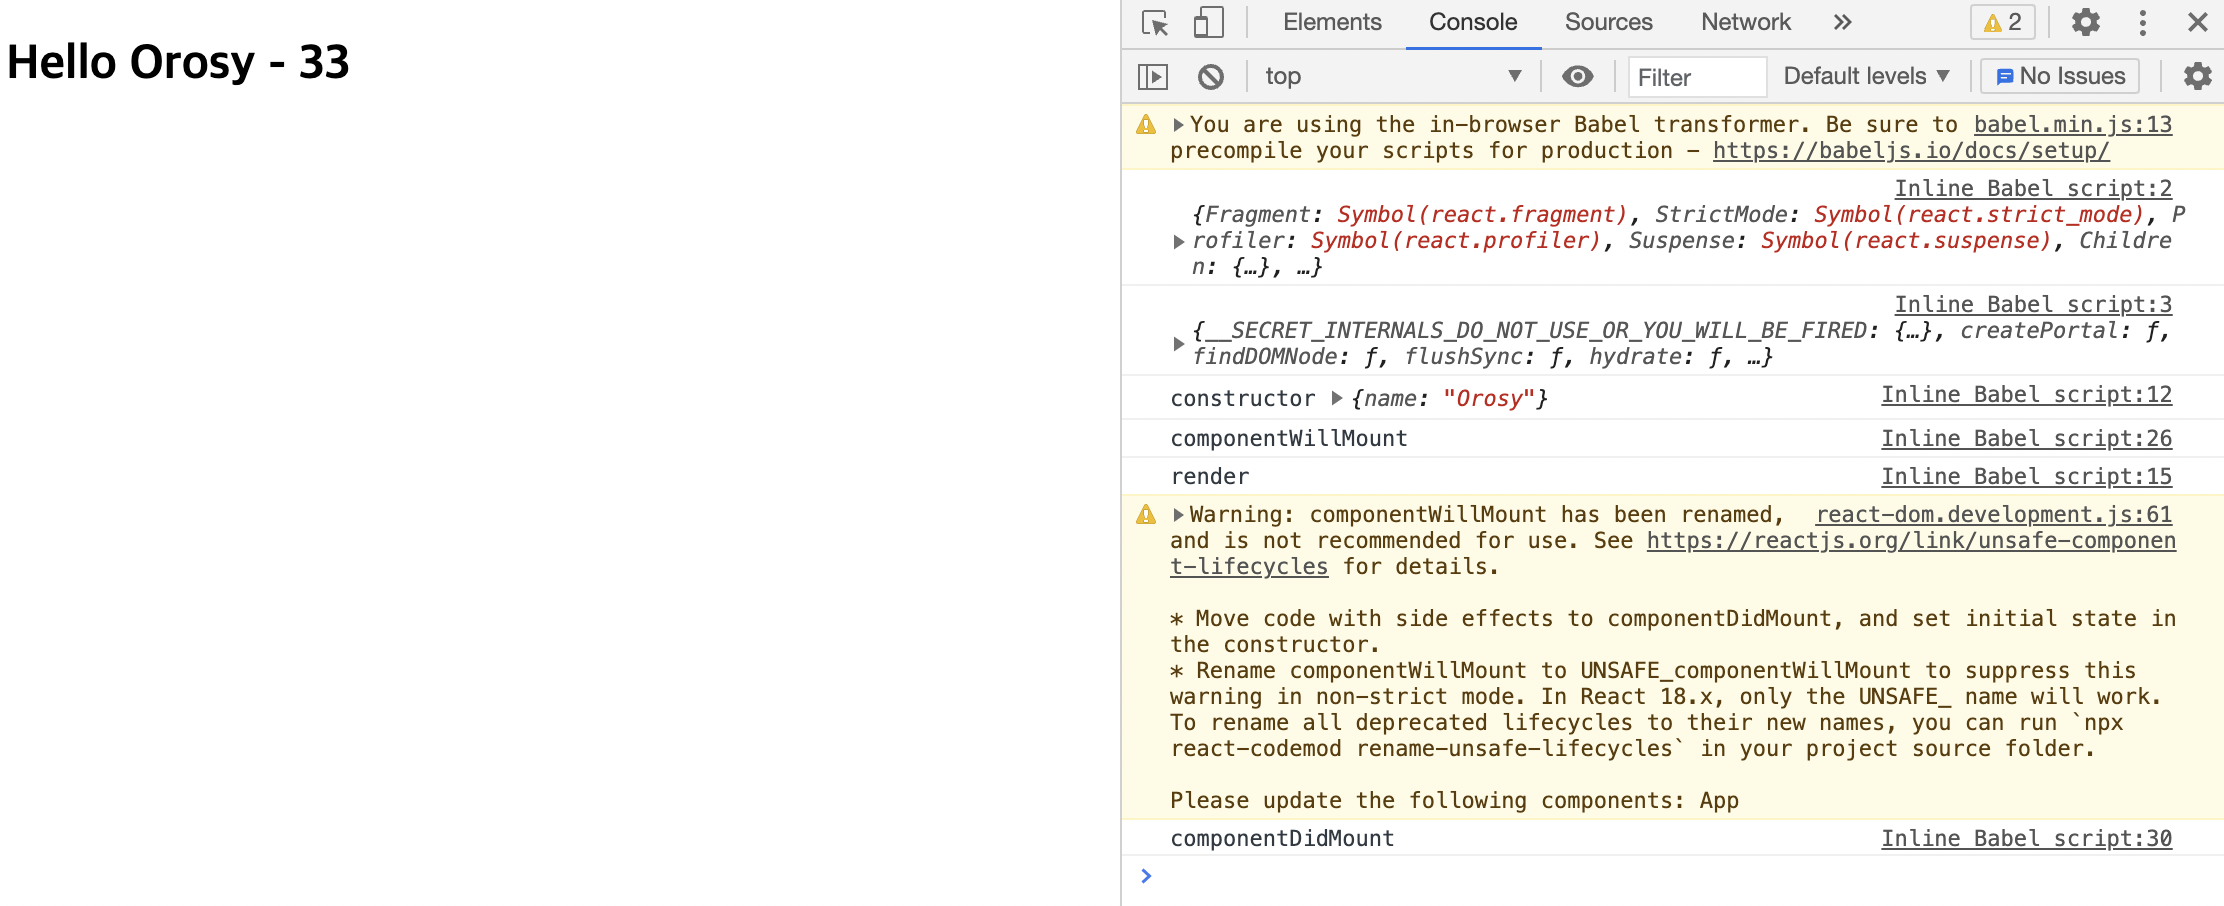
위 코드로 Component 생성과 마운트에 대해 알아볼 수 있습니다. 아래의 화면 구현을 보시면, constructor라는 생성자가 콘솔창에 출력이 되고 이후 렌더 메소드에 있는render라는 내용이 출력이 되는 것을 확인할 수 있습니다.
그리고 render 전에는 componentWillMount 그리고 이후에는 componentDidMount 라이프사이클이 콘솔창에 출력되는 것을 볼 수 있습니다.
1.2 화면 구현

2. Component props,state 변경
- componentWillReceiveProps (state 변경 시, 실행되지 않음)
- shouldComponentUpdate
- componentWillUpdate
- render(최초 렌더)
- componentDidUpdate
2.1 코드 예시
이번에는 클래스 컴포넌트로 이벤트 핸들러를 만든 코드입니다.
componentWillReceiveProps(nextProps) {
  console.log("componentWillReceiveProps", nextProps);
}

shouldComponentUpdate(nextProps, nextState)  {
  console.log("shouldComponentUpdate", nextProps, nextState);

  return false;
}

componentWillUpdate(nextProps, nextState) {
  console.log("componentWillUpdate", nextProps, nextState);
}

componentDidUpdate(prevProps, prevState) {
  console.log("componentDidUpdate", prevProps, prevState);
}

ReactDOM.render(<Component />, document.querySelector("#root"));
이처럼 코드를 작성할 수 있습니다. 여기서 중요하게 봐야할 것은 바로 shouldComponentUpdate 라이프사이클입니다. 다른 라이프사이클과는 달리 shouldComponentUpdate는 불린 데이터인 true와 false를 갖게 됩니다. 여기서 값을 false로 지정하게 되면, 이후의 라이프사이클은 실행되지 않습니다. 결국, componentWillUpdate부터 실행되지 않으며, 쉽게 말해 업데이트가 실행되지 않음을 의미합니다.
이로 인해 render의 실행 여부를 결정할 수 있는 중요한 라이프사이클이므로 꼭 기억해두어야 합니다.
2.2 componenetWillReceiveProps
이 라이프사이클은 props를 새로 지정했을 때 바로 호출되며, state의 변경에 반응하지 않습니다.
해당 라이프사이클에서 props에 따라 state를 변경해야 한다면, setState를 이용하여 state를 변경합니다. 그러면 다음 이벤트로 각각 가는 것이 아니라 한번에 변경됩니다.
2.3 shouldComponentUpdate
이 라이프사이클은 props, state 하나만 변경되거나 둘 다 변경되어도 실행이 됩니다. newProps와 newState를 인자로 하여 호출합니다.
위에서 언급했던 것처럼, return type이 불린 데이터입니다. 해당 함수를 구현하지 않으면 디폴트 값은 true이며, false일 경우 render가 호출되지 않습니다.
2.4 componentWillUpdate
컴포넌트가 재렌더링 되기 직전에 불리며, 여기선 setState와 같은 메소드는 사용해선 안됩니다.
2.5 componentDidUpdate
컴포넌트가 재렌더링을 마치면 불리는 라이프사이클입니다.
3. Component 언마운트
3.1 componentWillUnmount
실제로 컴포넌트가 unmount되고 난 후에는 처리할 수 없습니다. 그렇기 때문에 해당 라이프사이클만 활용이 가능합니다.

