CI
CI 는 Continuous Integration 의 약자로 직역하면 ‘지속적 통합’이다.
프로젝트를 진행할 때 여러 명이 각자 맡은 업무를 나누어 코드를 작성하는데, CI 는 모든 개발자가 작업한 코드를 지속적으로 하나로 모아 통합하는 것을 의미한다.
CI 에 포함되는 작업은 빌드, 테스트, 정적 분석, 피드백(알림), 배포가 있다.
- 빌드: 소스 코드를 컴파일해서 실행할 수 있는 프로그램으로 만드는 과정
- 테스트: 유닛 테스트, 통합 테스트 등 변경한 코드가 정상적으로 작동하는지 확인하는 과정
- 정적 분석: 코드 컨벤션 위반 여부, 오타, 사용하지 않는 코드, 잠재적으로 버그가 발생할 수 있는 코드, 잠재적인 보안 취약점 등을 발견하는 과정
- 피드백: 빌드, 테스트, 정적 분석의 결과를 슬랙과 같은 메신저에 알림을 보내주는 과정
- 배포: 위의 과정이 모두 성공적으로 끝나면 프로그램을 배포하는 것. 엄연히 따지자면 배포는 CD 의 영역으로 보고 있지만, 일부 CI 툴은 배포까지 지원한다.
예를 들면, 누군가 main 브랜치에 코드를 변경해서 커밋을 올리면 코드를 빌드해서, 테스트에 모두 통과하고, 정적 분석도 통과해야 자동으로 배포하는 것을 가능하게 하는 것이 CI 다.
CI 을 적용하면 얻을 수 있는 장점은 크게 아래와 같이 3가지로 정리할 수 있다.
- 소스 코드의 품질을 일정한 수준으로 유지할 수 있다.
- 코드를 통합하는 과정에서 문제를 빠르게 발견할 수 있다.
- 개발자 입장에서는 커밋만 하면 통합이 자동으로 이루어지기 때문에 개발에만 집중할 수 있기에 개발 생산성을 높일 수 있다.
대표적인 CI 툴로는 Jenkins, Travis Ci, Github Actions 등이 있다.
Jenkins
Jenkins(이하 젠킨스)는 자바로 만들어진 CI 툴이다.
젠킨스는 파이프라인이라고 부르는 스크립트를 작성해서 각 빌드 단계마다 수행할 작업과 순서를 정의할 수 있다.
만약, 특정 단계에서 실패가 발생하면 이 단계의 출력 결과를 사용하는 다음 단계는 실행되지 않고, 빌드 과정 전체가 실패한다.
설치
EC2 인스턴스의 amzon linux 운영체제에서 설치를 진행했다.
편리를 위해 root 계정으로 설치를 진행했다.
sudo su -자바 설치
젠킨스를 사용하기 위해 자바를 설치해야 한다.
자세한 설치 방법은 aws 공식 문서를 참고했다. (링크)
java17 버전을 설치한다.
sudo yum install fontconfig java-17-amazon-corretto -y
java -version # 자바 버전 확인
#openjdk version "17.0.10" 2024-01-16 LTS
#OpenJDK Runtime Environment Corretto-17.0.10.8.1 (build 17.0.10+8-LTS)
#OpenJDK 64-Bit Server VM Corretto-17.0.10.8.1 (build 17.0.10+8-LTS, mixed mode, sharing)
JAVA_HOME 환경변수를 등록하기 위해 alternatives 명령어를 이용해서 자바 설치 경로를 확인한다.
alternatives 명령어는 프로그램의 여러 버전을 관리하기 위한 명령어다.
이번 예시에서는 java17 버전만 설치했기 때문에 다른 버전이 나오지 않는다.
alternatives --display java
#java - status is auto.
# link currently points to /usr/lib/jvm/java-17-amazon-corretto.x86_64/bin/java
#/usr/lib/jvm/java-17-amazon-corretto.x86_64/bin/java - priority 17100801
# slave java-17-amazon-corretto: /usr/lib/jvm/java-17-amazon-corretto.x86_64
# slave jre: /usr/lib/jvm/java-17-amazon-corretto.x86_64
# slave jre_openjdk: /usr/lib/jvm/java-17-amazon-corretto.x86_64
# slave keytool: /usr/lib/jvm/java-17-amazon-corretto.x86_64/bin/keytool
# slave rmiregistry: /usr/lib/jvm/java-17-amazon-corretto.x86_64/bin/rmiregistry
# slave java.1: /usr/lib/jvm/java-17-amazon-corretto.x86_64/man/man1/java.1
# slave keytool.1: /usr/lib/jvm/java-17-amazon-corretto.x86_64/man/man1/keytool.1
# slave rmiregistry.1: /usr/lib/jvm/java-17-amazon-corretto.x86_64/man/man1/rmiregistry.1
#Current `best' version is /usr/lib/jvm/java-17-amazon-corretto.x86_64/bin/java.
현재 Current ‘best’ version 에 해당하는 경로를 JAVA_HOME 환경변수로 저장한다.
JAVA_HOME=/usr/lib/jvm/java-17-amazon-corretto.x86_64
echo $JAVA_HOME
#/usr/lib/jvm/java-17-amazon-corretto.x86_64
젠킨스 설치
젠킨스는 EC2 인스턴스에서 데몬(daemon)으로 실행하기 위해 아래와 같은 명령어를 실행해서 설치했다.
도커 컨테이너나 쿠버네티스에서도 실행 가능하기 때문에 환경과 사용 목적에 따라 원하는 형태로 설치하면 된다.
sudo wget -O /etc/yum.repos.d/jenkins.repo https://pkg.jenkins.io/redhat-stable/jenkins.repo
sudo rpm --import https://pkg.jenkins.io/redhat-stable/jenkins.io-2023.key
sudo yum upgrade
sudo yum install jenkins -y
sudo systemctl daemon-reload
sudo systemctl enable jenkins && sudo systemctl start jenkins
설치가 정상적으로 이루어졌는지 확인하기 위해 아래의 명령어를 실행한다.
sudo systemctl status jenkins정상적으로 설치되었다면 Active: active (running) 으로 표시될 것이다.
● jenkins.service - Jenkins Continuous Integration Server
   Loaded: loaded (/usr/lib/systemd/system/jenkins.service; enabled; vendor preset: disabled)
   Active: active (running) since Tue 2024-04-16 15:12:37 KST; 1min 21s ago
 Main PID: 13158 (java)
    Tasks: 47
   Memory: 1.1G
   CGroup: /system.slice/jenkins.service
           └─13158 /usr/bin/java -Djava.awt.headless=true -jar /usr/share/jav...

Apr 16 15:12:12 myeks-bastion jenkins[13158]: 9c576da86ed14141afc81646a83fa0c6
Apr 16 15:12:12 myeks-bastion jenkins[13158]: This may also be found at: /va...d
Apr 16 15:12:12 myeks-bastion jenkins[13158]: ******************************...*
Apr 16 15:12:12 myeks-bastion jenkins[13158]: ******************************...*
Apr 16 15:12:12 myeks-bastion jenkins[13158]: ******************************...*
Apr 16 15:12:37 myeks-bastion jenkins[13158]: 2024-04-16 06:12:37.685+0000 [...n
Apr 16 15:12:37 myeks-bastion jenkins[13158]: 2024-04-16 06:12:37.708+0000 [...g
Apr 16 15:12:37 myeks-bastion systemd[1]: Started Jenkins Continuous Integra....
Apr 16 15:12:38 myeks-bastion jenkins[13158]: 2024-04-16 06:12:38.520+0000 [...r
Apr 16 15:12:38 myeks-bastion jenkins[13158]: 2024-04-16 06:12:38.522+0000 [...1
Hint: Some lines were ellipsized, use -l to show in full.
젠킨스 UI 접속
젠킨스는 웹에서 이용할 수 있는 UI 를 제공하는데, 로컬에서는 8080번 포트를 이용해서 접속할 수 있다.
EC2 인스턴스의 퍼블릭 IP 를 확인해서 8080번 포트로 접속하면 젠킨스 UI 로 접속할 수 있다.
 curl -s ipinfo.io/ip | awk '{ print "Jenkins = http://"$1":8080" }'
 #Jenkins = http://a.b.c.d:8080
접속하면 아래의 이미지와 같이 관리자 초기 비밀번호를 입력하라는 안내 문구가 나온다.
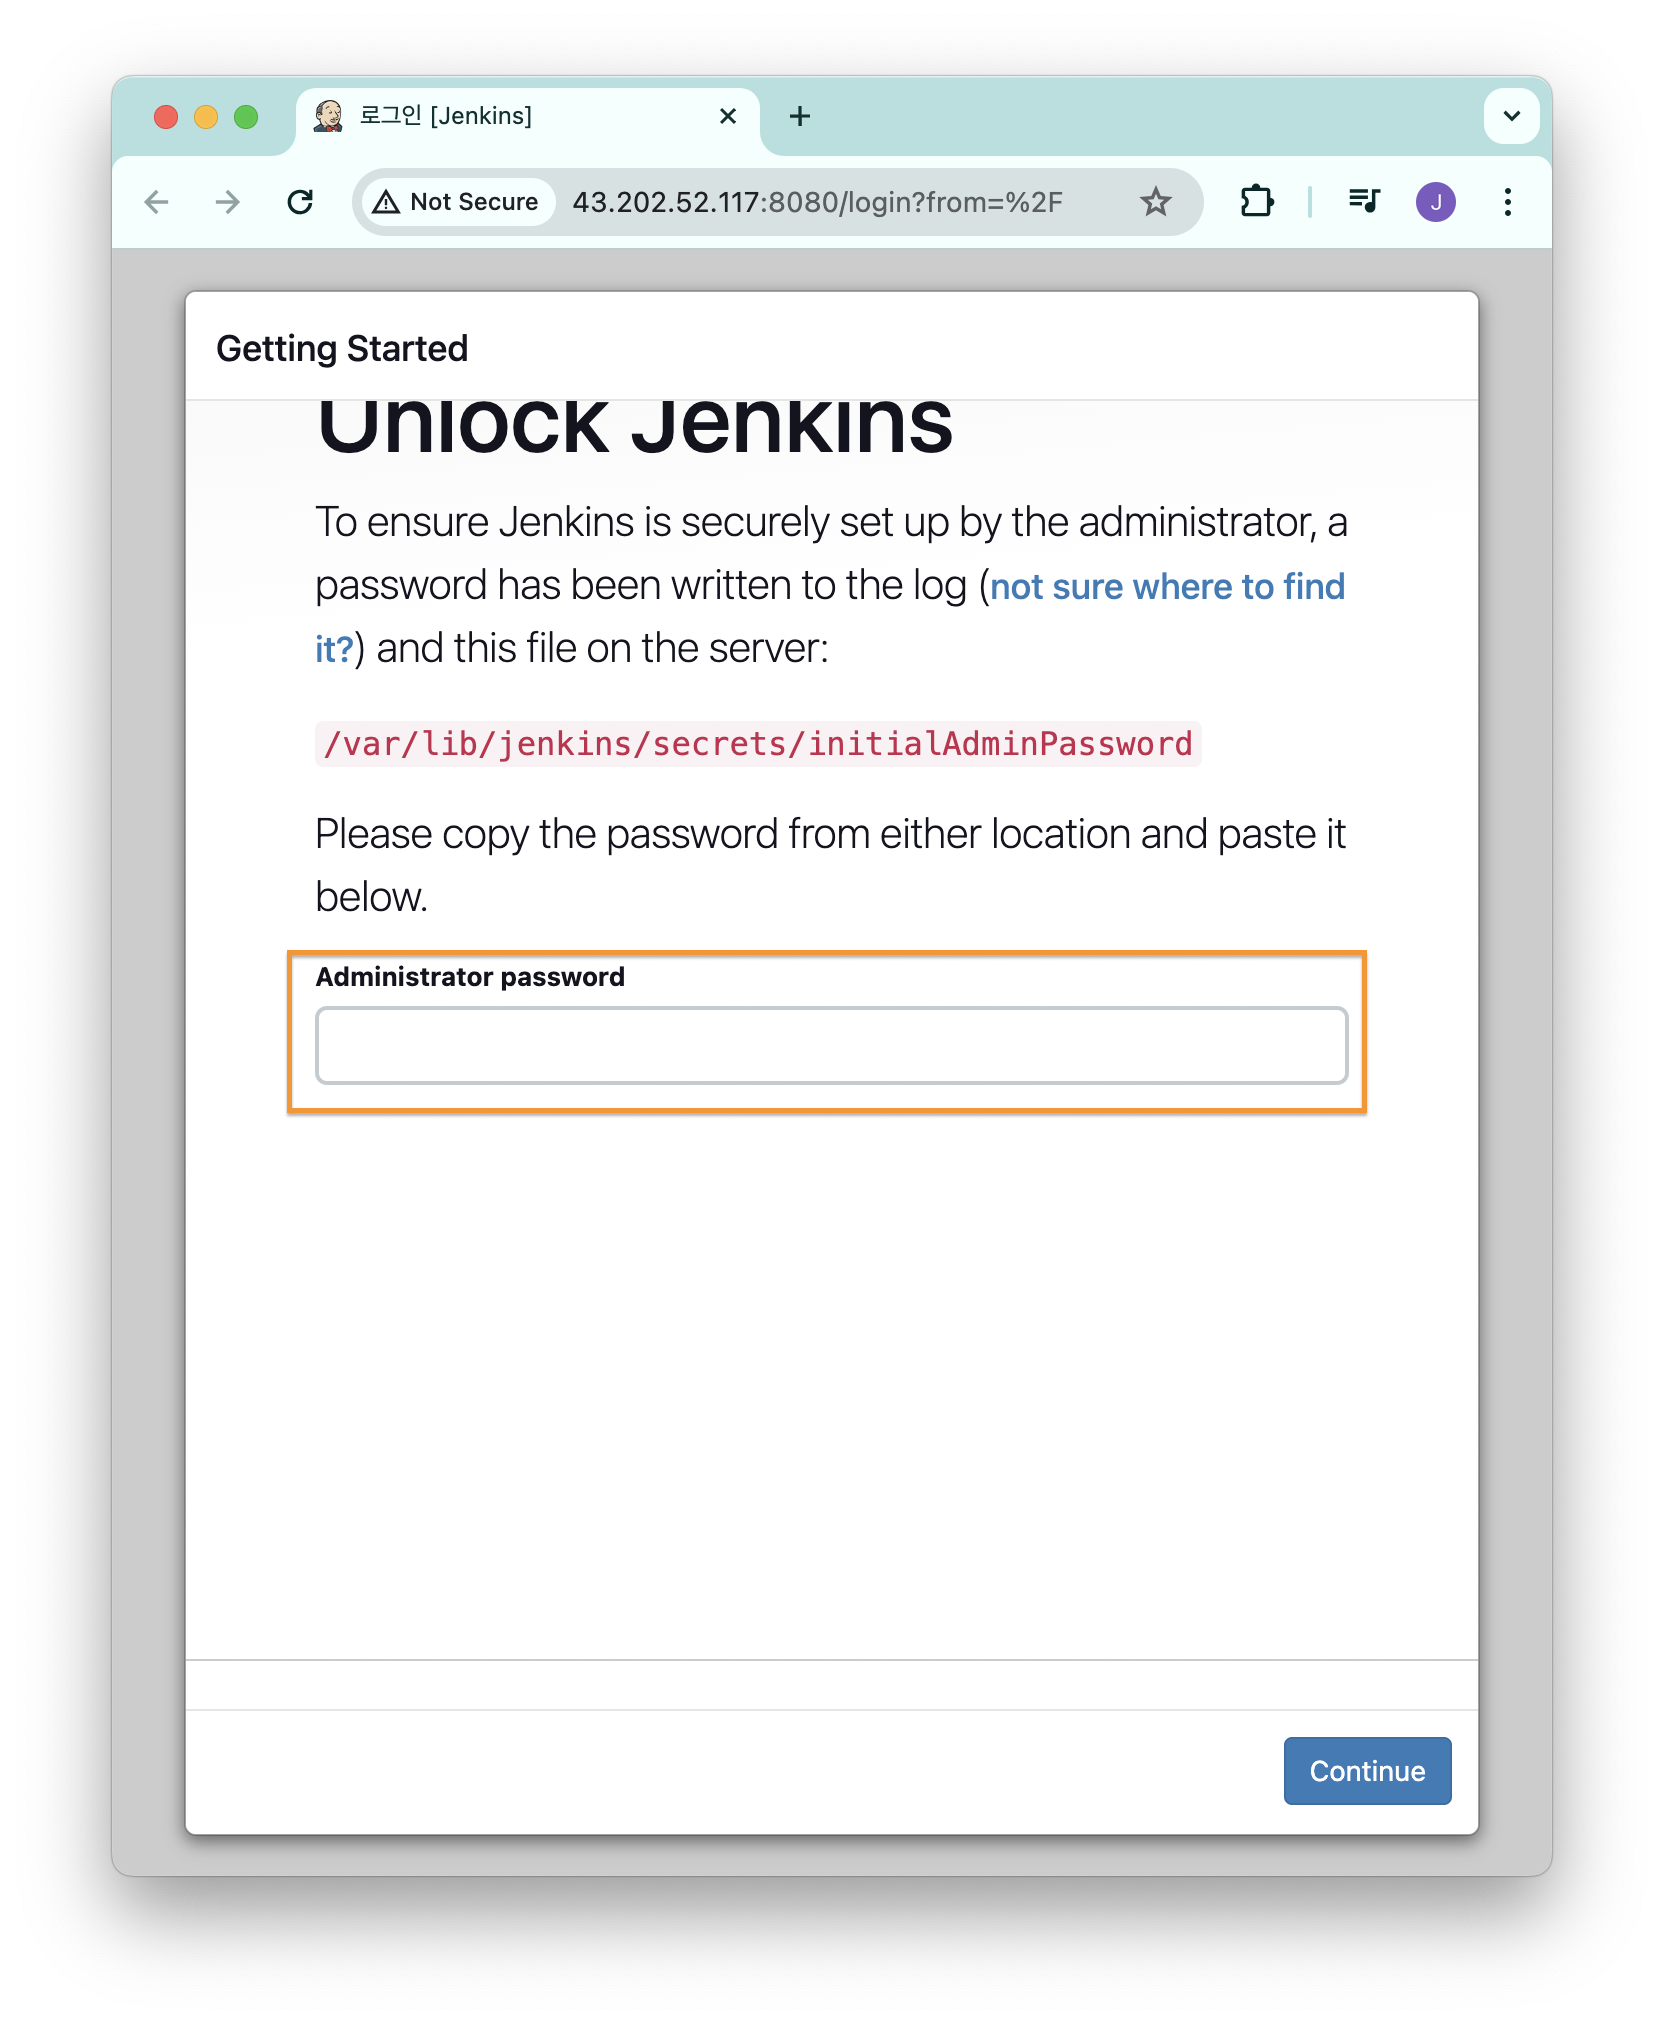
관리자 계정의 초기 암호는 아래의 명령어로 확인할 수 있다.
cat /var/lib/jenkins/secrets/initialAdminPassword
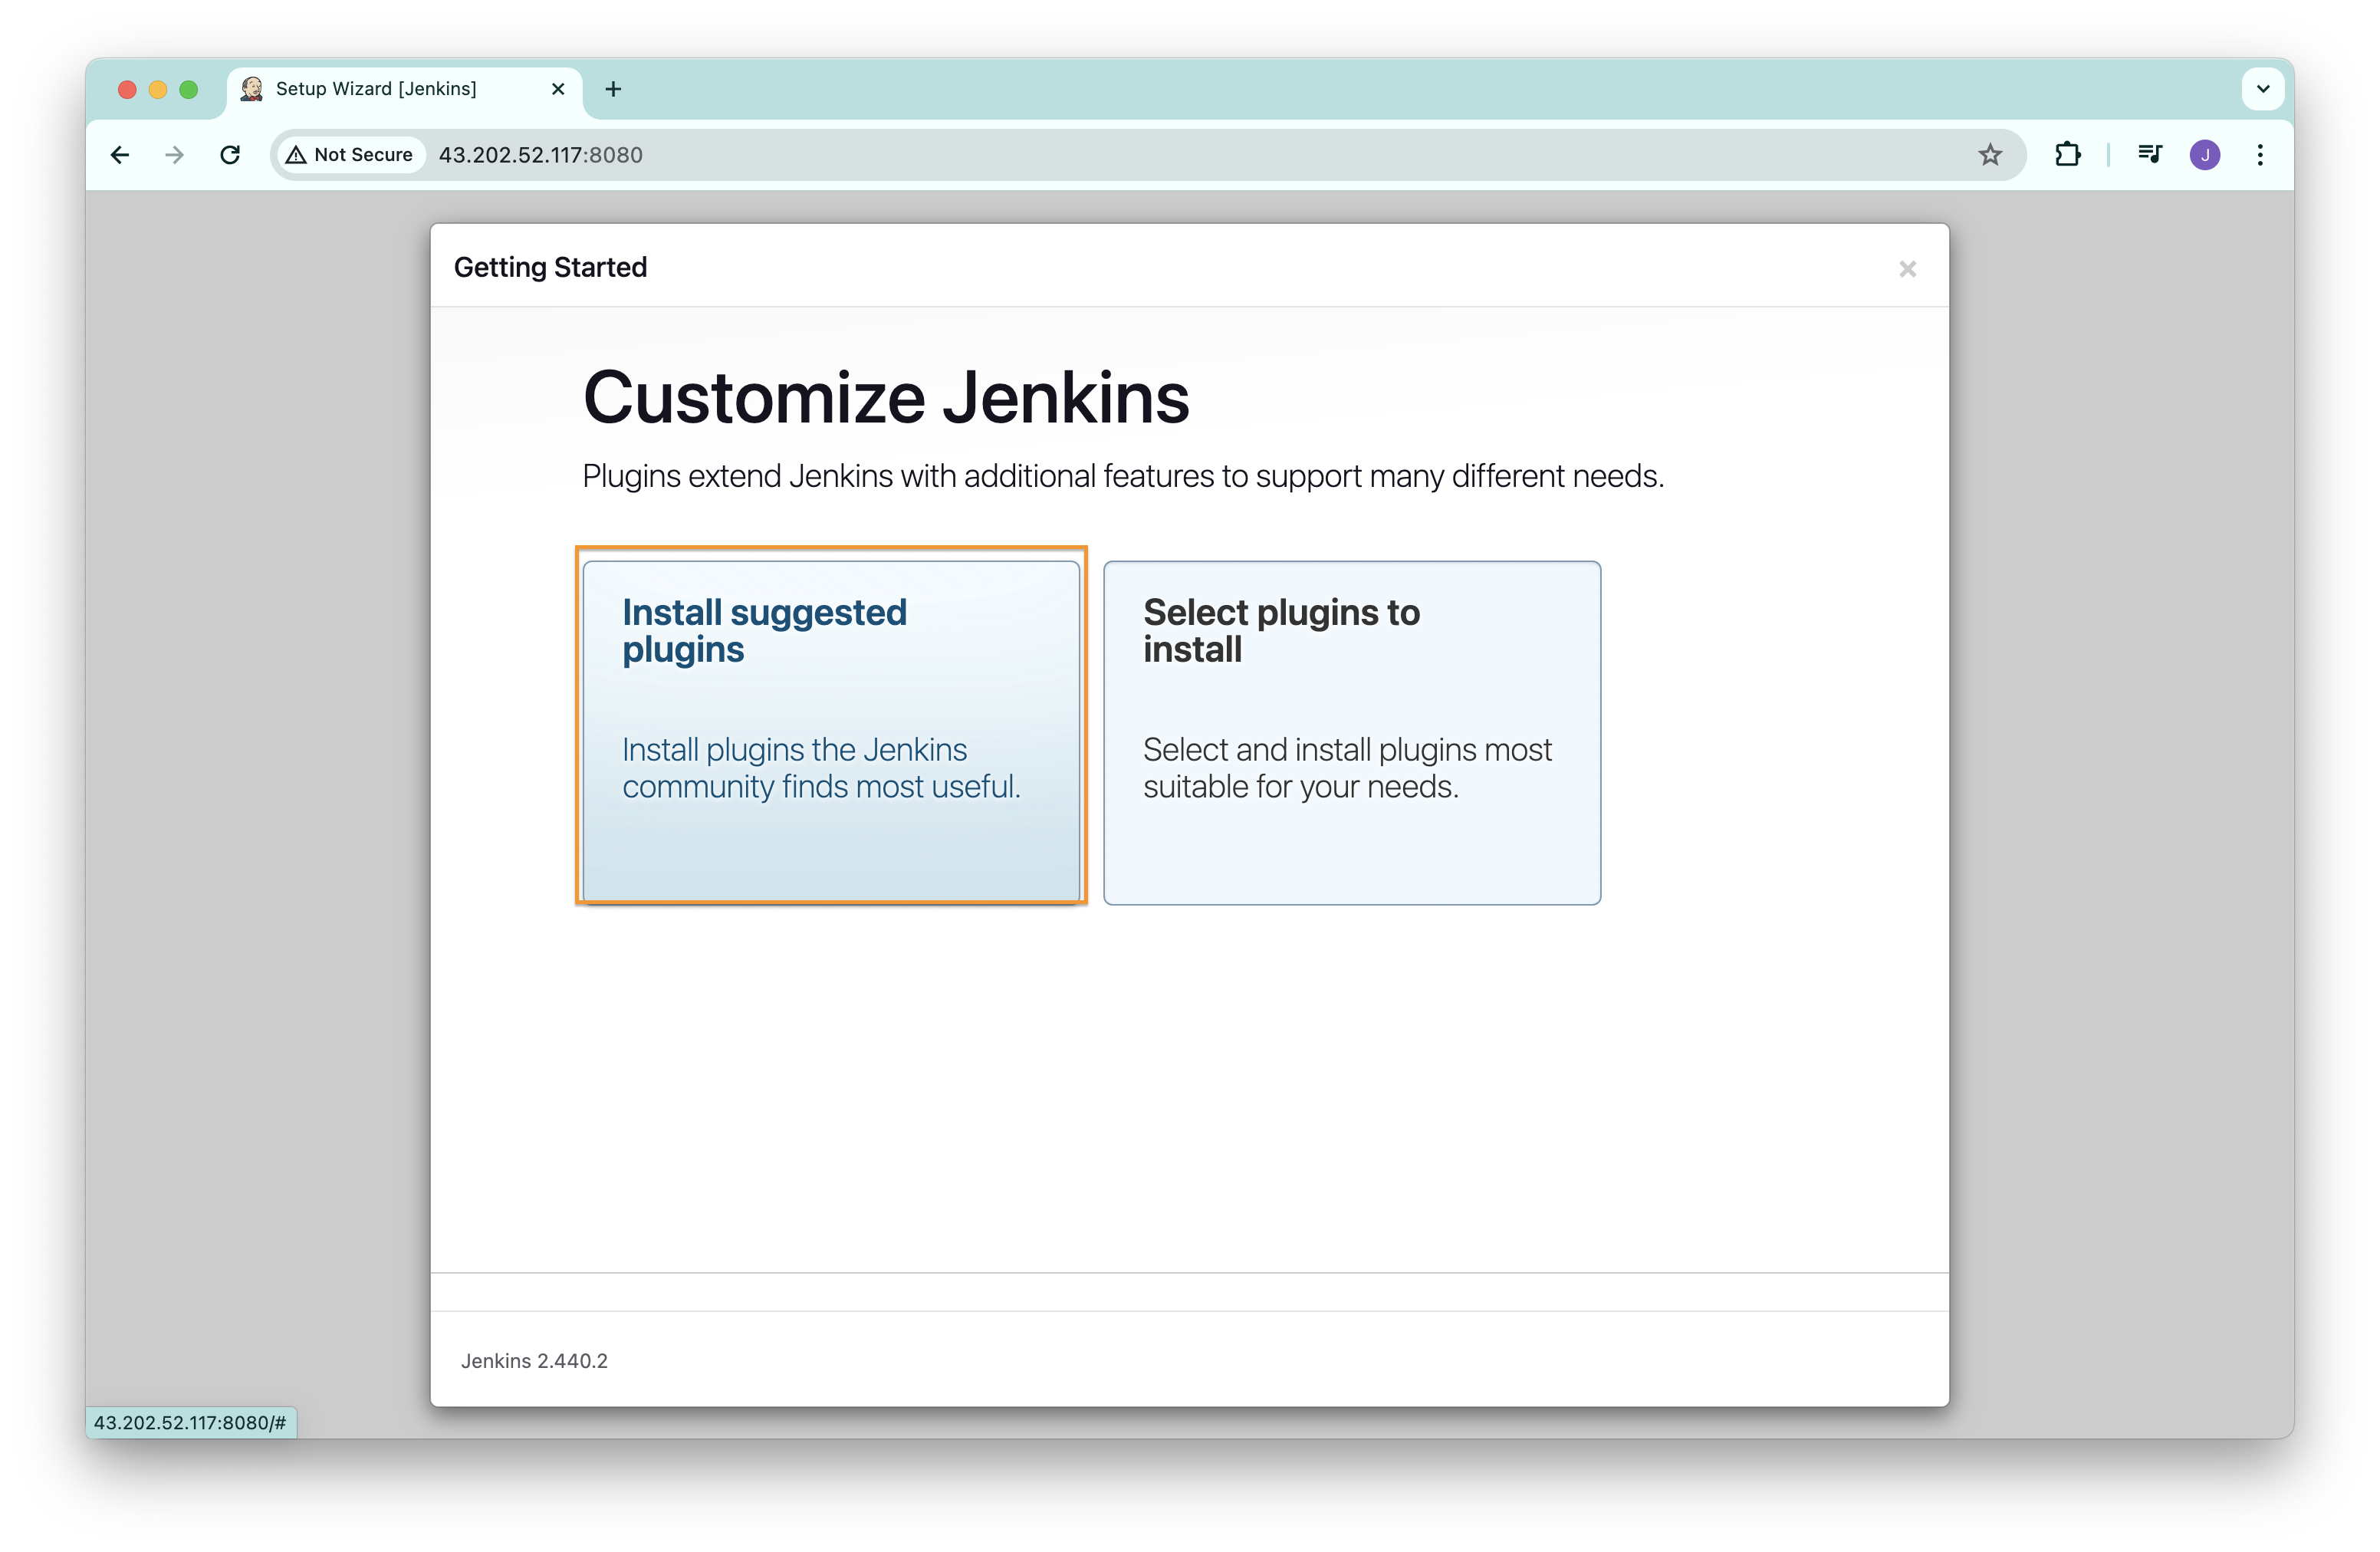
#9c57...플러그인 설치는 기본으로 추천해주는 것들을 설치한다.
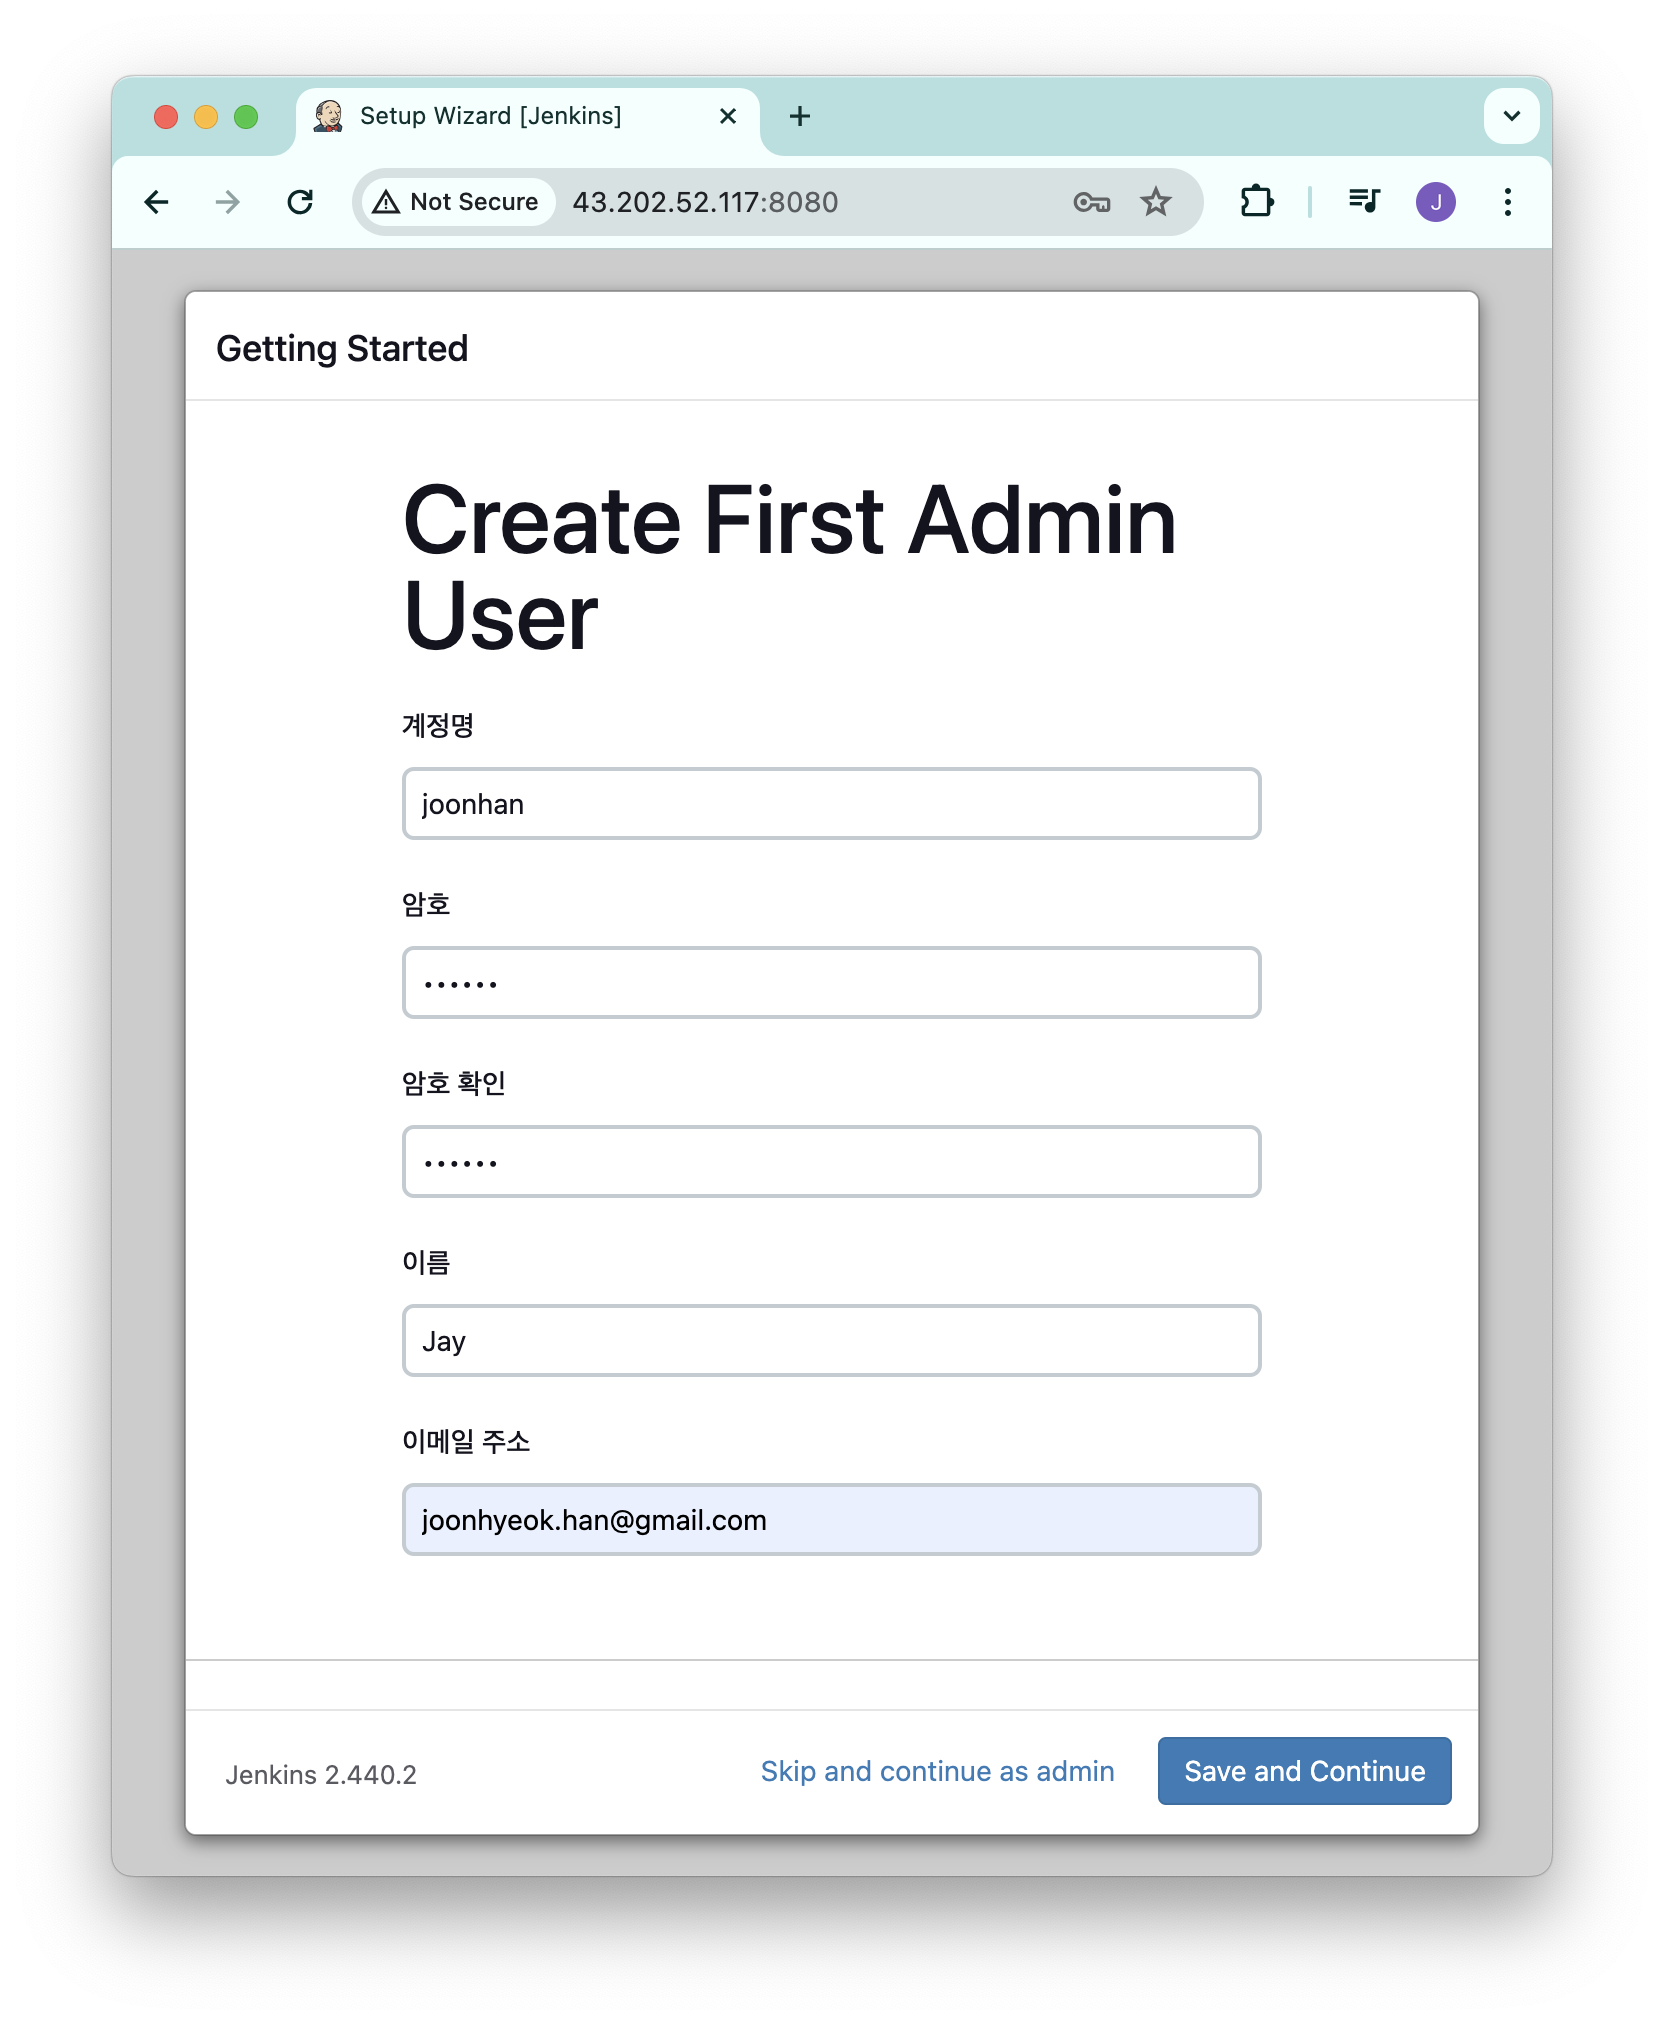
새로운 관리자 계정을 생성한다.
계정명은 로그인할 때 사용하는 것이고, 이름 은 닉네임과 같다.
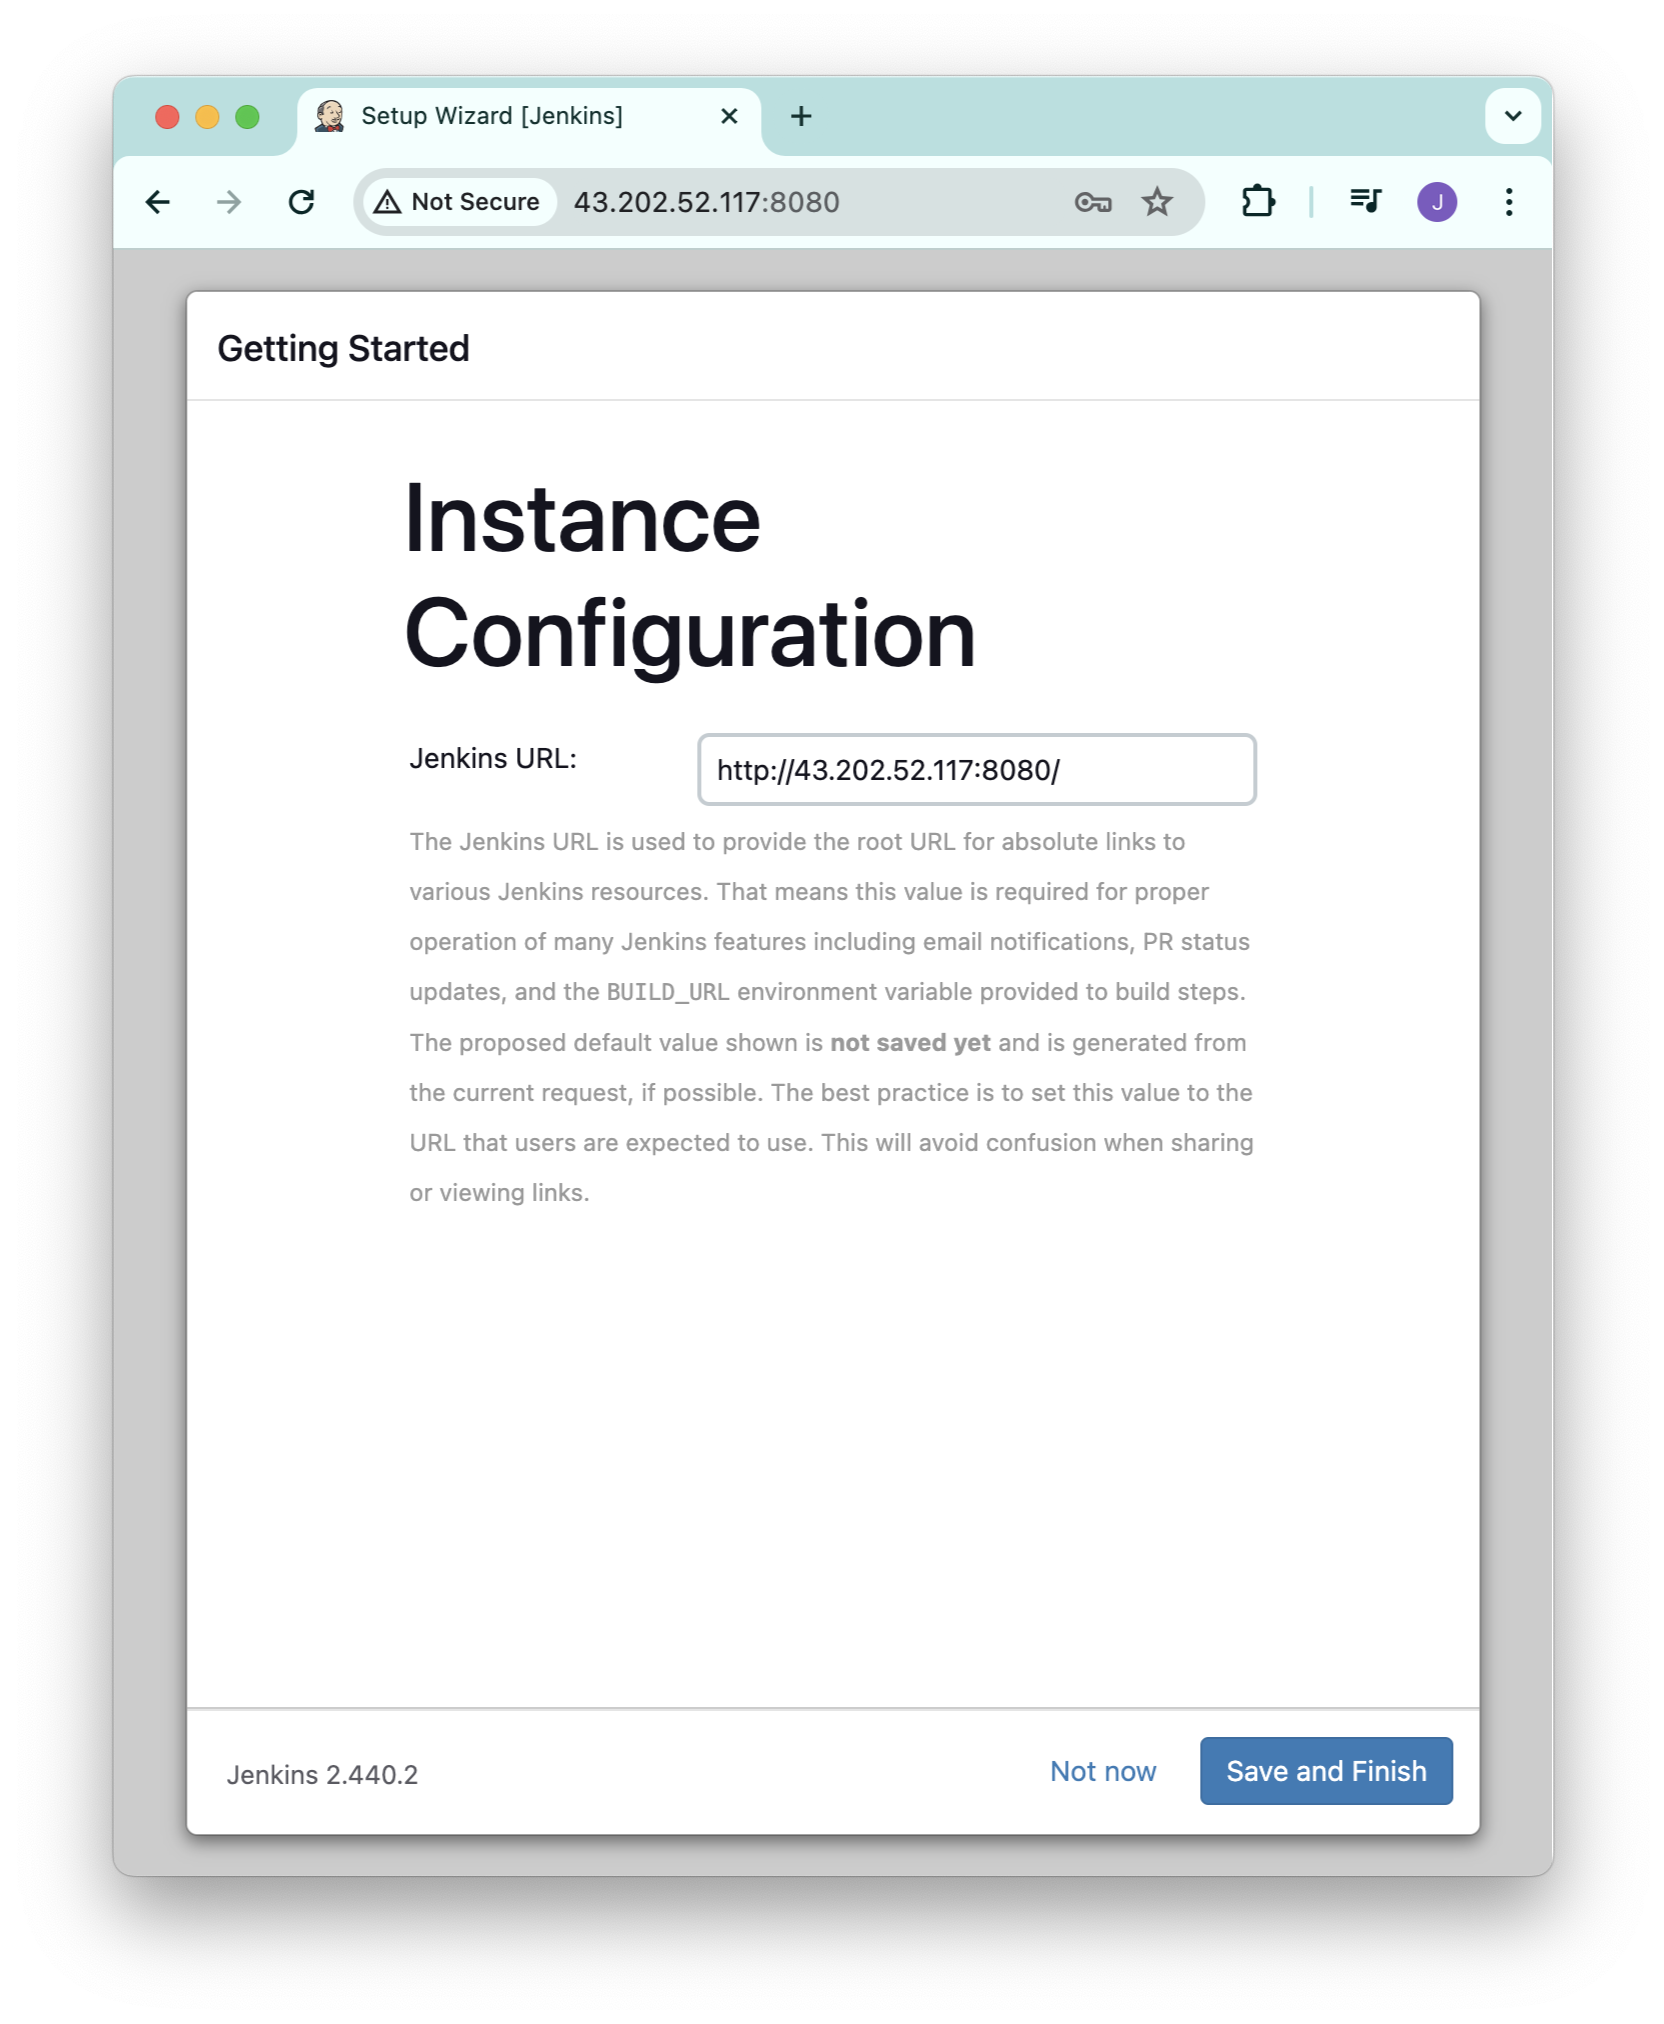
젠킨스를 이용할 URL 을 확인하고 Save and Finish 버튼을 클릭한다.
젠킨스의 각 단계(job)에서 사용할 자바의 버전을 설정하기 위해 [Jenkins 관리] - [Tools] 로 이동한다.
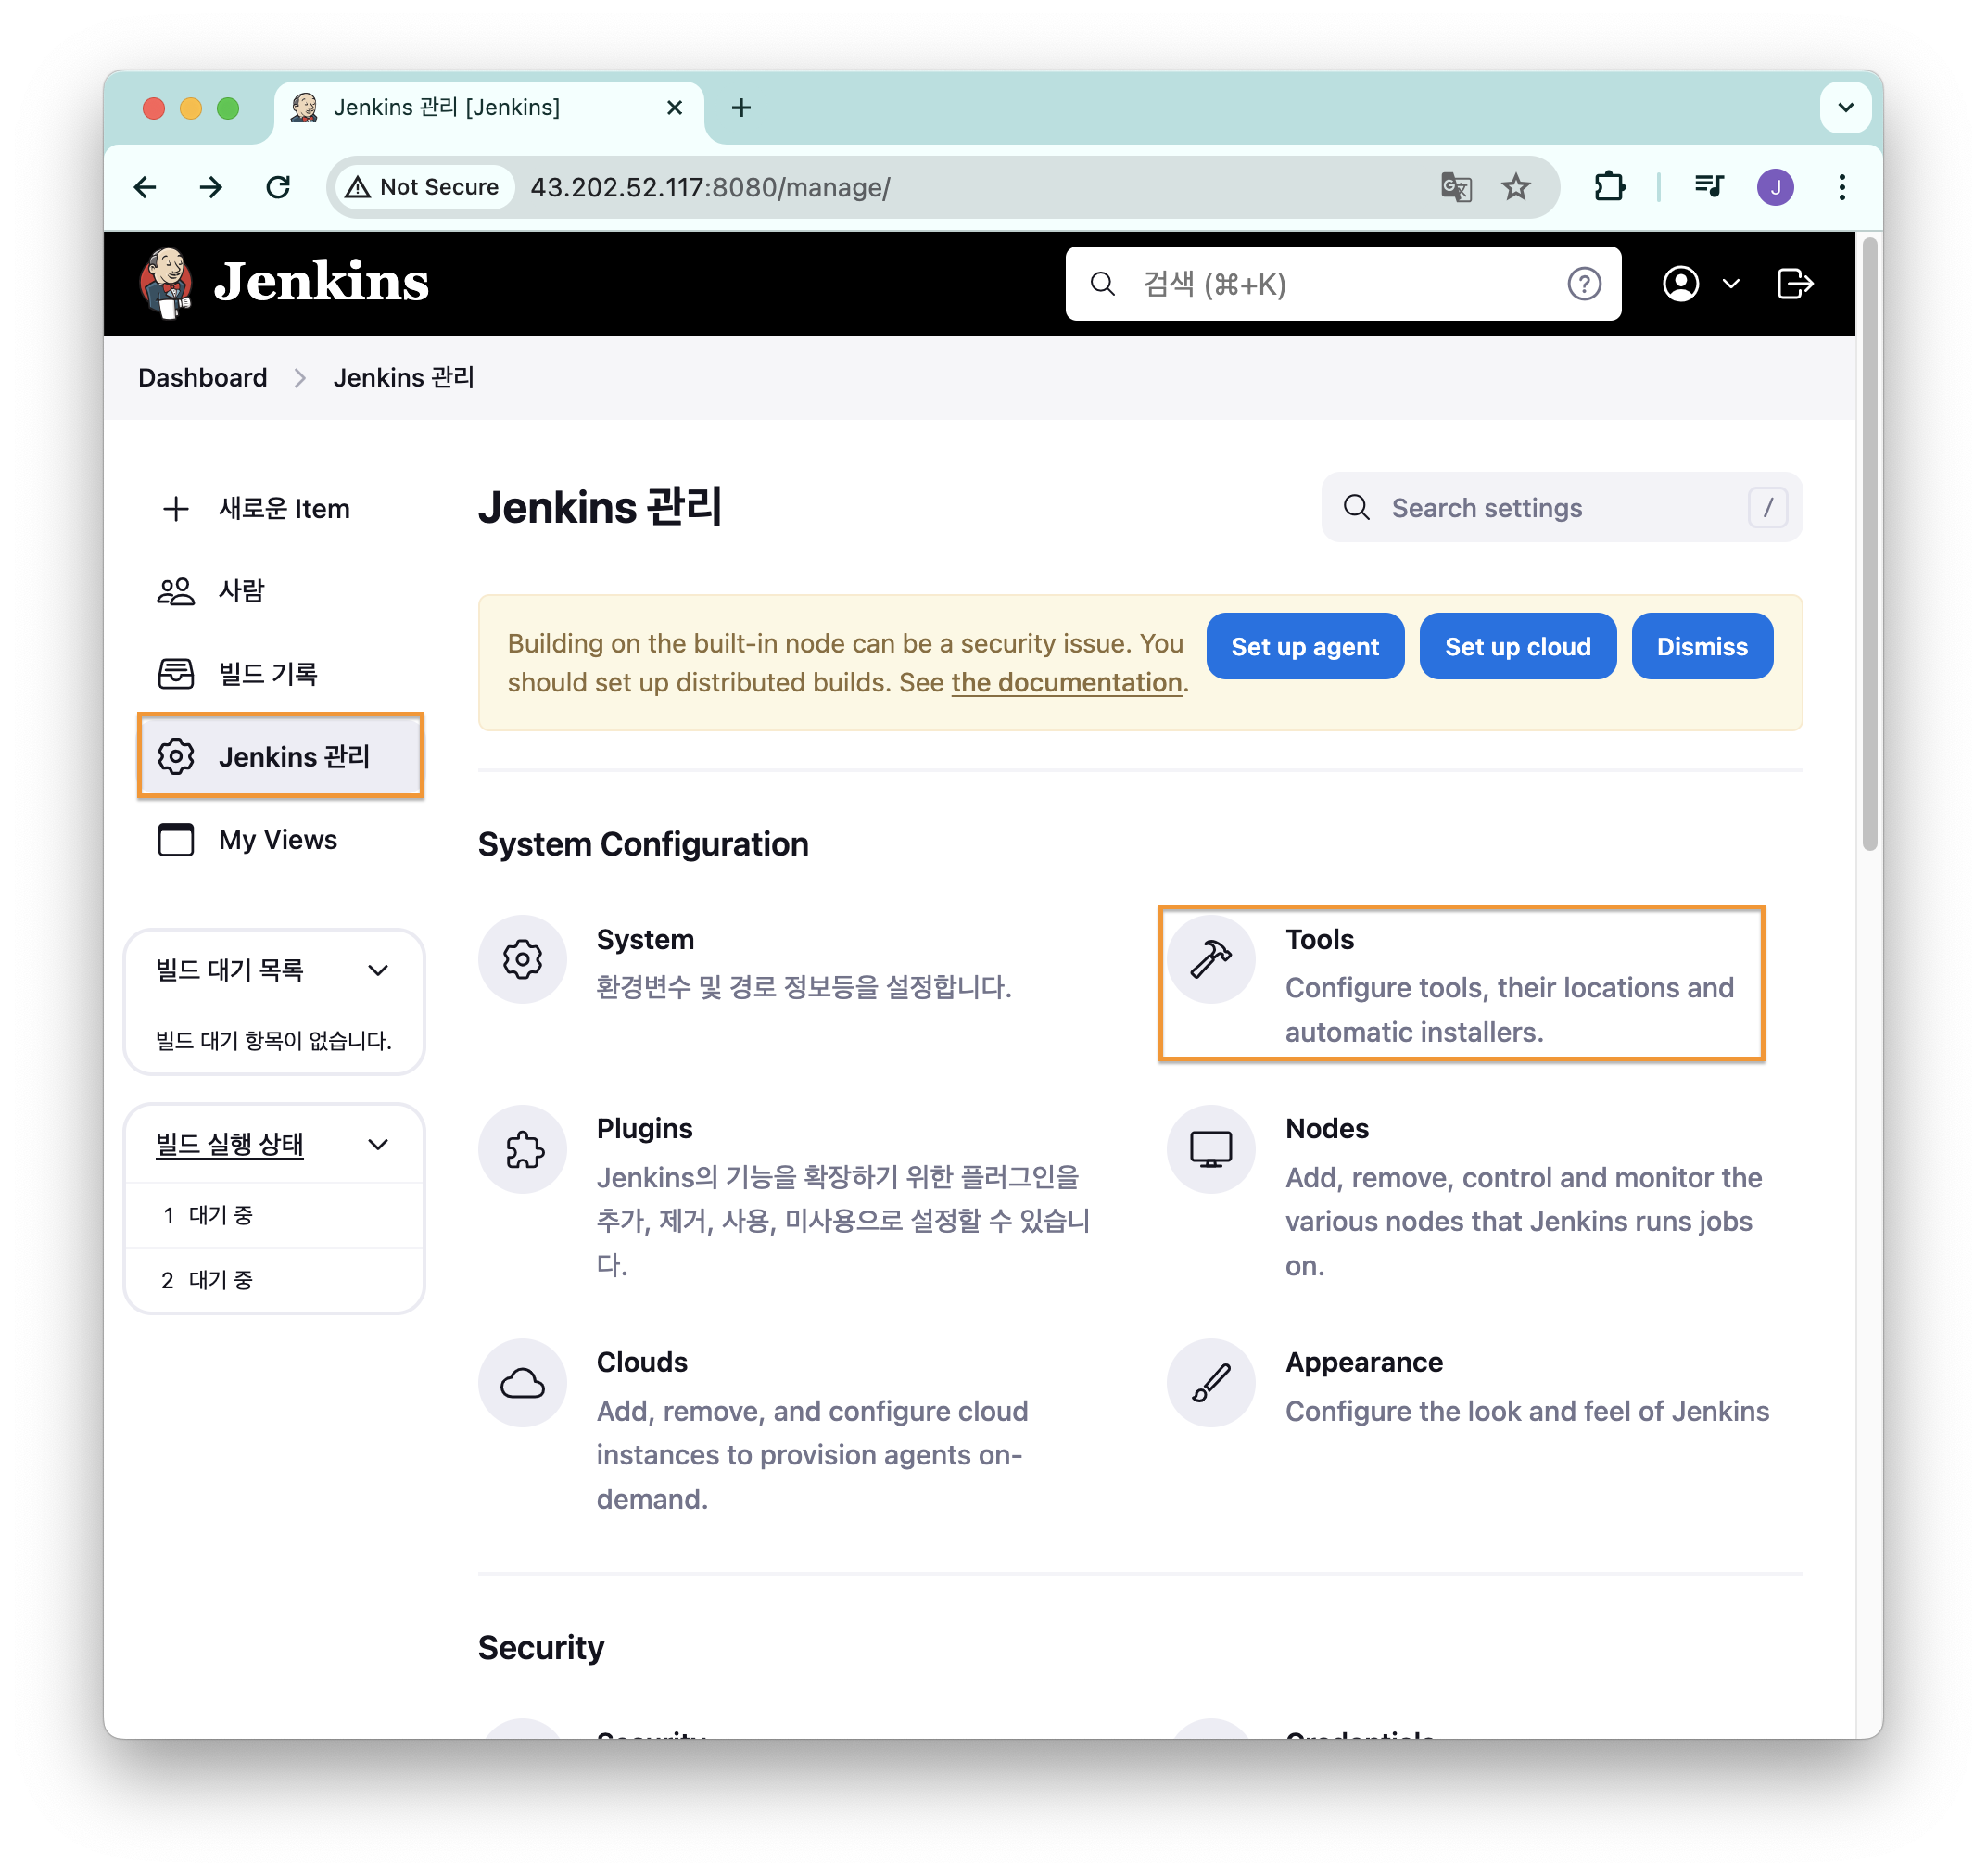
[JDK installations] 항목에서 [ADD JDK] 버튼을 클릭한다.
그리고 JAVA_HOME 항목에 위에서 입력했던 값을 그대로 입력해준다.
Name 항목은 버전을 구분하기 위한 환경변수 이름이다.
입력 후 [Save] 버튼 클릭

기본 사용 실습
shell 스크립트 실행
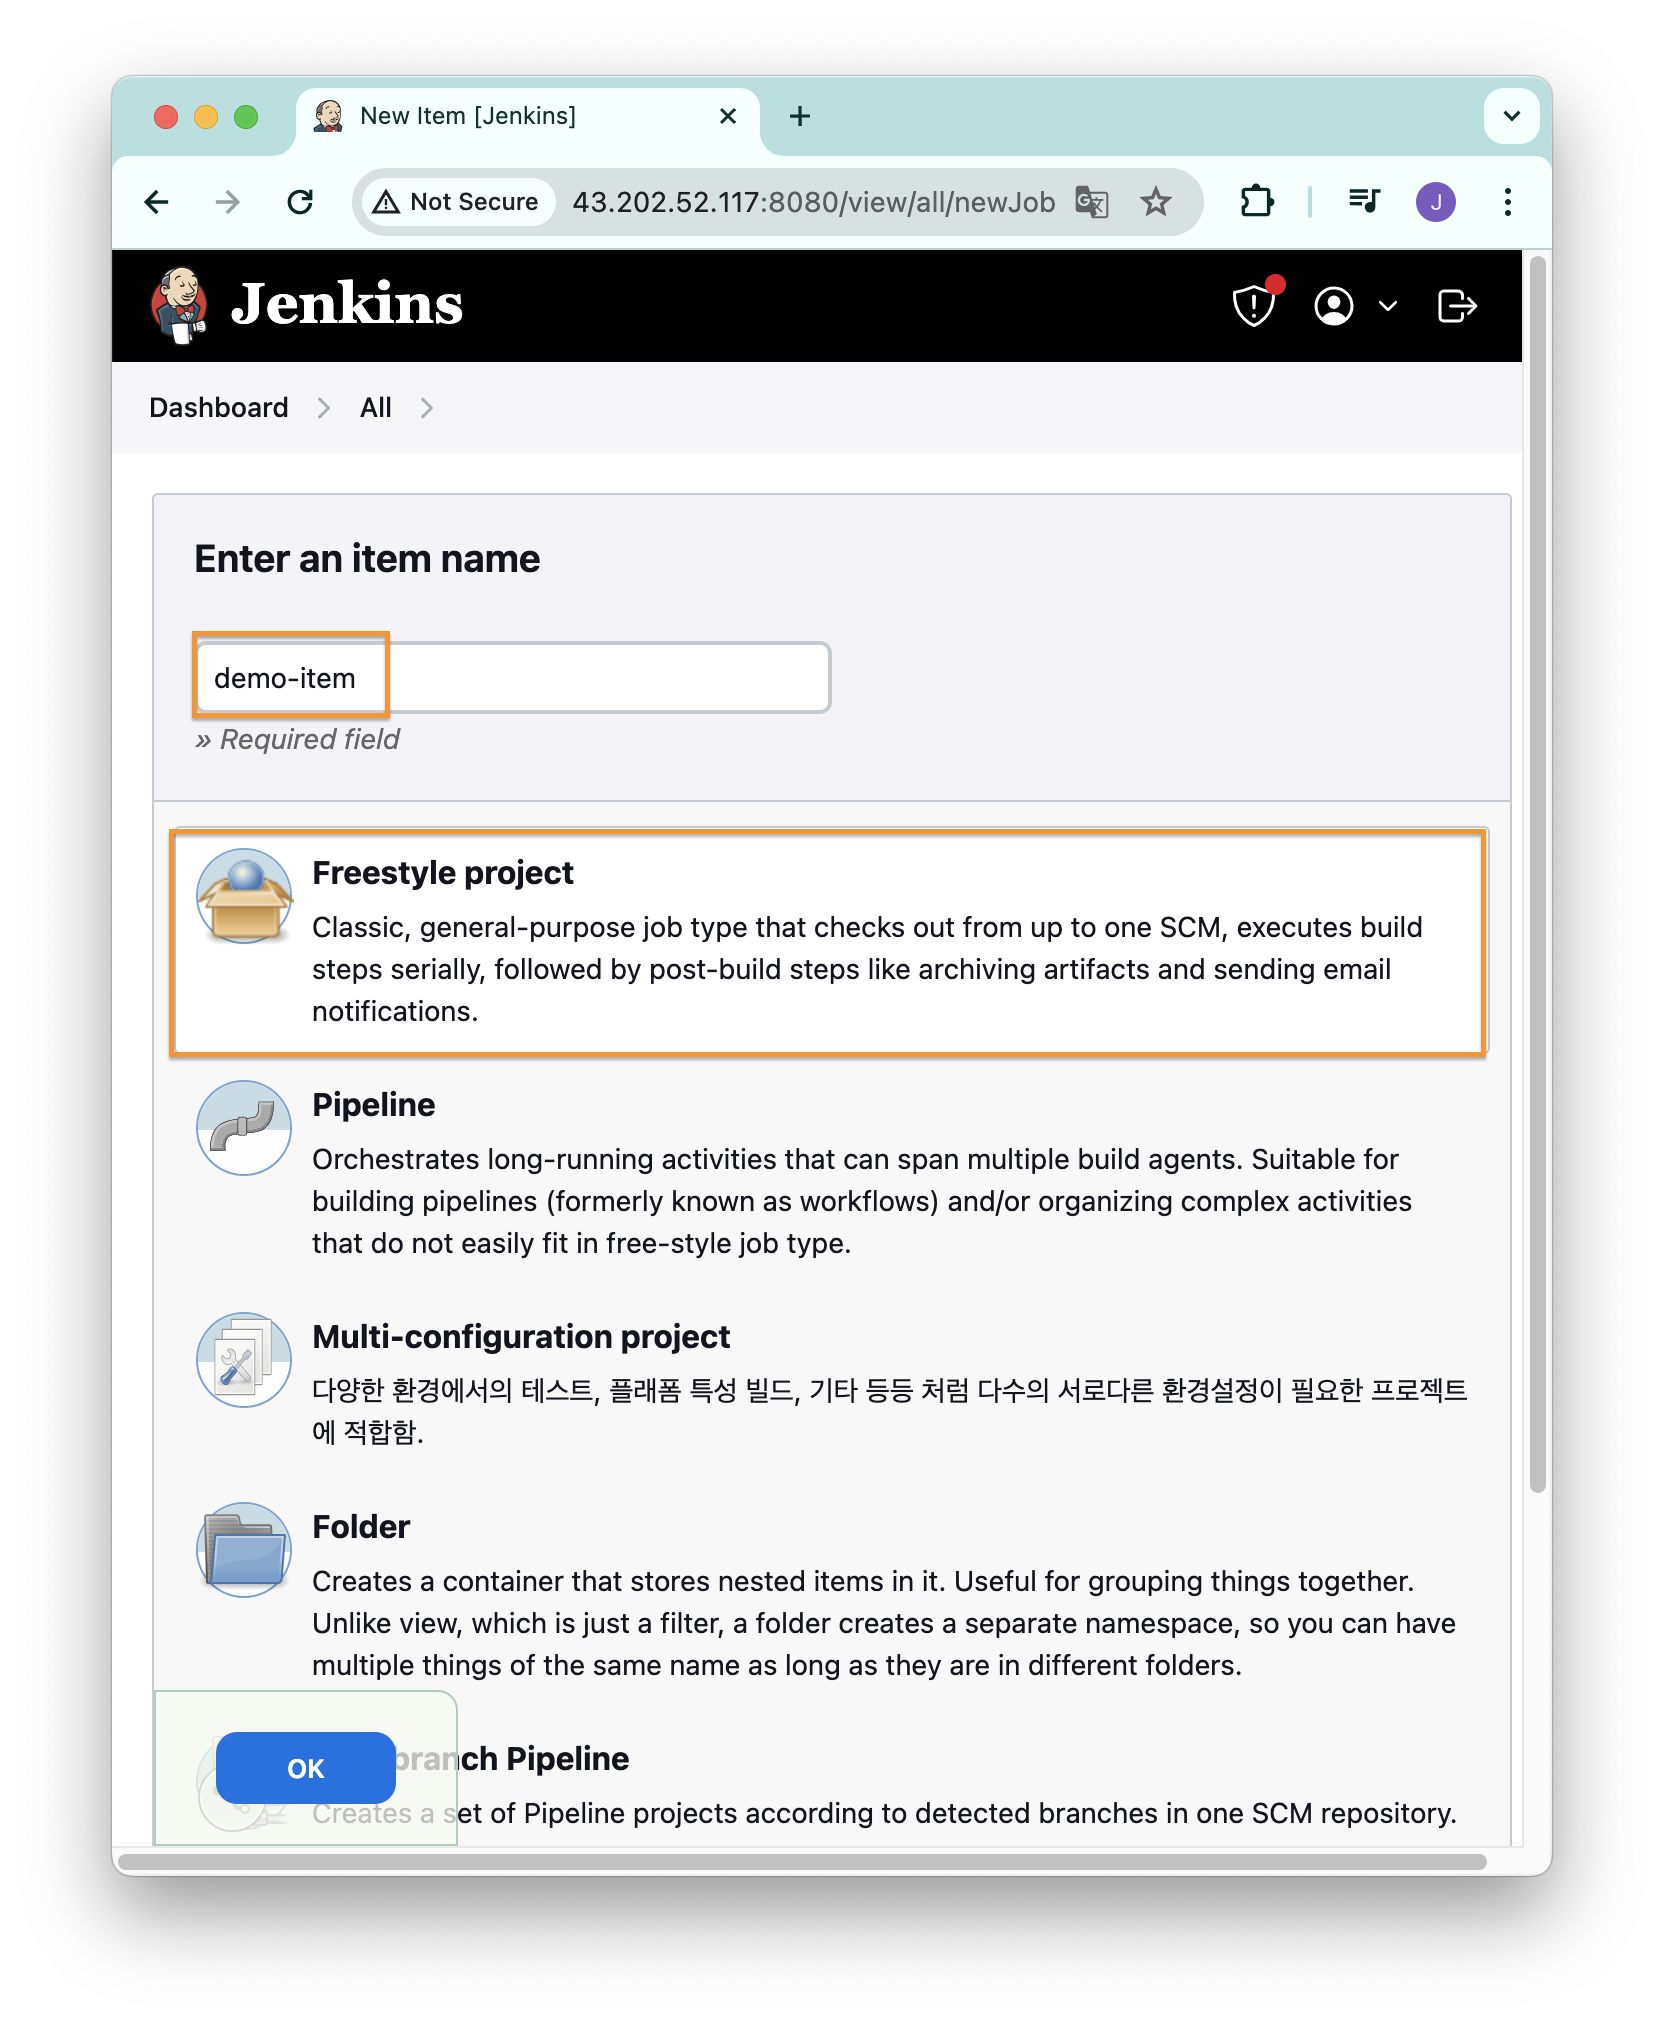
좌측 메뉴바에서 [새로운 Item] 버튼을 클릭하면 아래의 이미지와 같은 화면이 표시된다.
item name 은 자유롭게 입력하고, [Freestyle project] 를 선택한 다음 하단의 [OK] 버튼을 클릭한다.
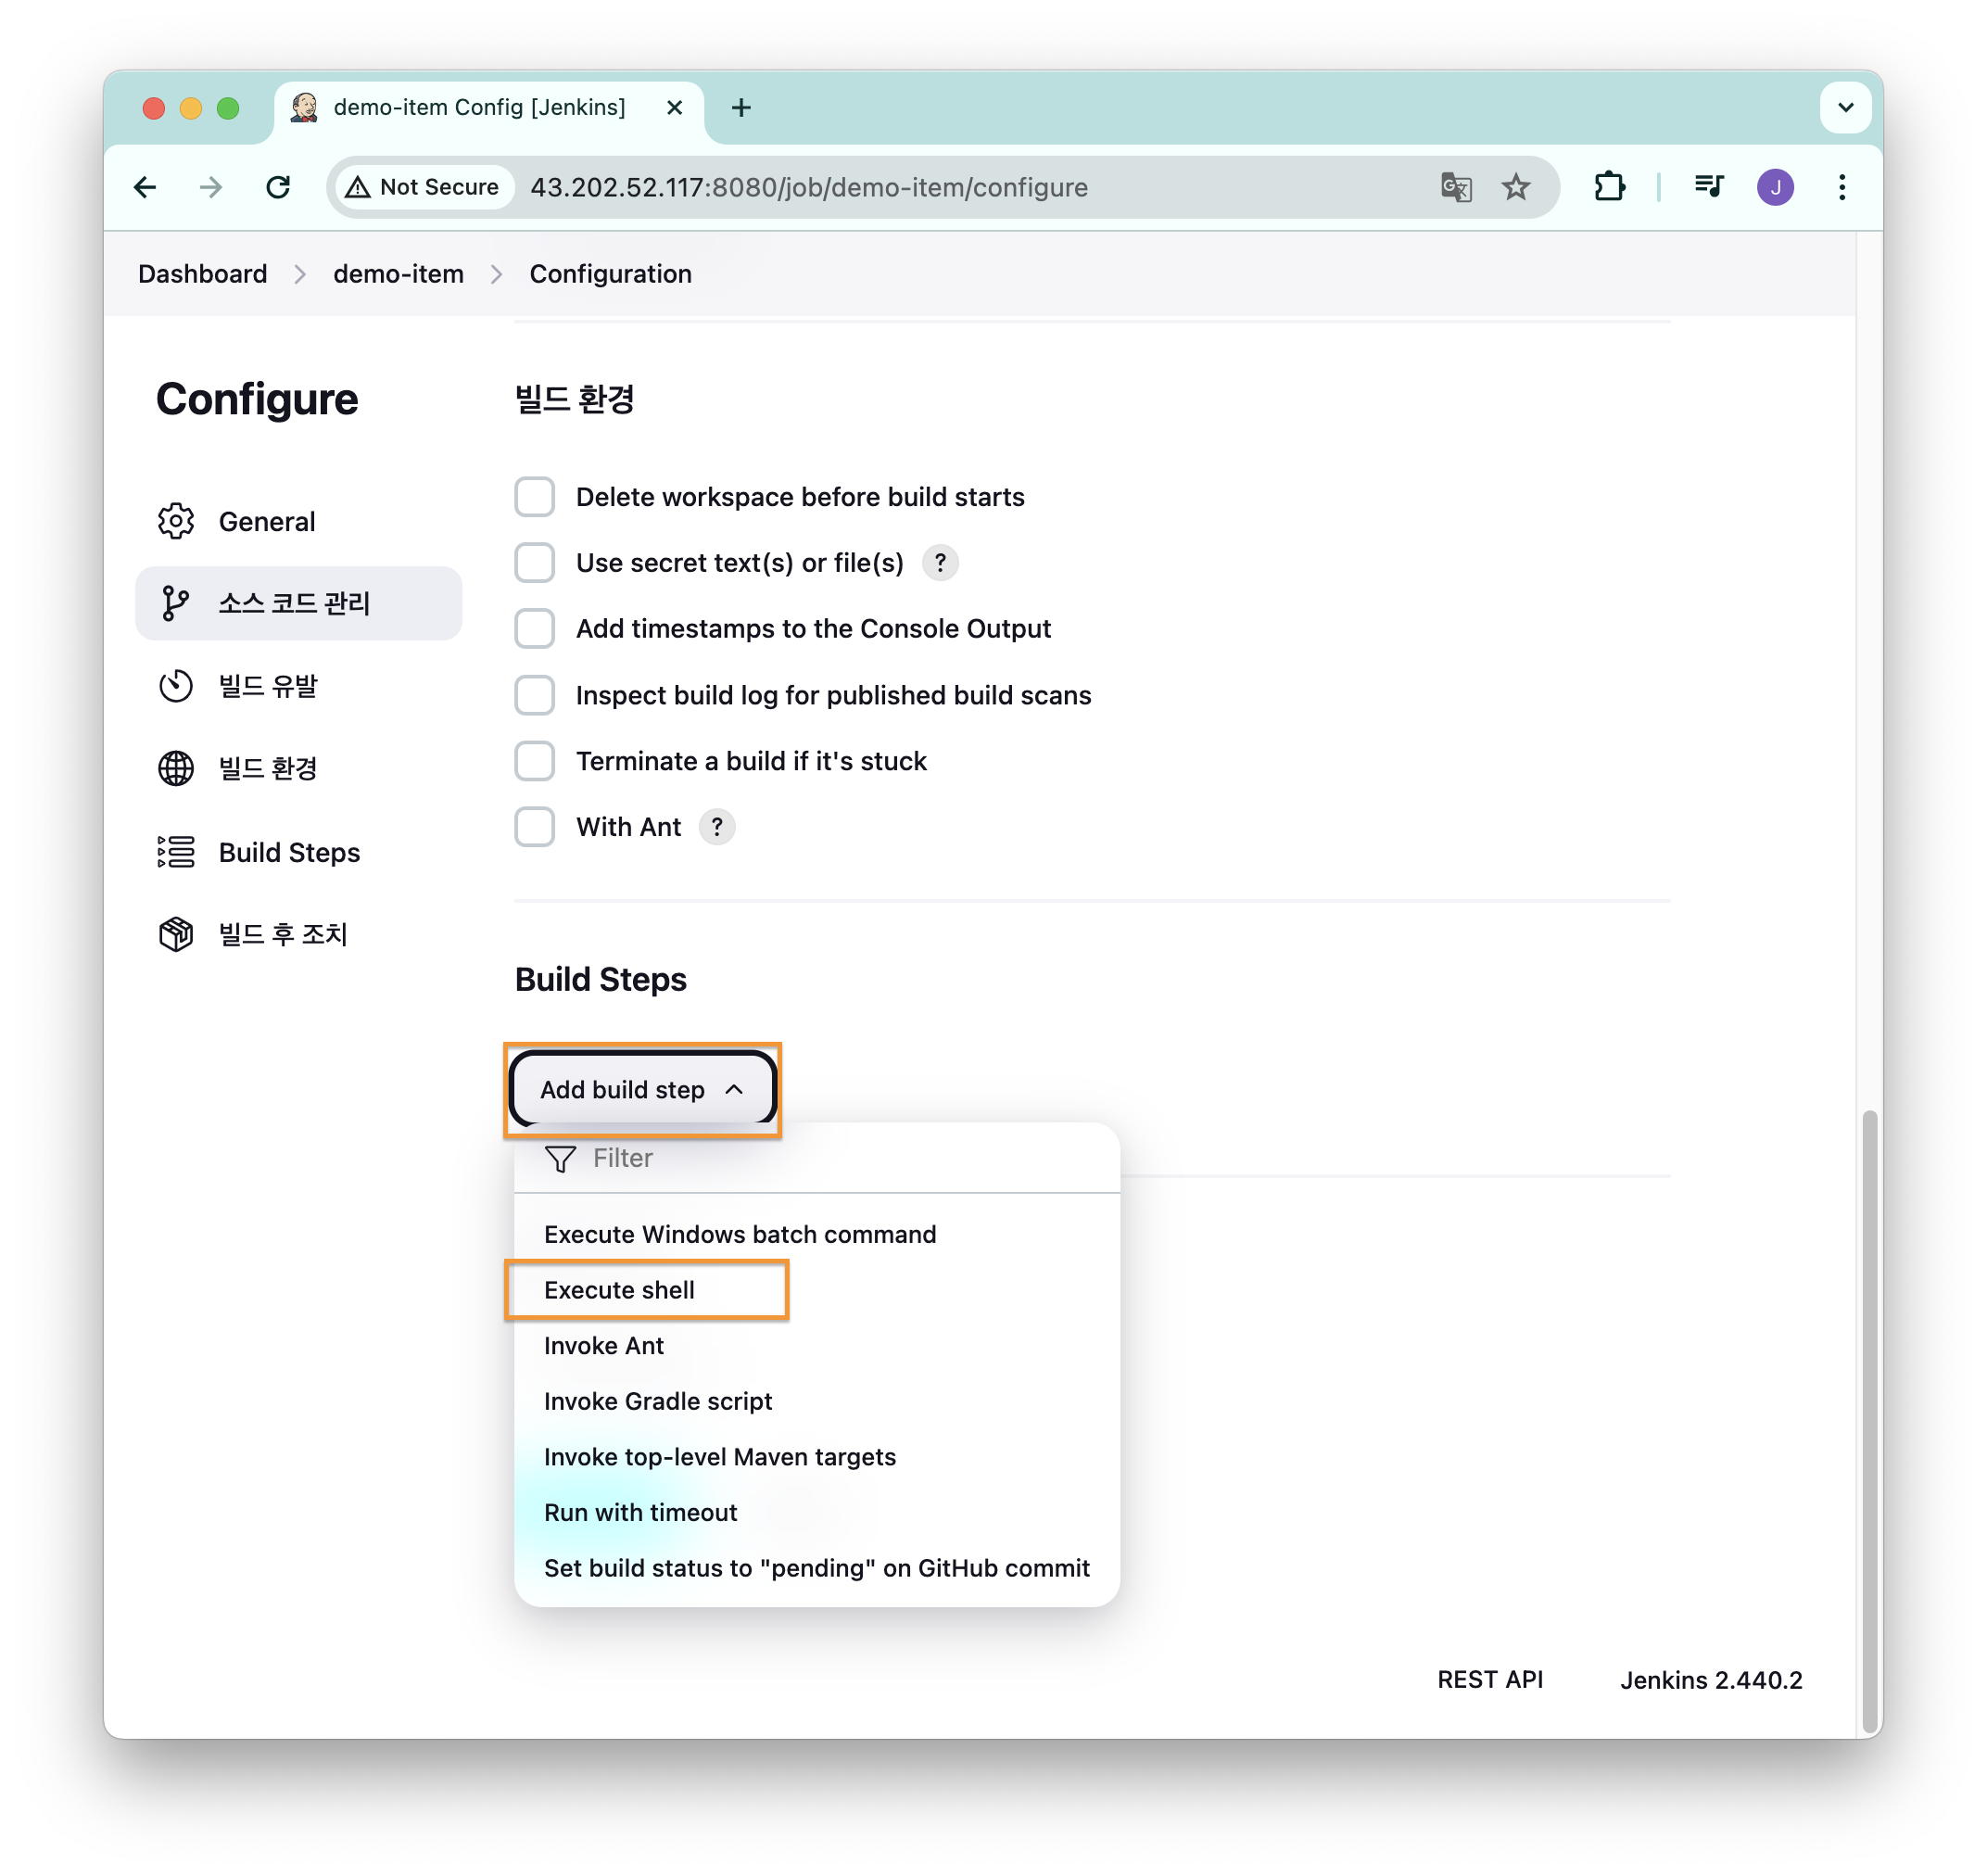
[Add build step] 클릭 후 [Execute shell] 선택
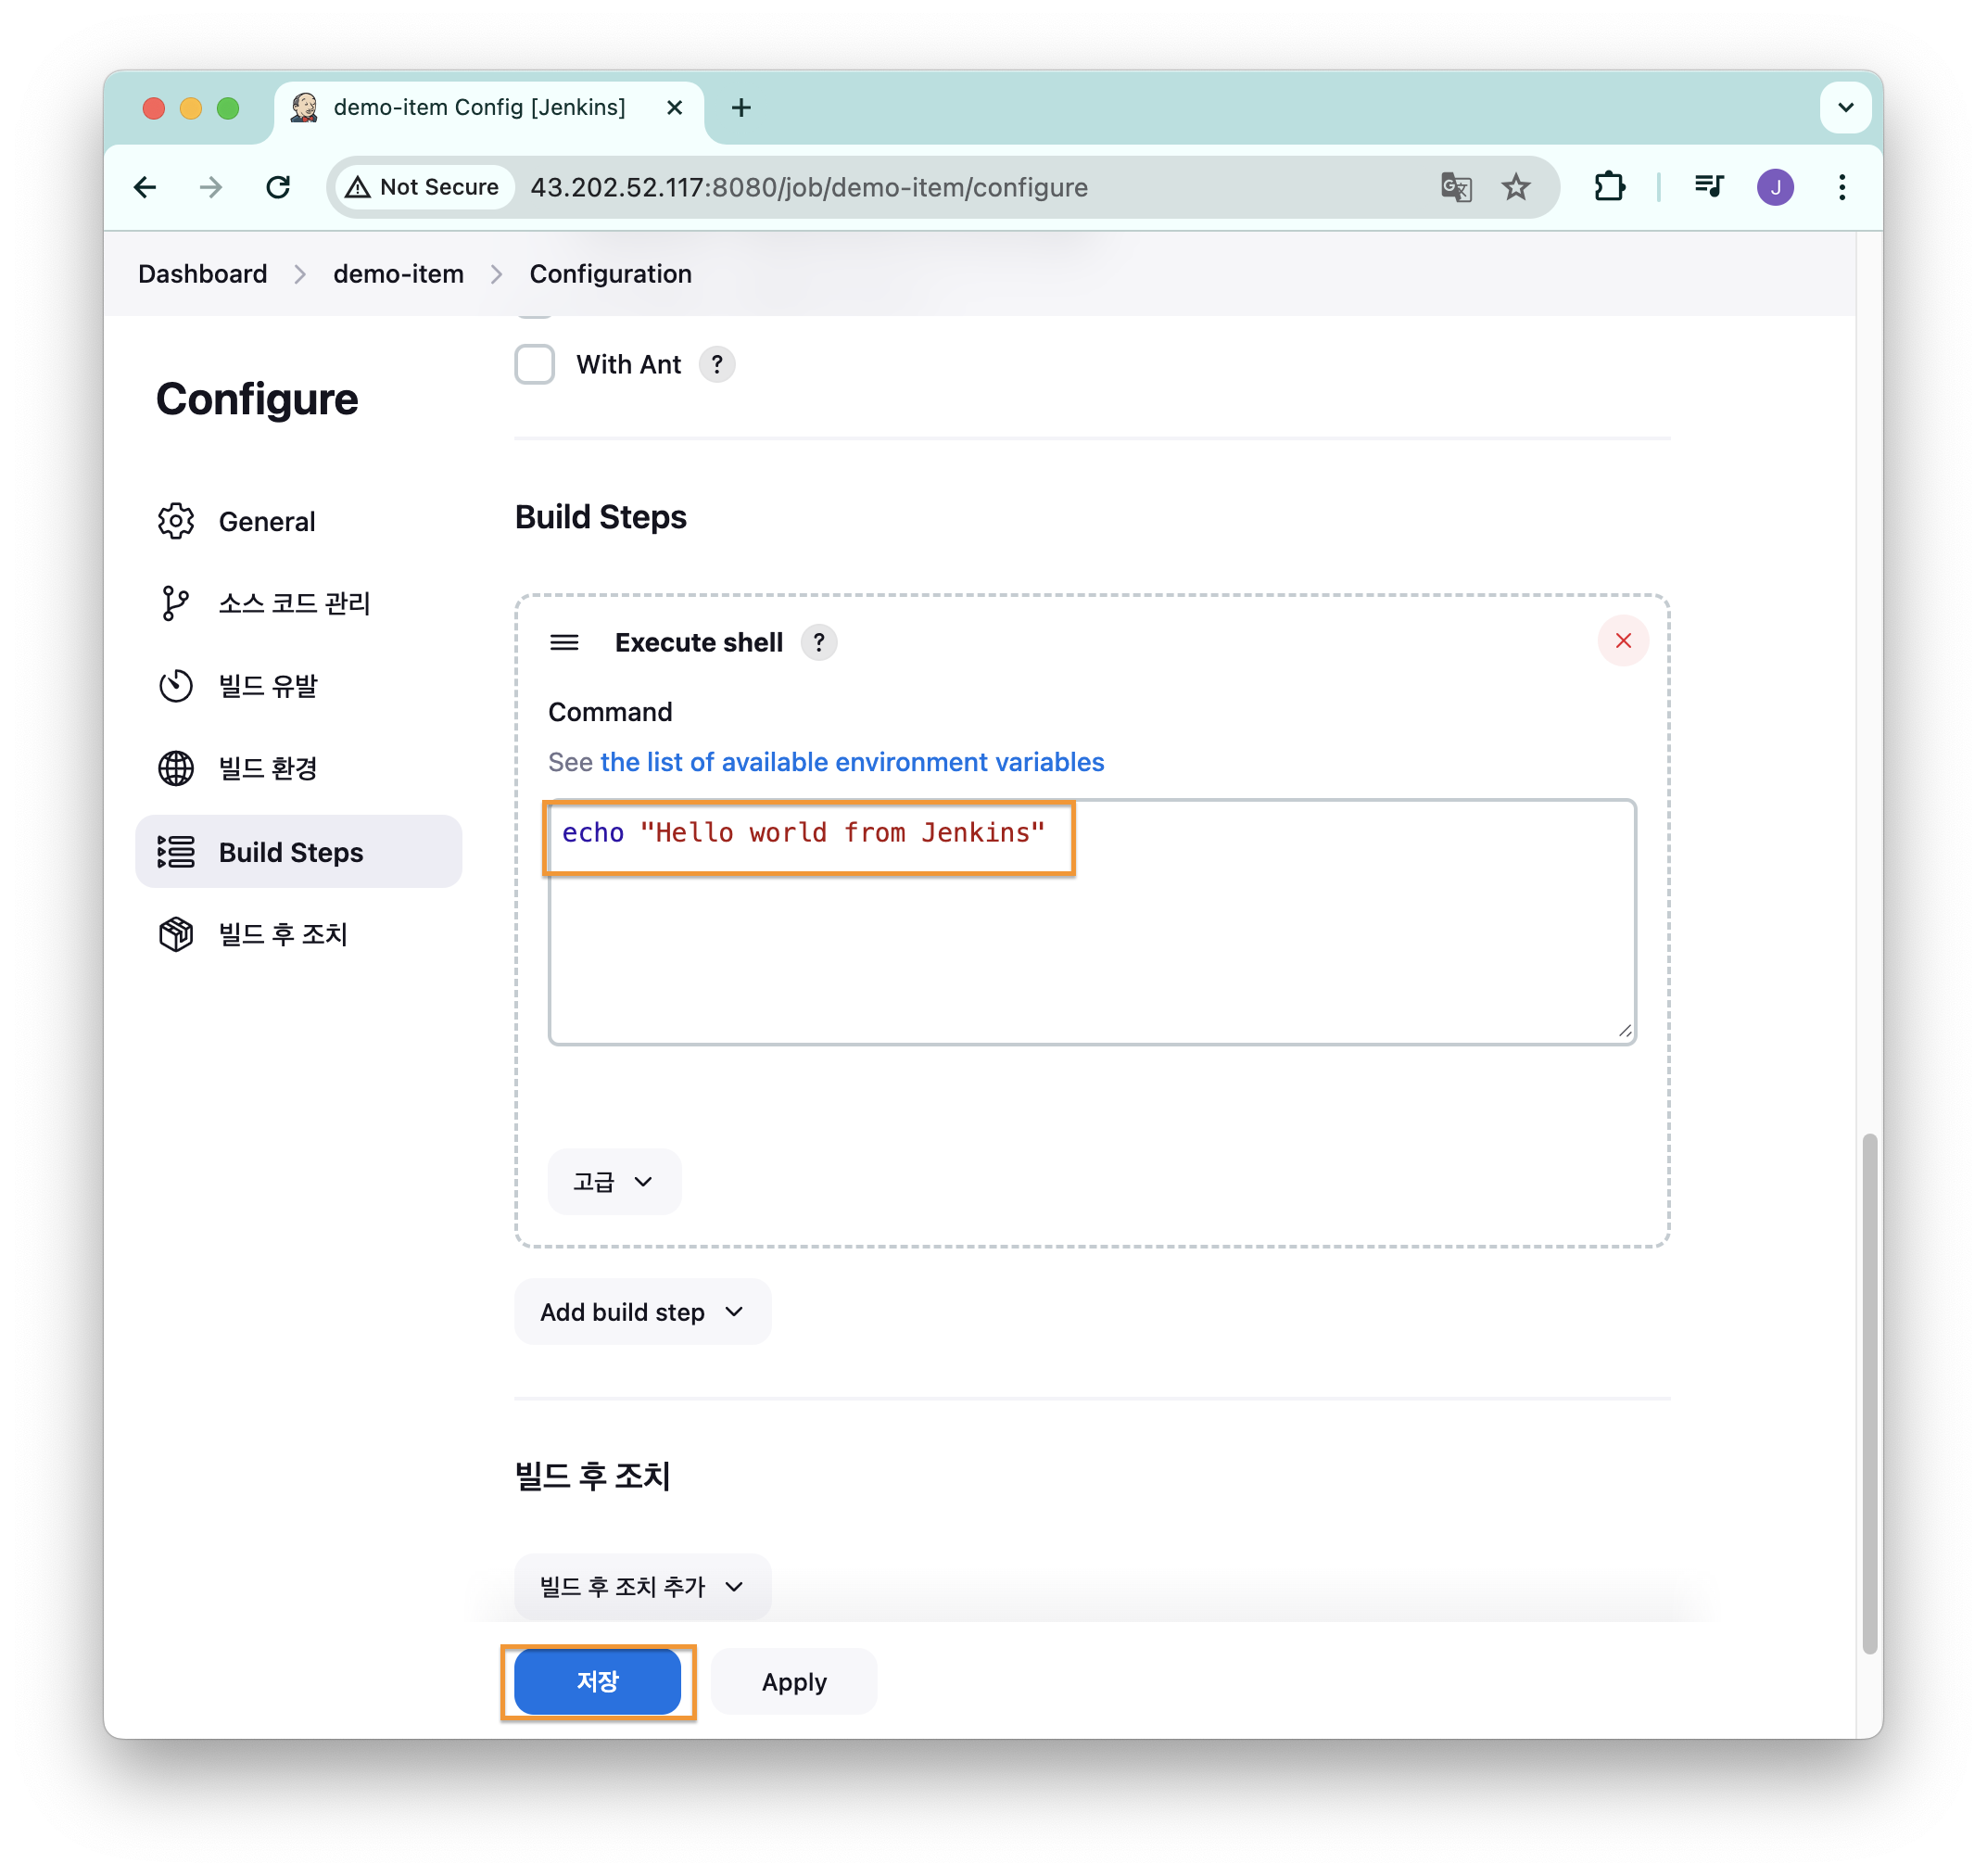
간단한 예시를 위해 echo "Hello world from Jenkins" 를 입력하고 [저장] 버튼 클릭
[지금 빌드] 를 클릭하면 [Build History] 항목 밑에 #1 이 새롭게 생성된다.
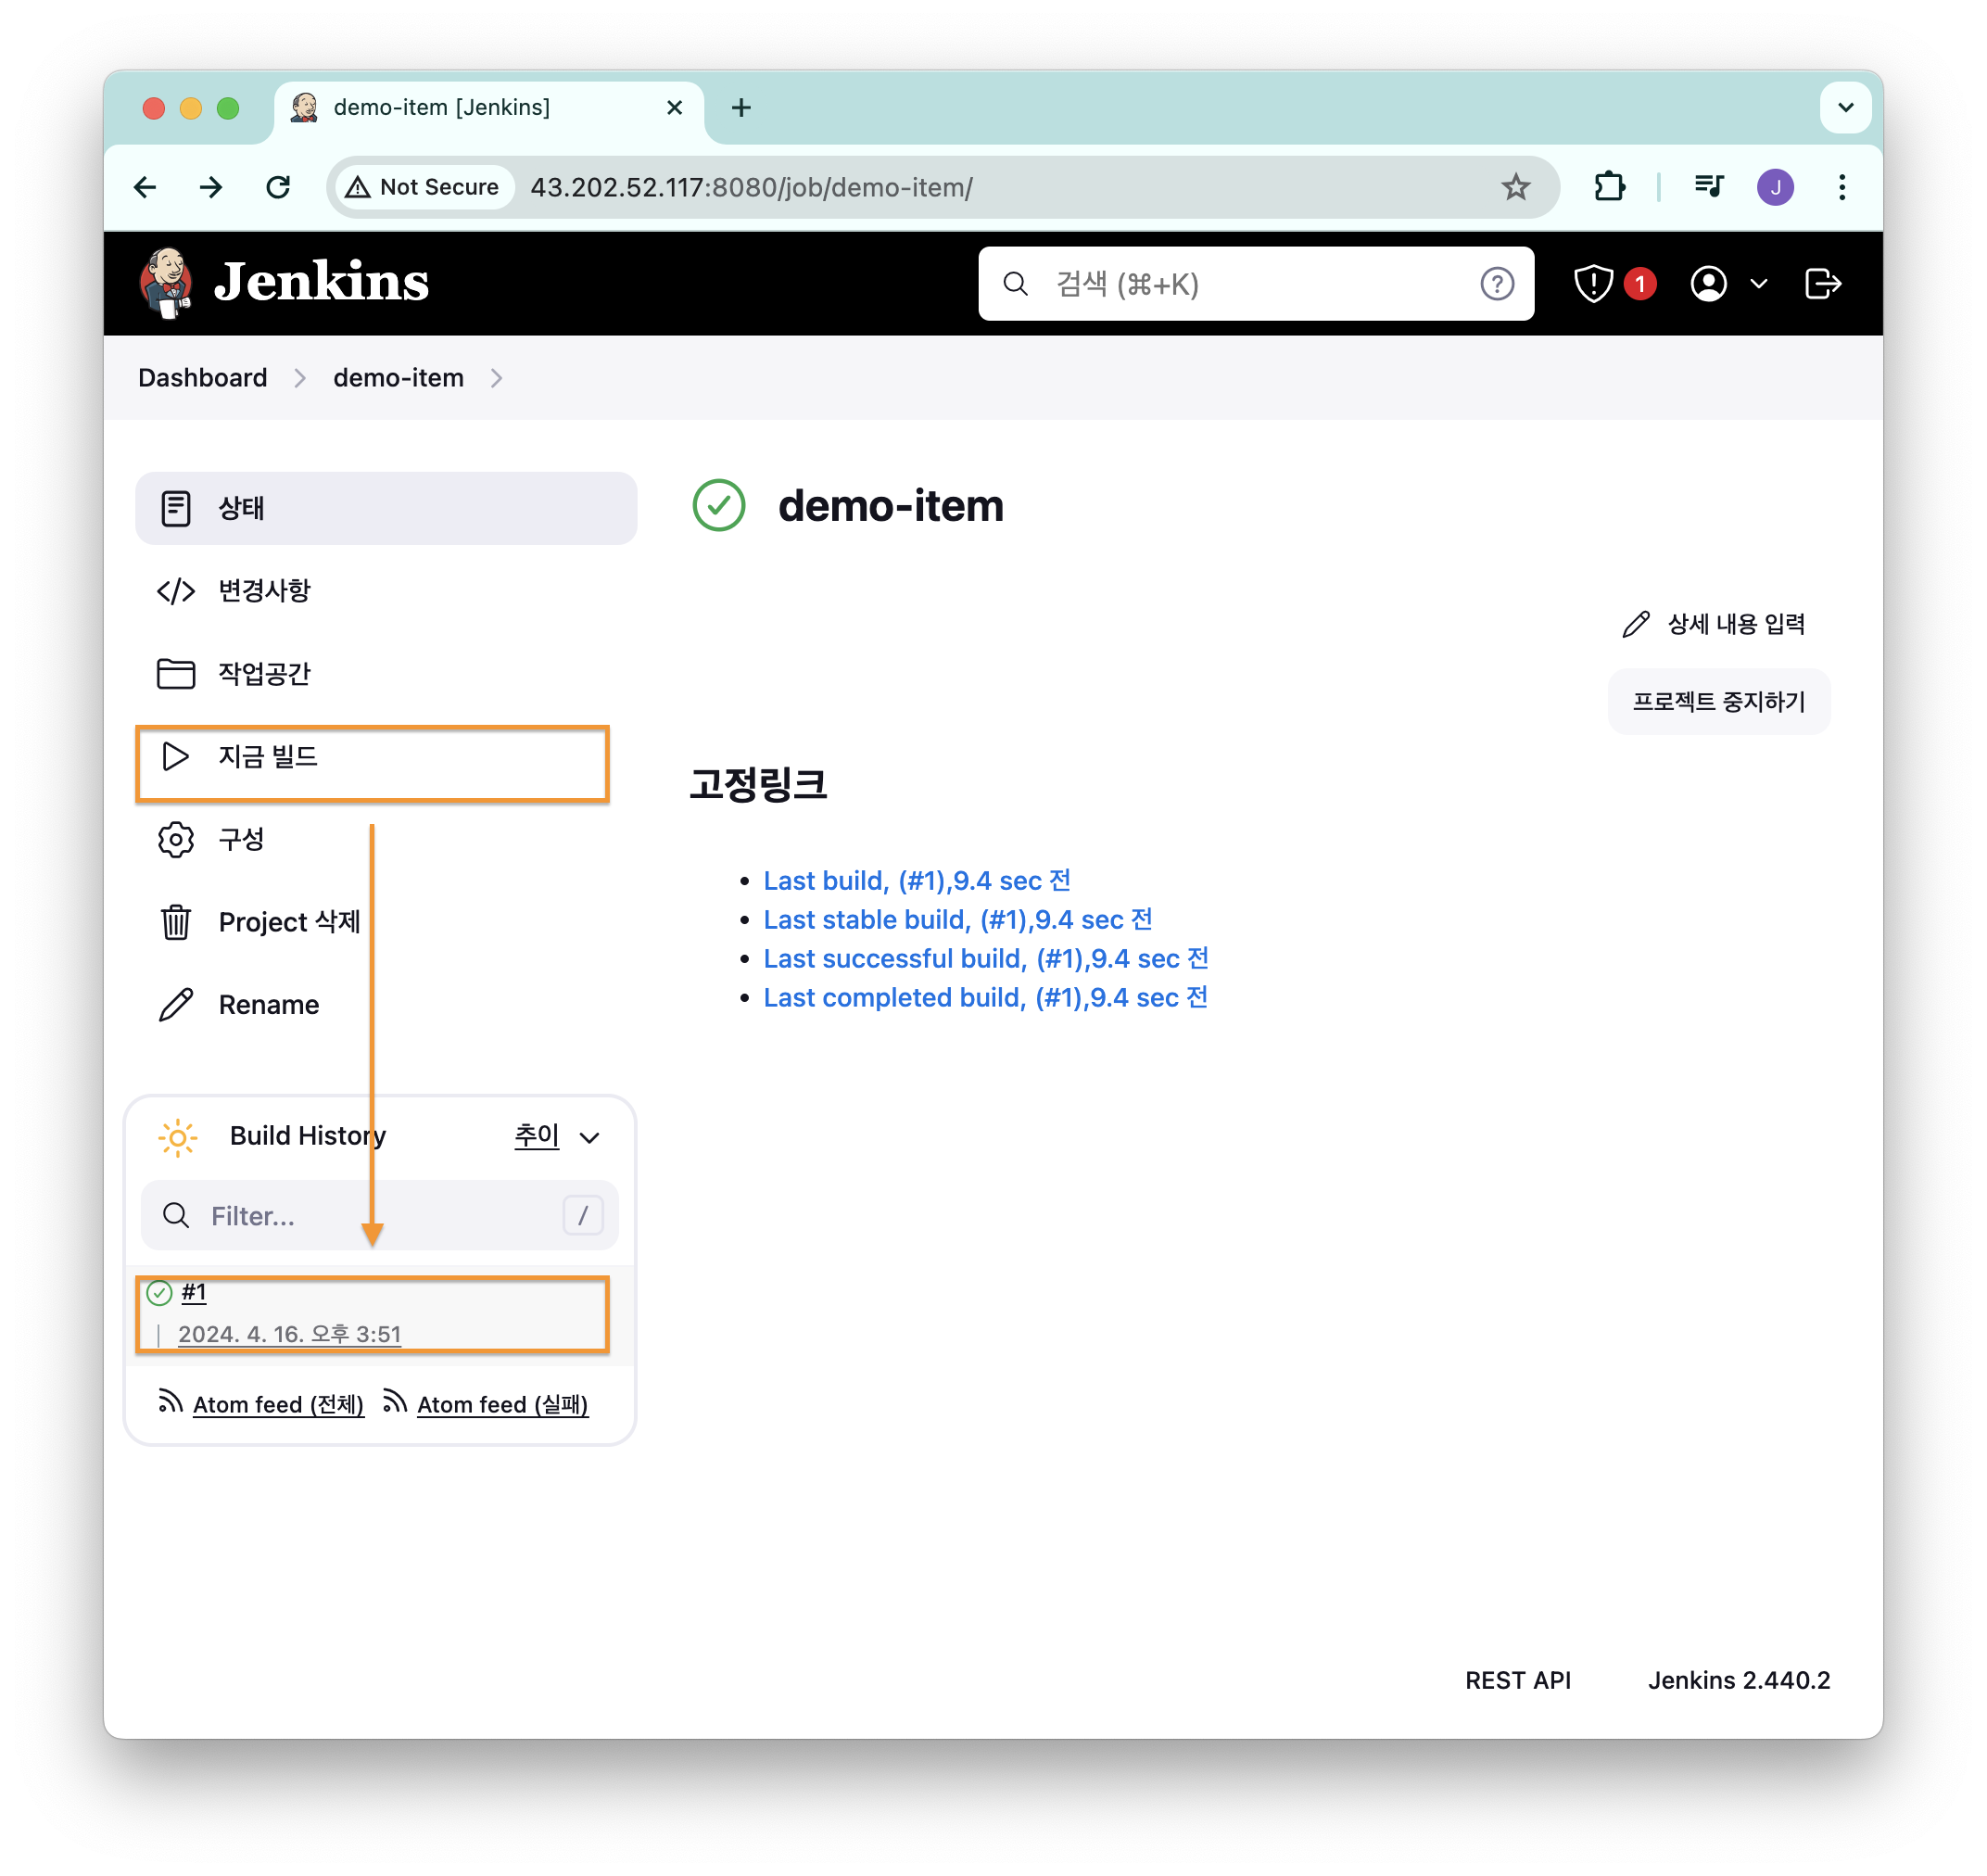
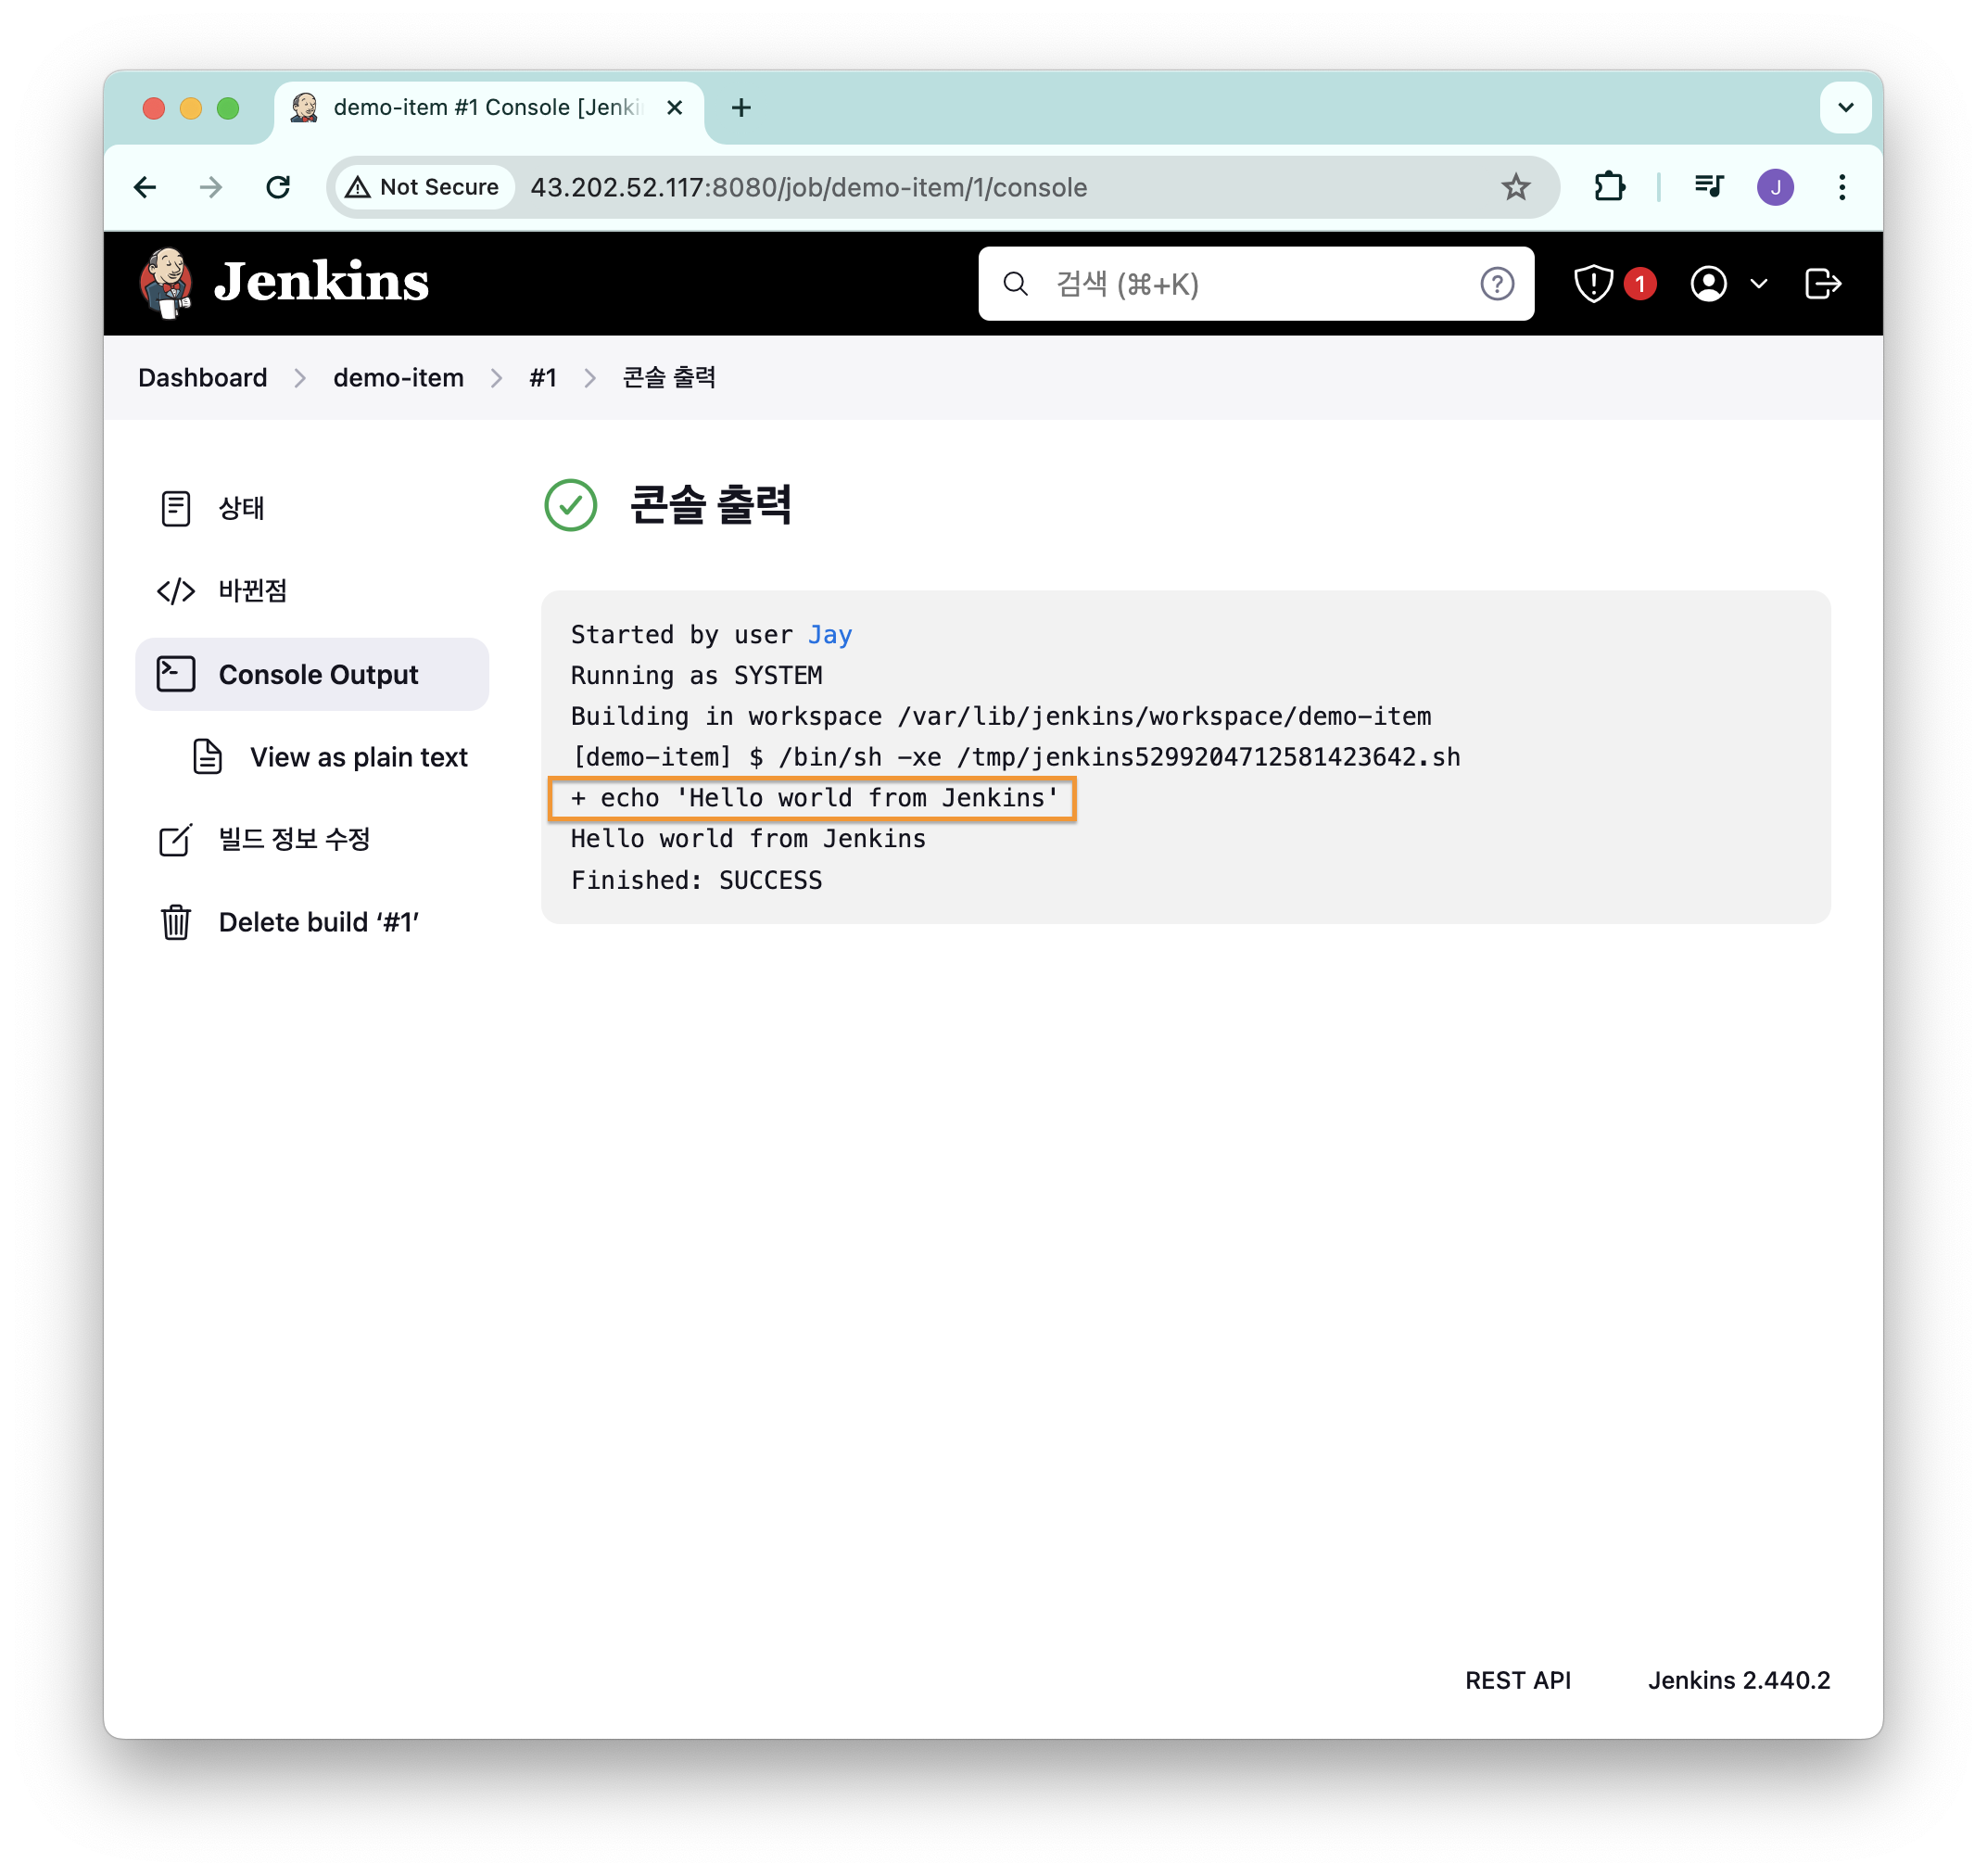
날짜를 클릭해서 [Console Output] 을 클릭하면 실행 결과를 확인할 수 있다.

아래의 이미지와 같이 echo "Hello world from Jenkins" 명령어가 실행된 것을 확인할 수 있다.
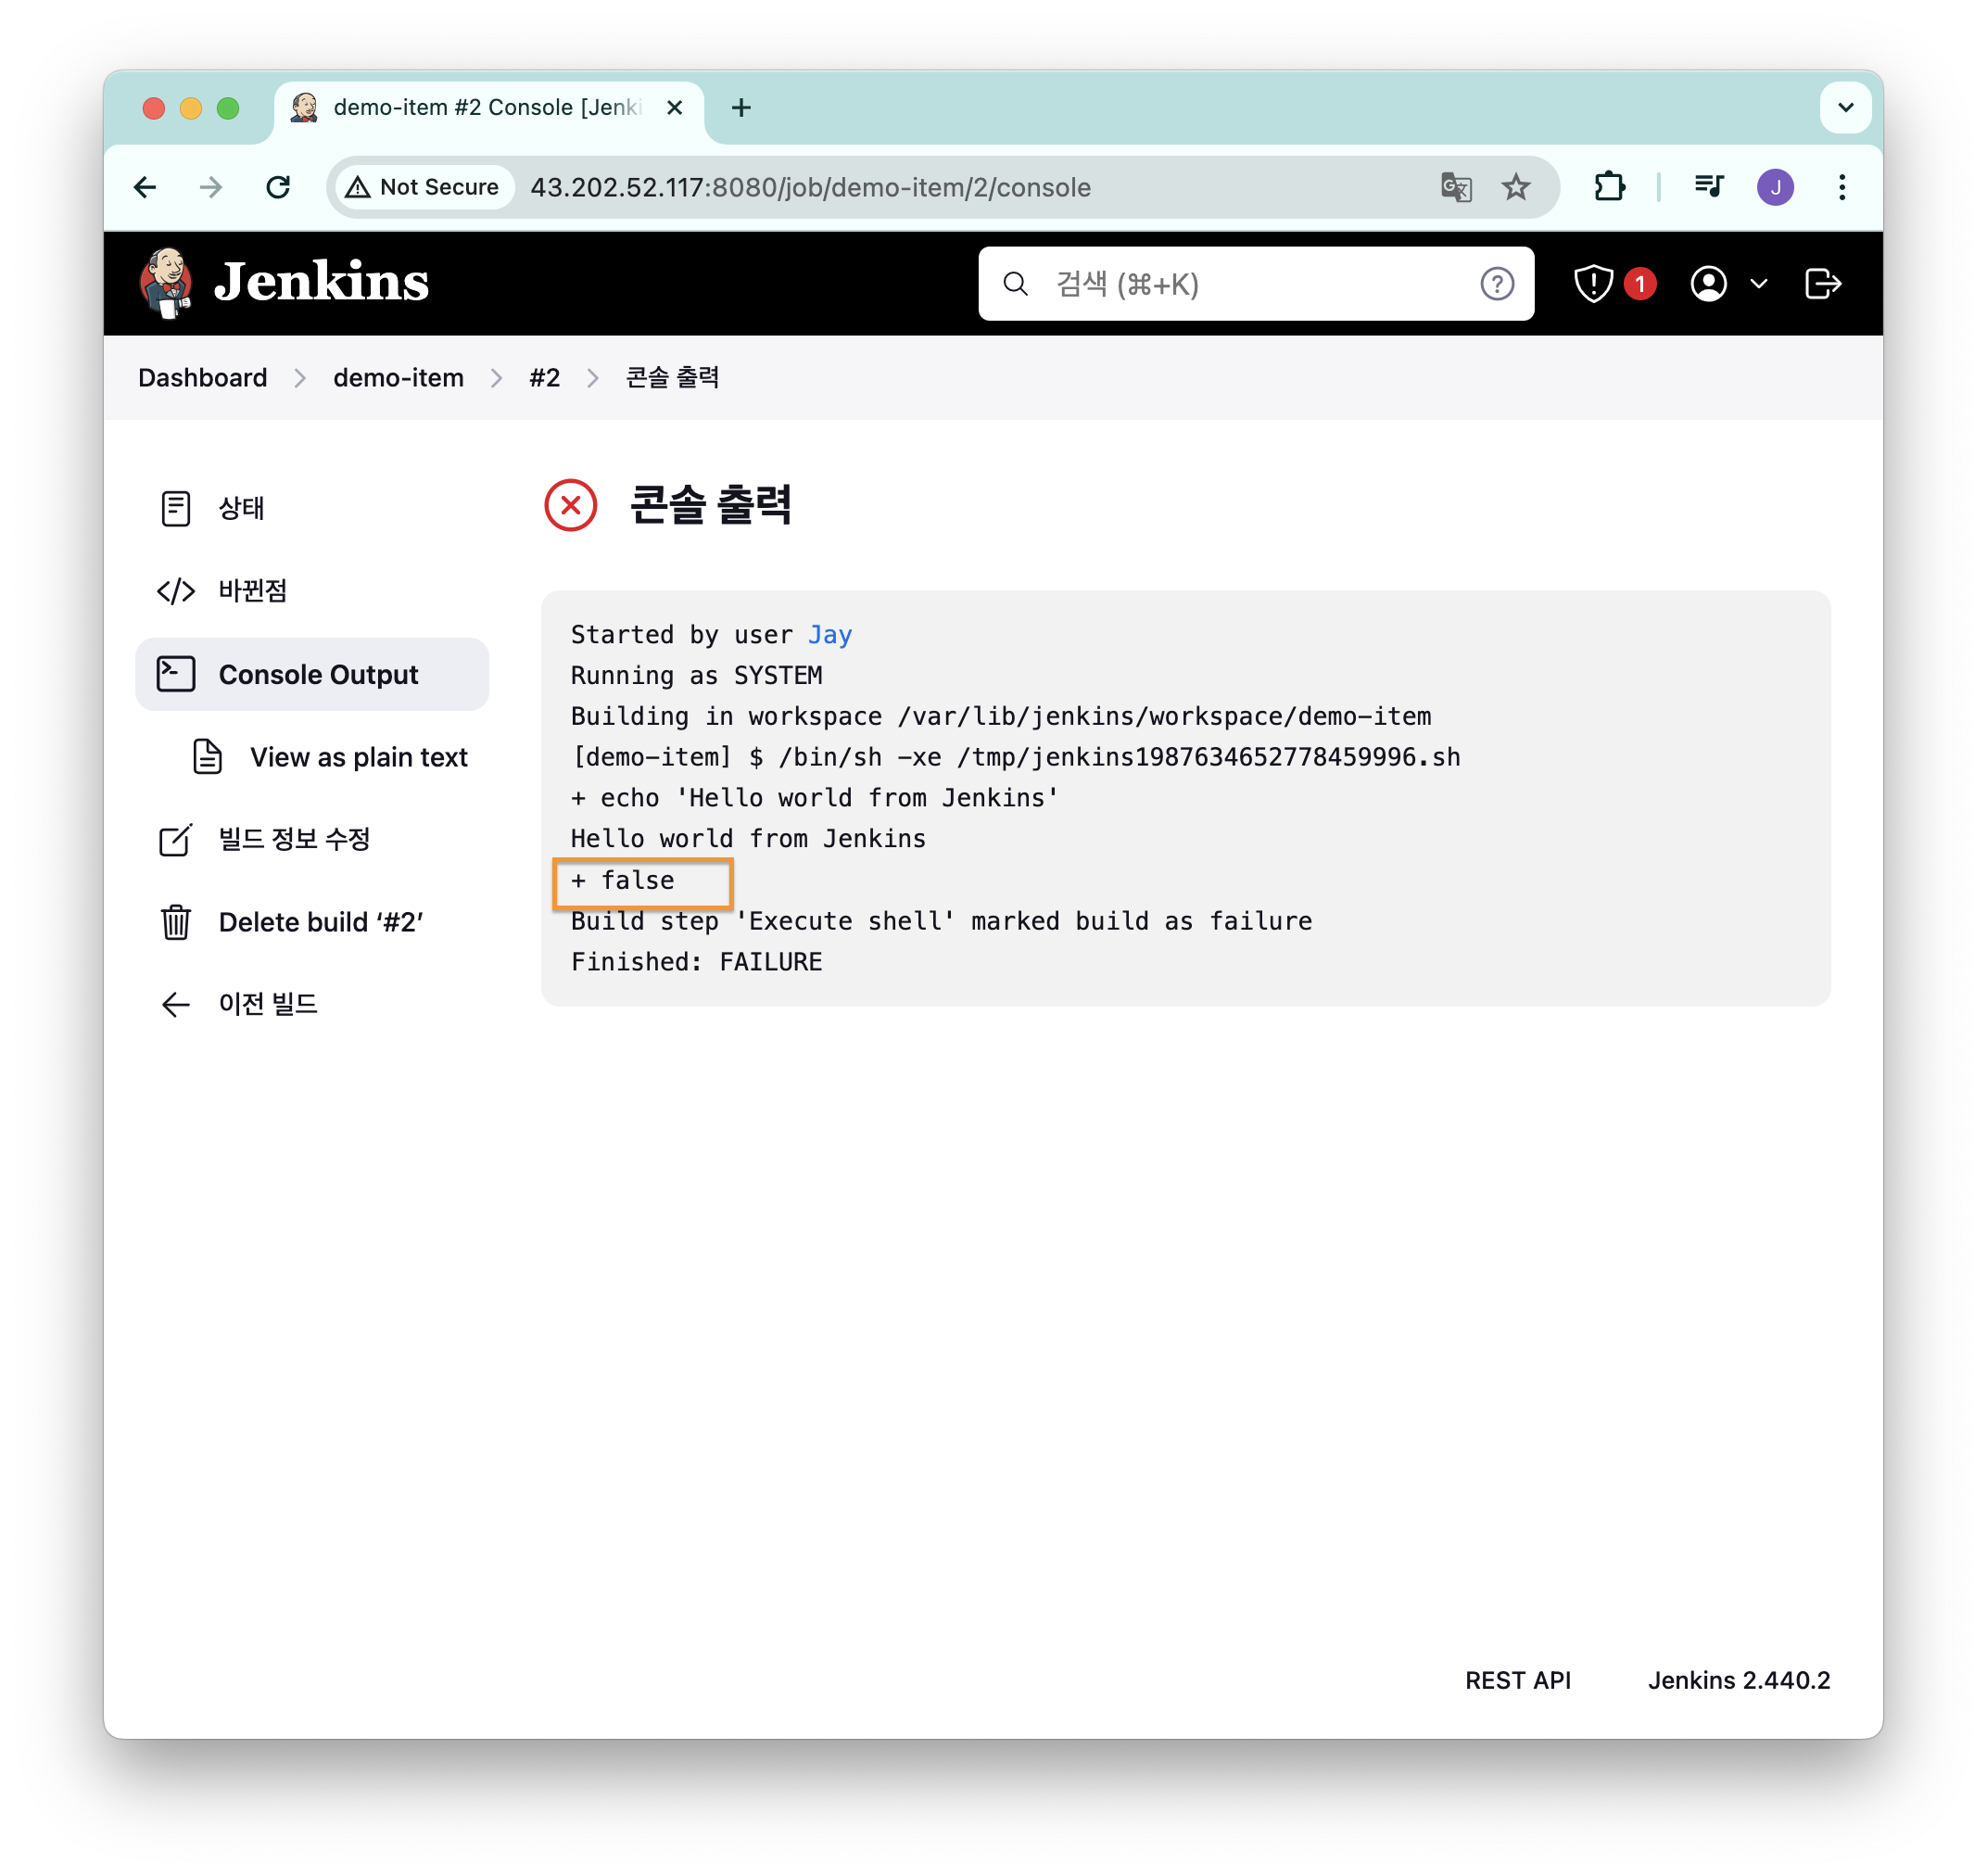
빌드 실패
만약 명령어 실행 종료값이 0이 아니라면 아래와 같이 빌드는 실패했다고 표시된다.
아래의 이미지에서는 false 명령어를 실행하게 해서 실행 종료값을 1을 반환하도록 한 것이다.
참고로 + false 에서 + 의 우측이 실행할 명령어라는 것을 의미한다.
파일 저장
shell 스크립트를 아래와 같이 hello.txt 파일을 저장하도록 수정했다.
echo "hello" > hello.txt[지금 빌드] 실행 후 해당 파일을 찾으려면 /var/lib/jenkins/workspace 에 생성된 워크스페이스 폴더에서 찾을 수 있다.
ls /var/lib/jenkins/workspace/
#demo-item

tree /var/lib/jenkins/workspace/demo-item
#/var/lib/jenkins/workspace/demo-item
#└── hello.txt

#0 directories, 1 file

cat /var/lib/jenkins/workspace/demo-item/hello.txt
#hello
참고로 각각의 job 도 /var/lib/jenkins/jobs 하위 디렉토리에 저장된다.
tree /var/lib/jenkins/jobs/
#/var/lib/jenkins/jobs/
#└── demo-item
#    ├── builds
#    │   ├── 1
#    │   │   ├── build.xml
#    │   │   ├── changelog.xml
#    │   │   └── log
#    │   ├── 2
#    │   │   ├── build.xml
#    │   │   ├── changelog.xml
#    │   │   └── log
#    │   ├── 3
#    │   │   ├── build.xml
#    │   │   ├── changelog.xml
#    │   │   └── log
#    │   ├── legacyIds
#    │   └── permalinks
#    ├── config.xml
#    └── nextBuildNumber
#
#5 directories, 13 files
3번 job 의 log 파일을 확인해보면 젠킨스 UI 에서 보여주는 로그와 동일한 것을 알 수 있다.
cat /var/lib/jenkins/jobs/demo-item/builds/3/log출력 결과는 아래와 같다.
Started by user ha:////4O...==Jay
Running as SYSTEM
Building in workspace /var/lib/jenkins/workspace/demo-item
[demo-item] $ /bin/sh -xe /tmp/jenkins11890863677381737251.sh
+ echo 'Hello world from Jenkins'
Hello world from Jenkins
+ echo hello
Finished: SUCCESS
도커 실습
docker 실행 권한 부여
[Build Steps] 에서 아래의 shell 스크립트를 실행하면 도커에 접근 권한이 없다고 표시된다.
docker ps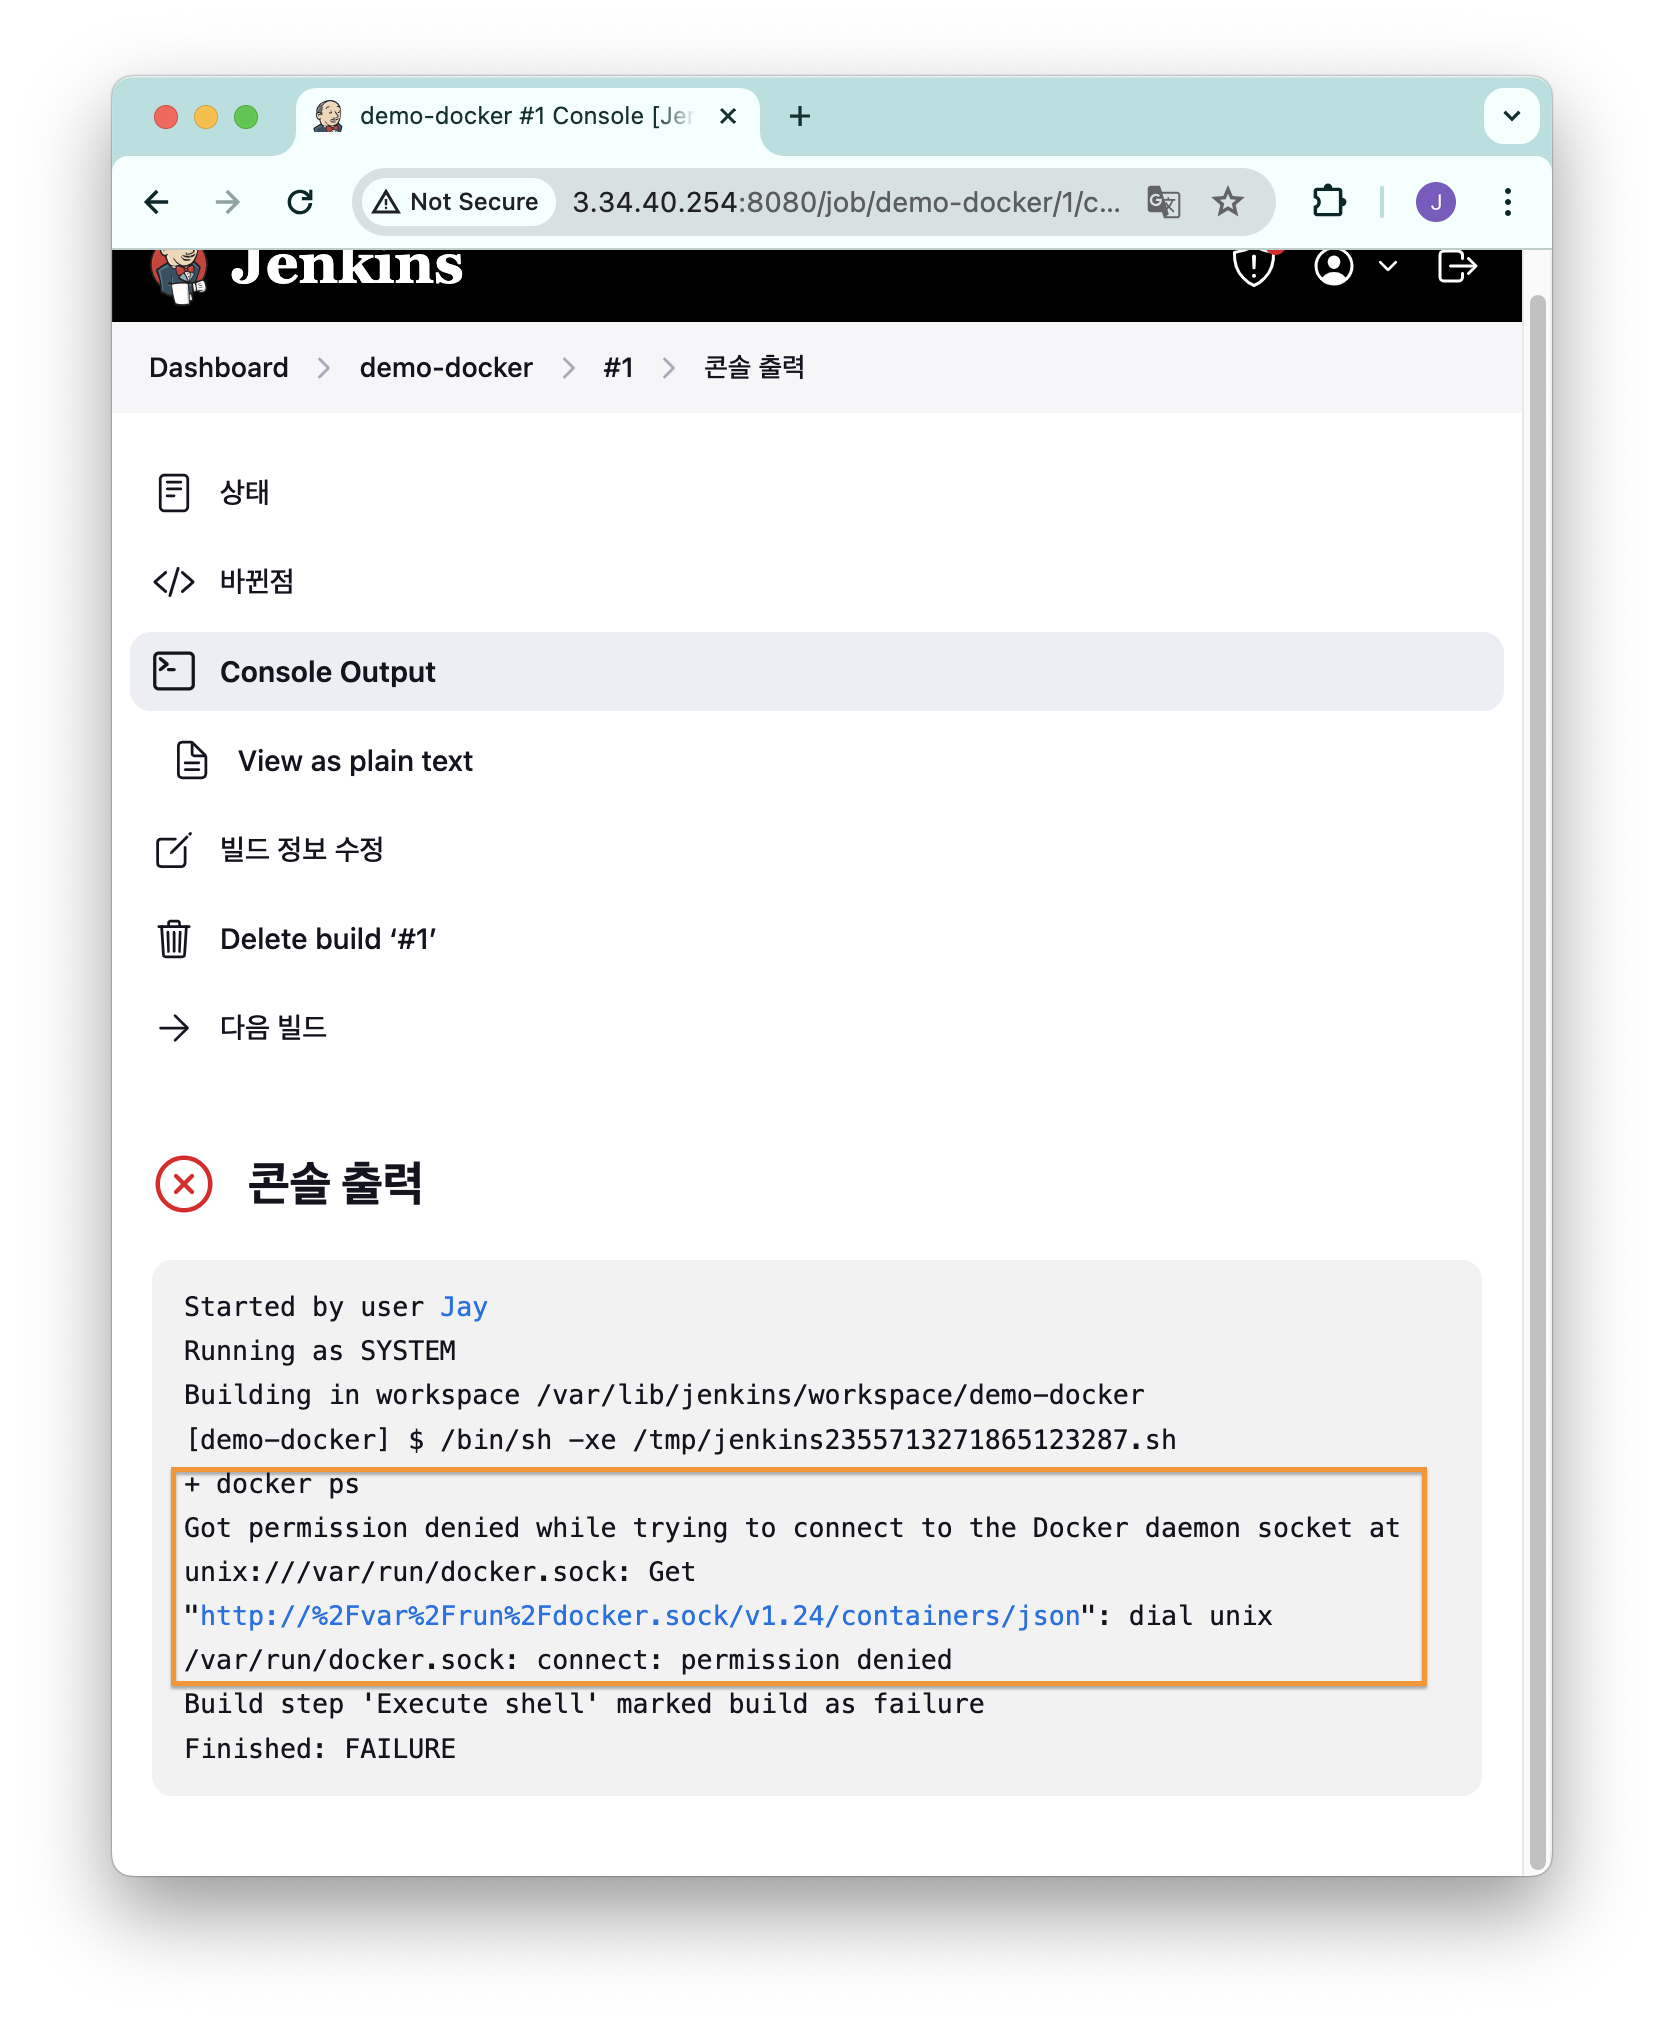
docker 명령어를 실행하기 위해서는 계정이 docker 그룹에 속해있어야 한다.
이는 docker 소켓 파일을 이용하기 위해서이다.
ls -l /var/run/docker.sock
#srw-rw---- 1 root docker 0 Apr 16 14:25 /var/run/docker.sock
기본으로 root 사용자와 docker 그룹에 속한 계정만 사용할 수 있기 때문이다.
jenkins 계정이 기본적으로 docker 그룹에 속하지 않는다.
id jenkins
#uid=995(jenkins) gid=991(jenkins) groups=991(jenkins)
따라서 docker 명령어를 실행하기 위해 jenkins 계정을 docker 그룹에 추가해준다.
usermod -aG docker jenkins젠킨스에서 계정 정보를 다시 읽어야 하기 때문에 젠킨스를 다시 실행해준다.
systemctl restart jenkins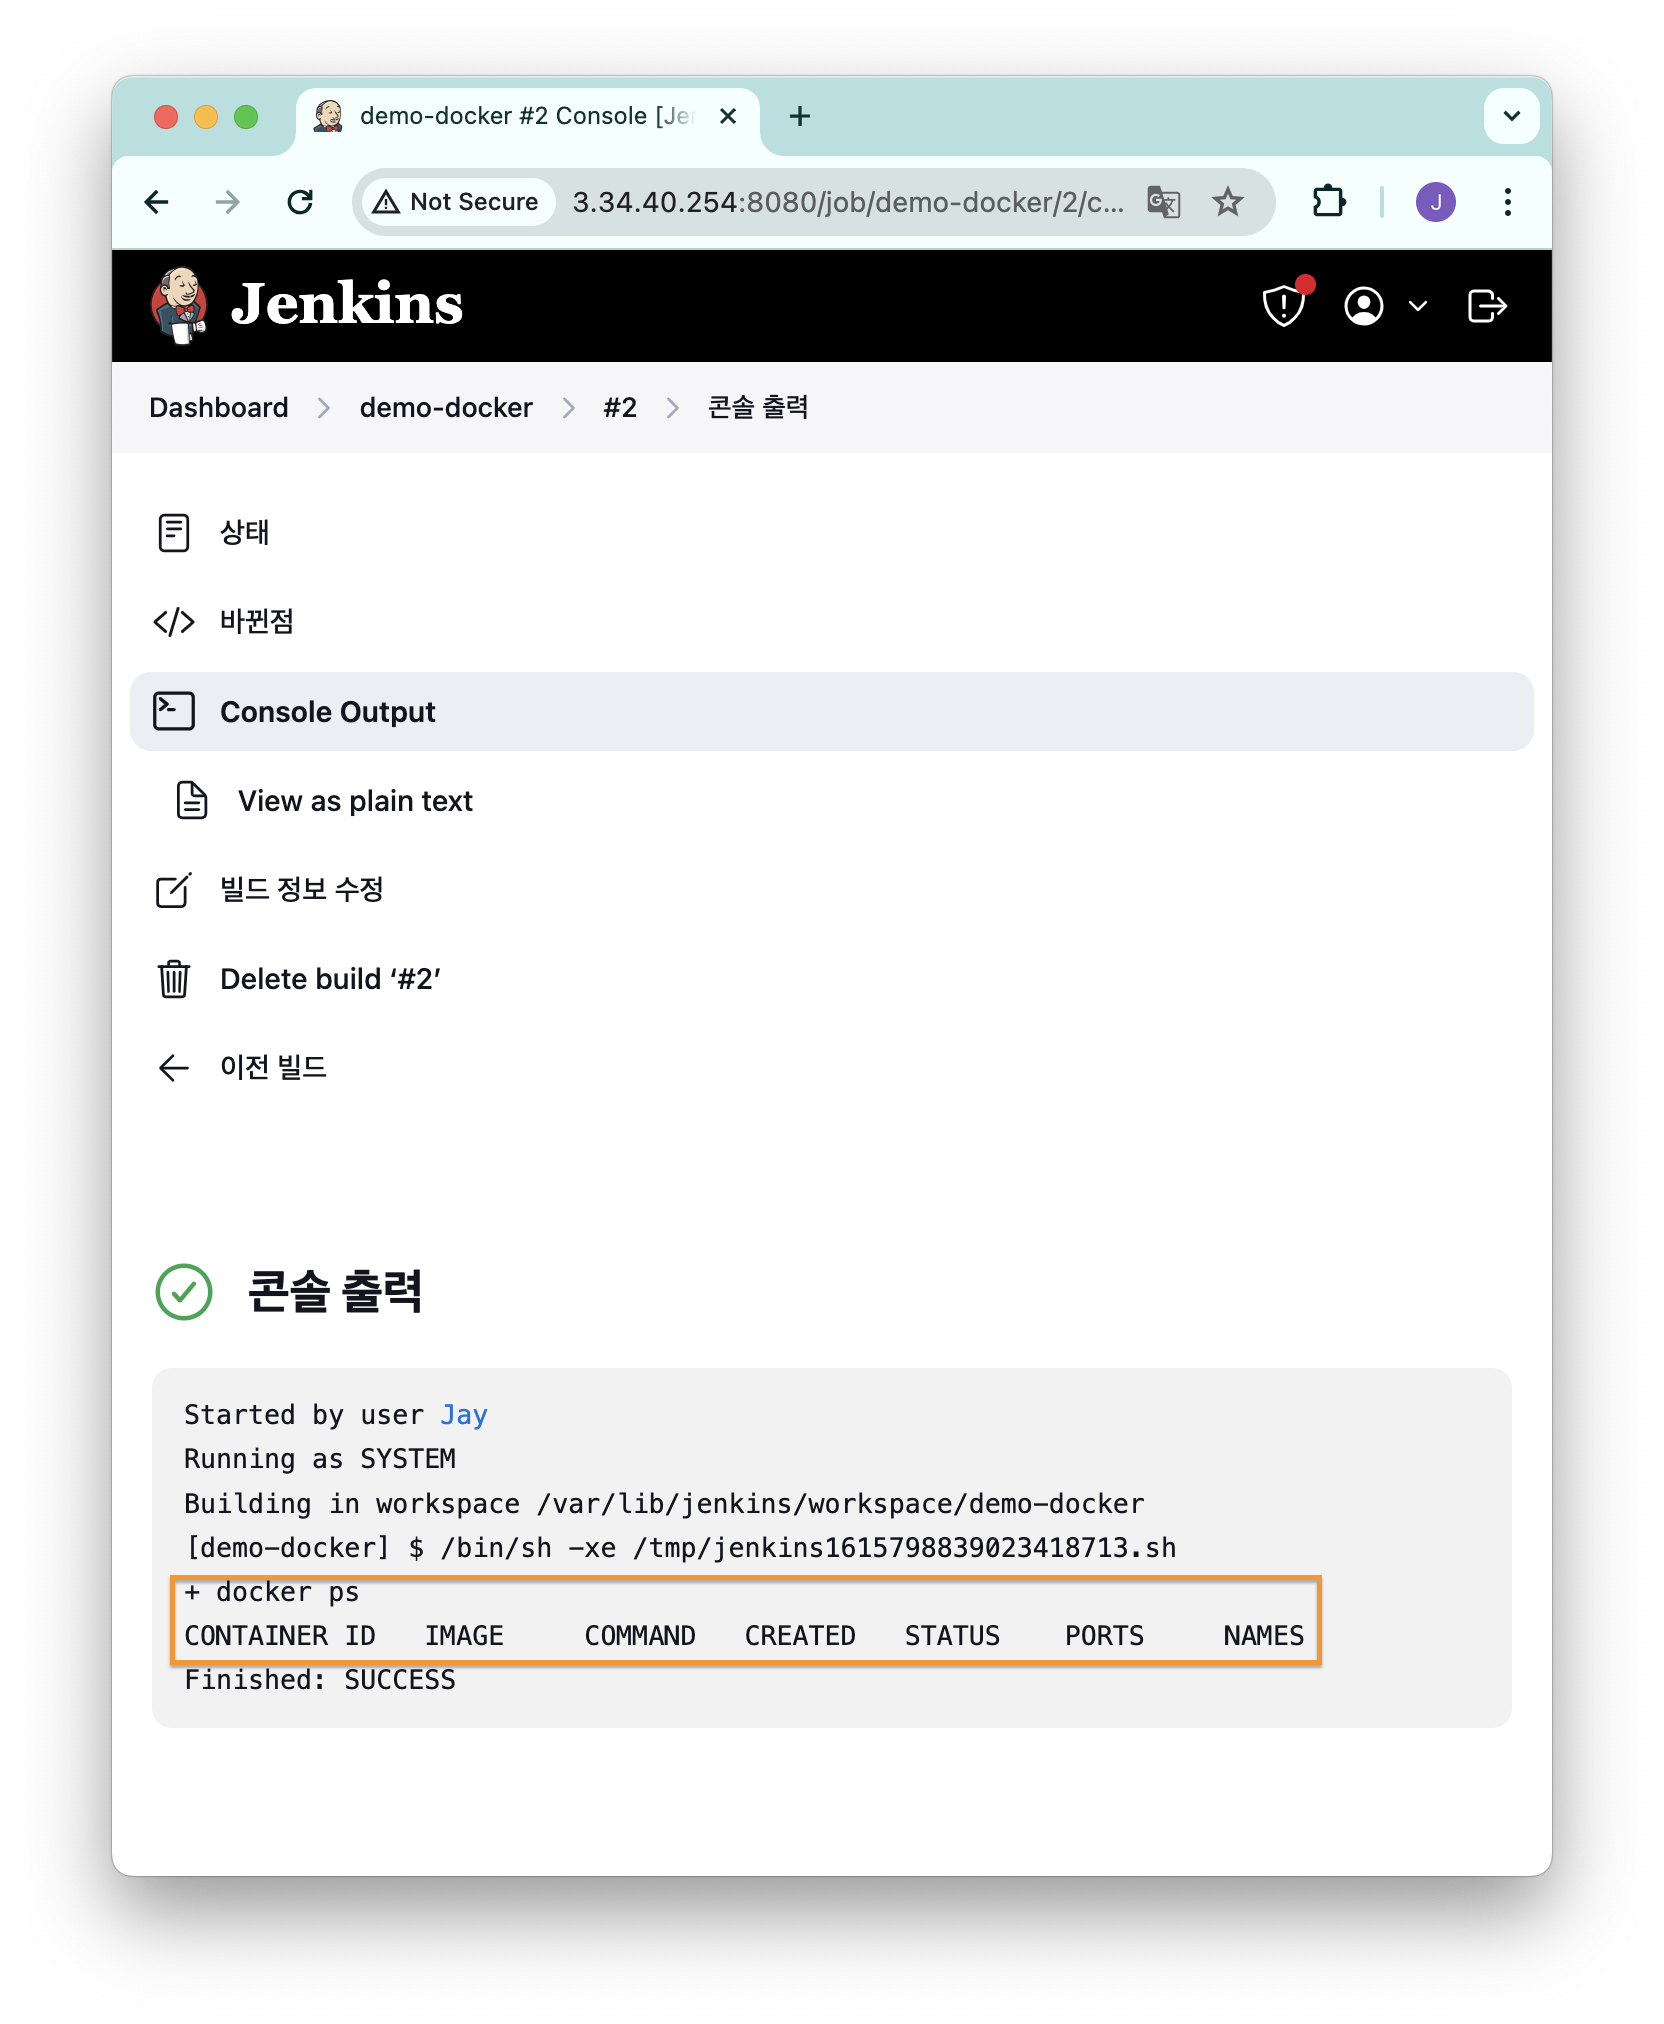
Github 변경 사항 감지하기
Github repository 에 변경 사항이 발생하면 젠킨스 작업을 수행하도록 하는 것도 가능하다.
이번 예시에서는 Github repository 의 특정 경로에 올라가있는 Dockerfile 의 변경사항이 생기면, 이를 젠킨스가 다운로드해서 이미지를 빌드하고 컨테이너로 실행하도록 했다.
설정
Freestyle 로 새로운 아이템을 생성한다.
[빌드 매개변수]
이 빌드는 매개변수가 있습니다.선택- String Parameter 사용
- VERSION, Default Value(v1.0.0)
- NICK, Default Value=<닉네임>
[소스 코드 관리]
- Git 선택
- Repository URL 은 Dockerfile 이 있는 Github repository URL 입력
- Branch 는 */main 으로 입력 (원하는 브랜치에 따라 다르게 입력 가능)
- Additional Behaviours 에서 Sparse Checkout paths 선택 후 Dockerfile 이 존재하는 경로를 입력한다.
[빌드 유발]
- Poll SCM 선택 후 Schedule 항목에 * * * * * 입력 (1분 간격 Github repository 의 상태를 받아옴)
[Build Steps]
- Execute shell
mkdir -p /var/lib/jenkins/myweb
cd /var/lib/jenkins/myweb
rm -rf Dockerfile
wget https://raw.githubusercontent.com/$NICK/aews-cicd/main/1/Dockerfile
docker build -t myweb:$VERSION .
docker run -d -p 80:80 --rm --name myweb myweb:$VERSION
사용한 도커 파일의 내용은 아래와 같이 아파치 웹 서버를 실행하도록 했다.
FROM ubuntu:20.04
ENV TZ=Asia/Seoul VERSION=1.0.0 NICK=Jay
RUN ln -snf /usr/share/zoneinfo/$TZ /etc/localtime && echo $TZ > /etc/timezone && \
    sed -i 's/archive.ubuntu.com/mirror.kakao.com/g' /etc/apt/sources.list && \
    sed -i 's/security.ubuntu.com/mirror.kakao.com/g' /etc/apt/sources.list && \
    apt-get update && apt-get install -y apache2 figlet && \
    echo "$NICK Web Server $VERSION<br>" > /var/www/html/index.html && \
    echo "<pre>" >> /var/www/html/index.html && \
    figlet AEWS Study >> /var/www/html/index.html && \
    echo "</pre>" >> /var/www/html/index.html
EXPOSE 80
CMD ["usr/sbin/apache2ctl", "-DFOREGROUND"]
변경 유발
Dockerfile 에서 ENV 의 VERSION 값을 변경하고 커밋을 올리면 1분 후 젠킨스가 이를 감지해서 컨테이너를 실행한다.
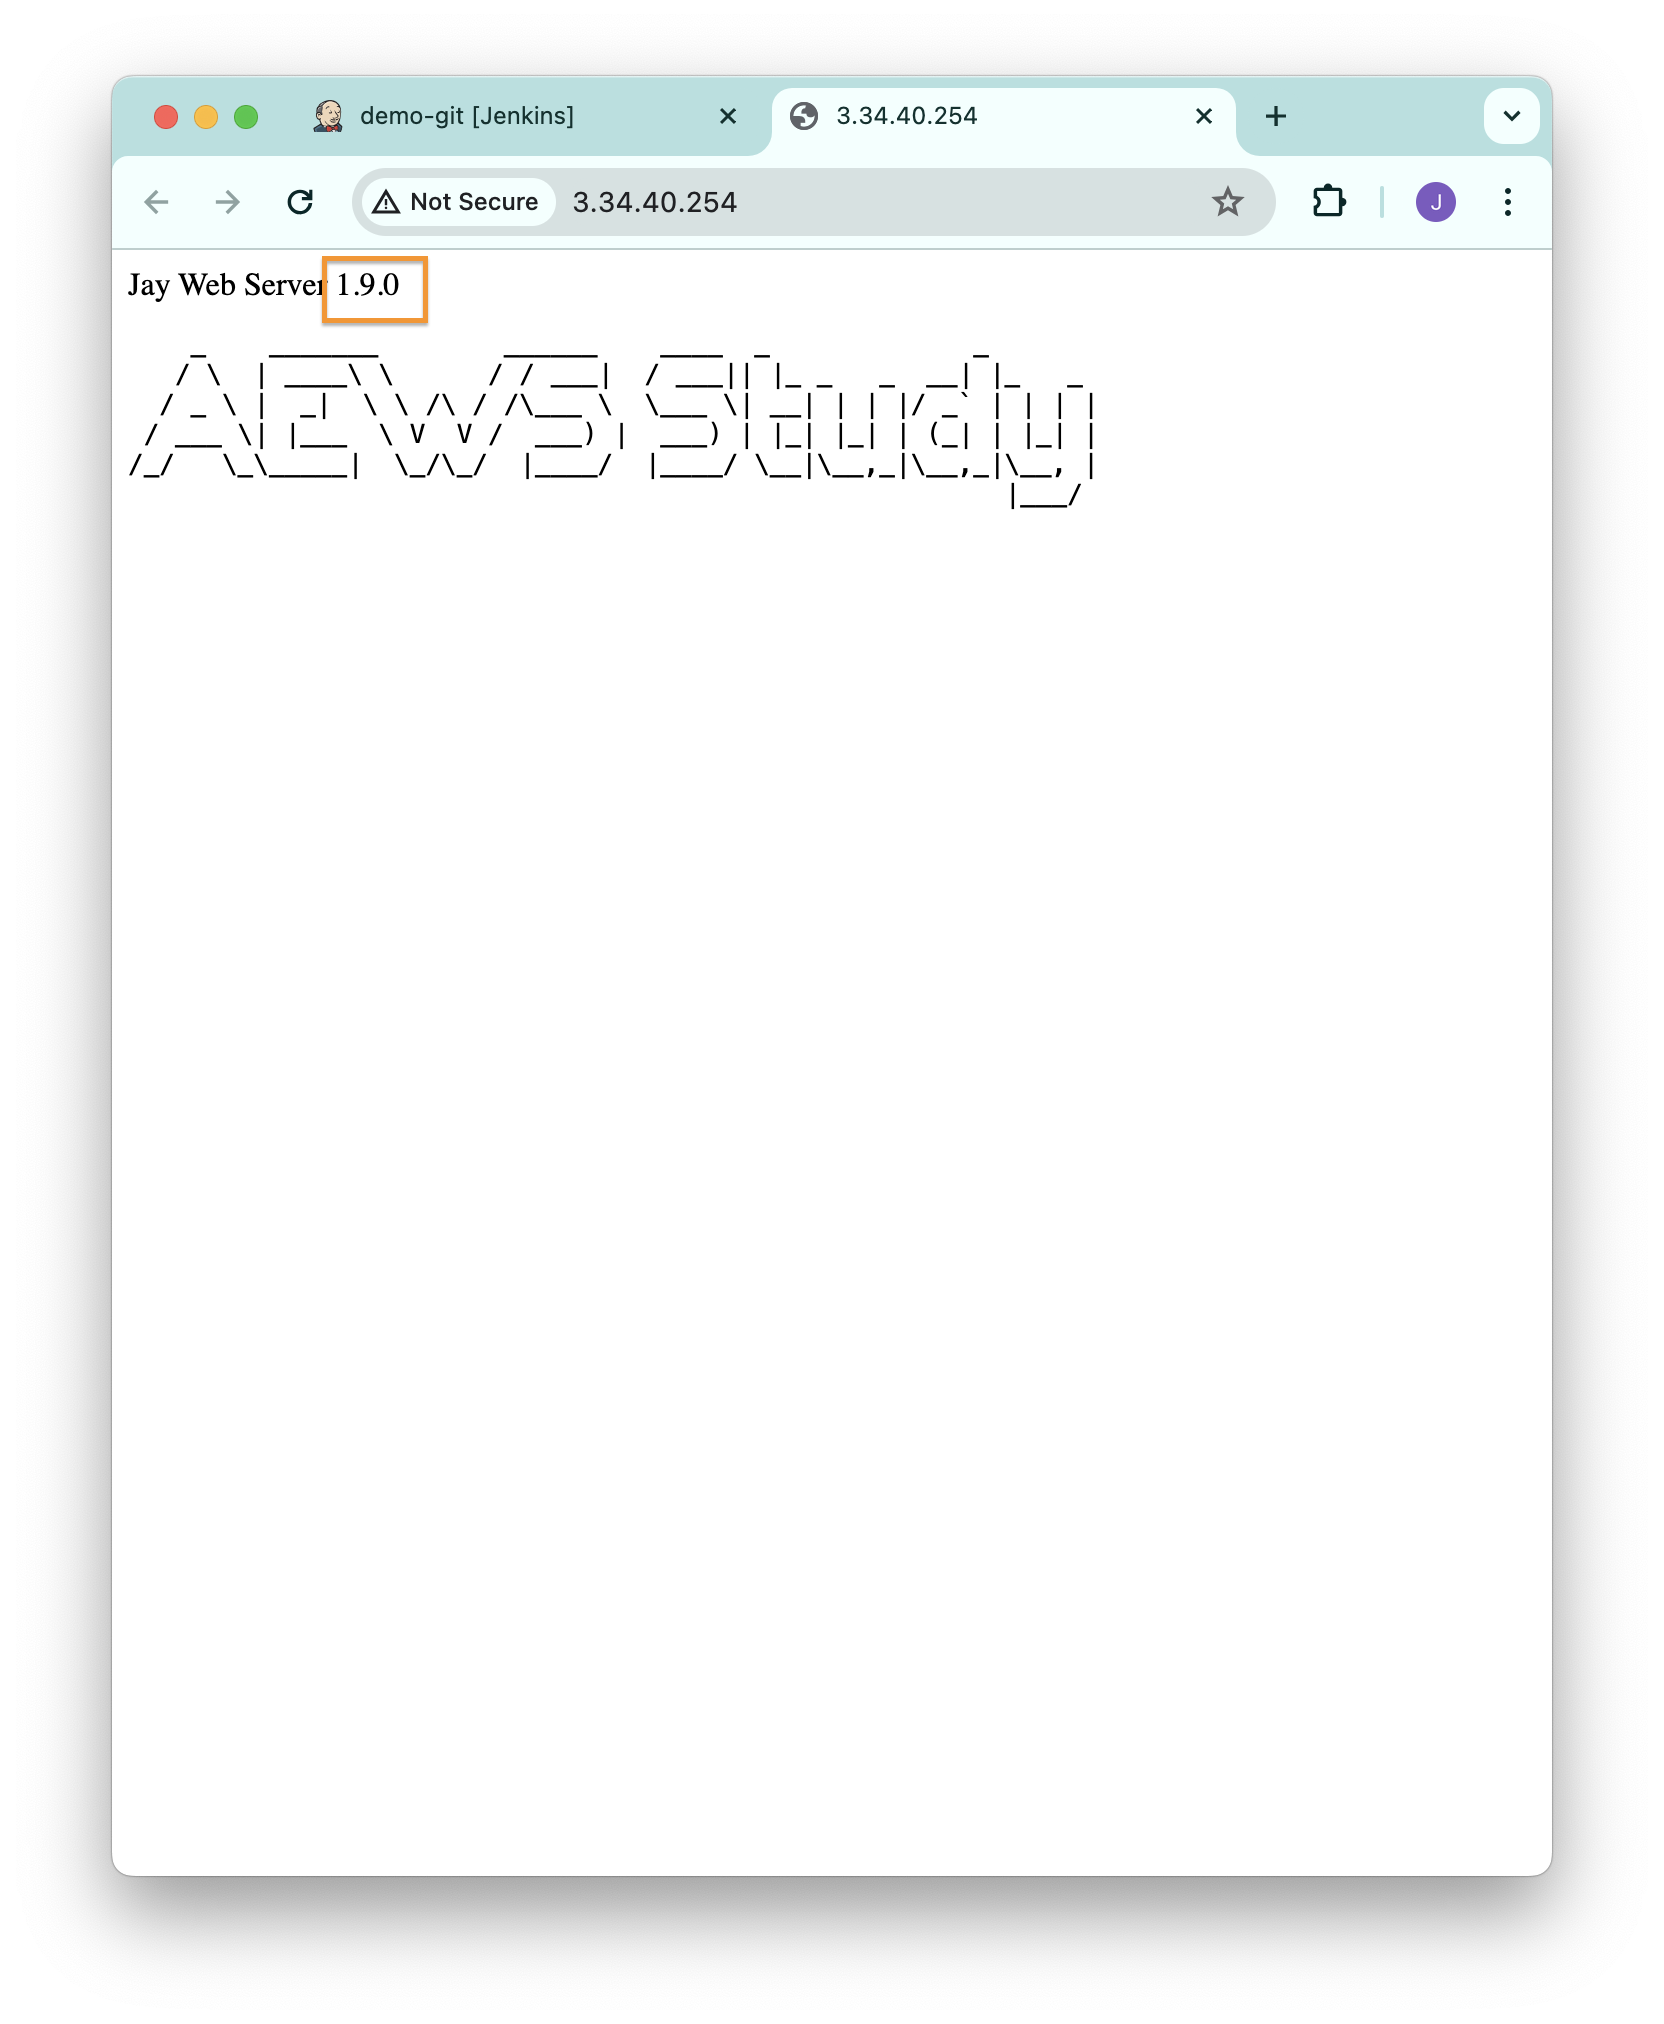
버전을 1.9.0 로 변경했는데, 정상적으로 반영된 것을 확인할 수 있다.
파이프라인
파이프라인은 젠킨스에서 CD 를 구현하기 위해 사용하는 스크립트이다.
Dockerfile 처럼 Jenkinsfile 에 코드를 작성해서 사용할 수 있다.
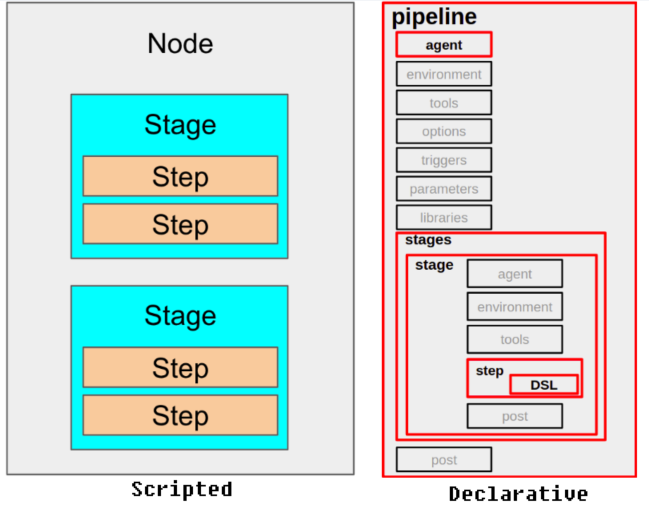
파이프라인 구문은 크게 선언형과 스크립트형으로 나뉜다.
참고: [CI/CD] Jenkins Pipeline 정리 [velog]
위의 이미지에서 선언형의 빨간색 박스는 필수로 작성되어야 하는 부분이다.
선언형을 권장하고 있으며, 2가지의 차이는 간단하게 정리하면 아래와 같다.
- 선언형: 쉽게 작성 가능하고, 젠킨스에서 권장함.
pipeline { agent any stages { stage('Build') { steps { // } } stage('Test') { steps { // } } stage('Deploy') { steps { // } } } } - 스크립트형: 커스텀한 작업 가능. 난이도가 높은 편.
node {
    stage('Build') {
        //
    }
    stage('Test') {
        //
    }
    stage('Deploy') {
        //
    }
}
선언형에서는 빌드 후 상태에 따라 다른 작업을 수행할 수 있는데, post 에 이를 정의할 수 있다.
예시는 아래와 같다.
pipeline {
    agent any
    stages {
        stage('Compile') {
            steps {
                echo "Compiled successfully!";
            }
        }

        stage('JUnit') {
            steps {
                echo "JUnit passed successfully!";
            }
        }

        stage('Code Analysis') {
            steps {
                echo "Code Analysis completed successfully!";
            }
        }

        stage('Deploy') {
            steps {
                echo "Deployed successfully!";
            }
        }
    }

    post {
      always {
        echo "This will always run"
      }
      success {
        echo "This will run when the run finished successfully"
      }
      failure {
        echo "This will run if failed"
      }
      unstable {
        echo "This will run when the run was marked as unstable"
      }
      changed {
        echo "This will run when the state of the pipeline has changed"
      }
    }
}- always: 항상 실행
- success: 현재 빌드가 성공하면 실행
- failure: 현재 빌드가 실패하면 실행
- unstable: 빌드가 성공했지만, 테스트를 통과하지 못하거나 사용자가 정의한 조건을 충족하지 못하면 실행
- changed: 현재 빌드의 상태가 이전 빌드의 상태와 달라졌다면 실행
파이프라인으로 도커 컨테이너 실행하기
Docker Hub 의 개인 저장소에 업로드한 이미지를 받아와서 컨테이너로 실행하는 예시를 정리했다.
플러그인 설치
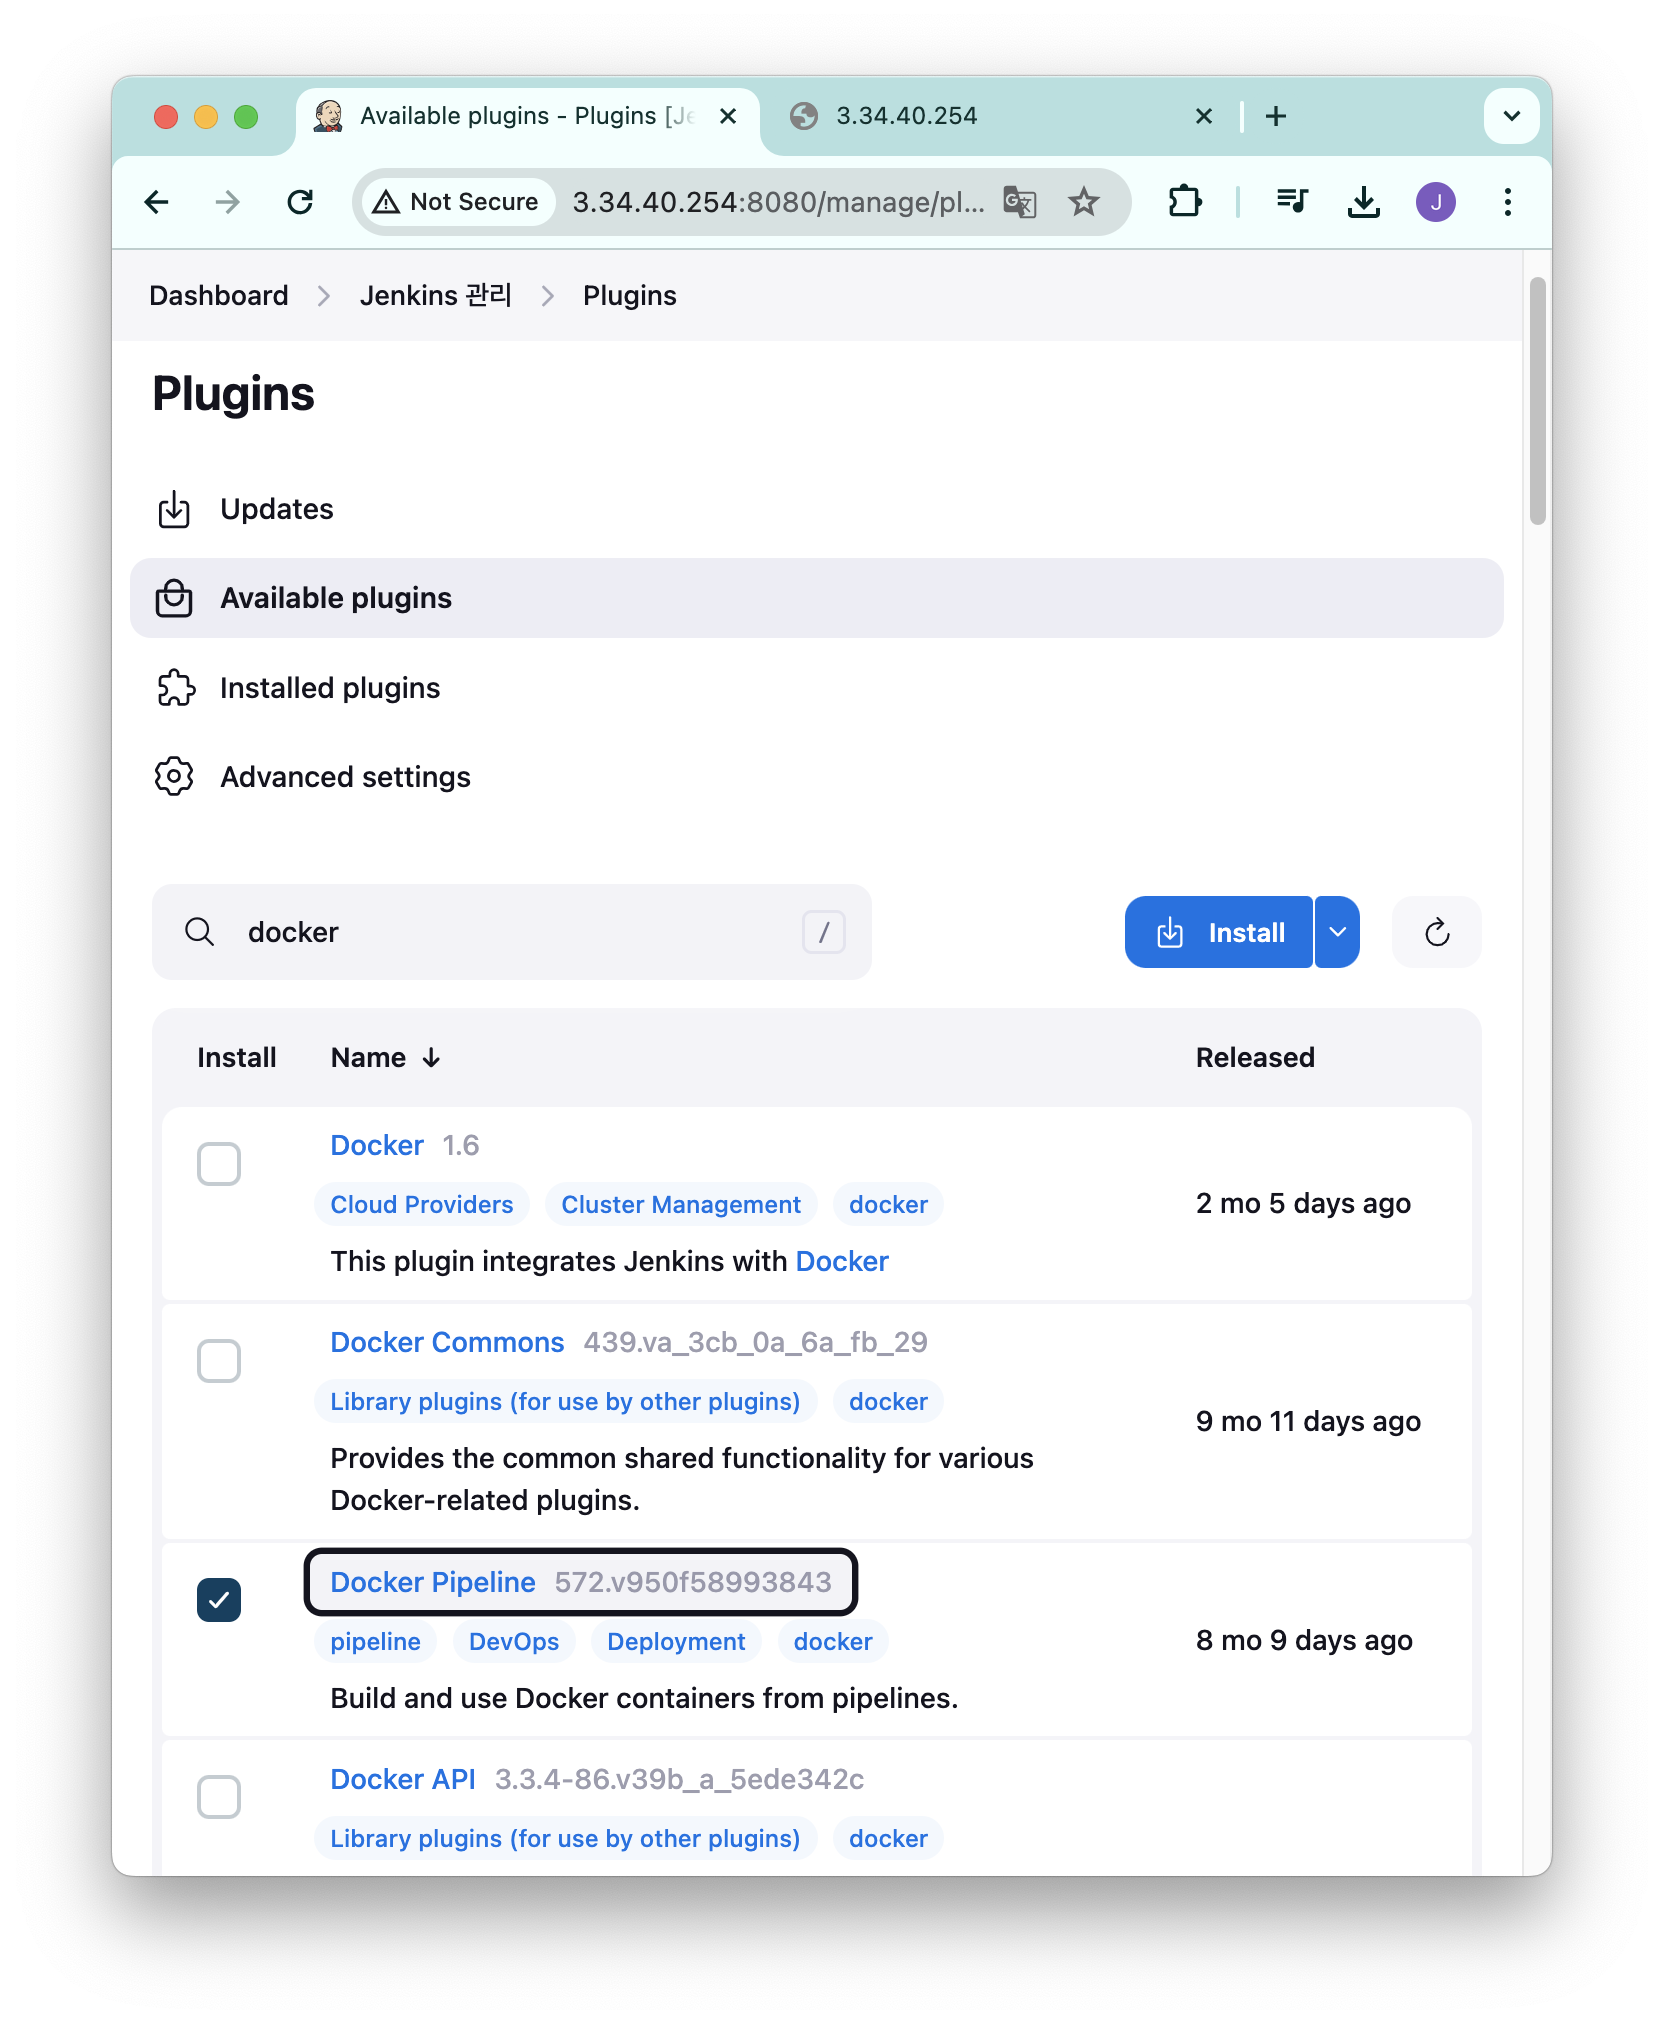
파이프라인에서 도커를 사용하려면 플러그인을 설치해야 한다.
젠킨스 대시보드에서 [Jenkins 관리] - [Plugins] - [Available plugins] 로 이동해서 docker pipeline 을 검색하고 설치한다.
가끔 Timeout 오류가 발생해서 설치가 완료되지 않는 경우가 있는데, 다시 설치를 하다보면 된다.
Docker Hub Credentials 등록
젠킨스에서 개인 Docker Hub 계정에 접근할 때 비밀번호가 아닌 Access Token 으로 접근하도록 할 것이다.
Docker Hub 에서 토큰을 발급하는 방법은 아래와 같다.
- Docker Hub 로그인 - [Account Settings] - [Security] 이동
- [New Access Token] 버튼 클릭
- [Access Token Description] 항목에 기억할 수 있는 설명 입력
- 발급 받은 토큰을 복사해서 저장한다. 창이 닫히면 다시 확인할 수 없으므로 잘 복사해둔다.
젠킨스 대시보드로 돌아와서 [Jenkins 관리] - [Credentials] - [System] - [Global credentials] 이동 후 [Add credentials] 버튼 클릭
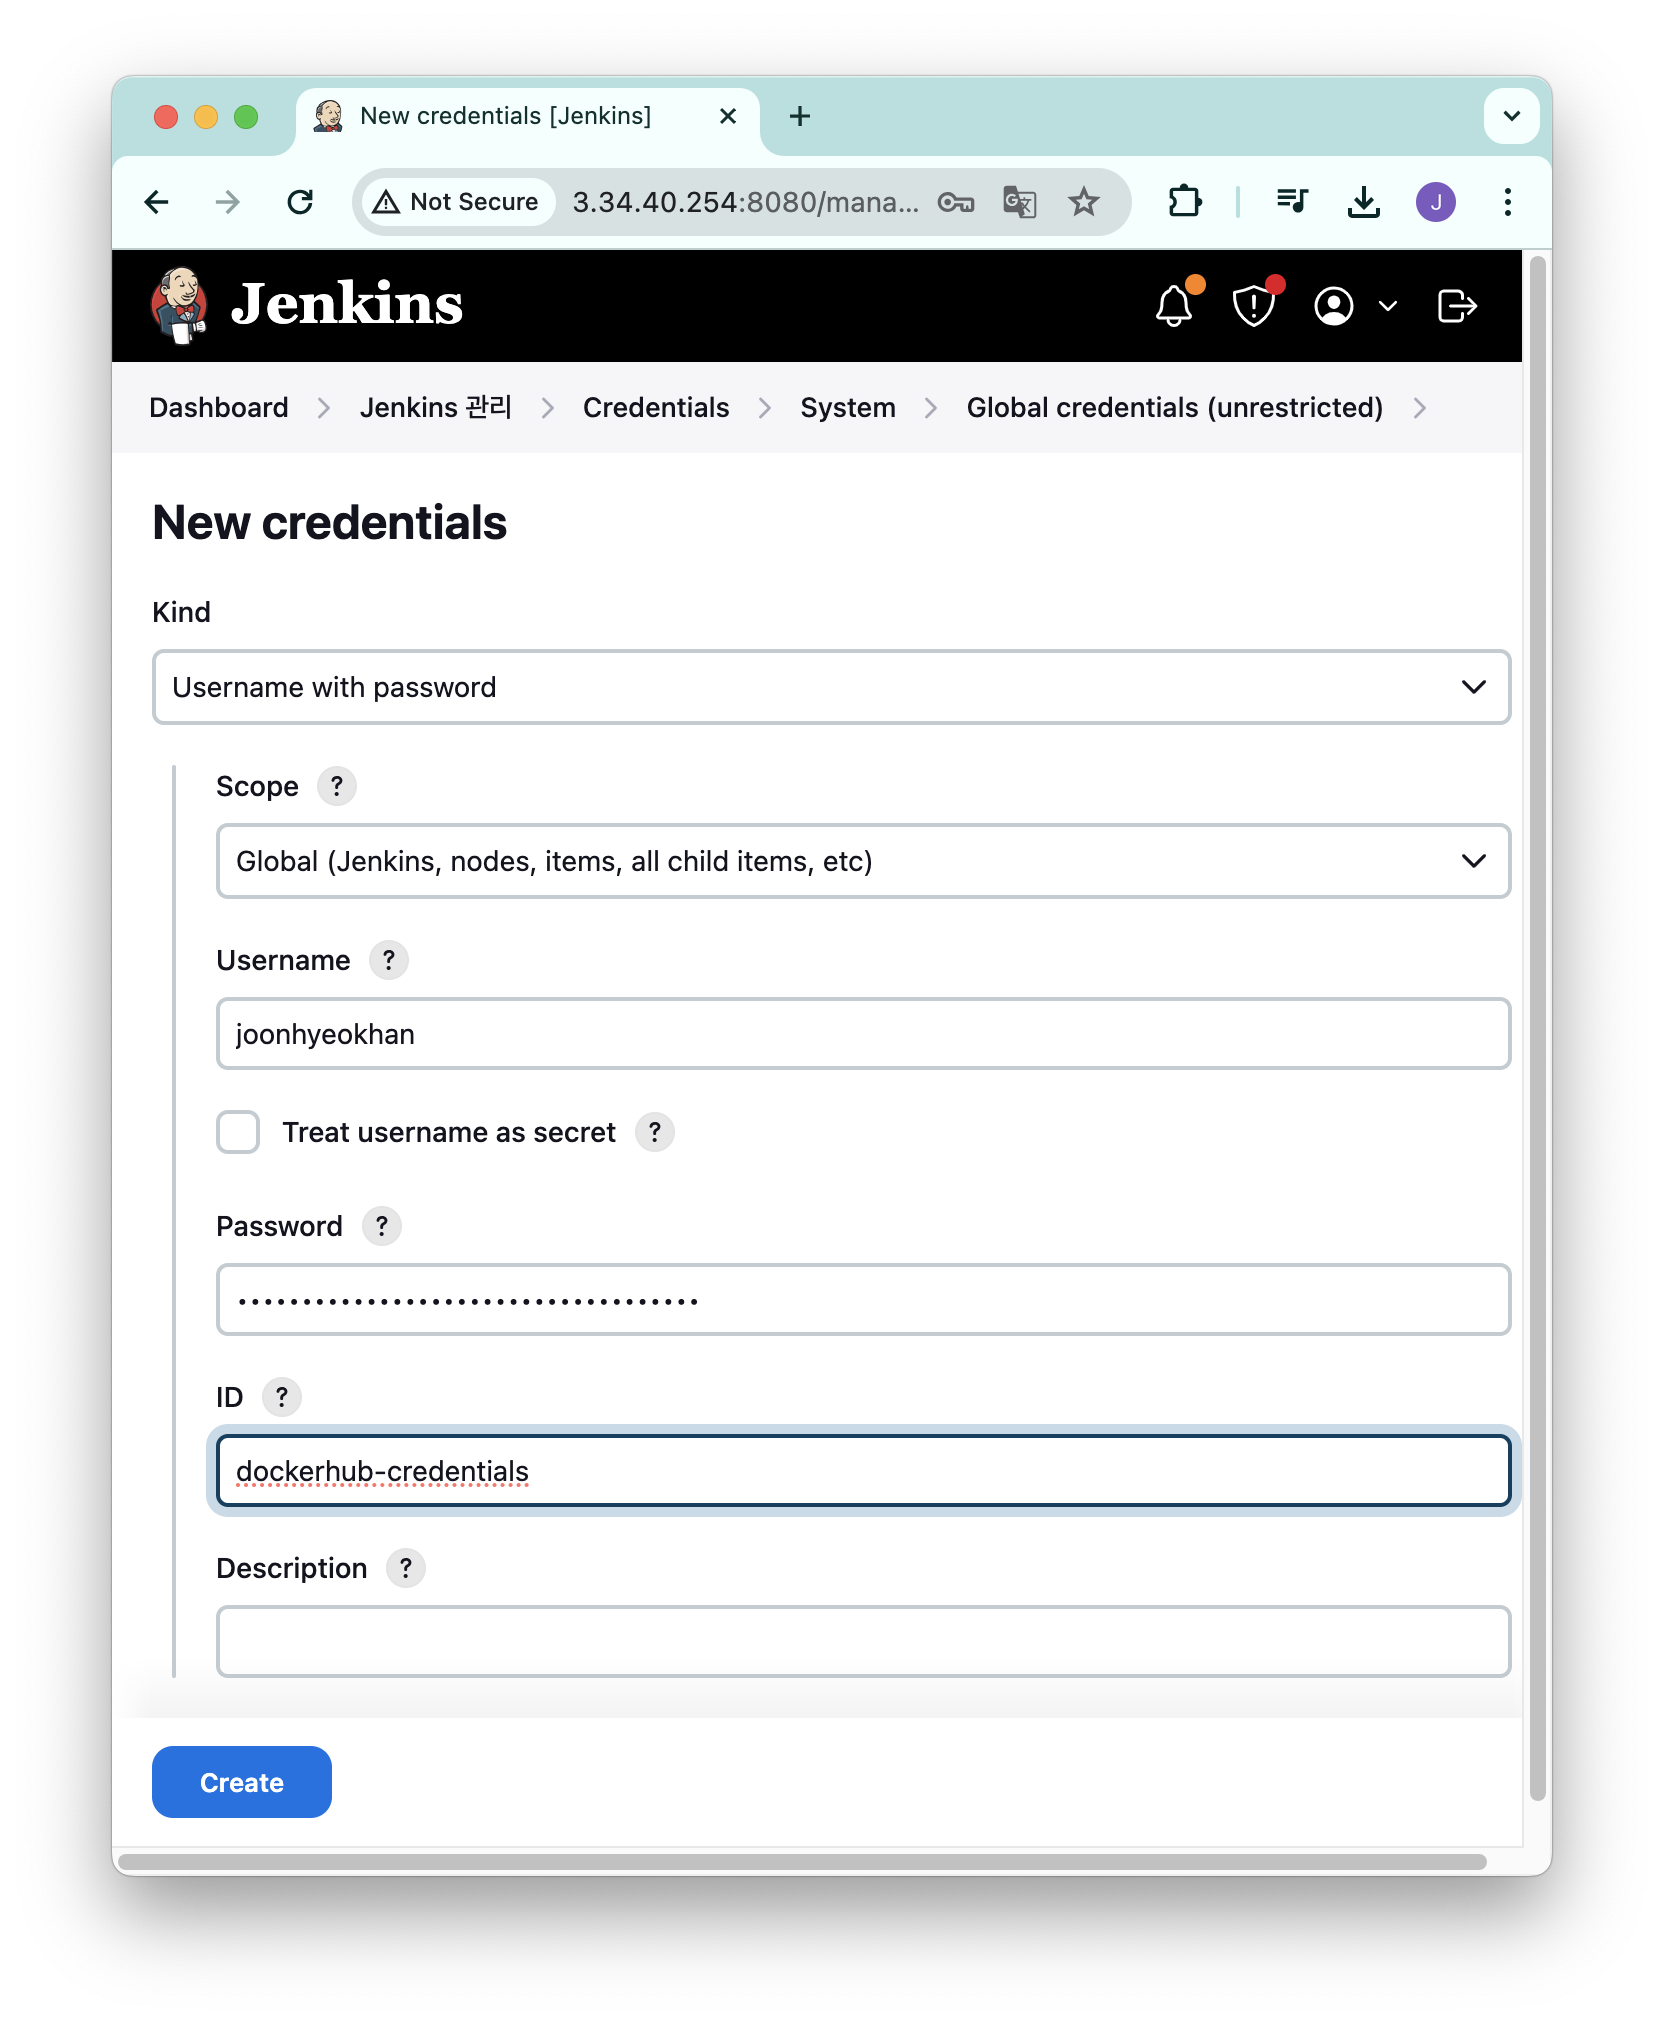
- Username: Docker Hub ID 입력
- Password: 발급 받은 Access Token 입력
- ID: 원하는 crendential 이름 지정 (젠킨스에서 고유하게 구별하는 키값)
입력 후 [Create] 버튼 클릭
Jenkinsfile 작성
Docker Hub 개인 저장소에 미리 업로드 해둔 myweb:v1.0.0 이라는 이미지를 가져와서 컨테이너로 실행할 것이다.
pipeline {
    environment {
        container_name = "myweb" // container 이름
        version = "v1.0.0"
        repository = "joonhyeokhan/myweb"  //docker hub id와 repository 이름
        DOCKERHUB_CREDENTIALS = credentials('dockerhub-credentials') // credential 등록할 때 입력했던 ID
        dockerImage = ''
  }
  agent any
  stages {
      stage('Docker Hub Login'){
          steps{
              sh 'echo $DOCKERHUB_CREDENTIALS_PSW | docker login -u $DOCKERHUB_CREDENTIALS_USR --password-stdin' // docker hub 로그인
          }
      }
      stage('Deploy container') {
          steps {
              script {
                sh 'docker run -d -p 80:80 --rm --name $container_name $repository:$version' // docker container 실행
              }
          }
      }
  }
  post {
      success {
        echo "This will run when the run finished successfully"
      }
      failure {
        echo "This will run if failed"
      }
      changed {
        echo "This will run when the state of the pipeline has changed"
      }
    }
}
environment 블록에 선언한 DOCKERHUB_CREDENTIALS 는 credentials()로 가져올 수 있고, 실제로는 아래와 같이 3가지 환경변수가 선언된다.
DOCKERHUB_CREDENTIALS_CREDS:username:password형태의 문자열을 담고 있다.DOCKERHUB_CREDENTIALS_USR: username 만 담고 있다.DOCKERHUB_CREDENTIALS_PSW: password 만 담고 있다.
자세한 내용은 젠킨스 공식 문서에서 확인할 수 있다. (링크)
이렇게 작성한 파일은 Github Repository 에 업로드했다.
- Github Repository: https://github.com/Han-Joon-Hyeok/aews-cicd/tree/main/2
파이프라인 생성
젠킨스 대시보드에서 [새로운 item] 클릭 후 [Pipeline] 을 선택해서 생성한다.
파이프라인은 위에서 Github Repository 에 업로드한 Jenkinsfile 을 가져와서 실행할 것이다.
[Definition]
- Pipeline script from SCM 선택
[SCM]
- Git 선택
[Repositories]
- Repository URL: Repository URL 입력. 여기서는 https://github.com/Han-Joon-Hyeok/aews-cicd 로 입력했다.
[Branches to build]
- Branch Specifier 에 */main 입력
[Additional Behaviours]
- Sparse Checkout paths 선택 후 Path 에 2 입력
- Jenkinsfile 은 2 라는 디렉토리에 생성했기 때문에 부분 체크아웃을 하는 것이다.
[Script Path]
- 2/Jenkinsfile 입력
- Jenkinsfile 은 기본적으로 git 루트 디렉토리에서 찾는데, 이번 예시에서는 2 디렉토리 하위에 생성했기 때문에 위와 같이 작성했다.
실행
[지금 빌드]를 클릭해서 Jenkinsfile 을 실행하면 아래의 이미지와 같이 빌드에 성공한 것을 확인할 수 있다.
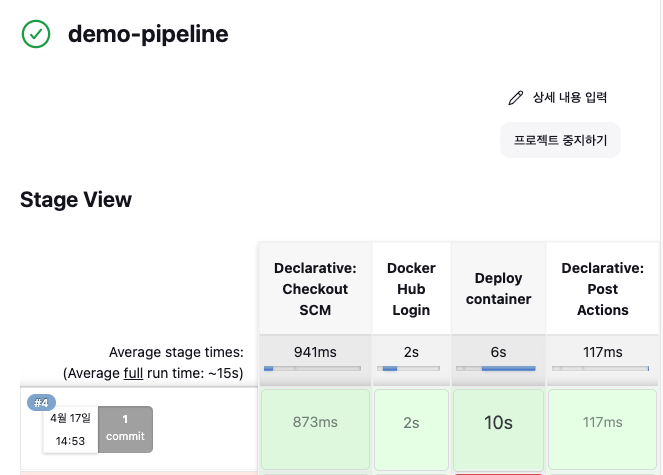
터미널에서 컨테이너를 확인해봐도 정상적으로 실행 중인 것을 확인할 수 있다.
docker ps
#CONTAINER ID   IMAGE                       COMMAND                  CREATED          STATUS          PORTS                               NAMES
#160220fa0e5c   joonhyeokhan/myweb:v1.0.0   "usr/sbin/apache2ctl…"   27 minutes ago   Up 27 minutes   0.0.0.0:80->80/tcp, :::80->80/tcp   myweb
이처럼 젠킨스를 이용해서 CD 를 구축할 수도 있다.
CD
지속적인 배포(Continuous Delivery)는 개발된 소프트웨어를 고객이 사용할 수 있는 환경에 끊임없이, 자동화된 방식으로 배포하는 것을 의미한다.
이 방식을 통해 소프트웨어의 품질을 높이고, 새로운 기능이나 버그 수정 등의 업데이트를 빠르게 사용자에게 제공할 수 있다.
이는 고객 만족도를 높이고, 시장 변화에 빠르게 대응하는 데에도 도움이 된다.
이를 위해 개발부터 테스팅, 배포까지의 모든 과정이 자동화되고, 이 과정들이 잘 이루어지고 있는지를 지속적으로 모니터링하게 됩니다.
쿠버네티스에서 CD 를 구축하기 위해 사용하는 대표적인 툴은 Argo CD 가 있다.
Argo
Argo 는 쿠버네티스에서 다양한 파이프라인 작업과 CD 를 가능하게 해주는 여러 프로젝트로 구성되어 있다.
Argo 프로젝트에 포함된 라이브러리들은 아래와 같다.
- Argo Workflows: 젠킨스에서 파이프라인을 구축한 것처럼 쿠버네티스에서 파드를 이용해서 일련의 작업들을 수행하도록 돕는다.
- Argo Events: 이벤트를 수신하면 작업을 실행할 수 있도록 돕는다. Argo Workflows 와 함께 사용할 수 있다.
- Argo CD: 쿠버네티스에서 애플리케이션을 배포할 수 있도록 돕는다. (CD)
- Argo Rollouts: Argo CD 를 기반으로 여러 배포 전략(blue/green, canary, rolling)을 적용할 수 있도록 돕는다.
이번 글에서는 Argo CD 와 Argo Rollouts 을 이용하는 예시를 다루었다.
Argo CD
Argo CD 는 GitOps 를 구현할 수 있도록 도와주는 CD 툴이다.
Argo CD 를 이용하면 Github repository 에서 변경이 발생했을 때 쿠버네티스 클러스터로 자동으로 배포하도록 설정할 수 있다.
또한, 배포 결과를 슬랙과 같은 메신저로 발송하는 알림 기능도 지원한다.
설치
helm 차트를 이용해서 설치했다.
Argo CD 는 웹 대시보드를 제공하는데, 이를 argocd.도메인 으로 접속하기 위해 아래와 같은 yaml 파일을 생성했다.
cat <<EOT > argocd-values.yaml
global:
  domain: argocd.$MyDomain

configs:
  params:
    server.insecure: true

controller:
  metrics:
    enabled: true
    serviceMonitor:
      enabled: true

server:
  ingress:
    enabled: true
    controller: aws
    ingressClassName: alb
    hostname: "argocd.$MyDomain"
    annotations:
      alb.ingress.kubernetes.io/scheme: internet-facing
      alb.ingress.kubernetes.io/target-type: ip
      alb.ingress.kubernetes.io/backend-protocol: HTTP
      alb.ingress.kubernetes.io/listen-ports: '[{"HTTPS":80}, {"HTTPS":443}]'
      alb.ingress.kubernetes.io/certificate-arn: $CERT_ARN
      alb.ingress.kubernetes.io/ssl-redirect: '443'
    aws:
      serviceType: ClusterIP
      backendProtocolVersion: GRPC
  metrics:
    enabled: true
    serviceMonitor:
      enabled: true

repoServer:
  metrics:
    enabled: true
    serviceMonitor:
      enabled: true

applicationSet:
  metrics:
    enabled: true
    serviceMonitor:
      enabled: true

notifications:
  metrics:
    enabled: true
    serviceMonitor:
      enabled: true
EOT
Argo CD 를 위한 네임스페이스를 생성하고 helm 으로 설치한다.
kubectl create ns argocd
helm repo add argo https://argoproj.github.io/argo-helm
helm install argocd argo/argo-cd --version 6.7.11 -f argocd-values.yaml --namespace argocd
젠킨스와 마찬가지로 admin 계정의 최초 비밀번호가 필요한데, 아래의 명령어로 확인할 수 있다.
kubectl -n argocd get secret argocd-initial-admin-secret -o jsonpath="{.data.password}" | base64 -d ;echoargocd cli 설치
웹 대시보드로 애플리케이션을 배포할 수도 있지만 cli 로 하는 방법도 소개하고자 한다.
먼저 아래의 명령어로 argocd cli 를 설치한다.
curl -sSL -o argocd-linux-amd64 https://github.com/argoproj/argo-cd/releases/latest/download/argocd-linux-amd64
sudo install -m 555 argocd-linux-amd64 /usr/local/bin/argocd
rm -f argocd-linux-amd64
argocd cli 를 이용하기 위해서는 로그인을 해야 한다.
argocd 서버의 주소를 입력하는데, 이번 글에서는 도메인을 이용해서 argocd 서버를 연결했기 때문에 도메인을 입력했다.
argocd login <argocd-서버>
#argocd login argocd.joonhan.link
Username: admin
Password: # 최초 비밀번호 복사해서 붙여넣기
'admin:login' logged in successfully
Context 'argocd.joonhan.link' updated
참고로 argocd 서버는 argocd 네임스페이스에 배포된 argocd-server 를 의미한다.
kubectl get svc -n argocd

#NAME                                      TYPE        CLUSTER-IP       EXTERNAL-IP   PORT(S)                      AGE
#argocd-applicationset-controller          ClusterIP   10.109.19.10     <none>        7000/TCP,8080/TCP            5d6h
#argocd-dex-server                         ClusterIP   10.104.125.244   <none>        5556/TCP,5557/TCP,5558/TCP   5d6h
#argocd-metrics                            ClusterIP   10.96.237.220    <none>        8082/TCP                     5d6h
#argocd-notifications-controller-metrics   ClusterIP   10.100.250.19    <none>        9001/TCP                     5d6h
#argocd-redis                              ClusterIP   10.97.138.210    <none>        6379/TCP                     5d6h
#argocd-repo-server                        ClusterIP   10.99.210.4      <none>        8081/TCP,8084/TCP            5d6h
#argocd-server                             ClusterIP   10.110.143.245   <none>        80/TCP,443/TCP               5d6h
#argocd-server-metrics                     ClusterIP   10.101.164.250   <none>        8083/TCP                     5d6h
애플리케이션 생성
argocd app create 명령어를 이용해서 애플리케이션을 생성할 수 있다.
argocd app create [애플리케이션 이름] \
  --repo [github repository 주소] \
  --path [repository 내부에 yaml 파일이 위치한 경로] \
  --dest-namespace [배포할 kubernetes namespace] \
  --dest-server [배포할 대상 kubernetes API 서버 주소]
배포에 사용할 yaml 파일은 아래와 같다.
apiVersion: apps/v1
kind: Deployment
metadata:
  name: myweb
  labels:
    gitadd : webedit
spec:
  replicas: 4
  selector:
    matchLabels:
      app: mywebs
  template:
    metadata:
      name: myweb
      labels:
        app: mywebs
    spec:
      containers:
      - name: myweb
        image: nginx
      terminationGracePeriodSeconds: 0
---
apiVersion: v1
kind: Service
metadata:
  name: myweb
spec:
  ports:
    - name: webport
      port: 8080
      targetPort: 80
  selector:
    app: mywebs
  type: ClusterIP
---
Public Github Repository 에 업로드 해두었으며, 이 파일을 바탕으로 배포를 진행할 것이다.
참고로 디렉토리 구조는 아래와 같다.
3
├── Dockerfile
└── deploy
    └── deployment-svc.yaml
여기서 3/deploy/deployment-svc.yaml 파일을 이용해서 배포를 할 것이다.
argocd app create myweb \
  --repo https://github.com/Han-Joon-Hyeok/aews-cicd \
  --path 3/deploy \
  --dest-namespace myweb \
  --dest-server https://kubernetes.default.svc
  --sync-option CreateNamespace=true # 네임스페이스가 없으면 자동 생성
#application 'myweb' created
아래의 명령어를 실행하면 STATUS 가 OutOfSync 인 것을 확인할 수 있다.
argocd app list
#NAME          CLUSTER                         NAMESPACE  PROJECT  STATUS     HEALTH   SYNCPOLICY  CONDITIONS  REPO                                         PATH      TARGET
#argocd/myweb  https://kubernetes.default.svc  myweb      default  OutOfSync  Missing  <none>      <none>      https://github.com/Han-Joon-Hyeok/aews-cicd  3/deploy
OutOfSync 는 현재 클러스터에서 배포된 것과 Github Repository 의 내용이 다르다는 것이다.
처음에 애플리케이션을 등록한 것만으로 바로 배포할 수는 없고, sync 를 맞춰야 비로소 배포가 된다.
애플리케이션 배포
아래의 명령어를 이용해서 애플리케이션을 배포할 수 있다.
argocd app sync [애플리케이션 이름]이번 예시에서는 아래와 같이 실행했다.
argocd app sync myweb실행 결과가 아래와 같이 표시되면서 배포가 완료된 것을 확인할 수 있다.
TIMESTAMP                  GROUP        KIND   NAMESPACE                  NAME    STATUS    HEALTH        HOOK  MESSAGE
2024-04-17T21:09:32+09:00            Service       myweb                 myweb  OutOfSync  Missing
2024-04-17T21:09:32+09:00   apps  Deployment       myweb                 myweb  OutOfSync  Missing
2024-04-17T21:09:35+09:00          Namespace                             myweb   Running   Synced              namespace/myweb created
2024-04-17T21:09:35+09:00            Service       myweb                 myweb    Synced  Healthy
2024-04-17T21:09:35+09:00            Service       myweb                 myweb    Synced   Healthy              service/myweb created
2024-04-17T21:09:35+09:00   apps  Deployment       myweb                 myweb  OutOfSync  Missing              deployment.apps/myweb created
2024-04-17T21:09:35+09:00   apps  Deployment       myweb                 myweb    Synced  Progressing              deployment.apps/myweb created

Name:               argocd/myweb
Project:            default
Server:             https://kubernetes.default.svc
Namespace:          myweb
URL:                https://argocd.joonhan.link/applications/myweb
Repo:               https://github.com/Han-Joon-Hyeok/aews-cicd
Target:
Path:               3/deploy
SyncWindow:         Sync Allowed
Sync Policy:        <none>
Sync Status:        Synced to  (64c73ab)
Health Status:      Progressing

Operation:          Sync
Sync Revision:      64c73abdc0777c42514b24ca7ccc1d5cf2d3cfd0
Phase:              Succeeded
Start:              2024-04-17 21:09:32 +0900 KST
Finished:           2024-04-17 21:09:35 +0900 KST
Duration:           3s
Message:            successfully synced (all tasks run)

GROUP  KIND        NAMESPACE  NAME   STATUS   HEALTH       HOOK  MESSAGE
       Namespace              myweb  Running  Synced             namespace/myweb created
       Service     myweb      myweb  Synced   Healthy            service/myweb created
apps   Deployment  myweb      myweb  Synced   Progressing        deployment.apps/myweb created
변경 사항 적용
Github Repository 에서 정보를 가져오는 간격은 기본으로 3분이다.
만약 바로 가져오고 싶다면 아래의 명령어를 사용하면 된다.
argocd app get myweb --refresh그러면 아래와 같이 Sync Status 가 OutOfSync 인 것을 확인할 수 있다.
Name:               argocd/myweb
Project:            default
Server:             https://kubernetes.default.svc
Namespace:          myweb
URL:                https://argocd.joonhan.link/applications/myweb
Repo:               https://github.com/Han-Joon-Hyeok/aews-cicd
Target:
Path:               3/deploy
SyncWindow:         Sync Allowed
Sync Policy:        <none>
Sync Status:        OutOfSync from  (359390e)
Health Status:      Healthy

GROUP  KIND        NAMESPACE  NAME   STATUS     HEALTH   HOOK  MESSAGE
       Service     myweb      myweb  Synced     Healthy        service/myweb unchanged
apps   Deployment  myweb      myweb  OutOfSync  Healthy        deployment.apps/myweb unchanged
변경 사항을 적용해서 배포하려면 아래의 명령어를 사용하면 된다.
argocd app sync myweb애플리케이션 삭제는 아래의 명령어를 실행하면 된다.
argocd app delete mywebArgo CD Github Private Repository 연동
Public Repository 는 간단하게 연동할 수 있지만, Private Repository 를 연동하려면 SSH 키를 발급 받아야 한다.
ssh 키 생성
아래의 명령어를 실행해서 ssh 키를 생성한다.
ssh-keygen
#Generating public/private rsa key pair.
#Enter file in which to save the key (/root/.ssh/id_rsa):
#/root/.ssh/id_rsa already exists.
#Overwrite (y/n)?
Github Repository 의 [Settings] - [Security] - [Deploy keys] 메뉴로 진입한다.

그 다음 Add deploy key 버튼을 클릭하고, 생성한 ssh 공개키를 복사해서 Key 항목에 입력한다.
cat ~/.ssh/id_rsa.pub
#ssh-rsa AAAA... root@myeks-bastion
Argo CD 와 Repository 연결
Argo CD 와 Repository 를 연결하기 위해서는 repository 의 ssh git 주소가 필요하다.
ssh git 주소는 아래의 이미지에 표시된 버튼을 클릭하면 확인할 수 있다.
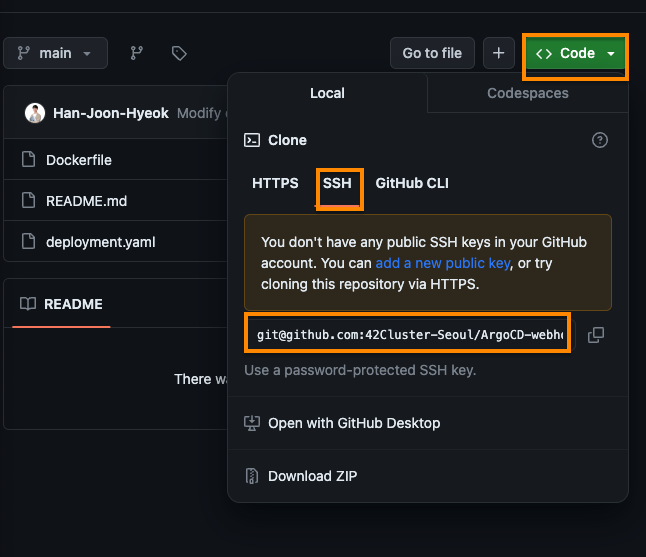
그 다음 아래의 명령어를 실행했다.
argocd repo add \
  git@github.com:42Cluster-Seoul/ArgoCD-webhook-demo.git \ # repository 의 ssh git 주소
  --ssh-private-key-path ~/.ssh/id_rsa # ssh 개인키 위치
그럼 아래와 같이 성공적으로 추가되었다는 메세지가 표시된다.
Repository 'git@github.com:42Cluster-Seoul/ArgoCD-webhook-demo.git' added아래의 명령어를 실행하면 현재 연동된 repository 목록을 확인할 수 있다.
argocd repo list
#TYPE  NAME  REPO                                                    INSECURE  OCI    LFS    CREDS  STATUS      MESSAGE  PROJECT
#git         git@github.com:42Cluster-Seoul/ArgoCD-webhook-demo.git  false     false  false  false  Successful
애플리케이션 생성 및 배포
앞서 했던 것과 마찬가지로 생성과 배포는 모두 동일한 흐름을 따른다.
다른 점이 있다면 --repo 옵션에 ssh git 주소를 입력했다는 점이다.
아래의 명령어로 애플리케이션을 생성했다.
argocd app create my-nginx \
  --repo git@github.com:42Cluster-Seoul/ArgoCD-webhook-demo.git \
  --path deploy \
  --dest-namespace my-nginx \
  --dest-server https://kubernetes.default.svc \
  --sync-option CreateNamespace=true
#application 'my-nginx' created
배포에 사용한 yaml 파일은 아래와 같다.
apiVersion: apps/v1
kind: Deployment
metadata:
  name: nginx-server
  labels:
    app: server
spec:
  replicas: 1
  selector:
    matchLabels:
      app: server
  template:
    metadata:
      name: nginx-server
      labels:
        app: server
    spec:
      containers:
        - name: server
          image: nginx:1.23.3
          ports:
            - containerPort: 80
배포는 아래의 명령어를 실행했다.
argocd app sync my-nginxArgo Rollouts
Argo CD 의 한 가지 아쉬운 점은 배포 전략을 적용할 수 없다는 점이다.
그래서 Argo Rollouts 은 blue/green, canary, rolling 배포 전략을 모두 할 수 있도록 도와준다.
설치
마찬가지로 Argo Rollouts 도 웹 대시보드를 제공하는데, helm 으로 배포하기 위해 아래의 yaml 파일을 사용했다.
cat <<EOT > argorollouts-values.yaml
dashboard:
  enabled: true
  ingress:
    enabled: true
    ingressClassName: alb
    hosts:
      - argorollouts.$MyDomain
    annotations:
      alb.ingress.kubernetes.io/scheme: internet-facing
      alb.ingress.kubernetes.io/target-type: ip
      alb.ingress.kubernetes.io/backend-protocol: HTTP
      alb.ingress.kubernetes.io/listen-ports: '[{"HTTPS":80}, {"HTTPS":443}]'
      alb.ingress.kubernetes.io/certificate-arn: $CERT_ARN
      alb.ingress.kubernetes.io/ssl-redirect: '443'
EOT
argocd-rollouts 라는 네임스페이스를 생성하고 나서 helm 을 이용해서 설치한다.
kubectl create ns argo-rollouts
helm install argo-rollouts argo/argo-rollouts --version 2.35.1 -f argorollouts-values.yaml --namespace argo-rollouts
argo rollouts cli 설치
Argo Rollouts 을 설치하기 위한 사전 조건은 아래와 같다.
kubectl설치kubeconfig파일이~/.kube/config디렉토리에 존재- 쿠버네티스 클러스터에 ArgoCD 설치 완료
argocd rollouts 은 kubectl 을 이용해서 사용한다는 특징이 있다.
argo rollouts 를 cli 로 이용하기 위해 아래의 명령어로 설치한다.
curl -LO https://github.com/argoproj/argo-rollouts/releases/latest/download/kubectl-argo-rollouts-linux-amd64
chmod +x ./kubectl-argo-rollouts-linux-amd64
sudo mv ./kubectl-argo-rollouts-linux-amd64 /usr/local/bin/kubectl-argo-rollouts
설치가 되었는지 확인하기 위해 아래의 명령어를 실행한다.
kubectl argo rollouts version
#kubectl-argo-rollouts: v1.6.6+737ca89
#  BuildDate: 2024-02-13T15:39:31Z
#  GitCommit: 737ca89b42e4791e96e05b438c2b8540737a2a1a
#  GitTreeState: clean
#  GoVersion: go1.20.14
#  Compiler: gc
#  Platform: linux/amd64
Argo Rollouts blue/green 배포 전략 적용
blue 이미지를 먼저 배포하고 나서 green 이미지로 변경하는 예시를 보자.
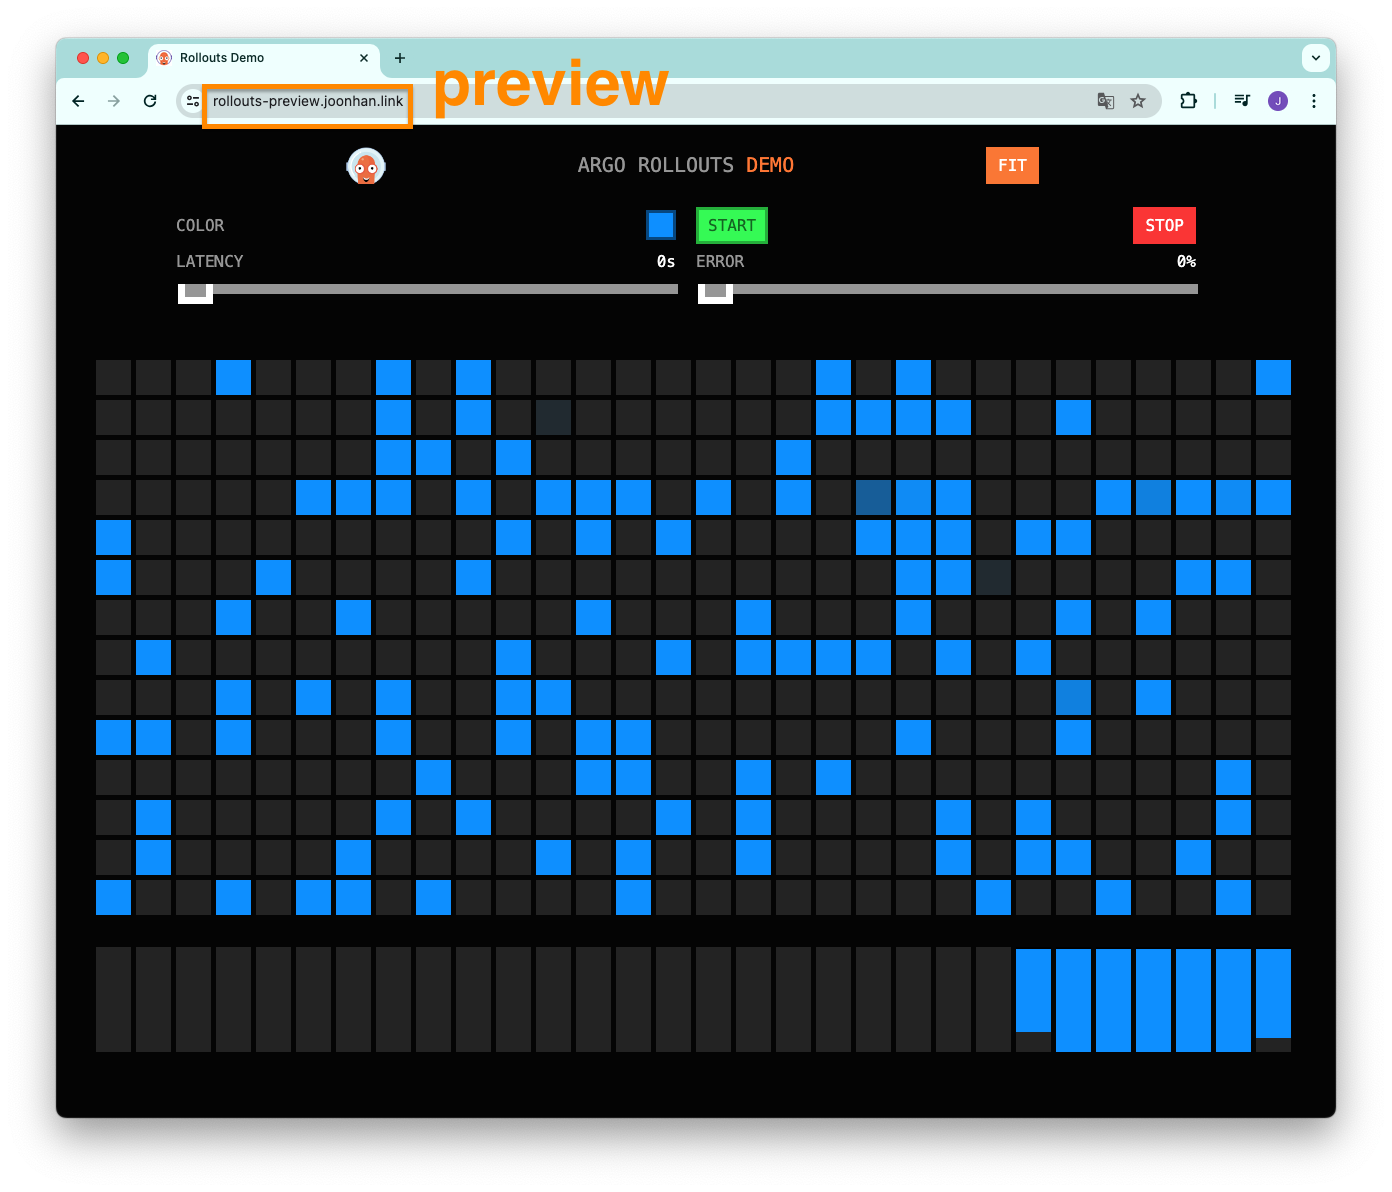
ALB 를 이용해서 rollouts-active.domain 에서는 현재 서비스 중인 화면(blue)을 보여주고, rollouts-preview.domain 에서는 새롭게 배포할 화면(green)을 보여줄 것이다.
Ingress 배포
EKS 에서 ALB 를 이용해서 도메인을 연결하는 작업이 가장 어려웠다.
Argo Rollouts 공식 문서와 Argo Rollouts 공식 Github Repository 를 참고해도 원하는 대로 작동하지 않아서 삽질을 많이 했다.
아래의 명령어를 실행해서 ingress yaml 파일을 생성했다.
cat << EOT > blue-green-ingress.yaml
apiVersion: v1
kind: Namespace
metadata:
  name: blue-green
---
apiVersion: networking.k8s.io/v1
kind: Ingress
metadata:
  namespace: blue-green
  name: rollouts-active-ingress
  annotations:
    alb.ingress.kubernetes.io/scheme: internet-facing
    alb.ingress.kubernetes.io/target-type: ip
    alb.ingress.kubernetes.io/backend-protocol: HTTP
    alb.ingress.kubernetes.io/listen-ports: '[{"HTTPS":80}, {"HTTPS":443}]'
    alb.ingress.kubernetes.io/certificate-arn: $CERT_ARN
    alb.ingress.kubernetes.io/ssl-redirect: '443'
spec:
  ingressClassName: alb
  rules:
    - host: "rollouts-active.$MyDomain"
      http:
        paths:
          - path: /
            pathType: Prefix
            backend:
              service:
                name: rollout-bluegreen-active
                port:
                  number: 80

---
apiVersion: networking.k8s.io/v1
kind: Ingress
metadata:
  namespace: blue-green
  name: rollouts-preview-ingress
  annotations:
    alb.ingress.kubernetes.io/scheme: internet-facing
    alb.ingress.kubernetes.io/target-type: ip
    alb.ingress.kubernetes.io/backend-protocol: HTTP
    alb.ingress.kubernetes.io/listen-ports: '[{"HTTPS":80}, {"HTTPS":443}]'
    alb.ingress.kubernetes.io/certificate-arn: $CERT_ARN
    alb.ingress.kubernetes.io/ssl-redirect: '443'
spec:
  ingressClassName: alb
  rules:
    - host: "rollouts-preview.$MyDomain"
      http:
        paths:
          - path: /
            pathType: Prefix
            backend:
              service:
                name: rollout-bluegreen-preview
                port:
                  number: 80
EOT
그 다음 아래의 명령어를 실행해서 ingress 를 생성했다.
kubectl apply -f blue-green-ingress.yaml정상적으로 생성되었는지 확인하기 위해 아래의 명령어를 실행한다.
kubectl get ingress -n blue-green
#NAME                       CLASS   HOSTS                           ADDRESS                                                                        PORTS   AGE
#rollouts-active-ingress    alb     rollouts-active.joonhan.link    k8s-bluegree-rollouts-3c4fac8b9a-1336180298.ap-northeast-2.elb.amazonaws.com   80      19m
#rollouts-preview-ingress   alb     rollouts-preview.joonhan.link   k8s-bluegree-rollouts-7992041658-1589460388.ap-northeast-2.elb.amazonaws.com   80      19m
ALB 를 생성하는데 약 3~5분 정도 소요된다.
애플리케이션 등록 및 배포
Rollouts 을 위한 yaml 파일은 아래와 같이 작성했다.
kind 에 입력한 Rollout 은 Deployment 와 동일한 역할을 한다.
apiVersion: argoproj.io/v1alpha1
kind: Rollout
metadata:
  name: rollout-bluegreen
spec:
  replicas: 2
  revisionHistoryLimit: 2
  selector:
    matchLabels:
      app: rollout-bluegreen
  template:
    metadata:
      labels:
        app: rollout-bluegreen
    spec:
      containers:
      - name: rollouts-demo
        image: argoproj/rollouts-demo:blue
        #image: argoproj/rollouts-demo:green
        imagePullPolicy: Always
        ports:
        - containerPort: 8080
  strategy:
    blueGreen:
      #activeService는 현재 운영중인 Blue 서비스
      activeService: rollout-bluegreen-active

      #previewService는 새롭게 배포될 Green 서비스
      previewService: rollout-bluegreen-preview

      #autoPromotioEnabled 옵션은 Blue/Green 배포를 자동으로 진행할 것인지 여부. false 옵션을 사용해 수동으로 지정
      autoPromotionEnabled: false
---
kind: Service
apiVersion: v1
metadata:
  name: rollout-bluegreen-active
spec:
  type: NodePort
  selector:
    app: rollout-bluegreen
  ports:
  - protocol: TCP
    port: 80
    targetPort: 8080

---
kind: Service
apiVersion: v1
metadata:
  name: rollout-bluegreen-preview
spec:
  type: NodePort
  selector:
    app: rollout-bluegreen
  ports:
  - protocol: TCP
    port: 80
    targetPort: 8080
strategy 속성에서는 어떤 배포 전략을 사용할 것인지 설정할 수 있다.
Blue/Green 전략에서는 2개의 서비스 preview 와 active 로 나누어서 새로운 배포가 발생하면 어떻게 바뀌는 지 살펴볼 것이다.
이번 예제에서는 처음에 blue 가 보이는 페이지를 표시해주고, 새로운 버전을 배포할 때는 green 이 보이는 페이지를 표시할 것이다.
autoPromotionEnabled 옵션은 관리자의 승인 없이 자동으로 배포할 지, 수동으로 승인할 지 결정하는 옵션이다.
여기서는 Blue/Green 배포가 이루어지는 과정을 확인하기 위해 false 로 지정했다.
  strategy:
    blueGreen:
      #activeService는 현재 운영중인 Blue 서비스
      activeService: rollout-bluegreen-active

      #previewService는 새롭게 배포될 Green 서비스
      previewService: rollout-bluegreen-preview

      #autoPromotioEnabled 옵션은 Blue/Green 배포를 자동으로 진행할 것인지 여부. false 옵션을 사용해 수동으로 지정
      autoPromotionEnabled: false
애플리케이션을 등록하기 위해 아래의 명령어를 사용했다.
argocd app create rollout-demo \
 --repo https://github.com/Han-Joon-Hyeok/aews-cicd \
 --path 3/blue-green \
 --dest-namespace blue-green \
 --dest-server https://kubernetes.default.svc \
 --sync-option CreateNamespace=true
그 다음 애플리케이션을 배포한다.
argocd app sync rollout-demo배포가 되면 ArgoCD 대시보드에서는 아래와 같이 파드가 2개 실행 중인 것을 확인할 수 있다.
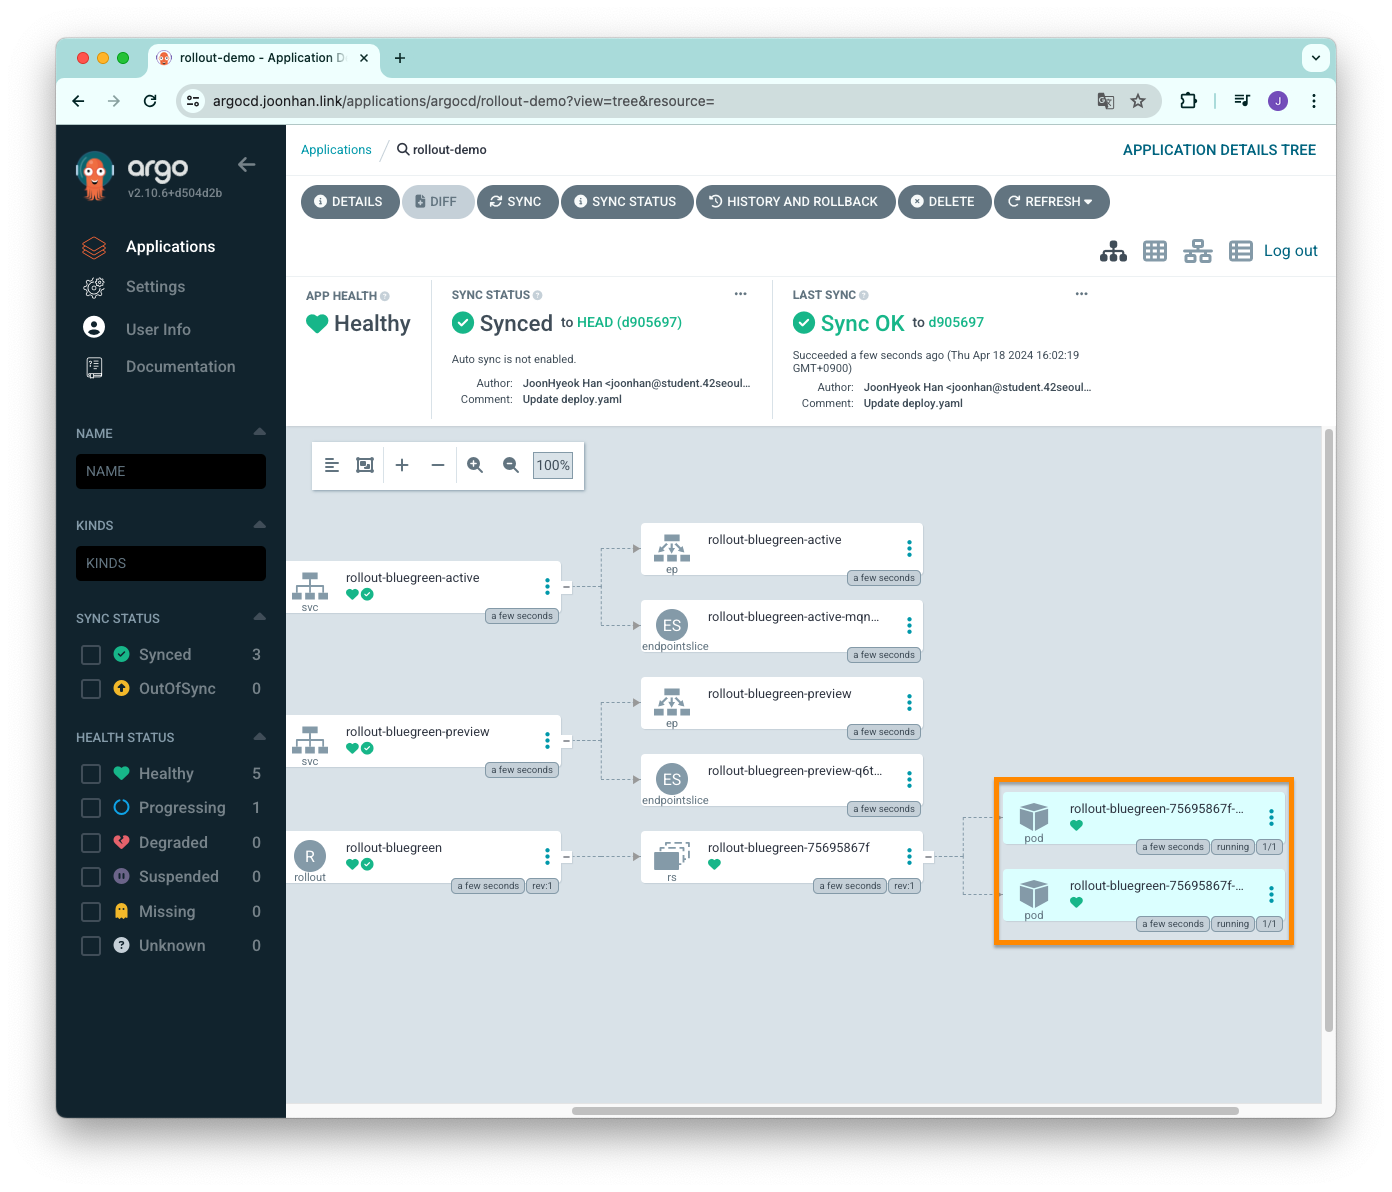
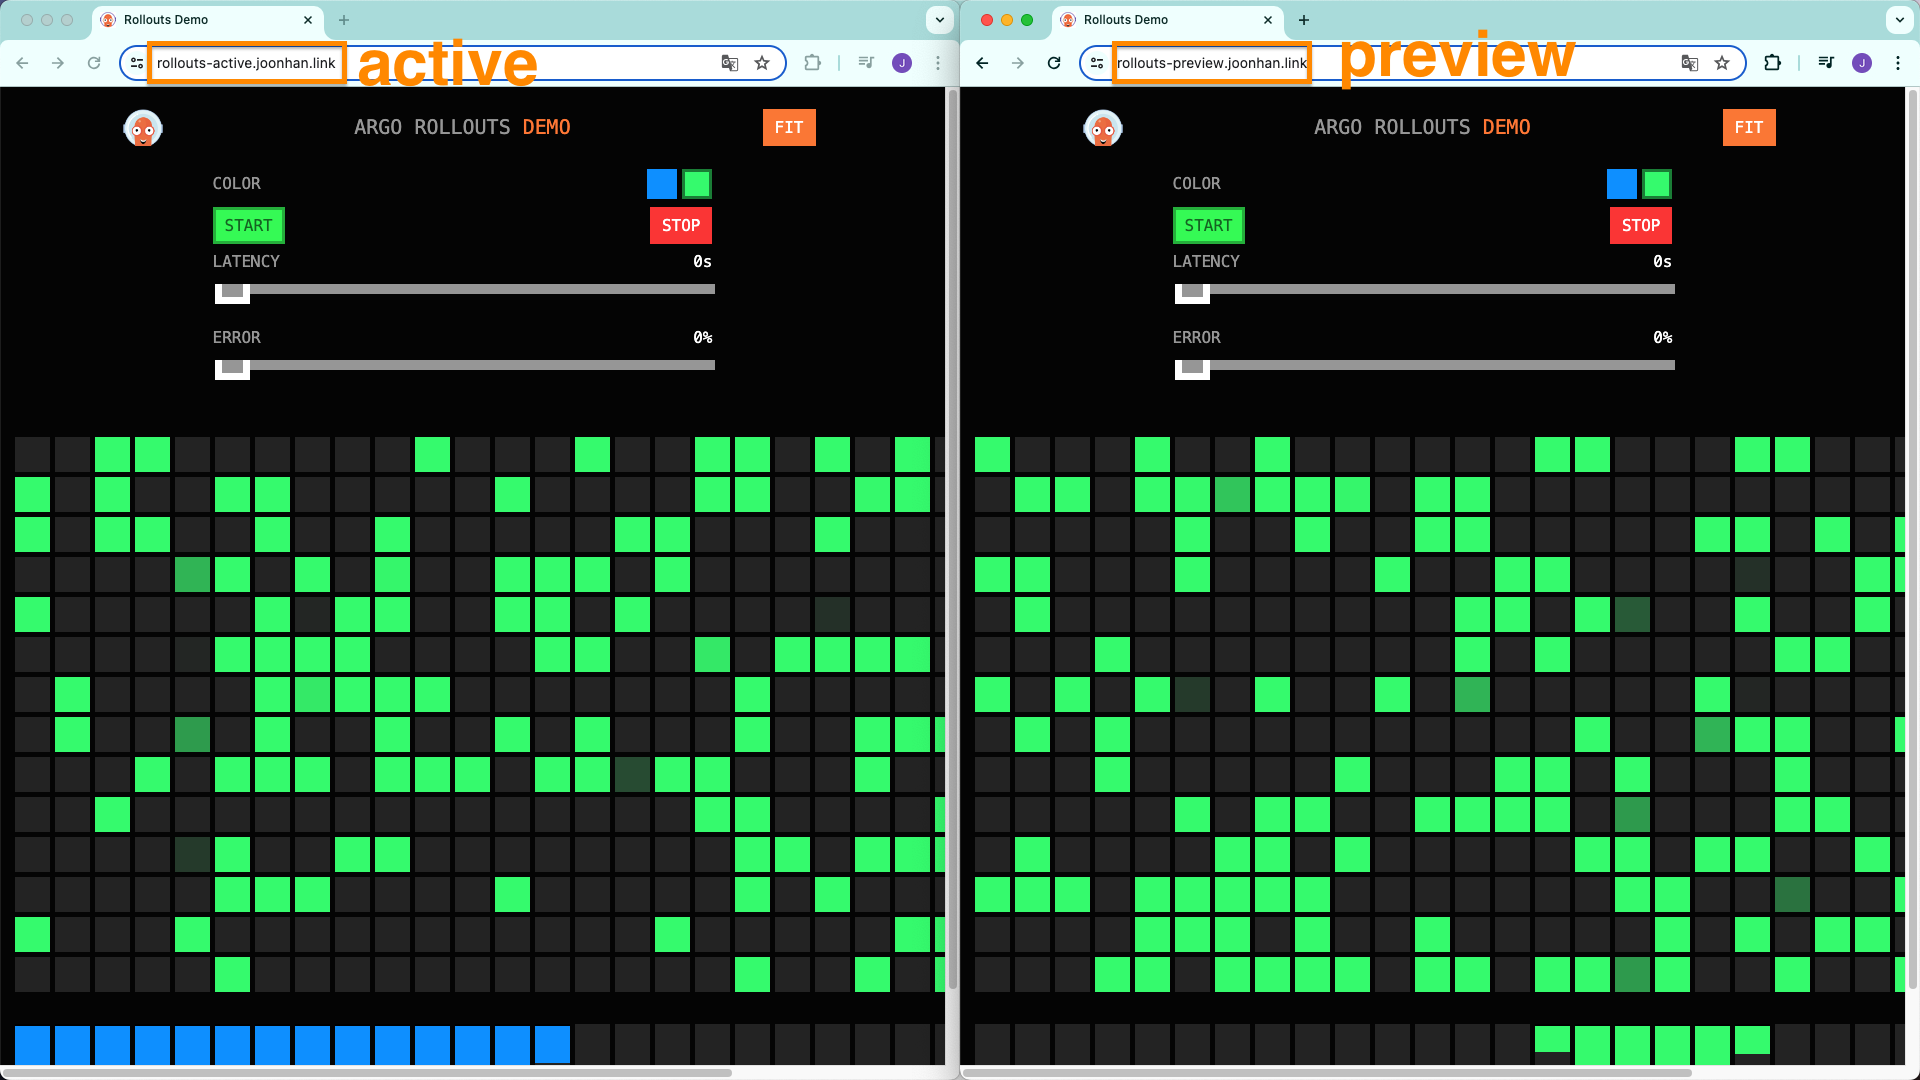
rollouts-active.domain 과 rollouts-preview.domain 에 각각 접속해보면 아래의 화면과 같이 모두 파란색 화면을 보여주는 것을 확인할 수 있다.
모두 같은 파란색 화면이 나오는 이유는 처음 배포할 때는 active 와 preview 가 동일한 서비스를 가리키고 있기 때문이다.

이미지 변경
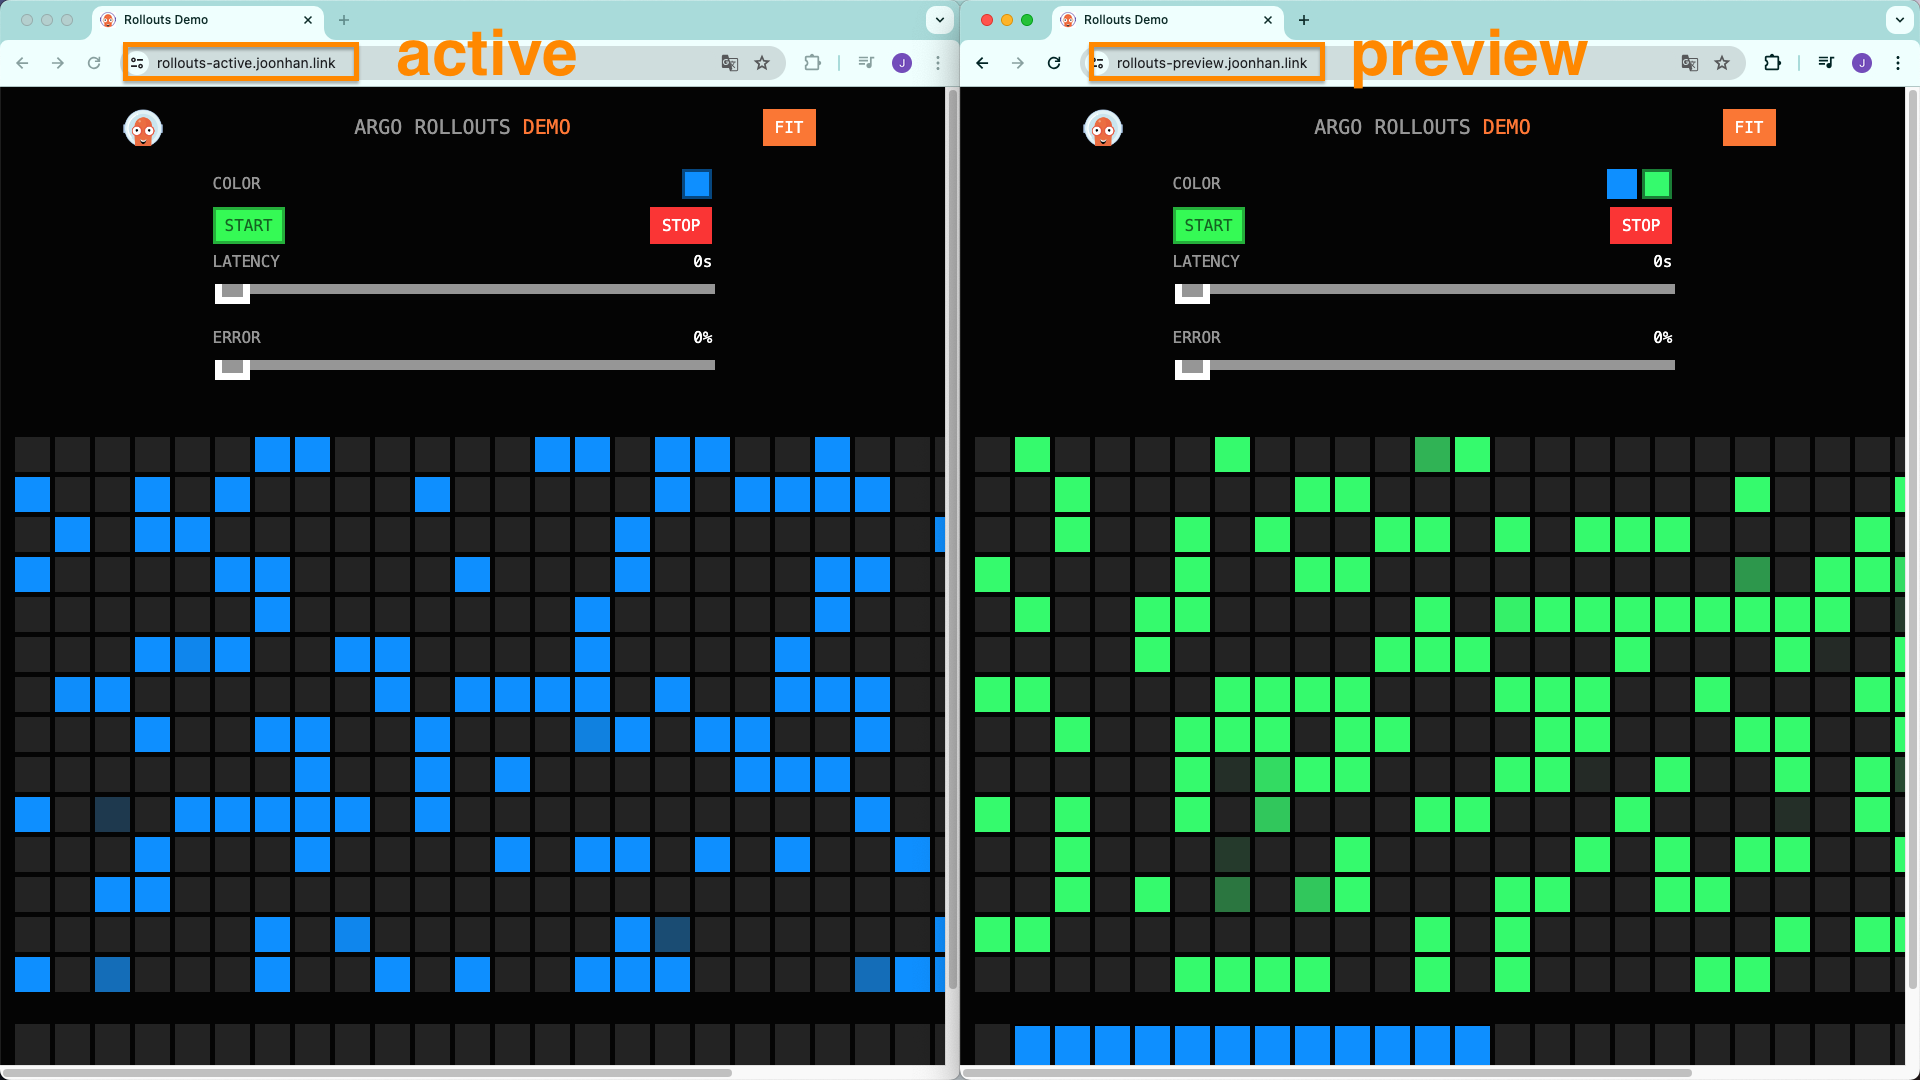
blue 이미지를 green 으로 변경하면서 완전히 배포를 하기 전에 active 는 여전히 파란색 화면을 보여주고, preview 는 초록색 화면을 보여주는 것을 확인해보자.
Github Repository 에서 컨테이너 이미지는 아래와 같이 변경했다.
...
    spec:
      containers:
      - name: rollouts-demo
        #image: argoproj/rollouts-demo:blue
        image: argoproj/rollouts-demo:green # 새롭게 적용할 이미지
        imagePullPolicy: Always
        ports:
        - containerPort: 8080
...
변경 사항을 적용하기 위해 argocd 에서 sync 를 맞춰주었다.
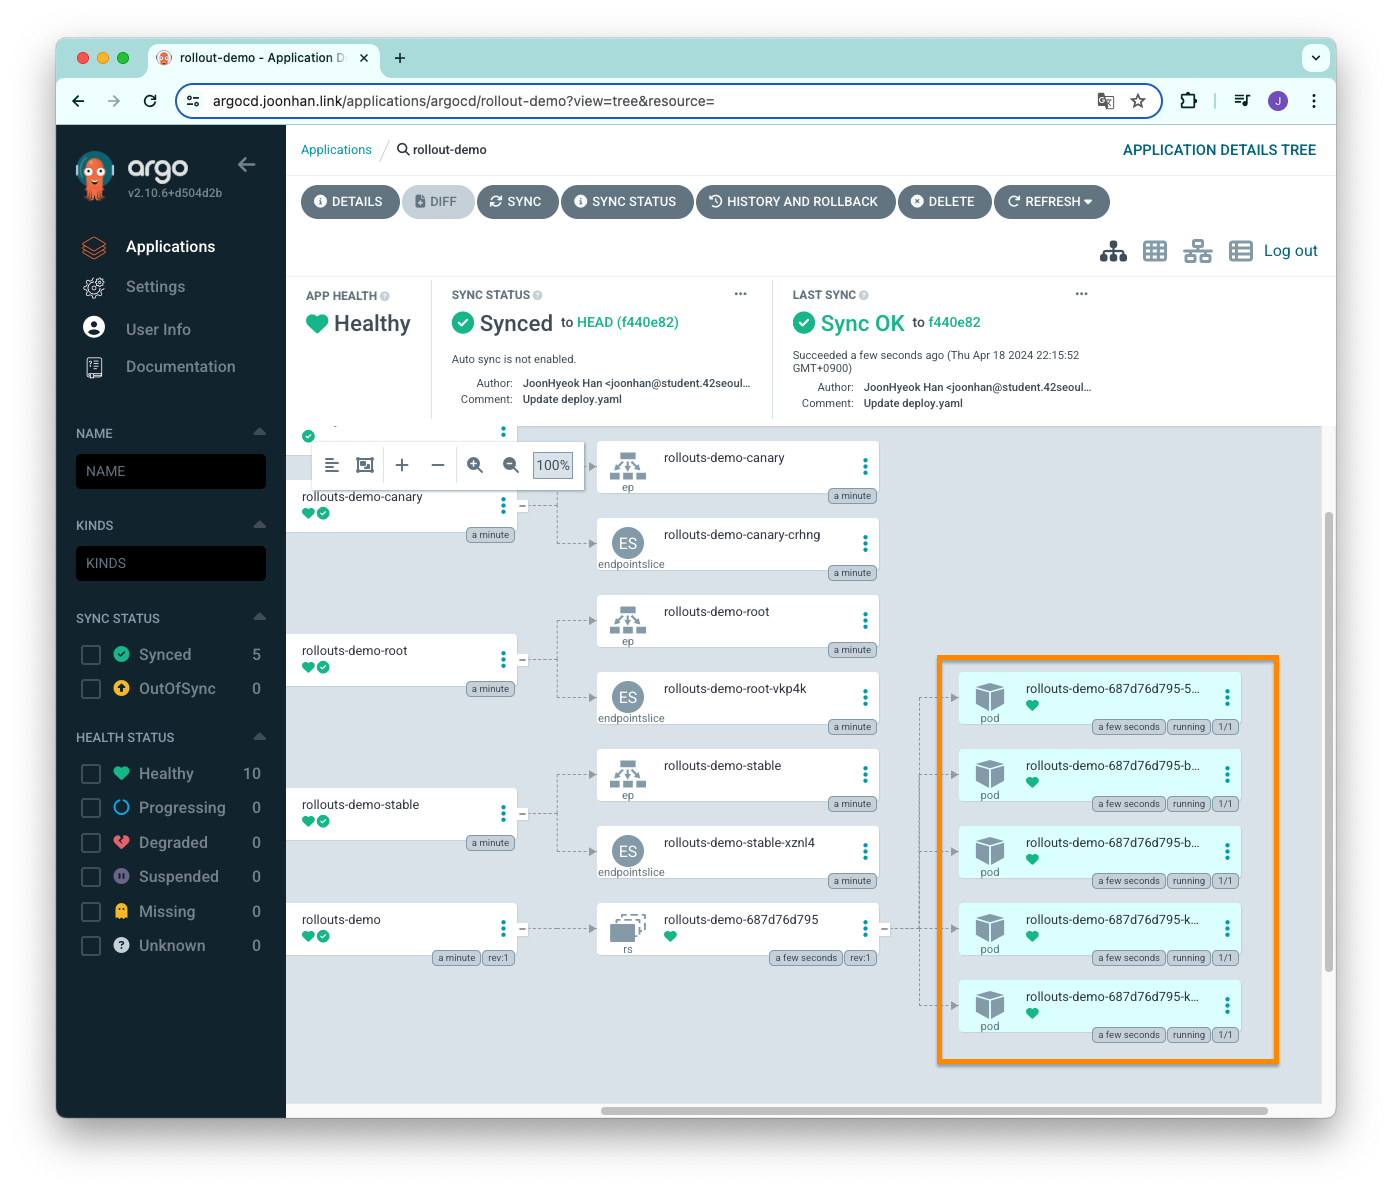
argocd app sync rollout-demoArgo CD 대시보드에서 확인해보면 파드가 총 4개 실행되고 있는 것을 확인할 수 있다.
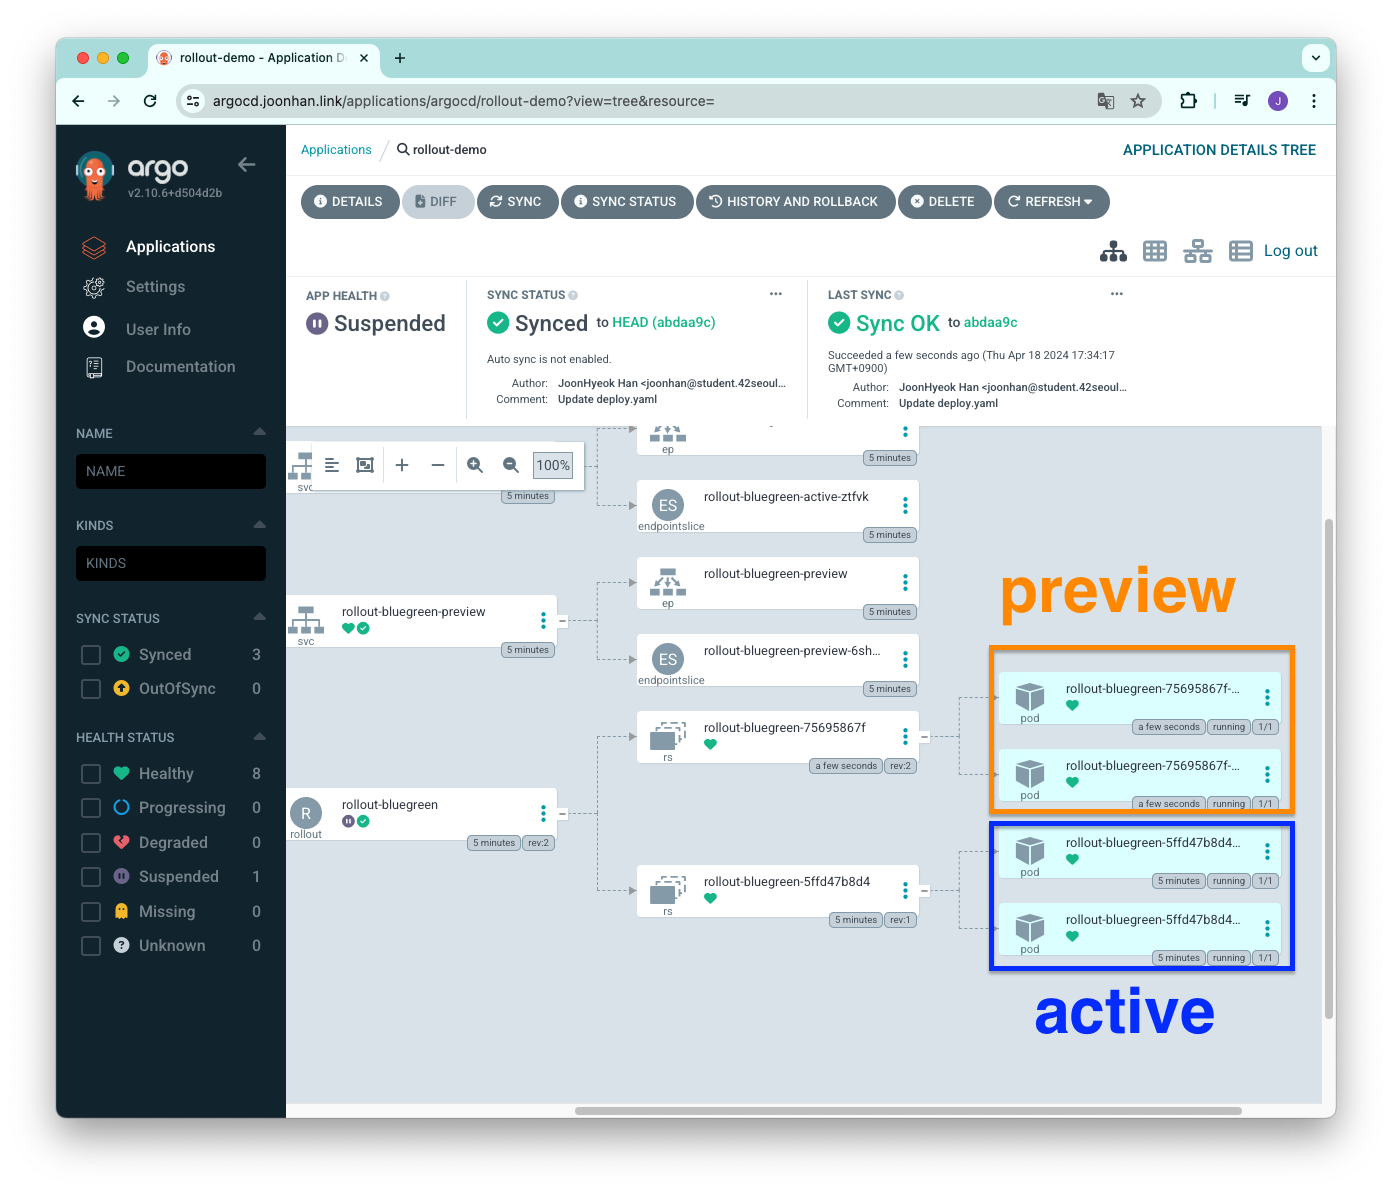
기존에 실행되던 파드는 active 이고, revision 1 으로 설정되어있다.
새롭게 생성된 파드는 preview 에 해당하며, revision 2 로 설정되어있다.
아직 완전히 배포를 완료한 것이 아니기 때문에 active 서비스 파드들이 종료되지 않고 있는 것이다.
아래의 이미지처럼 active 는 여전히 파란색 화면을 보여주고 있고, preview 는 초록색 화면을 보여주고 있다.
완전히 green 으로 트래픽을 변경하기 위해 아래의 명령어를 실행해서 promote 한다.
kubectl argo rollouts promote rollout-bluegreen -n blue-green위의 명령어에서 rollout-bluegreen 은 Rollout 을 정의한 yaml 파일에서 metadata.name 에 해당한다.
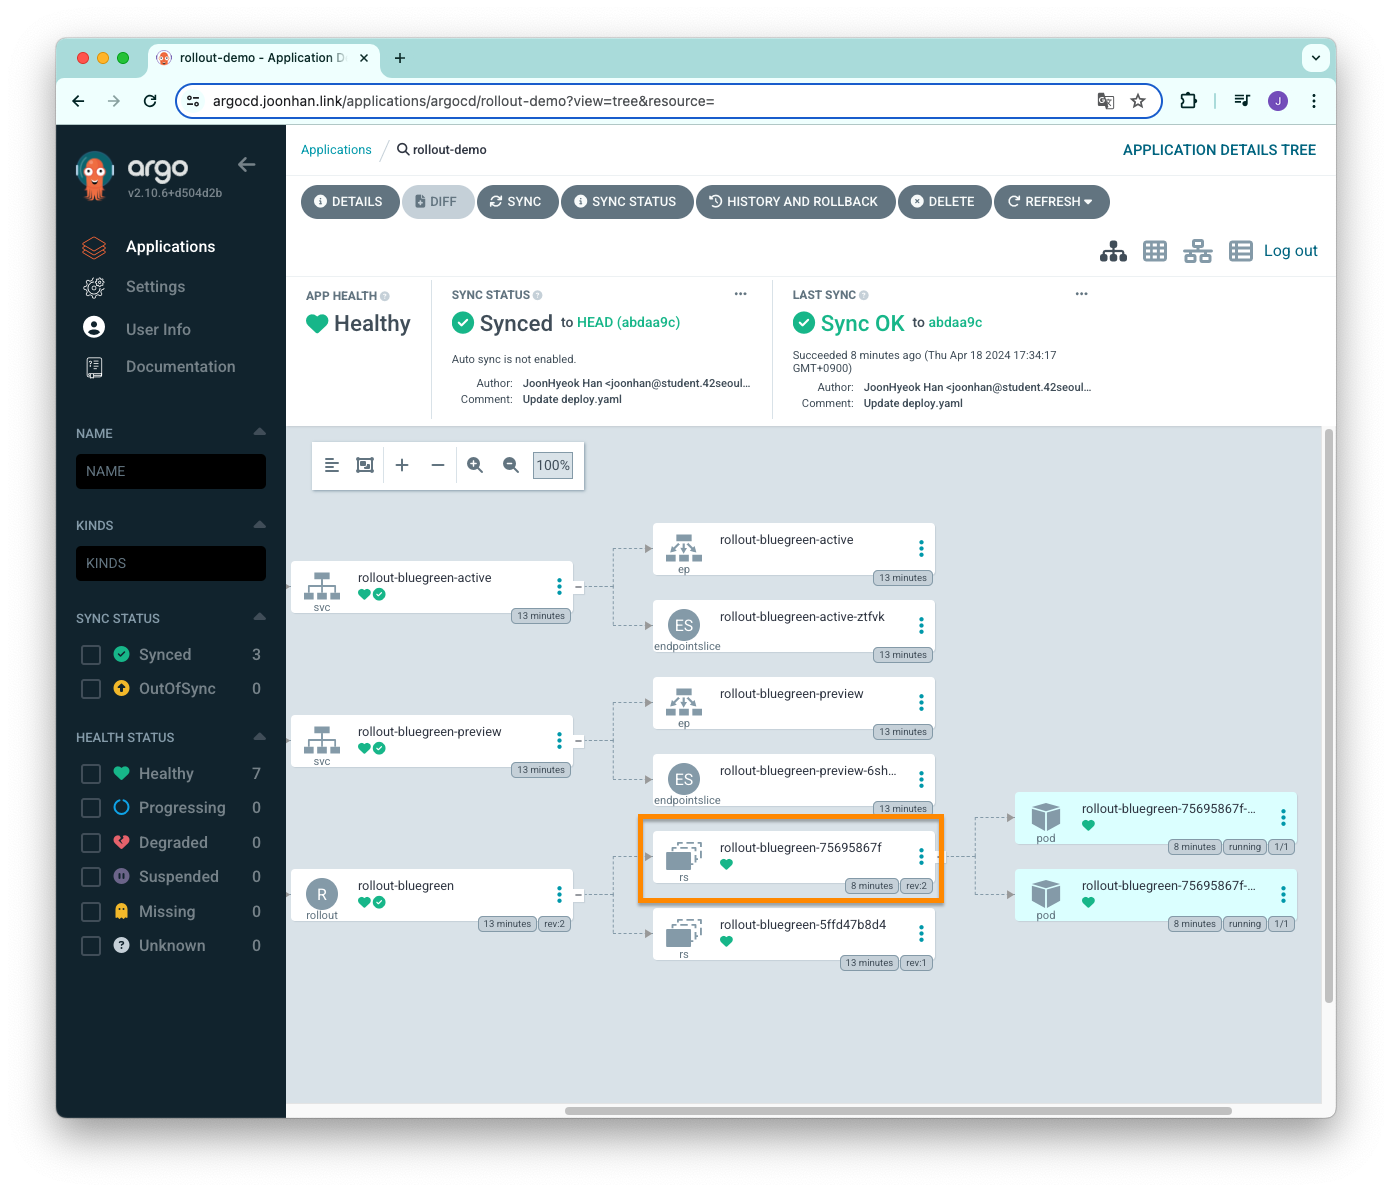
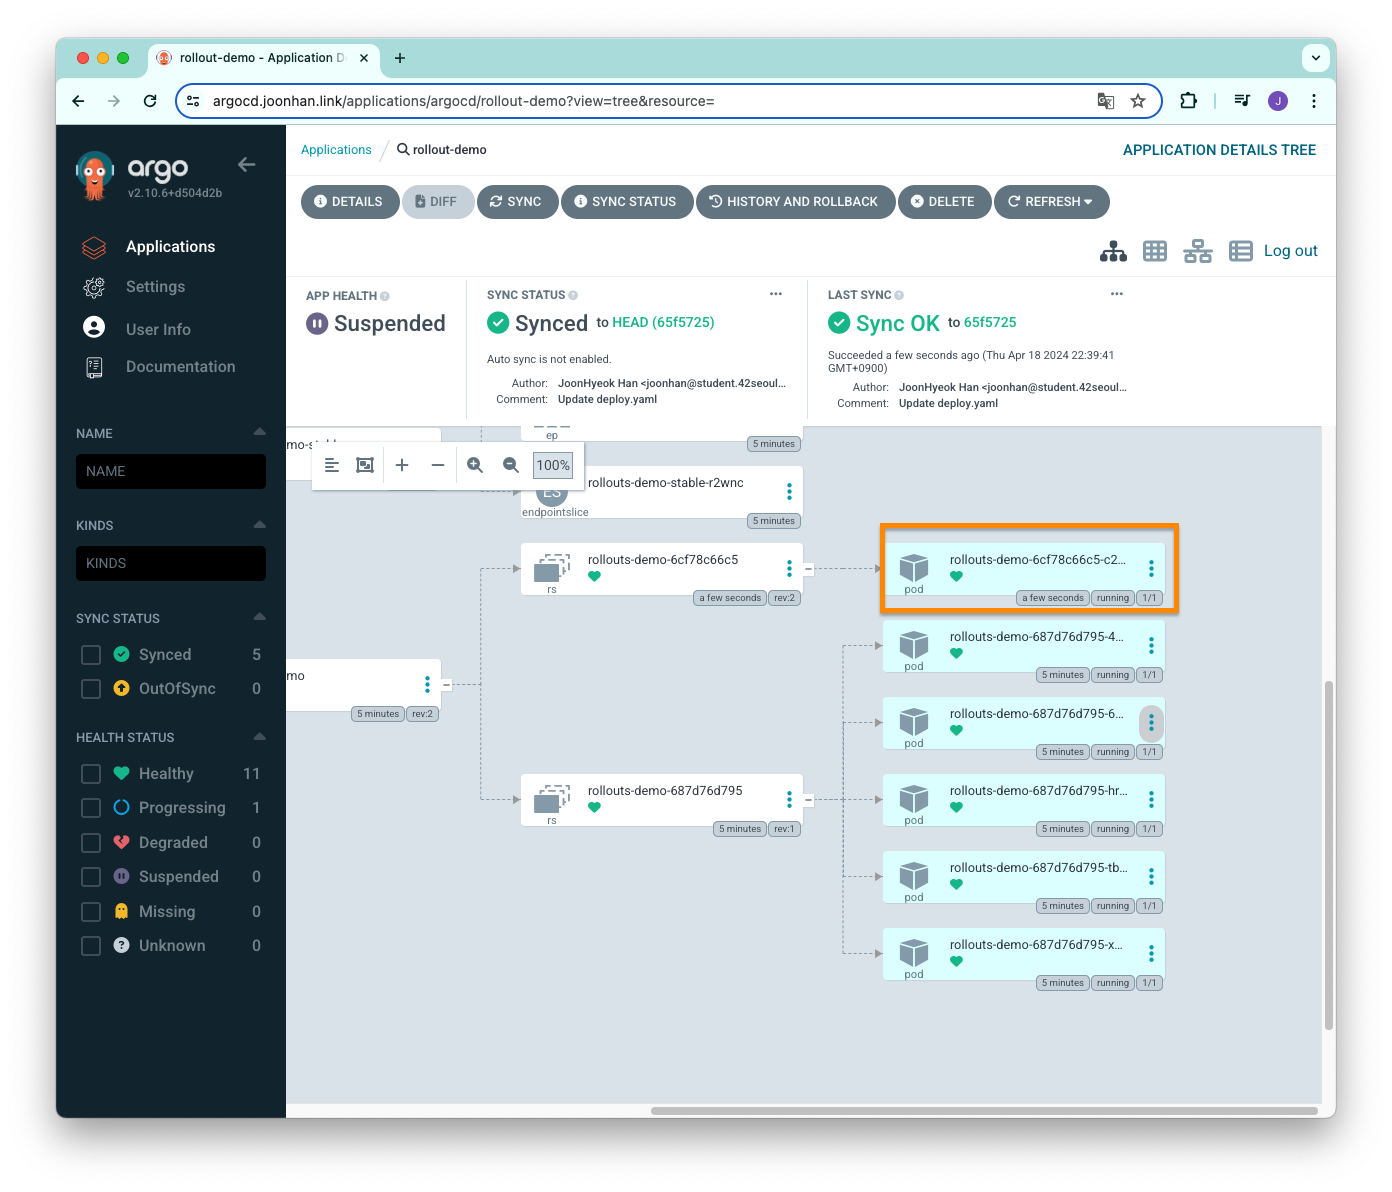
Argo CD 대시보드에서 확인해보면 revision 2 에 해당하는 레플리카셋만 남아있는 것을 확인할 수 있다.
도메인을 들어가서 확인해보면 active 와 preview 모두 초록색으로 변해있는 것을 확인할 수 있다.
실습에 사용한 자원을 삭제하기 위해 Argo 애플리케이션과 Ingress(ALB)를 삭제한다.
argocd app delete rollout-demo

kubectl delete -f blue-green-ingress.yaml
Argo Rollouts canary 배포 전략 적용
ingress 생성
blue green 에서 사용했던 것과 동일하지만, 도메인 이름만 rollouts-root.domain 로 변경하기 위해서 새로운 yaml 파일을 생성했다.
cat << EOT > canary-ingress.yaml
apiVersion: v1
kind: Namespace
metadata:
  name: canary
---
apiVersion: networking.k8s.io/v1
kind: Ingress
metadata:
  namespace: canary
  name: rollouts-root-ingress
  annotations:
    alb.ingress.kubernetes.io/scheme: internet-facing
    alb.ingress.kubernetes.io/target-type: ip
    alb.ingress.kubernetes.io/backend-protocol: HTTP
    alb.ingress.kubernetes.io/listen-ports: '[{"HTTPS":80}, {"HTTPS":443}]'
    alb.ingress.kubernetes.io/certificate-arn: $CERT_ARN
    alb.ingress.kubernetes.io/ssl-redirect: '443'
spec:
  ingressClassName: alb
  rules:
    - host: "rollouts-root.$MyDomain"
      http:
        paths:
          - path: /
            pathType: Prefix
            backend:
              service:
                name: rollouts-demo-root
                port:
                  name: use-annotation
EOT
그 다음 아래의 명령어를 실행해서 ingress 를 생성했다.
kubectl apply -f canary-ingress.yaml정상적으로 생성되었는지 확인하기 위해 아래의 명령어를 실행한다.
kubectl get ingress -n canary
#NAME                      CLASS   HOSTS                          ADDRESS                                                                      PORTS   AGE
#rollouts-root-ingress     alb     rollouts-root.joonhan.link     k8s-canary-rollouts-b68ec588bb-1256422484.ap-northeast-2.elb.amazonaws.com   80      8s
애플리케이션 생성 및 배포
canary 배포 전략을 적용하기 위한 Rollout yaml 파일을 아래와 같이 작성했다.
argo-rollouts 공식 Github Repository 를 참고해서 작성했다.
apiVersion: v1
kind: Namespace
metadata:
  name: canary
---
apiVersion: argoproj.io/v1alpha1
kind: Rollout
metadata:
  name: rollouts-demo
spec:
  replicas: 5
  strategy:
    canary:
      canaryService: rollouts-demo-canary
      stableService: rollouts-demo-stable
      trafficRouting:
        alb:
          ingress: rollouts-root-ingress
          servicePort: 80
          rootService: rollouts-demo-root
      steps:
      - setWeight: 20
      - pause: {}
      - setWeight: 40
      - pause: {duration: 5s}
      - setWeight: 60
      - pause: {duration: 5s}
      - setWeight: 80
      - pause: {duration: 5s}
  revisionHistoryLimit: 2
  selector:
    matchLabels:
      app: rollouts-demo
  template:
    metadata:
      labels:
        app: rollouts-demo
    spec:
      containers:
      - name: rollouts-demo
        image: argoproj/rollouts-demo:blue
        ports:
        - name: http
          containerPort: 8080
          protocol: TCP
        resources:
          requests:
            memory: 32Mi
            cpu: 5m
---
apiVersion: v1
kind: Service
metadata:
  name: rollouts-demo-root
spec:
  type: NodePort
  ports:
  - port: 80
    targetPort: http
    protocol: TCP
    name: http
  selector:
    app: rollouts-demo

---
apiVersion: v1
kind: Service
metadata:
  name: rollouts-demo-canary
spec:
  type: NodePort
  ports:
  - port: 80
    targetPort: http
    protocol: TCP
    name: http
  selector:
    app: rollouts-demo
---
apiVersion: v1
kind: Service
metadata:
  name: rollouts-demo-stable
spec:
  type: NodePort
  ports:
  - port: 80
    targetPort: http
    protocol: TCP
    name: http
  selector:
    app: rollouts-demo
canary.canaryService 는 새롭게 배포하는 서비스를 의미하고, canary.stableService 는 기존에 실행하던 서비스를 의미한다.
canary:
  canaryService: rollouts-demo-canary
  stableService: rollouts-demo-stable
canary.trafficRouting 은 alb 를 이용해서 새롭게 배포하는 canary 로 트래픽을 동적으로 옮겨주기 위한 설정이다.
alb.rootService 는 blue green 전략에서 활용했던 active 와 동일한 기능을 한다고 보면 된다.
rootService 는 stable 상태에 있는 트래픽을 canary 로 전달하는 역할을 한다.
새로운 배포가 끝나면 rootService 는 stableService 가 된다.
이렇게 하는 이유는 배포 도중 오류가 발생했을 때 롤백을 원활하게 해주기 위한 것 같은데, 정확한 이유는 모르겠다.
  trafficRouting:
    alb:
      ingress: rollouts-root-ingress
      servicePort: 80
      rootService: rollouts-demo-root
setWeight 옵션과 pause 옵션을 통해 단계 별로 canary 로 보내야 하는 트래픽의 비율과 rollout 을 잠시 멈추는 간격을 설정할 수 있다.
      steps:
      - setWeight: 20
      - pause: {}
      - setWeight: 40
      - pause: {duration: 5s}
      - setWeight: 60
      - pause: {duration: 5s}
      - setWeight: 80
      - pause: {duration: 5s}
setWeight 옵션은 카나리아로 보내야 하는 트래픽의 비율을 의미한다.
pause 옵션은 duration 에 정의된 시간만큼 기다렸다가 다음 단계로 진행한다.
위의 설정은 트래픽을 canary 로 20% 보내고 나서 직접 배포를 더 진행하고, 그 다음에 40% 에 도달하면 5초 대기, 60% 에 도달하면 5초 대기, 80% 에 도달하면 5초 대기하고 나서 트래픽의 100% 를 canary 로 보내는 것이다.
pause 의 duration 에 사용할 수 있는 시간 단위는 시, 분, 초이며, 기본값은 초로 지정된다.
spec:
  strategy:
    canary:
      steps:
        - pause: { duration: 10 }  # 10 seconds
        - pause: { duration: 10s } # 10 seconds
        - pause: { duration: 10m } # 10 minutes
        - pause: { duration: 10h } # 10 hours
        - pause: {}                # pause indefinitely
애플리케이션을 등록하기 위해 아래의 명령어를 사용했다.
argocd app create rollout-demo \
 --repo https://github.com/Han-Joon-Hyeok/aews-cicd \
 --path 3/canary \
 --dest-namespace canary \
 --dest-server https://kubernetes.default.svc \
 --sync-option CreateNamespace=true
그 다음 애플리케이션을 배포한다.
argocd app sync rollout-demoArgo CD 대시보드를 확인하면 파드가 5개 실행되고 있는 것을 확인할 수 있다.
도메인으로 접속해도 파란색 화면이 뜨고 있는 것을 확인할 수 있다.

이미지 변경
이미지를 blue 에서 yellow 로 변경해보자.
...
	spec:
    containers:
      - name: rollouts-demo
        image: argoproj/rollouts-demo:yellow
...
그 다음 Github Repository 에 push 하고 argocd app sync 명령어를 실행했다.
argocd app sync rollout-demoArgoCD 대시보드를 확인하면 아래의 이미지 같이 새로운 파드가 하나 생긴 것을 확인할 수 있다.
도메인으로 접속해보면 노란색 박스가 생긴 것을 확인할 수 있다.
배포를 더 진행하기 위해 promote 를 해준다.
이후에는 자동으로 canary 로 보내는 트래픽의 비율이 높아질 것이다.
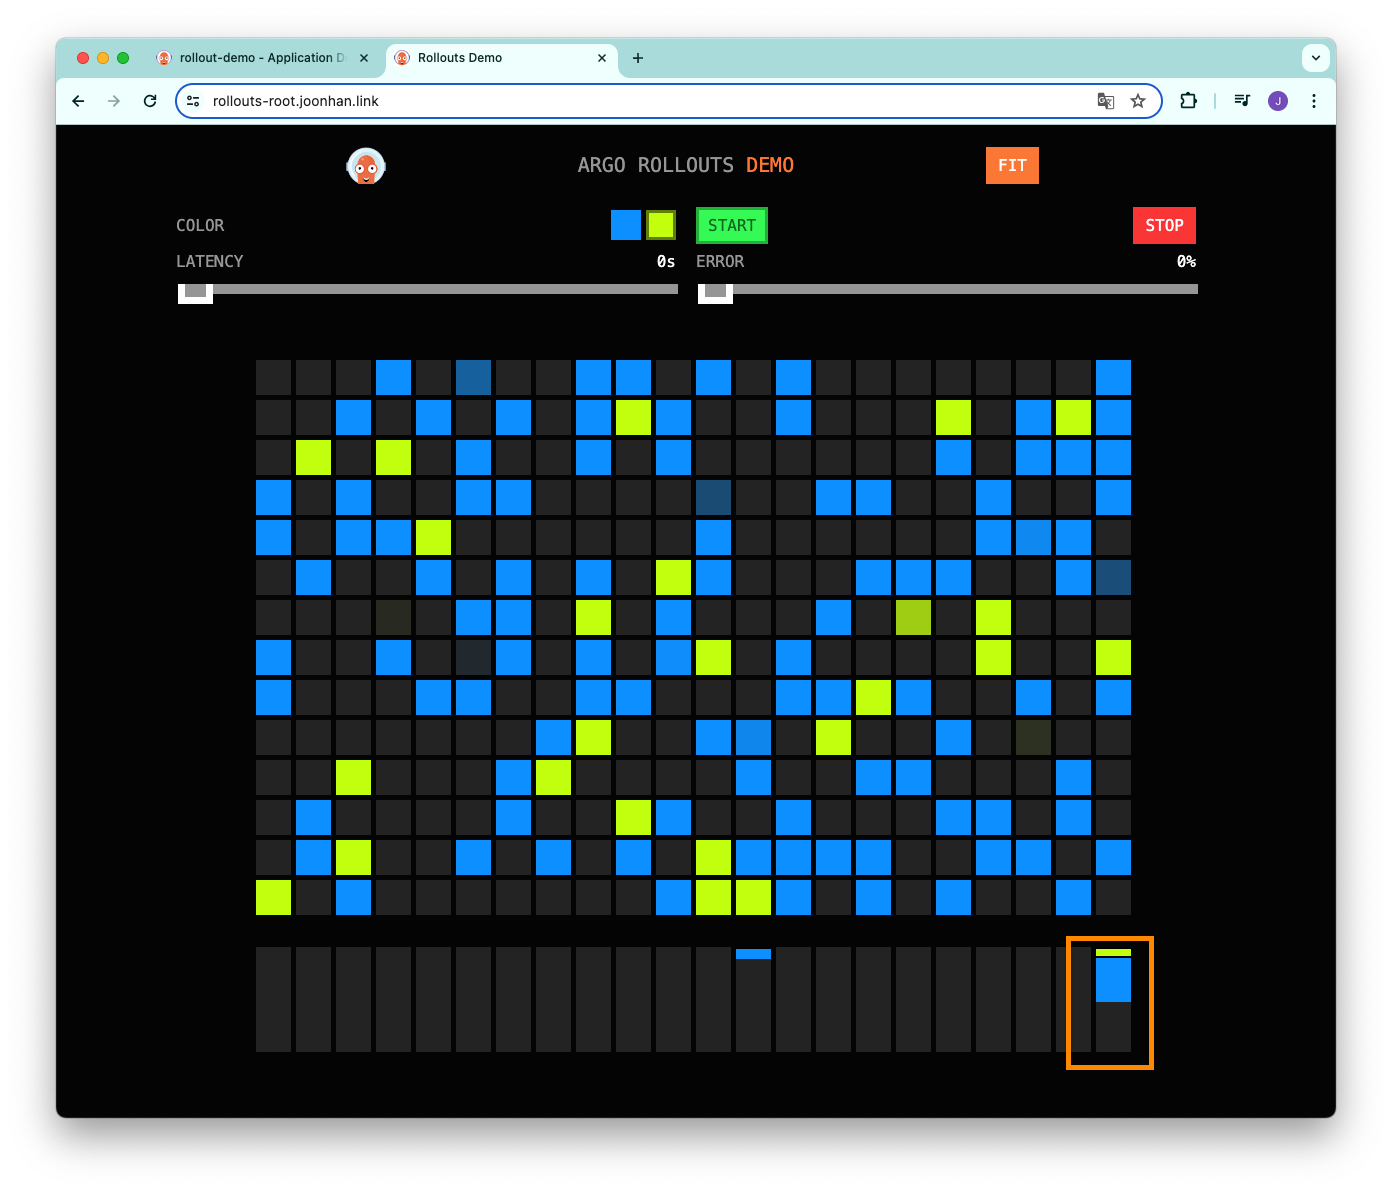
kubectl argo rollouts promote rollouts-demo -n canary아래의 이미지는 revision 2(canary) 의 파드가 늘어나면서 canary 에 해당하는 노란색 박스가 점점 많아지는 것을 확인할 수 있다.
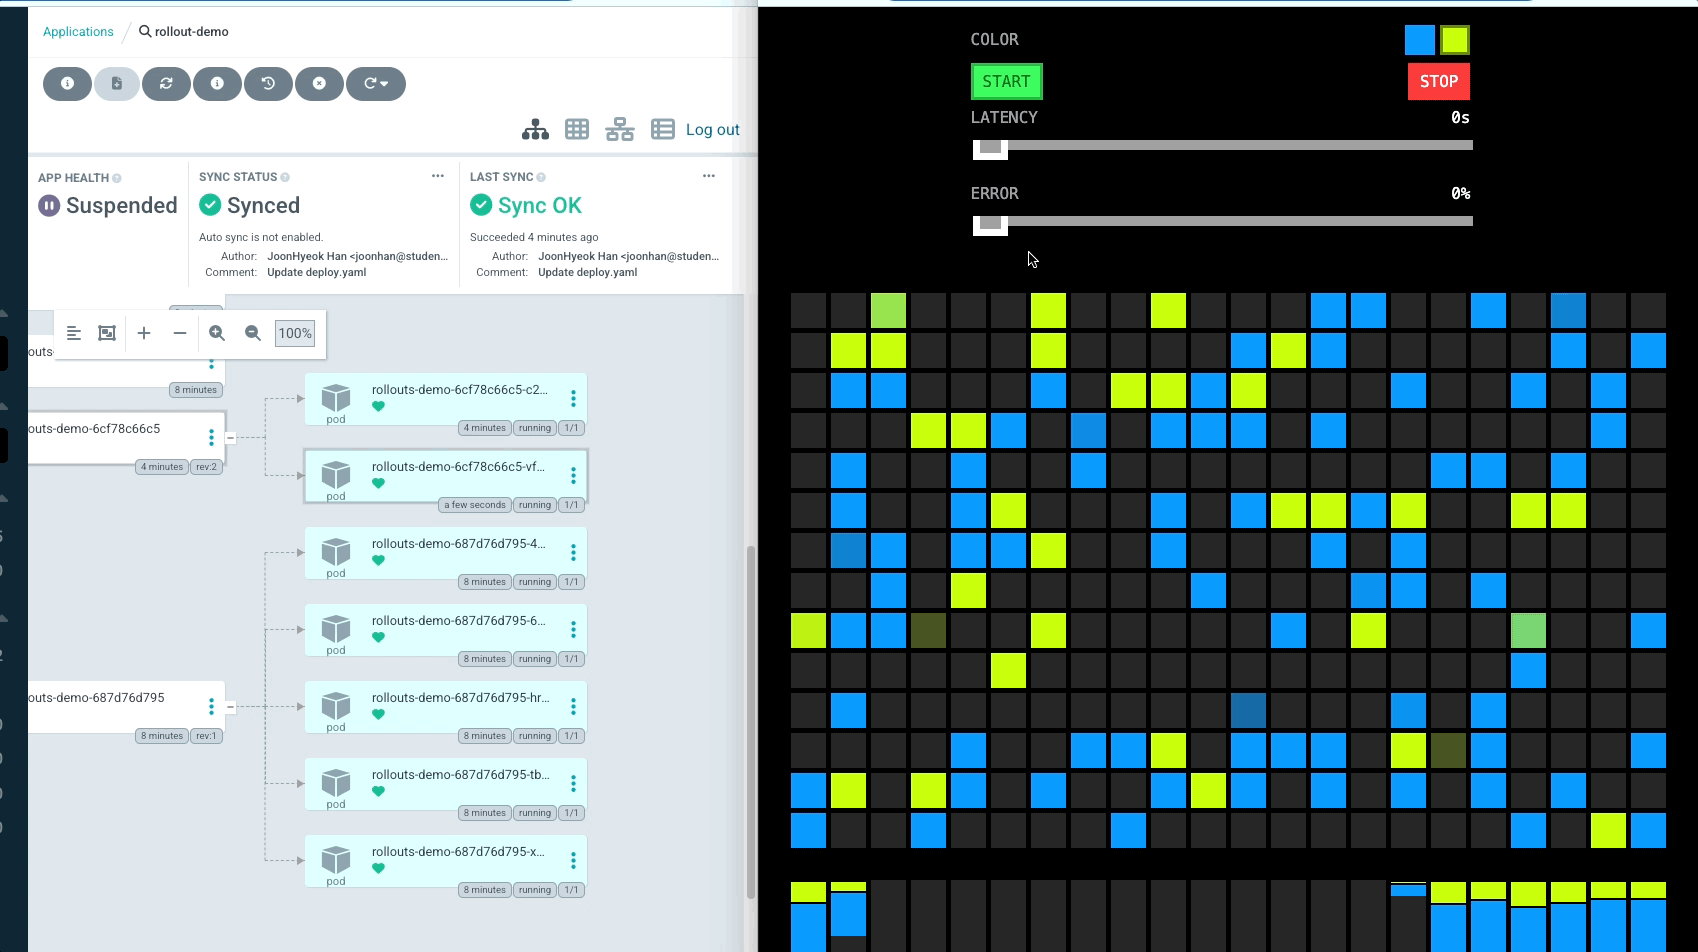
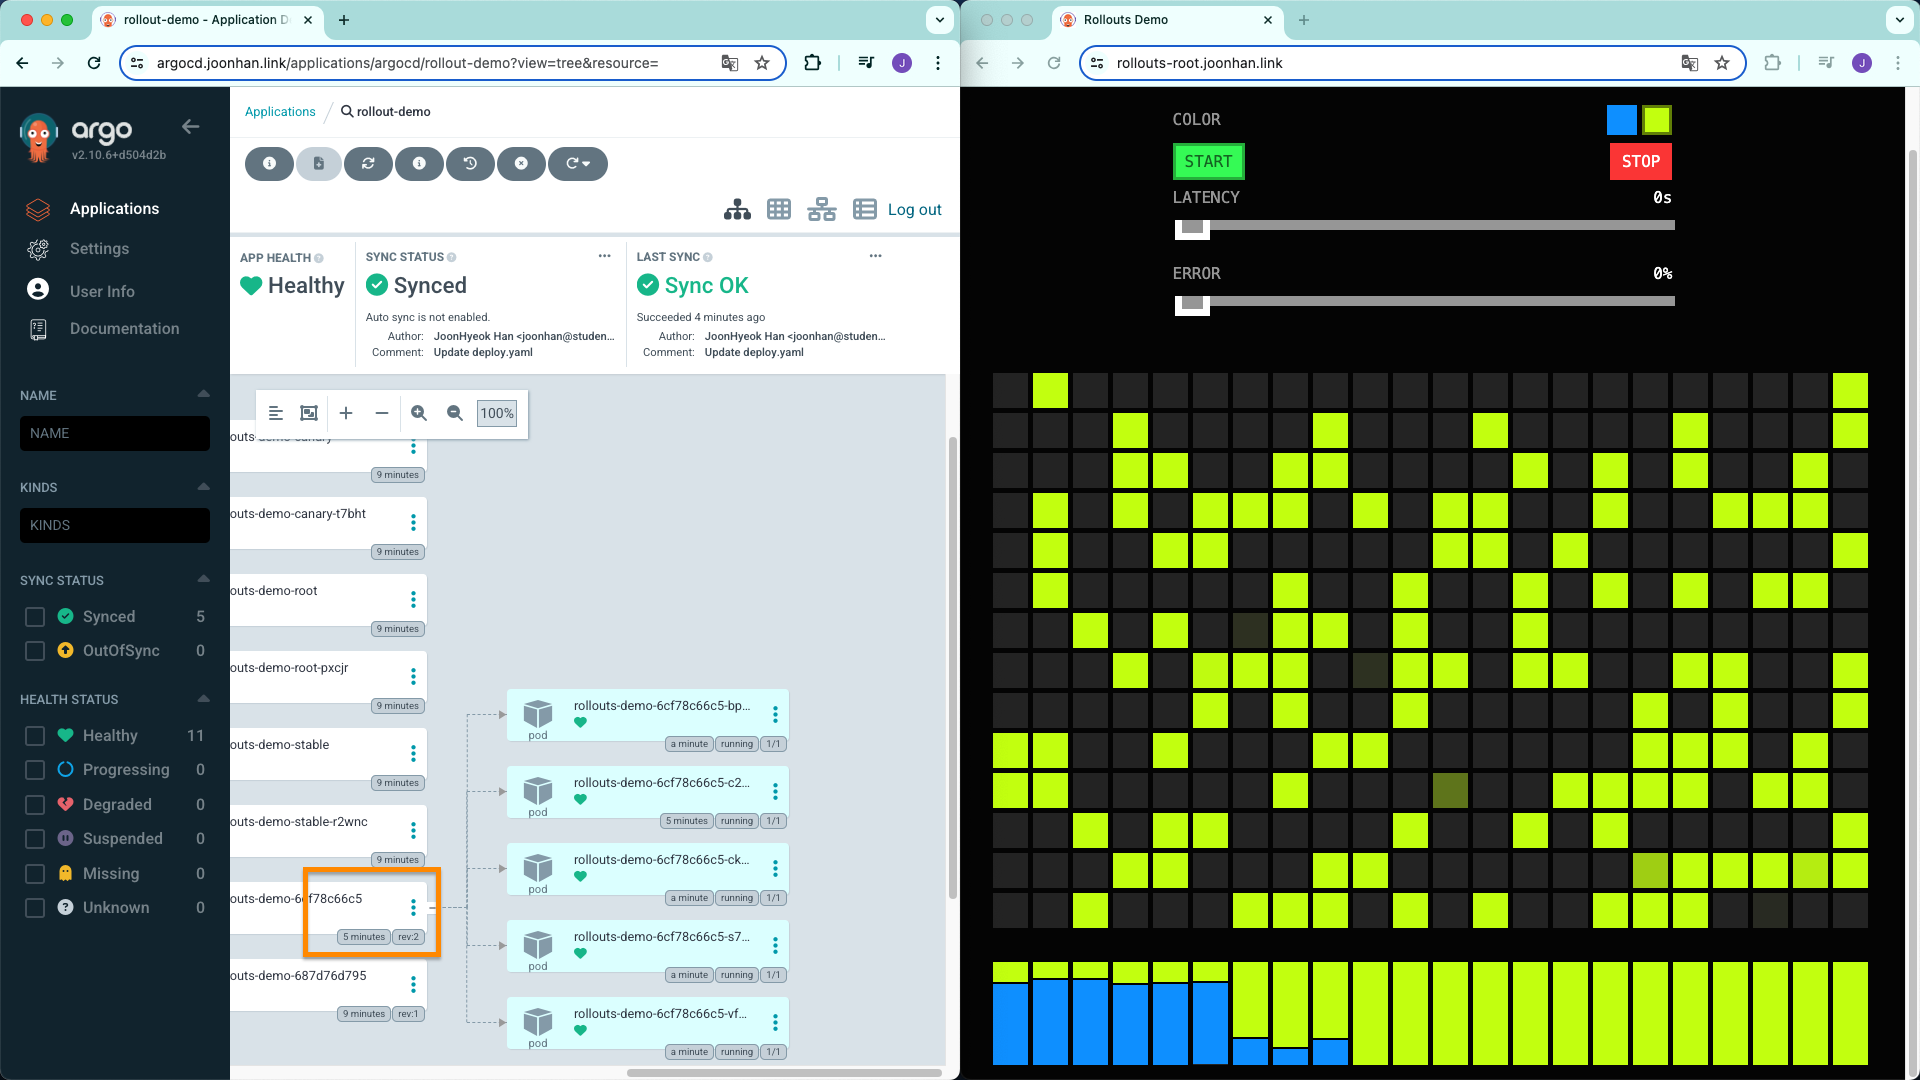
배포가 전부 끝나면 revision 1 (이전 stable service) 의 파드는 모두 삭제되고 revision 2 (현재 stable service) 의 파드만 남은 것을 확인할 수 있다.
Argo Rollouts + Argo Notifications
Argo CD 에는 배포 중에 발생하는 오류를 이메일이나 슬랙과 같은 메신저로 알림을 보낼 수 있는 기능을 지원한다.
argocd notifications controller 를 argocd 네임스페이스에 별도로 설치해주어야 한다.
Argo CD 뿐만 아니라 Argo Rollouts 를 이용할 때도 argocd 네임스페이스에 설치된 argocd notifications controller 를 이용해서 알림을 보낼 수 있다.
여기서는 슬랙으로 알림을 보내는 예시를 공식 자료를 참고해서 정리했다.
설치
아래의 명령어를 실행해서 argocd 네임스페이스에 argocd notifications controller 를 설치한다.
kubectl apply -n argocd -f https://raw.githubusercontent.com/argoproj-labs/argocd-notifications/release-1.0/manifests/install.yaml설치 후 파드를 확인해보면 추가된 것을 확인할 수 있다.
kubectl get pod -n argocd
#NAME                                                READY   STATUS    RESTARTS       AGE
#...
#argocd-notifications-controller-8cc55b789-ljqhn     1/1     Running   3 (16m ago)    8d
#...
슬랙으로 언제 메세지를 보낼 지 결정하는 트리거와 트리거가 작동하면 보낼 메세지의 템플릿 제공해주는데, 이를 설치해주자.
kubectl apply -n argocd -f https://raw.githubusercontent.com/argoproj-labs/argocd-notifications/release-1.0/catalog/install.yaml참고로 메세지 형식은 직접 편집이 가능하기 때문에 원하는 형식과 정보를 알림으로 보낼 수 있다.
Secret 및 ConfigMap 생성
Argo Rollouts 을 이용하면서 알림 기능을 이용하기 위해서는 argo-rollouts 네임스페이스에 Secret 과 ConfigMap 을 생성해야 한다.
슬랙 봇을 이용해서 메세지를 전송할 것이기 때문에 슬랙 봇 토큰을 저장하는 Secret 을 생성해주었다.
슬랙 봇을 생성하는 방법은 자세히 설명하지 않고 생략한다.
cat << EOT > rollout-notification-secret.yaml
apiVersion: v1
kind: Namespace
metadata:
  name: argo-rollouts
---
apiVersion: v1
kind: Secret
metadata:
  name: argo-rollouts-notification-secret
stringData:
  slack-token: xoxb-...
EOT
Secret 정보와 트리거를 설정하는 ConfigMap 도 생성해주었다.
cat << EOT > rollout-notification-cm.yaml
apiVersion: v1
kind: Namespace
metadata:
  name: argo-rollouts
---
apiVersion: v1
kind: ConfigMap
metadata:
  name: argo-rollouts-notification-configmap
data:
  service.slack: |
    token: $slack-token
  defaultTriggers: |
    - on-rollout-completed
    - on-scaling-replica-set
EOT
여기서는 rollout 이 완료되는 경우와 파드가 스케일링 할 때 알림을 전송하도록 트리거를 설정했다.
annotations 추가
위에서 사용했던 canary 배포에 사용한 파일을 그대로 활용했다.
배포를 자동으로 이루어지도록 하기 위해 spec.strategy.canary.steps 항목에서 첫 번째 pause 의 duration 을 5초로 변경했다.
알림을 받기 위해서는 metadata.annotations 를 추가해주어야 한다.
notifications.argoproj.io/subscribe.on-rollout-completed.slack 은 rollout 이 완료되면 알림을 받겠다는 것이고, 값에 해당하는 general 은 슬랙 채널 이름이다.
알림을 받고자 하는 채널에는 슬랙 봇이 초대되어 있어야 한다.
apiVersion: v1
kind: Namespace
metadata:
  name: canary
---
apiVersion: argoproj.io/v1alpha1
kind: Rollout
metadata:
  name: rollouts-demo
  annotations: # 추가해준 부분
    notifications.argoproj.io/subscribe.on-rollout-completed.slack: general
    notifications.argoproj.io/subscribe.on-scaling-replica-set.slack: general
spec:
  replicas: 5
  strategy:
    canary:
      canaryService: rollouts-demo-canary
      stableService: rollouts-demo-stable
      trafficRouting:
        alb:
          ingress: rollouts-root-ingress
          servicePort: 80
          rootService: rollouts-demo-root
      steps:
      - setWeight: 20
      - pause: {duration: 5s} # duration 추가
      - setWeight: 40
      - pause: {duration: 5s}
      - setWeight: 60
      - pause: {duration: 5s}
      - setWeight: 80
      - pause: {duration: 5s}
...
변경 사항 적용
변경 사항을 적용하기 위해 레플리카의 수만 변경해주었다.
apiVersion: v1
kind: Namespace
metadata:
  name: canary
---
apiVersion: argoproj.io/v1alpha1
kind: Rollout
metadata:
  name: rollouts-demo
  annotations: # 추가해준 부분
    notifications.argoproj.io/subscribe.on-rollout-completed.slack: general
    notifications.argoproj.io/subscribe.on-scaling-replica-set.slack: general
spec:
  replicas: 1 # 1개로 변경
  strategy:
    canary:
...
아래의 명령어를 실행해서 변경 사항을 적용했다.
argocd app sync rollout-demo슬랙 채널에 아래의 이미지와 같이 레플리카셋의 수를 조절했다는 알림이 발송되었다.
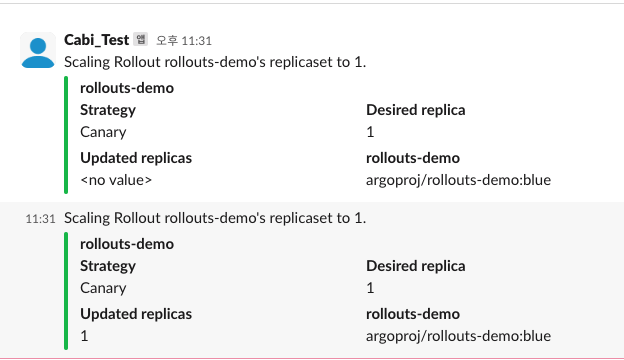
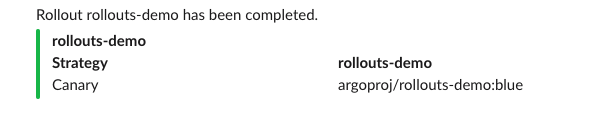
배포가 완전히 끝나면 한번 더 알림을 보내준다.
후기
기존에 진행하고 있던 쿠버네티스 프로젝트에서 Argo CD 를 이용해서 삽질을 많이 했었기에 이번 스터디 주제는 수월하게 진행할 수 있었다.
젠킨스는 처음 사용해봤는데, 2011년에 첫 릴리즈 해서 지금까지 많이 발전해왔기에 굉장히 사용하기 편리했고, 참고할 자료도 많아서 좋았다.
지금 하고 있는 프로젝트에서는 젠킨스보단 Github Actions 로도 충분히 CI 를 구축할 수 있을 것 같긴 한데, 규모가 커지면 젠킨스를 적극적으로 사용해봐도 좋을 것 같다는 생각이 들었다.
이번에 가장 어려웠던 건 Argo Rollouts 이용해서 Blue/Green 배포 전략 실습을 작성하기 위해 ALB 를 이용해서 Ingress 를 생성하는 것이었다.
Argo Rollouts 공식 자료에는 Blue/Green 배포 예시가 아닌 Canary 만 있었고, Ingress 를 직접 생성하는 것은 처음이었기에 많이 헤매기도 했다.
원하는 대로 되지 않아서 적당히 스터디에서 진행한 내용만 정리하고 포기하고 싶은 마음도 들었지만, 포기하기엔 아깝다는 생각도 들면서 오기가 생겼었다.
지금까지 스터디에서 배운 내용을 천천히 되돌아보니, AWS Load Balancer Controller 도 2주차에 배웠고, helm 차트로 대시보드를 띄울 때 yaml 파일에 annotations 부분에서 ALB 관련 설정하는 부분이 있다는 것이 떠올랐기 때문이다.
그래서 다른 블로그 자료도 찾아보고, 이것저것 삽질한 결과로 rollouts-active.domain 과 rollouts-preview.domain 경로로 ALB 를 연결하는 것에 성공했다.
그리고 이전에 Argo CD 를 Github Private Repository 에 연결하는 것과 Argo Rollouts 를 이용해서 배포 전략을 적용하고 알림 기능까지 전부 삽질을 해봤던 터라 비교적 쉽게 내용을 작성할 수 있었다.
내용이 워낙 많아서 자세히 정리하진 못했지만, 실습에 필요한 핵심을 짚고자 노력했다.
스스로 힘든 실습을 선택했지만, 원하는 대로 잘 되어서 자신감도 생기고 뿌듯했다.
결코 쉽지 않았지만, 한 단계 더 성장한 느낌이 들어서 좋다.
참고자료
- CI/CD란? [redhat]
- 정적 분석(Static Analysis)이란? [hudi]
- [Jenkins] Jenkins pipeline을 구축하여 Docker build 및 이미지 push 하기 [velog]
- argo workflow란 [티스토리]
- 주니어 개발자의 Argo Workflow, Events 사용기 - 2 [티스토리]
- EKS Blue/Green 배포 2부 [medium]
- Canary Deployment Strategy [argo-rollouts]
- AWS Load Balancer Controller (ALB) [argo-rollouts]
- Argo CD Notifications [argocd-notifications]