
👻 nodeTypes에 등록할 컴포넌트 만들기
필자의 경우에는 컴포넌트 폴더에 reactflow 라는 폴더를 만들고 nodes라는 폴더를 생성하여 그 안에 커스텀 노드들을 만들어주었습니다.
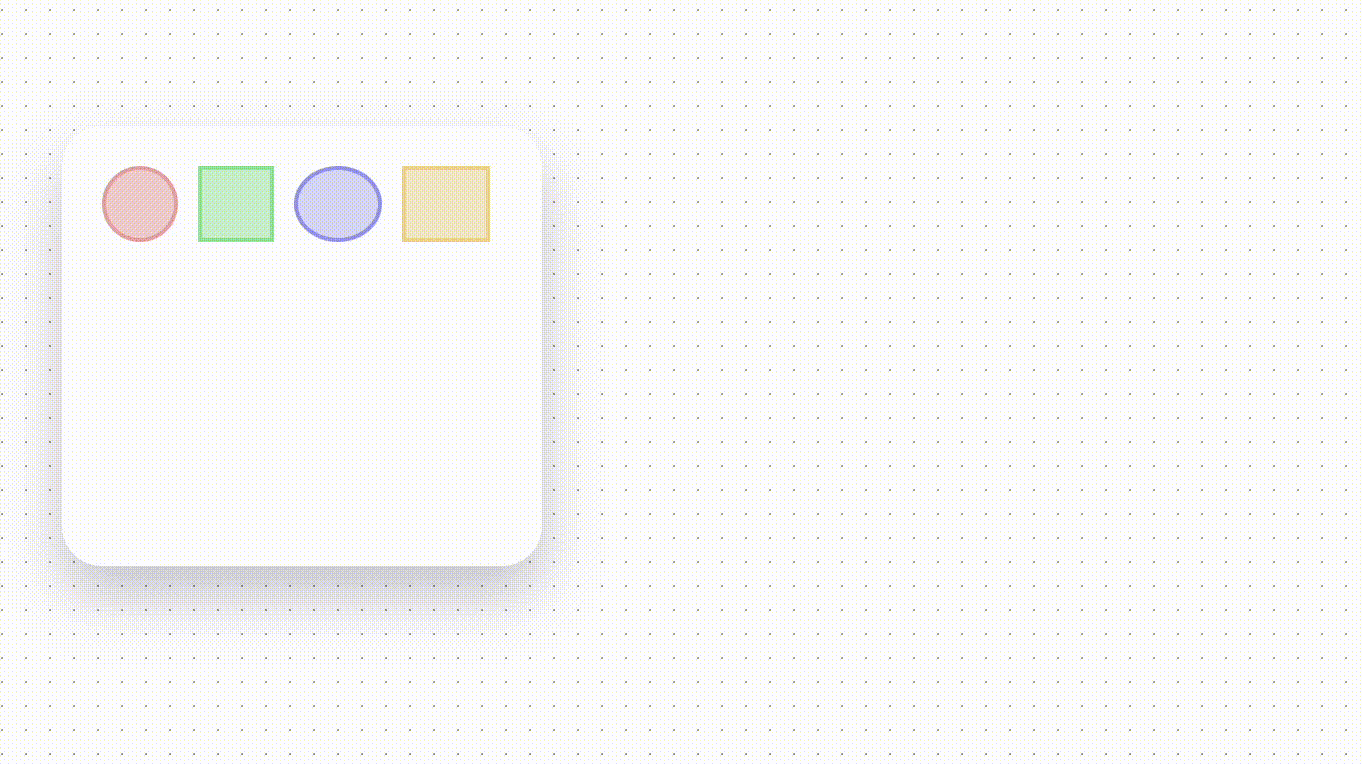
editorTools 에 만들어준 4개의 모형대로 해당 폴더 안에 컴포넌트들을 만들어보겠습니다.
네이밍 센스가 부족하여 간단히 test1,2,3,4 로 구분하였습니다 😅
🙌🏻 Test1.tsx
const Test1 = React.memo(() => {
  return (
    <>
      <div className="wrapper test1" />
      <Handle type="target" position={Position.Left} />
      <Handle type="source" position={Position.Right} />
    </>
  );
});

export default Test1;
...test2, test3, test4 또한 동일하게 만들어주자.
스타일링은 ReactFlow 최상단을 감쌌던 styled-component 안에서 해줄거기 때문에, className을 각각 넣어주었다.
🙌🏻 ReactFlowCanvas.tsx 스타일 수정
다음과 같이 각각 도형들에 대하여 스타일링해주었다.
// ReactFlowCanvas.tsx

const ReactFlowStyled = styled(ReactFlow)`
  .react-flow__node-custom {
    width: 120px;
    height: 120px;
    background: conic-gradient(
      from -160deg at 50% 50%,
      #e92a67 0deg,
      #a853ba 120deg,
      #2a8af6 240deg,
      #e92a67 360deg
    );
    border-radius: 100%;
    color: #fff;
    display: flex;
    align-items: center;
    justify-content: center;
  }

  .wrapper {
    width: 200px;
    height: 200px;
    border: 2px solid;
  }
  .test1 {
    border-radius: 100%;
    border-color: #e9acac;
    background-color: #f1d3d3;
  }
  .test2 {
    border-color: #99e7a0;
    background-color: #cff2d2;
  }
  .test3 {
    width: 200px;
    height: 140px;
    border-radius: 100%;
    border-color: #9d9df1;
    background-color: #ddddf6;
  }
  .test4 {
    width: 200px;
    height: 140px;
    border-color: #f1d996;
    background-color: #f5ebcc;
  }
`;
🙌🏻 nodeTypes 에 컴포넌트 등록해주기
아래와 같이 test1: Test1.tsx 가 대칭되도록 입력해주었다.
// ReactFlowCanvas.tsx

const NodeTypes = {
  custom: CustomNode,
  test1: Test1,
  test2: Test2,
  test3: Test3,
  test4: Test4,
};
이제 도형이 추가될 때, "custom"이 아닌 각각의 키를 입력하여주면, 해당 키에 맞는 컴포넌트가 도형으로 만들어질 것이다.
👻 선택된 도형이 추가되도록 onDrop 이벤트 수정하기
방식은 다음과 같다.
기존 EditorTools에서 도형을 선택할 때에 onMouseDown 이벤트를 만들어, 선택된 도형의 state에 담기게 하며,
ReactFlowCanvas 안에서 onDrop이 발생할 때, 해당 state가 담아주어 해당 도형이 nodes에 추가되도록 할 것이다.
🙌🏻 ReactFlowExample 에 state 추가하기
다음과 같이 state를 추가한 후, EditorTools에 props로 setState를 넘겨주자.
// ReactFlowCanvas.tsx

// 임시 타입 생성
export type TTestName = "test1" | "test2" | "test3" | "test4";

// 생략 //
const [selectTypeName, setSelectTypeName] = useState<TTestName>("test1");
// EditorTools.tsx
interface IProps {
setSelectTypeName: React.Dispatch<React.SetStateAction<TTestName>>;
}
const EditorTools = ({ setSelectTypeName }: IProps) => {🙌🏻 EditorTools에 onMouseDown 이벤트 추가
const EditorTools = ({ setSelectTypeName }: IProps) => {
  const onMouseDown = (type: TTestName) => {
    setSelectTypeName(type);
  };
  return (
    <Container>
      {["test1", "test2", "test3", "test4"].map((item) => (
        <div
          key={item}
          className={item}
          onMouseDown={() => {
            onMouseDown(item as TTestName);
          }}
          draggable
        />
      ))}
    </Container>
  );
};
🙌🏻 ReactFlowExampl에 onDrop 이벤트 수정
// ReactFlowCanvas.tsx

  const onDrop = useCallback(
    (event: React.DragEvent) => {
      event.preventDefault();
      const newNode = {
        id: `${v1()}`,
        type: selectTypeName,
        position: screenToFlowPosition({
          x: event.clientX,
          y: event.clientY,
        }),
        data: {},
      };

      setNodes((nds) => nds.concat(newNode));
    },
    [screenToFlowPosition, selectTypeName, setNodes]
  );
👻 최종결과
다음시간에는 resize 외 추가적인 옵션들에 대해서 포스팅해보겠다!! 🙇🏻♀️

web developer
이런 유용한 지식을 공유해주시다니 너무 감사합니다!! ☺️