Class의 정의
모든 프로그램은 다음 두 가지로 이뤄진다
1) 프로그램상에서 유지하고 관리해야 할 데이터
2) 데이터를 처리하고 조작하는 메소드
따라서 Class는 = 데이터 + 메소드로 이뤄진다는
정의를 내릴 수 있다.
아래 예제를 보면서 조금 더 상세하게 설명한다면
class BankAccount{
	// 예금 잔액
	int balance = 0;

    // balance와 연관 있는 메소드 1
    public int deposit( int amount ){
    	balance += amount;
        return = balance;
    }

    // balance와 연관 있는 메소드 2
    public int withdraw( int amount ){
    	balance -= amount;
        return balance;
    }

    // balance와 연관 있는 메소드 3
    public int checkMybalance(){
    	System.out.println("잔액 : " + balance );
        return balance;
    }
}
위 예제에서 볼 수 있듯이
변수 balance는 프로그램상에서의 데이터이며
" 메소드 deposit, withdraw, checkMyBalance와 긴밀히 연관되어 있다."
또한, 메소드 deposit, withdraw, checkMybalance는 프로그램상에서의 기능이며
" 변수 balance를 위한 메소드이다. "
풀어서 말하면
메소드 deposit은 변수 balance와 뗼 수 없는 관계이고,
이렇게 연관 있는 변수와 메소드를 묶기 위해 Class라는 것이 존재한다.
클래스 멤버들 종류
1. 인스턴스 변수( Instance Variable ) - 클래스 내에 선언된 변수
인스턴스 변수는 같은 클래스 내에 위치한 메소드 내에서 접근이 가능하다.
class SampleClass{
	// 인스턴스 변수
   	int sampleCount = 0;

    // 인스턴스 메소드
    public int addCount(){...}

}
2. 클래스 변수( Static Variable )
인스턴스의 생성과 상관없이 존재하는 변수
3. 지역 변수 ( Local Variable )
선언된 범위 내에서만 유효하며, 범위를 벗어나면 소멸 됨.
4. 참조 변수 ( Reference Variable )
new 연산자로 생성된 인스턴스(객체)를 가리키는 변수
// 참조변수 ac1 선언
Account ac1;
// 참조변수 ac2 선언
Account ac2;

// 참조변수 ac1이 새로 생성된 인스턴스를 가리킴
ac1 = new Account();
// 참조변수 ac2가 새로 생성된 인스턴스를 가리킴
ac2 = new Account();
new 키워드를 통해서 인스턴스를 생성하면 생성된 인스턴스의 주솟값이 반환 됨
즉, 참조변수에는 생성된 인스턴스의 주솟값이 저장됨
참조 변수의 내용이 아니라 실제 가리키는 메모리 주소는 어떻게 알 수 있을까 ?
// 참조변수 ac1이 가리키는 주소 값 출력
Account ac1 = new Account();

// 객체의 해시 코드( Hash Code )를 반환하는 System.identityHashCode() 메서드 사용
System.out.println( "ac1 address : " + System.identityHashCode( ac1 ) );


[ 실행 결과 ]

ac1 address : 644117698
같은 클래스의 참조 변수를 2개 선언했을때 같은 메모리 주소를 가리킬까 ?
Account ac1 = new Account();
Account ac2 = new Account();

System.out.println( "ac1 address : " + System.identityHashCode( ac2 ) );
System.out.println( "ac2 address : " + System.identityHashCode( ac2 ) );

[ 실행 결과 ]

ac1 address : 644117698
ac2 address : 1872034366
만약 같은 메모리 주소를 가리키려면 어떻게 해야 할까 ?
Account ac1 = new Account();
Account ac2 = ac1

System.out.println( "ac1 address : " + System.identityHashCode( ac2 ) );
System.out.println( "ac2 address : " + System.identityHashCode( ac2 ) );

[ 실행 결과 ]

ac1 address : 644117698
ac2 address : 644117698
관련 예제 )
class Account{
    int balance = 0;

    public Account(int balance) {
        this.balance = balance;
    }

    public int checkMyBalance(){
        System.out.println(" 잔액 : " + balance);
        return balance;
    }
}
public class BankAccount extends Account
{
    public BankAccount(int balance) {
        super(balance);
    }

    @Override
    public int checkMyBalance() {
        return super.checkMyBalance();
    }

    public static void main(String[] args) {
        Account ac1 = new Account(100);
        Account ac2 = ac1;

        ac1.checkMyBalance();
        ac2.checkMyBalance();
    }
}

[ 실행 결과 ]

 잔액 : 100
 잔액 : 100
실제 클래스 사용 예제
현업에서 사용될 관리 및 처리 프로그램의 비즈니스 로직을 간단하게 작성함으로써
클래스 사용에 대한 다양한 업무 영역을 모델링하고 관리하는 방법을 익혀보자.
[ 사용자 관리 클래스 ]
사용자 정보를 관리하고 사용자 인증을 처리하는 클래스
class User {
    private String username;
    private String password;

    public User(String username, String password) {
        this.username = username;
        this.password = password;
    }

    public boolean authenticate(String enteredPassword) {
        return this.password.equals(enteredPassword);
    }
}

public class UserManagement {
    public static void main(String[] args) {
        User user1 = new User("alice", "password123");
        if (user1.authenticate("password123")) {
            System.out.println("Authentication successful.");
        } else {
            System.out.println("Authentication failed.");
        }
    }
}

[ 실행 결과 ]

Authentication successful.
[ 직원 관리 클래스 ]
직원 정보를 관리하고 급여 계산을 수행하는 클래스
class Employee {
    private String name;
    private int employeeId;
    private double hourlyRate;

    public Employee(String name, int employeeId, double hourlyRate) {
        this.name = name;
        this.employeeId = employeeId;
        this.hourlyRate = hourlyRate;
    }

    public double calculateWeeklyPay(int hoursWorked) {
        return hoursWorked * hourlyRate;
    }

    public String getName() {
        return name;
    }

    public int getEmployeeId() {
        return employeeId;
    }

    public double getHourlyRate() {
        return hourlyRate;
    }
}

public class Management {
    public static void main(String[] args) {
        Employee employee1 = new Employee("John Doe", 1001, 25.0);
        double weeklyPay = employee1.calculateWeeklyPay(40);
        System.out.println("Weekly pay for " + employee1.getName() + ": $" + weeklyPay);
    }
}

[ 실행 결과 ]

Weekly pay for John Doe: $1000.0
[ 주문 처리 클래스 ]
주문 및 주문 항목들을 관리하고 주문 처리를 수행하는 클래스
import java.util.ArrayList;
import java.util.List;

class OrderItem {
    private String product;
    private int quantity;

    public OrderItem(String product, int quantity) {
        this.product = product;
        this.quantity = quantity;
    }

    public double calculateTotalPrice(double pricePerUnit) {
        return quantity * pricePerUnit;
    }
}

class Order {
    private List<OrderItem> items;

    public Order() {
        items = new ArrayList<>();
    }

    public void addItem(OrderItem item) {
        items.add(item);
    }

    public double calculateTotalOrderPrice() {
        double total = 0.0;
        for (OrderItem item : items) {
            total += item.calculateTotalPrice(10.0); // 가격은 10.0으로 가정
        }
        return total;
    }
}

public class OrderProcessing {
    public static void main(String[] args) {
        Order order = new Order();
        order.addItem(new OrderItem("Product A", 3));
        order.addItem(new OrderItem("Product B", 2));

        double totalOrderPrice = order.calculateTotalOrderPrice();
        System.out.println("Total order price: $" + totalOrderPrice);
    }
}

[ 실행 결과 ]

Total order price: $50.0
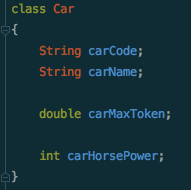
객체 만드는 방법 (new 키워드 이해하기)
Instance란 ?
클래스로부터 객체를 선언하는 과정을 인스턴스화라 하고
또한 이렇게 선언된 해당 클래스 타입의 객체를 인스턴스 ( Instance ) 라고 함
인스턴스는 메모리에 할당된 객체
Instance 생성
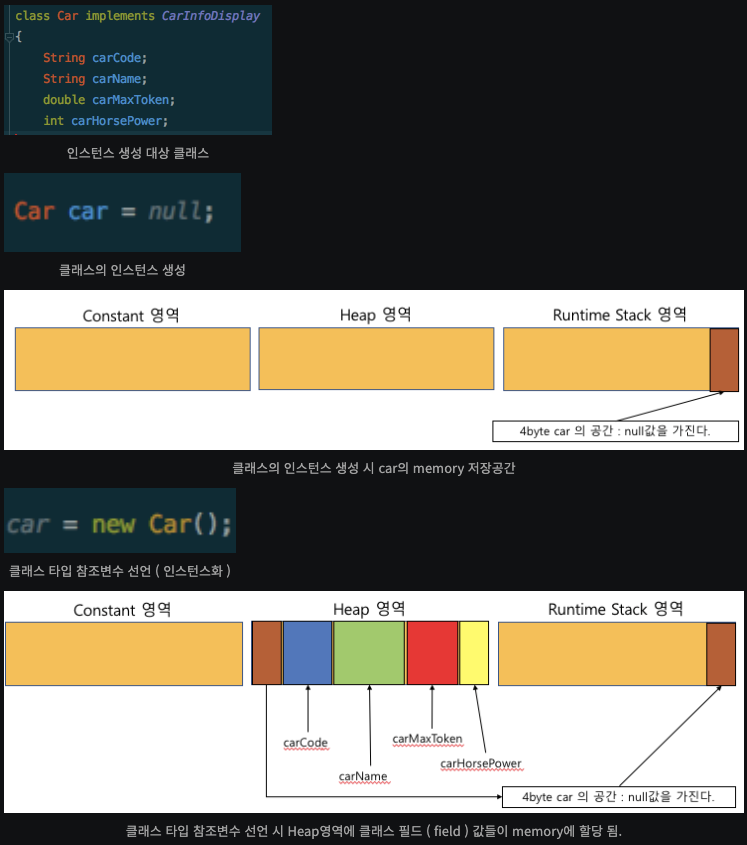
그렇다면 여기서 메모리 크기에 관련된 질문을 하나 하겠다.
class Question
{
	int a;
    int b;
    float c;
}
public class Main{
	public static void main( String[] args ){
		Question qt = new Question();
    }
}
위 코드에서
Question qt = new Question(); 크기는 얼마일까?
정답은 4byte이다.
이유는,
qt는 참조 변수이며
참조변수는 객체를 가리키는데 사용되며,
객체의 주소를 저장하므로
주소 크기에 따라 참조 변수 크키가 결정된다.
따라서 참조 변수의 크기는
32비트 JVM에서는 -> 4byte
64비트 JVM에서는 -> 8byte
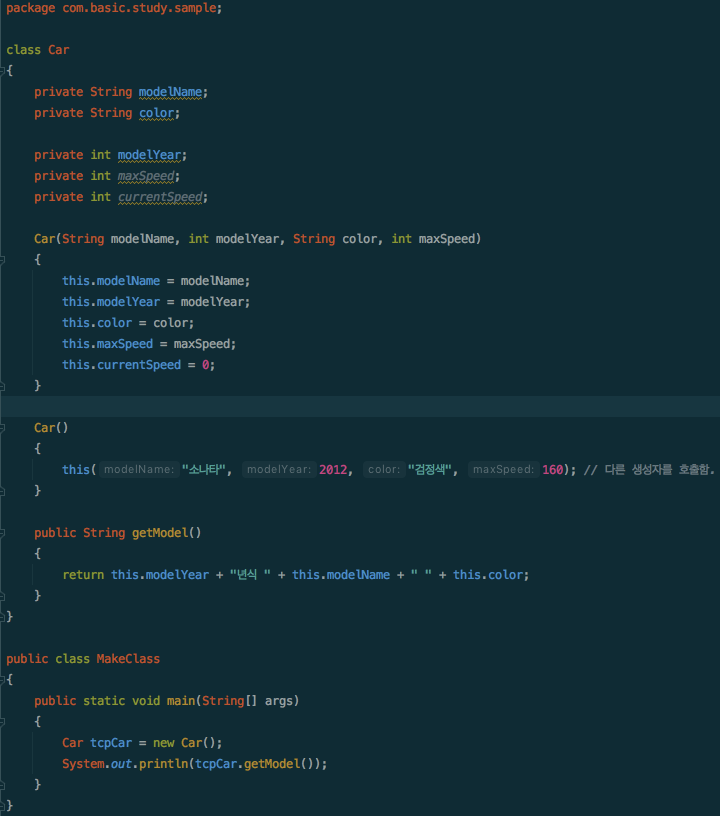
생성자 ( Construct )
객체를 생성함에 있어서 필요한 인스턴스 변수의 값을
원하는 형식대로 할당할 수 있도록 도와주는 메서드
생성자 특징
1) 반환값이 없지만, 반환 타입을 void형으로 선언하지 않음
2) 초기화를 위한 데이터를 인수로 전달받을 수 있음
3) 객체를 초기화하는 방법이 여러 개 존재할 경우에는 하나의 클래스가 여러 개의 생성자를 가질 수 있다.
( 메소드 오버로딩 )
생성자 종류
public Car{
	// default 생성자
	Car(){};

    // 매개변수가 있는 생성자
    Car( String code, String name , double token, int power ){...};
}
생성자 호출 후 인스턴스 변수 초기화
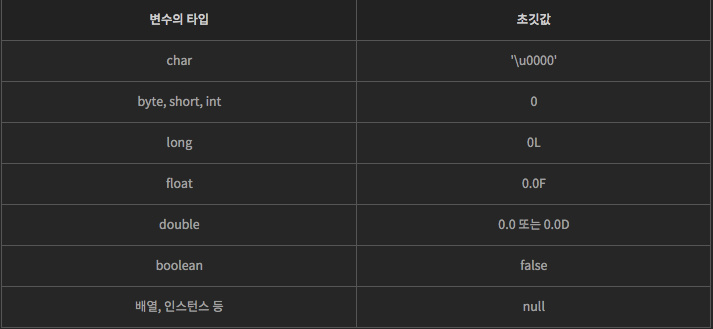
클래스를 가지고 객체를 생성하면, 해당 객체는 메모리에 즉시 생성되지만
이렇게 생성된 객체는 모든 인스턴스 변수가 아직 초기화 되지 않는 상태이다.
따라서 클래스 변수와 인스턴스 변수는 별도로 초기화 하지 않으면
아래 값으로 자동 초기화 된다.
하지만 사용자가 원하는 값으로 인스턴스 변수를 초기화하려면,
일반적인 초기화 방식으로는 초기화할 수 없음
인스턴스 변수 중에는 private 변수도 있으며, 이러한 private 변수에는
사용자나 프로그램이 직접 접근할 수 없기 때문
따라서 private 인스턴스 변수에도 접근할 수 있는 초기화만을 위한 public 메소드가 필요하고
이러한 초기화만을 위한 메소드는 객체가 생성된 후부터 사용되기 전까지
반드시 인스턴스 변수의 초기화를 위해 호출되어야 함
this 키워드 이해하기
this 참조 변수는 인스턴스가 바로 자기 자신을 참조하는 데 사용하는 변수
이러한 this 참조 변수는 해당 인스턴스의 주소를 가리킴
this 참조 변수를 사용하여 인스턴스 변수에 접근할 수 있고,
this 참조 변수를 사용할 수 있는 영역은 인스턴스 메소드뿐이며,
클래스 메소드에서는 사용할 수 없음.
즉, 모든 인스턴스 메소드에는 this 참조 변수가 숨겨진 지역 변수로 존재
this 키워드를 사용하는 이유
class ExampleThis{
	int a, b, c;
    public ExampleThis(){
    	a = 10; b = 20; c = 30;
    }
}
위 예제에서 만약 매개변수 하나만 받아들여
c값을 초기화하는 생성자를 하나 추가한다고 하면?
[ 매개변수 하나만 받아들여 c값을 초기화하는 생성자를 추가한 소스코드 ]
class ExampleThis{
	int a, b, c;
    public ExampleThis(){
    	a = 10; b = 20; c = 30;
    }

    // c 값을 매개변수 x로 받아서 초기화
    public ExampleThis(int x){
    	a = 10; b = 20; c = x;
    }
}
위 예제를 보기에도 효율적이지 못하게 중첩적인 요소를 많이 가지고 있다.
이 중첩적인 요소를 없애기 위해선 바로 상위에 있는 생성자를 한번 호출하고 나서
c의 값만 변형 시킨다면 중첩적이지 않게 코드를 작성할 수 있다.
따라서 이럴땐this 키워드를 이용하면 된다.
[ this 키워드 이용 후 개선된 소스 코드 ]
class ExampleThis{
	int a, b, c;
    public ExampleThis(){
    	a = 10; b = 20; c = 30;
    }

    // c 값을 매개변수 x로 받아서 초기화
    public ExampleThis(int x){
    	// 상위 생성자 호출 후 매개변수 x의 값을 c값에 할당
    	this();
        c = x;
    }
}
[ this 메소드 사용 예제 ]
this() 메소드는 생성자 내부에서만 사용할 수 있으며,
같은 클래스의 다른 생성자를 호출할 때 사용
메소드 ( Method )
특정한 작업을 수행하기 위한 명령문의 집합
장점
중복되는 코드의 반복적인 프로그래밍을 피할 수 있음
모듈화로 인해 전체적인 코드 가독성이 좋아짐
프로그램 문제가 발생되거나 기능의 변경이 필요할때도 손쉽게 유지보수할 수 있음
메소드 작성 예제 ( 인터페이스 implement )

매개변수
메서드 호출 시 지정되는 매개 변수는
기본형(primitive type)과 참조형( reference type )으로 나뉜다.
기본형은 값이 복사되지만,
참조형이면 인스턴스(객체)의 주소가 복사된다.
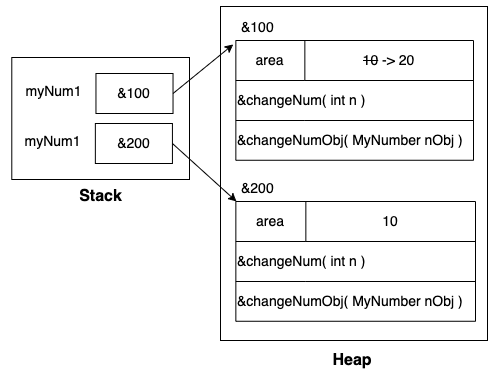
메서드의 매개 변수로 사용하는 ' 기본형 '과 ' 참조형 '의 예제
class MyNumber {
    int num = 10;

    // 기본형 매개 변수
    void changeNum( int n) {
        num = n;
    }

    // 참조형 매개 변수
    void changeNumObj( MyNumber myNum ) {
        num = myNum.num;
    }

    void display() {
        System.out.println("num = " + num);
    }
}

public class 메서드실행 {
    public static void main(String[] args) {
        MyNumber myNum1 = new MyNumber();
        MyNumber myNum2 = new MyNumber();

        myNum1.changeNum(20);
        myNum1.display();

        // 이 명령은 myNum2.changeNumObj( &200 )으로 해석 됨
        myNum1.changeNumObj(myNum2);
        myNum2.display();
    }
}
private 접근 제한자
OOP의 특징 중에 하나인 캡슐화 중 은닉성을 강화하는 예약어로 사용
동일 클래스 내에서만 사용 가능
private 예제 1
public class PrivateExample{
	private int x = 10;

    public static void main( String[] args ){
    	PrivateExample pe = new PrivateExample();
        System.out.println( "x = " + pe.x );
   	}
}

[ 실행 결과 ]

x = 10;
위 예제 실행시
실행 결과가 정상으로 출력되지만 다음 예제를 한번 보자
private 예제 2
class Independent{
	private int x = 10;
}

public class PrivateExample{
    public static void main( String[] args ){
    	PrivateExample pe = new PrivateExample();
        System.out.println( "x = " + pe.x );
   	}
}

[ 실행 결과 ]

pe.x <-- error
얼핏 유사하지만 실행 결과는 전혀 다르다는 걸 알 수 있다.
즉, private 접근 제한자는 서로 다른 클래스에서는 사용할 수 없다는 것