SW아카데미에서 프로젝트로 진행했던 글 추천 시스템을 구현한 방법이다. Sagemaker로 배포한 모델의 엔드포인트를 호출해서 유사도를 계산하여 각 포스트의 유사도를 계산하는 방법으로 진행되며, 이 글에서는 모델을 학습하는 과정 없이 학습된 한국어 모델을 사용하여 진행한다.
Content-Based Filtering
간단하게 Content-Based Filtering에 대해서 설명하면, 사용자가 선택하거나 구매한 아이템과 비슷한 내용을 가진 다른 아이템을 추천해주는 방식이다.
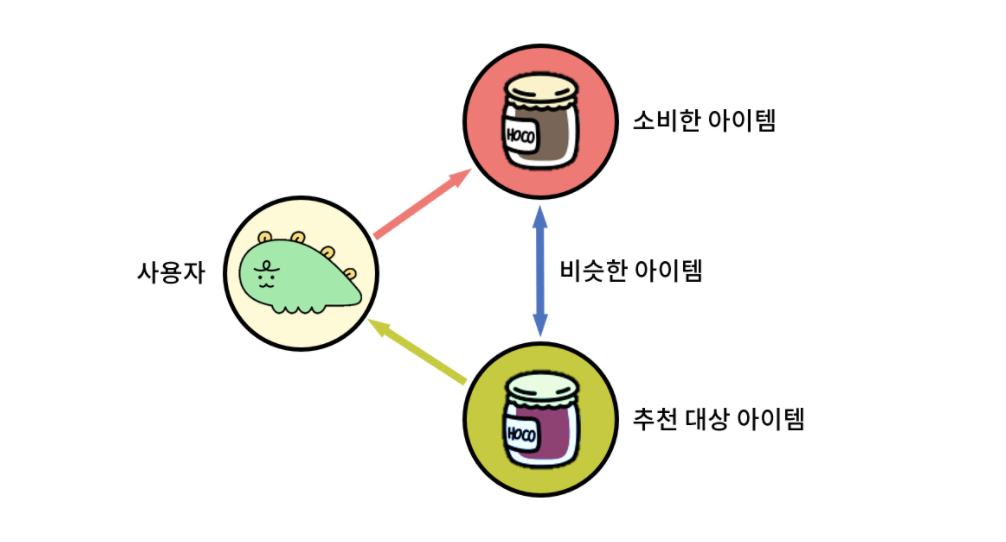
출처: 카카오 테크 블로그 https://tech.kakao.com/posts/486
위 그림처럼 추천을 위해 사용자가 소비한 아이템과 비슷한 아이템을 어떻게 찾을 수 있을까? 바로 모든 아이템에 대하여 소비한 아이템과의 유사도를 계산하여 유사도가 높은 것을 추천해주는 것이다. 즉, 그림의 보라색 아이템은 검은색의 소비한 아이템과 유사도가 높은 아이템일 것이다. 이제 유사도를 계산하는 방법을 찾아보자.
KoSimCSE-roberta
흔히 Word2Vec를 텍스트 임베딩에 많이 사용한다. 예를 들면, 다음처럼 공고를 크롤링한 posting.csv라는 파일에서 간단하게 사용자가 제시한 키워드와 연관된 키워드들을 뽑아낼 수 있다.
import pandas as pd
from gensim.models import Word2Vec
data = pd.read_csv("posting.csv")

# Converting each keyword group into a list of words
keywords = [group.split(', ') for group in data['키워드']]

# Training the Word2Vec model
model = Word2Vec(sentences=keywords, vector_size=100, window=5, min_count=1, workers=4)

# User-input keywords
user_keywords = "소프트웨어개발, 모바일앱개발"
user_keywords = user_keywords.split(", ")

# Finding the most similar keywords to the user-input keywords
similar_keywords = model.wv.most_similar(user_keywords, topn=10)

print(similar_keywords)
['BigData', '솔루션', 'SI', 'SM', 'SI개발', '솔루션영업', 'ERP', '시스템운영', 'asp', '네트워크관리']그러나 나는 각 단어의 임베딩 벡터를 계산하는 방식이 수많은 단어가 연결된 블로그 글을 분석해 추천하는 데에는 조금 적합하지 않다고 생각하였다. 또한, Sagemaker에는 Word2Vec 모델을 불러올 수는 없고, 대신 비슷한 기능을 하는 BlazingText라는 것을 사용해야 한다.
그래서 대신 KoSimCSE-roberta라는 한국어 문장 임베딩 모델을 사용하였다.
https://huggingface.co/BM-K/KoSimCSE-roberta
Query: 치타가 들판을 가로 질러 먹이를 쫓는다.
Top 5 most similar sentences in corpus:
치타 한 마리가 먹이 뒤에서 달리고 있다. (Score: 0.8106)
한 남자가 말을 탄다. (Score: 0.1910)
한 남자가 담으로 싸인 땅에서 백마를 타고 있다. (Score: 0.1614)
두 남자가 수레를 숲 속으로 밀었다. (Score: 0.1557)
원숭이 한 마리가 드럼을 연주한다. (Score: 0.1269)
이처럼 제시한 문장의 의미를 분석하여 다른 문장들과의 유사도를 측정할 수 있다.
Sagemaker
가장 먼저 AWS 콘솔에 로그인하고 Sagemaker로 이동하여 노트북 인스턴스를 생성해준다.
⚠️ 주의!
ml.t3.medium은 sagemaker를 이용할 수 없습니다.
다음에 포함된 인스턴스를 생성해야 합니다.
[ml.r7i.48xlarge, ml.trn1.32xlarge, ml.r6i.16xlarge, ml.m6i.xlarge, ml.r5d.12xlarge, ml.r5.12xlarge, ml.p2.xlarge, ml.m5.4xlarge, ml.m4.16xlarge, ml.r7i.16xlarge, ml.m7i.xlarge, ml.p5.48xlarge, ml.r6gd.xlarge, ml.r6g.8xlarge, ml.r6g.large, ml.m6gd.16xlarge, ml.m6i.12xlarge, ml.r5d.24xlarge, ml.r5.24xlarge, ml.r7i.8xlarge, ml.r7i.large, ml.m7i.12xlarge, ml.r6gd.12xlarge, ml.r6g.16xlarge, ml.m6gd.8xlarge, ml.m6gd.large, ml.m6g.xlarge, ml.p4d.24xlarge, ml.m6i.24xlarge, ml.m7i.24xlarge, ml.m6g.12xlarge, ml.r6i.8xlarge, ml.r6i.large, ml.g5.2xlarge, ml.p3.16xlarge, ml.m5d.xlarge, ml.m5.large, ml.t2.xlarge, ml.m7i.48xlarge, ml.g6.2xlarge, ml.m6i.16xlarge, ml.p2.16xlarge, ml.m5d.12xlarge, ml.m7i.16xlarge, ml.r6gd.16xlarge, ml.c6gd.2xlarge, ml.g5.4xlarge, ml.inf1.2xlarge, ml.m5d.24xlarge, ml.m6g.16xlarge, ml.g6.4xlarge, ml.c4.2xlarge, ml.c6gn.xlarge, ml.c6gd.4xlarge, ml.c5.2xlarge, ml.c6gn.12xlarge, ml.c6i.32xlarge, ml.c4.4xlarge, ml.g6e.xlarge, ml.g5.8xlarge, ml.c6i.xlarge, ml.inf1.6xlarge, ml.c5d.2xlarge, ml.c5.4xlarge, ml.c7i.xlarge, ml.inf2e.32xlarge, ml.c7g.2xlarge, ml.g6e.12xlarge, ml.g6.8xlarge, ...]
그냥 대충 m5 정도 쓰면 된다는 것 같다...
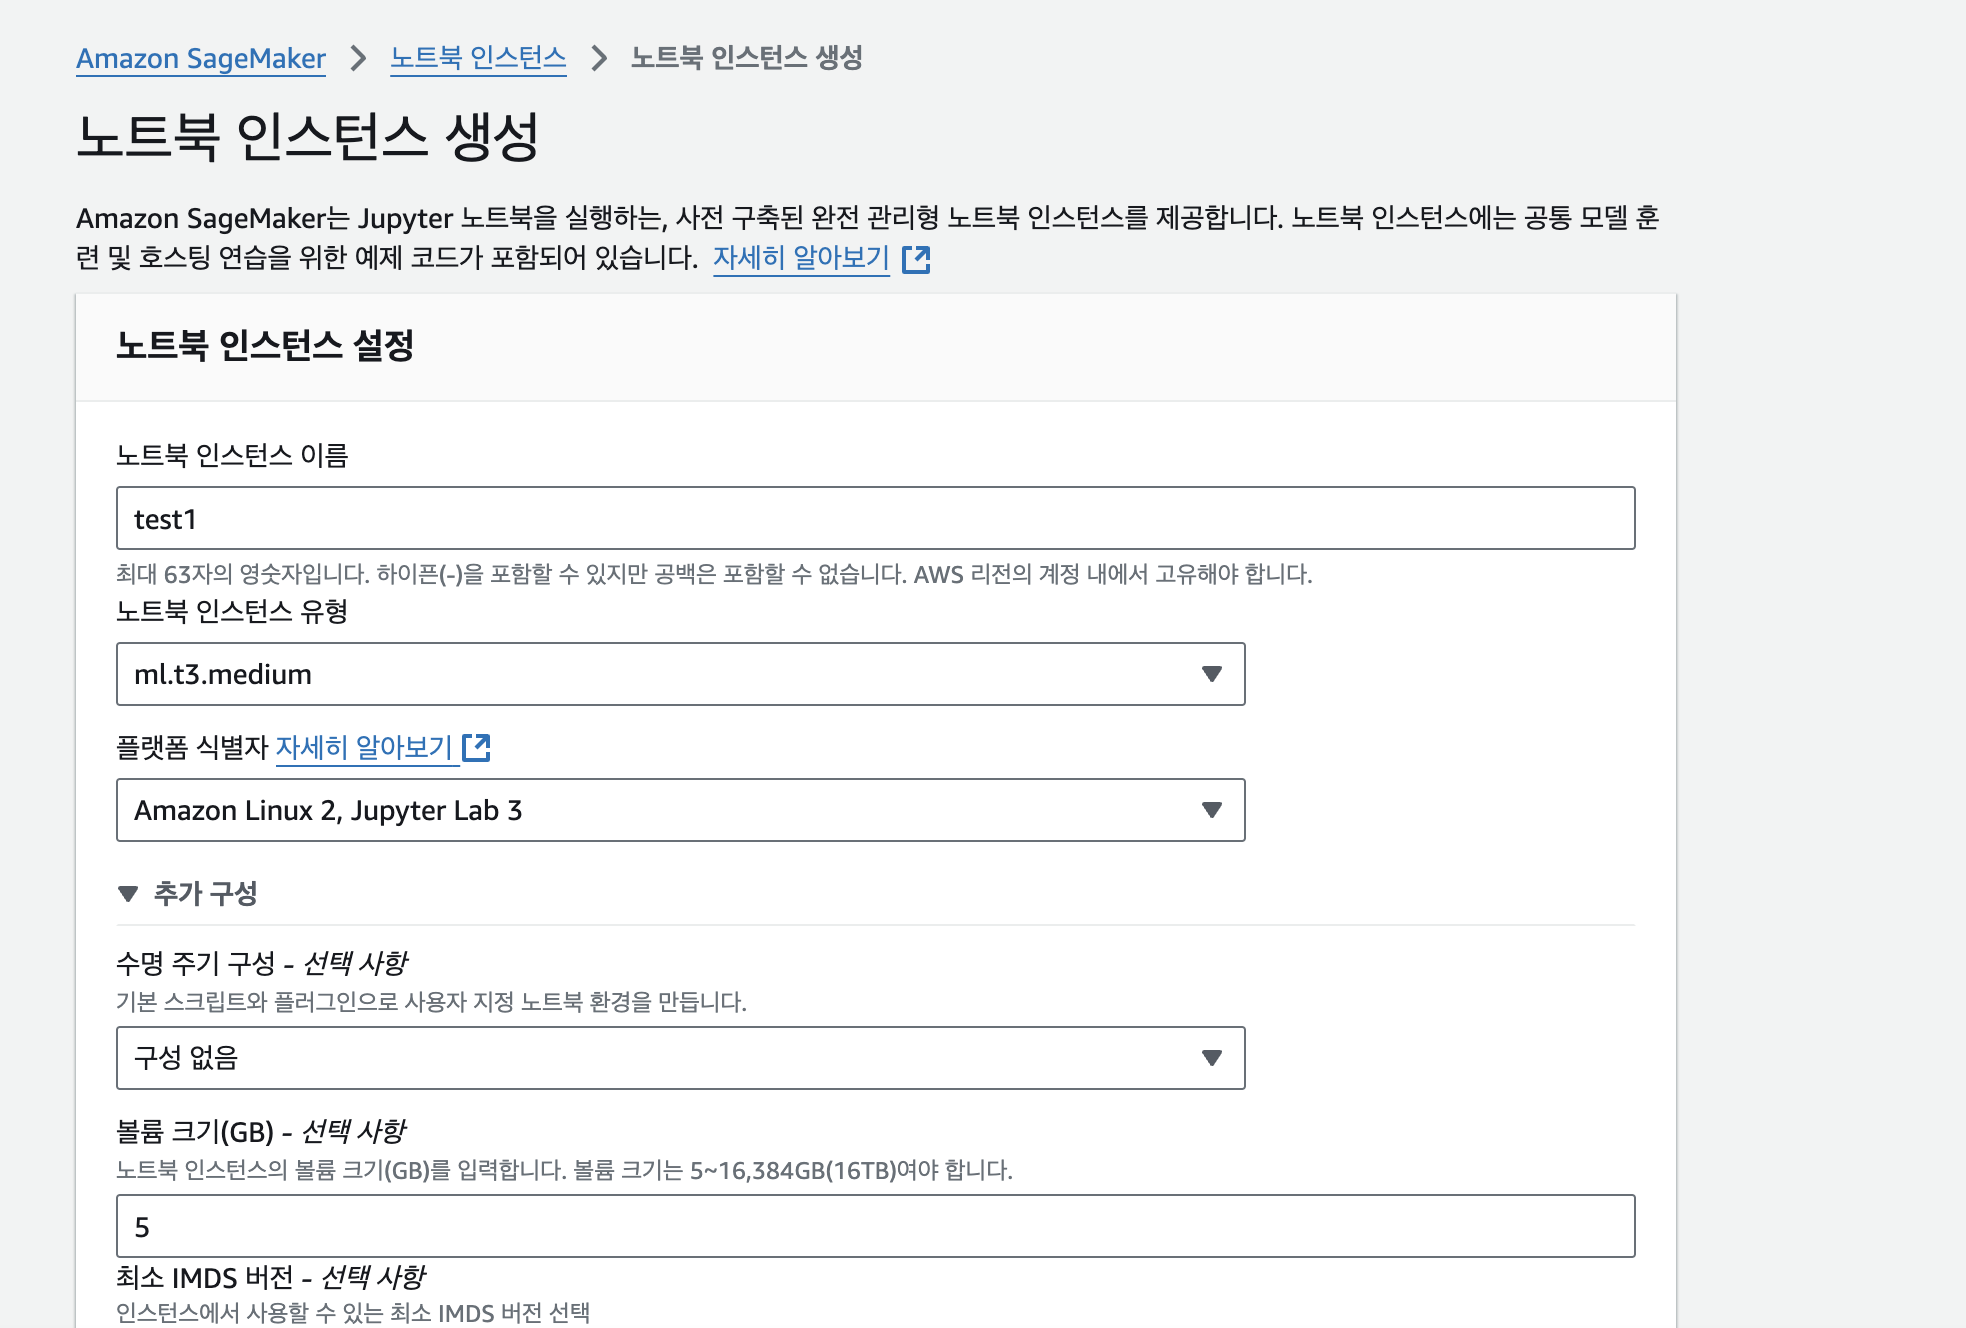
생성이 완료되면 Jupyter를 열어준다.

New를 누르고 conda_python3를 눌러서 파이썬 파일을 생성한다.
jupyter 노트북 파일을 다음처럼 작성하고 실행한다.
import sagemaker
import boto3
from sagemaker.huggingface import HuggingFaceModel

hub = {
  'HF_MODEL_ID':'BM-K/KoSimCSE-roberta',
  'HF_TASK':'feature-extraction'
}

huggingface_model = HuggingFaceModel(
   env=hub,
   role=sagemaker.get_execution_role(),
   transformers_version="4.26",
   pytorch_version="1.13",
   py_version="py39",
)

from datetime import datetime

time_stamp = datetime.now().strftime("%Y-%m-%d-%H-%M-%S")

endpoint_name = f"KoSimCSE-roberta-" + time_stamp

predictor = huggingface_model.deploy(
   initial_instance_count=1,
   endpoint_name = endpoint_name,
   instance_type="ml.t3.medium"
)

print(endpoint_name)
model에 인자로 들어가는 버전은 원하시는 것으로 설정하시면 됩니다.
배포할 때 인스턴스의 타입은 본인이 생성한 인스턴스의 타입을 기입합니다.
KoSimCSE-roberta-2024-11-02-09-43-06이렇게 배포가 완료된 모델의 엔드포인트 주소를 호출해서 유사도를 계산하면 된다.
나는 추천 서비스를 FastAPI로 개발했으며, 핵심 코드들은 다음과 같다.
def request_endpoint_post(user_post: Post, posts: List[Post]) -> List[PostSimilarity]:
    endpoint_name = os.getenv('RECOMMEND_ENDPOINT')

    user_payload = {
        "inputs": user_post.content
    }

    user_response = query_endpoint_embedding_with_json_payload(
        json.dumps(user_payload).encode("utf-8"), endpoint_name=endpoint_name
    )

    user_emb = transform_output(user_response['Body'])

    similarities = []
    for post in posts:
        post_payload = {
            "inputs": post.content
        }

        query_response = query_endpoint_embedding_with_json_payload(
            json.dumps(post_payload).encode("utf-8"), endpoint_name=endpoint_name
        )
        post_emb = transform_output(query_response['Body'])

        score = show_embedding_score(user_emb, post_emb)

        similarity = PostSimilarity(
            post1_id=user_post.post_id,
            post2_id=post.post_id,
            similarity=score.item()
        )
        similarities.append(similarity)

    return similarities
Sagemaker에서 마지막에 출력한 엔드포인트를 RECOMMEND_ENDPOINT라는 이름으로 .env 파일에 저장하고 이를 불러와 사용했다.
먼저, user_post(유저가 좋아한 게시물)의 임베딩 결과를 엔드포인트를 호출해 계산한다.
다음으로, 모든 게시물들의 임베딩 결과를 엔드포인트를 호출해 얻고, 유저 임베딩 결과와의 유사도를 각각 계산한다.
import boto3
import json

def query_endpoint_embedding_with_json_payload(encoded_json, endpoint_name, content_type="application/json"):
    client = boto3.client("runtime.sagemaker")
    response = client.invoke_endpoint(
        EndpointName=endpoint_name, ContentType=content_type, Body=encoded_json
    )
    return response

def transform_output(output: bytes) -> str:
    response_json = json.loads(output.read().decode("utf-8"))
    return response_json[0][0]
배포한 모델의 엔드포인트를 호출하는 함수는 다음처럼 작성하였다.
import torch

def cal_score(a, b):
    if len(a.shape) == 1: a = a.unsqueeze(0)
    if len(b.shape) == 1: b = b.unsqueeze(0)

    a_norm = a / a.norm(dim=1)[:, None]
    b_norm = b / b.norm(dim=1)[:, None]

    return torch.mm(a_norm, b_norm.transpose(0, 1)) * 100

def show_embedding_score(emb1, emb2):

    embeddings_0 = torch.Tensor(emb1)
    embeddings_1 = torch.Tensor(emb2)

    score = cal_score(embeddings_0, embeddings_1)

    return score
임베딩 결과 간의 유사도를 구하는 함수이다. 코사인 유사도를 계산하는 것으로 진행되었다.
이렇게 계산된 유사도를 높은 순으로 정렬해서 유저에게 유사도가 높은 게시물들을 추천하였다.
궁금한 점이나 틀린 점이 있다면 댓글에 작성해주시면 감사하겠습니다!