목차
- FILEZILLA 설치 및 가비아 가입하기
- [버킷리스트] - 프로젝트 세팅
- [버킷리스트] - 뼈대 준비하기
- [버킷리스트] - POST연습(기록하기)
- [버킷리스트] - GET연습(보여주기)
- [버킷리스트] - POST연습(완료하기)
- 내 프로젝트를 서버에 올리기
- AWS 서버 구매하기
- 서버 세팅하기
- FLASK 서버를 실행해보기
- nohup 설정하기
- 도메인 연결하기
- og 태그
- 5주차 끝 & 숙제
1. FILEZILLA 설치 및 가비아 가입하기
- 1) 오늘 배울 것 이야기 - 5주차: 미니프로젝트3
👉 오늘은 아직 익숙해지지 않았을 당신을 위해! 같은 난이도의 유사한 프로젝트를 진행하며 머릿속의 퍼즐을 맞출 예정입니다.
그리고 드디어! 친구들도 볼수록 배포하는 일까지, 한번 쭉-해보겠습니다!

- 2) 이번주 수업을 위해 설치할 것들!
- Filezilla 설치하기
- [코드스니펫] 파일질라 다운로드
[https://filezilla-project.org/download.php](https://filezilla-project.org/download.php) - 다운로드: https://filezilla-project.org/download.php
- 다운로드 클릭 후 가장 기본 버전 (스크린샷 기준 왼쪽) 다운로드!
- [코드스니펫] 파일질라 다운로드
- Filezilla 설치하기

- 가비아 가입하기 & 도메인 구입하기
- [코드스니펫] 가비아 접속하기
[https://www.gabia.com](https://www.gabia.com/)- 접속하기 & 가입하기: https://www.gabia.com
- 가비아에서 할인이벤트(500원/1년)를 진행하는 도메인을 구매해서 진행 할 예정입니다.
🚨 기억하기 - 무통장입금(가상계좌)으로 결제하시기를 추천드립니다!
- 로그인 후, 메인 페이지에서 원하는 도메인을 검색해주세요.

- 마침 .shop 도메인이 500원/1년으로 할인중이니, 추천드립니다. :-)
💡 원하는 도메인을 구매하세요!
bumkyulee.shop 은 제가 구매했으니, 당연히 여러분은 안 되겠죠? 🤣

- 결제를 마무리해주세요.
👉 결제 기간을 1년으로 맞춰주세요! 그래야 500원 찬스!

- 무통장입금을 선택!
👉 1,000원 이하는 카드 결제가 안된대요~!
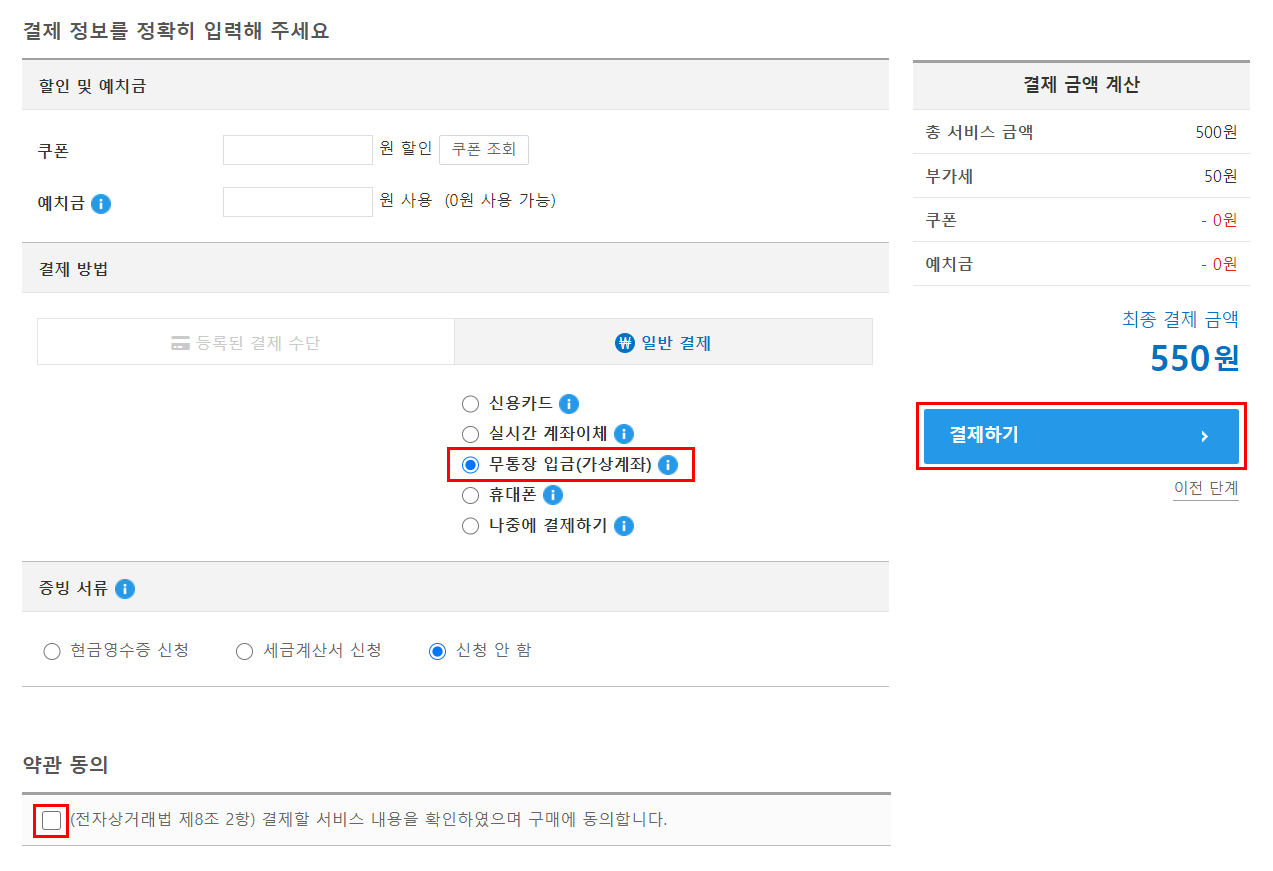
- 토스, 카카오페이, 은행 앱 등을 이용해 계좌이체를 진행합니다!

- 마이페이지(링크)에 접속하고, 10분 정도 기다리면 → 총 서비스 수가 '1'로 바뀔 거예요!

2. [버킷리스트] - 프로젝트 세팅
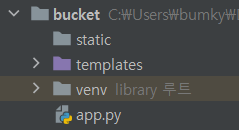
🔥 sparta → projects → bucket 폴더를 열고 시작!
- 1) 문제 분석 - 완성작부터 보기!
bucket: "버킷리스트" 관련 코드를 작성합니다.
- 2) 프로젝트 설정 - flask 폴더 구조 만들기 👉 static, templates 폴더 + [app.py](http://app.py) 만들기! 이젠 너무 익숙하죠?
- 3) 패키지 설치하기
- 3개 : flask, pymongo, dnspython
3. [버킷리스트] - 뼈대 준비하기
- 1) 프로젝트 준비 -
index.html,app.py준비하기- [코드스니펫] 버킷리스트-app.py
from flask import Flask, render_template, request, jsonify app = Flask(__name__) @app.route('/') def home(): return render_template('index.html') @app.route("/bucket", methods=["POST"]) def bucket_post(): sample_receive = request.form['sample_give'] print(sample_receive) return jsonify({'msg': 'POST(기록) 연결 완료!'}) @app.route("/bucket/done", methods=["POST"]) def bucket_done(): sample_receive = request.form['sample_give'] print(sample_receive) return jsonify({'msg': 'POST(완료) 연결 완료!'}) @app.route("/bucket", methods=["GET"]) def bucket_get(): return jsonify({'msg': 'GET 연결 완료!'}) if __name__ == '__main__': app.run('0.0.0.0', port=5000, debug=True) - [코드스니펫] 버킷리스트-index.html
<!DOCTYPE html>
<html lang="en">
<head>
    <meta charset="UTF-8">
    <meta http-equiv="X-UA-Compatible" content="IE=edge">
    <meta name="viewport" content="width=device-width, initial-scale=1.0">

    <link href="https://cdn.jsdelivr.net/npm/bootstrap@5.0.2/dist/css/bootstrap.min.css" rel="stylesheet"
        integrity="sha384-EVSTQN3/azprG1Anm3QDgpJLIm9Nao0Yz1ztcQTwFspd3yD65VohhpuuCOmLASjC" crossorigin="anonymous">
    <script src="https://ajax.googleapis.com/ajax/libs/jquery/3.5.1/jquery.min.js"></script>
    <script src="https://cdn.jsdelivr.net/npm/bootstrap@5.0.2/dist/js/bootstrap.bundle.min.js"
        integrity="sha384-MrcW6ZMFYlzcLA8Nl+NtUVF0sA7MsXsP1UyJoMp4YLEuNSfAP+JcXn/tWtIaxVXM"
        crossorigin="anonymous"></script>

    <link href="https://fonts.googleapis.com/css2?family=Gowun+Dodum&display=swap" rel="stylesheet">

    <title>인생 버킷리스트</title>

    <style>
        * {
            font-family: 'Gowun Dodum', sans-serif;
        }
        .mypic {
            width: 100%;
            height: 200px;

            background-image: linear-gradient(0deg, rgba(0, 0, 0, 0.5), rgba(0, 0, 0, 0.5)), url('https://images.unsplash.com/photo-1601024445121-e5b82f020549?ixid=MnwxMjA3fDB8MHxwaG90by1wYWdlfHx8fGVufDB8fHx8&ixlib=rb-1.2.1&auto=format&fit=crop&w=1189&q=80');
            background-position: center;
            background-size: cover;

            color: white;

            display: flex;
            flex-direction: column;
            align-items: center;
            justify-content: center;
        }
        .mypic > h1 {
            font-size: 30px;
        }
        .mybox {
            width: 95%;
            max-width: 700px;
            padding: 20px;
            box-shadow: 0px 0px 10px 0px lightblue;
            margin: 20px auto;
        }
        .mybucket {
            display: flex;
            flex-direction: row;
            align-items: center;
            justify-content: space-between;
        }

        .mybucket > input {
            width: 70%;
        }
        .mybox > li {
            display: flex;
            flex-direction: row;
            align-items: center;
            justify-content: center;

            margin-bottom: 10px;
            min-height: 48px;
        }
        .mybox > li > h2 {
            max-width: 75%;
            font-size: 20px;
            font-weight: 500;
            margin-right: auto;
            margin-bottom: 0px;
        }
        .mybox > li > h2.done {
            text-decoration:line-through
        }
    </style>
    <script>
        $(document).ready(function () {
            show_bucket();
        });
        function show_bucket(){
            $.ajax({
                type: "GET",
                url: "/bucket",
                data: {},
                success: function (response) {
                    alert(response["msg"])
                }
            });
        }
        function save_bucket(){
            $.ajax({
                type: "POST",
                url: "/bucket",
                data: {sameple_give:'데이터전송'},
                success: function (response) {
                    alert(response["msg"])
                }
            });
        }
        function done_bucket(num){
            $.ajax({
                type: "POST",
                url: "/bucket/done",
                data: {sameple_give:'데이터전송'},
                success: function (response) {
                    alert(response["msg"])
                }
            });
        }
    </script>
</head>
<body>
    <div class="mypic">
        <h1>나의 버킷리스트</h1>
    </div>
    <div class="mybox">
        <div class="mybucket">
            <input id="bucket" class="form-control" type="text" placeholder="이루고 싶은 것을 입력하세요">
            <button onclick="save_bucket()" type="button" class="btn btn-outline-primary">기록하기</button>
        </div>
    </div>
    <div class="mybox" id="bucket-list">
        <li>
            <h2>✅ 호주에서 스카이다이빙 하기</h2>
            <button onclick="done_bucket(5)" type="button" class="btn btn-outline-primary">완료!</button>
        </li>
        <li>
            <h2 class="done">✅ 호주에서 스카이다이빙 하기</h2>
        </li>
        <li>
            <h2>✅ 호주에서 스카이다이빙 하기</h2>
            <button type="button" class="btn btn-outline-primary">완료!</button>
        </li>
    </div>
</body>
</html>
- [코드스니펫] 버킷리스트-app.py
- 2) 프로젝트 준비 - mongoDB Atlas 창 띄워두기
- [코드스니펫] mongoDB Atlas 주소
https://cloud.mongodb.com/
- [코드스니펫] mongoDB Atlas 주소
4. [버킷리스트] - POST연습(기록하기)
- 1) API 만들고 사용하기 - 버킷리스트 기록 API (Create→ POST) 👉 1. 요청 정보 : URL=
/bucket, 요청 방식 =POST-
클라(ajax) → 서버(flask) :
bucket -
서버(flask) → 클라(ajax) : 메시지를 보냄 (기록 완료!)
단! 서버에서 한 가지 일을 더 해야합니다.
→ 번호를 만들어 함께 넣어주는 것. 그래야 업데이트가 가능하겠죠!
- 1) 클라이언트와 서버 연결 확인하기 [서버 코드 -
app.py]
[클라이언트 코드 -@app.route("/bucket", methods=["POST"]) def bucket_post(): sample_receive = request.form['sample_give'] print(sample_receive) return jsonify({'msg': 'POST(기록) 연결 완료!'})index.html]function save_bucket(){ $.ajax({ type: "POST", url: "/bucket", data: {sample_give:'데이터전송'}, success: function (response) { alert(response["msg"]) } }); } <button onclick="save_bucket()" type="button" class="btn btn-outline-primary">기록하기</button> - 2) 서버부터 만들기
-
bucket정보를 받아서, 저장하면 되겠죠? -
단, 한 가지 일이 더 있답니다. → 네, 버킷 번호 와 완료여부 를 함께 넣어주는 것!
-
우리가 일전에 만들어둔
[dbtest.py](http://dbtest.py)파일도 불러와봅시다! -
재밌는 사실! 아래 코드도 살펴봅시다.
count = list(db.bucket.find({},{'_id':False})) num = len(count) + 1 vs count = db.bucket.find({},{'_id':False}).count() num = count + 1@app.route("/bucket", methods=["POST"]) def bucket_post(): bucket_receive = request.form["bucket_give"] count = db.bucket.find({},{'_id':False}).count() num = count + 1 doc = { 'num':num, 'bucket': bucket_receive, 'done':0 } db.bucket.insert_one(doc) return jsonify({'msg':'등록 완료!'})
-
- 3) 클라이언트 만들기
-
쉬워요!
bucket정보만 보내주면 되겠죠?function save_bucket(){ let bucket = $('#bucket').val() $.ajax({ type: "POST", url: "/bucket", data: {bucket_give:bucket}, success: function (response) { alert(response["msg"]) window.location.reload() } }); }
-
- 4) 완성 확인하기
- DB에 잘 들어갔는지 확인해보면 되겠죠? num과 done도 잘 들어갔네요!
-

5. [버킷리스트] - GET연습(보여주기)
-
1) API 만들고 사용하기 - 버킷리스트 조회 API (Read→ GET)
👉 1. 요청 정보 : URL=
/bucket, 요청 방식 =GET- 클라(ajax) → 서버(flask) : (없음)
- 서버(flask) → 클라(ajax) : 전체 버킷리스트를 보여주기
- 1) 클라이언트와 서버 연결 확인하기 [서버 코드 -
app.py]
[클라이언트 코드 -@app.route("/bucket", methods=["GET"]) def bucket_get(): return jsonify({'msg': 'GET 연결 완료!'})index.html]$(document).ready(function () { show_bucket(); }); function show_bucket(){ $.ajax({ type: "GET", url: "/bucket", data: {}, success: function (response) { alert(response["msg"]) } }); } - 2) 서버부터 만들기
-
받을 것 없이
buckets에 주문정보를 담아서 내려주기만 하면 됩니다!@app.route("/bucket", methods=["GET"]) def bucket_get(): buckets_list = list(db.bucket.find({},{'_id':False})) return jsonify({'buckets':buckets_list})
-
- 3) 클라이언트 만들기
-
응답을 잘 받아서 for 문으로! 붙여주면 끝이겠죠!
function show_bucket(){
    $('#bucket-list').empty()
    $.ajax({
        type: "GET",
        url: "/bucket",
        data: {},
        success: function (response) {
            let rows = response['buckets']
            for (let i = 0; i < rows.length; i++) {
                let bucket = rows[i]['bucket']
                let num = rows[i]['num']
                let done = rows[i]['done']

                let temp_html = ``
                if (done == 0) {
                    temp_html = `<li>
                                    <h2>✅ ${bucket}</h2>
                                    <buttontoken interpolation">${num})" type="button" class="btn btn-outline-primary">완료!</button>
                                </li>`
                } else {
                    temp_html = `<li>
                                    <h2 class="done">✅ ${bucket}</h2>
                                </li>`
                }
                $('#bucket-list').append(temp_html)
            }
        }
    });
}
-
- 4) 완성 확인하기
- 버킷리스트가 잘 붙었는지 확인해보면 되겠죠!
- 버킷리스트가 잘 붙었는지 확인해보면 되겠죠!

6. [버킷리스트] - POST연습(완료하기)
- 1) API 만들고 사용하기 - 버킷리스트 완료 API (Update→ POST) 👉 1. 요청 정보 : URL=
/bucket/done, 요청 방식 =POST- 클라(ajax) → 서버(flask) :
num(버킷 넘버) - 서버(flask) → 클라(ajax) : 메시지를 보냄 (버킷 완료!)
- 1) 클라이언트와 서버 연결 확인하기 [서버 코드 -
app.py]
[클라이언트 코드 -@app.route("/bucket/done", methods=["POST"]) def bucket_done(): sample_receive = request.form['sample_give'] print(sample_receive) return jsonify({'msg': 'POST(완료) 연결 완료!'})index.html]function done_bucket(num){ $.ajax({ type: "POST", url: "/bucket/done", data: {sameple_give:'데이터전송'}, success: function (response) { alert(response["msg"]) } }); } <button onclick="done_bucket(5)" type="button" class="btn btn-outline-primary">완료!</button> - 2) 서버부터 만들기
버킷 번호를 받아서, 업데이트 하면 됩니다!- 그.런.데!
num_receive는 문자열로 들어오니까, 숫자로 바꿔주는 것이 중요합니다!
- 클라(ajax) → 서버(flask) :

        @app.route("/bucket/done", methods=["POST"])
        def bucket_done():
            num_receive = request.form["num_give"]
            db.bucket.update_one({'num': int(num_receive)}, {'$set': {'done': 1}})
return jsonify({'msg': '버킷 완료!'})- 3) 클라이언트 만들기
- 버킷 넘버를 보여주면 됩니다! 버킷 넘버는? HTML이 만들어질 때 적히게 되죠!
- 바로 이렇게!

        function done_bucket(num){
            $.ajax({
                type: "POST",
                url: "/bucket/done",
                data: {'num_give':num},
                success: function (response) {
                    alert(response["msg"])
                    window.location.reload()
                }
            });
}- 4) 완성 확인하기
- 선이 쫙! 그어진 것 확인해볼까요!

7. 내 프로젝트를 서버에 올리기
- 1) "웹서비스 런칭" 에 필요한 개념 소개
👉 이제 내가 만든 프로젝트를 배포해봅니다. 배포는 누구나 내 서비스를 사용할 수 있게 하기 위해서 작업들이에요. 웹 서비스를 런칭하는 거죠!
- 웹 서비스를 런칭하기 위해 클라이언트의 요청에 항상 응답해줄 수 있는 서버에 프로젝트를 실행시켜줄 거에요.
- 언제나 요청에 응답하려면,
1) 컴퓨터가 항상 켜져있고 프로그램이 실행되어 있어야하고,
2) 모두가 접근할 수 있는 공개 주소인 공개 IP 주소(Public IP Address)로 나의 웹 서비스에 접근할 수 있도록 해야해요.- 서버는 그냥 컴퓨터라는거 기억나시죠? 외부 접속이 가능하게 설정한 다음에 내 컴퓨터를 서버로 사용할 수도 있어요.
- 우리는 AWS 라는 클라우드 서비스에서 편하게 서버를 관리하기 위해서 항상 켜 놓을 수 있는 컴퓨터인 EC2 사용권을 구입해 서버로 사용할 겁니다.
8. AWS 서버 구매하기
- 1) EC2 서버 구매하기
- AWS EC2 서버 사기 (준비 상식 편)
- 클릭 만으로 내가 원하는 서버(컴퓨터)의 설정을 정하고, 거기에 컴퓨터를 실행시키기 위한 운영체제(OS)를 설치할 거에요.
- 우리는 OS로 리눅스의 Ubuntu를 설치합니다. 윈도우와 같이, OS가 여러개 존재합니다. 리눅스도 그 중의 하나이며, 오픈소스로 발전되는 OS입니다.
- AWS EC2 서버 사기
- [코드스니펫] EC2 콘솔페이지
[https://ap-northeast-2.console.aws.amazon.com/ec2/v2/home?region=ap-northeast-2](https://ap-northeast-2.console.aws.amazon.com/ec2/v2/home?region=ap-northeast-2#Instances:sort=instanceId)
- [코드스니펫] EC2 콘솔페이지
- AWS EC2 서버 사기 (준비 상식 편)
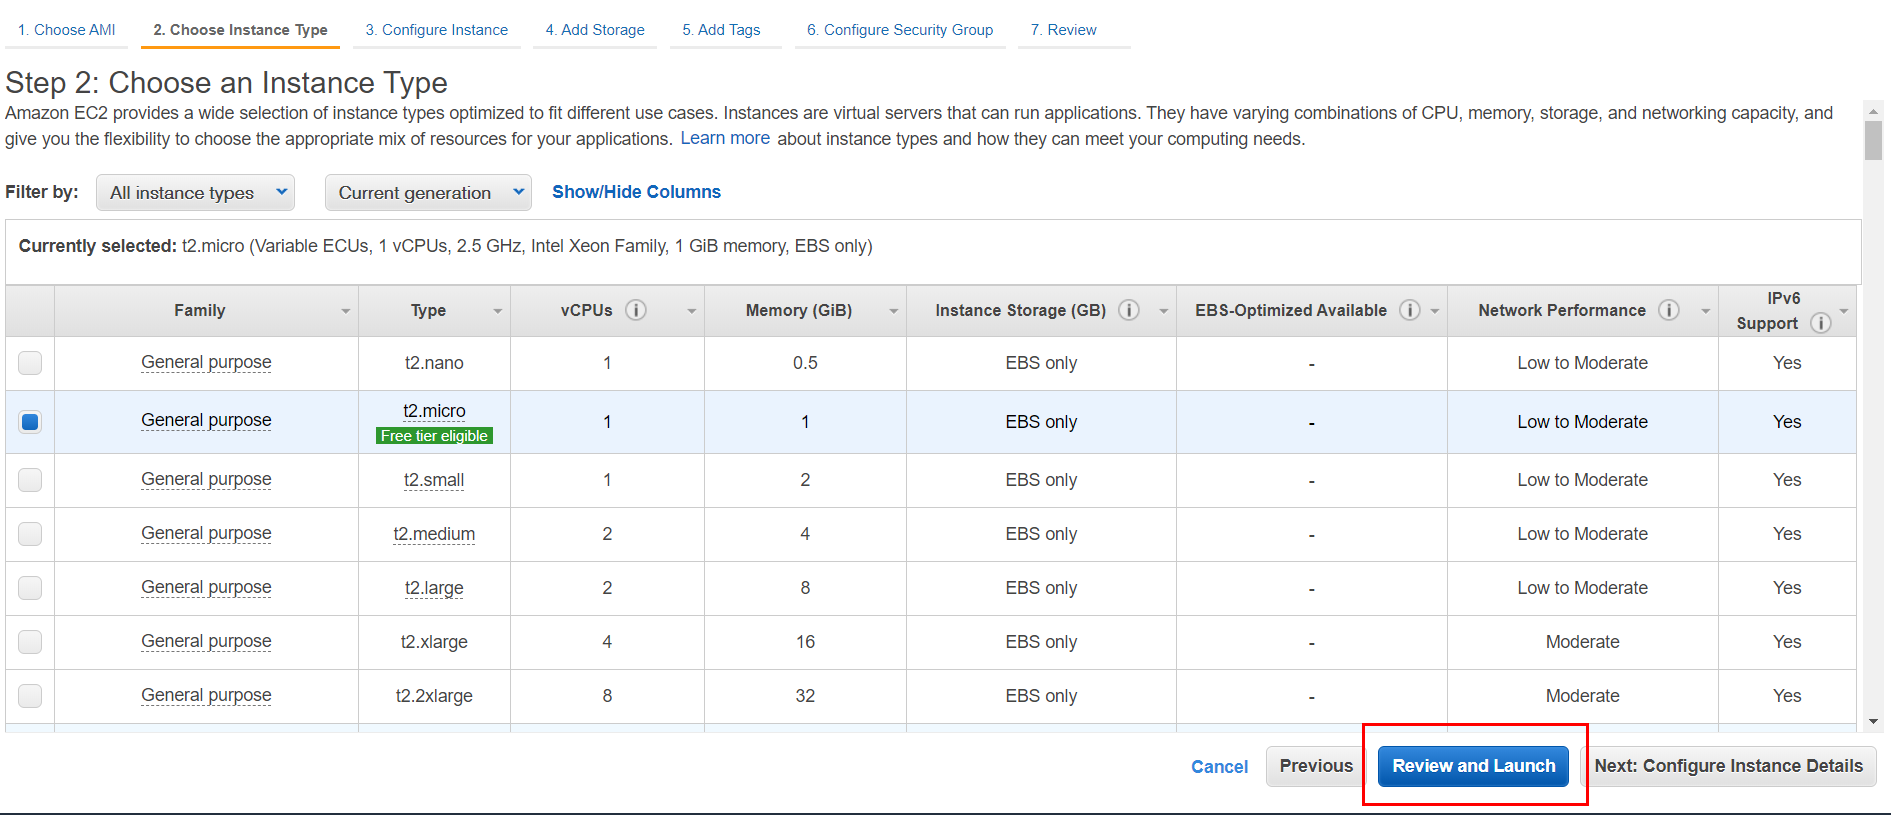
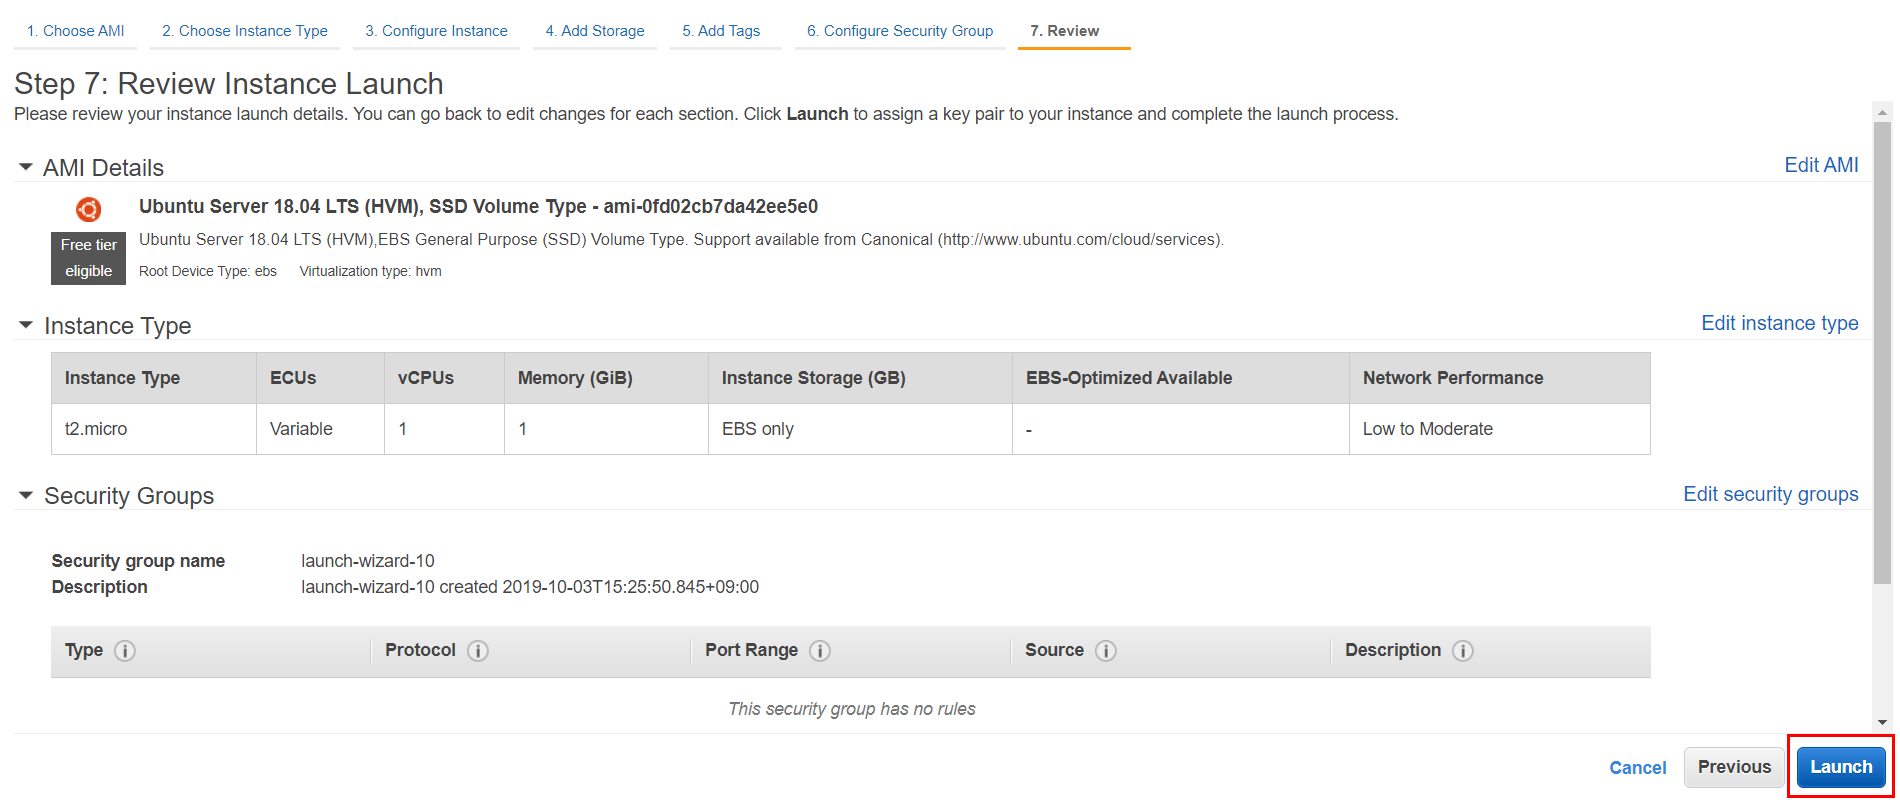
- 구매 화면들 따라하기 👉 Ubuntu Server 18.04 또는 20.04 버전을 구매합니다.


- 2) EC2 서버 종료하는 방법 (1년 후 자동결제 방지!) 💡 중지 또는 종료하는 법. 무료 기간(1년) 후 결제가 되기 전에, 이렇게 종료하세요! 대상 인스턴스에 마우스 우클릭 > '인스턴스 상태' 를 클릭합니다. 중지 또는 종료 중 하나를 클릭하면 명령을 실행합니다.

- 3) EC2에 접속하기
- AWS EC2에 접속하기 (준비 상식 편)
- SSH(Secure Shell Protocol)
- 다른 컴퓨터에 접속할 때 쓰는 프로그램입니다. 다른 것들 보다 보안이 상대적으로 뛰어납니다.
- 접속할 컴퓨터가 22번 포트가 열려있어야 접속 가능합니다. AWS EC2의 경우, 이미 22번 포트가 열려있습니다. 확인해볼까요?
- SSH(Secure Shell Protocol)
- AWS EC2에 접속하기 (준비 상식 편)

- AWS EC2에 접속하기
- Mac OS: Mac은 ssh가 있어서, 명령어로 바로 접근 가능!
- 터미널을 열기 (spotlight에 terminal 입력)
- 방금 받은 내 Keypair의 접근 권한을 바꿔주기
sudo chmod 400 받은키페어를끌어다놓기 - SSH로 접속하기
ssh -i 받은키페어를끌어다놓기 ubuntu@AWS에적힌내아이피예) 아래와 비슷한 생김새!
ssh -i /path/my-key-pair.pem ubuntu@13.125.250.20- Window: ssh가 없으므로, git bash라는 프로그램을 이용!
- gitbash를 실행하고, 아래를 입력!
ssh -i 받은키페어를끌어다놓기 ubuntu@AWS에적힌내아이피예) 아래와 비슷한 생김새!
ssh -i /path/my-key-pair.pem ubuntu@13.125.250.20- Key fingerprint 관련 메시지가 나올 경우 Yes를 입력해주세요!
- git bash를 종료할 때는 exit 명령어를 입력하여 ssh 접속을 먼저 끊어주세요.
- 4) 간단한 리눅스 명령어 연습하기
-
리눅스는 윈도우 같지 않아서, '쉘 명령어'를 통해 OS를 조작한다. (일종의 마우스 역할)
[가장 많이 쓰는 몇 가지 명령어]
-
팁! 리눅스 커널에서 윗화살표를 누르면 바로 전에 썼던 명령어가 나옵니다.
-
    ls: 내 위치의 모든 파일을 보여준다.

    pwd: 내 위치(폴더의 경로)를 알려준다.

    mkdir: 내 위치 아래에 폴더를 하나 만든다.

    cd [갈 곳]: 나를 [갈 곳] 폴더로 이동시킨다.

    cd .. : 나를 상위 폴더로 이동시킨다.

    cp -r [복사할 것] [붙여넣기 할 것]: 복사 붙여넣기

    rm -rf [지울 것]: 지우기

    sudo [실행 할 명령어]: 명령어를 관리자 권한으로 실행한다.
    sudo su: 관리가 권한으로 들어간다. (나올때는 exit으로 나옴)
9. 서버 세팅하기
- 1) 서버 환경 통일하기 💡 우리는 지금 막! 컴퓨터를 구매한 상태예요. 여기에 이런저런 세팅들(업그레이드, DB설치, 명령어 통일 등)을 해줘야 본격적으로 이용할 때 편리하답니다!
- [코드스니펫] EC2 한방에 세팅하기
# python3 -> python
sudo update-alternatives --install /usr/bin/python python /usr/bin/python3 10

# pip3 -> pip
sudo apt-get update
sudo apt-get install -y python3-pip
sudo update-alternatives --install /usr/bin/pip pip /usr/bin/pip3 1

# port forwarding
sudo iptables -t nat -A PREROUTING -i eth0 -p tcp --dport 80 -j REDIRECT --to-port 5000
- [코드스니펫] EC2 한방에 세팅하기
- 2) filezilla를 이용해서, 간단한 python 파일을 올려봅니다.
- 서버에 업로드 할 간단한 파일을 작성합니다.
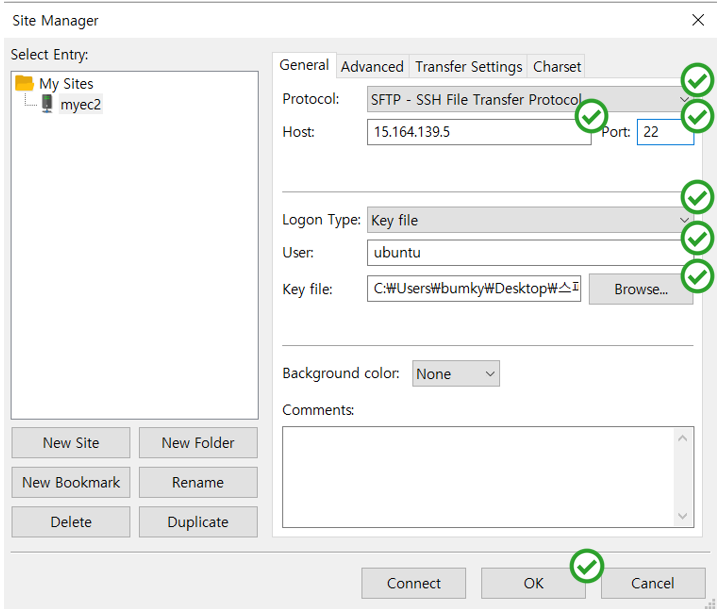
# 아주 간단하게, 이 정도만 적어볼까요? # 그리고 적당한 곳에 파일을 저장해봅니다. print('hello sparta!!') - 파일질라 실행, 다음과 같이 설정
- 서버에 업로드 할 간단한 파일을 작성합니다.

- 정보들을 입력하고, ok 누르면 서버의 파일들을 볼 수 있음
(Host: 내 EC2서버의 ip // User: ubuntu 로 입력)
- 마우스로 드래그 해서 파일을 업로드/다운로드하면 됩니다!
(자, 그럼 이제 간단한 파이썬 파일을 하나 만들어서 업로드 해볼까요?)
왼쪽이 내 컴퓨터 vs 오른쪽이 내가 방금 산 컴퓨터

- 3) 파이썬 파일을 실행해보기
python [test.py](http://test1.py) - 4) [한 걸음 더] 서버 환경 세팅 - 한 줄씩 설명 💡 실제 업무에서는 아래 내용을 인프라 엔지니어 또는 개발 팀장님이 해두시는 경우가 많습니다. 튜터들도 모두 외우고 있는 코드가 아니기에, 맥락만 이해해주시면 되겠습니다!
-
파이썬 (python3 → python)
💡 python3 명령어를 python으로 사용할 수 있게 하는 명령어
-
pip (pip3 → pip)
💡 1) pip3 설치
2) pip3 명령어를 pip으로 사용할 수 있게 하는 명령어- 한 줄 씩 복사 붙여넣기!
-
        # pip3 설치
        sudo apt-get update
        sudo apt-get install -y python3-pip

        # pip3 대신 pip 라고 입력하기 위한 명령어
sudo update-alternatives --install /usr/bin/pip pip /usr/bin/pip3 1- 포트포워딩 (80포트 → 5000포트)
💡 80포트로 들어오는 요청을 5000포트로 넘겨주는 명령어
sudo iptables -t nat -A PREROUTING -i eth0 -p tcp --dport 80 -j REDIRECT --to-port 500010. FLASK 서버를 실행해보기
- 1) 팬명록 완성본을 filezilla로 EC2에 업로드해봅니다.
- 파일질라에서 homework 폴더 째로 드래그 드롭으로 EC2 인스턴스의 home/ubuntu 폴더에 업로드합니다. (간단하죠?)
- 그리고 - 실행해보세요!
python app.py
- 2) pip로 패키지를 설치하기 💡 우리가 file → setting → .. 에서
+버튼 누르고 설치했던 작업을, 명령어로 하면 이렇게 된답니다! 🤓
pip install flask-
3) 하는 김에, 다른 패키지들도 설치해줄까요?
pip install pymongo dnspython -
4) 다시 flask 서버를 실행해보기
-
아래 명령어로 flask 서버를 실행합니다.
python app.py -
서버 실행이 되면, 크롬에서 접속을 해봅니다.
크롬 브라우저 창에 아래와 같이 입력합니다.

http://[내 EC2 IP]:5000/
👉 아직, 작동하지 않을 걸요! → AWS에서 약간의 설정이 더 필요합니다.
-
-
5) AWS에서 5000포트를 열어주기
- EC2 서버(=가상의 내 컴퓨터)에서 포트를 따로 설정하는 것 외에도,
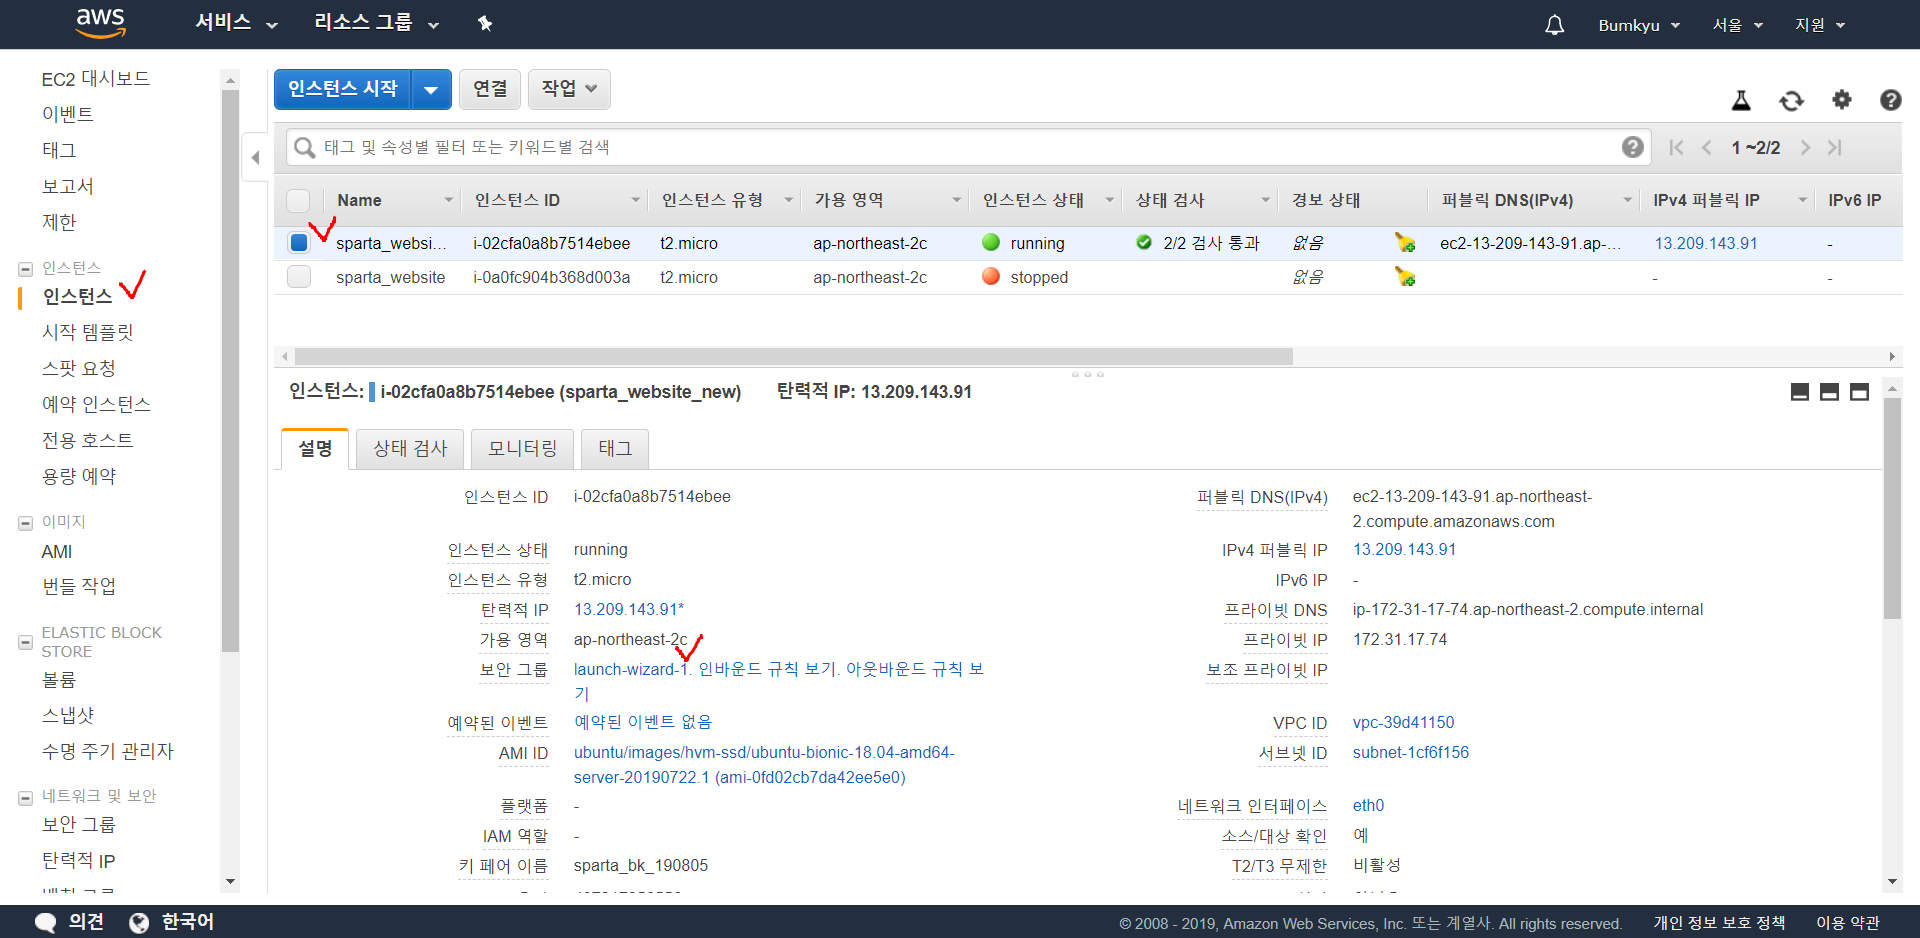
AWS EC2에서도 자체적으로 포트를 열고/닫을 수 있게 관리를 하고 있습니다.→ 그래서 AWS EC2 Security Group에서 인바운드 요청 포트를 열어줘야 합니다. - 일단, EC2 관리 콘솔로 들어갑니다. 그리고 보안그룹(영문: Security Group)을 눌러 들어갑니다. 여기선 launch-wizard-1 이라고 쓰여 있네요
- EC2 서버(=가상의 내 컴퓨터)에서 포트를 따로 설정하는 것 외에도,
- 해당 보안그룹을 클릭합니다.
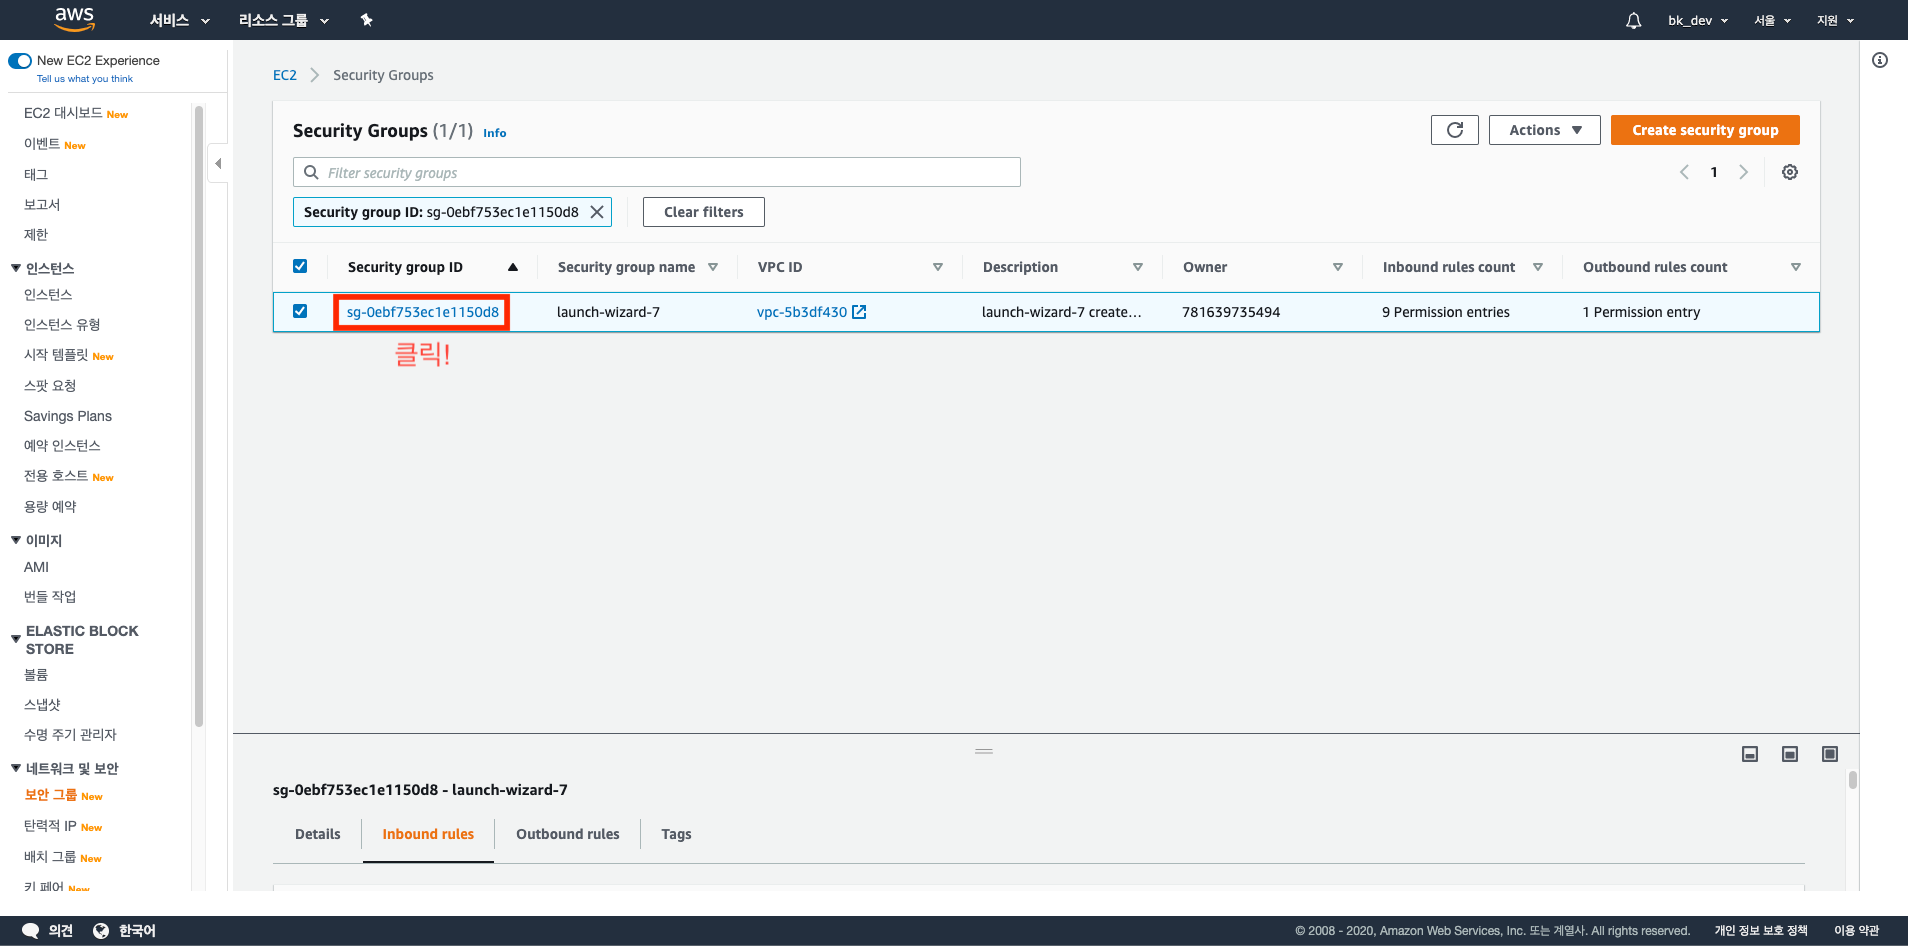
- Edit inbound rules를 선택합니다.
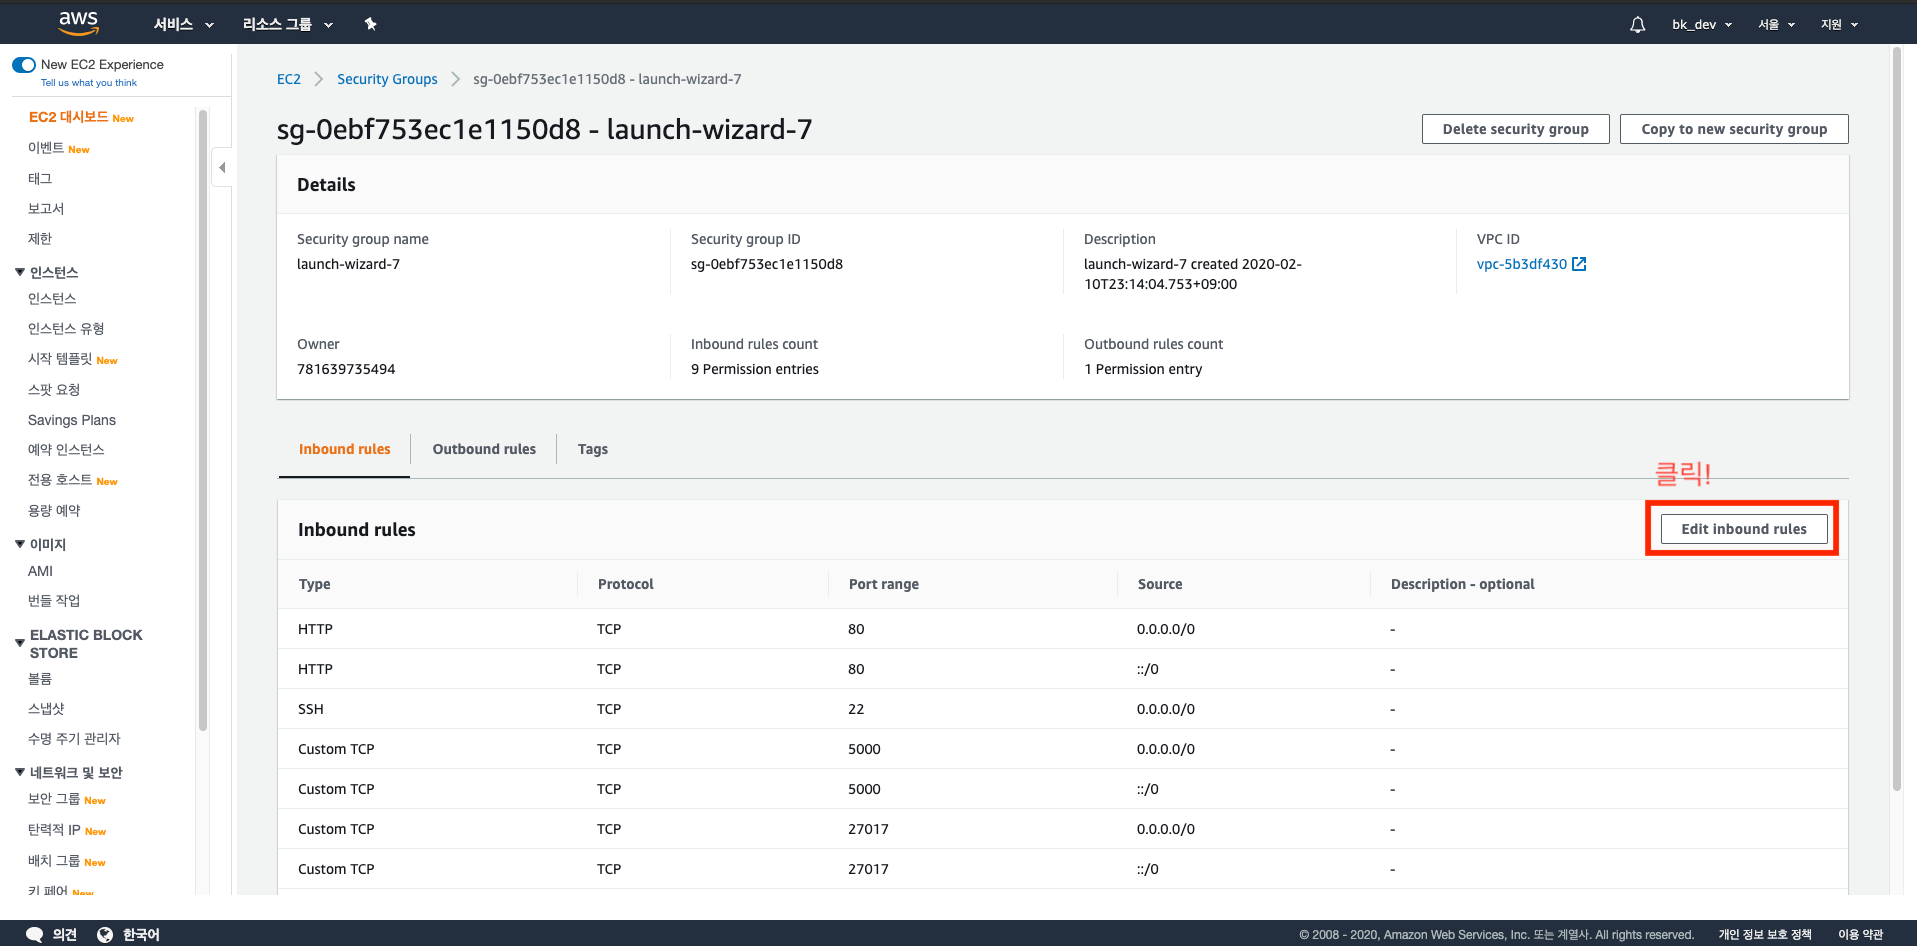
- 두 가지 포트를 추가해봅니다. Anywhere-IPv4 를 클릭해주세요!
→ 80포트: HTTP 접속을 위한 기본포트
→ 5000포트: flask 기본포트

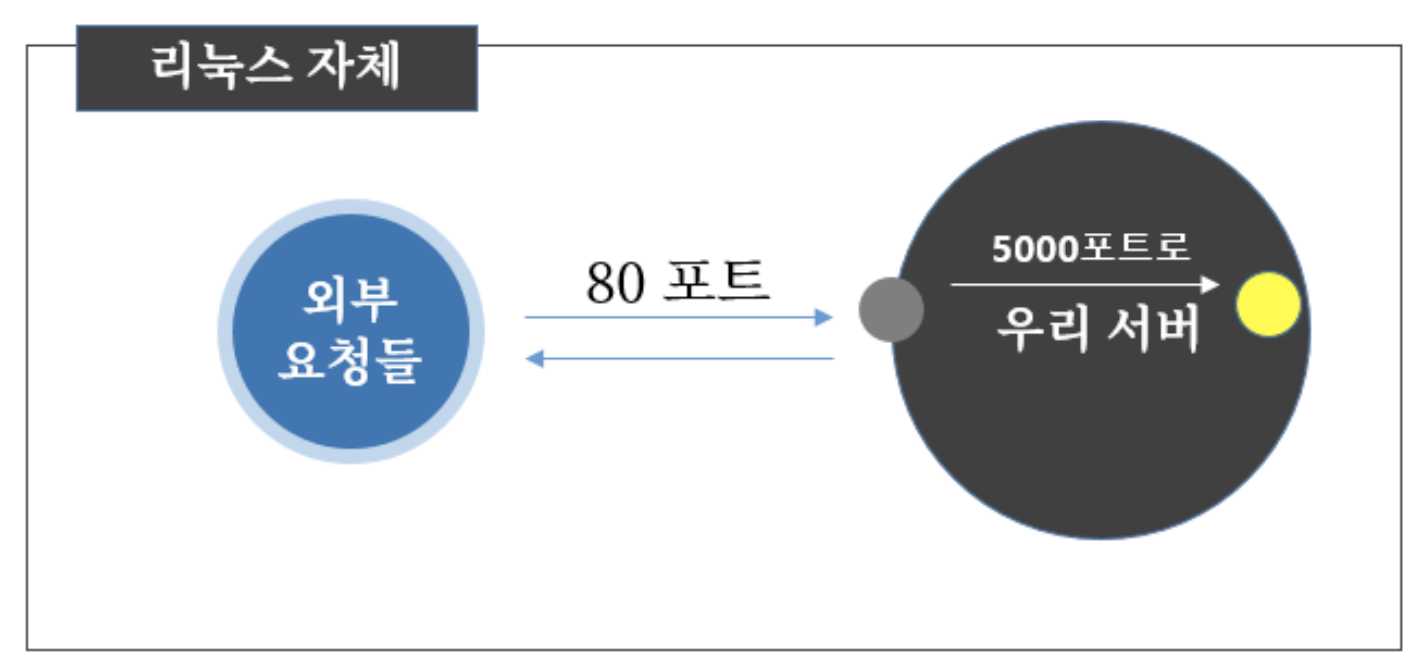
- 6) 어떻게 되는걸까? 포트 번호 없애기 - 기본 개념 💡 우리는 이미 포트포워딩 세팅을 해뒀기 때문에, 여기서는 개념만!
- 지금은 5000포트에서 웹 서비스가 실행되고 있습니다. 그래서 매번 :5000 이라고 뒤에 붙여줘야 하죠. 뒤에 붙는 포트 번호를 없애려면 어떻게 해야할까요?
- http 요청에서는 80포트가 기본이기 때문에, 굳이 :80을 붙이지 않아도 자동으로 연결이 됩니다.
- 포트 번호를 입력하지 않아도 자동으로 접속되기 위해, 우리는 80포트로 오는 요청을 5000 포트로 전달하게 하는 포트포워딩(port forwarding) 을 사용하겠습니다.
- 리눅스에서 기본으로 제공해주는 포트포워딩을 사용할 것입니다. 그림으로 보면 아래와 같습니다.
- 7) 다시 접속해봅니다!
- http://내아이피 → 잘 작동하는 것을 확인할 수 있습니다.
- 이제 app.py 파일을 수정하고, 다듬어서 올리면 진짜 프로젝트가 되겠죠?
- http://내아이피 → 잘 작동하는 것을 확인할 수 있습니다.
11. nohup 설정하기
- 1) SSH 접속을 끊어도 서버가 계속 돌게 하기
- 현재 상황 Git bash 또는 맥의 터미널을 종료하면 (=즉, SSH 접속을 끊으면) 프로세스가 종료되면서, 서버가 돌아가지 않고 있습니다. 그러나 우리가 원격접속을 끊어도, 서버는 계속 동작해야겠죠?
- 원격 접속을 종료하더라도 서버가 계속 돌아가게 하기
# 아래의 명령어로 실행하면 된다 nohup python app.py & - 서버 종료하기 - 강제종료하는 방법
- [코드스니펫] 강제종료하기
ps -ef | grep 'python app.py' | awk '{print $2}' | xargs kill
- [코드스니펫] 강제종료하기
- 현재 상황 Git bash 또는 맥의 터미널을 종료하면 (=즉, SSH 접속을 끊으면) 프로세스가 종료되면서, 서버가 돌아가지 않고 있습니다. 그러나 우리가 원격접속을 끊어도, 서버는 계속 동작해야겠죠?
- 2) SSH 접속을 종료한 뒤, 접속해봅니다!
- 브라우저에서 접속하기
http://내AWS아이피/
- 브라우저에서 접속하기
12. 도메인 연결하기
- 1) 도메인 구입/연결
- 도메인을 구매한다는 것은, 네임서버를 운영해주는 업체에, IP와 도메인 매칭 유지비를 내는 것입니다. 한국 또는 글로벌 업체 어디든 상관 없지만, 우리는 한국의 '가비아'라는 회사에서 구입해보겠습니다.
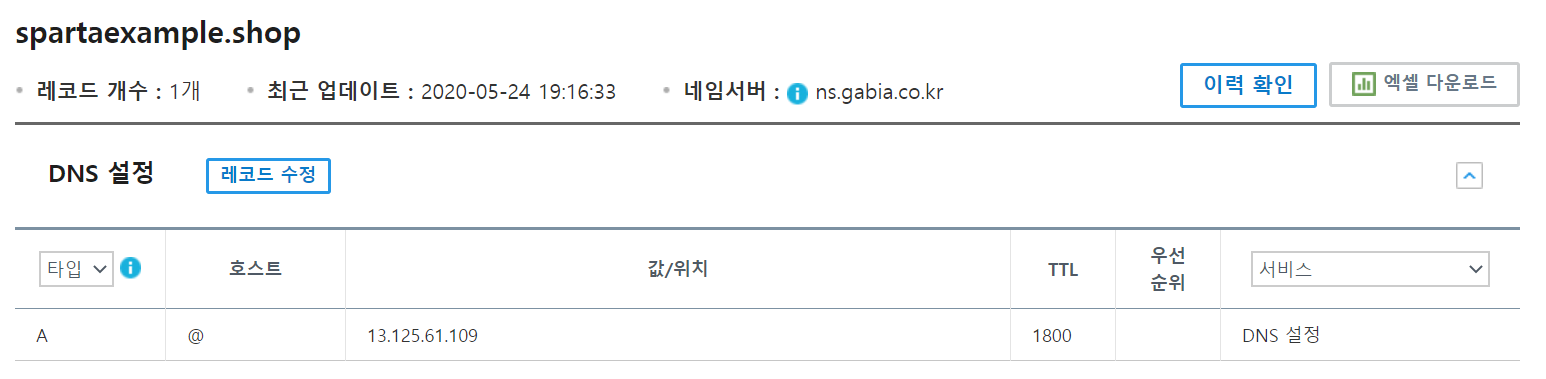
- 2) 구입 후 아래 화면을 띄워주세요
- [코드스니펫] 가비아 접속하기
https://dns.gabia.com/ - 링크: https://dns.gabia.com/
- [코드스니펫] 가비아 접속하기
(DNS 설정 클릭)

(호스트 이름에 @, IP주소에 IP주소를 입력합니다)

(이렇게!)
- 3) 10분 정도 기다려주세요!
- 네임서버에 내 도메인-IP가 매칭되는 시간이 필요합니다.
- 4) IP주소로 접근해보기
- 내 IP주소로 지금 flask 서버가 잘 돌고 있나요? 먼저 확인해봅니다.
http://내AWS아이피/ - 약간의 시간을 가진 후, 내 도메인으로 접근하면, 접속이 됩니다.
http://내도메인/
- 내 IP주소로 지금 flask 서버가 잘 돌고 있나요? 먼저 확인해봅니다.
13. og 태그
- 1) og 태그 만들기
- 스파르타피디아에서 배웠던 og:image, og:title, og:description 태그 기억하시나요? 👉 내 프로젝트도 카톡/페이스북/슬랙에 공유했을 때 예쁘게 나오도록,
미리 꾸며봅시다!
- 스파르타피디아에서 배웠던 og:image, og:title, og:description 태그 기억하시나요? 👉 내 프로젝트도 카톡/페이스북/슬랙에 공유했을 때 예쁘게 나오도록,

- static 폴더 아래에 이미지 파일을 넣고, 각자 프로젝트 HTML의 ~ 사이에 아래 내용을 작성하면 og 태그를 개인 프로젝트에 사용할 수 있습니다.
- [코드스니펫] og태그 넣기
            <meta property="og:title" content="내 사이트의 제목" />
            <meta property="og:description" content="보고 있는 페이지의 내용 요약" />
            <meta property="og:image" content="이미지URL" />
- 참고! 이미지를 바꿨는데 이전 ogimage가 그대로 나와요!
👉 그것은 페이스북/카카오톡 등에서 처음 것을 한동안 저장해놓기 때문입니다.
- 페이스북 og 태그 초기화 하기: https://developers.facebook.com/tools/debug/
- 카카오톡 og 태그 초기화 하기: https://developers.kakao.com/tool/clear/og
14. 5주차 끝 & 후기
후기?
대략 3일 동안 5주 치를 들어서 사실 지금 정신이 없다. 근데 우연하게 5주차를 한번 더 들을 기회가 생겼는데, 다시 한번 >> 강의를 들었을 때, 해당 강의의 효과를 느꼈다. 2번째 강의를 듣다보니 이해의 깊이가 달랐고, 해당 코드와 사이트 들의 필요성을 체감하게 되었다. 그래서 기회가 된다면, 최대한 많은 강의를 들어야 겠다라는 생각을 하게 되었다. 역시 코딩은 많이 해야하고, 지식은 많이 보아야 한다는 걸 체감했다. 그럼 복습하러 이만~~! ( 스터디 구해야 겠지? 헤헤 )