0. 목차
1. 리스트 작성
<!DOCTYPE html>
<html lang="en">
<head>
    <meta charset="UTF-8">
    <meta http-equiv="X-UA-Compatible" content="IE=edge">
    <meta name="viewport" content="width=device-width, initial-scale=1.0">
    <title>목록태그연습</title>
</head>
<body>
    <ol type="A" reversed>
       <li>Coffee</li>
       <li>Tea</li>
       <li>Milk</li>
       <li>juice</li>
    </ol>

    <ol start="10">
        <li>Coffee</li>
        <li>Tea</li>
        <li>Milk</li>
        <li>juice</li>
    </ol>

    <ul>
        <li>Coffee</li>
        <li>Tea</li>
        <li>Milk</li>
        <li>juice</li>
    </ul>

    <dl>
        <dt>Coffee</dt>
        <dd>Black hot drink</dd>
        <dt>Milk</dt>
        <dd>White cold drink</dd>
    </dl>
</body>
</html>
< 몰랐던 부분 >
1. < ol type="A" >

	- 리스트 형식을 type으로 지정하여 바꿀 수 있다는 것을 까먹고 있었는데 다시 한 번 알게됨.
2. < reversed >
- ol 태그 뒤에 reversed를 기입하면, 내림차순(DESC)로 바뀜.3. < ol start='숫자' >
- 리스트 시작 번호를 해당 속성으로 설정할 수 있음.4. <dl>
<dt>Coffee</dt>
<dd>Black hot drink</dd>
<dt>Milk</dt>
<dd>White cold drink</dd>
</dl>
- dl은 리스트 정렬
- dt는 설명대상
- dd는 dt에 대한 설명2. 멀티미디어 작성

<!DOCTYPE html>
<html lang="en">
<head>
<meta charset="UTF-8">
<meta http-equiv="X-UA-Compatible" content="IE=edge">
<meta name="viewport" content="width=device-width, initial-scale=1.0">
<title>멀티미디어 연습</title>
<style>
a {
text-decoration: none;
color: black;
}
</style>
</head>
<body>
<img src="./img/p4.jpg" width="500px" title="컵케이크"><br>
<video src="./media/ch1.mp4" width="200px" controls autoplay muted loop></video>
<video width="200px" controls autoplay muted loop>
<source src="./media/ch1.mp4" type="video/mp4">
</video><br>
<audio src="./media/kakao.mp3" controls></audio>
<ul>
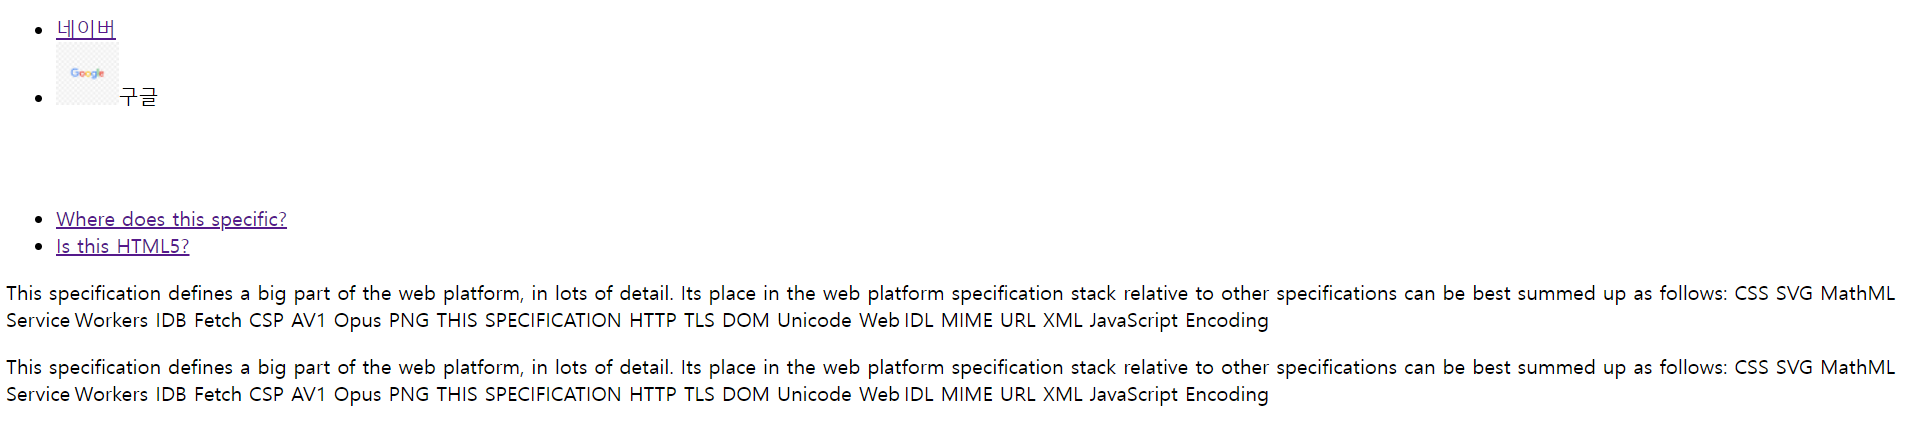
<li><a href="https://www.naver.com/">네이버 바로가기(글씨 클릭!)</a></li>
<li>구글 바로가기(이미지 클릭!)</li><a href="https://www.google.com"><img src="https://www.coindeskkorea.com/news/photo/202201/77238_17805_4923.png" width="100px" alt="구글 로고"></a>
</ul>
<iframe width="500" height="300" src="https://www.youtube.com/embed/kC4st0SvqqQ" title="YouTube video player"
frameborder="0" allow="accelerometer; autoplay; clipboard-write; encrypted-media; gyroscope; picture-in-picture"
allowfullscreen></iframe>
</body>
</html>
< 몰랐던 부분 >
1. <img src=~~ title="커서가 포커스 될때 나오는 글씨" alt="렌더링 오류 방지용" >

	- title 속성과 alt 속성을 구분할 것.
2. < video width=~~ controls autoplay muted loop >
- video 태그를 처음 써봄 / controls : 재생, 일시정지 등 제어 기능
/ autoplay + muted : 자동재생 / loop : 반복 재생3. <video width="200px" controls autoplay muted loop>
<source src="./media/ch1.mp4" type="video/mp4">
</video>
- 이런 video 태그 삽입도 있음을 참고할 것. ( 사이즈 및 속성 설정에 편함 )4. <iframe width="500" height="300" src="https://www.youtube.com/embed/kC4st0SvqqQ" title="YouTube video player"
frameborder="0" allow="accelerometer; autoplay; clipboard-write; encrypted-media; gyroscope; picture-in-picture"
allowfullscreen></iframe>
- 유튜브에서 '소스 코드 복사' 를 누르면 <iframe> 태그와 함께 해당 소스가 나온다.
- iframe 태그에 대해서 공부하고 싶으면, 해당 사이트를 참고할 것3. 링크 작성
<!DOCTYPE html>
<html lang="en">

<head>
    <meta charset="UTF-8">
    <meta http-equiv="X-UA-Compatible" content="IE=edge">
    <meta name="viewport" content="width=device-width, initial-scale=1.0">
    <title>Document</title>
</head>

<body>
    <!-- a
        - href : 링크의 목적지
        - target : 창 여는 형태 _blank, _self, _top, _parent  -->
    <ul>
        <li><a href="https://www.naver.com/">네이버</a></li>
        <li><a href="https://www.google.com"><img width="50px"
                    src="https://w7.pngwing.com/pngs/101/999/png-transparent-google-logo-google-search-google-doodle-google-text-logo-number-thumbnail.png"></a>구글
        </li>
    </ul>

    <!--
        앵커 : id를 성정하여 원하는 페이지의 부분으로 넘어가게 하는 것.
        관련사이트 : https://html.spec.whatwg.org/multipage/introduction.html
    -->

    <br><br>
    <ul>
        <li><a href="#ch1">Where does this specific?</a></li>
        <li><a href="#ch2">Is this HTML5?</a></li>
    </ul>

    <p id="ch1">This specification defines a big part of the web platform, in lots of detail. Its place in the web
        platform specification stack relative to other specifications can be best summed up as follows:

        CSS SVG MathML Service Workers
        IDB Fetch CSP
        AV1 Opus PNG
        THIS SPECIFICATION
        HTTP TLS DOM Unicode Web IDL
        MIME URL XML JavaScript Encoding</p>

    <p id="ch2">This specification defines a big part of the web platform, in lots of detail. Its place in the web
        platform specification stack relative to other specifications can be best summed up as follows:

        CSS SVG MathML Service Workers
        IDB Fetch CSP
        AV1 Opus PNG
        THIS SPECIFICATION
        HTTP TLS DOM Unicode Web IDL
        MIME URL XML JavaScript Encoding</p>
</body>

</html>
< 몰랐던 부분 >
1. <a href='#ch1'>해당 글씨를 누르면</a>
	---> <p id='ch1'>해당 부분으로 이동한다.</p>

    - 앵커라는 것인데 현재 벨로그 작성에도 적용해보았다. 편하다!
4. 테이블 작성
<!DOCTYPE html>
<html lang="en">
<head>
<meta charset="UTF-8">
<meta http-equiv="X-UA-Compatible" content="IE=edge">
<meta name="viewport" content="width=device-width, initial-scale=1.0">
<title>테이블 작성</title>
<style>
table,
tr,
th,
td {
border: solid 1px black;
border-collapse: collapse;
padding: 8px;
}
</style>
</head>
<body>
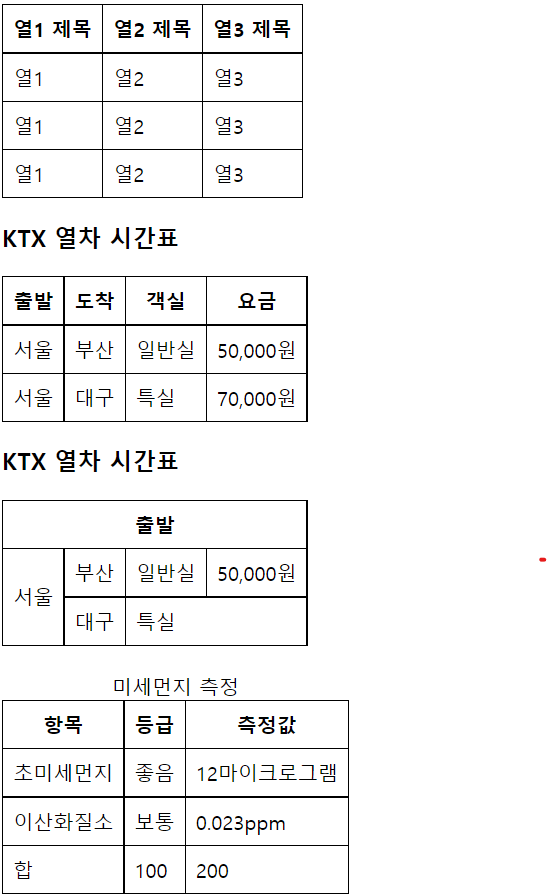
<table>
<tr>
<th>열1 제목</th>
<th>열2 제목</th>
<th>열3 제목</th>
</tr>
<tr>
<td>열1</td>
<td>열2</td>
<td>열3</td>
</tr>
<tr>
<td>열1</td>
<td>열2</td>
<td>열3</td>
</tr>
<tr>
<td>열1</td>
<td>열2</td>
<td>열3</td>
</tr>
</table>
<h3>KTX 열차 시간표</h3>
<table>
<tr>
<th>출발</th>
<th>도착</th>
<th>객실</th>
<th>요금</th>
</tr>
<tr>
<td>서울</td>
<td>부산</td>
<td>일반실</td>
<td>50,000원</td>
</tr>
<tr>
<td>서울</td>
<td>대구</td>
<td>특실</td>
<td>70,000원</td>
</tr>
</table>
<!-- colspan, rowspan => 셀이 합쳐진다. => th, td -->
<h3>KTX 열차 시간표</h3>
<table>
<tr>
<th colspan="4">출발</th>
<!-- <th>도착</th>
<th>객실</th>
<th>요금</th> -->
</tr>
<tr>
<td rowspan="2">서울</td>
<td>부산</td>
<td>일반실</td>
<td>50,000원</td>
</tr>
<tr>
<td>대구</td>
<td colspan="2">특실</td>
</tr>
</table><br>
<!-- caption, thead, tbody, tfoot -->
<table>
<caption>미세먼지 측정</caption>
<thead>
<tr>
<th>항목</th>
<th>등급</th>
<th>측정값</th>
</tr>
</thead>
<tbody>
<tr>
<td>초미세먼지</td>
<td>좋음</td>
<td>12마이크로그램</td>
</tr>
<tr>
<td>이산화질소</td>
<td>보통</td>
<td>0.023ppm</td>
</tr>
</tbody>
<tfoot>
<tr>
<td>합</td>
<td>100</td>
<td>200</td>
</tr>
</tfoot>
</table>
</body>
</html>< 몰랐던 부분 >
1. rowspan, colspan 은 th, td 태그에 넣어야 할 것
	- 병합 당한 테이블 부분은 제거해야함.
5. 폼 양식 작성
<!DOCTYPE html>
<html lang="en">
<head>
<meta charset="UTF-8">
<meta http-equiv="X-UA-Compatible" content="IE=edge">
<meta name="viewport" content="width=device-width, initial-scale=1.0">
<title>폼 태그 속성</title>
</head>
<body>
<!--
[폼 태그 속성]
name : 스크립트나 서버에서 폼을 식별하기 위해 사용하는 폼 이름
action : 폼 데이터를 전솔할 URL 지정
method : HTTP 요청 메소드(get, post)
- get : 데이터를 URL의 일부로 전송
- post : 데이터를 본문으로 송신
target : 웹 서버 응용프로그램으로부터 전송받은 데이터(HTML 문서나 이미지)를 출력할 윈도우 이름
-->
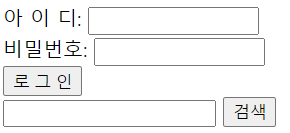
<form name="fo" method="get">
아 이 디: <input type="text" size="15"><br>
비밀번호: <input type="password" size="15"><br>
<input type="submit" value="로 그 인">
</form>
<!-- 폼 전송과정 -->
<form name="sform" action="https://search.naver.com/search.naver" method="get">
<input type="text" name="query">
<!-- input의 name을 변수라고 설정하고, text로 입력하는 부분은 value라고 설정되면, name = value로 되어서 검색결과가 나오게 된다. -->
<input type="submit" value="검색">
</form>
</body>
</html>< 몰랐던 부분 >
1. size 속성을 넣어서 사이즈 조절 가능6. 폼 태그 작성

<!DOCTYPE html>
<html lang="en">
<head>
<meta charset="UTF-8">
<meta http-equiv="X-UA-Compatible" content="IE=edge">
<meta name="viewport" content="width=device-width, initial-scale=1.0">
<title>form 태그</title>
</head>
<body>
<h3>자기소개서 작성</h3>
<form>
이름 : <input type="text" value="한승준" size="15" disabled><br>
암호 : <input type="password" value="" size="15" maxlength="4"><br>
자기소개서 : <br>
<textarea rows="5" cols="30" placeholder="여기에 입력하세요"></textarea>
<!-- 데이터 목록을 가진 텍스트입력 : datalist (자동완성기능) -->
<h3>선호과일</h3>
<input type="text" list="fruit">
<datalist id="fruit">
<option value="apple"></option>
<option value="banana"></option>
<option value="grape"></option>
</datalist>
<br>
<h3>먹고싶은 음식은?</h3>
<!-- 콤보박스 만들기, selected 기본선택 -->
<select name="china">
<option value="1">짜장면</option>
<option value="2">짬뽕</option>
<option value="3" selected>탕수육</option>
</select>
<!--
datalist와 콤보박스를 만드는 select의 차이는???
datalist : 사용자 입력 가능
select : 목록에서만 선택 가능
-->
<br><br>
<!-- <label> : 폼 요소의 캡션 만들기 -->
<!-- 라디오버튼 -->
<label for=""><input type="radio" name="fruit1" checked>바나나</label><br>
<label for=""><input type="radio" name="fruit1">포도</label><br>
<label for=""><input type="radio" name="fruit1">수박</label>
<br>
<br>
<!-- -->
<label for="addr">사는 곳 : </label>
<input type="text" id="addr">
<br>
<br>
<label for="">좋아하는 색깔은?</label>
<label for=""><input type="checkbox" value="1" checked>빨강</label>
<label for=""><input type="checkbox" value="2">파랑</label>
<label for=""><input type="checkbox" value="3">노랑</label>
<!--
색깔 입력
#FFFFFF ( RGB => #rrggbb ) 0 ~ 255(8bit) / 00 ~ FF
-->
<label><input type="checkbox" value="4">기타 <input type="color" value="#00BFFF"
onchange="document.body.style.color=this.value">
</label><br>
</form>
<h3>시간정보입력</h3>
<input type="month" value="2010-12"><br>
<input type="week" value="2022-W30"><br>
<input type="date" value="2012-01-01"><br>
<input type="datetime-local" value="2012-01-01T06:10:10"><br>
<input type="time" value="21:30"><br>
<br><br>
<h3>홈제어시스템</h3>
<hr>
<form>
<fieldset>
<legend>현재 온도를 입력하시오.</legend>
지속시간(0.0 ~ 10.0 시간) : <input type="number" min="0.0" max="10.0" step="0.5"><br>
온도설정:10°
<input type="range" min="10" max="30" list="temp">30°
<datalist id="temp">
<option value="12" label="Low"></option>
<option value="20" label="Medium"></option>
<option value="28" label="High"></option>
</datalist>
</fieldset>
<hr><br><br>
</form>
<!-- 폼 요소 그룹핑 fieldset / legend(제목) -->
<h3> 정보입력 </h3>
<hr>
<form>
<fieldset>
<legend>필수항목(모두 입력해주세요)</legend>
<input type="email" placeholder="id@host" required><br>
<input type="url" placeholder="http://" required><br>
<input type="tel" placeholder="010-1234-5678" required><br>
<input type="search" placeholder="검색어" required><br>
<input type="submit" placeholder="전송"><br>
</fieldset>
<small>문의 : Tel.010-9876-5432</small>
</form>
</body>
</html>< 몰랐던 부분 >
1. input 태그 --> disabled : 작성 불가 / maxlength : 최대 입력 길이 /

  list : 배열 설정 / radio 타입 시, name 동일하게 할 것 / <label for> = <input name>

  / : body 태그의 글씨 바꾸는 속성

  / 날짜 타입은 총 5가지 (type : value)

  ---> ( month : 2020-12 / week : 2022-W30 / date : 2012-01-01 / datetime-local : 2012-01-01T06:10:10 / time : 21:30 )

  / range : 범위를 보여주는 input 태그의 속성( ex. 온도 )
  / number : 이것도 특정 단위로 범위를 제한하여 보여주는 input 태그의 속성 중 하나
2. datalist 태그는 사용자가 검색이 가능, select 태그는 사용자가 검색이 불가능 (선택이 한정적)
* datalist + option(value , label)
* select + option3. fieldset 으로 form 을 묶는다고 생각할 것
* fieldset + legend4. ° 는 섭씨 온도 단위 표시용 기호5. small 태그로 fieldset 태그의 첨자로서 활용 가능 ( 코드 참고 )7. 한줄소감
HTML을 제대로 한번 다시 정리한듯 하고, 내가 생각보다 많이 몰랐다는 것을 깨달았다.

필요하다면 공부하는 개발자, 한승준