✅ JQuery CSScontrol
☑️ addClass, removeClass, toggleClass
<!DOCTYPE html>
<html>
<head>
<meta charset="UTF-8">
<title>Insert title here</title>
<script src="https://code.jquery.com/jquery-3.6.0.min.js"></script>
<script>
	function addClass() {
		$("#a1").addClass("active");
	}

	function removeClass() {
		$("#a1").removeClass("active");
	}

	function toggleClass() {
		$("#a1").toggleClass("active");
	}

</script>
<style>
	.active {
		background-color: black;
		color: white;
	}
</style>
</head>
<body>
	<h1 id="a1">h1 태그</h1>
	<button onclick="addClass()">CSS 클래스 추가하기</button>
	<button onclick="removeClass()">CSS 클래스 제거하기</button>
	<button onclick="toggleClass()">CSS 클래스 전환하기</button>
</body>
</html>
addClass(),removeClass(),toggleClass()는 내장 함수
☑️ getCss, setCss
<!DOCTYPE html>
<html>
<head>
<meta charset="UTF-8">
<title>Insert title here</title>
<script src="https://code.jquery.com/jquery-3.6.0.min.js"></script>
<script>
	function getCss() {
		var backgroundColor = $("#a1").css("background-color");
		var color = $("#a1").css("color");

		$("#result").append("background-color : " + backgroundColor + "<br/>");
		$("#result").append("color : " + color + "<br/>");
	}

	function setCss() {
		$("#a1").css("background-color", "blue");
		$("#a1").css("color", "skyblue");
	}
</script>
<style>
	#a1{
		background-color: black;
		color: white;
	}
</style>
</head>
<body>
	<h1 id="a1">h1 태그</h1>
	<button onclick="getCss()">css 읽어오기</button>
	<button onclick="setCss()">css 설정하기</button>
	<div id="result"></div>
</body>
</html>
내장 함수는 아니고, 보통 해당 태그 및 코드의 정보를 가져올 때는
get()
해당 태그 및 코드의 정보를 바꿀 때는set()
☑️ parent, parents, parentsUntil
<!DOCTYPE html>
<html>
<head>
<meta charset="UTF-8">
<title>Insert title here</title>
<script src="https://code.jquery.com/jquery-3.6.0.min.js"></script>
<script>
	$(function(){
		$("#a4").parent().css("border-color", "red");
		$("#a4").parents().css("border-width", "4px");
		$("#a4").parents(".c1").css("border-style", "dashed");
		$("#a4").parentsUntil(".c1").css("border-style", "dotted");
	});
</script>
<style>
	div {
		border: 2px solid black;
		padding: 10px;
	}
</style>
</head>
<body>
	<div>div tag 1
		<div class="c1">div tag 2
			<div class='c2'>div tag 3
				<div id="a4">div tag 4</div>
			</div>
		</div>
	</div>
</body>
</html>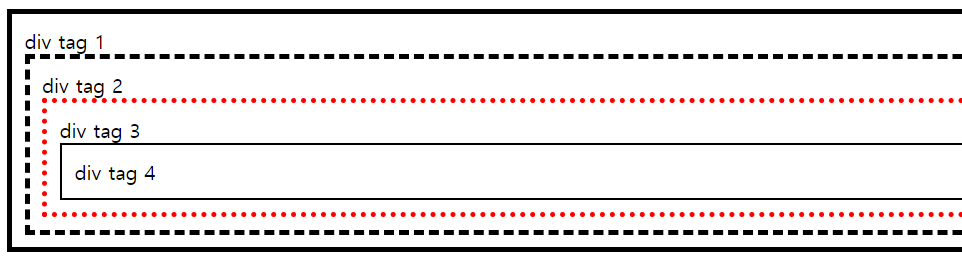
parent()는 해당 태그의 기준이 되는 부모 하나만 가져옴
parents()는 해당 태그의 모든 부모를 다 가져옴, 괄호 안에 선택자를 지정하면, 해당 부모태그만 태그만 선택됨
parentsUntil()괄호 안에 선택자를 넣으면 해당 선택자의 태그의 자식에서 기준 태그의 부모 태그까지만 적용됨
☑️ children, find
<!DOCTYPE html>
<html>
<head>
<meta charset="UTF-8">
<title>Insert title here</title>
<script src="https://code.jquery.com/jquery-3.6.0.min.js"></script>
<script>
	$(function(){
		$("#a1").children().css("border-color", "red");
		$("#a1").children(".c1").css("border-width", "4px");
		$("#a1").find(".c3").css("border-style", "dotted");
	});
</script>
<style>
	div {
		border: 2px solid black;
		padding: 10px;
	}
</style>
</head>
<body>
	<div id="a1">
		div
		<div class="c1">
			div 1
			<div class="c3">
				div 1-2
			</div>
		</div>
		<div class="c2">
			div 2
			<div>
				div 2-2
			</div>
		</div>
	</div>
</body>
</html>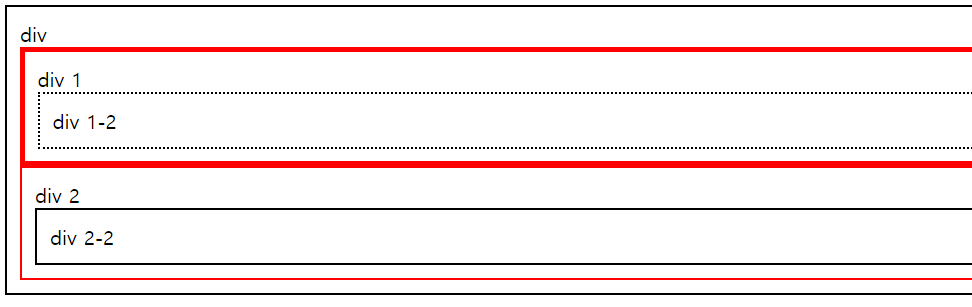
children()은 자식 태그를 의미하며, 괄호 안에 선택자를 넣으면, 자식 태그 중에 해당 태그만을 지정함
find()은 자식 태그 중에서 특정 선택자만 찾아서 지정함
☑️ siblings
<!DOCTYPE html>
<html>
<head>
<meta charset="UTF-8">
<title>Insert title here</title>
<script src="https://code.jquery.com/jquery-3.6.0.min.js"></script>
<script>
	$(function(){
		$("#a1").siblings().css("border-color", "red");
		$("#a1").siblings(".c2").css("border-style", "dotted");
	});
</script>
<style>
	div{
		border : 2px solid black;
		padding : 10px;
	}
</style>
</head>
<body>
	<div class="c1">div 1</div>
	<div class="c2">div 2</div>
	<div id="a1">div 3</div>
	<div class="c1">div 4</div>
	<div class="c2">div 5</div>
</body>
</html>
siblings()는 기준 태그를 제외하고 같은 계열의 형제 태그만 지정함
괄호 안에 선택자를 넣으면, 해당 형제 태그만 지정됨
☑️ next, nextAll, nextUntil
<!DOCTYPE html>
<html>
<head>
<meta charset="UTF-8">
<title>Insert title here</title>
<script src="https://code.jquery.com/jquery-3.6.0.min.js"></script>
<script>
	$(function(){
		$("#a1").next().css("border-color", "red");
		$("#a1").nextAll().css("border-style", "dotted");
		$("#a1").nextUntil("#a2").css("border-width", "4px");
	});
</script>
<style>
	div{
		border : 2px solid black;
		padding : 10px;
		margin-bottom : 10px;
	}
</style>
</head>
<body>
	<div>div 1</div>
	<div id="a1">div 2</div>
	<div>div 3</div>
	<div>div 4</div>
	<div id="a2">div 5</div>
</body>
</html>
next()는 해당 태그의 다음 형제 태그만을 지정함
nextAll()해당 태그의 다음 모든 형제 태그를 지정함
nextUntil()는 해당 태그와 괄호안에 있는 선택자 사이에 있는 모든 형제 태그를 지정함
☑️ prev, prevAll, prevUntil
<!DOCTYPE html>
<html>
<head>
<meta charset="UTF-8">
<title>Insert title here</title>
<script src="https://code.jquery.com/jquery-3.6.0.min.js"></script>
<script>
	$(function(){
		$("#a1").prev().css("border-color", "red");
		$("#a1").prevAll().css("border-style", "dotted");
		$("#a1").prevUntil("#a2").css("border-width", "4px");
	});
</script>
<style>
	div{
		border : 2px solid black;
		padding : 10px;
		margin-bottom : 10px;
	}
</style>
</head>
<body>
	<div id="a2">div 1</div>
	<div>div 2</div>
	<div>div 3</div>
	<div id="a1">div 4</div>
	<div>div 5</div>
</body>
</html>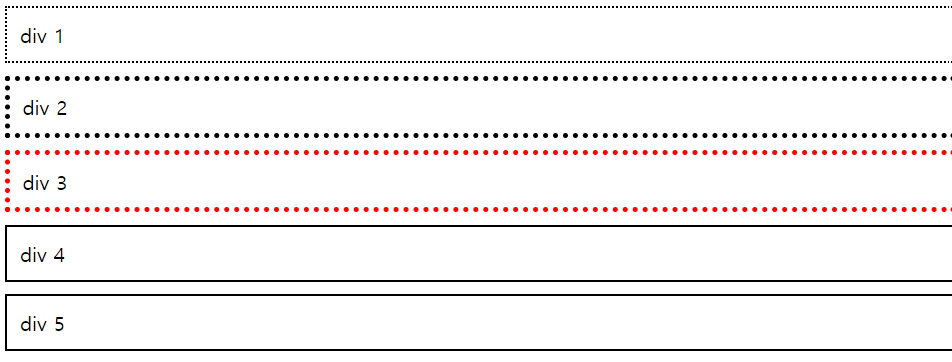
prev()는 해당 태그의 이전의 형제 태그만을 지정함
prevAll()해당 태그의 이전의 모든 형제 태그를 지정함
prevUntil()는 해당 태그와 괄호안에 있는 선택자 사이에 있는 모든 형제 태그를 지정함
✅ JQuery Effect
☑️ hide, show, toggle
<!DOCTYPE html>
<html>
<head>
<meta charset="UTF-8">
<title>Insert title here</title>
<script src="https://code.jquery.com/jquery-3.6.0.min.js"></script>
<script>
	function div_hide() {
		$("#a1").hide("slow");
	}

	function div_show() {
		$("#a1").show("fast");
	}

	function div_toggle() {
		$("#a1").toggle(1000);
	}
</script>
<style>
	#a1{
		border: 1px solid black;
		background-color: yellow;
		width: 200px;
		height: 200px;
	}
</style>
</head>
<body>
	<button onclick = "div_hide()">hide</button>
	<button onclick = "div_show()">show</button>
	<button onclick = "div_toggle()">toggle</button>
	<div id="a1"></div>
</body>
</html>
show()는 말그대로 보여주기
hide()는 숨기기
toggle()는show()+hide()
☑️ fadeIn, fadeOut, fadeToggle, fadeTo
<!DOCTYPE html>
<html>
<head>
<meta charset="UTF-8">
<title>Insert title here</title>
<script src="https://code.jquery.com/jquery-3.6.0.min.js"></script>
<script>
	function div_fadeout() {
		$("#a1").fadeOut(300);
	}
	function div_fadein() {
		$("#a1").fadeIn(300);
	}
	function div_fadetoggle() {
		$("#a1").fadeToggle("slow");
	}
	function div_fadeto() {
		$("#a1").fadeTo("slow", 0.3);
	}
	function div_fadeto1() {
		$("#a1").fadeTo("slow", 1);
	}
</script>
<style>
	#a1{
		border: 1px solid black;
		background-color: yellow;
		width: 200px;
		height: 200px;
	}
</style>
</head>
<body>
	<button onclick="div_fadeout()">fade out</button>
	<button onclick="div_fadein()">fade in</button>
	<button onclick="div_fadetoggle()">fade toggle</button>
	<button onclick="div_fadeto()">fade to</button>
	<button onclick="div_fadeto1()">fade to - 복구</button>
	<div id="a1"></div>
</body>
</html>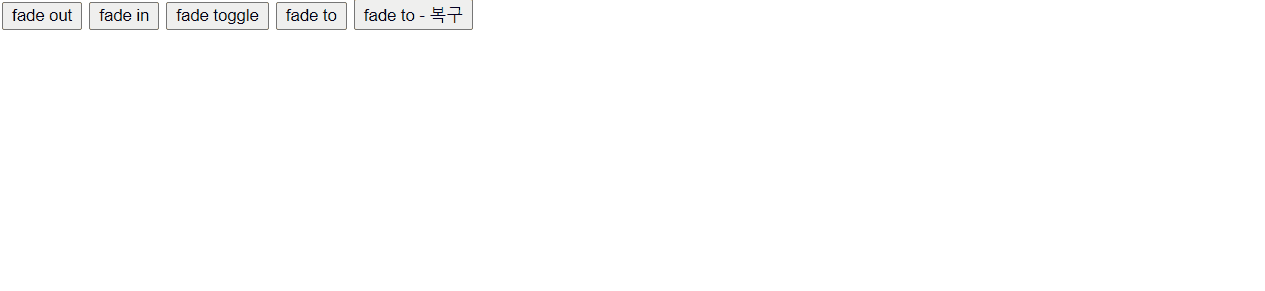
fadeOut()점점 사라지게 함
fadeIn()점점 나타나게 함
fadeToggle()는fadeOut()+fadeIn()
fadeTo는 투명도 조절하기
☑️ slideUp, slideDown, slideToggle
<!DOCTYPE html>
<html>
<head>
<meta charset="UTF-8">
<title>Insert title here</title>
<script src="https://code.jquery.com/jquery-3.6.0.min.js"></script>
<script>
	function div_slideup() {
		$("#a1").slideUp("slow");
	}
	function div_slidedown() {
		$("#a1").slideDown("slow");
	}
	function div_slidetoggle() {
		$("#a1").slideToggle("slow");
	}
</script>
<style>
	#a1{
		border: 1px solid black;
		background-color: yellow;
		width: 200px;
		height: 200px;
	}
</style>
</head>
<body>
	<button onclick="div_slideup()">slide up</button>
	<button onclick="div_slidedown()">slide down</button>
	<button onclick="div_slidetoggle()">slide toggle</button>
	<div id="a1"></div>
</body>
</html>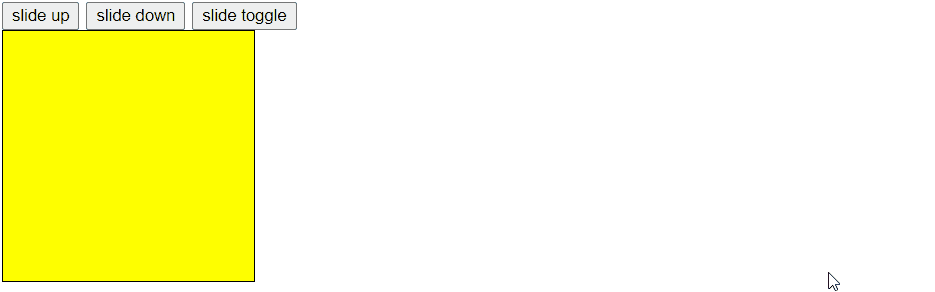
slideUp()는 이미지를 올리기
slideDown()는 이미지를 내리기
slideToggle()는slideUp()+slideDown()
☑️ callback
- 앞서 살펴본 효과가 종료되면 자동으로 호출되는 함수(
ex) alert())를 등록할 수 있다.
<!DOCTYPE html>
<html>
<head>
<meta charset="UTF-8">
<title>Insert title here</title>
<script src="https://code.jquery.com/jquery-3.6.0.min.js"></script>
<script>
	function test_callback() {
		$("#a1").hide("slow", function(){
			alert("effect end");
		});
	}
	function test_callback2() {
		$("#a1").show("slow", function(){
			alert("effect end");
		});
	}
</script>
<style>
	#a1{
		border: 1px solid black;
		background-color: yellow;
		width: 200px;
		height: 200px;
	}
</style>
</head>
<body>
	<button onclick="test_callback()">callback_hide 테스트</button>
	<button onclick="test_callback2()">callback_show 테스트</button>
	<div id="a1"></div>
</body>
</html>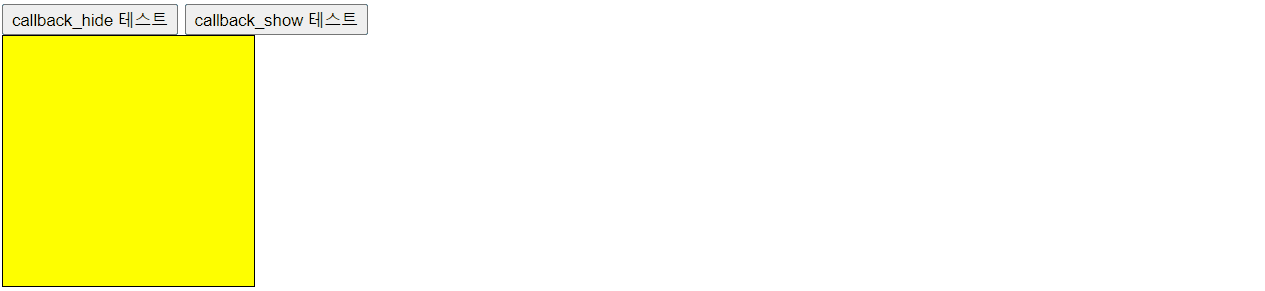
callback이라는 게 어떠한 효과가 끝나면, 얼럿 같은 창을 띄울 수 있게 하는 것이라고 생각하면 될 것같다.
✅ Animate
<!DOCTYPE html>
<html>
<head>
<meta charset="UTF-8">
<title>Insert title here</title>
<script src="https://code.jquery.com/jquery-3.6.0.min.js"></script>
<script>
	function setSize() {
		$("#a1").animate({
			width: 400,
			height: 400
		}, "slow");
	}
	function setSize1() {
		$("#a1").animate({
			width: 200,
			height: 200
		}, "slow");
	}
	function setOpacity0() {
		$("#a1").animate({
			opacity: 0
		}, "slow");
	}
	function setOpacity1() {
		$("#a1").animate({
			opacity: 1
		}, "slow");
	}
	function setPosition() {
		$("#a1").animate({
			left : 100,
			top : 100
		}, "slow");
	}
	function setPosition1() {
		$("#a1").animate({
			left : 0,
			top : 0
		}, "slow");
	}
	/* function setBackgroundColor() {
		$("#a1").animate({
			backgroundColor : "red"
		}, "slow");
	} */
	function setTotal() {
		$("#a1").animate({
			width: 400,
			height: 400,
			opacity: 0.2,
			left: 100,
			top: 100
		}, "slow");
	}
	function setTotal1() {
		$("#a1").animate({
			width: 200,
			height: 200,
			opacity: 1,
			left: 0,
			top: 0
		}, "slow");
	}
	/* animate 개별로 딜레이를 걸고 싶으면 delay() 설정하면 됨. */
	function setSequence() {
		$("#a1").animate({
			width: 400,
			height: 400
		}, "slow").delay(500).animate({
			left: 100,
			top: 100
		},"slow").delay(800).animate({
			opacity: 0.2
		},"slow");
	}
	function setSequence1() {
		$("#a1").animate({
			width: 200,
			height: 200
		}, "slow").delay(500).animate({
			left: 0,
			top: 0
		},"slow").delay(800).animate({
			opacity: 1
		},"slow");
	}
</script>
<style>
	#a1{
		border: 1px solid black;
		background-color: yellow;
		width: 200px;
		height: 200px;
		position: relative;
	}
</style>
</head>
<body>
	<button onclick="setSize()">size 설정 - 커짐</button>
	<button onclick="setSize1()">size 설정 - 돌아옴</button><br>
	<button onclick="setOpacity0()">투명도 조절(사라짐)</button>
	<button onclick="setOpacity1()">투명도 조절(나타남)</button><br>
	<button onclick="setPosition()">위치 이동 - 이동함</button>
	<button onclick="setPosition1()">위치 이동 - 돌아옴</button><br>
<!-- 	<button>배경색 설정(작동불가)</button> -->
	<button onclick="setTotal()">종합 설정 - 적용</button>
	<button onclick="setTotal1()">종합 설정 - 해제</button><br>
	<button onclick="setSequence()">순차 설정 - 설정</button>
	<button onclick="setSequence1()">순차 설정 - 해제</button><br><br><br>
	<div id="a1"></div>
</body>
</html>
animate({ 설정값 }, "속도")은 설정값에 따라 함수의 효과를 달리 할 수 있음- 대신 포지션 변경은 기존의 포지션이 설정이 되어 있어야 함
- 효과를 한번에 나타낼 수도 있으며,
animate().animate().animate()등의 배치로 연결하면 순차적으로 효과를 나타낼 수 있음.delay()를 하면 시간차를 나타내는 것도 가능.
✅ Ajax ⭐⭐⭐⭐⭐
☑️ 표준 웹 통신이란?
- 웹 브라우저는 서버에게 파일을 요청
- 이 때 서버는 요청한 파일이 있으면 파일의 내용을 읽어 응답결과로 클라이언트에게 전달
- 응답 결과를 받은 웹 브라우저는 데이터를 분석하여 자신이 스스로 처리

☑️ 표준 웹 통신의 문제점
- 표준 웹 통신은 클라이언트 브라우저가 서버에게 응답 결과를 받게되면 브라우저가 스스로 처리하려고 함
- 브라우저가 처리할 수 있는 데이터면 스스로 처리하고 그렇지 않으면 다운로드가 됨
- 만약 응답 결과가 html 코드이면 html 코드를 통해 화면을 변경하고 이미지, 사운드, 동영상 등 미디어 데이터면 미디어 데이터를 처리할 수 있는 화면으로 변경되어 처리, 즉 웹 브라우저는 처리할 수 있는 데이터를 받게 되면 화면이 변경
☑️ Ajax 통신
- Ajax 통신은 서버와 통신시 서버로 부터 받은 응답 결과를 웹 브라우저에 반영하지 않고 JavaScript로 처리할 수 있도록 고안된 통신 방식
- 이를 이용하면 서버와의 통신은 정상적으로 이루어 지며 화면은 변경되지 않기 때문에 화면의 일부분만을 변경하는 등의 작업이 가능
- 오늘날 웹 애플리케이션을 개발할 때 많이 사용하는 통신 기술
- Ajax 통신은 같은 도메인으로 요청할 수 있는 파일만 요청 가능
☑️ jQuery Ajax 통신
- Ajax 통신은 브라우저의 종류나 버전에 따라 작성하는 코드가 다르다.
- 이에 jQuery는 개발자가 손쉽게 Ajax 통신을 할 수 있도록 함수를 만들어 제공
- load : 지정된 파일을 요청하고 받은 응답 결과를 태그 내부에 삽입
- get : get 방식으로 ajax 통신
- post : post 방식으로 ajax 통신
- ajax : ajax 통신을 위한 종합적인 모든 기능을 제공하는 함수
☑️ Ajax 이용 종류 4가지
💯 Ajax text
<!DOCTYPE html>
<html>
<head>
<meta charset="UTF-8">
<title>Insert title here</title>
<script src="https://code.jquery.com/jquery-3.6.0.min.js"></script>
<script>
	function getText() {
		$.ajax({
			url : "data1.txt",
			type : "POST",
			dataType : "text",
			success : function(response){
				$("#result").text(response);
			}
		});
	}
</script>
</head>
<body>
	<button onclick="getText()">문자열 데이터</button>
	<div id="result"></div>
</body>
</html>

일반적으로
text를 불러올 때 쓰는 방식을 사용
💯 Ajax html
<!DOCTYPE html>
<html>
<head>
<meta charset="UTF-8">
<title>Insert title here</title>
<script src="https://code.jquery.com/jquery-3.6.0.min.js"></script>
<script>
	function getHtml() {
		$.ajax({
			url : "data2.html",
			type : "POST",
			dataType : "html",
			success : function(response){
				$("#result").html(response);
			}
		});
	}
</script>
</head>
<body>
	<button onclick="getHtml()">HTML 데이터</button>
	<div id="result"></div>
</body>
</html>

일반적으로
html를 불러올 때 쓰는 방식을 사용 ( 코드를 가져오지는 않음 )
💯 Ajax xml
<!DOCTYPE html>
<html>
<head>
<meta charset="UTF-8">
<title>Insert title here</title>
<script src="https://code.jquery.com/jquery-3.6.0.min.js"></script>
<script>
	function getXml() {
		$.ajax({
			url : "data3.xml",
			type : "POST",
			dataType : "xml",
			success : function(response){
				let data = $(response).find("data");

				$(data).each(function(idx, obj){
					let str1 = $(obj).find("str1");
					let str2 = $(obj).find("str2");

					let str11 = $(str1).text();
					let str22 = $(str2).text();

					$("#result").append("str1 : " + str11 + "<br/>");
					$("#result").append("str2 : " + str22 + "<br/>");
				});
			}
		});
	}
</script>
</head>
<body>
	<button onclick="getXml()">XML 데이터</button>
	<div id="result"></div>
</body>
</html>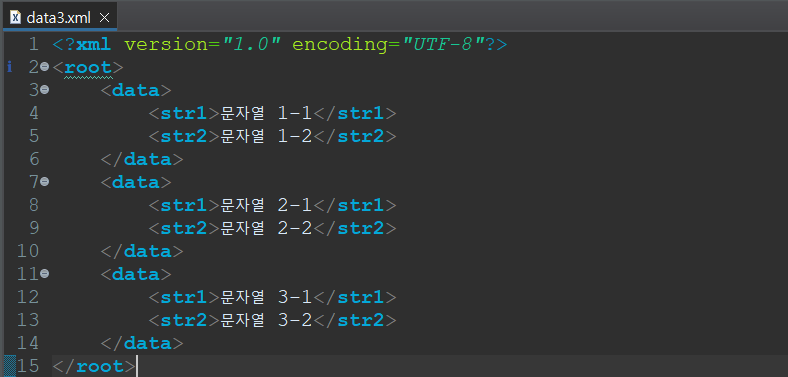

xml은 배열이라고 생각하고 진행해야한다.- 먼저
xml파일 안에 있는 data 태그에 있는 value를 data 변수에 저장- 그리고 data 변수 안에서
str1과str2태그의obj(value)를 str1, str2 변수에 저장- 그 다음 str1, str2 변수에 있는 value 값을 text로 변환하여 변수 str11과 str22에 저장
- 이는 배열이라고 생각해야하기 때문에,
append()를 통해서 div 시맨틱에 차곡차곡 붙여넣는다. ( 순서대로 됨 )
💯 Ajax json
<!DOCTYPE html>
<html>
<head>
<meta charset="UTF-8">
<title>Insert title here</title>
<script src="https://code.jquery.com/jquery-3.6.0.min.js"></script>
<script>
	function getJson() {
		$.ajax({
			url : "data4.json",
			type : "POST",
			dataType : "json",
			success : function(response){
				$("#result").append("data1 : " + response.data1 + "<br/>")
				$("#result").append("data2 : " + response.data2 + "<br/>")
				$("#result").append("data3 : " + response.data3 + "<br/>")
			}
		});
	}
</script>
</head>
<body>
	<button onclick="getJson()">JSON 데이터</button>
	<div id="result"></div>
</body>
</html>

JSON파일은 객체형이다. 그러므로 key값을 통해서 value 값을 가져올 수 있다.
해당 파일의 내용 전체를 칭하는response의 key값은data1,data2,data3이다.
그러므로response.key로 value 값을 출력하여,append한다.
똑같이 빈 배열에 붙여넣는다고 생각하면 된다.
내용 자체가 알차기도 했고, 나중에 또 볼 수 있게 정리를 잘해놓아서 나도 글을 올리기에 편했다. Ajax 파트는 나중에 해당 글을 참고하여 공부를 해야겠다.