
회사에서 특정 달에 해당하는 모든 직원들의 초과 근무 시간을 어떻게 계산해야 할까? 먼저, 크게 나누어보면 다음과 같다.
- 특정 달에 해당하는 모든 직원들의 총 근무 시간을 구한다.
- 그 달에 해당하는 한 달 기준 근로 시간을 구한다.
- 각 직원마다 (1 - 2) 값을 구한다.
이 글에서는 2번에 관한 과정을 서술한다.
실제 법으로 지정한 시간은 아니고 자바와 스프링 부트로 생애 최초 서버 만들기, 누구나 쉽게 개발부터 배포까지! [서버 개발 올인원 패키지]의 미니 프로젝트 4단계에 해당하는 요구사항에 알맞는 시간이다. 요구사항의 기준은 다음과 같다.
- 모든 직원은 하루 근무 8시간을 기준으로 근로 계약을 맺고 있다.
- 근무 시간은 주말과 법정 공휴일을 제외하고 계산되어야 한다.
- 2024년 1월을 예로 들어보면, 전체 근무일은 22일로 토/일 8일과 1월 1일 공휴일 1일이 빠진 수치이다.(31 - 8 -1 = 22) 따라서, 176시간이 기준 근무 시간이 된다.
위의 기준을 토대로 식을 도출해내면,
기준 근무 시간 = 해당 달의 일 수 - 주말 수 - 법정 공휴일 수 이다.
하지만, 사실은
기준 근무 시간 = 해당 달의 일 수 - 주말 수 - 법정 공휴일 수 + 주말이면서 공휴일인 수
처럼 겹쳐지는 일 수를 더해줘야 한다. (예를 들어, 2024년 5월 5일은 어린이날이면서 일요일이다.)
해당 달의 일수
Java time api의 YearMonth클래스에서 lengthOfMonth를 사용하면 된다.
주말 수
주말 수를 구하는 util 클라스를 나타내보면 다음과 같이 나타낼 수 있다.
public class WeekendCalculator {

    // 주말 수를 구하는 메서드
    public static long countNumberOfWeekends(YearMonth yearMonth) {
        LocalDate startDate = yearMonth.atDay(1);
        return IntStream.rangeClosed(0, yearMonth.lengthOfMonth() - 1)
                .mapToObj(startDate::plusDays)
                .filter(WeekendCalculator::isWeekend)
                .count();
    }

    // 주말인지 아닌지 확인하는 메서드
    public static boolean isWeekend(LocalDate date) {
        return isSaturday(date) || isSunday(date);
    }

    private static boolean isSaturday(LocalDate date) {
        return date.getDayOfWeek() == DayOfWeek.SATURDAY;
    }

    private static boolean isSunday(LocalDate date) {
        return date.getDayOfWeek() == DayOfWeek.SUNDAY;
    }
}
여기서 조심해야할 부분은 rangeClosed(..)의 범위이다. 확인하는 가장 빠른 방법은 ide에서 바로 javadoc을 확인하는 것이다.
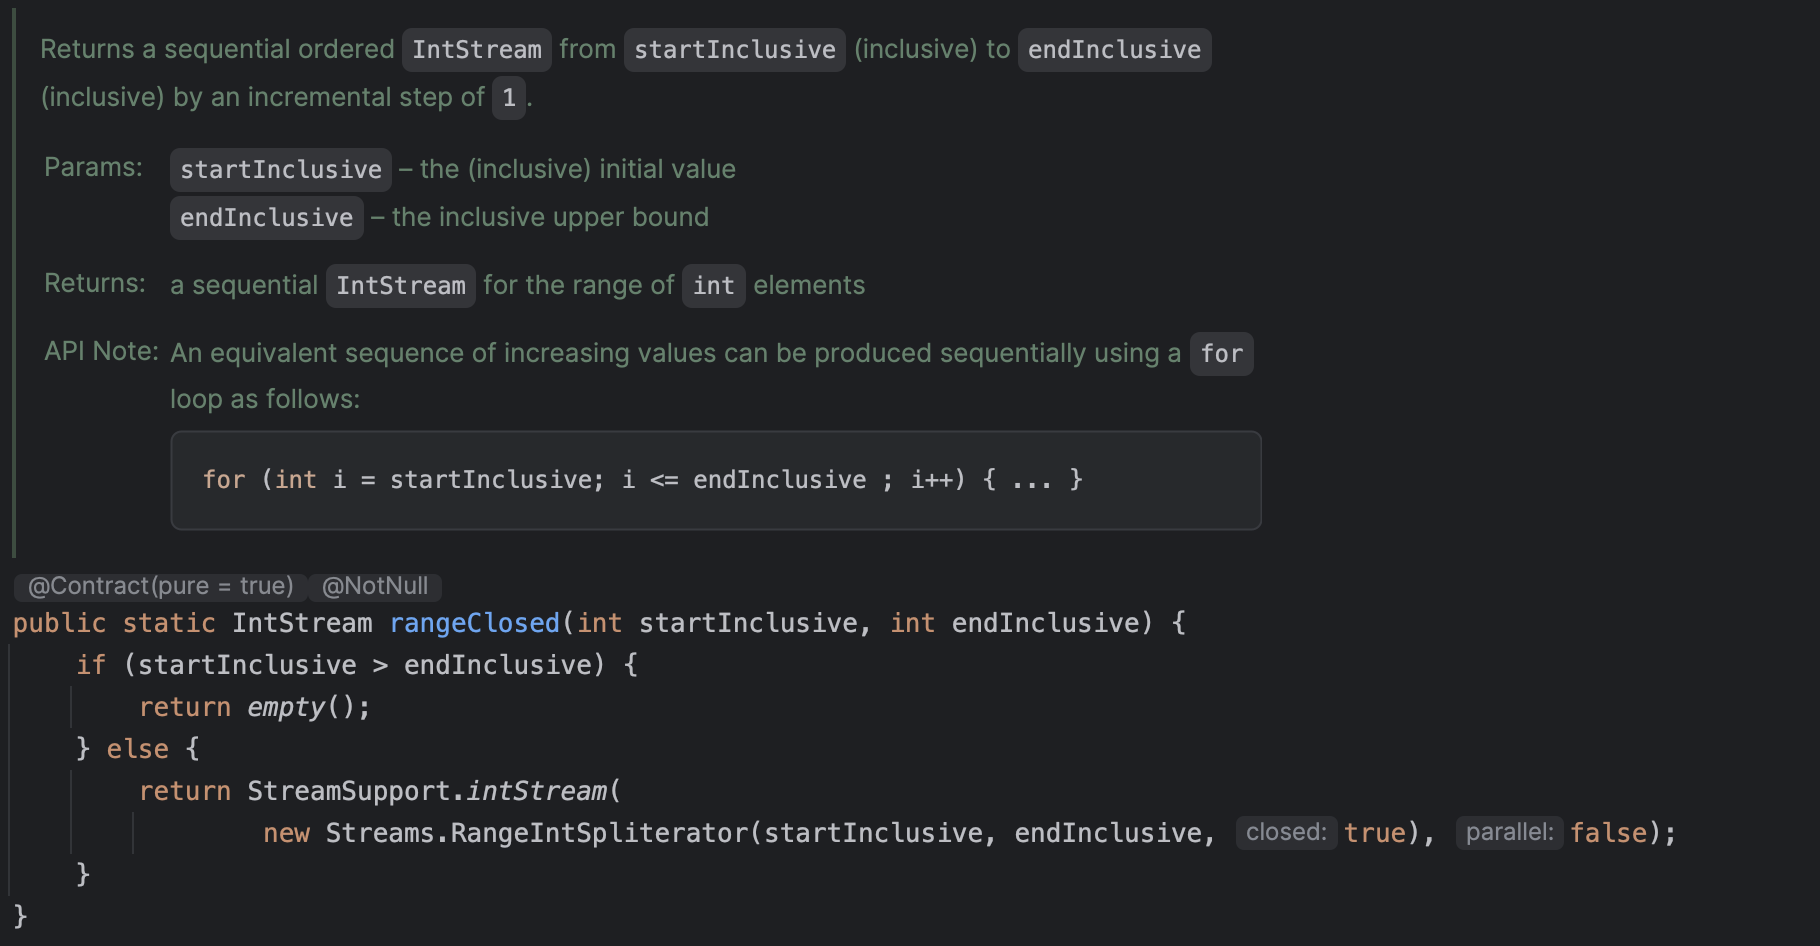
범위는 처음부터 끝까지를 포함하는 범위이다. mapToObj를 보면 순회하면서 startDate에 해당 범위에 해당하는 숫자를 더해주는 로직이다. 처음 값은 yearMonth.atDay(1)인 1일이기 때문에 rangeClosed(0, yearMonth.lengthOfMonth() - 1) 이 된다.
실제로 이 스트림 파이프라인에서 특정 메서드의 로직을 확인하고 싶으면, 디버깅보다 peek 메서드를 이용하면 편하다.
public static long countNumberOfWeekends(YearMonth yearMonth) {
        LocalDate startDate = yearMonth.atDay(1);
        return IntStream.rangeClosed(0, yearMonth.lengthOfMonth() - 1)
                .peek(System.out::println)
                .mapToObj(startDate::plusDays)
                .peek(System.out::println)
                .filter(WeekendCalculator::isWeekend)
                .count();
}
peek은 스트림 파이프라인에서 각 라인의 결과값을 보여준다.
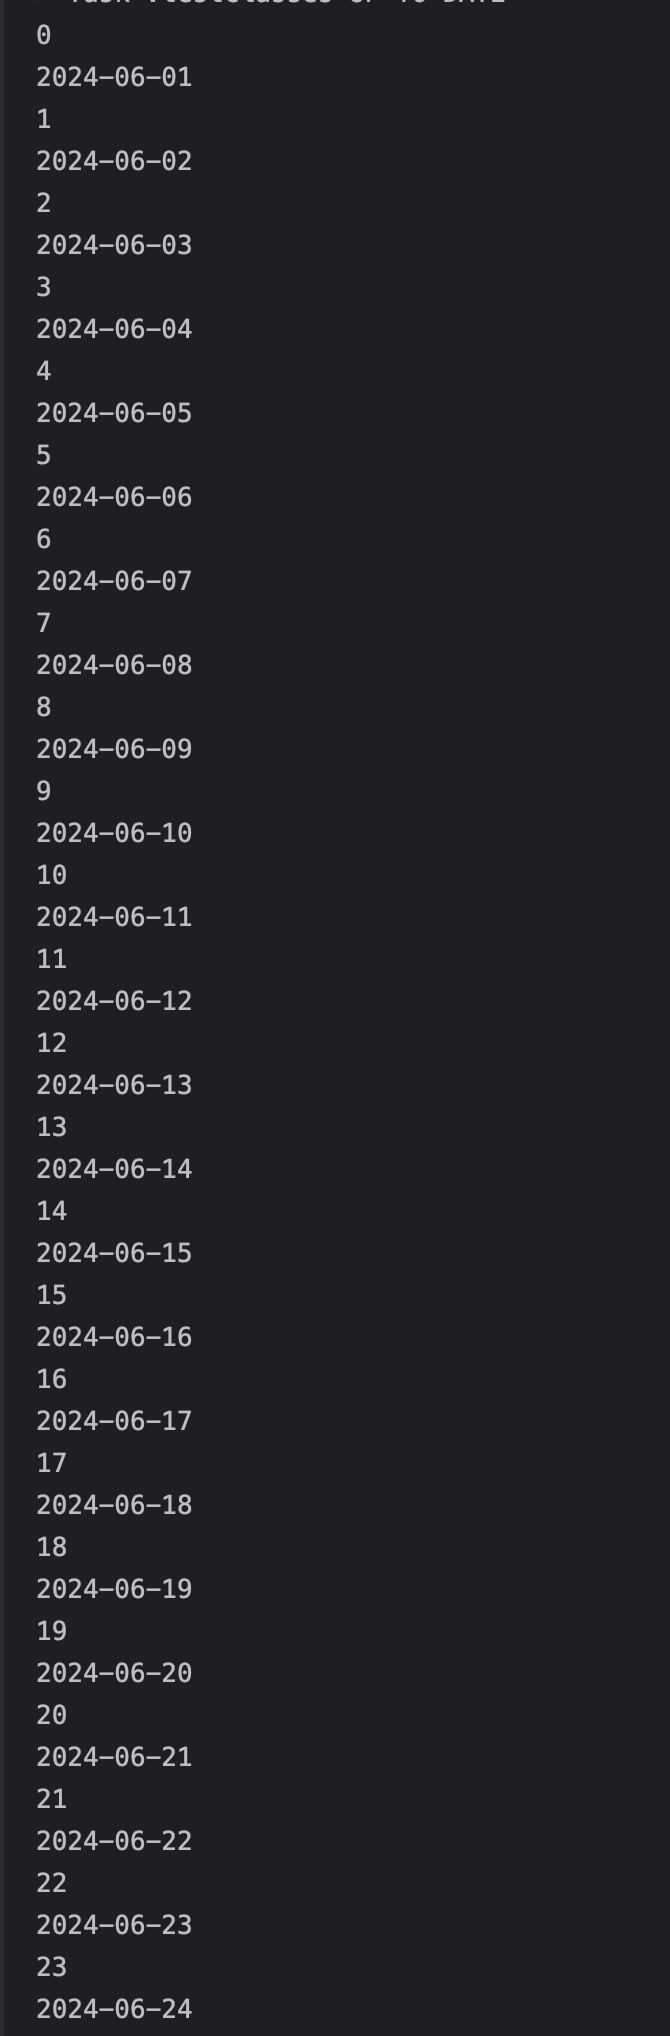
@Test
void testCountNumberOfWeekends() {
    assertThat(WeekendCalculator.countNumberOfWeekends(YearMonth.of(2024, 6))).isEqualTo(10);
}
이 단위 테스트를 돌리면, 콘솔에는 다음과 같이 나타난다.
(아래 24,25,... 결과들은 생략한다.)
법정 공휴일 수
법정 공휴일 수를 구하는 방법은 공공데이터포털의 오픈 api를 사용하여 구할 수 있다. 그 중에서 한국천문연구원 특일 정보를 통해서 계산할 수 있다.
로그인을 하고 활용신청을 하면 인증키를 발급받을 수 있다.
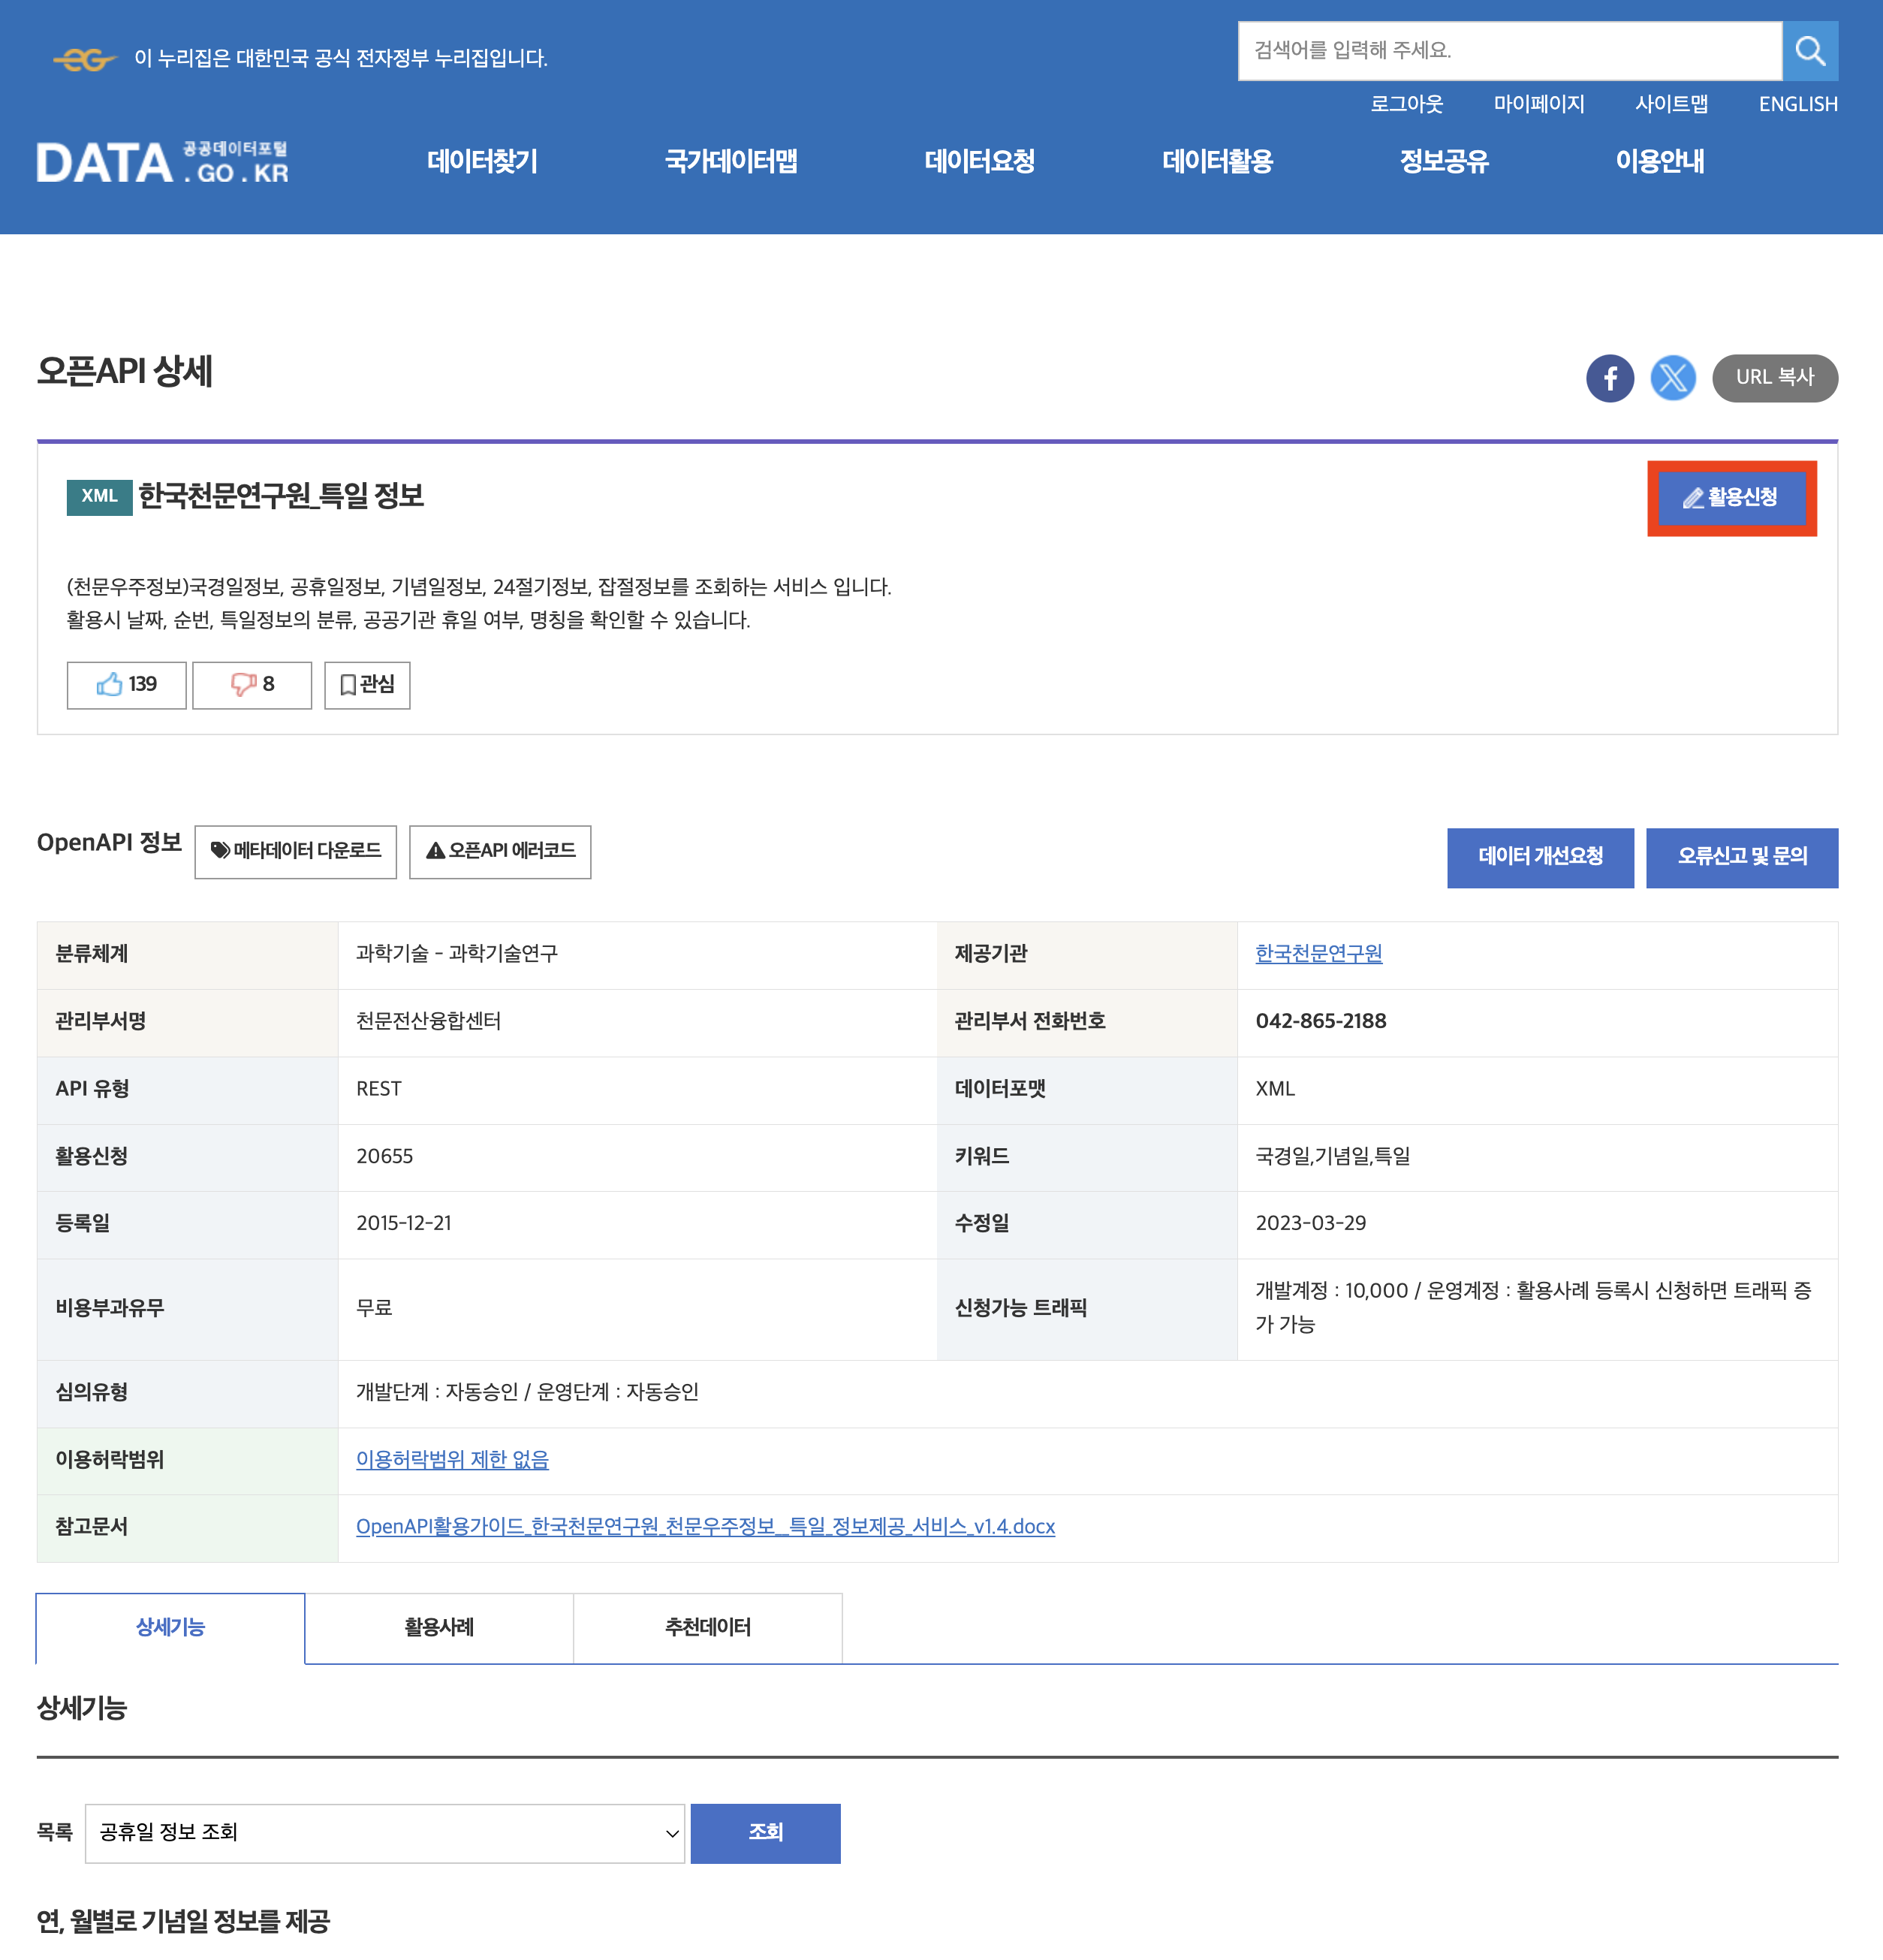
이어서 데이터 활용 > Open API > 활용신청 현황 > 승인 한국천문연구원_특일 정보를 클릭하면 요청 변수에 따라 응답하는 데이터를 미리보기 할 수 있다.
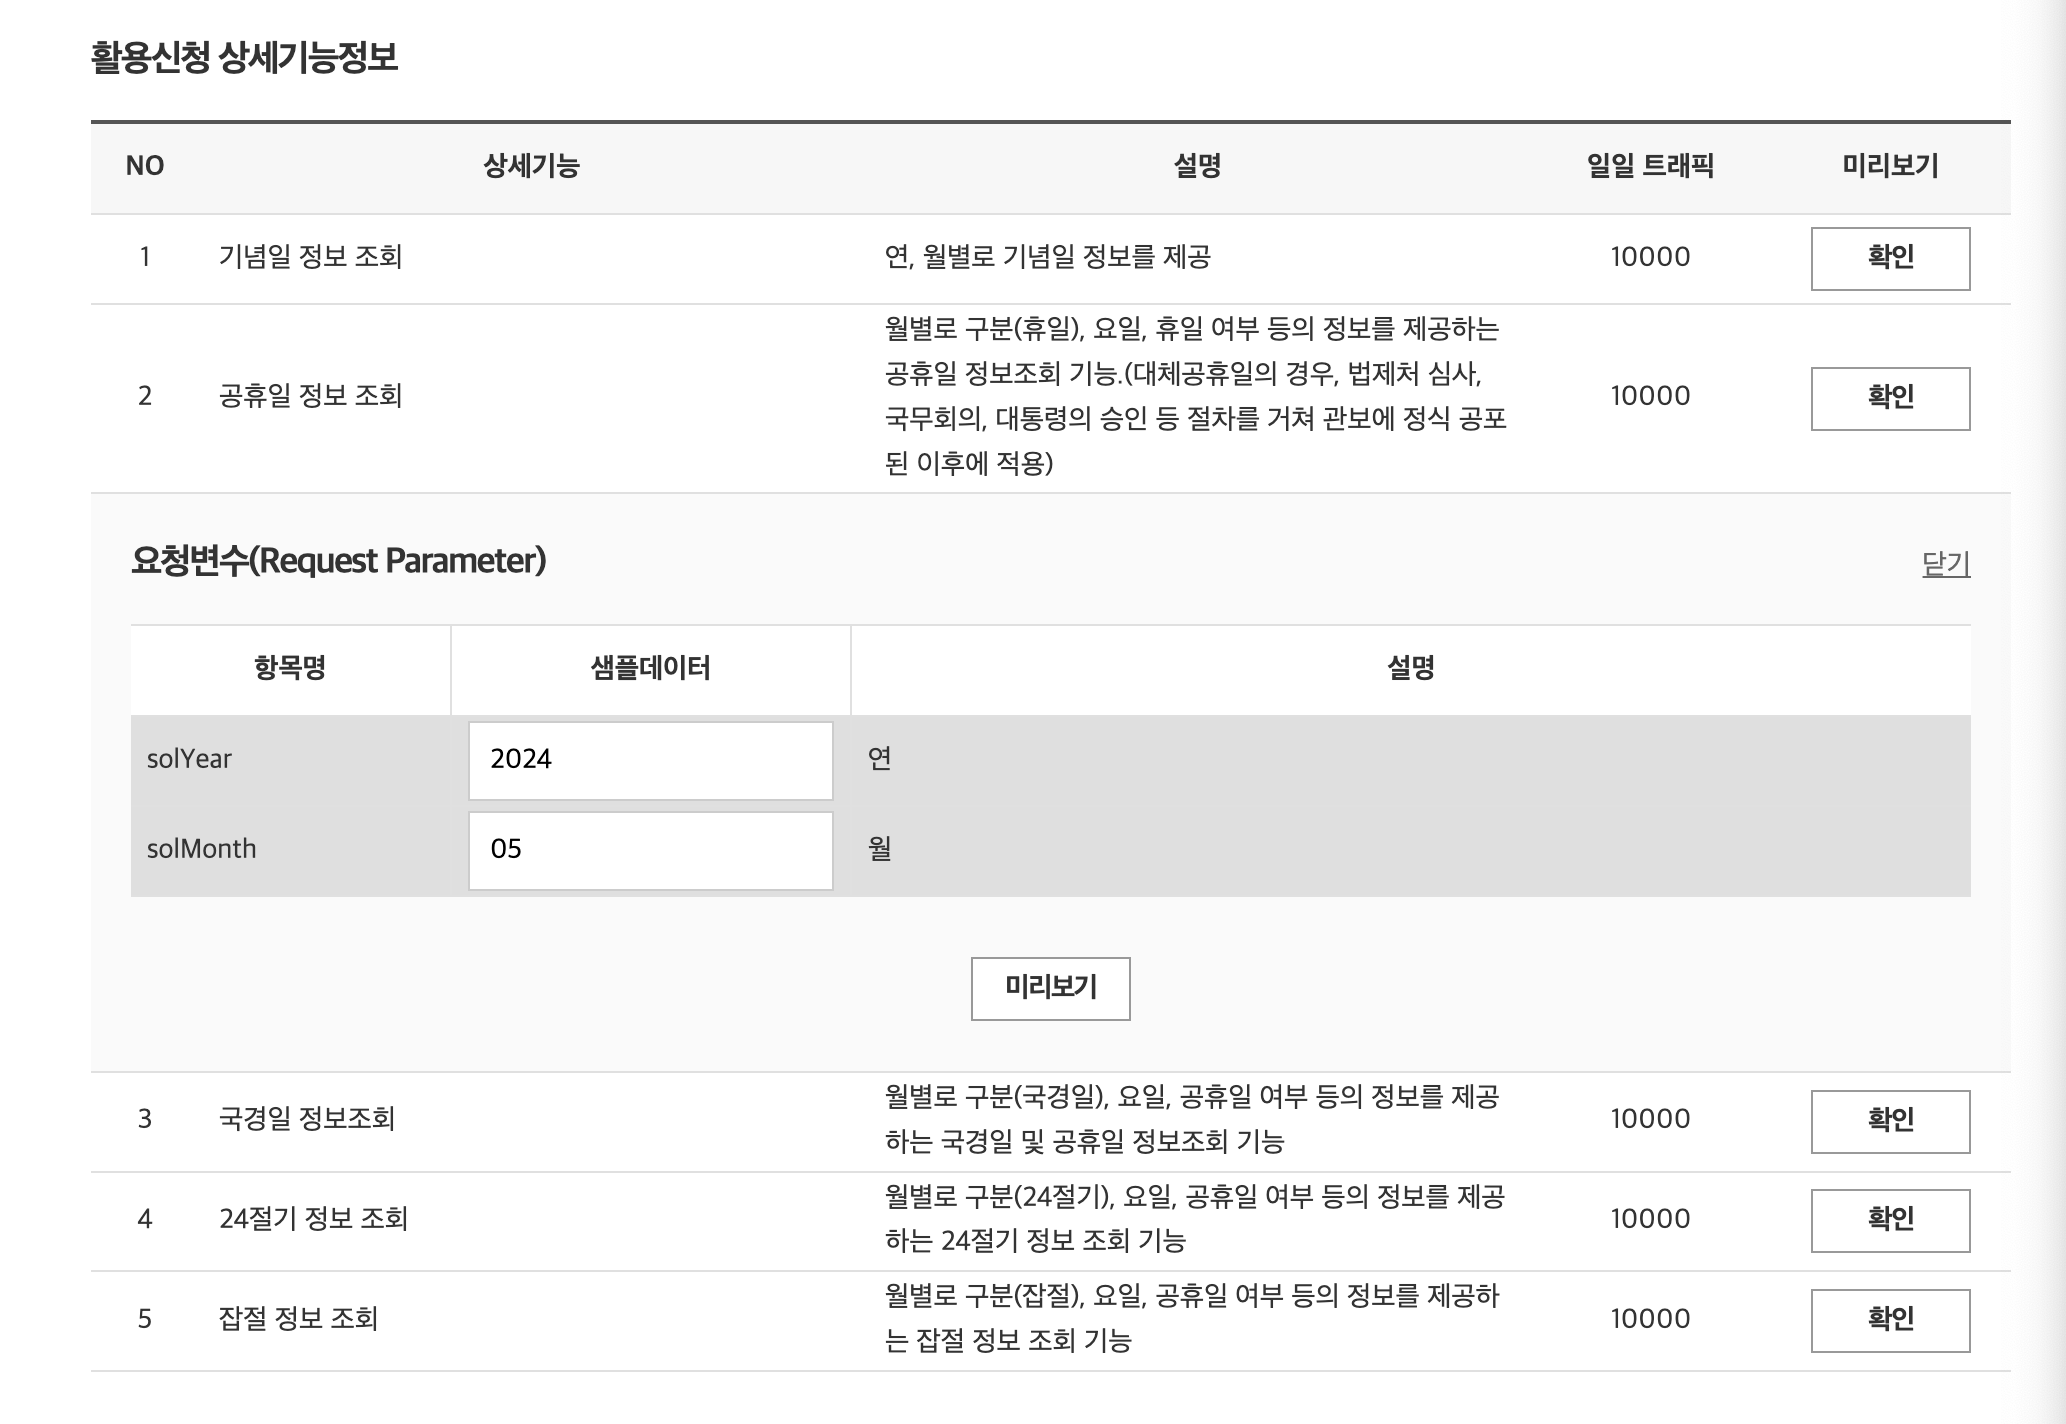
상세 정보를 보면 요청 변수와 출력 결과를 확인할 수 있다.

이 정보들을 활용한 샘플 코드를 제공해준다.
이 코드를 스프링 부트에서 쓸려고 할 때, 좀 더 보기 좋게 사용할 수 있는 방법이 있다. RestTemplate를 이용하면 된다.
RestTemplate는 JDK의 HttpURLConnection, Apache HttpComponents 등과 같은 기본 HTTP 클라이언트 라이브러리 위에 간단하고 템플릿화된 API를 제공한다. 즉, 객체 마샬링/언마샬링을 자동으로 해준다.
마샬링이란 객체 메모리 표현을 전송에 적합한 형태로 바꾸는 과정을 말한다. (예를 들어, Jackson 라이브러리는 자바 객체와 json간의 마샬링/언마샬링을 지원한다.)
여기서 쓸 메서드는 getForObject(URI url,
Class<T> responseType)이다. 간단하게 로직을 설명하면,
1. RestTemplate가 자동으로 url을 가지고 요청을 보낸다.
2. 응답받은 결과(여기선 xml)을 가지고 메시지 컨버터가 HolidayResponse(내가 만든 객체)로 변환시킨다.
3. 그러기 위해선 setter가 필요하다. 어처피, 이 객체는 단순히 값을 전달받는 객체이기 때문에 여기선 setter를 쓴다.
@Component
public class ApiConvertor {

    private final RestTemplate restTemplate;
    private final ApiProperties apiProperties;

    private static final DateTimeFormatter DATE_FORMATTER = DateTimeFormatter.ofPattern("yyyyMMdd");

    public ApiConvertor(RestTemplate restTemplate, ApiProperties apiProperties) {
        this.restTemplate = restTemplate;
        this.apiProperties = apiProperties;
    }

    public List<HolidayResponse.Item> itemsOfResponse(YearMonth yearMonth)
            throws MalformedURLException, URISyntaxException {
        String solYear = String.valueOf(yearMonth.getYear());

        int month = yearMonth.getMonthValue();
        // 10월 미안의 달들은 1~9까지 입력되는데 요청변수인 solMonth는 01~09와 같이 입력해야 하기 때문에 아래와 같이 작성해두었다.
        // 직접 눈으로 확인해보고 싶으면, 미리보기를 통해 확인해 볼 수 있다.
        String solMonth = (month < 10) ? "0" + month : String.valueOf(month);

        String stringURL = apiProperties.combineURL(solYear, solMonth);
        URL url = new URL(stringURL);

        HolidayResponse holidayResponse = restTemplate.getForObject(url.toURI(), HolidayResponse.class);
        // 이 items의 사이즈가 법정 공휴일의 갯수이다. (혹은 위의 출력 결과의 totalCount를 이용해서 한번에 나타내도 된다.)
        List<HolidayResponse.Item> items = holidayResponse.getBody().getItems();
        return items;
    }

}
@Configuration
@ConfigurationProperties(prefix = "public.data.api")
public class ApiProperties {
private String url;
private String serviceKey;
public String getUrl() {
return url;
}
public void setUrl(String url) {
this.url = url;
}
public String getServiceKey() {
return serviceKey;
}
public void setServiceKey(String serviceKey) {
this.serviceKey = serviceKey;
}
public String combineURL(String solYear, String solMonth) {
return this.url + "?serviceKey=" + this.serviceKey + "&solYear=" + solYear + "&solMonth=" + solMonth;
}
}@ConfigurationProperties(prefix = "public.data.api")을 설정해준건 인증키와 url을 외부로 유출시키지 않기 위해서 application.yml 파일에 따로 설정을 해둔 경로를 지정해둔 것이다. 이 클래스의 인스턴스 변수명을 보면 url, serviceKey로 맞춰준 것을 확인할 수 있다.
application.yml 설정 참고
public:
  data:
    api:
      serviceKey: "앞에서 발급받은 인증키를 작성하면 된다."
      url: "내가 요청받고 싶은 url을 파라미터 제외하고 작성하면 된다."
아래에서 각각 @JacksonXmlRootElement, @JacksonXmlProperty를 설정해준 것은 xml데이터를 객체로 바꿔줘야 하기 때문이다. 그 옆에 localName은 위에서 미리보기에서 보았던 출력결과의 항목명을 그대로 써줘야 한다.
@JacksonXmlRootElement(localName = "response")
public class HolidayResponse {

    @JacksonXmlProperty(localName = "body")
    private Body body;

    public Body getBody() {
        return body;
    }

    public void setBody(Body body) {
        this.body = body;
    }

    public static class Body {
        @JacksonXmlElementWrapper(localName = "items")
        @JacksonXmlProperty(localName = "item")
        private List<Item> items;

        public List<Item> getItems() {
            return items;
        }

        public void setItems(List<Item> items) {
            this.items = items;
        }
    }

    public static class Item {
        @JacksonXmlProperty(localName = "isHoliday")
        private String isHoliday;

        @JacksonXmlProperty(localName = "locdate")
        private String locdate;

        public String getIsHoliday() {
            return isHoliday;
        }

        public String getLocdate() {
            return locdate;
        }

        public void setIsHoliday(String isHoliday) {
            this.isHoliday = isHoliday;
        }

        public void setLocDate(String locdate) {
            this.locdate = locdate;
        }
    }

}
이제 테스트코드로 검증을 해보자.
@SpringBootTest
class ApiConvertorTest {
private final ApiConvertor apiConvertor;
@Autowired
ApiConvertorTest(ApiConvertor apiConvertor) {
this.apiConvertor = apiConvertor;
}
@Test
void testItemsOfResponse() throws MalformedURLException, URISyntaxException {
YearMonth yearMonth = YearMonth.of(2024, 5);
List<HolidayResponse.Item> items = apiConvertor.itemsOfResponse(yearMonth);
int numberOfHolidays = items.size();
assertThat(numberOfHolidays).isEqualTo(3);
}
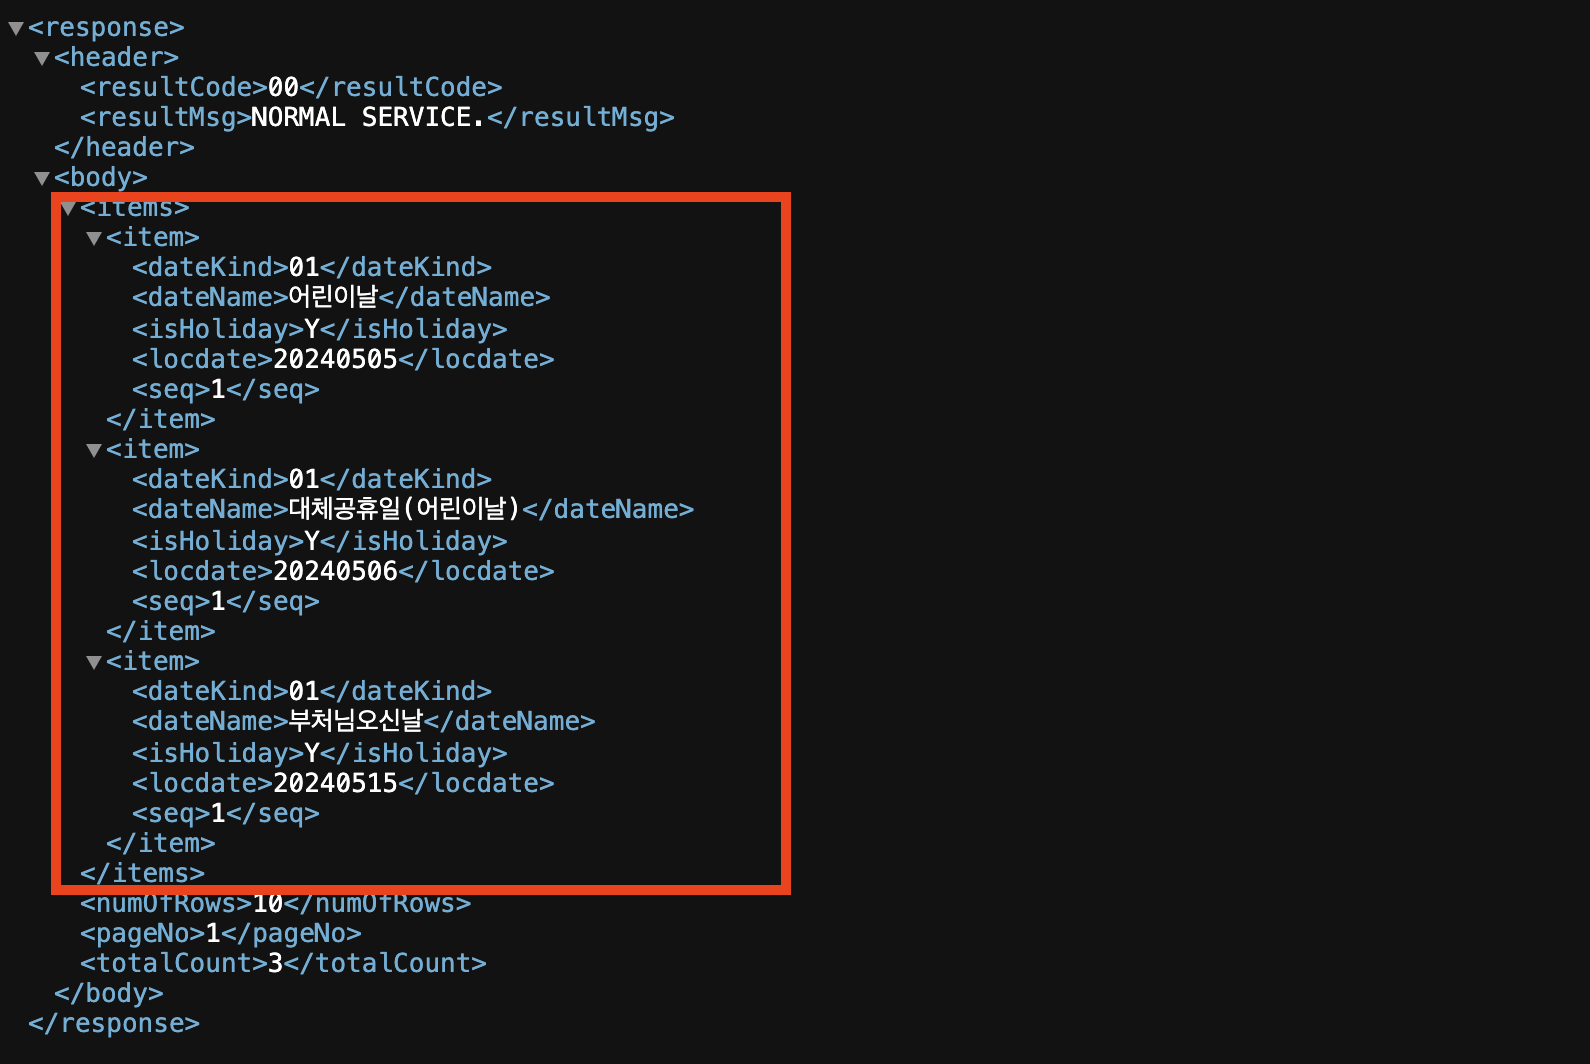
}5월은 어린이날, 어린이날(대체공휴일), 부처님 오신날 3개의 법정 공휴일이 있다. 하지만, 위에서 언급했던대로 어린이날은 일요일이기 때문에 일요일일 때도 빼고 법정 공휴일일 때도 빼게 된다. 따라서, 이렇게 겹치는 날은 제외하고 빼야한다.
총 계산
총 계산 로직을 작성하면 다음과 같다.
@Component
public class ApiConvertor {

    private final RestTemplate restTemplate;
    private final ApiProperties apiProperties;

    private static final DateTimeFormatter DATE_FORMATTER = DateTimeFormatter.ofPattern("yyyyMMdd");

    public ApiConvertor(RestTemplate restTemplate, ApiProperties apiProperties) {
        this.restTemplate = restTemplate;
        this.apiProperties = apiProperties;
    }

    // 이 클래스 안에서만 사용되기 때문에 아까의 테스트를 지우고 private로 바꾼다.
    private List<HolidayResponse.Item> itemsOfResponse(YearMonth yearMonth)
    		throws MalformedURLException, URISyntaxException {
        String solYear = String.valueOf(yearMonth.getYear());

        int month = yearMonth.getMonthValue();
        String solMonth = (month < 10) ? "0" + month : String.valueOf(month);

        String stringURL = apiProperties.combineURL(solYear, solMonth);
        URL url = new URL(stringURL);

        HolidayResponse holidayResponse = restTemplate.getForObject(url.toURI(), HolidayResponse.class);
        List<HolidayResponse.Item> items = holidayResponse.getBody().getItems();
        return items;
    }

    // 한달 기준 근로 일 수 계산
    public long countNumberOfStandardWorkingDays(YearMonth yearMonth)
            throws MalformedURLException, URISyntaxException {
        List<HolidayResponse.Item> items = itemsOfResponse(yearMonth);

        int lengthOfMonth = yearMonth.lengthOfMonth();
        long numberOfWeekends = WeekendCalculator.countNumberOfWeekends(yearMonth);
        long numberOfHolidays = items.size();
        // weekDays는 평일
        long numberOfWeekDays = lengthOfMonth - numberOfWeekends;

        // 휴일은 딱딱 정해져 있기 때문에 Set 자료구조에 담는다.
        Set<LocalDate> holidays = convertToLocalDate(items);
        // 중복되는 일을 빼는 메서드이다. 아래 private 메서드로 구현했다.
        numberOfHolidays = minusDuplicateHolidays(numberOfHolidays, holidays);

        return numberOfWeekDays - numberOfHolidays;
    }

    private static long minusDuplicateHolidays(long numberOfHolidays, Set<LocalDate> holidays) {
        numberOfHolidays -= holidays.stream()
                .filter(WeekendCalculator::isWeekend)
                .count();
        return numberOfHolidays;
    }

}
테스트 코드를 작성하고 테스트를 하면 통과한다.
@SpringBootTest
class ApiConvertorTest {

    private final ApiConvertor apiConvertor;

    @Autowired
    ApiConvertorTest(ApiConvertor apiConvertor) {
        this.apiConvertor = apiConvertor;
    }

    @Test
    void test() throws MalformedURLException, URISyntaxException {
        long numberOfStandardWorkingDays = apiConvertor.countNumberOfStandardWorkingDays(
        		YearMonth.of(2024, 5));

        assertThat(numberOfStandardWorkingDays).isEqualTo(21L);
    }

    // 위의 한달 근로 일을 기준으로 그 시간을 계산하는 것은 간단하다.
    // (한달 근로 일 * 8 * 60) 만 하면 된다.
    @Test
    void testCalculateStandardWorkingMinutes() {
        long standardWorkingMinutes = apiConvertor.calculateStandardWorkingMinutes(21L);
        assertThat(standardWorkingMinutes).isEqualTo(21L * 8 * 60);
    }
}
에러 해결 과정
버전 문제
먼저 테스트를 실행시켰을 때, 다음과 같은 에러가 나왔었다.
'com.fasterxml.jackson.databind.PropertyName com.fasterxml.jackson.databind.PropertyName.merge(com.fasterxml.jackson.databind.PropertyName, com.fasterxml.jackson.databind.PropertyName)'
java.lang.NoSuchMethodError: 'com.fasterxml.jackson.databind.PropertyName com.fasterxml.jackson.databind.PropertyName.merge(com.fasterxml.jackson.databind.PropertyName, com.fasterxml.jackson.databind.PropertyName)'java.lang.NoSuchMethodError는 말그대로 해당 메서드가 없다는 것을 의미한다. PropertyName.merge(..)란 메서드가 없다는 것이다. 이 때의 jackson library는 2.17,1로 추가해주었으나, spring boot의 버전이 3.2.2버전으로 내장 library가 2.15.3버전이어서 났었던 에러였다.

가정에 좀만 더 힘을 실어주기 위해 에러가 난 곳 바로 전 스택을 추적해보면,
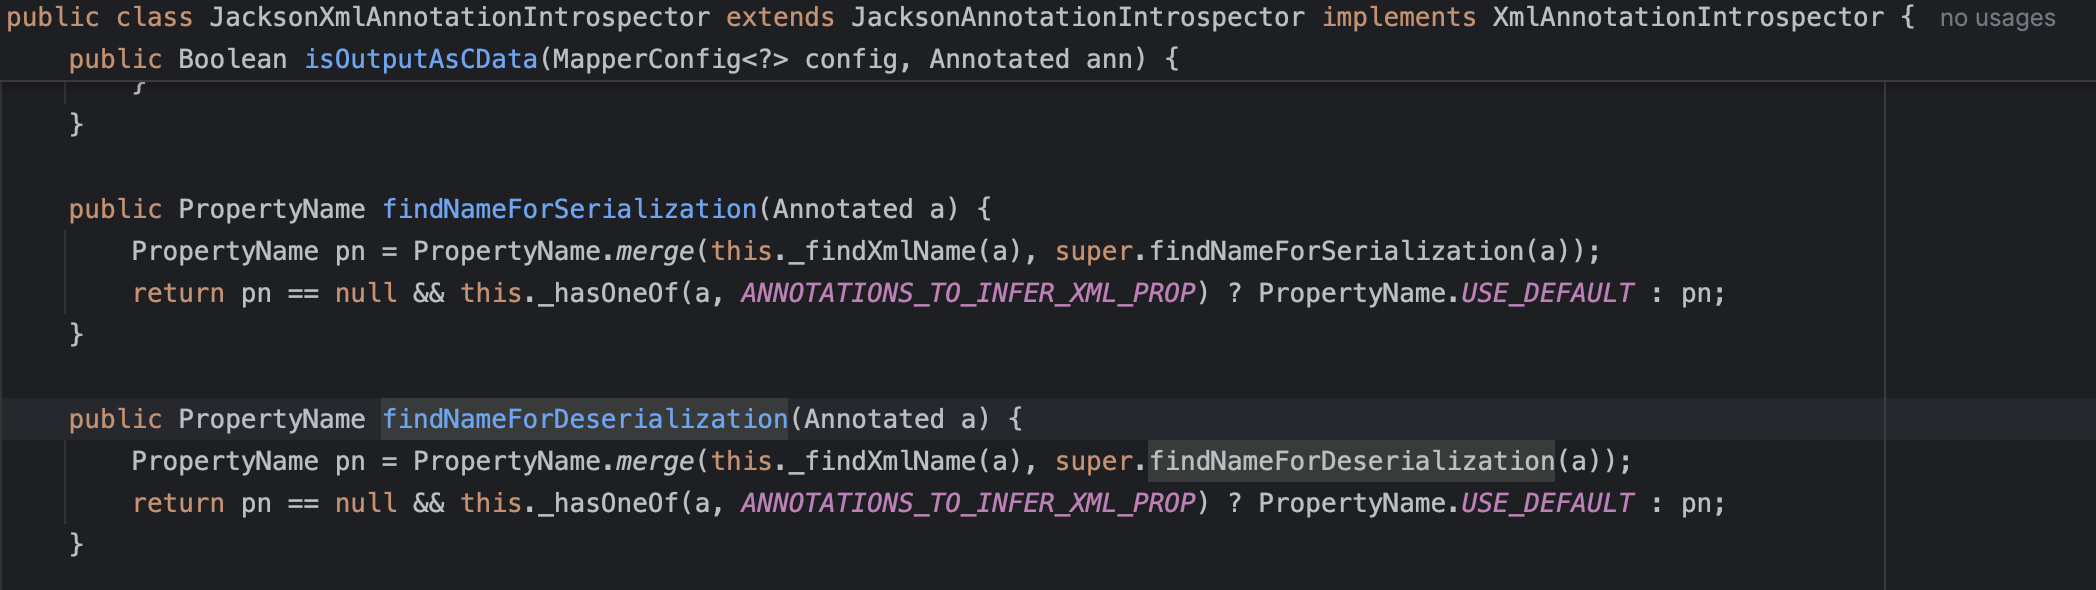
findNameForDeserialization(Annotated a)메서드가 나왔고 그 안으로 보면 merge메서드가 있다는 걸 알 수 있었다. 즉, merge를 실행시켜야 되는데 이 스프링 부트 3.2.2버전엔 없기 때문에 발생한 에러라고 좀 더 강하게 가정할 수 있다.
가정을 확인하기 위해 새로운 프로젝트를 생성시켜 spring boot 3.3버전으로 위의 로직에 해당하는 부분들만 따로 떼어내서 재현해보았다. 이 때, 프로젝트 버전말고 나머지부분은 전부 일치시켰다.
java.lang.NoSuchMethodError 를 발견하는데엔 성공했지만, 또 다른 에러가 났었다.
빈 초기화에 대한 개념 부족
두번째로 발생했던 에러는 response.getBody() 가 null이 되서 자꾸 NullPointerException이 발생했었다.
@Component
public class ApiConvertor {
    private final RestTemplate restTemplate;

    @Value("${public.data.api.url}")
    private String API_URL;

    @Value("${public.data.api.serviceKey}")
    private String AUTH_KEY;

    public ApiConvertor(RestTemplate restTemplate) {
        this.restTemplate = restTemplate;
    }

    // ...
}
원래는 application.yml에 있는 정보를 가져오기 위해서 위와 같이 @Value를 써서 가져올려고 했었다.
Value의 javadoc을 보면 다음과 같은 설명을 볼 수 있다.
Note that actual processing of the @Value annotation is performed by a BeanPostProcessor which in turn means that you cannot use @Value within BeanPostProcessor or BeanFactoryPostProcessor types.
@Value annotation은 BeanPostProcessor에 의해 처리된다.
하지만, 생성자에서는 RestTemplate를 주입받고 있다. 생성자 주입은 BeanFactory에 의해 초기화된다.
Bean Lifecycle 은 다음과 같다.
1. BeanDefinitionReader
2. BeanFactoryPostProcessor
3. BeanFactory(생성자)
4. BeanPostProcessor(@Value)
즉, @Value로 주입된 값은 생성자로 주입된 값보다 나중에 주입이 되므로 결국 값이 안담기게 되어 버리는 것이다.
따라서, @Value와 같이 RestTemplate를 필드주입하거나 반대로 @Value로 주입받던 것을 생성자 주입으로 바꾸면된다. 생성자주입을 spring에서도 권고하므로 생성자 주입으로 바꾸면 다음과 같다.
@Component
public class ApiConvertor {

    private final RestTemplate restTemplate;
    private final ApiProperties apiProperties;

    private static final DateTimeFormatter DATE_FORMATTER = DateTimeFormatter.ofPattern("yyyyMMdd");

    public ApiConvertor(
        RestTemplate restTemplate,
        ApiProperties apiProperties
    ) {
        this.restTemplate = restTemplate;
        this.apiProperties = apiProperties;
    }
이렇게 하니 값이 완벽하게 담기고 테스트가 통과될 수 있었다.
