디자인 패턴에서 정의된 Singleton pattern의 싱글톤 객체와 스프링 Beans에서의 싱글톤 빈 객체는 무슨 차이가 있을까? 멀티 쓰레드 환경에서는 Spring bean말고 그냥 Java로는 어떻게 해결할까?
Spring bean singleton vs GoF singleton
스프링 공식문서의 Bean Scopes - The Singleton Scope에 보면 다음과 같은 설명이 있다.
Spring’s concept of a singleton bean differs from the singleton pattern as defined in the Gang of Four (GoF) patterns book. The GoF singleton hard-codes the scope of an object such that one and only one instance of a particular class is created per ClassLoader. The scope of the Spring singleton is best described as being per-container and per-bean. This means that, if you define one bean for a particular class in a single Spring container, the Spring container creates one and only one instance of the class defined by that bean definition. The singleton scope is the default scope in Spring.
GoF 디자인 패턴 책에 나오는 싱글톤 패턴과 스프링의 싱글톤 빈은 다른 개념이다.
스프링의 Bean은 Spring IoC container가 생성하고, 우리가 흔히 아는 싱글톤 패턴의 싱글톤 객체는 ClassLoader를 통해 만들어진다.
ClassLoader - 참고
Class Loader에 대해 간단하게만 짚고 넘어간다.
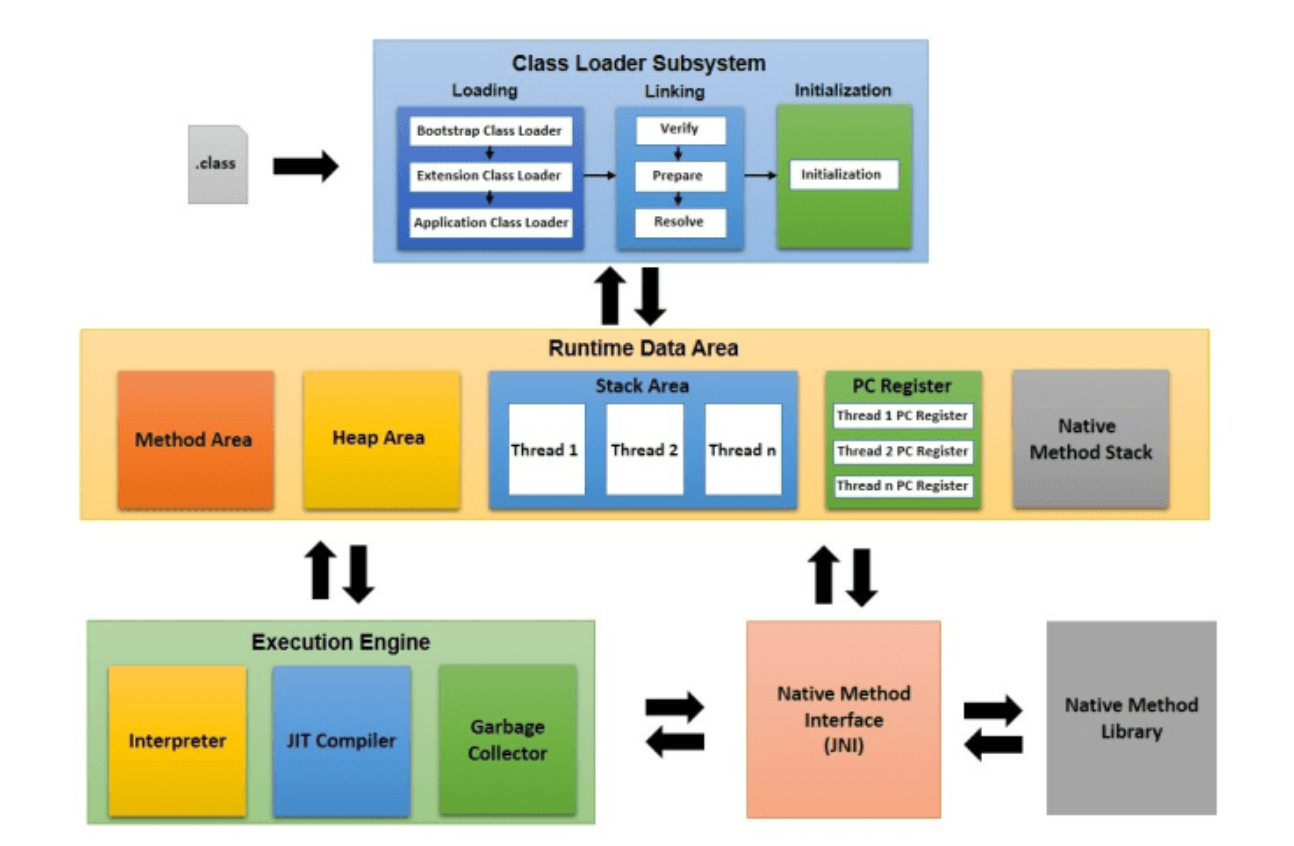 (참고: https://www.linkedin.com/pulse/jvm-architecture-santoshi-yadav/)
.class파일에서 bytecode를 읽고 메모리에 저장한다.Loading: bytecode를 method area에 로드하고 저장한다.Linking: binary type을 runtime state로 연결Initialization: static으로 선언된 값들이 초기화되고 할당된다.
그렇다면, 먼저 GoF 방식의 싱글톤 객체를 구현해보자. 그리고 멀티 쓰레드 환경에 좀 더 안전하게 개선해나가도 본다.
기본적인 싱글톤
public class Singleton {
    private static Singleton instance;

    private Singleton() {
    }

    public static Singleton getInstance() {
        if (instance == null) {
            instance = new Singleton();
        }
        return instance;
    }
}- 생성자의 접근제한자를 private
- 인스턴스를 private static 변수에만 할당
- public static getter를 통해 인스턴스를 얻는다.
하지만, 이 기본적인 싱글톤 구현은 문제점이 있다.
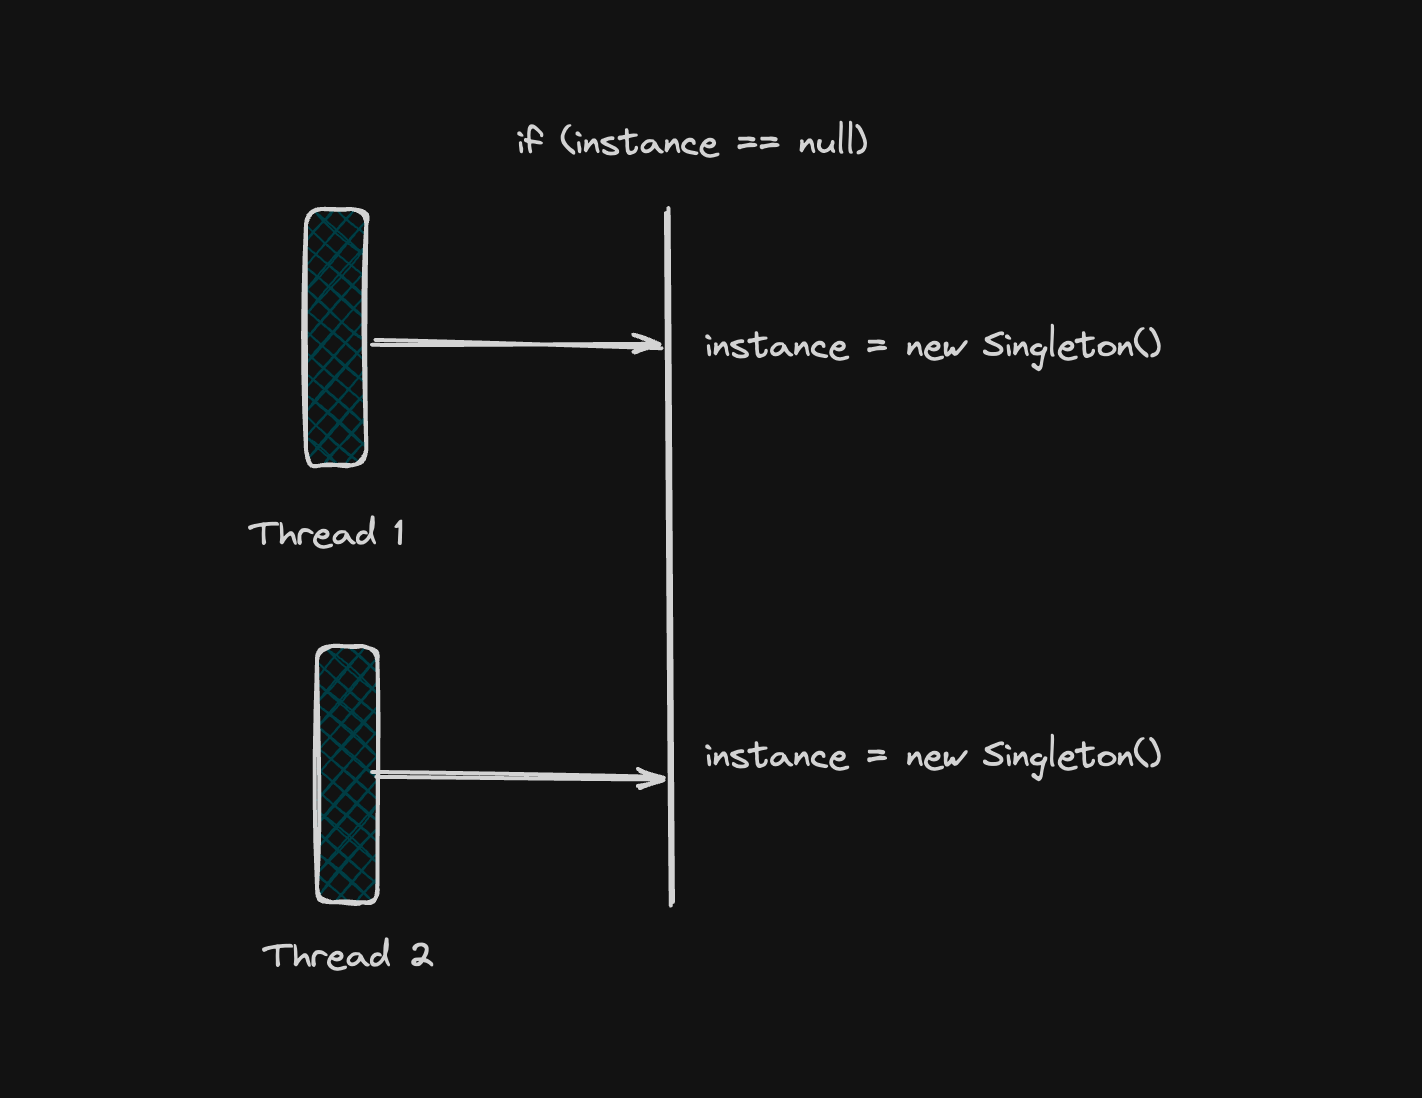
만약, 두 쓰레드(Thread1, Thread2)가 동시에 getInstance()에 진입했다고 가정하자. 그러면, 기존의 객체를 하나만 만들겠다는 로직이 성립하지 않게 된다.
synchronized
간단하다. 그냥 getInstance()에 synchronized를 선언해주면 된다.
public class Singleton {
    private static Singleton instance;

    private Singleton() {
    }

    // 동기화가 진행된다.
    public static synchronized Singleton getInstance() {
        if (instance == null) {
            instance = new Singleton();
        }
        return instance;
    }
}
하지만 이 방법 역시 문제가 있다. 항상 동기화가 진행되기 때문에 성능이 너무 느려진다.
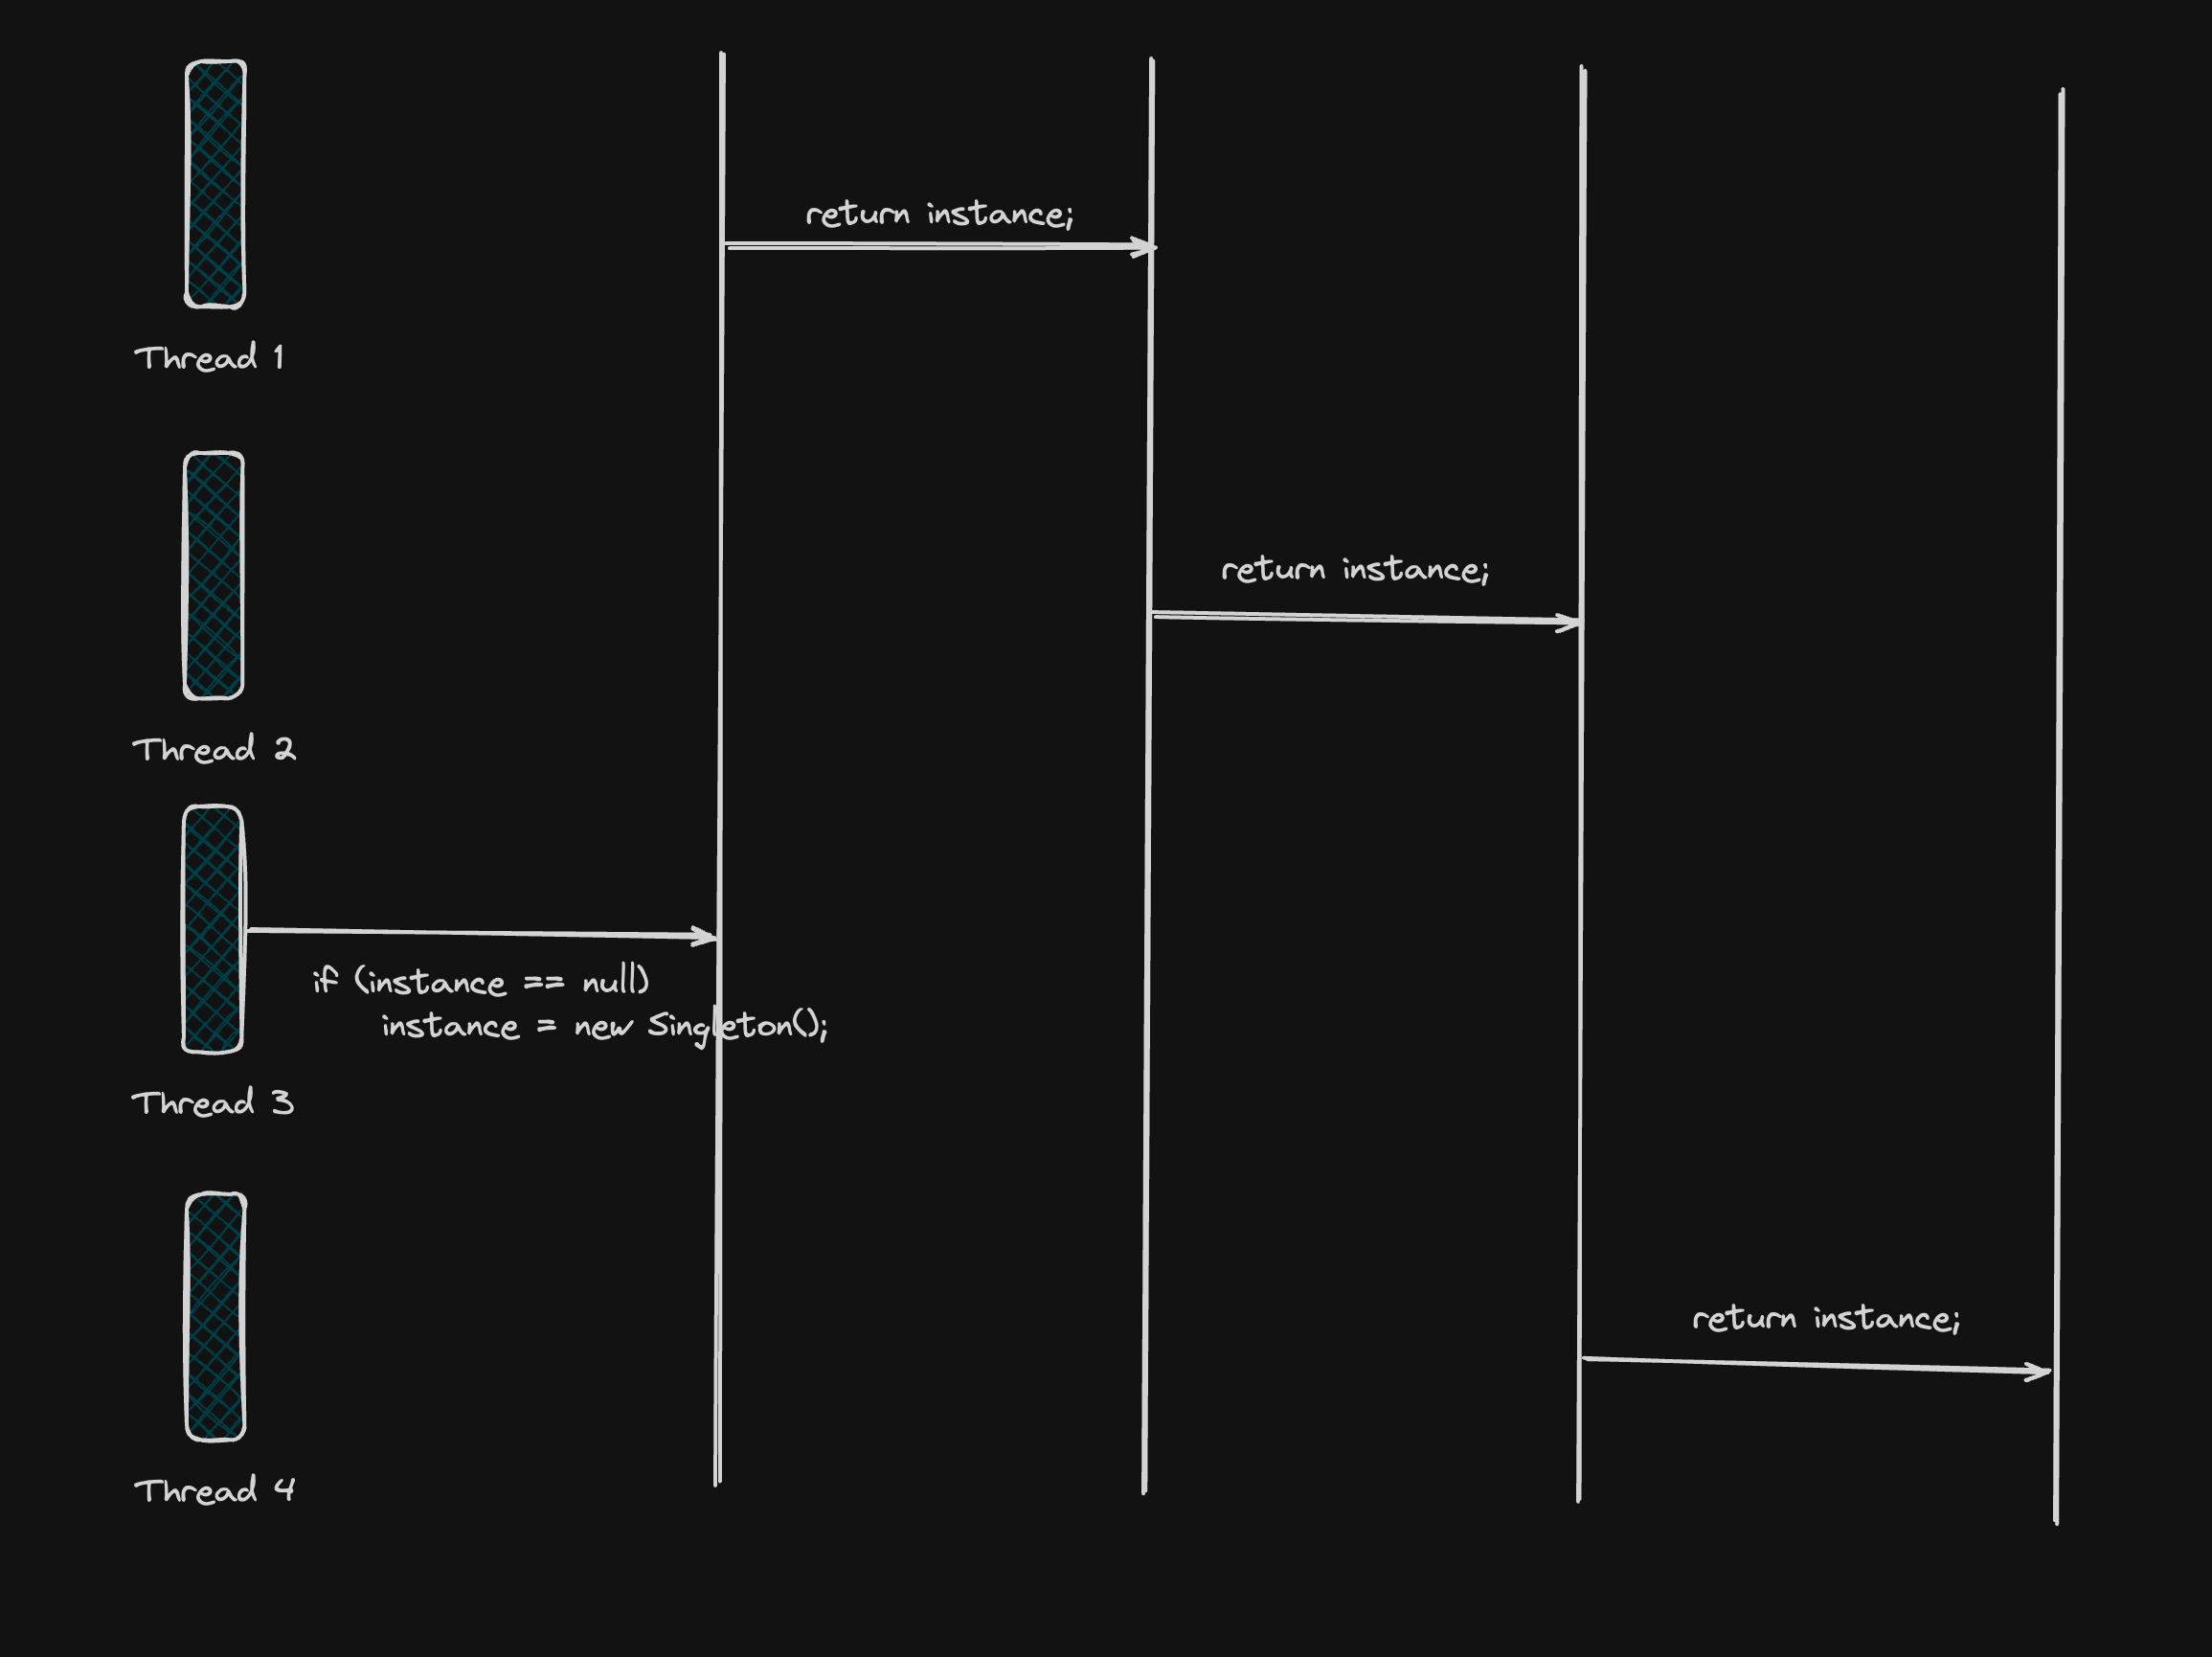
Thread 가 4개라 체감이 안올 수도 있지만, 만약에 어느 요청이 한꺼번에 몇만건이 온다고 생각해보자. 너무 비효율적인 결과를 초래하게 된다.
이상적인 방향은 다음과 같다.
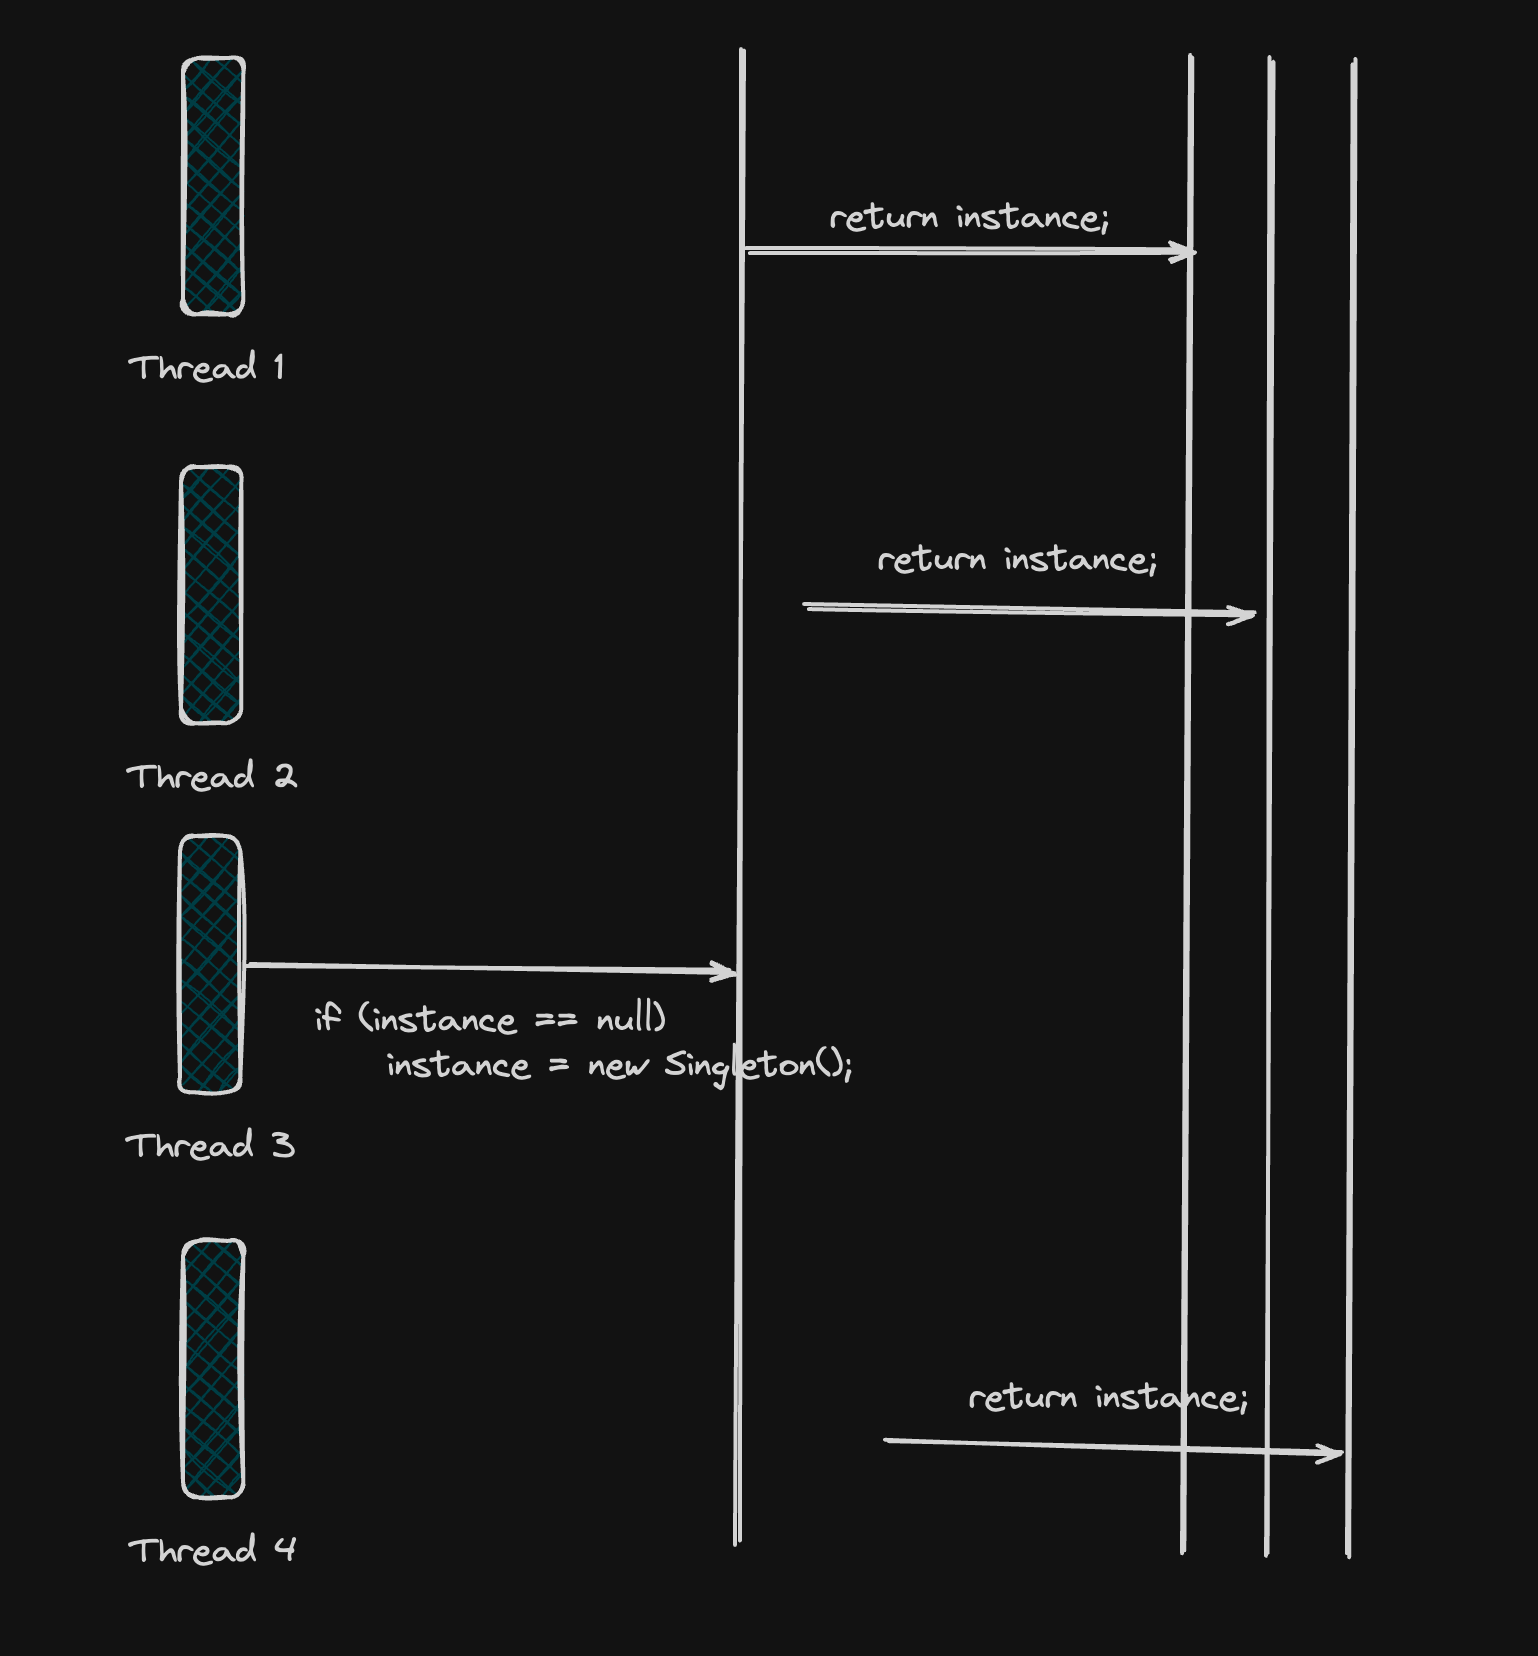
Double checked locking
getInstance()에는 먼저 동기화를 걸어주지 않는다. null 체크를 먼저 하고 null일 경우 Singleton class를 동기화해 class loading 시키고 다시 체크를 시킨다.
public class Singleton {
    private static Singleton instance;

    private Singleton() {
    }

    public static Singleton getInstance() {
        if (instance == null) {
            synchronized (Singleton.class) {
                if (instance == null) {
                    instance = new Singleton();
                }
            }
        }
        return instance;
    }
}
이렇게 하는 경우, 그냥 getInstance() 메서드 자체에 동기화를 하는 것보다 더 효율적으로 작동하게 할 수 있다. 이 방식은 하지만 다음과 같은 경우에 문제가 된다.
public class Singleton {
    private static Singleton instance;

    private Singleton() {
    }

    public static Singleton getInstance() {
    	// 2. 쓰레드 B가 접근할 때, null 체크가 되어 진입하게 된다.
        if (instance == null) {
            synchronized (Singleton.class) {
            	// 3. 쓰레드 A와 B가 경쟁상태(race condition)가 된다.
                if (instance == null) {
                	// 1. 쓰레드 A가 null체크를 하고 아직 할당되기 전
                    instance = new Singleton();
                }
            }
        }
        return instance;
    }
}
따라서, 이 문제를 해결하기 위해 volatile 키워드를 staic 변수에 붙혀준다.
public class Singleton {
    private static volatile Singleton instance;

    private Singleton() {
    }

    public static Singleton getInstance() {
        if (instance == null) {
            synchronized (Singleton.class) {
                if (instance == null) {
                    instance = new Singleton();
                }
            }
        }
        return instance;
    }
}
volatile은 읽기 쓰기 연산에 대해 순서가 보장되게 해준다. volatile 변수를 읽을 때마다 캐시된 값이 무효화되고 메인 메모리에 로드된다. 이 volatile을 쓸 때마다 캐시에서 값을 업데이트한 다음 캐시된 값을 메인 메모리로 플러시한다.
하지만, 이것 역시 문제가 있다. volatile은 내부에 굉장히 복잡하게 구현되어 있어서 멀티 쓰레드환경에서 정말 잘 작동되는지 확인하기가 너무 어렵다는데에 있다. Java memory model을 신경써줘야 하기 때문이다.
Holder class
public class Singleton {

    private Singleton() {
    }

    private static final class InstanceHolder {
        private static final Singleton INSTANCE = new Singleton();
    }

    public static Singleton getInstance() {
        return InstanceHolder.INSTANCE;
    }
}
Initialization-on-demand holder idiom이라고 불리우는 방식이다.
Singleton클래스가 로딩이 되면서InstanceHolder가 같이 로드된다.- 여러 쓰레드가 동시에
getInstance()를 호출할 때, 가장 먼저 도착한 쓰레드가 InstanceHolder 초기화를 시작한다. - 이 때, 다른 쓰레드들은 이 초기화가 완료될 때까지 자동으로 대기상태가 된다.
- 먼저 초기화를 한 쓰레드에 의해
new Instance()가 호출되어INSTANCE가 생성된다. - 이 INSTANCE는 static final field이기 때문에 나머지 쓰레드에 안전하게 공유가 된다.
여기서 2번이 핵심이다. JVM이 이 클래스가 초기화가 되어 있는지 확인하고, 안되어 있다면 초기화 락을 획득하게 된다. 이 락이 다른 스레드가 동시에 초기화를 하게 되는 것을 막아준다. 이런 과정들은 JVM에 최적화가 되어 있기 때문에 단순히 명시적으로 synchronized를 선언하는 것보다 훨씬 경제적이게 된다. (참고: jvms - 5.5. Initialization)
ThreadLocal
class Singleton {
    private static final ThreadLocal<Helper> perThreadHelper = new ThreadLocal<>();

    private Singleton() {
    }

    public static Helper getHelper() {
        Helper helper = perThreadHelper.get();
        if (helper == null) {
            synchronized (Singleton.class) {
                helper = perThreadHelper.get();
                if (helper == null) {
                    helper = new Helper();
                    perThreadHelper.set(helper);
                }
            }
        }
        return helper;
    }
}ThreadLocal은 각각의 쓰레드마다 고유한 Helper 인스턴스를 저장한다. 가장 처음 접근한 쓰레드가 동기화되어 초기화가 되면, 나머지 쓰레드들은 그들의 상태를 바꾸게 된다.
하지만, 이 방식은 쓰레드당 하나의 고유한 인스턴스가 생성된다는 점이 애플리케이션 전체 범위의 단일 인스턴스를 보장하지 않는다.
Spring singleton
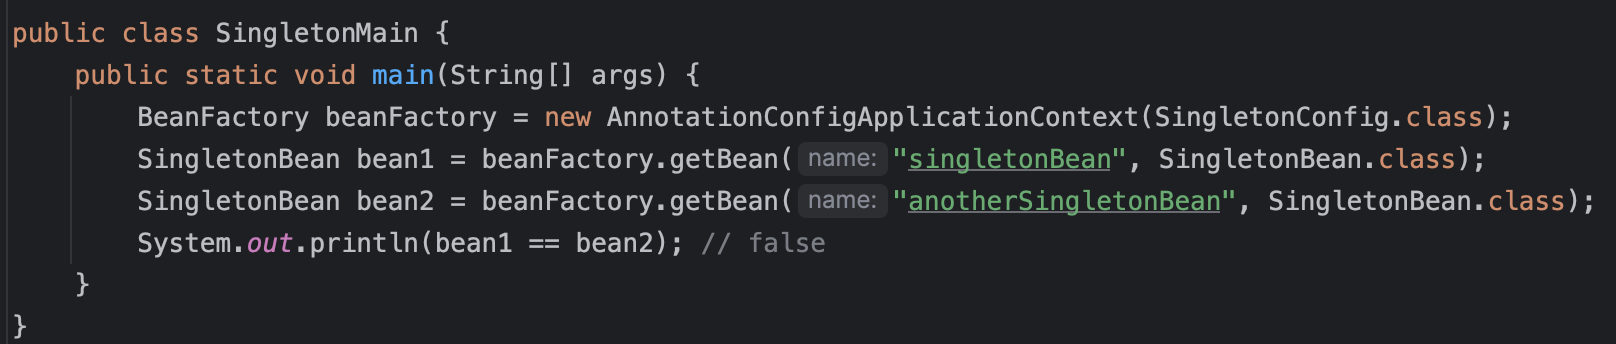
먼저, 스프링 싱글톤 빈은 같은 클래스에서 여러개의 빈을 만들 수 있다.
@Configuration
public class SingletonConfig {

    @Bean
    @Scope(value = ConfigurableBeanFactory.SCOPE_SINGLETON)
    public SingletonBean singletonBean() {
        return new SingletonBean();
    }

    @Bean
    @Scope(value = ConfigurableBeanFactory.SCOPE_SINGLETON)
    public SingletonBean anotherSingletonBean() {
        return new SingletonBean();
    }
}
물론, 이 빈을 주입해줄 때는 @Qualifier 혹은 @Primary를 써 무엇을 주입할지 명시해줘야 한다.
@Configuration
public class SingletonConfig {

    @Bean
    @Scope(value = ConfigurableBeanFactory.SCOPE_SINGLETON)
    public SingletonBean singletonBean() {
        return new SingletonBean();
    }

    @Bean
    @Scope(value = ConfigurableBeanFactory.SCOPE_SINGLETON)
    public SingletonBean anotherSingletonBean() {
        return new SingletonBean();
    }
}
@Configuration
public class SingletonAnotherConfig {

    @Bean
    @Scope(value = ConfigurableBeanFactory.SCOPE_SINGLETON)
    public SingletonBean singletonBean() {
        return new SingletonBean();
    }

    @Bean
    @Scope(value = ConfigurableBeanFactory.SCOPE_SINGLETON)
    public SingletonBean anotherSingletonBean() {
        return new SingletonBean();
    }
}
public class Main {
    public static void main(String[] args) {
        BeanFactory beanFactory1 = new AnnotationConfigApplicationContext(SingletonConfig.class);
        BeanFactory beanFactory2 = new AnnotationConfigApplicationContext(SingletonAnotherConfig.class);

        SingletonBean bean1 = beanFactory1.getBean("singletonBean", SingletonBean.class);
        SingletonBean bean2 = beanFactory2.getBean("singletonBean", SingletonBean.class);

        // 빈의 이름, 클래스정보 다 같게하고 IoC Container 만 다르게 했을 때, 검증
        System.out.println("bean1 == bean2 = " + (bean1 == bean2)); // false, 즉, 다른 IoC 컨테이너마다 독립적으로 빈이 존재한다.
    }
}
또한, 이렇게 다른 IoC Container에 빈 이름을 똑같이 하고 생성하더라도 다른 객체가 생성된다.
확실히 위에서 봤던 싱글톤 패턴의 싱글톤과는 다르다. 어떻게? 그리고 왜? 그랬을까?
singletone Registry
스프링에서는 빈을 만들 때, registry 패턴이라고 하는 방식으로 만든다.
이 레지스트리는 기존에 알고 있던 싱글톤 패턴과는 다르다. 싱글톤 패턴은 객체가 전역적으로 공유된다. 이에 따라 많은 문제가 발생한다.
스프링에서는 이 문제를 레지스트리로 해결한다. 스프링에서 레지스트리는 BeanFactory와 ApplicaitonContext등을 말한다. 이 레지스트리가 중앙 집중식으로 객체를 관리해준다.
CGLIB
public class Main {
    public static void main(String[] args) {
        SingletonConfig bean = beanFactory1.getBean(SingletonConfig.class);
        System.out.println("bean = " + bean);
    }
}
콘솔에 출력된 걸 보면 다음과 같은 모습을 볼 수 있다.

그냥 단순한 객체가 아니라 CGLIB가 붙는다. 이 CGLIB는 바이트코드를 조작하는 라이브러리다. 즉, 스프링은 이 바이트코드 조작으로 SingletonConfig 클래스를 상속하는 sub Class를 만들고 이것을 빈으로 등록한다. 이렇게 함으로써 각 컨테이너당 하나의 빈을 생성시킨다.
Bean이 가지는 장점
이렇게 GoF 책에 나오는 싱글톤과 스프링에서 쓰이는 singleton registry에 대해서 비교해 보았다. 다음은 singleton registry를 이용한 빈이 어떤 장점을 가지는지 몇가지 열거해보았다.
- 싱글톤의 전역 상태 문제 해결
- 빠른 에러 검출
- 테스트의 어려움 해결
- 멀티쓰레딩 안전성 해결
전역 상태 문제 해결
싱글톤 패턴의 방식은 전역적으로 상태를 공유하기 때문에 실수로 상태를 유지하는 코드를 작성하게 되면, 다른 사용자들끼리 어떠한 데이터를 공유하기 때문에 문제가 발생하게 된다.
하지만, 레지스트리를 이용하게 되면, 완전히 해결하진 않지만 직접 접근하는 방식이 아닌 의존성 주입을 통해서 간접적으로 접근하기 때문에 위험성이 줄어들게 된다.
빠른 에러 검출
스프링 빈은 레지스트리를 통해scope를 설정해줄 수 있다.
기본적으로 스프링의 레지스트리는 eager initialization이 사용된다. 프로그램을 실행할 때, 빈들을 미리 만들어 두기 때문에 사전에 빈이 중복되는 것을 방지할 수 있다.
@Controller
public class Hello {

    @GetMapping("/hello")
    public String hello1() {
        return "hello";
    }

    @GetMapping("/hello")
    public String hello2() {
        return "hello";
    }
}
만약 위의 코드를 작성하고 실행을 시키면 다음과 같은 에러를 스프링에서 말해준다.

테스트의 어려움 해결
또한, Spring은 테스트를 하기 쉽게 해준다. (참고:https://docs.spring.io/spring-framework/reference/testing.html)
상태를 전역적으로 공유하는 객체를 이곳, 저곳에서 사용한다고 했을 때, 따로따로 분리해서 테스트를 수행하기가 상당히 복잡해진다.
스프링의 빈 레지스트리를 이용해 이 문제를 해결할 수 있다.
@ContextConfiguration,@Autowired를 통해 우리가 직접 의존성을 주입시켜주고 context에 맞는 객체를 만들필요가 없게 해준다.@Mock,@InjectMock을 통해 목 객체를 이용하여 순수하게 내가 테스트하고자 하는 로직만 테스트가 가능해진다.
