📝 일정 관리 프로젝트
이 프로젝트는 사용자들이 일정 목록을 관리할 수 있도록 하기 위한 간단한 일정 관리 시스템이다. 일정 생성, 조회, 수정, 삭제 기능을 제공하며, 각각의 일정에 작성자, 비밀번호, 내용, 수정일 정보가 포함된다.
목차
- 요구사항 분석
- 개발 과정
- 요구사항 설계 (API 명세서, ERD 작성, SQL 작성)
- Entity 및 DTO 생성
- Controller 생성
- 데이터베이스 연동
- Postman을 통한 API 테스트
- 프로젝트를 통해 배운 것들
📋 1. 요구사항 분석
이 프로젝트는 Spring Boot를 기반으로 개발되었으며, MySQL 데이터베이스를 사용해 일정 정보를 저장하고 조회하는 시스템이다. JDBC를 이용해 데이터베이스와 상호작용하며, 일정 생성, 수정, 삭제 시 비밀번호 인증이 필요하다. LocalDateTime을 사용해 일정을 생성한 날짜와 수정 날짜를 관리한다.
💻 2. 개발 과정
1) 요구사항 설계
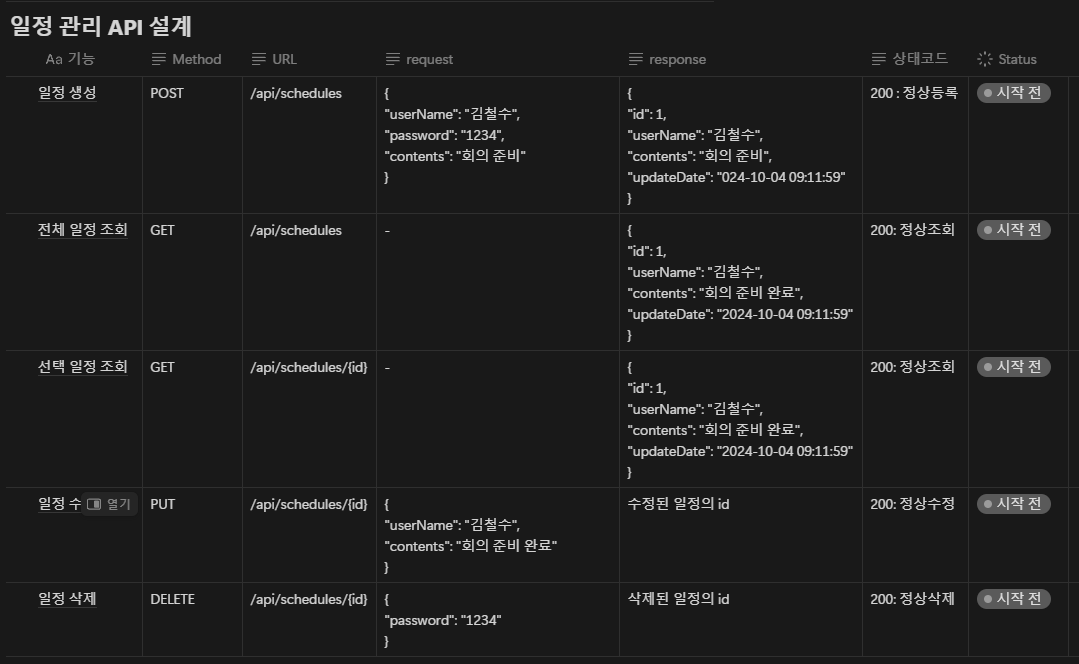
(1) API 명세서 작성
일정 관리 시스템의 API는 다음과 같다.
(2) ERD 작성
일정을 저장하는 schedules 테이블은 다음과 같이 설계되었다.
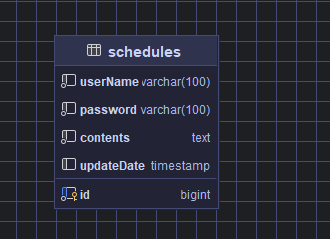
- userName: 작성자의 이름
- password: 일정 수정 및 삭제를 위한 비밀번호
- contents: 일정의 내용
- updateDate: 일정이 생성되거나 수정된 날짜
(3) SQL 작성
데이터베이스에서 사용되는 테이블을 생성하기 위해 다음 SQL 쿼리를 작성하였다.
CREATE TABLE schedules (
    id BIGINT AUTO_INCREMENT PRIMARY KEY,
    userName VARCHAR(100) NOT NULL,
    password VARCHAR(100) NOT NULL,
    contents TEXT NOT NULL,
    updateDate TIMESTAMP DEFAULT CURRENT_TIMESTAMP ON UPDATE CURRENT_TIMESTAMP
);
2) Entity 및 DTO 생성
(1) Entity 생성
Schedule 엔티티는 일정 정보를 다루기 위한 클래스로, 데이터베이스와 상호작용하며, 각 필드에 데이터를 담아 관리한다.
@Getter
@Setter
@NoArgsConstructor
public class Schedule {
    private Long id;
    private String userName;
    private String password;
    private String contents;
    private LocalDateTime updateDate; // LocalDateTime 사용

    public Schedule(ScheduleRequestDto requestDto) {
        this.userName = requestDto.getUserName();
        this.password = requestDto.getPassword();
        this.contents = requestDto.getContents();
        this.updateDate = LocalDateTime.now(); // 현재 시간으로 설정
    }

    public void update(ScheduleRequestDto requestDto) {
        this.userName = requestDto.getUserName();
        this.password = requestDto.getPassword();
        this.contents = requestDto.getContents();
        this.updateDate = LocalDateTime.now(); // 수정 시 현재 시간으로 업데이트
    }
}
(2) DTO 생성
데이터 전송을 위한 DTO를 생성한다. 클라이언트에서 요청할 때 사용하는 ScheduleRequestDto와 서버에서 응답할 때 사용하는 ScheduleResponseDto이다.
- ScheduleRequestDto
@Getter
@Setter
public class ScheduleRequestDto {
    private String userName;
    private String password;
    private String contents;
    private String updateDate;
}- ScheduleResponseDto
@Getter
public class ScheduleResponseDto {
    private Long id;
    private String userName;
    private String contents;
    private String updateDate;

    public ScheduleResponseDto(Schedule schedule) {
        this.id = schedule.getId();
        this.userName = schedule.getUserName();
        this.contents = schedule.getContents();

        // LocalDateTime을 String으로 변환
        DateTimeFormatter formatter = DateTimeFormatter.ofPattern("yyyy-MM-dd HH:mm:ss");
        this.updateDate = schedule.getUpdateDate().format(formatter);
    }
}
3) Controller 생성
ScheduleController는 API 요청을 처리하는 클래스이다. JdbcTemplate을 사용해 MySQL과 상호작용하며, 일정을 생성, 조회, 수정, 삭제하는 기능을 제공한다.
@RestController
@RequestMapping("/api")
public class ScheduleController {
    private final JdbcTemplate jdbcTemplate;

    public ScheduleController(JdbcTemplate jdbcTemplate) {
        this.jdbcTemplate = jdbcTemplate;
    }

    // 1. 일정 생성 API
    @PostMapping("/schedules")
    public ScheduleResponseDto createSchedule(@RequestBody ScheduleRequestDto requestDto) {
        Schedule schedule = new Schedule(requestDto);
        KeyHolder keyHolder = new GeneratedKeyHolder();

        String sql = "INSERT INTO schedules (userName, password, contents, updateDate) VALUES (?, ?, ?, ?)";
        jdbcTemplate.update(con -> {
            PreparedStatement ps = con.prepareStatement(sql, Statement.RETURN_GENERATED_KEYS);
            ps.setString(1, schedule.getUserName());
            ps.setString(2, schedule.getPassword());
            ps.setString(3, schedule.getContents());
            ps.setObject(4, schedule.getUpdateDate());
            return ps;
        }, keyHolder);

        schedule.setId(keyHolder.getKey().longValue());
        return new ScheduleResponseDto(schedule);
    }

    // 2. 전체 일정 조회 API
    @GetMapping("/schedules")
    public List<ScheduleResponseDto> getAllSchedules() {
        String sql = "SELECT * FROM schedules ORDER BY updateDate DESC";
        return jdbcTemplate.query(sql, (rs, rowNum) -> new ScheduleResponseDto(
                rs.getLong("id"),
                rs.getString("userName"),
                rs.getString("updateDate"),
                rs.getString("contents")
        ));
    }

    // 3. 선택 일정 조회 API
    @GetMapping("/schedules/{id}")
    public ScheduleResponseDto getSchedule(@PathVariable Long id) {
        Schedule schedule = findByID(id);
        if (schedule != null) {
            return new ScheduleResponseDto(schedule);
        } else {
            throw new IllegalArgumentException("선택한 일정은 존재하지 않습니다.");
        }
    }

    // 4. 일정 수정 API
    @PutMapping("/schedules/{id}")
    public Long updateSchedule(@PathVariable Long id, @RequestBody ScheduleRequestDto requestDto) {
        Schedule schedule = findByID(id);
        if (schedule != null) {
            schedule.update(requestDto);
            String sql = "UPDATE schedules SET userName = ?, contents = ?, updateDate = NOW() WHERE id = ?";
            jdbcTemplate.update(sql, schedule.getUserName(), schedule.getContents(), id);
            return id;
        } else {
            throw new IllegalArgumentException("선택한 일정은 존재하지 않습니다.");
        }
    }

    // 5. 일정 삭제 API
    @DeleteMapping("/schedules/{id}")
    public Long deleteSchedule(@PathVariable Long id, @RequestBody Map<String, String> passwordMap) {
        Schedule schedule = findByID(id);
        if (schedule != null) {
            if (schedule.getPassword().equals(passwordMap.get("password"))) {
                String sql = "DELETE FROM schedules WHERE id = ?";
                jdbcTemplate.update(sql, id);
                return id;
            } else {
                throw new IllegalArgumentException("비밀번호가 일치하지 않습니다.");
            }
        } else {
            throw new IllegalArgumentException("선택한 일정은 존재하지 않습니다.");
        }
    }

    // DB에서 특정 ID로 일정 조회
    private Schedule findByID(Long id) {
        String sql = "SELECT * FROM schedules WHERE id = ?";
        return jdbcTemplate.queryForObject(sql, (rs, rowNum) -> {
            Schedule schedule = new Schedule();
            schedule.setId(rs.getLong("id"));
            schedule.setUserName(rs.getString("userName"));
            schedule.setPassword(rs.getString("password"));
            schedule.setContents(rs.getString("contents"));
            schedule.setUpdateDate(rs.getTimestamp("updateDate").toLocalDateTime());
            return schedule;
        }, id);
    }
}
4) 데이터베이스 연동
MySQL 데이터베이스와 연동하기 위해 application.properties 파일에 데이터베이스 연결 설정을 추가하였다.
spring.datasource.url=jdbc:mysql://localhost:3306/schedulemanagement
spring.datasource.username=root
spring.datasource.password=your_password
spring.datasource.driver-class-name=com.mysql.cj

.jdbc.Driver
5) Postman을 통한 API 테스트
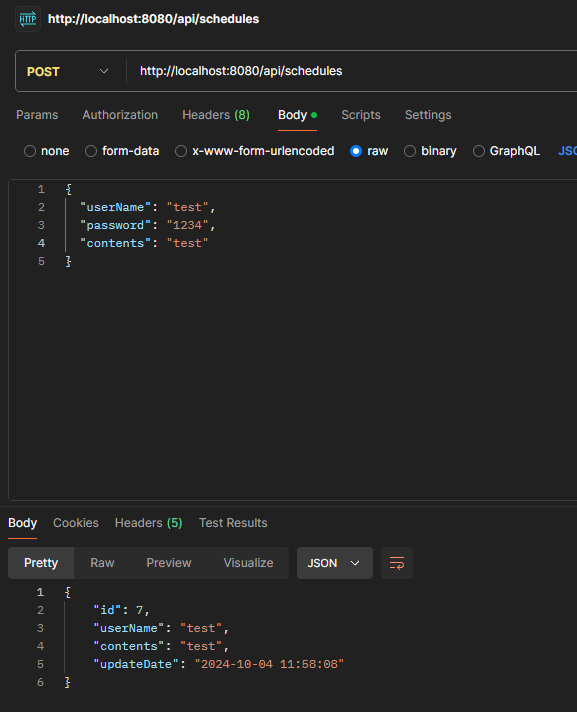
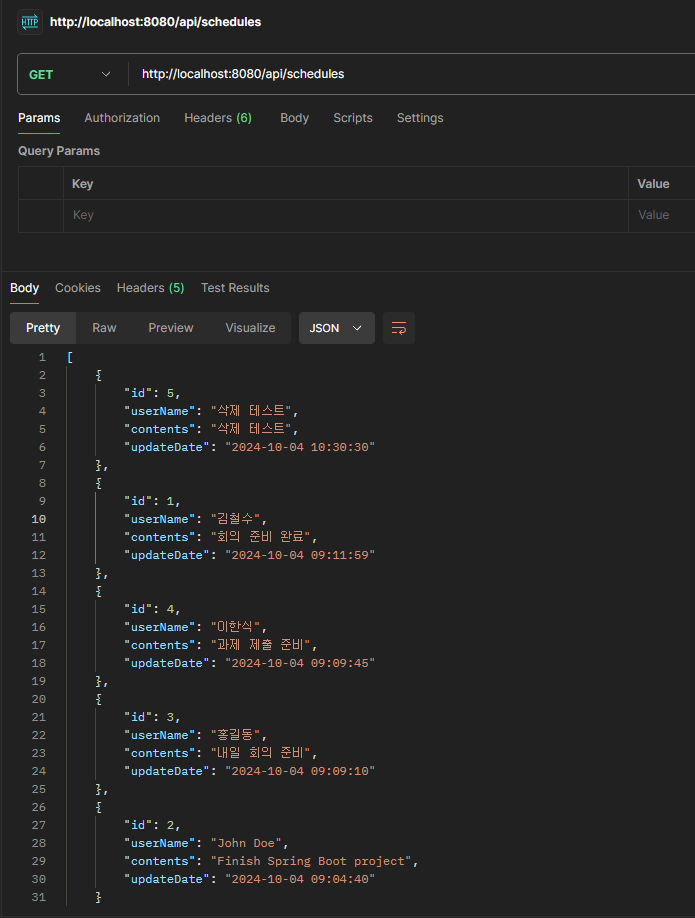
이제 Postman을 사용해 API를 테스트하였다.
일정 생성 API (updateDate 생략 가능)
전체 일정 조회 API
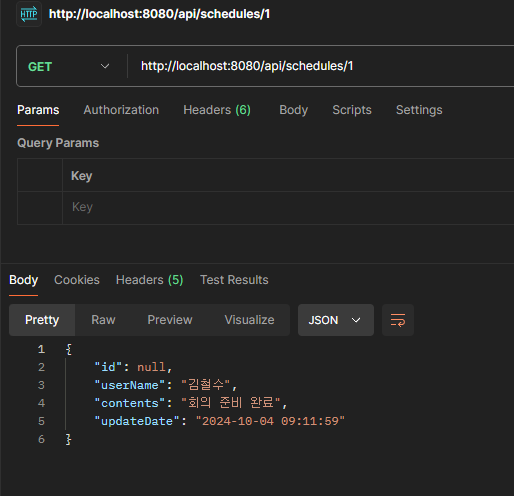
선택 일정 조회 API
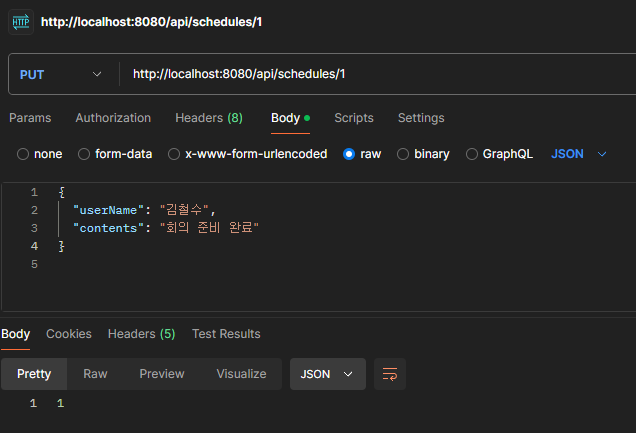
일정 수정 API
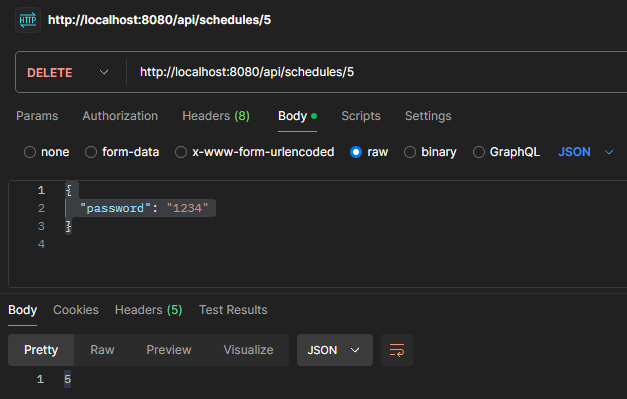
일정 삭제 API
📌 3. 프로젝트를 통해 배운 것들
-
RESTful API 설계
- 명확한 API 설계를 통해 서버와 클라이언트 간의 통신을 원활하게 구현할 수 있었다.
-
JDBC와 MySQL 연동
- Spring Boot에서 JDBC를 사용해 MySQL과 연동하여 데이터의 CRUD 작업을 배웠다.
-
Postman을 통한 API 테스트
- Postman을 사용해 서버의 요청과 응답을 확인하며 API 기능을 검증할 수 있었다.
-
트러블슈팅 경험
- 다양한 오류와 문제를 해결하며 코드를 개선하는 과정에서 많은 것을 배웠다.
이로써 일정 관리 프로젝트의 필수 기능을 모두 구현하였다. 다음 단계로 도전 기능을 추가하여 프로젝트를 더욱 확장할 예정이다.
