docker CLI
- docker daemon과 통신하여 기능 수행
docker- docker group을 supplementary group에 포함시켜야 daemon 사용 가능
$ whoami
$ sudo usermod -aG docker [username]
$ id
$ id [username]id: runtime 상태id [username]: 현재 설정 의미

- 그룹 추가 후에는 session을 재생성해야 group 정보를 다시 읽는다
- 재로그인하면 된다
- ubuntu는 재로그인으로는 group이 반영되지 않는다. gdm을 재실행해야한다. 또는 그냥 reboot해도 된다
- reboot 하면
id에서 docker 확인 가능

- root에서만이 아닌 개인 계정으로도 docker를 실행할 수 있게 되었다
~/.bash_aliase에 자주 사용하는 docker ps 명령은 alias에 등록하여 사용하면 편하다- https://docs.docker.com/engine/reference/commandline/ps/
1. ps
$ docker ps
$ docker ps -a-
docker는 기본적으로 작동중인 container를 보여준다

-
exited (0) : 성공
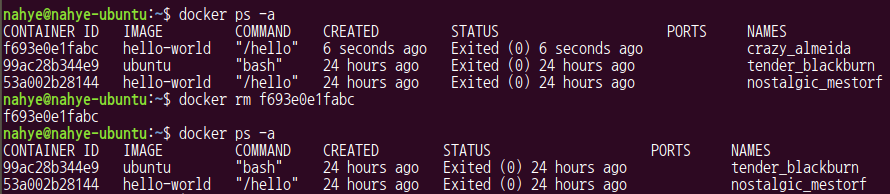
ps / run / rm
$ docker run hello-world
$ docker ps -a
$ docker rm f693e0e1fabc
$ docker ps -a- name을 입력해서 삭제할 수도 있다
2. run (name)
- docker run --name [원하는 name][이미지]
$ docker run --name hello-world_01 hello-world
$ docker ps -a
$ docker rm hello-world_01 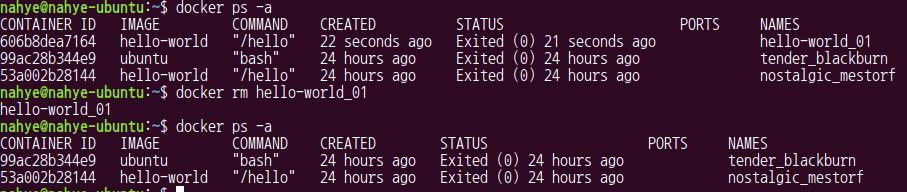
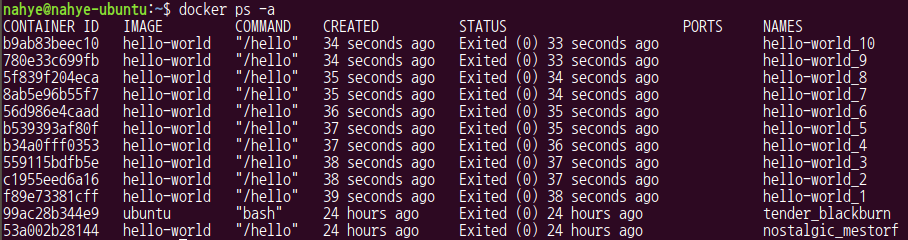
- 한번에 1부터 10까지의 hello-world container 생성
$ for ii in {1..10}; do docker run --name hello-world_${ii} hello-world; done
3. filter
-
docker CLI의 option에는 filter 기능 제공 (모든 명령어에 제공되는 것은 아니다)
-
-f,--filter로 사용 -
name에 hello가 들어간 container 검색
$ docker ps -a -f 'name=hello'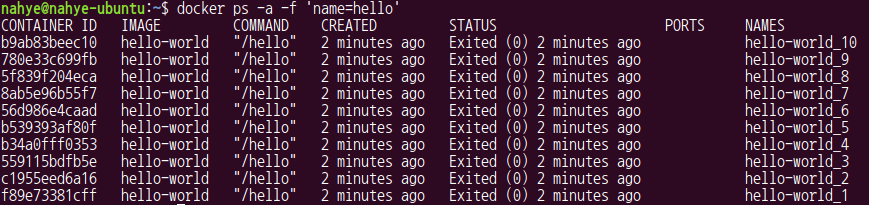
- glob pattern 지원 (단 extglob는 지원안한다)
$ docker ps -af 'name=hello-world_[1-3]'
$ docker ps -af 'name=hello-world_[1|4|6]'
- ancester는 image 검색
4. format
- 원하는 column만 뽑아볼 수 있다
$ docker ps -af 'name=hel' --format "{{.ID}} {{.Image}} {{.Status}} {{.Names}}"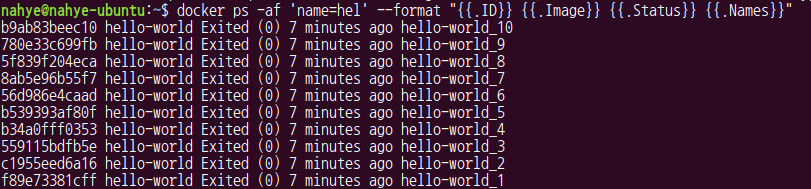
5. rm
- container 삭제
- rm [NAME|ID][...]
$ docker ps -af 'name=hello' --format "{{.Names}}"
$ docker rm hello-world_10
$ docker ps -af 'name=hello' --format "{{.Names}}" | xargs docker r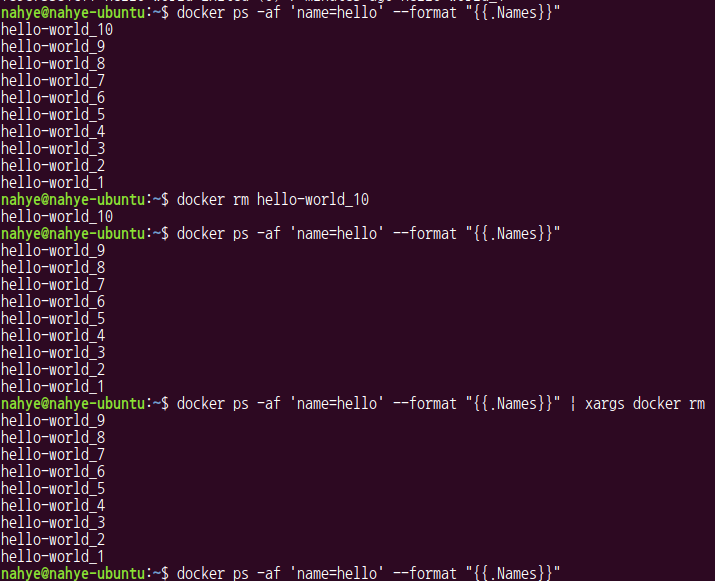
6. rmi
- image 삭제
- rmi [image][...]
- container가 존재하면 image 삭제가 실패
- force option으로 삭제할 수 있지만 되도록 container를 삭제하고 image를 삭제
$ docker rmi hello-world
$ docker ps -af 'ancestor=hello-world' --format {{.Names}} | xargs docker rm
$ docker rmi hello-world

7. image
ls
$ docker image ls
- REPOSITORY : docker image 저장소 이름
- TAG : 버전
pull
- image, repository pull
- run 명령의 경우 image가 없으면 pull 해서 가져온 후 docker 실행
- run 목적이 아니라 나중에 run 하거나 build 혹은 save 목적인 경우에 pull을 한다
- docker image pull [이미지]
- docker pull [이미지]
$ docker image pull nginx
$ docker image ls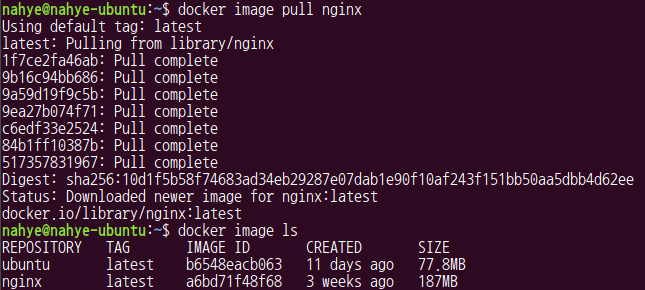
inspect
- 이미지 안의 설정, 환경을 확인하는 명령어
- docker image inspect [이미지]
- docker inspect [이미지]
$ docker image inspect nginx
$ docker image inspect -f '{{.Config.Env}}' nginx
$ docker image inspect -f '{{json .Config.Env}}' nginx
save
- 자주 사용하거나 특정 버전의 image의 경우 저장해놓고 재사용하는 것을 권장
- 여러번 다운받거나하면 불이익이 있을수도 있기 때문
- save를 진행하면 stdout으로 출력되므로 redirection을 사용하여 저장
- docker image save [이미지] > [파일명]
- docker save [이미지] > [파일명]
$ docker image save nginx > docker_nginx_1.25.3.tar
$ file docker_nginx_1.25.3.tar
- 버전의 경우 inspect로 확인한 버전
- docker image가 tar 파일로 저장된다
load
- stdin으로부터 불러온다
- docker image load < [파일명]
- docker load < [파일명]
- image를 삭제한 후 load 해온다
$ docker image ls
$ docker image rm nginx
$ docker image ls
$ docker image load < docker_nginx_1.25.3.tar
8. run
새롭게 container를 실행하는 명령
준비
- 이미 존재하는 conrainer를 모두 삭제
$ docker ps -a --format '{{.ID}}' | xargs docker rm
- 터미널 2개 실행 후 각각 docker run
1. 1번 터미널 실행
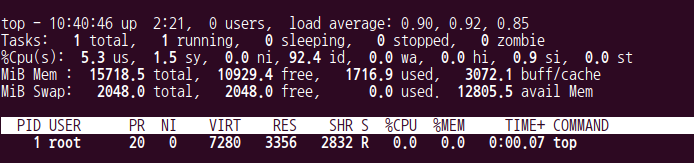
$ docker run -it --name ubuntu_top ubuntu "top" "-d 1"- interative terminal로 실행
-it ubuntu_top이름의 container 생성- ensector는
ubuntu - 안에서 실행할 명령어는
top - argument는 delay를 1초로 주는
-d 1 - 성공하면 top 화면이 보인다
2. 2번 터미널 실행
- 새로운 터미널에서 같은 명령어를 입력하면 아래와 같이 error 발생
- 동일한 이름을 가진 container를 만들 수 없기 때문

- 2번째 터미널의 name을 ubuntu_top2로 변경하면 된다
$ docker run -it --name ubuntu_top2 ubuntu "top" "-d 1"- ubuntu_top과 ubuntu_top2는 서로 다른 container
3. 2번 터미널만 종료

- 1번 터미널의 ubuntu_top은 여전히 실행중(Status : Up)
- 원하는 작업은 2개의 top이 같은 container에서 실행되게 하고 싶다 -> exec 사용
9. exec
기존에 존재하는 container에서 실행하는 명령
1. 2번 터미널에서 exec 명령 실행
$ docker exec -it ubuntu_top "-d 0.2"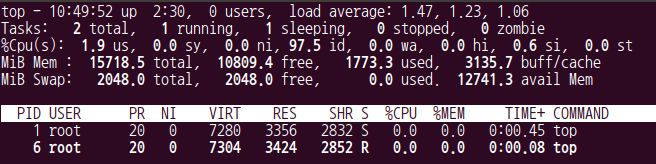
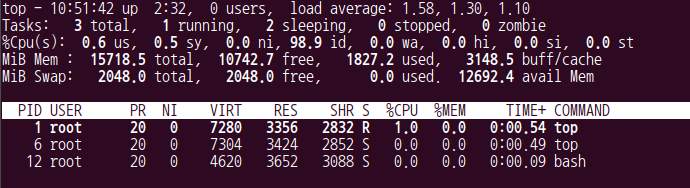
- 2번 터미널에서 들어온 top은 PID 6을 받았다
- 1번 터미널에서도 확인가능
2. 3번 터미널에서 bash 실행
$ docker exec -it ubuntu_top bash

# ps -ef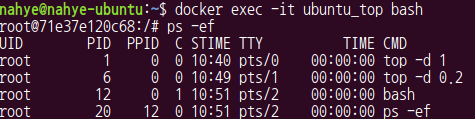
- top 2개와 bash 확인가능, bash에서 실행한 명령도 확인 가능
- 1번 터미널에서도 bash가 나타난다
3. container 닫기
- 1번 터미널을 닫으면 속한 프로세스들은 다 닫힌다
10. binding
- container의 자원을 외부와 연결
- 일반적으로 I/O와 storage 관련을 연결
- network
- port binding : host OS의 port와 container의 port를 바인딩
- network : docker network 사용
- directory, file, block-device
- mount binding : host OS의 directory를 바인딩
- volume : docker volume 저장소 사용
- device : host OS의 device, GPU를 바인딩
- environment
- shell environment variables
- docker는 container이고 container안에는 custom할 수 있는 설정들이 있다. 이를 미리 environment로 만들어놓는다
net
- port binding = network service
- nginx web server를 실행하기 위해 nginx container가 사용할 port를 config해서 확인
$ docker inspect nginx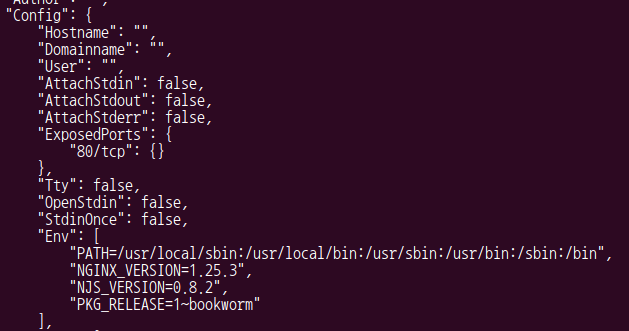
- 웹서버 port : http 80 (ssh 22, https 443)
- daemon은 std를 사용하지 않는다
- attachstdin, attachstdout, attachstderr -> false
- SIGTTIN과 SIGTTOU를 발생시키지 않기 위해
1. 1번 터미널에서 nginx 실행
$ docker run --rm -p 8080:80/tcp --name nginx_8080 nginx-rm: container가 종료되면 자동으로 삭제-p: port binding8080:80host port 번호 : container port 번호- 시스템의 8080 port로 들어오면 docker안의 80 port로 연결
2. 2번 터미널에서 8080 port LISTEN 확인
$ ss -nlt 'sport = :8080'-n: numeric-l: listen-t: tcp- sport(source port)가 8080인 경우를 보여줘라
3. 웹사이트로 연결
$ curl 127.0.0.1:8080- 127.0.0.1 자기 자신의 8080 port에 접속하면 nginx 페이지를 볼 수 있다
4. 1번 터미널 stop
- ctrl+c로 stop
- container가 foreground로 작동하고 있기 때문에 해당 프로세스를 죽이면 docker가 닫히게 되고 --rm 옵션으로 인해 자동 삭제된다
detach
- background에서 작동시키는 방법
- service를 돌릴 때 보통 backgroud에서 다 돌린다
-d: detach
1. 1번 터미널
$ docker run -d --rm -p 8080:80/tcp --name nginx_8080 nginx- 그 결과 나오는 것이 container ID -> 여기의 앞부분만 잘라서 사용한다

2. 2번 터미널에서 log 확인
$ docker logs nginx_8080
$ docker logs -f nginx_8080- 지속적으로 확인하고 싶을 때는
-f옵션을 사용
attach, detach
- interactive mode & terminal을 사용하는 경우 container를 running 상태로 두고 잠시 빠져나올 때 detach를 할 수 있다
- ctrl+p+q 를 누르면 빠져나올 수 있다
- detach mode로 실행하고 그 container로 들어가고 싶으면 attach를 사용
$ docker run --rm -itd --name ubuntu_bash ubuntu bash
$ docker attach ubuntu_bash- 이 상태에서 ^p^q를 누르면 read escape sequence가 출력되며 host를 나올 수 있다. 다시 attach한 후 exit로 나오면 container가 종료되면서 rm된다

mount
- nginx에 외부 디렉터리를 mount
- 예를 들면 웹서버에서 나오는 파일들을 다른 곳에 저장해놓고 불러오는, 즉 서비스해줄 수 있도록 하는 것
-v,--volume을 사용--mount이를 사용하는 경우가 많다- docker에서 권장
- 명령어가 더 직관적이고 통일성 있다
1. 1번 터미널에서 nginx docker container 내부로 들어가기
- 실제 서비스 용도가 아니라 한번 보기 위함이다
$ docker run --rm -it nginx bash
# alias ls='ls --color'    //ls를 설정하여 색상이 이쁘게 나오도록
# ls
# cd conf.d/
# ls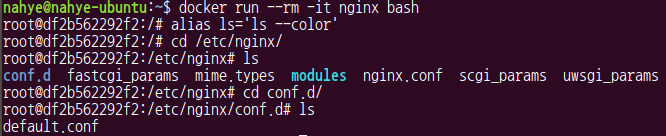
- ls 결과
.conf: 메인 설정파일.d: additional 파일들이 있다
# more default.conf 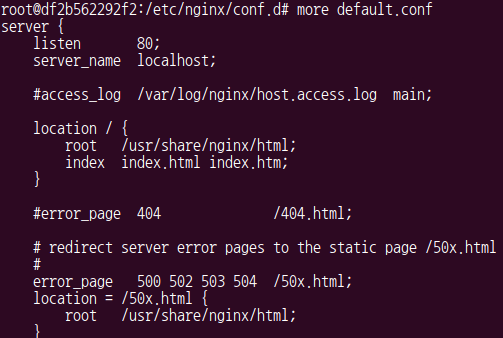
location /: root를 의미/usr/share/nginx/html가 web document root이다. 여기를 외부 host에서 mount로 binding 해본다
2. exit
- 현재 container 나오기
3. 1번 터미널 : container에 binding할 dir의 준비 및 실행
- $HOME/nginx_doc_root 를 만들고 이를 container 디렉터리인 /usr/share/nginx/html에 binding
$ mkdir ~/nginx_doc_root
$ readlink -f ~/nginx_doc_root

$ echo "Hello Document rook dir" > ~/nginx_doc_root/hello.txt
$ ls ~/nginx_doc_root/

$ docker run --rm -d -p 8080:80/tcp -v /home/nahye/nginx_doc_root:/usr/share/nginx/html --name nginx_8080 nginx--v host_file:container_file : host_file을 container_file에 binding
- 즉, container안에서 container_file를 읽으면 host의 host_file을 읽어들이는 것과 같다

4. 2번 터미널 : curl로 nginx에 접속
$ curl 127.0.0.1:8080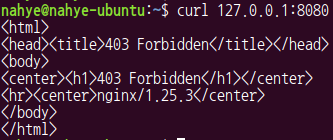
- 403 Forbidden가 뜬다
- 원래 있던 것에 overwrite 된 것이기 때문에 기존의 것이 없어져서 이렇게 나타난다
$ curl http://127.0.0.1:8080/hello.txt
$ echo "Hello world" >> ~/nginx_doc_root/hello.txt
$ curl http://127.0.0.1:8080/hello.txt
- 근데 hello.txt 파일은 뜬다
5. 해당 container 중지
$ docker stop nginx_8080 --rm옵션이 있었기 때문에 stop하면 자동으로 container가 삭제된다
mount 사용 방법
- --mount type=bind,src=[host_file],dst=[container_file]
- type=bind : mount의 bind 기능
- type=volume : volume을 사용
$ docker run --rm -d -p 8080:80/tcp --mount type=bind,src=/home/nahye/nginx_doc_root,dst=/usr/share/nginx/html --name nginx_8080 nginx
environment variables
- 환경변수 binding
-e,--env사용- --env KEY=value
- --env-file env_file
예시
- 처음에는 LANG 설정을 하지 않았기 때문에 아무것도 나오지 않는다
$ docker run --rm -it --name ubuntu_bash ubuntu bash

# echo $LANG
# exit
- 환경 변수 LANG 설정
$ docker run --rm -it -e LANG=en_US.utf8 --name ubuntu_bash ubuntu bash

# echo $LANG
# exit
11. volume, net
- docker volume
- docker volume management 기능
- logical volume과 비슷
- docker network
- network IP address, subnet mask 설정
- 이 기능들은 docker-compose와 같이 쓰이는 경우가 많다
12. stop, start
- docker stop...
- detached mode로 실행중이면 외부에서 docker stop으로 정지
- -it을 사용하지 않는 시스템은 signal 혹은 docker stop으로 정지할 수 밖에 없다
- docker start
- docker run --rm을 쓰지 않는 경우 exited시 container가 남는다
- stop 후 재시작할 때는 start로 가능
detached mode로 작동시킨 nginx를 stop, start
- detached mode로 실행, --rm이 없다
$ docker run -d -p 8080:80/tcp --mount type=bind,src=/home/nahye/nginx_doc_root,dst=/usr/share/nginx/html --name nginx_8080 nginx
$ docker ps
- --rm이 없다 -> stop을 해도 container가 남아있다
- 따라서 exited 상태이지만 container가 남아있다
$ docker stop nginx_8080 && docker ps -a
- 재시작
$ docker start nginx_8080 && docker ps
요약
- docker run의 선택적 option
| 내용 | option | 설명 |
|---|---|---|
| detach mode | -d | |
| stdio 사용 | -it | 이 경우에만 ^P^Q을 통해 잠시 밖으로 나갈 수 있다 |
| 종료시 제거 | --rm | |
| binding(port) | -p host_port:container_port | |
| binding(file) | --mount ... or -v .... | |
| binding(env.) | -e KEY=value or --env-file ... | file로 KEY=value를 만들어놓고 그 file을 불러온다(--env-file) |