Redis 설치
# 이미지 다운 (docker images 로 확인 가능)
$ docker pull redis
# 컨테이너로 레디스 실행 (--name: 컨테이너 이름 설정, -p: 포트 포워딩, -d: 백그라운드에서 실행)
$ docker run --name some-redis -p 6379:6379 -d redis
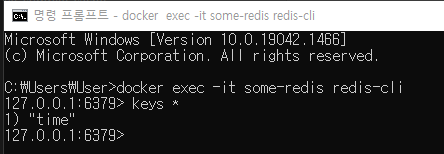
# redis-cli 접속
$ docker exec -it some-redis redis-cli라이브러리 설치
$ npm install cache-manager-ioredis --save
$ npm install -D @types/cache-manager-ioredis
테스트
import { Module, CacheModule } from '@nestjs/common';
import { AppController } from './app.controller';
import { AppService } from './app.service';
import * as redisStore from 'cache-manager-ioredis';

@Module({
  imports: [
    CacheModule.register({
      store: redisStore,
      host: 'localhost',
      port: 6379,
      ttl: 100000, // 없는 경우 default 5초
    }),
  ],
  controllers: [AppController],
  providers: [AppService],
})
export class AppModule {}
import { CACHE_MANAGER, Inject, Injectable } from '@nestjs/common';
import { Cache } from 'cache-manager';
@Injectable()
export class AppService {
constructor(@Inject(CACHE_MANAGER) private cacheManager: Cache) {}
async getCache() {
const savedTime = await this.cacheManager.get<number>('time');
if (savedTime) {
return 'saved time : ' + savedTime;
}
const now = new Date().getTime();
await this.cacheManager.set<number>('time', now);
return 'save new time : ' + now;
}
}import { Controller, Get } from '@nestjs/common';
import { AppService } from './app.service';
@Controller()
export class AppController {
constructor(private readonly appService: AppService) {}
@Get()
getHello() {
return 'hello';
}
@Get('cache')
getCache() {
return this.appService.getCache();
}
}
관련코드는 여기서
🍪 https://github.com/hocaron/nestJS-study/tree/main/nest-redis

기록을 통한 성장을