관련 라이브러리 설치
$ npm i @sentry/node nest-raven
$ npm i @slack/client
Sentry 설정
Sentry App
Sentry 웹 → Project → Create a new Project → Node 선택 → 프로젝트 생성후 DSN 복사
Slack 설정
Slack API Incoming Webhooks 생성
Slack API 홈페이지 → Create New App → 이름 및 workspace 지정 → Feature/Incoming Webhooks 메뉴 → Activate Incoming Webhooks 를 On → Webhook URL .env 파일에 저장
Sentry / Slack에 버그 메시지 전송
Sentry 연결 및 초기화
main에 sentry 연결
import { NestFactory } from '@nestjs/core';
import { AppModule } from './app.module';
import * as Sentry from '@sentry/node';
import { WebhookInterceptor } from './common/webhook.interceptor';

async function bootstrap() {
  const app = await NestFactory.create(AppModule);
  Sentry.init({
    dsn: process.env.SENTRY_DSN,
  });
  app.useGlobalInterceptors(new WebhookInterceptor());
  await app.listen(3000);
}
bootstrap();
Interceptor 생성
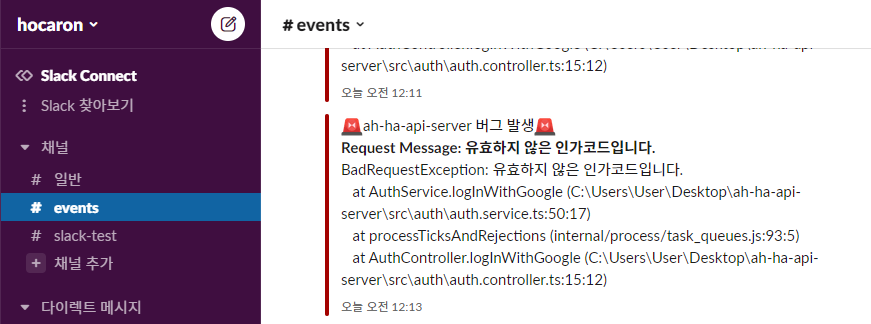
- slack에 버그 메시지를 보내기 위한 코드이다.
webhook.interceptor
import {CallHandler, ExecutionContext, Injectable, NestInterceptor} from '@nestjs/common';
import {catchError} from 'rxjs/operators';
import {IncomingWebhook} from '@slack/client';
import slackConfig from '../config/slack.config';
import {of} from 'rxjs';
import * as Sentry from '@sentry/minimal';

@Injectable()
export class SentryInterceptor implements NestInterceptor {
  intercept(_: ExecutionContext, next: CallHandler) {
    return next.handle().pipe(
      catchError(error => {
        Sentry.captureException(error);
        const webhook = new IncomingWebhook(SentryConfig.webhook);
        webhook.send({
          attachments: [
            {
              color: 'danger',
              text: '🚨ah-ha-api-server 버그 발생🚨',
              fields: [
                {
                  title: `Request Message: ${error.message}`,
                  value: error.stack,
                  short: false,
                },
              ],
              ts: Math.floor(new Date().getTime() / 1000).toString(),
            },
          ],
        });
        return of(error);
      }),
    );
  }
}
error가 발생하면, slack으로 메시지가 도착한다.
그런데, sentry에서 제공하는 더 좋은 기능도 있다.
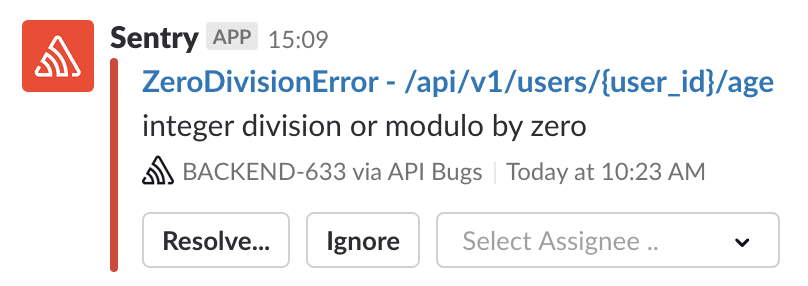
- 이 기능은 Team Plan이상을 사용해야 한다.😱
- 2주간 무료로 제공해주니 한번 사용해보자.
- 코드는
Sentry.captureException(error);만 있으면 된다.
Sentry 연결 및 초기화
main에 sentry 연결
import { NestFactory } from '@nestjs/core';
import { AppModule } from './app.module';
import * as Sentry from '@sentry/node';
import { SentryInterceptor } from './common/sentry.interceptor';
import { WebhookInterceptor } from './common/webhook.interceptor';

async function bootstrap() {
  const app = await NestFactory.create(AppModule);
  Sentry.init({
    dsn: process.env.SENTRY_DSN,
  });
  app.useGlobalInterceptors(new SentryInterceptor());
  await app.listen(3000);
}
bootstrap();
Interceptor 생성
sentry.interceptor
import {
  ExecutionContext,
  Injectable,
  NestInterceptor,
  CallHandler,
} from '@nestjs/common';
import { Observable } from 'rxjs';
import { catchError } from 'rxjs/operators';
import * as Sentry from '@sentry/minimal';

@Injectable()
export class SentryInterceptor implements NestInterceptor {
  intercept(_: ExecutionContext, next: CallHandler): Observable<any> {
    return next.handle().pipe(
      catchError((error) => {
        Sentry.captureException(error);
        return null;
      }),
    );
  }
}
error 발생
- 단순히 메시지 보내는 것을 넘어서 resolve, ignore도 할 수 있다!!!
- 장애대응을 위해서는, 필수적인 기능이니 사용하도록 해보자😎
관련코드는 여기서
🍪 https://github.com/hocaron/nestJS-study/tree/main/nest-sentry

기록을 통한 성장을
class SentryInterceptor 에서 return이 Observable 이라
return of(null);수정해야 할 것 같습니다.