01. 1주차 오늘 배울 것
1) 퍼블리싱 기본 개념
👉 Figma, Photoshop 등 그래픽 리소스를
html + css + js 로 변환해 브라우저에 표현하는 것.
- 디자인 리소스에 대한 이해
Photoshop, PowerPoint 와 같이 전통적인 툴에서 Sketch, Zeplin, Figma, Protopie 처럼 최근 많이 사용되는 프로토타이핑 틀까지 많은 소프트웨어가 사용되고 있습니다. 실제 퍼블리싱 작업을 진행할 때는 이러한 디자인 툴이 어떤 결과물을 만들어 낼 수 있는지에 대해 이해하는 것이 중요합니다. 이번 수업에서는 Figma로 만들어진 간단한 예제를 보고 이 요소(엘리먼트)가 어떤 마크업과 스타일링을 가져야 하는지 보고 간단하게 실습합니다.- 퍼플리싱에 대한 개념
디자이너가 제작한 그래픽 데이터를 웹 브라우저 위에서 표현하기 위핸 가장 기초적인 작업이며, 퍼블리싱은 크게 마크업과 스타일링으로 나뉩니다. 그리고 개발자가 미리 정의한 기능이 있을 경우 Javascript 작업을 통해 스타일링을 마친 뒤 부가 기능을 추가하기도 합니다.- 마크업: HTML을 통해 기본 뼈대를 만듭니다.
- 스타일링: CSS로 마크업에 색상등의 속성을 입혀 스타일을 지정합니다.
- 부가 기능: Javascript로 특정 요소에 기능을 만들어 부여합니다.2) 준비하기
👉 Visual Studio Code (VS Code) 프로그램👉 Figma(피그마, 프로타타이핑 툴)
Sketch + Zeplin 과 더불어 많이 사용되는 디자인/프로토타이핑 툴.
Figma는 하나의 툴로 기획, 와이어프레임, 디자인, 프로토타이핑까지 수행할수 있는 장점이 있다.- 좌측 레이어 영역: 포토샵에서의 레이어 영역과 동일
- 가운데 영역: 실제 구현된 디자인 요소 미리보기
- 우측 영역: 현재 선택한 요소의 세부 속성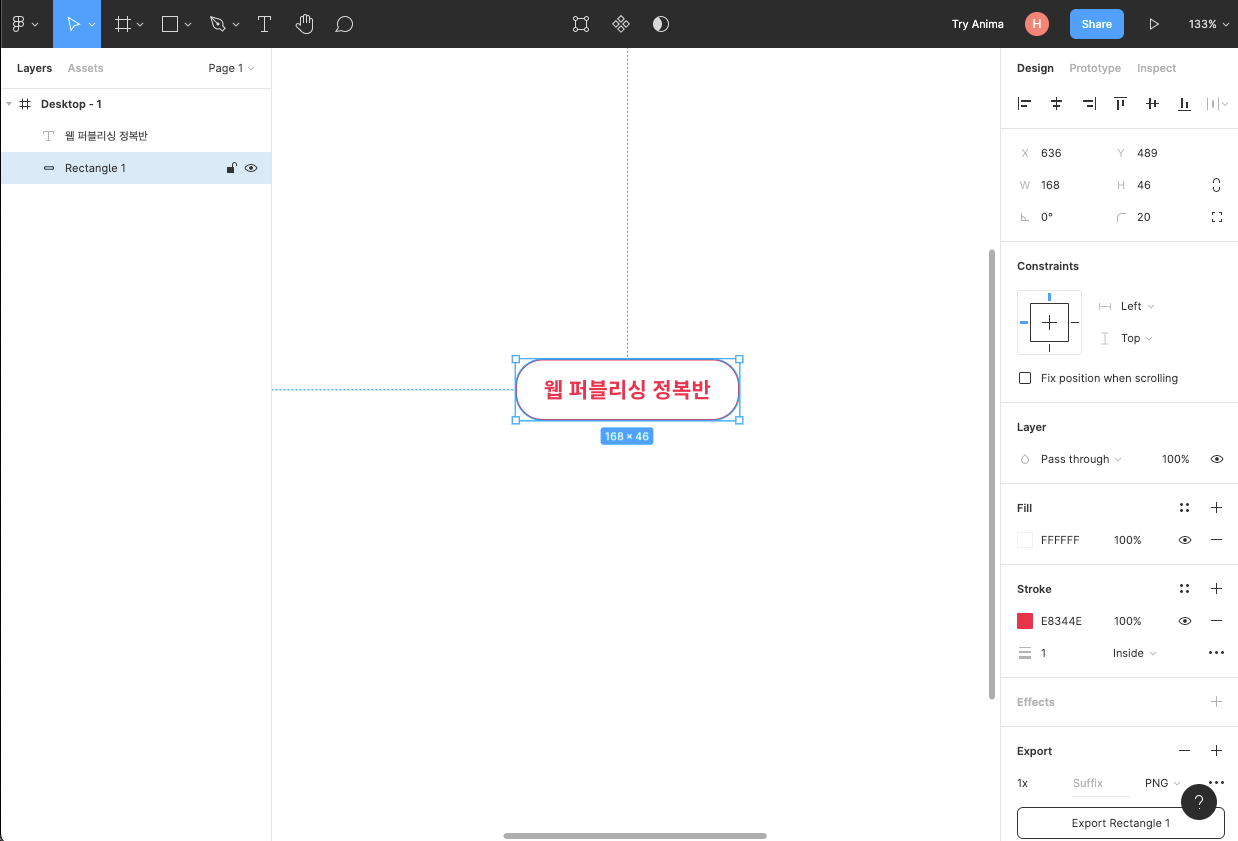
3) HTML, CSS 기본 내용
HTML은 크게 head와 body로 구성되며, head안에는 페이지의 속성 정보를, body안에는 페이지의 내용을 담습니다.
3-1) HTML의 기초
- head 안에 들어가는 대표적인 요소들: meta, script, link, title 등
- body 안에 들어가는 대표적인 요소들!
<<!DOCTYPE html>
<html lang="en">

<head>
    <meta charset="UTF-8">
    <meta name="viewport" content="width=device-width, initial-scale=1.0">
    <title>스파르타코딩클럽 | HTML 기초</title>
</head>

<body>
    <!-- 구역을 나누는 태그들 -->
    <div>나는 구역을 나누죠</div>
    <p>나는 문단이에요</p>
    <ul>
        <li> bullet point!1 </li>
        <li> bullet point!2 </li>
    </ul>

    <!-- 구역 내 콘텐츠 태그들 -->
    <h1>h1은 제목을 나타내는 태그입니다. 페이지마다 하나씩 꼭 써주는 게 좋아요. 그래야 구글 검색이 잘 되거든요.</h1>
    <h2>h2는 소제목입니다.</h2>
    <h3>h3~h6도 각자의 역할이 있죠. 비중은 작지만..</h3>
    <hr>
    a 태그입니다: <a href="http://google.com/" target="_blank">하이퍼링크</a>
    <hr>
    img 태그입니다: <img src="https://www.google.com/images/branding/googlelogo/1x/googlelogo_color_272x92dp.png" />
    <hr>
    input 태그입니다: <input type="text" />
    <hr>
    button 태그입니다: <button> 버튼입니다</button>
    <hr>
    textarea 태그입니다: <textarea></textarea>
</body>

</html>- VScode에서의 코드 정렬 단축키
- ctrl+k+f (맥은 cmd+k+f)
3-2) CSS의 기초
<head> ~ </head> 안에 <style> ~ </style> 로 공간을 만들어 작성합니다.
- 태그를 바로 가리켜서 꾸며주기
(Javascript)
h1 {
	color: red;
}- 이름표를 붙이고 꾸며주기
(HTML)
<<div class="box">
    <div>첫 번째 구역</div>
    <div>두 번째 구역</div>
</div>
(CSS)
.box {
    background-color: green;
		color: white;
}
4) HTML, CSS 실습하기
기본 내용을 습득했다면 한번 실습을 해봅시다!
1. 회원가입
2. 가운데 화면 버튼을 클릭 한 후 우측 속성을 살펴보자- 완성된 코드
(HTML)
<<!DOCTYPE html>
<html lang="en">
  <head>
    <meta charset="UTF-8" />
    <meta http-equiv="X-UA-Compatible" content="IE=edge" />
    <meta name="viewport" content="width=device-width, initial-scale=1.0" />
    <title>버튼 만들기</title>
    <style>

      body {
        width: 100%;
        height: 100vh;
      }

      .wrap {
        width: 100%;
        height: 100%;

        display: flex;
        justify-content: center;
        align-items: center;
      }

      button {
        background: #ffffff;
        border: 1px solid #e8344e;
        box-sizing: border-box;
        border-radius: 20px;

        padding-top: 14px;
        padding-bottom: 13px;
        padding-left: 21px;
        padding-right: 21px;

        font-weight: bold;
        font-size: 16px;
        line-height: 19px;
        color: #e8344e;
      }
    </style>
  </head>
  <body>
    <div class="wrap">
      <button>웹 퍼블리싱 정복반</button>
    </div>
  </body>
</html>
5) Javascript/jQuery 기본과 실습
Javascript는 특정 요소에 역할(기능)을 부여할때 사용되는 언어
주로 <script> </script> 안에 작성되며, 선택자(Selector)로 특정 요소를 선택해 클릭과 같은 부가적인 기능을 추가하는 코드입니다.
- [코드스니펫] 버튼에 클릭 이벤트 할당하기
```html
<!DOCTYPE html>
<html>
<head>
  <meta charset="utf-8">
</head>
<body>
  <button id="btn" type="button">버튼</button>

  <script>
    // id 가 btn 인 요소에 alert 을 표시하는 클릭 이벤트 부여하기
    document.getElementById('btn').addEventListener('click', function() {
      alert('버튼 클릭 이벤트');
    })
  </script>
</body>
</html>
```
jQuery는 Javascript를 좀 더 쉽게 다룰수 있도록 2006년에 출시된 자바스크립트 라이브러리입니다.
위에서 배운 Javascript를 jQuery 문법으로 작성하면 다음과 같습니다. 어때요 좀 더 간결해 보이나요?
- [코드스니펫] 버튼에 클릭 이벤트 할당하기 - jQuery
<!DOCTYPE html>
<html>
<head>
  <meta charset="utf-8">
	<script src="https://ajax.googleapis.com/ajax/libs/jquery/3.4.1/jquery.min.js"></script>
</head>
<body>
  <button id="btn" type="button">버튼</button>

  <script>
    // id 가 btn 인 요소에 alert 을 표시하는 클릭 이벤트 부여하기
    $('#btn').on('click', function() {
      alert('버튼 클릭 이벤트');
    })
  </script>
</body>
</html>
6) CSS 트랜지션(애니메이션) 개념과 실습
CSS 트랜지션은 주로 이전 스타일과 다음 스타일을 부드럽게 연결시켜주는 애니메이션을 구현할 때 주로 사용됩니다.
- 11) CSS 트랜지션 기본 개념 CSS 트랜지션은 CSS 속성을 변경할 때 애니메이션 속도를 조절하는 방법을 제공합니다. 속성 변경이 즉시 영향을 미치게 하는 대신, 그 속성의 변화가 일정 기간에 걸쳐 일어나도록 할 수 있습니다. 예를 들어, 여러분이 어떤 요소의 색상을 흰색에서 검은색으로 변경한다면, 변화는 대개 즉시 일어납니다. CSS 트랜지션을 이용하면, 모두 커스터마이즈 가능한 어떤 가속도 곡선을 따르는 시간 주기마다 변화가 일어납니다.
- [코드스니펫] 간단한 샘플 살펴보기 간단한 메뉴 버튼 트랜지션 이벤트 샘플 - 링크
- [코드스니펫] 간단한 샘플 살펴보기 간단한 메뉴 버튼 트랜지션 이벤트 샘플 - 링크
- 12) 마우스 hover 애니메이션 (색깔 변화) 예제 트랜지션 효과를 이용한 예제 3가지 케이스를 잘 비교하며 살펴봐 주세요.
- [코드스니펫] 간단한 버튼 hover 애니메이션 구현하기 button_hover_animation.zip
https://s3.ap-northeast-2.amazonaws.com/materials.spartacodingclub.kr/web_publish/week01/button_hover_animation.zip - HTML
<!DOCTYPE html> <html> <head> <meta charset="UTF-8" /> <meta name="viewport" content="width=device-width, initial-scale=1.0" /> <link rel="stylesheet" href="style.css" /> <script src="https://ajax.googleapis.com/ajax/libs/jquery/3.4.1/jquery.min.js"></script> </head> <body> <!-- 간단한 버튼 hover 애니메이션 (색깔 변화) --> <div class="buttons"> <button class="button use-css">웹 퍼블리싱</button> <button class="button use-javascript">왕초보 시작반</button> <button class="button use-class">웹개발 플러스</button> </div> <script src="script.js"></script> </body> </html> - CSS
html, body { margin: 0; padding: 0; width: 100%; height: 100%; display: flex; justify-content: center; align-items: center; } .button { padding: 5px 20px; font-size: 16px; font-weight: bold; cursor: pointer; color: #e8344e; background-color: white; border: solid 2px #e8344e; border-radius: 20px; transition: all 0.3s ease-in-out; } /* button use-css */ .button.use-css:hover { background-color: #e8344e; color: white; } /* button use-class */ .button.use-class.on { background-color: #e8344e; color: white; } - JavaScript
// button use-javascript
// mouseover, mouseout 시
// css 함수 사용
$(".button.use-javascript")
  .mouseover(function () {
    $(this).css({
      backgroundColor: "#e8344e",
      color: "white",
    });
  })
  .mouseout(function () {
    $(this).css({
      backgroundColor: "white",
      color: "#e8344e",
    });
  });

// button use-class
// mouseenter, mouseleave 시
// addClass, removeClass 함수 사용 css로 컨트롤
$(".button.use-class")
  .mouseenter(function () {
    $(this).addClass("on");
  })
  .mouseleave(function () {
    $(this).removeClass("on");
  });
- [코드스니펫] 간단한 버튼 hover 애니메이션 구현하기 button_hover_animation.zip
- 13) 클릭시 확장되는 드롭다운 예제 각 코드가 어떤것을 의미하는지 정확히 피악하는게 중요해요!
- [코드스니펫] 전체 코드 다운로드 dropdown_sample.zip
https://s3.ap-northeast-2.amazonaws.com/materials.spartacodingclub.kr/web_publish/week01/dropdown_sample.zip - HTML
<!DOCTYPE html> <html lang="en"> <head> <meta charset="UTF-8" /> <meta http-equiv="X-UA-Compatible" content="IE=edge" /> <meta name="viewport" content="width=device-width, initial-scale=1.0" /> <title>Document</title> <link rel="stylesheet" href="style.css" /> <script src="https://ajax.googleapis.com/ajax/libs/jquery/3.4.1/jquery.min.js"></script> </head> <body> <!-- 1. 제이쿼리 배우기, 간단한 예제로 클릭시 확장되는 드롭다운 샘플 --> <div class="dorpdown"> <button class="dropbtn">수업탐색</button> <ul> <li><a href="#webpublishing">웹 퍼블리싱</a></li> <li><a href="#start">왕초보 시작반</a></li> <li><a href="#plus">웹개발 플러스</a></li> </ul> </div> <script src="script.js"></script> </body> </html> - CSS
html, body { margin: 0; padding: 0; width: 100%; height: 100%; display: flex; justify-content: center; align-items: center; } a { text-decoration: none; color: inherit; } .dropbtn { padding: 5px 20px; font-size: 16px; font-weight: bold; cursor: pointer; color: #e8344e; background-color: white; border: solid 2px #e8344e; border-radius: 20px; transition: all 0.3s ease-in-out; } .dropbtn:hover, .dropbtn:focus { background-color: #e8344e; color: white; } ul { display: none; list-style: none; margin: 0; padding: 0; display: show; position: absolute; background-color: #f1f1f1; border-radius: 10px; box-shadow: 0px 8px 16px 0px #00000033; overflow: hidden; } ul li a{ display: block; width: 100%; height: 100%; padding: 10px; box-sizing: border-box; transition: all 0.3s ease-in-out; } ul li a:hover{ background-color: #fb6379; color: white; } - JavaScript
$('.dropbtn').on('click', function (evt) {
  const ulElement = $('ul');

  // 단순 보이기 구현
  // ulElement.show();

  // 토글 기능 구현
  ulElement.toggle();
});

// Click Outside : 버튼 외부 요소 클릭시 드롭다운이 다시 닫히도록 할 경우 사용합니다.
// $(document).on('click', function (evt) {
//   if ($(evt.target).parents('.dorpdown').length === 0) {
//     $('ul').hide();
//   }
// });
- [코드스니펫] 전체 코드 다운로드 dropdown_sample.zip
7) CSS 미디어 쿼리 기본 내용
- 14) 미디어 쿼리란? 주로 화면 크기가 다른 장치(PC, 태블릿, 스마트폰) 마다 다른 디자인을 보여주기 위해 사용됩니다. 미디어 쿼리는 단말기의 유형(출력물 vs. 화면)과, 어떤 특성이나 수치(화면 해상도, 뷰포트 너비 등)에 따라 웹 사이트나 앱의 스타일을 수정할 때 유용합니다.
- 반응형 웹을 구현하기 위해 사용하는 대표적인 CSS 기술입니다.
- 미디어 쿼리를 사용해 1개의 요소가 다른 디자인을 가질 수 있습니다.
- 즉, 일정 해상도(화면 크기) 에 따라 다른 CSS 코드를 가집니다.
- 미디어 쿼리는
@media (max-width: 700px) { ... }형태로 스타일 코드를 감싸야 합니다.
- 15) 샘플 코드로 살펴보는 미디어 쿼리 최근 현업에서는 미디어 쿼리를 사용하지 않고 각 디바이스(PC, TABLET, MOBILE)을 완전히 분리해 만드는 방식으로 점점 변화하고 있습니다.
- [코드스니펫] 미디어 쿼리 샘플 코드
<!DOCTYPE html>
<html>
  <head>
    <meta charset="UTF-8" />
    <meta name="viewport" content="width=device-width, initial-scale=1.0" />
    <title>mediaquery</title>
    <style>
      html,
      body {
        display: flex;
        margin: 0;
        padding: 0;
        width: 100%;
        height: 100%;
        justify-content: center;
        align-items: center;
      }

      .buttons {
        display: flex;
        justify-content: center;
        width: 100%;
      }

      .button {
        width: 300px;
        padding: 5px 20px;
        font-size: 16px;
        font-weight: bold;
        cursor: pointer;
        color: #e8344e;
        background-color: white;
        border: solid 2px #e8344e;
        border-radius: 20px;
        transition: all 0.3s ease-in-out;
      }

      /* button */
      .button:hover {
        background-color: #e8344e;
        color: white;
      }

      /* media query */
      /* 참고 MDN */
      /* https://developer.mozilla.org/ko/docs/Web/CSS/Media_Queries/Using_media_queries */
      /* https://developer.mozilla.org/ko/docs/Web/CSS/@media */

      /* 768px 이하일때 */
      /* button width 조정 */
      @media (max-width: 768px) {
        .button {
          width: 100%;
        }
      }
    </style>
  </head>
  <body>
    <!-- 미디어 쿼리와 반응형에 대한 개념. -->
    <div class="buttons">
      <button class="button">웹 퍼블리싱</button>
    </div>
  </body>
</html>
- [코드스니펫] 미디어 쿼리 샘플 코드

뭐든 시작은 좋은 사람