1. 오토 레이아웃

Width : 정렬 사각형의 너비
Height : 정렬 사각형의 높이
Top : 정렬 사각형의 상단
Bottom : 정렬 사각형의 하단
Baseline : 텍스트의 하단
Horizontal : 수평
Vertical : 수직
Leading : 리딩, 텍스트를 읽을 때 시작 방향
Trailing : 트레일링, 텍스트를 읽을 때 끝 방향
CenterX : 수평 중심
CenterY : 수직 중심
오토 레이아웃이란?
- 정의
- 핸드폰 기종에 따라 다양한 사이즈와 화면 비율로 출시되면서, 사이즈에 구애받지 않고 시각적으로 동일한 화면을 구현하기 위해 뷰의 제약 사항을 바탕으로 뷰 체계 내의 모든 뷰의 크기와 위치를 동적으로 계산합니다.
- 애플리케이션을 사용시 발생하는 외부 변경과 내부 변경에 동적으로 반응하는 사용자 인터페이스를 가능하게 합니다.
- 왜 필요?
- iOS기기의 스크린 화면 크기가 다를 경우
- iOS기기의 스크린이 회전할 수 있는 경우
- 상태표시줄에 전화중임을 나타내는 액티브 콜과 오디오 녹음 중임을 나타내는 오디오 바가 보여지거나 사라지는 경우
- app의 콘텐츠가 동적으로 보여지는 경우
- app이 지역화를 지원하는 경우
- app이 동적 타입을 지원하는 경우
- 외부 변경
- 슈퍼뷰의 크기나 모양이 변경할때 발생
- 사용자가 아이패드의 Split View를 사용하거나 사용하지 않는 경우
- 장치를 회전할때
- active call과 오디오 녹음바가 보여지거나 사라지는 경우
- 다른 크기의 클래스,스크린을 지원하기 원하는 경우
- 내부 변경
- 사용자 인터페이스의 뷰의 크기 또는 설정이 변경할때 발생
- 애플리케이션 변경에 의해 콘텐츠가 보여지는 경우
- 애플리케이션이 국제화를 지원하는 경우
- 애플리케이션이 동적 타입을 지원하는 경우
안전 영역 Safe Area

- 콘텐츠가 상태바, 내비게이션바, 툴바, 탭바를 가리는 것을 방지하는 영역
- iOS 11부터 사용가능 ( 11미만 버전에선 상/하단 레이아웃 가이드 사용 )
- 안전 영역 레이아웃 가이드는 UIView클래스의 var safeAreaLayoutGuide: UILayoutGuide로 접근할 수 있습니다.
제약 Constraint
- 뷰 스스로 또는 뷰 사이의 관계를 속성을 통하여 정의합니다.
고유 콘텐츠 크기
-
뷰의 고유 콘텐츠 크기는 뷰가 갖는 원래의 크기로 생각할 수 있습니다.
-
ex - 레이블의 고유 콘텐츠 크기는 레이블의 텍스트의 크기
- 이미지의 고유 콘텐츠 크기는 이미지 자체의 크기
제약 우선도
-
오토레이아웃은 뷰의 고유 콘텐츠 크기를 각 크기에 대한 한 쌍의 제약을 사용하여 나타냅니다.
-
우선도가 높을수록 다른 제약보다 우선적으로 레이아웃에 적용하며, 같은 속성의 다른 제약과 경합하는 경우, 우선도가 낮은 제약은 무시됩니다.

-
콘텐츠 허깅 우선도(Content hugging priority)
- 콘텐츠 고유 사이즈보다 뷰가 커지지 않도록 제한합니다.
- 다른 제약사항보다 우선도가 높으면 뷰가 콘텐츠 사이즈보다 커지지 않습니다.
-
콘텐츠 축소 방지 우선도(Content compression resistance priority)
- 콘텐츠 고유 사이즈보다 뷰가 작아지지 않도록 제한합니다.
- 다른 제약사항보다 우선도가 높으면 뷰가 콘텐츠 사이즈보다 작아지지 않습니다.
레이아웃 마진
- 뷰에 콘텐츠 내용을 레이아웃할 때 사용하는 기본 간격(default spacing)
- 레이아웃 마진 가이드(Layout Margins Guide) : 레이아웃 마진에 따라 형성되는 사각의 프레임 영역
앵커
-
오토레이아웃을 코딩으로 구현하여 제약(Constraint)을 만들기 위해 앵커(Anchor)를 사용할 수 있습니다.
-
앵커와 관련된 프로퍼티
var constraints: [NSLayoutConstraint]
// 뷰에 부여한 제약사항들은 담은 배열

var bottomAnchor: NSLayoutYAxisAnchor { get }
// 뷰 프레임의 하단부 레이아웃 앵커

var centerXAnchor: NSLayoutXAxisAnchor { get }
// 뷰 프레임의 수평 중심부 레이아웃 앵커

var centerYAnchor: NSLayoutYAxisAnchor { get }
// 뷰 프레임의 수직 중심부 레이아웃 앵커

var heightAnchor: NSLayoutDimension { get }
// 뷰 프레임의 높이를 가리키는 레이아웃 앵커

var leadingAnchor: NSLayoutXAxisAnchor { get }
// 뷰 프레임의 리딩을 가리키는 레이아웃 앵커

var topAnchor: NSLayoutYAxisAnchor { get }
// 뷰 프레임의 상단부 레이아웃 앵커

var trailingAnchor: NSLayoutXAxisAnchor { get }
// 뷰 프레임의 트레일링을 가리키는 레이아웃 앵커

var widthAnchor: NSLayoutDimension { get }
// 뷰 프레임의 넓이를 가리키는 레이아웃 앵커
2. 코드로 구현
NSLayoutConstraint
NSLayoutConstraint 인스턴스 생성을 사용하여 제약조건을 지정하는 방법
예시
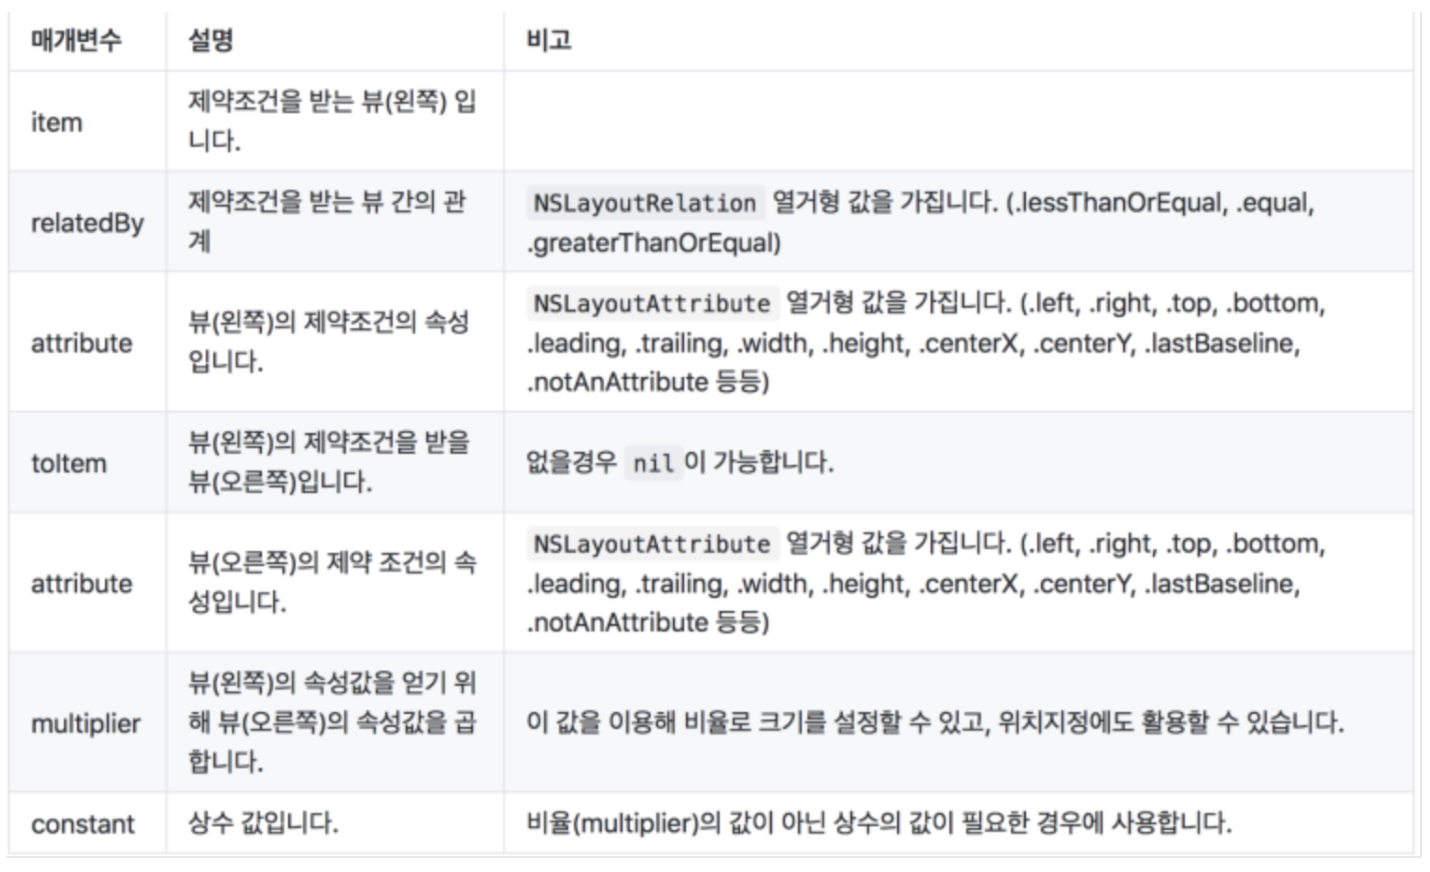
- button과 textField에 기본간격에 제약을 주기 위해 NSLayoutConstraint 인스턴스를 생성하는 코드
NSLayoutConstraint(item: button,
 			  attribute: .right,
 			  relatedBy: .equal,
 			  toItem: textField,
 			  attribute: .left,
 			  multiplier: 1.0,
constant: 8.0)- button의 너비가 50보다 크거나 같도록 넓이 제약(Width Constraint)을 줄 수 있는 NSLayoutConstraint 인스턴스 생성 코드

NSLayoutConstraint(item: button,
 			  attribute: .width,
 			  relatedBy: .greaterThanOrEqual,
 			  toItem: nil,
 			  attribute: .notAnAttribute,
 			  multiplier: 1.0,
constant: 50.0)-
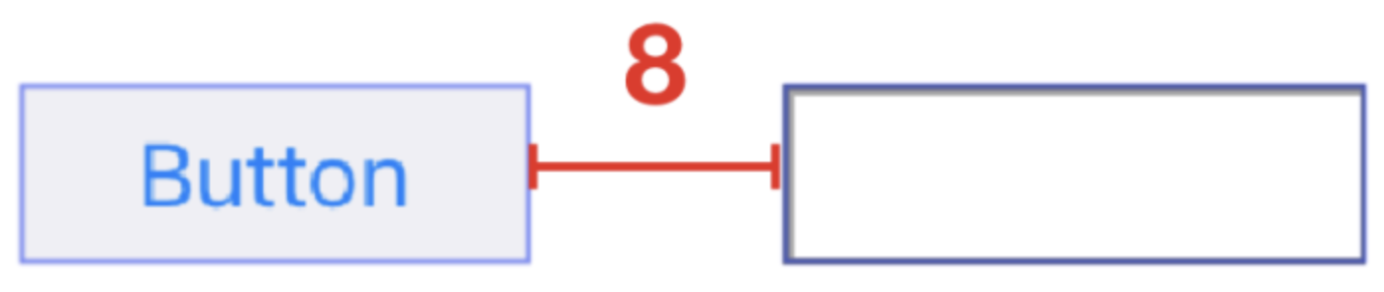
purpleBox가 superView를 기준으로 왼쪽(Leading) 간격은 50포인트, 오른쪽(Trailing) 간격은 50포인트로 설정합니다. (Connection to Superview)

NSLayoutConstraint(item: purpleBox, attribute: .left, relatedBy: .equal, toItem: self.view, attribute: .left, multiplier: 1.0, constant: 50.0) NSLayoutConstraint(item: purpleBox, attribute: .right, relatedBy: .equal, toItem: self.view, attribute: .right, multiplier: 1.0, constant: -50.0) -
topField와 bottomField의 세로 사이의 간격을 10포인트로 설정합니다.(Vertical Layout)
NSLayoutConstraint(item: topField,
 			  attribute: .bottom,
 			  relatedBy: .equal,
 			  toItem: bottomField,
 			  attribute: .top,
 			  multiplier: 1.0,
 			  constant: -10.0)
-
maroonView와 blueView의 간격이 없습니다. (Flush Views)
NSLayoutConstraint(item: maroonView,
 			  attribute: .right,
 			  relatedBy: .equal,
 			  toItem: blueView,
 			  attribute: .left,
 			  multiplier: 1.0,
 			  constant: 0.0)
-
button의 너비는 100포인트이고 우선도는 20으로 설정합니다. (Priority)
NSLayoutConstraint(item: button,
 			  attribute: .width,
 			  relatedBy: .equal,
 			  toItem: nil,
 			  attribute: .notAnAttribute,
 			  multiplier: 1.0,
 			  constant: 100.0).priority = UILayoutPriority(rawValue: 20)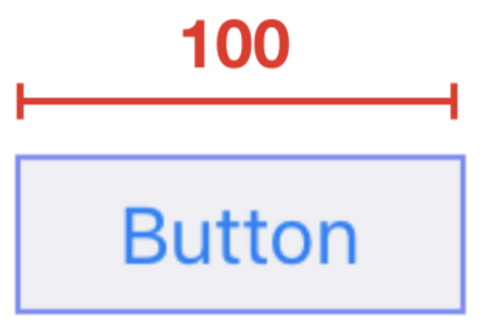
3. 인터페이스 빌더로 구현
-
인터페이스 빌더에서 오토레이아웃 제약 설정 3가지
-
컨트롤 - 드래그 제약

-
Using the Stack, Align, Pin and Resolve Tools 사용
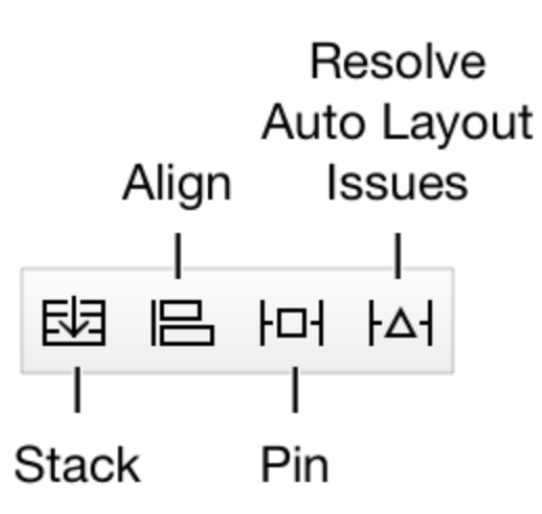
-
스택 툴 : 스택뷰를 재빠르게 생성할 수 있게 해줍니다.

-
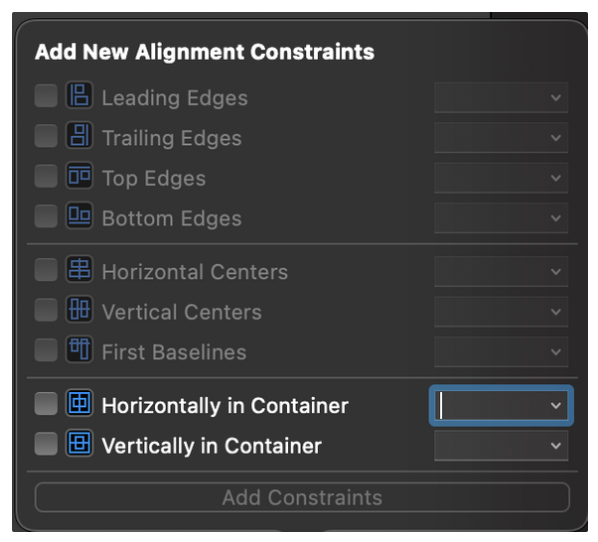
정렬 툴 : 정렬하려는 뷰를 선택후, 정렬 툴 사용
-
핀 툴 : 뷰의 이웃과 연관된 뷰의 위치 또는 그 크기를 재빠르게 정의하도록 합니다.

- constrain to margins : 여백 제약하기, 슈퍼뷰가 슈퍼뷰의 여백 또는 엣지를 사용하는 것을 제약할 것인지의 여부를 결정
-
리졸브 툴 : 오토레이아웃 문제 해결의 위한 도구로, 일반적인 오토레이아웃의 문제를 고치는 몇가지 옵션을 제공합니다.
- 메뉴의 절반 위 : 현재 선택된 뷰에 한해 영향
- 메뉴의 절반 아래 : 씬에 있는 모든 뷰에 영향
-
-
인터페이스 빌더가 제약 설정하는 방식
-