배열
- 변수를 묶음으로 다루는 것 (자료구조의 기초)
(JS 변수의 특징 : 대입되는 값에 따라서 자료형이 변함)
-> JS 배열 : 자료형 상관 없이 여러 값을 한 번에 다룸
- JS 배열의 특징
- 자료형 제한 X (하지만 보통은 한 가지 자료형만 저장한다)
- 길이 제한 X (자동으로 배열 길이가 늘었다, 줄었다 한다)
[JS 배열 선언 방법]
1. const arr = new Array();	// 0칸짜리 배열(비어있는 배열) 생성

2. const arr = new Array(3); // 3칸짜리 배열 생성
							// 단, 각 칸의 값은 비어있음

3. const arr = [];	// 0칸짜리 배열 생성
					// [] : 배열 기호

4. const arr [값1, 값2, 값3];	// 3칸짜리 배열 생성
							  // 각 칸이 값으로 채워져 있음
# JS

  // 배열 선언 및 기초 사용법
  function check1() {

  // 배열 선언 방법 확인
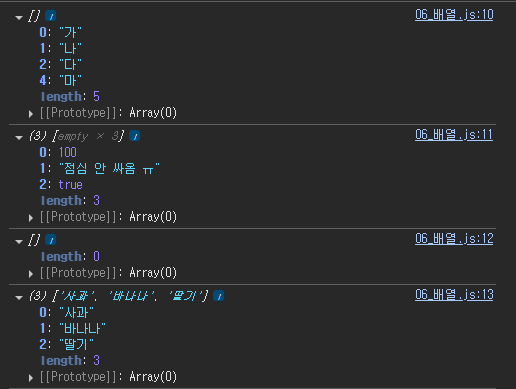
  const arr1 = new Array();
  const arr2 = new Array(3);
  const arr3 = [];
  const arr4 = ["사과", "바나나", "딸기"];

  console.log(arr1);
  console.log(arr2);
  console.log(arr3);
  console.log(arr4);
  // 배열명.length : 배열의 길이
  // (배열에 있는 칸 수 또는 저장된 데이터 수)
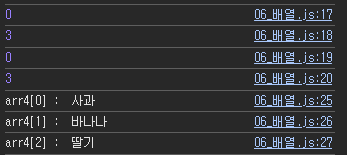
  console.log(arr1.length);
  console.log(arr2.length);
  console.log(arr3.length);
  console.log(arr4.length);

  // 배열의 index
  // 배열명[index]
  // -> 배열의 해당 인덱스에 존재하는 데이터를 반환
  console.log('arr4[0] : ', arr4[0]);
  console.log('arr4[1] : ', arr4[1]);
  console.log('arr4[2] : ', arr4[2]);
 // 배열명[index] = 값;
  // -> 해당 인덱스에 지정된 값 대입

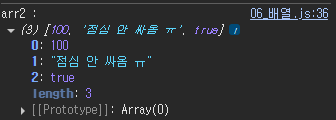
  arr2[0] = 100;  // number
  arr2[1] = "점심 안 싸옴 ㅠ" // String
  arr2[2] = true; // boolean

  console.log("arr2 : ", arr2);
  // JS 배열의 특징 : 인덱스별로 자료형을 다르게 지저할 수 있다!
  // 길이 제한이 없다 -> 값을 배열에 원하는 만큼 추가 가능
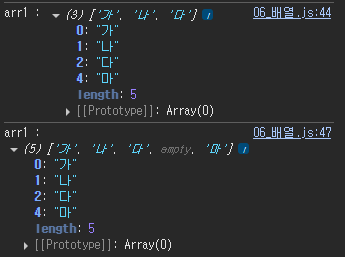
  arr1[0] = "가";
  arr1[1] = "나";
  arr1[2] = "다";

  console.log("arr1 :" , arr1);

  arr1[4] = "마";
  console.log("arr1 :" , arr1);
  // 원하는 index에 값을 마음대로 추가할 수 있다.
  // -> 중간에 건너뛴 index는 빈칸으로 채워짐.
// 배열과 for문
  // for문을 이용해서 배열 요소 초기화 하기

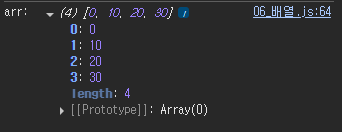
  const arr = [];

  for(let i = 0; i <= 3; i++) {
    arr[i] = i * 10;
  }

  console.log("arr: ", arr);
    <button onclick="check3()">점심 메뉴 뽑기</button>
    <h4>오늘의 점심 : <span id="menuResult"></span></h4>
// 점심메뉴 뽑기 // 결과 출력 span const menuResult = document.getElementById("menuResult"); // 점심 메뉴로 초기화 된 배열 생성 const menu = ["돈까스", "김치볶음밥", "샌드위치", "순두부", "알리오올리오", "페퍼로니피자", "소맥", "짜파구리", "오리", "뇨끼", "파전"]; // 길이 11 // menu 배열 index 범위 내에서 난수 생성 const randomNumber = Math.floor(Math.random() * menu.length); // Math.floor() 이용 시 소수점 이하가 버려져 정수 범위만 출력 // 0이상 10 이하 난수 생성 // 난수 번째 index 요소값을 화면에 출력 menuResult.innerText = menu[randomNumber];
요소 접근 방법
DOM (Document Object Model : 문서 객체 모델)
- 웹 문서(HTML)의 모든 요소를 객체 형식으로 표현한 것.
(HTML 요소 == JS에서 객체라고 부름)-> 문서 내 특정 요소에 접근 가능
+ 요소(객체)에 속성 값을 세팅 또는 얻어올 수 있다.
document.getElememtById("id속성값");
document.getElementByClassName("class속성값");
DOM을 이용한 요소 접근하기
- id로 접근하기 : document.getElementById("id속성값");
-> 아이디가 일치하는 요소(객체)를 얻어옴
- class로 접근하기 : document.getElementsByClassName("class속성값");
-> 클래스가 일치하는 모든 요소를 얻어와 배열 형태로 반환
- name으로 접근하기 : document.getElementsByName("name속성값");
-> name이 일치하는 모든 요소를 얻어와 배열(NodeList, 유사배열) 형태로 반환
- tag로 접근하기 : document.getElementsByTagName("tag명");
-> 태그가 일치하는 모든 요소를 얻어와 배열 형태로 반환
- CSS 선택자로 접근하기
1) document.querySelector("CSS 선택자");
-> 선택자가 선택한 요소 중 첫번째 요소를 반환
2) document.querySelectorAll("CSS 선택자");
-> 선택한 요소 모두를 배열(NodeList, 유사배열) 형태로 반환
유사배열이란 ?
배열처럼 index, length를 가지고 있으나, 배열 전용 기능(메서드)를 제공하지 않음.
pop(), push(), map(), filter() 등..
HTMLCollection, NodeList는 유사 배열.HTMLCollection : 동적 Collection
-> DOM 변경 시 자동 업데이트 됨.
-> getElementsByTagName(), getElementsByClassName()NodeList : 정적 Collection
-> DOM 변경과 무관
-> getElementsByName(), querySelectorAll()
class를 이용한 요소(DOM 객체) 접근하기
  <button onclick="classTest()">배경색 변경</button>
  <div class="cls-test"></div>
  <div class="cls-test"></div>
  <div class="cls-test"></div>
# CSS .cls-test { width: 400px; height: 150px; border: 1px solid black; }# JS // class 접근 테스트 function classTest() { const divs = document.getElementsByClassName("cls-test"); console.log(divs); // divs 0, 1, 2 째 요소에 각각 배경색 변경하기 divs[0].style.backgroundColor = "rgb(114,203,80)"; divs[1].style.backgroundColor = "blue"; divs[2].style.backgroundColor = "deepPink"; }
태그명으로 요소 접근하기
  <ul>
    <li>#ffbe0b</li>
    <li>#fb5607</li>
    <li>#ff006e</li>
    <li>#8338ec</li>
    <li>#3a86ff</li>
  </ul>
  <button onclick="tagNameTest()">배경색 변경</button>
# JS // 태그명으로 요소 접근하기 function tagNameTest() { const tagList = document.getElementsByTagName("li"); console.log(tagList); for(let i = 0; i < tagList.length; i++) { console.log(tagList[i].innerText); tagList[i].style.backgroundColor = tagList[i].innerText; } }
name으로 요소 접근하기
- name 속성은 input 또는 input 관련 태그만 기본 속성으로 가지고 있다.
  <table>
    <tr>
      <td>
        <input type="checkbox" name="hobby" id="game" value="게임">
        <label for="game">게임</label>
      </td>
      <td>
        <input type="checkbox" name="hobby" id="music" value="음악감상">
        <label for="music">음악감상</label>
      </td>
      <td>
        <input type="checkbox" name="hobby" id="movie" value="영화감상">
        <label for="movie">영화감상</label>
      </td>
    </tr>

    <tr>
      <td>
        <input type="checkbox" name="hobby" id="coding" value="코딩">
        <label for="coding">코딩</label>
      </td>
      <td>
        <input type="checkbox" name="hobby" id="exercise" value="운동">
        <label for="exercise">운동</label>
      </td>
      <td>
        <input type="checkbox" name="hobby" id="book" value="독서">
        <label for="book">독서</label>
      </td>
    </tr>
  </table>

  <div id="name-div"></div>

  <button onclick="nameTest()">선택된 취미만 출력하기</button>
# CSS #name-div { width: 300px; height: 100px; border: 1px solid black; }# JS // name으로 요소 접근하기 function nameTest() { // name 속성값이 hobby인 요소를 모두 얻어와 변수에 저장 const hobbyList = document.getElementsByName("hobby"); console.log(hobbyList); let str = ""; // 체크된 값 누적할 문자열 let count = 0; // 체크된 수 카운트 for(let i = 0; i < hobbyList.length; i++ ){ // checkbox, radio 전용 속성 (.checked) // input요소.checked // -> 요소가 체크되어있다면 true, 아니면 false 반환 // input요소.checked = true; -> 해당 요소를 체크하겠다. // input요소.checked = false; -> 해당 요소를 체크 해제하겠다. if(hobbyList[i].checked) { str += hobbyList[i].value + " "; count++; } } // #name-div 요소에 내용으로 결과 출력 document.getElementById("name-div").innerHTML = `${str} <br><br>선택된 취미 개수 : ${count}`; // 요소.innerHTML // HTML 태그를 포함하여 문자열 등을 실제 HTML 요소로 해석함 // 요소.innerText // 텍스트 내용만 요소 콘텐트 내부에 출력함.(HTML 코드로 해석 X) }
CSS 선택자로 요소 접근하기
  <div target-div="css-div">
    <div>test1</div>
    <div>test2</div>
  </div>

  <button onclick="cssTest()">css 선택자로 요소 접근하기</button>
# CSS [target-div="css-div"] { width: 200px; height: 200px; border: 1px solid black; } [target-div="css-div"] > div { height: 50%; } [target-div="css-div"] > div:first-child { background-color: pink; } [target-div="css-div"] > div:last-child { background-color: yellow; }# JS function cssTest() { // target-div 속성값이 "css-div" 요소에 접근 const container = document.querySelector("[target-div='css-div']"); // 요소의 테두리 변경 container.style.border = "10px solid red"; // 첫번째 자식 div 접근해서 // 내용을 "CSS 선택자로 선택해서 값 변경됨" 변경해보기 const div1 = document.querySelector("[target-div='css-div'] > div"); div1.innerText = "CSS 선택자로 선택해서 값 변경됨"; const div2 = document.querySelector("[target-div='css-div'] > div:last-child"); div2.innerText = "첫번째 요소가 아니면 querySelector() 특징 활용 못함"; // 모든 자식 div 한 번에 선택(배열) const divList = document.querySelectorAll("[target-div='css-div'] > div"); console.log(divList); // index를 이용해서 요소 하나씩 접근 divList[0].style.fontFamily = "궁서"; divList[1].style.fontSize = "20px"; for(let i=0; i < divList.length; i++) { divList[i].onclick = function() { alert(`${i} 번째 요소 입니다!`); } } }
카카오톡 모양의 채팅화면 만들기
  <div class="chatting">
    <div id="chatting-bg">
      <p><span>입력되는 채팅 출력</span></p>
      <p><span>입력되는 채팅 출력</span></p>
      <p><span>입력되는 채팅 출력</span></p>
    </div>

    <div id="chatting-input">
      <input type="text" id="user-input">
      <button onclick="readValue()">입력</button>
    </div>
  </div>
# CSS /* 카카오톡 채팅 화면 만들기 */ .chatting, .chatting * { box-sizing: border-box; padding: 0; margin: 0; } /* 전체 감싸는 요소 */ .chatting { width: 360px; border: 1px solid black; margin: 50px 20px; } /* 채팅 출력 부분 */ #chatting-bg { background-color: rgb(178, 199, 217); width: 100%; height: 400px; /* overflow : 내부 내용이 감싸는 요소를 넘었을 때 처리하는 속성 */ /* auto : 넘치기 전 -> 변화없음 , 넘친 후 -> 스크롤 발생 */ /* hidden : 넘친 부분을 안보이게끔 처리함 */ overflow: auto; } /* 채팅 내용 */ #chatting-bg > p { margin: 20px 10px; text-align: right; } #chatting-bg > p > span { background-color: rgb(254, 234, 51); padding: 5px; border-radius: 5px; } /* 입력 부분 */ #chatting-input { width: 100%; display: flex; height: 22px; } #chatting-input > input { height: 100%; width: 90%; outline: 0; padding-left: 5px; } #chatting-input > button { height: 100%; width: 10%; }# JS // 카카오톡 채팅 화면 만들기 function readValue() { // 채팅이 출력되는 배경 요소 const bg = document.querySelector("#chatting-bg"); // 채팅 내용 입력 input 요소 const input = document.querySelector("#user-input"); // 입력된 값이 없을 경우 // 1) 진짜 안적음 // 2) 공백만 적음 // 문자열.trim() : 문자열 좌우 공백 제거 if(input.value.trim().length == 0) { alert('채팅 내용을 입력해주세요'); input.value = ""; // 이전 input에 작성된 값 삭제 input.focus(); // input에 커서 활성화 return; // 아래 수행 X , 현재 수행중인 함수 종료 } bg.innerHTML += `<p><span>${input.value}</span></p>`; bg.scrollTop = bg.scrollHeight; // bg.scrollTop : 현재 스크롤 위치 // (스크롤이 현재 얼마만큼 내려와있는지를 나타냄) // bg.scrollHeight : bg의 스크롤 전체 높이 // (스크롤바를 이용해 스크롤 할 수 있는 전체 높이) //console.log(bg.scrollTop); //console.log(bg.scrollHeight); input.value = ""; input.focus(); } /* 아이디가 user-input인 input요소에서 키가 올라오는 동작이 발생했을 때(감지되었을때) 올라온 키가 "Enter" 키 이면 readValue() 함수를 호출 */ // keydown : 키가 눌러졌을 때 (+ 꾹 누르고 있으면 계속 인식됨) // keyup : 눌러지던 키가 떼어졌을 때(1회만 인식) document.querySelector("#user-input") .addEventListener("keyup", function(e) { // e : 이벤트 객체 (발생한 이벤트 정보를 담고있는 객체) console.log(e); if(e.key == "Enter") { // 엔터가 눌러지고 떼어졌을 때 readValue(); } });
이벤트
동작, 행위
-> 브라우저에서 할 수 있는 동작ex) click, keyup, keydown, keypress, mouseover, mouseon, mouseout,
mouseleave, drag, change, submit...* 이벤트 리스너 (Event Listener)
-> 브라우저에서 이벤트가 감지될 때까지 대기하다가 감지가 되었을 때
연결된 기능(함수)을 수행하는 것.
- 이벤트 리스너는 "on이벤트명" 형식으로 작성됨
ex) onclick, onchange, onsubmit, onkeyup ...* 이벤트 핸들러 (Event Handler)
-> 이벤트 리스너에 연결된 기능(함수)으로
이벤트가 감지되었을 때 수행할 내용을 작성한 함수(function)
인라인 이벤트 모델 (Inline)
HTML 요소에 이벤트리스터='이벤트핸들러' 형식을 작성하는 방법
하나의 요소에 동일한 이벤트 핸들러를 중복 작성 X
* 최근에는 사용을 많이 하지는 않지만 종종 사용됨
* 인라인 이벤트 모델 작성 시 this -> 이벤트가 발생한 현재 요소<button onclick="check1(this)" style="background-color: yellow;"> 인라인 이벤트 모델 확인 </button># JS /* 인라인 이벤트 모델 확인 */ function check1(btn) { console.log(btn); // 매개변수 btn == 클릭한 버튼(this) // 현재 버튼의 배경색을 얻어와 저장 const bgColor = btn.style.backgroundColor; // 버튼이 클릭 될 때마다 pink <-> yellow 변경 if(bgColor == "yellow") { btn.style.backgroundColor = "pink"; } else { btn.style.backgroundColor = "yellow"; } }
고전 이벤트 모델
HTML 요소에 이벤트 관련 코드를 작성하지 않고
JS에서 DOM 객체에 직접 이벤트 관련 코드를 작성하는 방법.하나의 요소에 동일한 이벤트 핸들러를 중복 작성 X
  <button id="test1-1">고전 이벤트 모델 확인</button>
  <button id="test1-2">고전 이벤트 모델 제거</button>
  <button id="test1-3">고전 이벤트 모델 단점</button>
# JS // 고전 이벤트 모델 확인 // 아이디가 test1-1 요소를 얻어와 test1a 변수에 저장 const test1a = document.querySelector("#test1-1"); // ** 고전 이벤트 모델 작성법 ** // 요소.이벤트리스너 = 이벤트핸들러 test1a.onclick = function() { alert("고전 이벤트 모델 확인 버튼 클릭됨"); } // 고전 이벤트 모델 제거 // #test1-2 버튼 클릭 시 // #test1-1 의 onclick 이벤트리스너의 이벤트 핸들러 제거하기 document.querySelector("#test1-2").onclick = function() { // 기존 onclick 의 이벤트핸들러(함수)를 // null 로 덮어씌움 (이벤트제거) test1a.onclick = null; alert("이벤트 제거됨"); } // 고전 이벤트 모델 단점 // #test1-3 요소를 얻어와 test1c 변수에 저장 const test1c = document.querySelector("#test1-3"); // #test1-3 요소가 클릭되었을 때 배경색 빨간색으로 변경 test1c.onclick = function() { test1c.style.backgroundColor = "red"; } // 시간이 지난 뒤 test1c.onclick = function() { test1c.style.color = "white"; } // -> onclick에 저장된 값이 덮어씌워지면서 // 이전 코드(배경색 red)가 사라지는 문제 발생
표준 이벤트 모델 (요소.addEventListener())
w3c (웹 표준 재정 단체)에서 공식적으로 지정한 이벤트 모델
특징 : 한 요소에 중복되는 이벤트 리스너를 만들어 여러 이벤트 핸들러를 추가할 수 있다.
-> 고전 이벤트 모델 단점 해결<!-- 클릭할 수록 투명해지게 + 클릭한 횟수 count --> <div id="test2">클릭!!!</div># CSS #test2 { width: 100px; height: 100px; border: 1px solid black; background-color: green; }# JS // 표준 이벤트 모델 확인 const test2 = document.querySelector("#test2"); // *** 표준 이벤트 모델 작성법 *** // 요소.addEventListener("이벤트종류", 이벤트핸들러(함수)); test2.addEventListener("click", function() { // 투명도 1 (불투명) -> 0 (투명) 0.1씩 감소 // 현재 #test2 의 투명도 확인 let curr = test2.style.opacity; console.log(curr); // 맨처음에는 투명도 "" -> 1 대입 if(curr == '') { test2.style.opacity = 1; curr = 1; } // 투명도 0.1 감소 test2.style.opacity = curr - 0.1; if(test2.style.opacity == 0) { // 완전히 투명해졌다면 test2.style.opacity = 1; // 다시 불투평하게 바꿔라 } }); // #test2 요소를 클릭하면 클릭 횟수 카운트 let count = 0; test2.addEventListener("click", function() { count++; // 카운트 1 증가 // 표준 이벤트 모델의 이벤트 핸들러 내부에서 this // == 이벤트가 발생한 요소 this.innerText = count; });
연습문제
입력한 색상으로 배경색 변경하기
  <div class="container3">
    <div id="box3"></div>
    <input type="text" id="input3" placeholder="색상 입력">
  </div>
# CSS .container3 { width: 200px; border: 1px solid black; display: flex; flex-direction: column; padding: 5px; } #box3 { box-sizing: border-box; height: 200px; border: 1px solid black; transition-duration: 0.5s; } .container3 * { margin-bottom: 5px; }# JS const input3 = document.querySelector("#input3"); const box3 = document.querySelector("#box3"); input3.addEventListener("keyup", function(e) { if(e.key == "Enter") { box3.style.backgroundColor = input3.value; } }); box3.addEventListener("click", function(e) { // e.target : 이벤트가 발생한 대상 요소 == this alert(`배경색 : ${e.target.style.backgroundColor}`); })