1 아키텍처 기초
1.1 아키텍처 설계란?
- 서브시스템 수준에서 덩어리화(chunking) 하여 구성요소를 나누고, 다양한 수준에서 구성요소의 역할과 구성요소 간 관계에 집중하는 작업
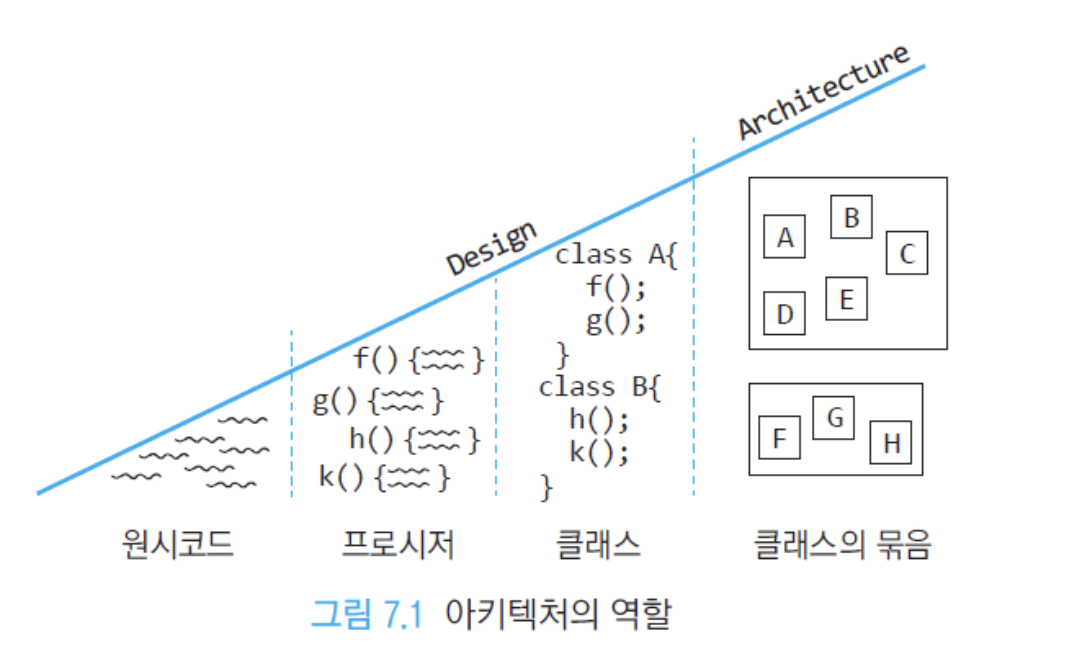
1.2 아키텍처의 역할
- 시스템 구조를 확립하는 SW 개발의 중심축
- 설계뿐 아니라 구현·통합·테스팅까지 이어지는 뼈대
- 전 단계에 영향을 주는 초기 의사결정의 핵심
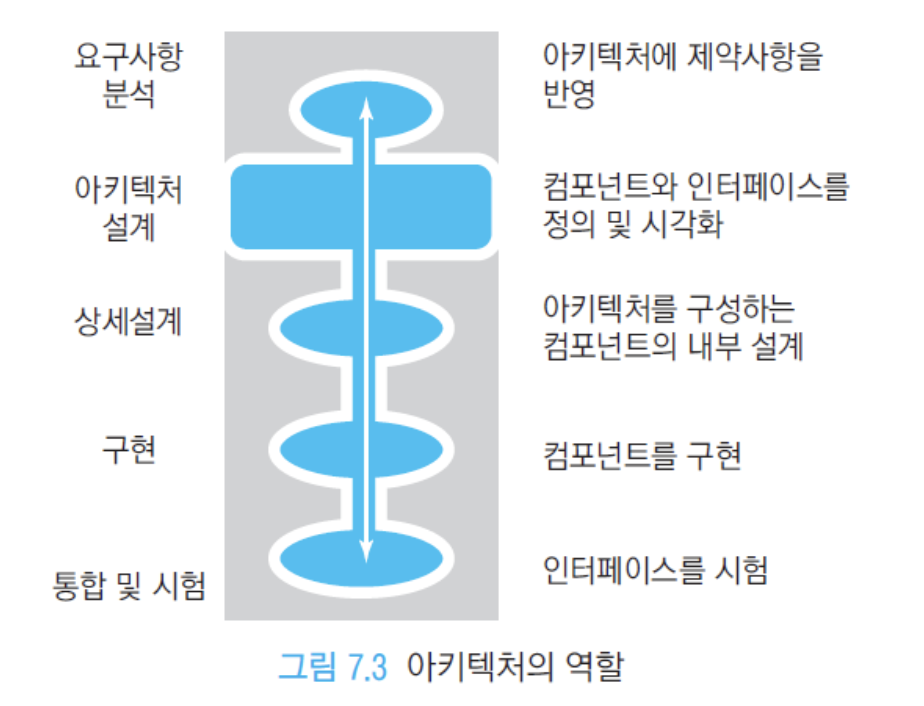
1.3 아키텍처의 표현
2 아키텍처 스타일(Architecture Styles)
아키텍처 스타일이란?
- 시스템의 “일반적인 모양/조화”를 정하는 작업
- 포함 내용: 시스템 분할, 전체 제어 흐름, 오류 처리 방침, 서브시스템 통신 프로토콜 등
- 구성요소 유형, 런타임 제어, 데이터 전송 패턴을 규정
주요 스타일
- 클라이언트-서버형 / 계층형 / 이벤트 기반 / MVC / 파이프-필터 / 데이터 중심 / P2P
2.1 클라이언트-서버(Client-Server)
- 서버: 자원 관리 + 클라이언트 요청 기능/자원 제공
- 클라이언트: 자원 사용을 위해 서버 접속
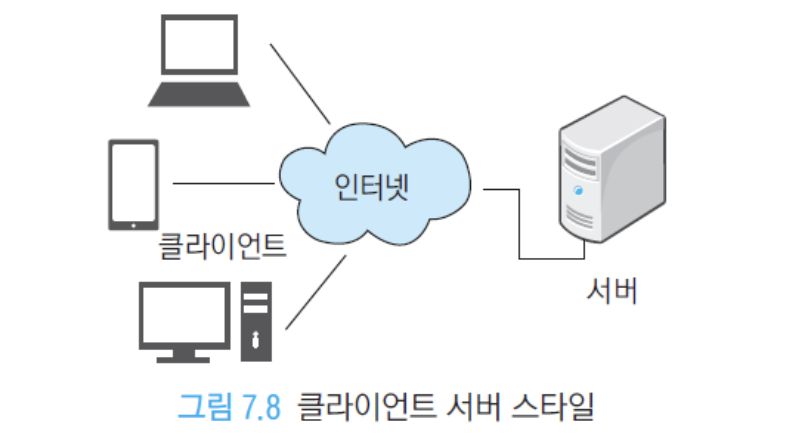
- 장점: 데이터 집중화, 보안
- 단점: 병목, 비용, 비강인성(서버 문제 시 영향 큼)
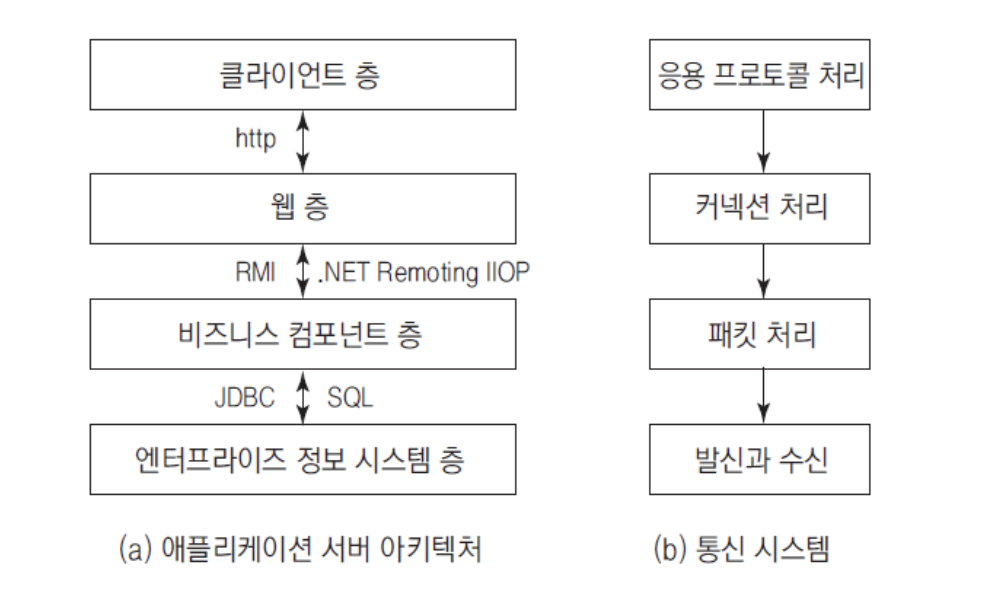
2.2 계층형(Layered)
- 기능을 수직으로 여러 층으로 분할, 층 사이 메시지 교환
- 장점: 추상화/캡슐화, 응집 높음, 결합 낮음, 재사용성
- 단점: 이웃 층과의 커뮤니케이션 제한적
2.3 이벤트 기반(Event-driven)
- 이벤트 스트림을 생성하는 이벤트 생산자 + 이벤트를 수신 대기하는 이벤트 소비자로 구성
- 이벤트는 실시간 전달되어 소비자가 즉시 응답(상태 기반 처리)
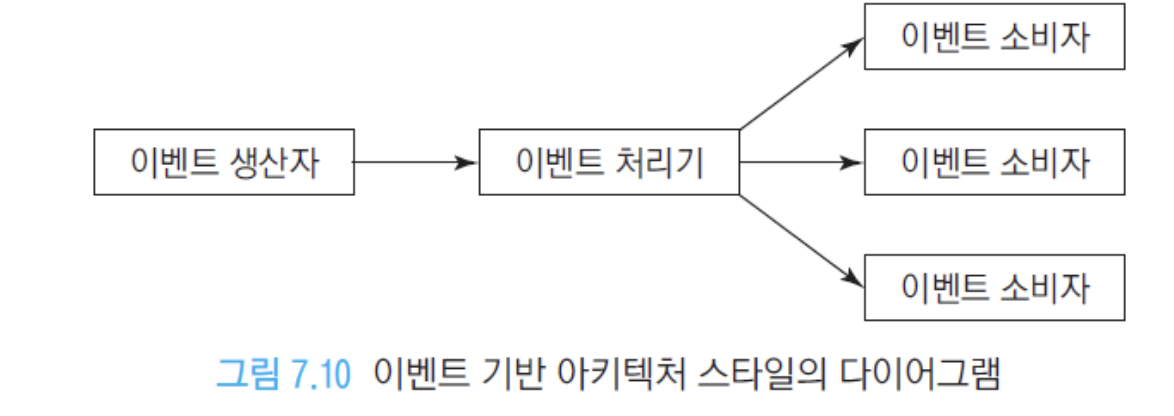
- 장점: 캡슐화, 응집, 확장성
- 단점: 복잡성, 테스팅
2.4 MVC(Model-View-Controller)
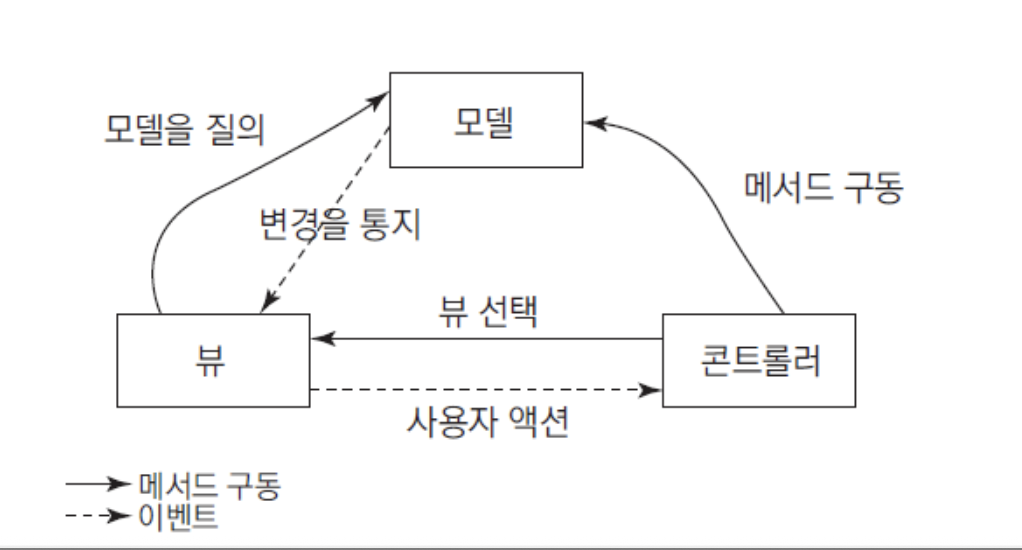
- UI로부터 비즈니스 로직/데이터를 분리
- Controller: 모델에 명령 → 모델 상태 변경
- Model: 상태 변화 시 컨트롤러/뷰에 통보
- View: 사용자에게 보여줄 결과 생성(모델에서 정보 획득)
- 장점: 느슨한 결합, 확장성, 다양한 뷰, 비동기
- 단점: 복잡도, 비효율성
2.5 파이프-필터(Pipe & Filter)
- 필터 사이로 데이터를 이동시키며 단계적으로 처리
- 필터: 데이터 변환 수행 구성요소(예: 컴파일러)
- 데이터 전처리 시에 등장함
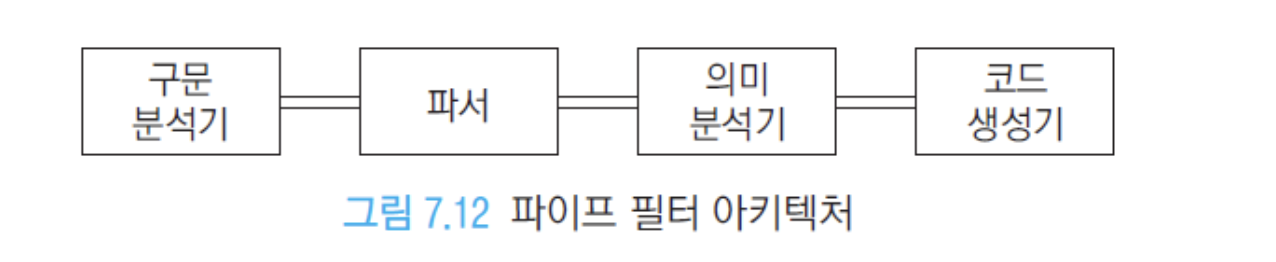
- 데이터 전처리 시에 등장함
- 장점: 단순성, 재사용, 병렬성
- 단점: 자원 낭비
2.6 데이터 중심(Data-centered)
- 공유 데이터 저장소 + 공유 데이터 접근자로 구성
- 접근자: 공유 데이터 추가/삭제/수정
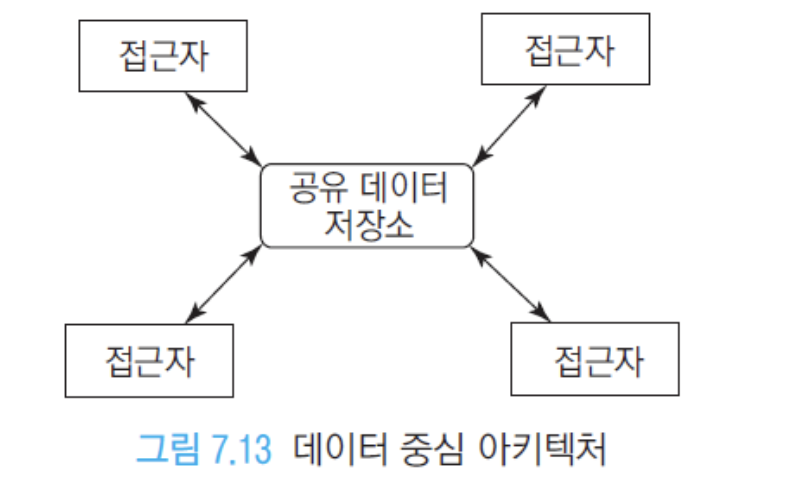
- 블랙보드: 제어 스레드 포함, 옵서버 패턴 사용
- 리파지토리: 공유 데이터를 질의해 변경사항 발견
- 장점: 낮은 결합, 확장성
- 단점: 단일 장애지점
2.7 Peer-to-Peer(P2P)
- 각 컴포넌트가 동등: 요청하는 클라이언트이면서 동시에 제공하는 서버 역할
- 동일한 수신/전송 데이터 양을 가지는 대칭적 시스템
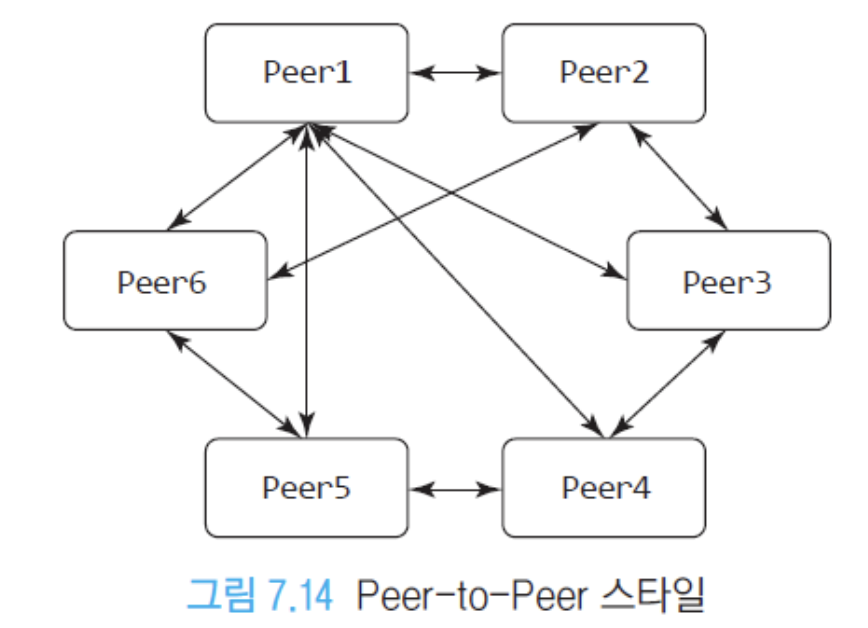
- 장점: 전담하는 애플리케이션이나 서버가 없음, 컴포넌트에 고장이 있어도 전체 시스템은 가동됨.
- 단점: 보안이 취약할 수 있음, 중앙 제어 x, 공유된 자원으로 성능이 저하될 수 있음
2.8 마이크로커널 스타일
3 디자인 패턴(Design Patterns)
디자인 패턴이란?
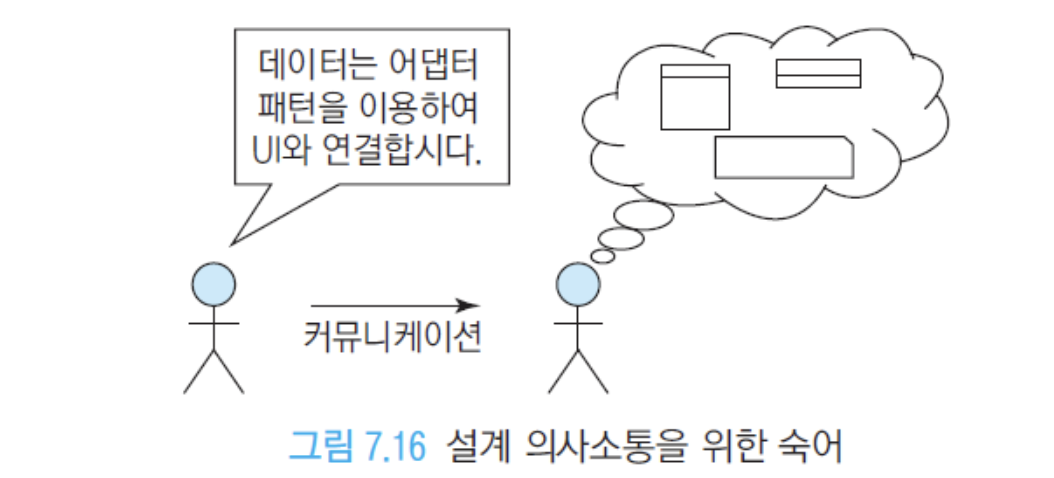
- 아키텍처 설계보다 낮은 수준의 설계 문제에 대해 재사용 가능한 솔루션을 제공
3.1 디자인 패턴의 혜택
- 재사용 가능, 설계 작업 쉬움
- 확장이 용이해야함.
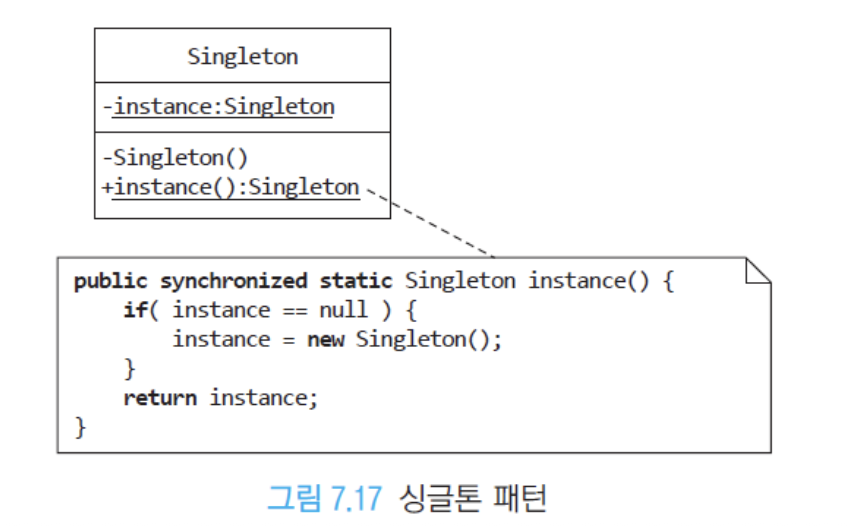
- 설계 지식 정리, 의사소통 쉬움
- 객체지향 설계 원리를 잘 따르게 됨
3.2 디자인 패턴의 형식
소프트웨어 디자인 패턴을 설명하는 일관된 형식이 존재함.
- 패턴 이름
- 소개
- 해결하는 문제
- 솔루션
- 예제
- 관련 패턴
3.3 싱글톤(Singleton) 패턴
- 객체를 강제적으로 하나만 생성 (예: DB 커넥션 인터페이스)
- 이 하나를 계속 활용함. (하나 만들고 없애고 다시 만들고.. 이런거 아님)
- 방법: 정적 변수로 인스턴스 유지 + 생성자 private + 정적 메서드로 접근
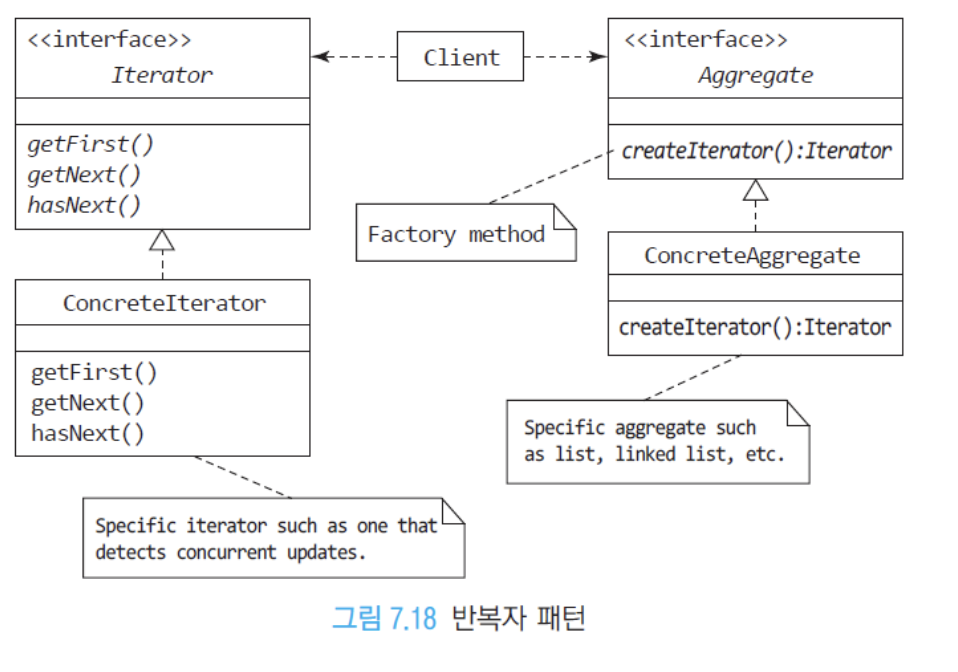
**“만약 싱글톤 == null, 없으면 new로 새로 만든다. 있으면 어디간에 있는 인스턴스 호출**

**생성자는 private로 선언해야한다. → public으로 만들면 누군가가 만들어 버리기 때문.**

**싱글톤은 클래스 내부에서만 접근할 수 있도록 해야한다.”**
```java
public class DatabaseConnection {
    private static DatabaseConnection instance;

    private Connection connection;

    private DatabaseConnection() { //생성자
        // Initialize the database connection
        try {
            connection = DriverManager.getConnection("jdbc:mysql://localhost:3306...");
        } catch (SQLException e) {
            e.printStackTrace();
        }
    }

    public static DatabaseConnection getInstance() {
        if (instance == null) {
            instance = new DatabaseConnection();
        }
        return instance;
    }

    public Connection getConnection() {
        return connection;
    }

    // Other database-related methods
    public void executeQuery(String query) {
        // ...
    }
}

public class Main {
    public static void main(String[] args) {

        DatabaseConnection databaseConnection = DatabaseConnection.getInstance();
        Connection connection = databaseConnection.getConnection();

        // Use the connection to execute queries or perform database operations
        try {
            Statement statement = connection.createStatement();
            ResultSet resultSet = statement.executeQuery("SELECT * FROM mytable");

            // Process the result set
            while (resultSet.next()) {
                // ...
            }

            // Close the result set, statement, and connection
            resultSet.close();
            statement.close();
            connection.close();
        } catch (SQLException e) {
            e.printStackTrace();
        }
    }
}
```
3.4 반복자(Iterator) 패턴
- 집합 클래스(컨테이너 클래스 또는 컬렉션 클래스)의 자료구조와 무관하게 요소 접근을 반복자에게 위임
- 클라이언트가 집합 유형별 접근/집계 방식을 신경 쓰지 않게 함
 “이터레이터는 인터페이스이기 때문에 각 자료형마다 정의가 되어 있다. 즉 여러분이 개발할 때는 implement하면 된다. 위 UML을 보고 반복자 패턴인걸 알면 된다.”
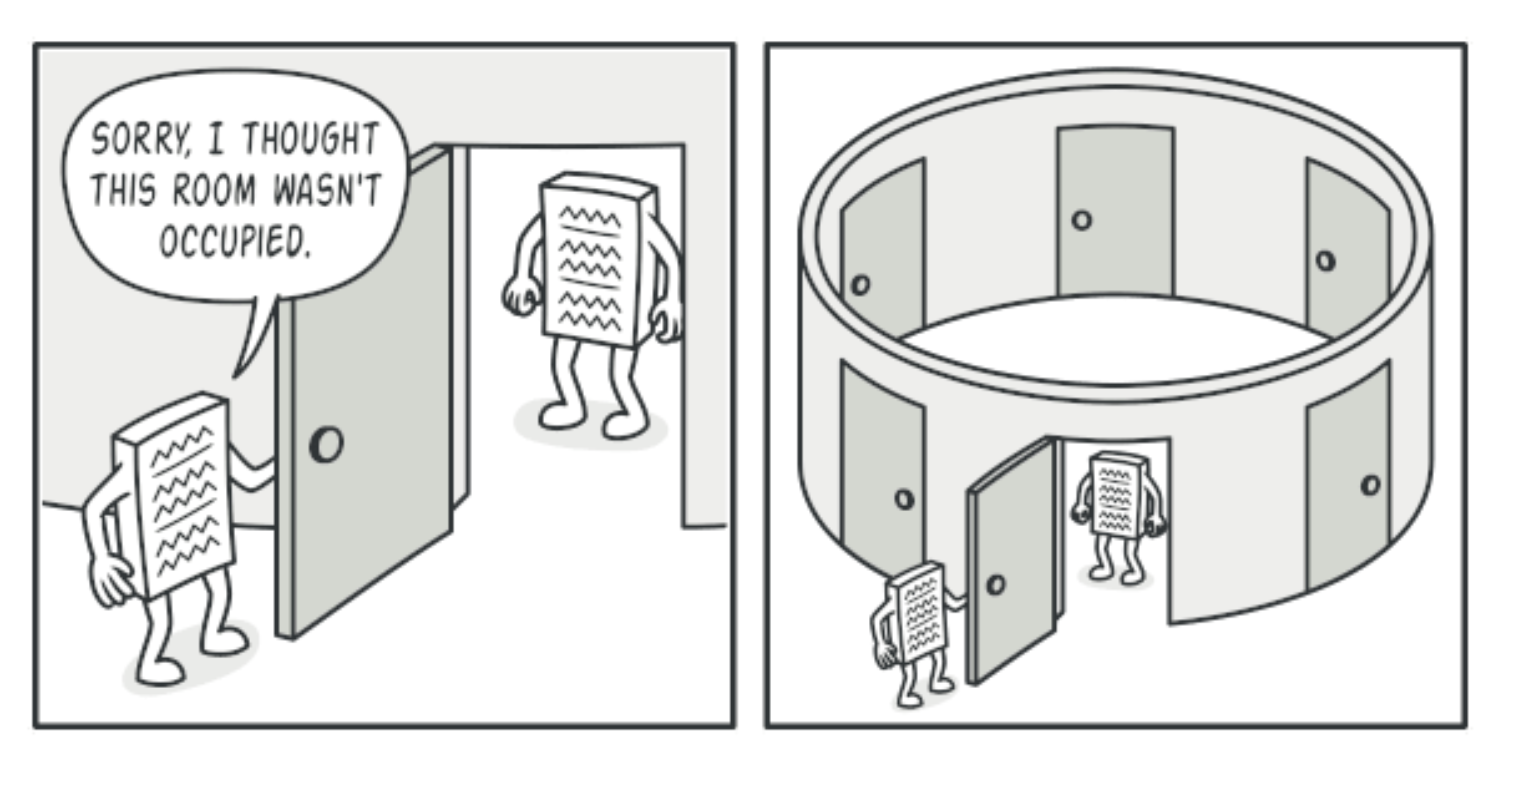
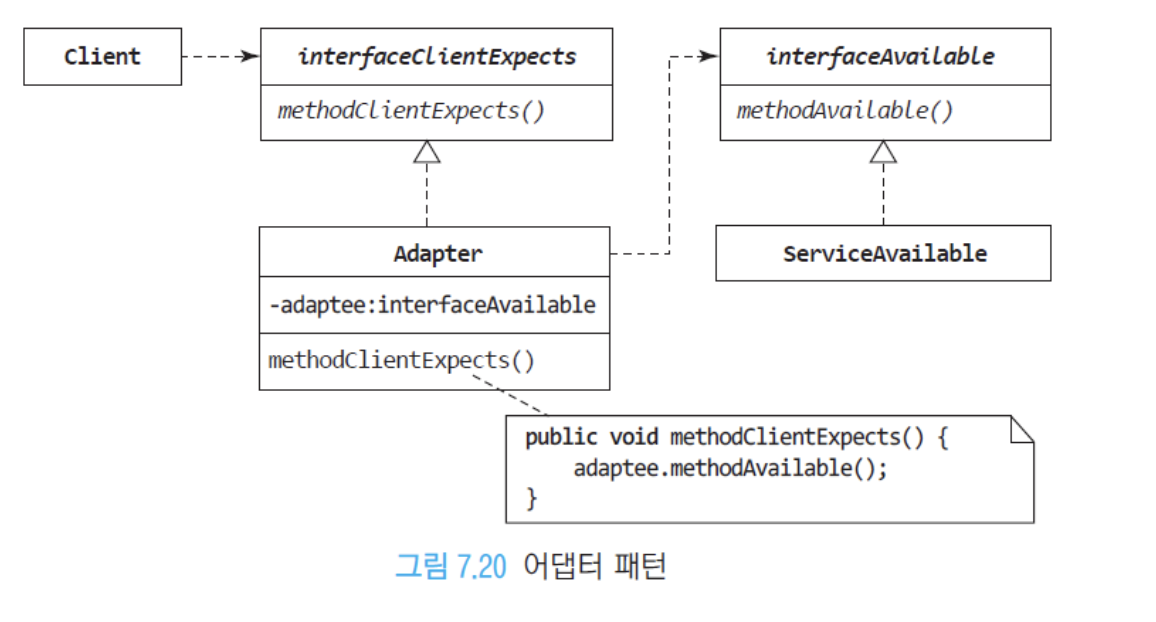
3.5 어댑터(Adapter)
- 서비스 인터페이스를 클라이언트가 기대하는 인터페이스로 변환(조정)
- 어댑터: 변환 역할을 수행
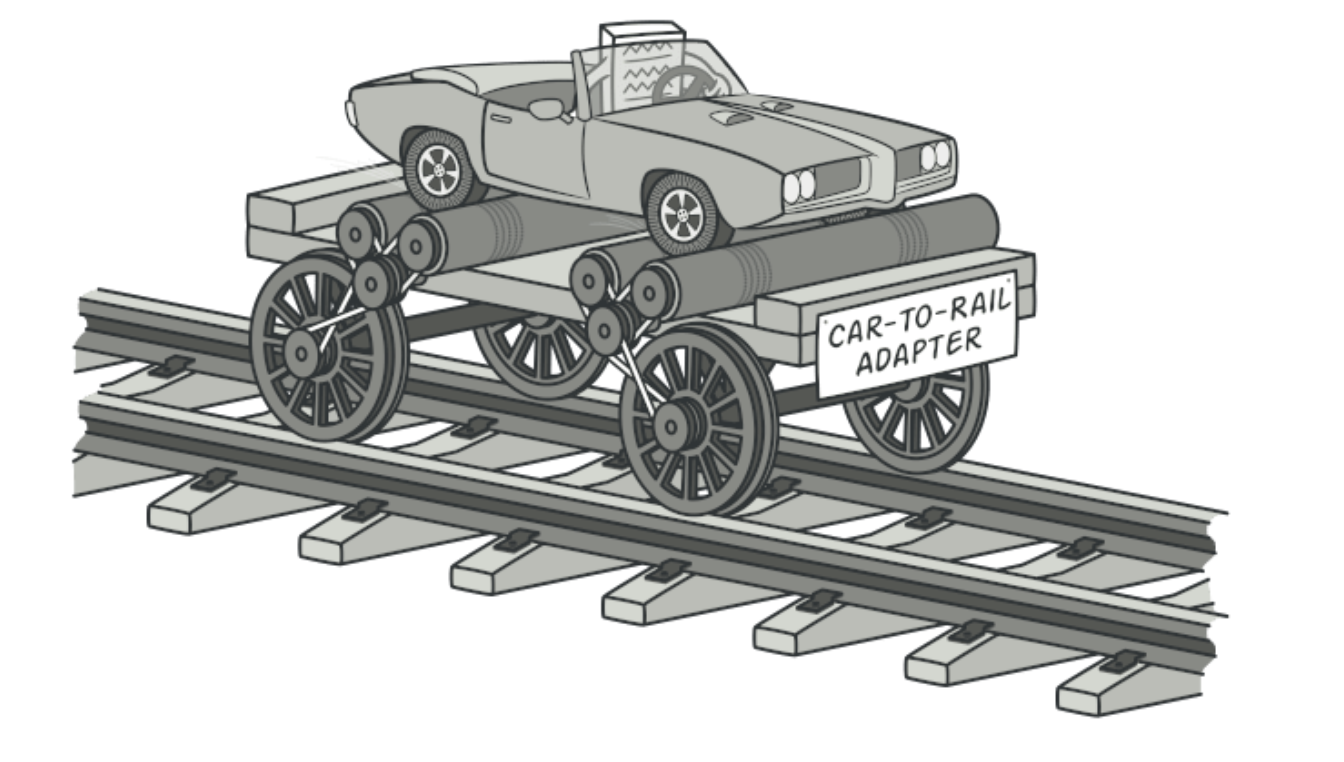
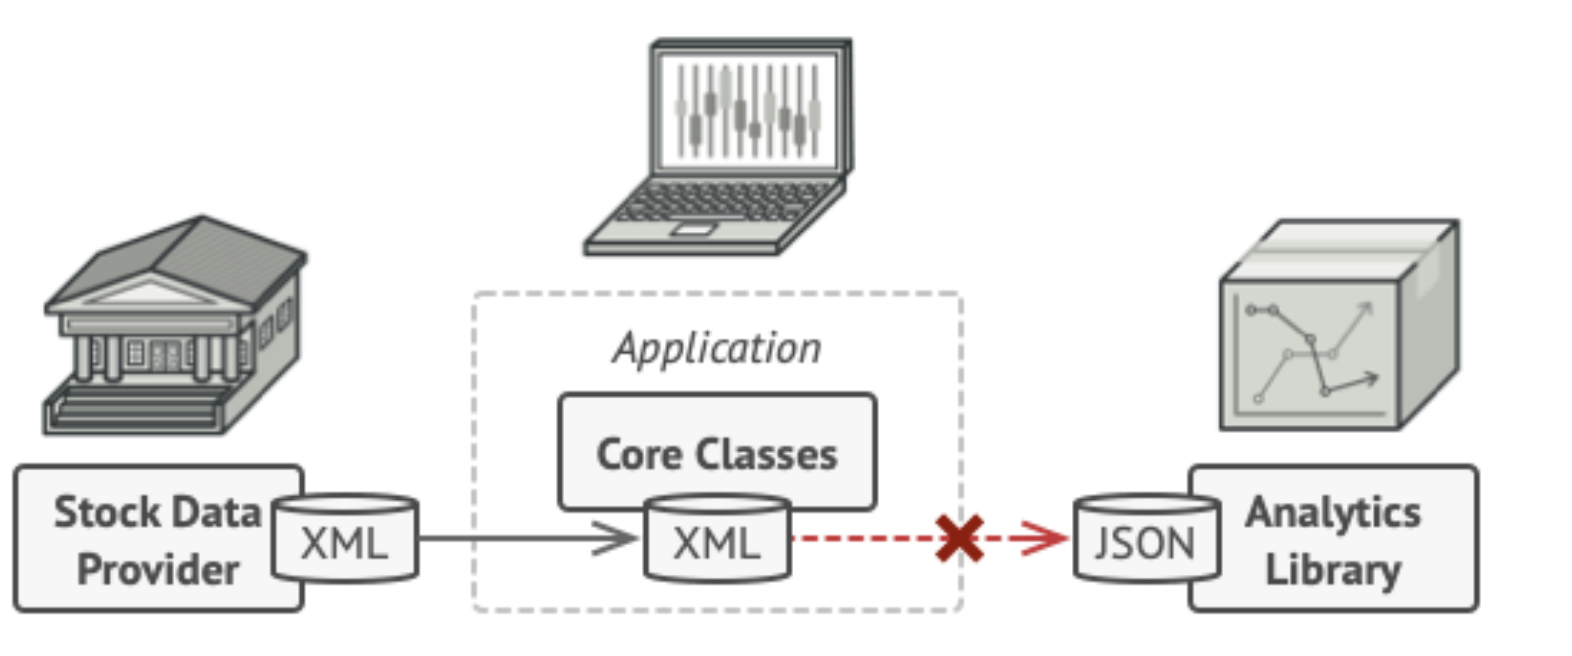
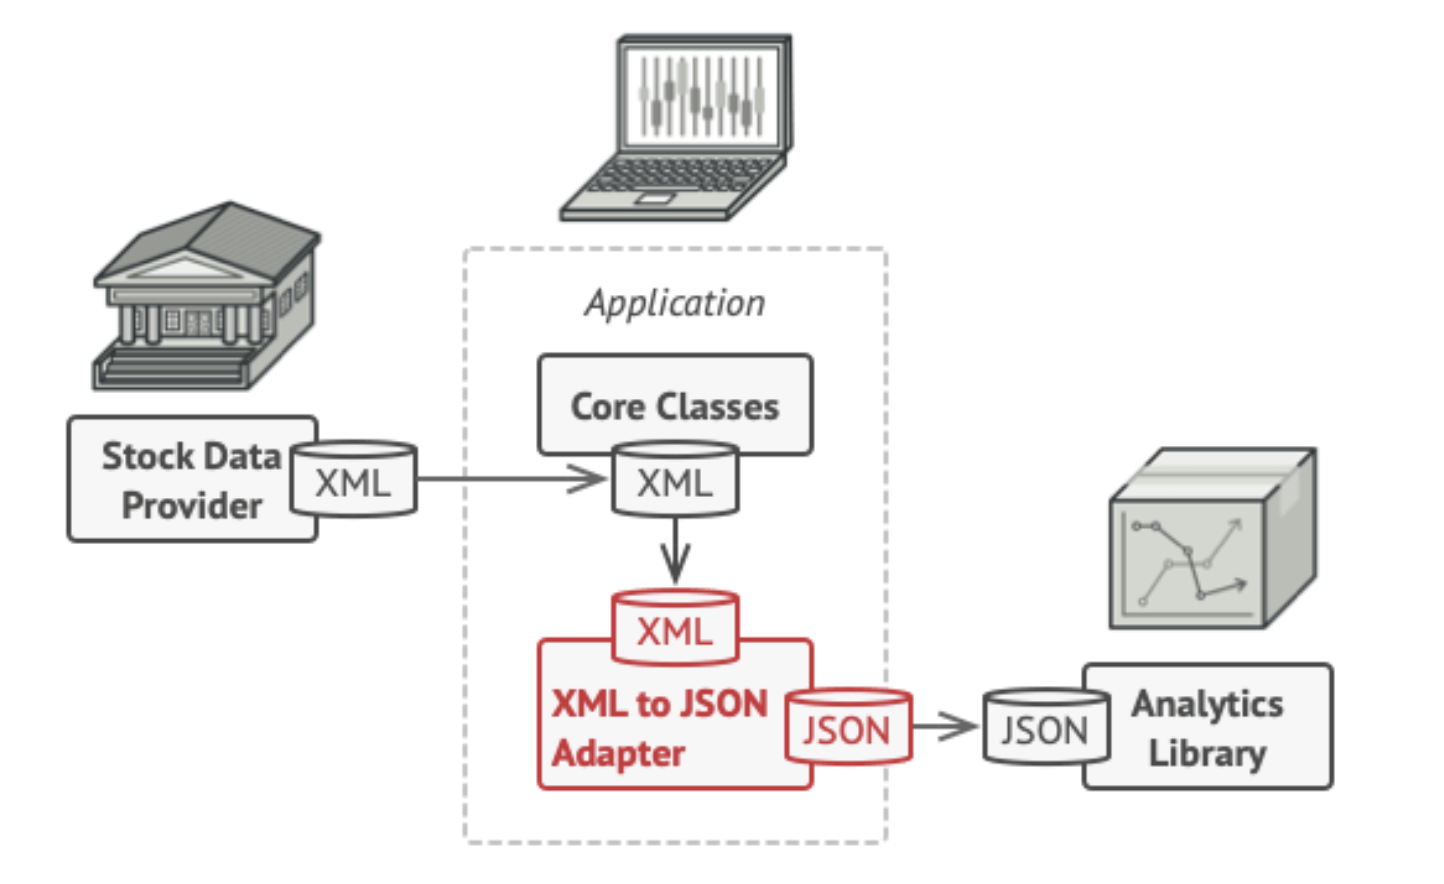
“XML을 JSON으로 변환하는 어댑터를 만들어서 준다”
- 예시 어댑터 패턴은 서로 호환되지 않는 인터페이스를 연결해,
기존 클래스(Json)를 수정하지 않고도 클라이언트가 원하는 형태(Xml)로 사용할 수 있게 해주는 패턴이다.
// 클라이언트가 기대하는 Target 인터페이스
// "Json을 받아서 Xml로 변환할 수 있어야 한다"는 약속
interface IDataAdapter {
    Xml convert(Json json);
}

// 기존에 이미 존재하던 클래스 (Adaptee)
// 클라이언트가 바로 쓰기엔 인터페이스가 맞지 않음
class Json {
    public Json(){}

    // Json 데이터를 Xml 형태로 바꾸는 기존 기능
    Xml convertToXML(){
        // Logic to convert the data into Xml
    }
}

// Adapter 클래스
// 클라이언트가 원하는 IDataAdapter 인터페이스를 구현하면서
// 내부적으로는 기존 Json 객체의 기능(convertToXML)을 사용함
class JsonToXmlAdapter implements IDataAdapter {

    // Adaptee(Json)를 내부에 포함
    // 즉, "상속"보다 "구성(composition)"으로 연결하는 형태
    private Json json;

    public JsonToXmlAdapter(Json json){
        this.json = json;
    }

    // 클라이언트는 convert()만 호출하면 됨
    // 실제 변환은 내부 Json 객체에게 위임
    public Xml convert(Json json){
        // Logic to convert Json to Xml

        // 기존 Json 클래스의 기능을 호출해서 Xml로 변환
        this.json.convertToXML();
    }
}
// 원본 Json 데이터 생성
Json json = new Json("some json data");
// 클라이언트는 JsonToXmlAdapter를 직접 쓰지만,
// 타입은 IDataAdapter로 받음 -> 인터페이스에 의존
IDataAdapter adapter = new JsonToXmlAdapter(json);
// 클라이언트는 "convert()"만 호출하면 Xml을 얻을 수 있음
// 내부적으로는 adapter가 Json의 convertToXML()을 대신 호출해줌
Xml xml = adapter.convert();
// 변환된 Xml 데이터를 이용해 다른 시스템/API 호출 가능
Decimal tax = calculateTax(xml);// 서로 다른 데이터 포맷 객체들
Json json = new Json("some json data");
Csv csv = new Csv("some csv data");
Xml xml = new Xml("some xml data");
Bson bson = new Bson("some bson data");
// Client code
// 1) Json -> Xml 변환
// Json 형식 데이터를 Xml 형식으로 바꾸기 위한 어댑터 사용
IDataAdapter adapter = new JsonToXmlAdapter(json);
Xml xml = adapter.convert();
// 2) Json -> Csv 변환
// 같은 방식으로 Json을 Csv로 바꾸는 다른 어댑터 사용
adapter = new JsonToCsvAdapter(json);
Csv csv = adapter.convert();
// 3) Csv -> Bson 변환
// 이번에는 Csv를 Bson으로 변환하는 어댑터 사용
adapter = new CsvToBsonAdapter(csv);
Bson bson = adapter.convert();하나의 json 데이터를 여러 가지 형태의 데이터로 변환할 필요가 있을때, 어댑터 패턴을 사용하면 좋다. 그럴 필요가 없다면 오히려 어댑터 패턴은 독이 된다.
3.6 데코레이터(Decorator) 패턴
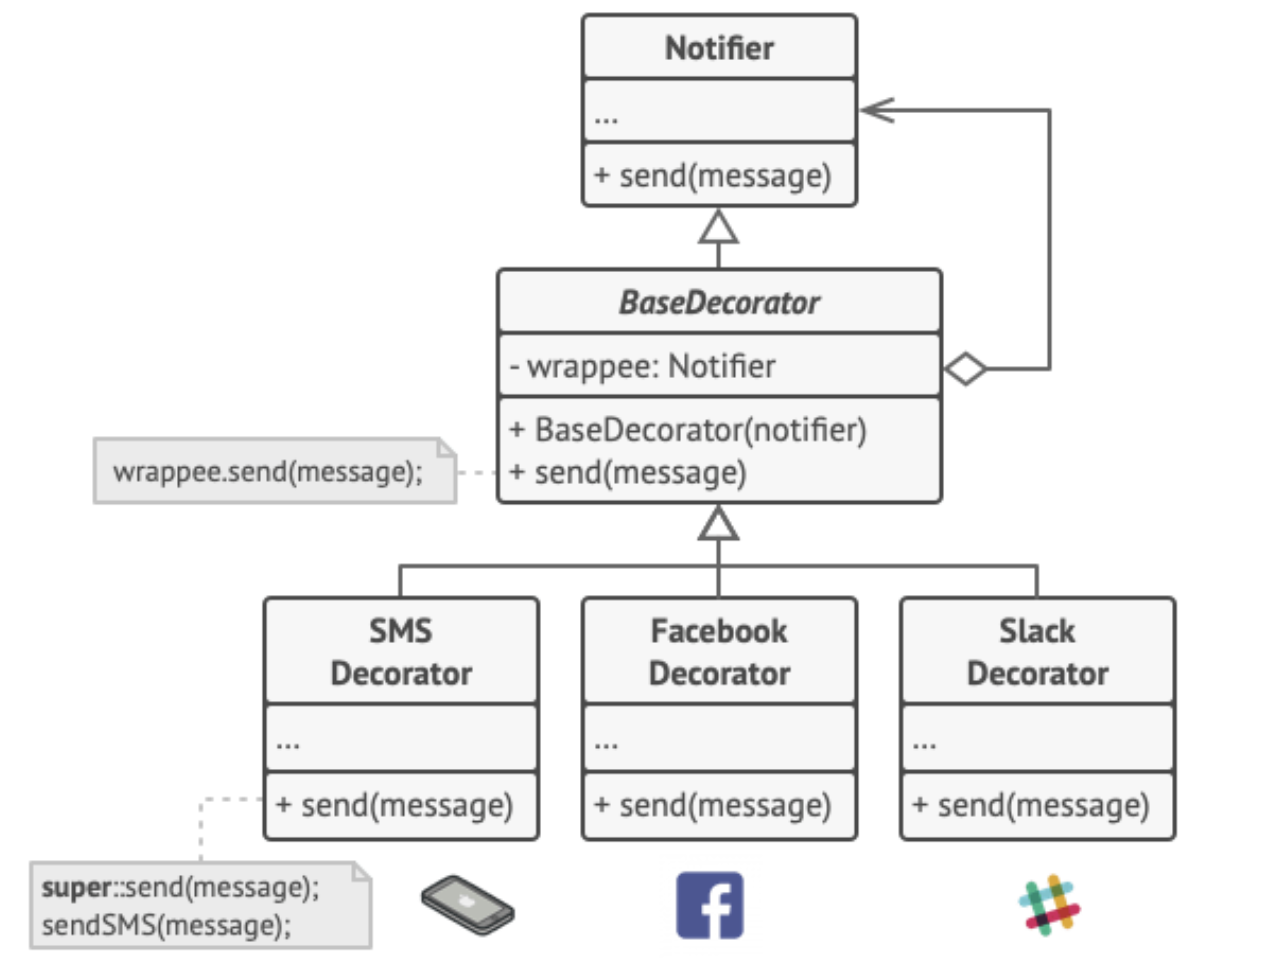
Application은Notifier타입만 알고 있음.- 애플리케이션은 “알림을 보낼 수 있는 객체”만 필요하고, 그게 SMS인지 페이스북인지 슬랙인지는 몰라도 됨.
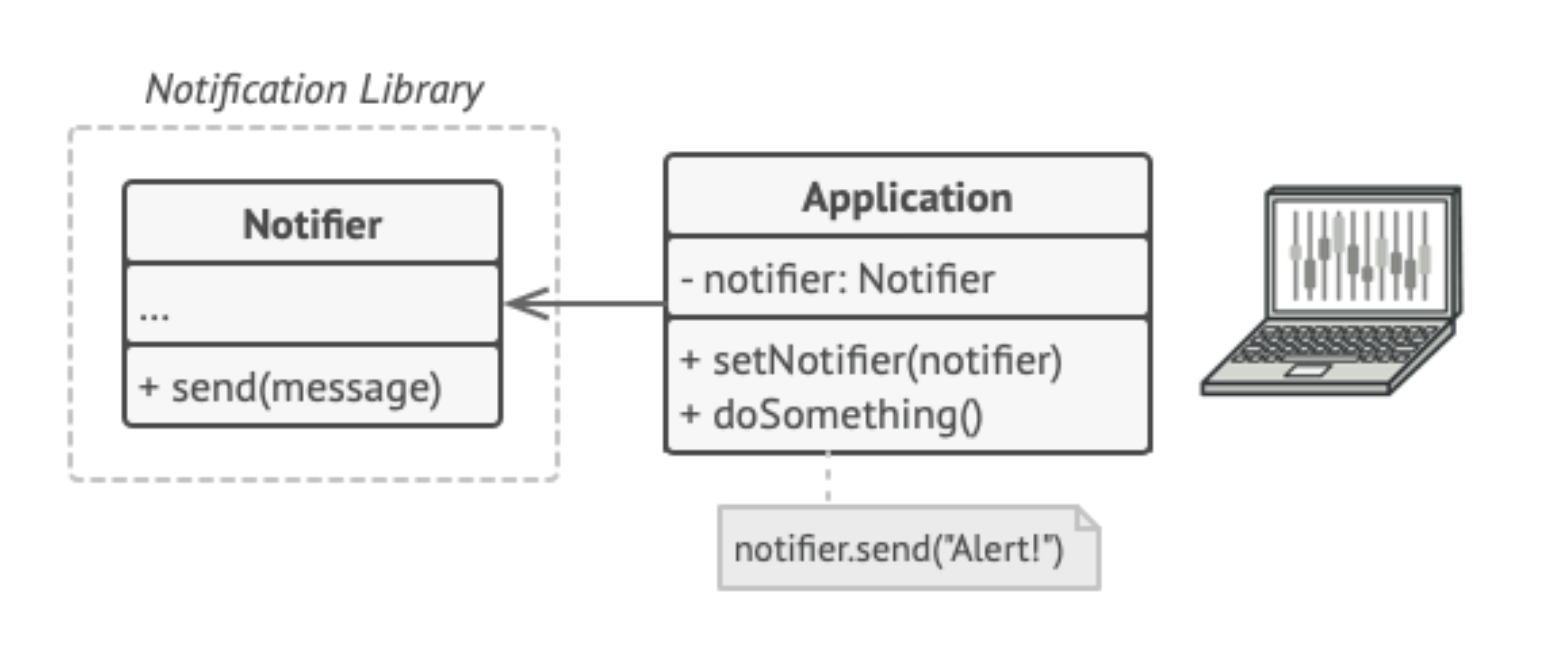
- 클래스의 동작을 확장하는 가장 간단한 방법은 단순히 새로운 동작을 포함하도록 클래스를 수정하는 것.
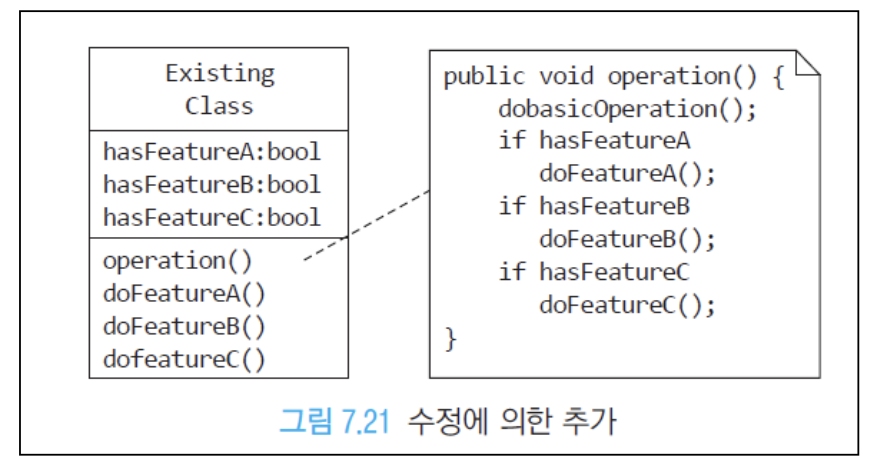
- “수정으로 기능 추가”는 OCP 위배
- 클래스의 동작을 확장하는 또다른 방법으로 상속이 있다.
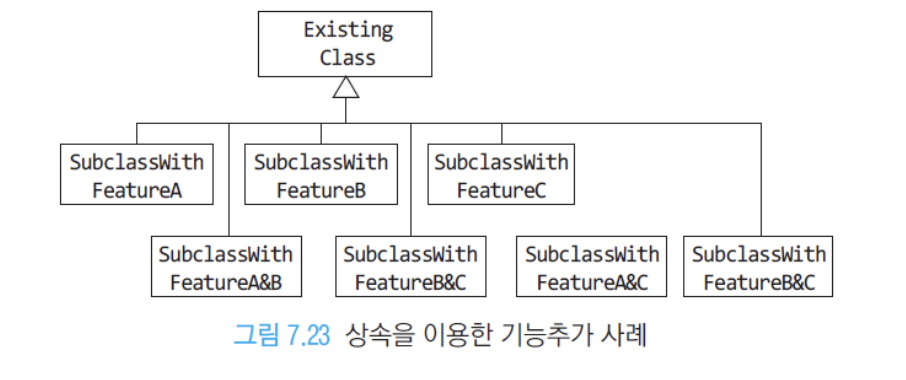
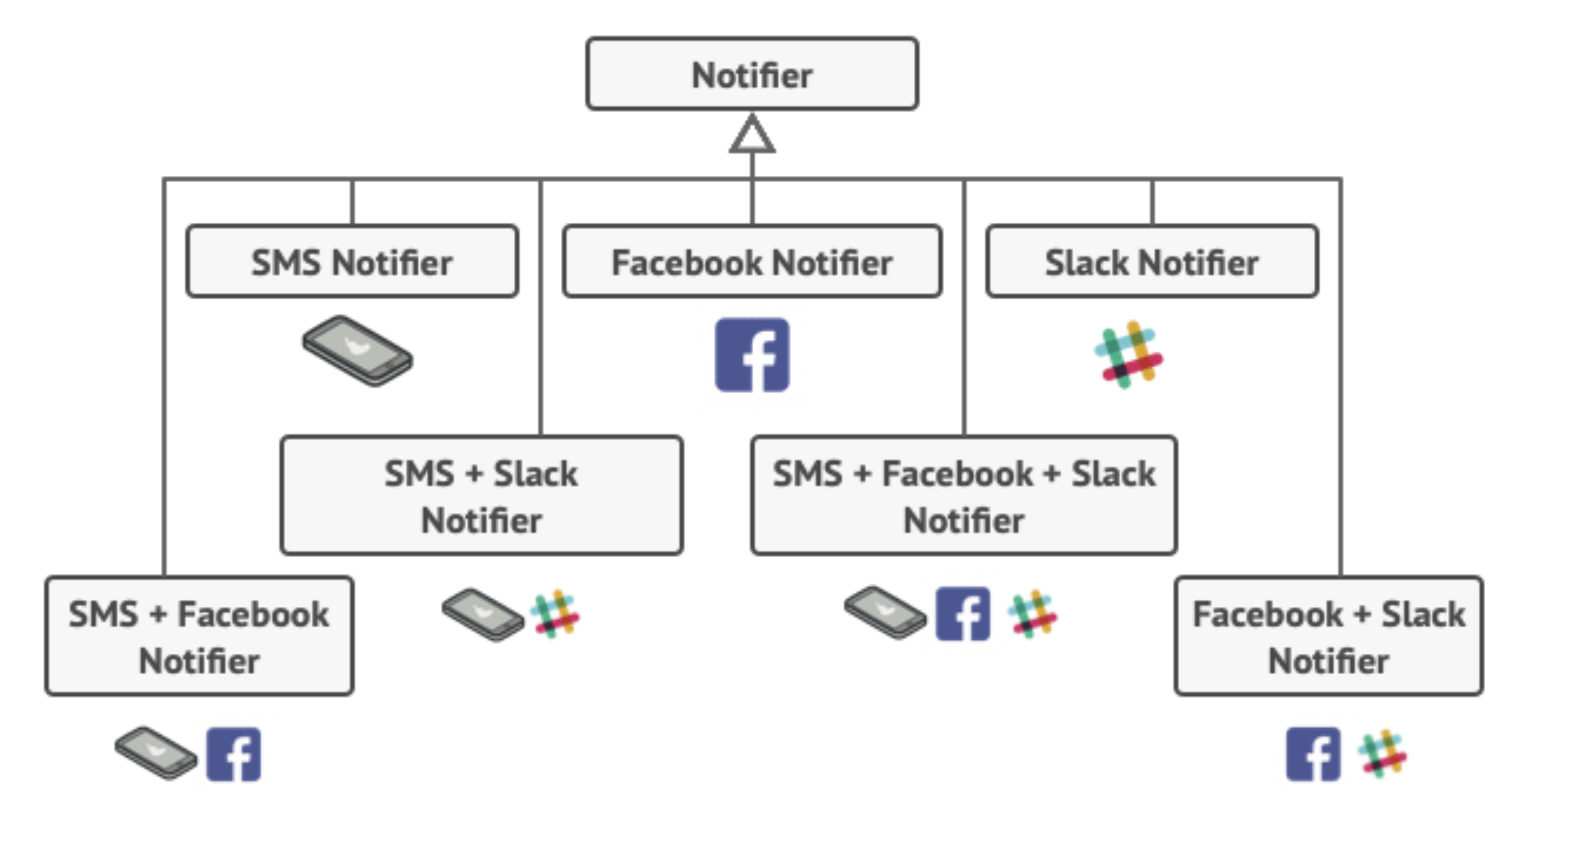
Notifier을 상속받는 서브 클래스들
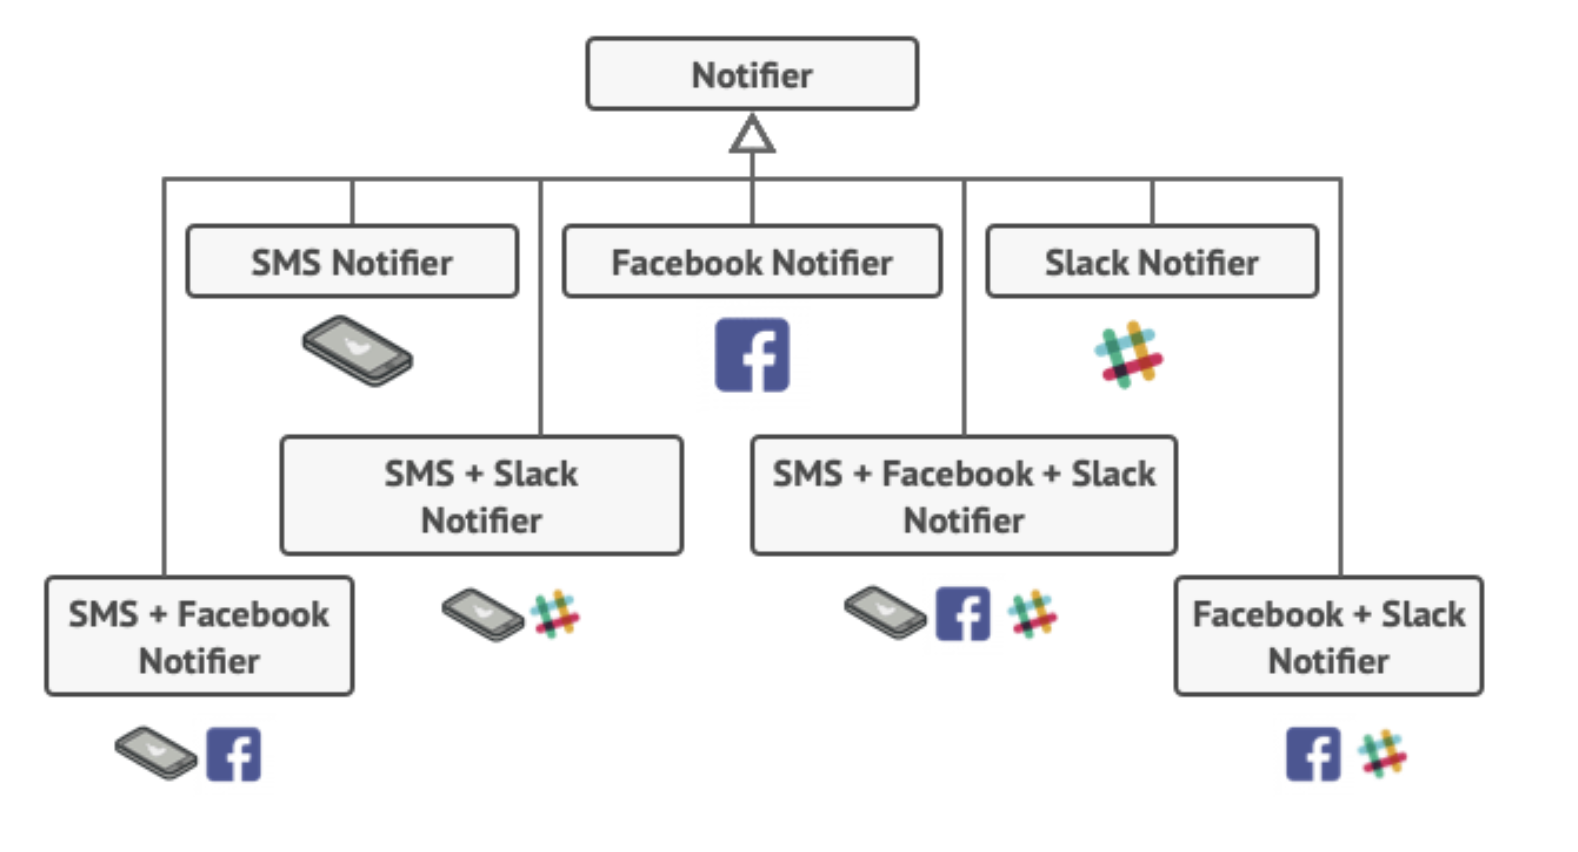
상속시, 만약 여러 기능을 조합해서 사용하긴 원한다면 조합별 클래스를 모두 만들어야함.
-
“상속으로 추가”는 OCP를 잘 따르는 것 같지만, 조합 수만큼 서브클래스 필요, 캡슐화를 약화시킴
-
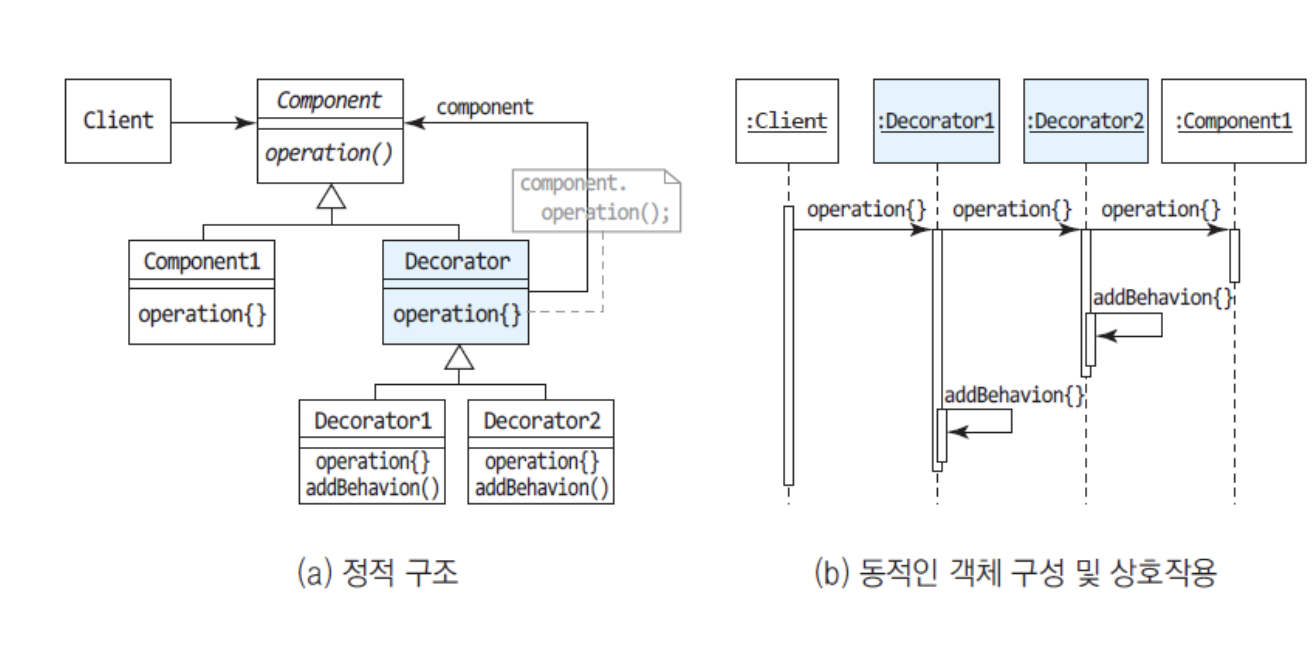
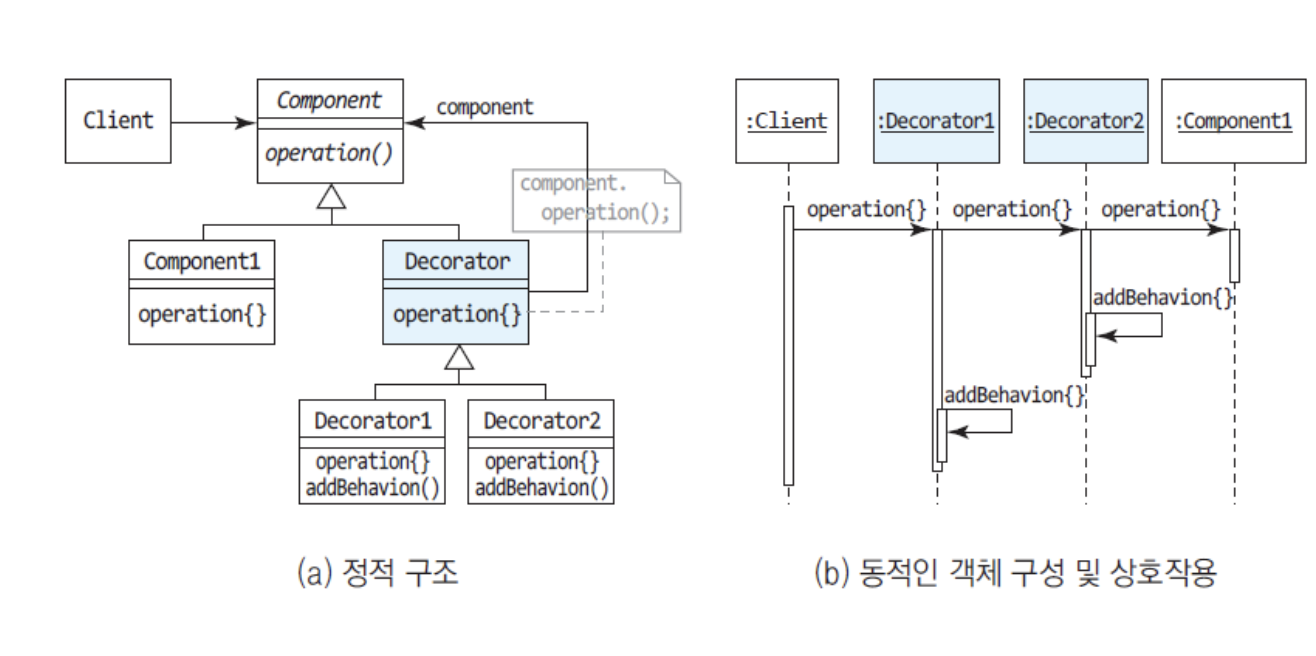
객체의 구성 관계 (합(Composition) 관계)+ 위임으로 기존 클래스 동작을 가볍고 유연하게 동적 확장
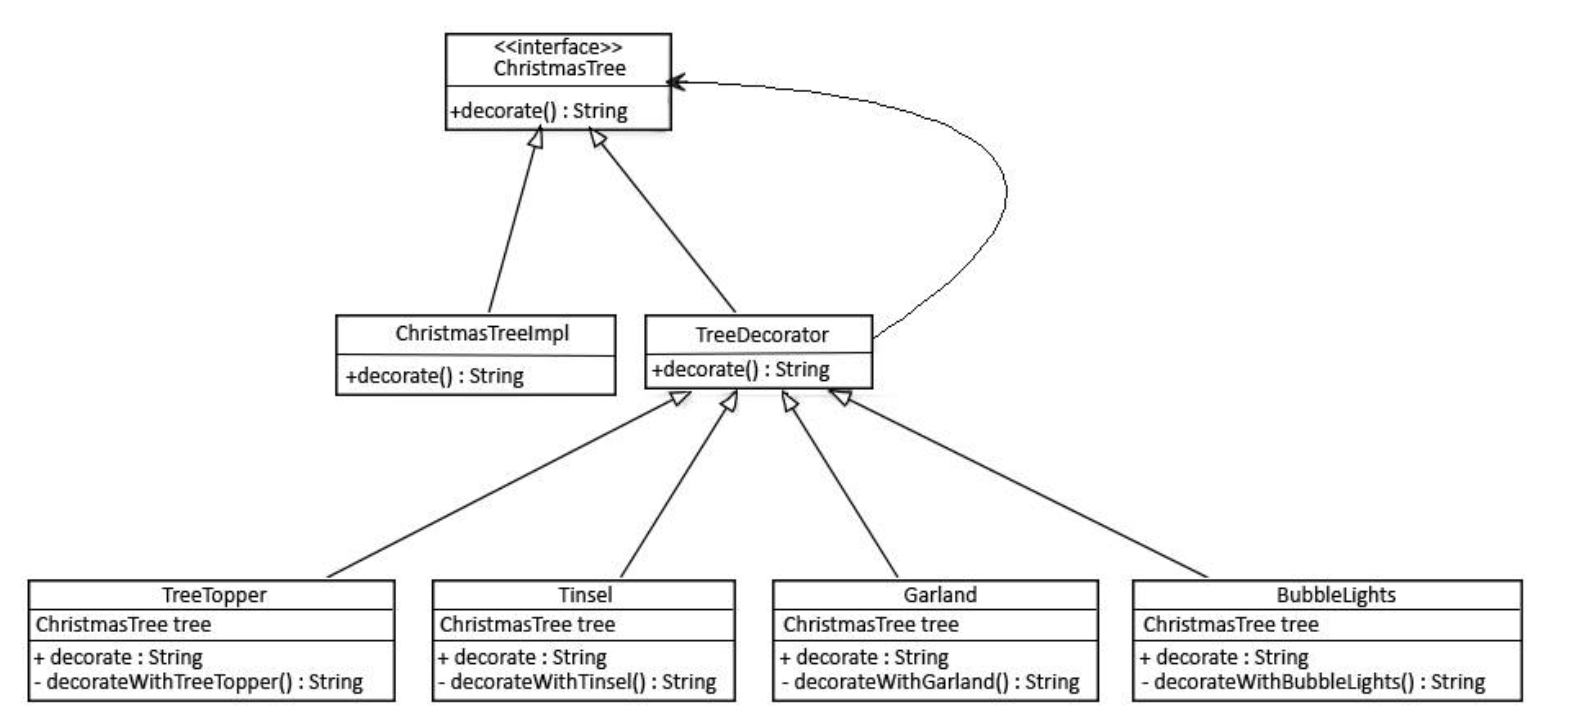
- 데코레이터 패턴의 두 가지 구성 요소 : componet 클래스 , 확장 기능이 담긴 데코레이터 -
데코레이터 객체가 component를 재귀적으로 래핑
-
BaseDecorator를 공통 부모로 해서 SMSDecorator, FacebookDecorator, SlackDecorator를 만들고, 기능을 추가하고 싶을 때는 조합별 클래스를 새로 만드는 대신 필요한 데코레이터 객체를 순서대로 감싸서 붙인다.
public interface Notifier {
    public void send(String message);
}
--------------------------------------------------------------------
public class BaseDecorator implements Notifier {
    private Notifier notifier;

    public void send(String message) {
        // 기본 메시지 로직
    }
}
--------------------------------------------------------------------
public class SMSDecorator extends BaseDecorator {
    public SMSDecorator(Notifier notifier) {
        super(notifier);
    }

    public void send(String message) {
        message += "SMS Format message";
        super.send(message);
    }
}
--------------------------------------------------------------------
BaseDecorator base = new SMSDecorator(new FBDecorator(new BaseDecorator()));
base.send(message);

// SMS -> FB -> 최종 전송
3.7 팩토리 메소드(Factory Method) 패턴
- 일반적인 클래스의 유형이 필요한지는 알고싶지만 구체적인 클래스 유형이 생성되는지는 모르거나 신경쓰고 싶지 않을 때 이용!
- 객체 생성 책임을 분리해 생성 변화에 대비
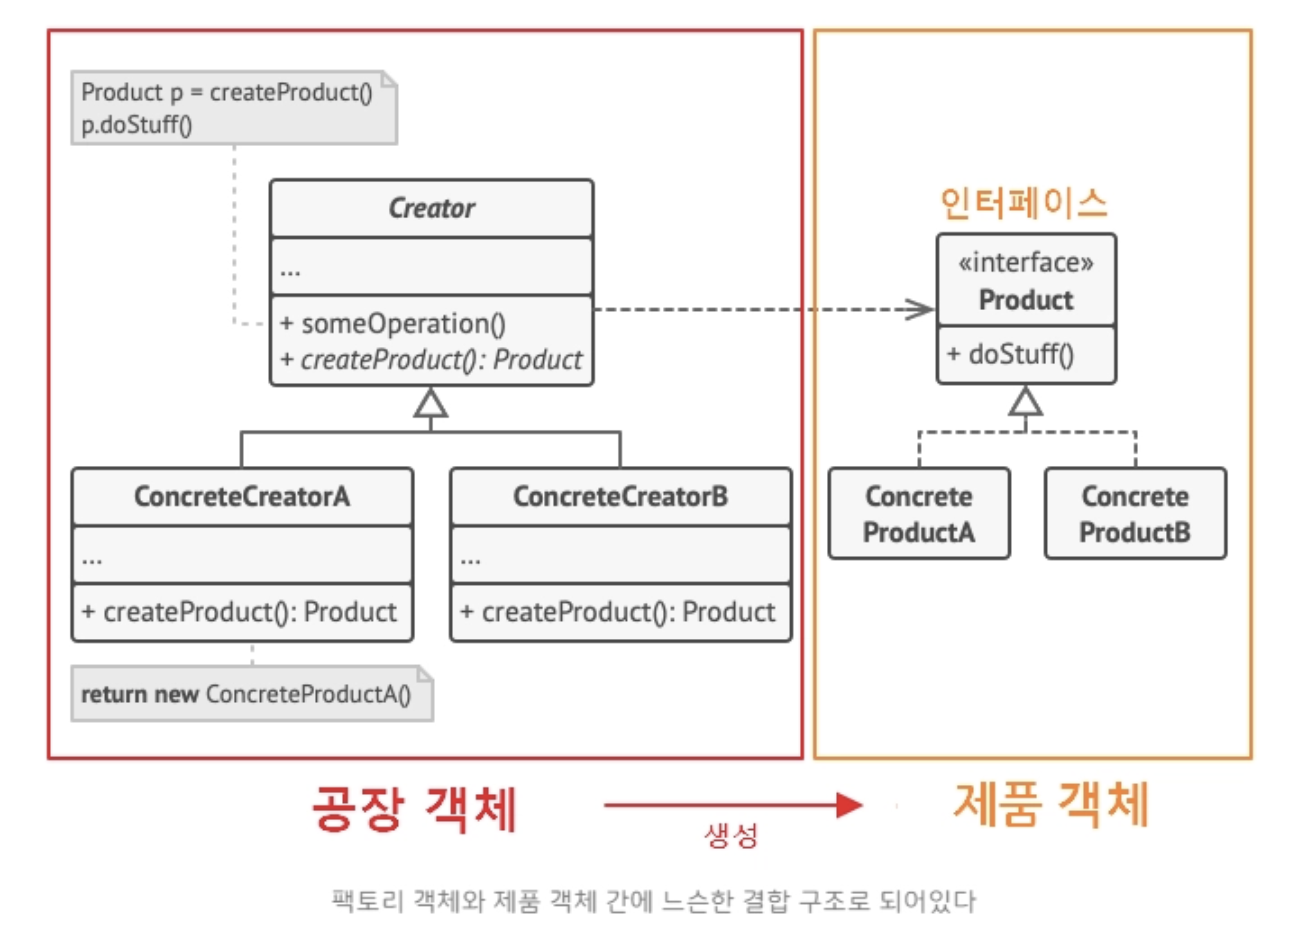
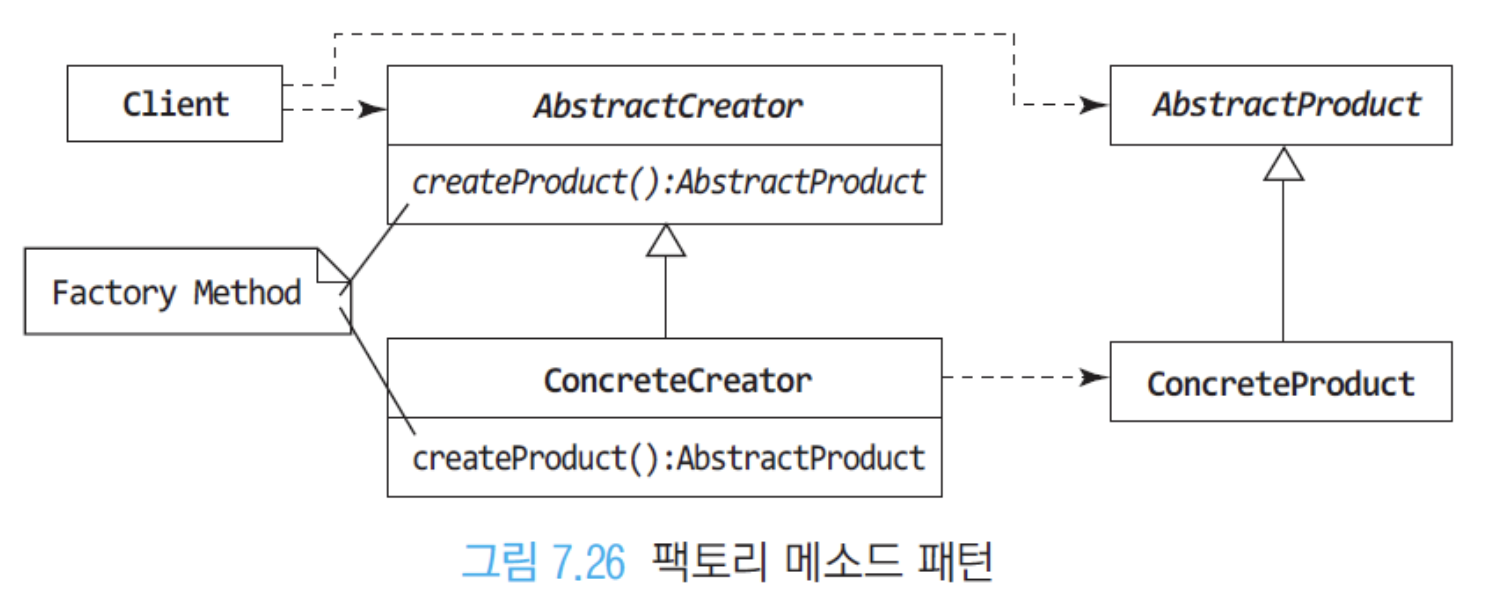
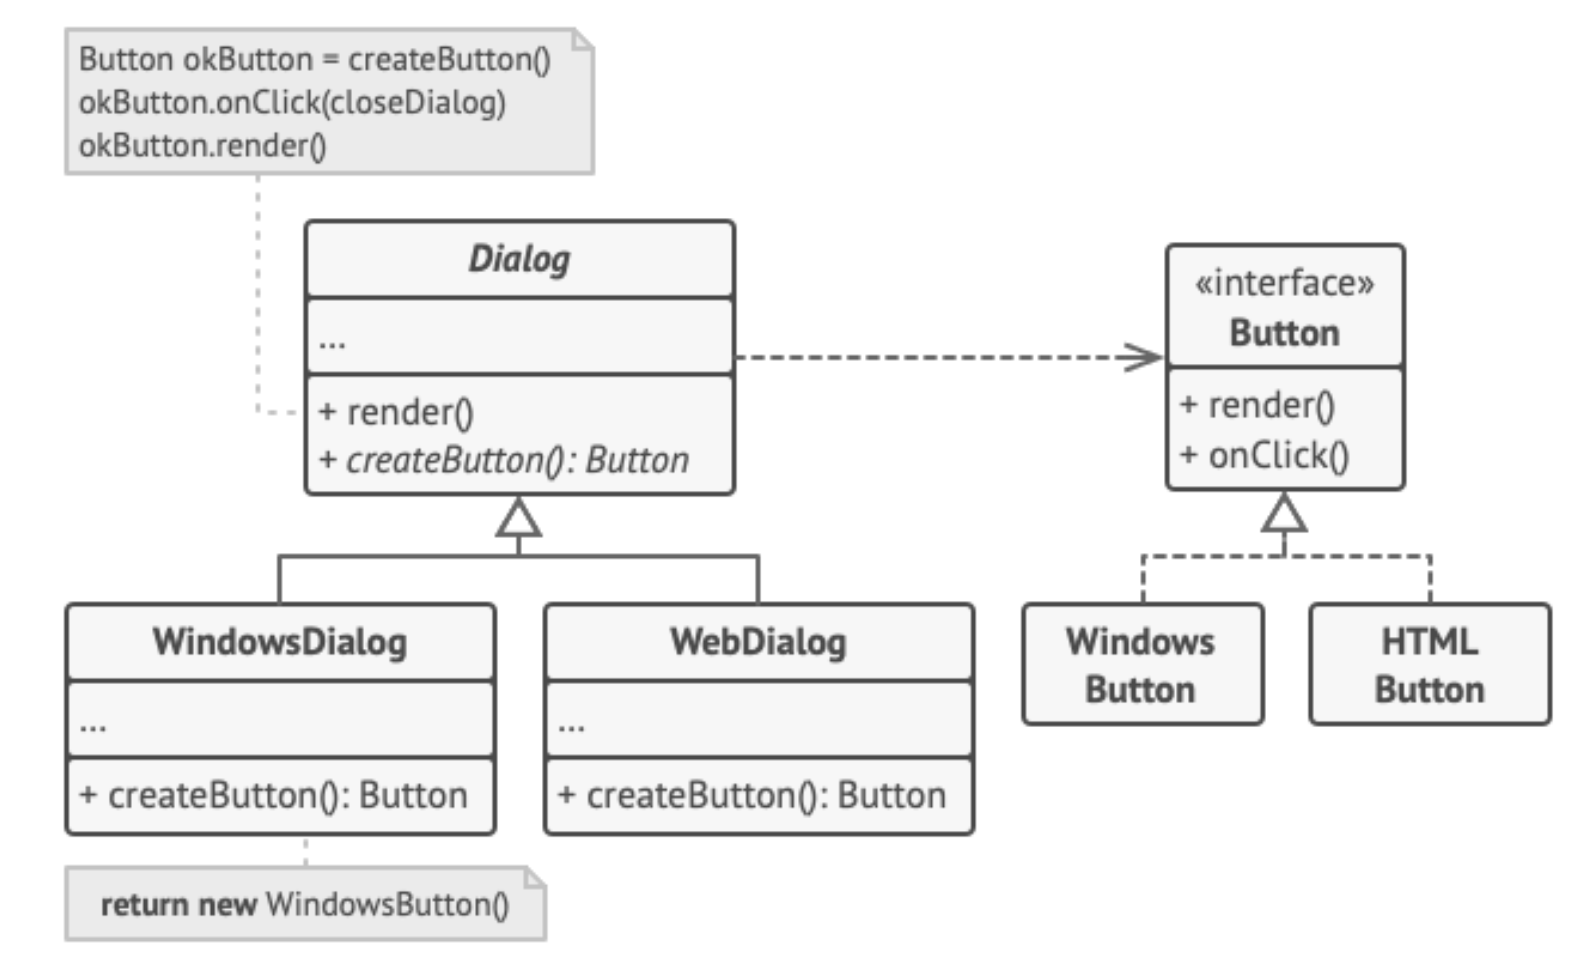
- 팩토리 메소드(createProduct)를 가진 추상 Creator 정의
- 팩토리 메소드 솔루션
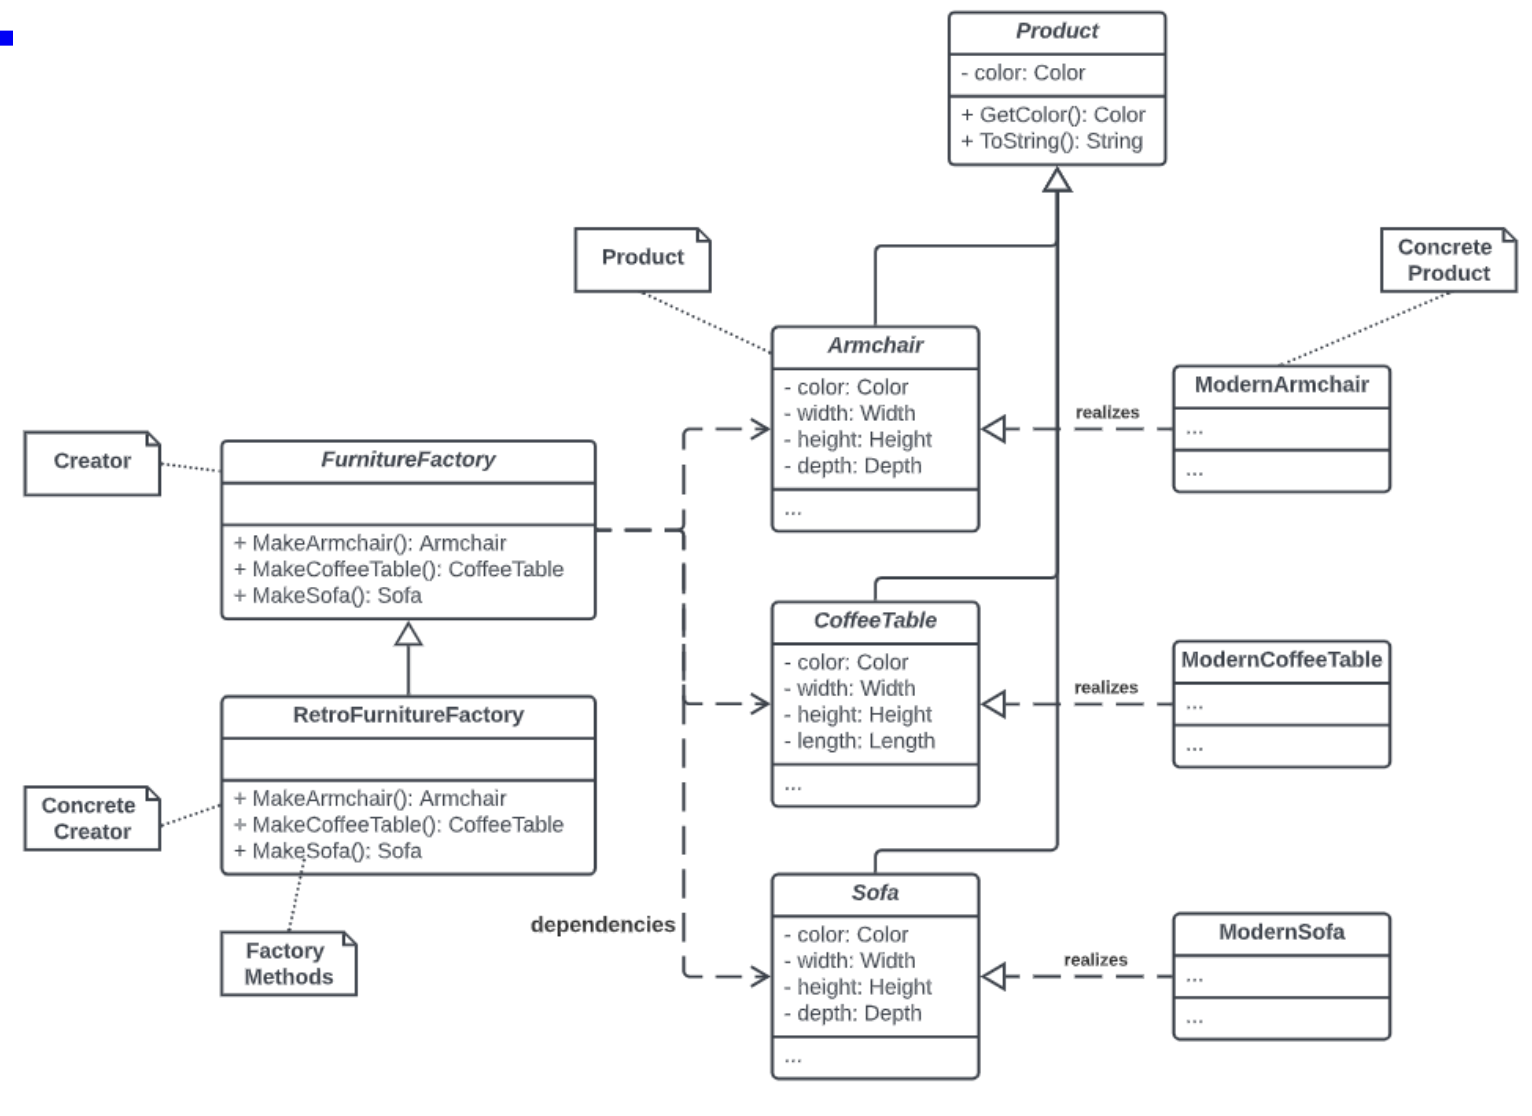
1. 최상위 공장 클래스(Creator)로서, 팩토리 메서드를 추상화(createProduct)하여 서브 클래스로 하여금 구현을 위임
2. 각 서브 공장 클래스들(ConcreteCreator)은 이에 맞는 제품 객체를 반환하도록 생성 추상 메서드(createProduct)를 재정의
3. 제품 구현체를 추상화(Product)
4. 실제 제품 구현체(ConcreteProduct)
3.8 추상 팩토리(Abstract Factory) 패턴
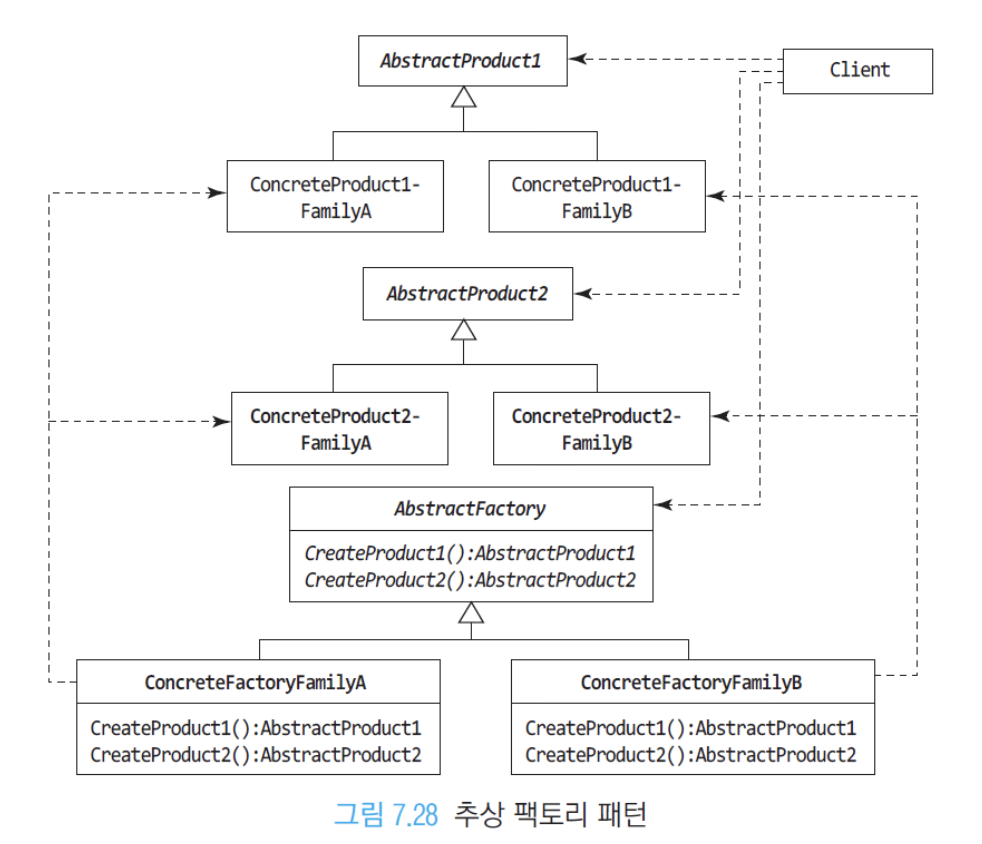
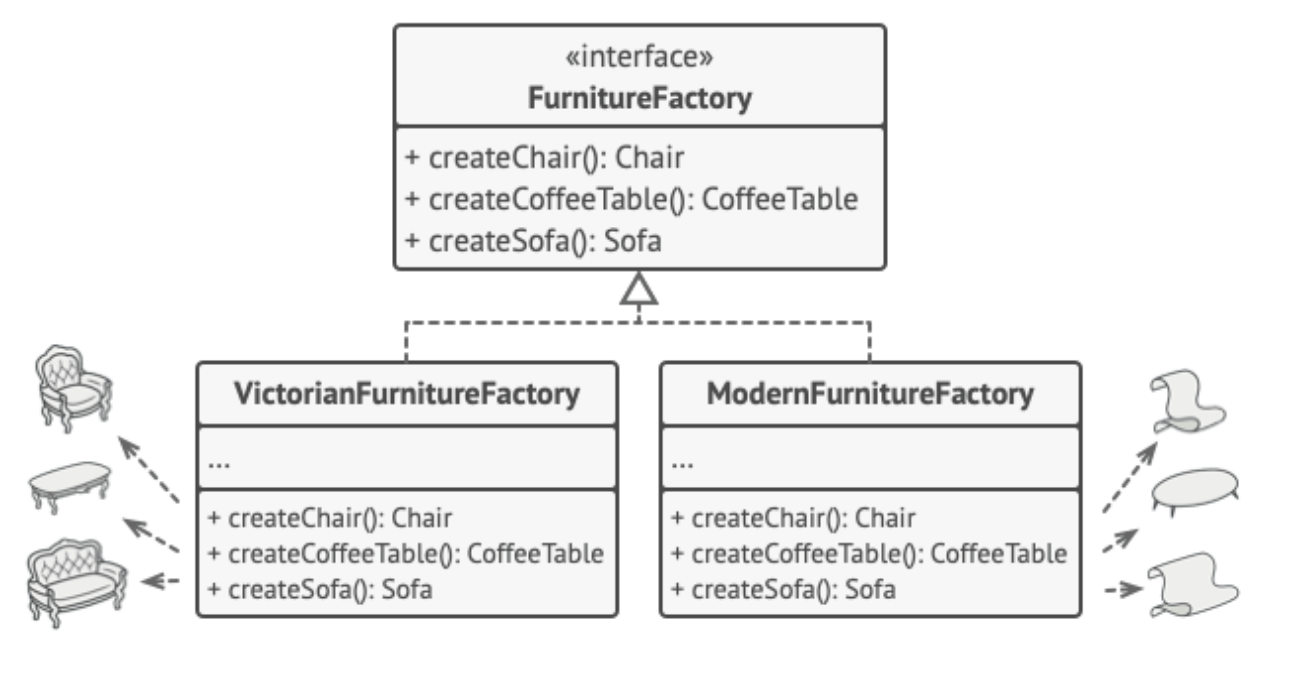
- 구체 클래스 지정 책임을 분리하기 위해 추상 인터페이스로 관련 객체 패밀리 생성
- 팩토리 메소드 패턴과의 차이점
- 추상 팩토리 패턴은 객체의 패밀리(부품 객체의 집합체)를 작성하도록 설계되었다.
- 추상 팩토리 패턴 솔루션
- 최상위 공장 클래스(AbstractFactory)로 여러 개의 제품들을 생성하는 여러 메소드들을 추상화
- 서브 공장 클래스(ConcreteFactory)들은 타입에 맞는 제품 객체를 반환하도록 메소드들을 재정의
- 각 타입의 제품들을 추상화한 인터페이스(AbstractProduct)
- 각 타입의 제품 구현체들로 이들은 팩토리 객체로부터 생성(ConcreteProduct)
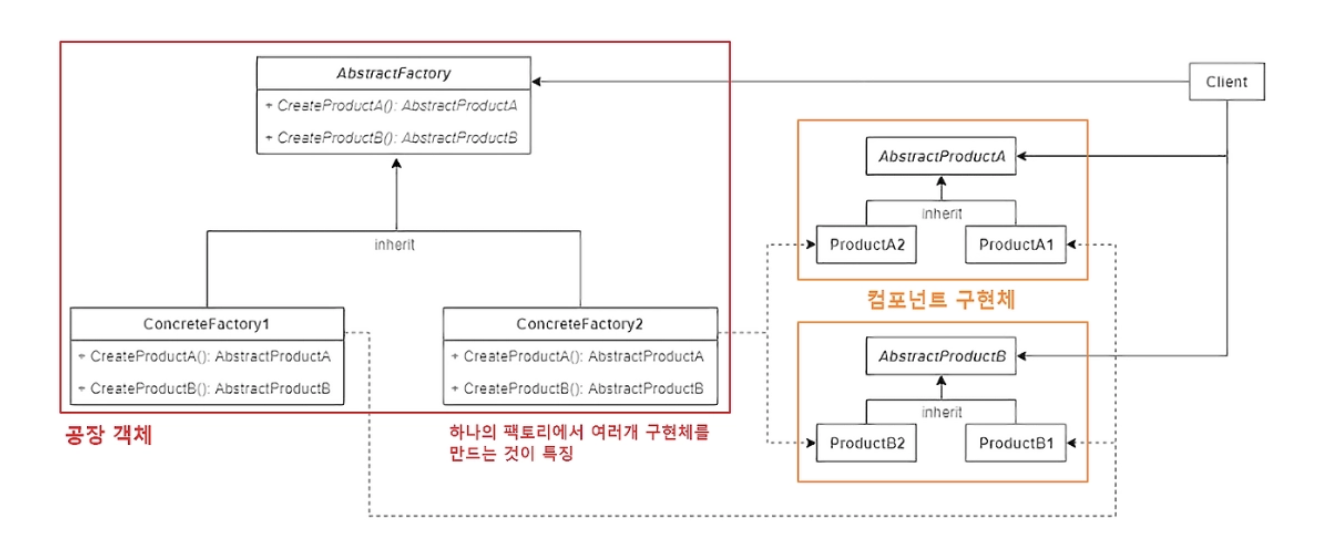
“서로 관련 있는 객체들을 세트로 묶어서 생성하게 해주는 패턴”
- 의자만 따로 만들고
- 소파만 따로 만들고
- 테이블만 따로 만드는 게 아니라
“빅토리안 스타일 가구 세트”, “모던 스타일 가구 세트”
처럼 같은 계열의 객체들을 한꺼번에 맞춰서 생성
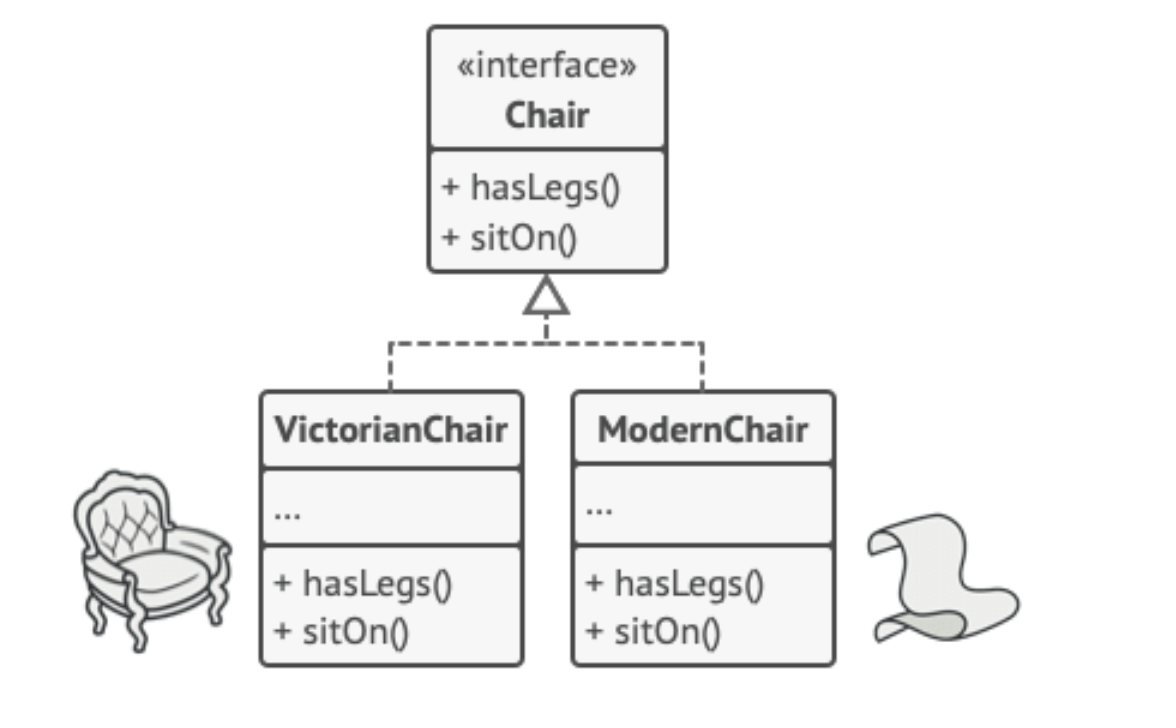
같은 종류의 제품(Chair) 안에도 스타일별 구현체가 여러 개 있을 수 있다.
FurnitureFactory: 추상 팩토리 인터페이스createChair()createCoffeeTable()createSofa()
VictorianFurnitureFactoryModernFurnitureFactory
이제 제품 하나만 만드는 게 아니라 서로 관련된 제품 묶음을 한 번에 만드는 공장을 만든다.
실제 예시
- Windows용 버튼/체크박스 세트
- Mac용 버튼/체크박스 세트
- Application은 추상 팩토리에만 의존
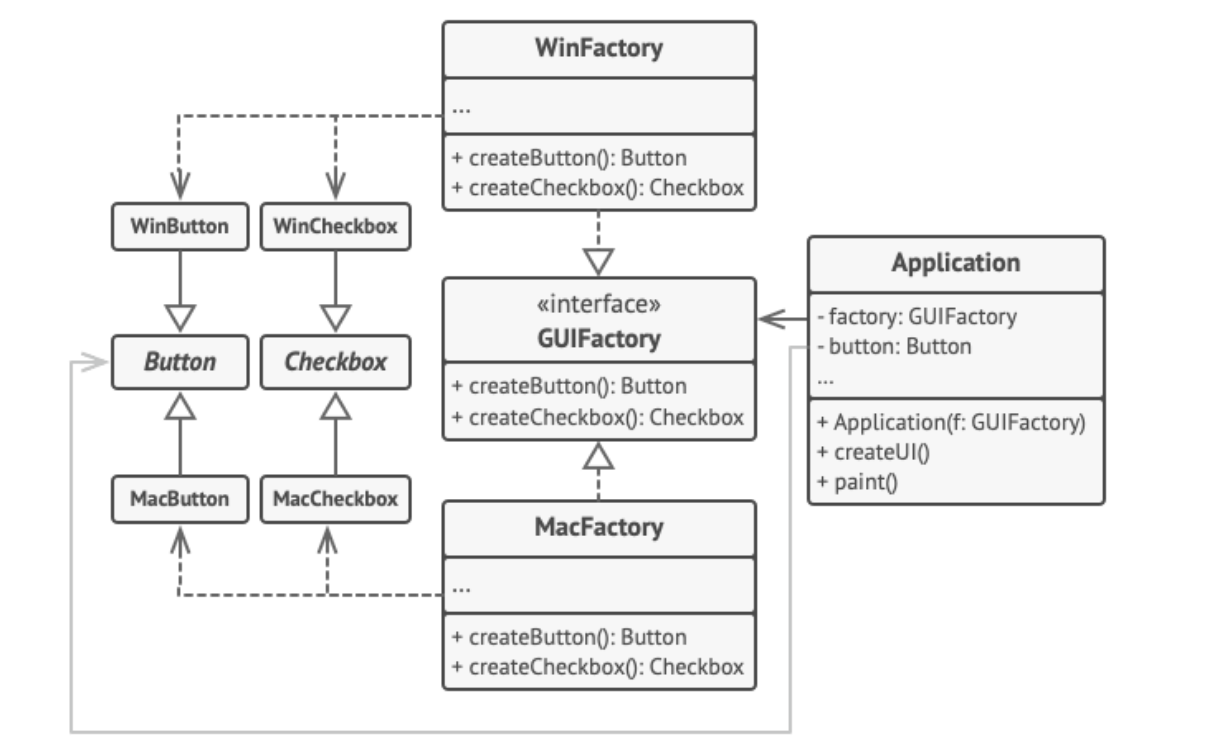
제품군
ButtonCheckbox
스타일(운영체제 계열)
WinButton,WinCheckboxMacButton,MacCheckbox
클라이언트
Application
추상 팩토리
GUIFactorycreateButton()createCheckbox()
구체 팩토리
WinFactoryMacFactory
public class Demo {

    /**
     * Application picks the factory type and creates it in run time (usually at
     * initialization stage), depending on the configuration or environment
     * variables.
     */
    private static Application configureApplication() {
        Application app;
        GUIFactory factory; //내가 원하는 형태의 GUI를 GUIfactory를 통해서 결정
        String osName = System.getProperty("os.name").toLowerCase();

        if (osName.contains("mac")) { //MAC이면 Mac에 맞는 팩토리를 만듦
            factory = new MacOSFactory();
        } else {
            factory = new WindowsFactory();
        }

        app = new Application(factory);
        return app;
    }

    public static void main(String[] args) {
        Application app = configureApplication();
        app.paint();
    }//GUI를 세분화해서 표현
}
3.9 상태(State) 패턴
- 상태에 따라 객체 동작이 바뀌는 경우, Context와 State를 분리해 유연성 확보
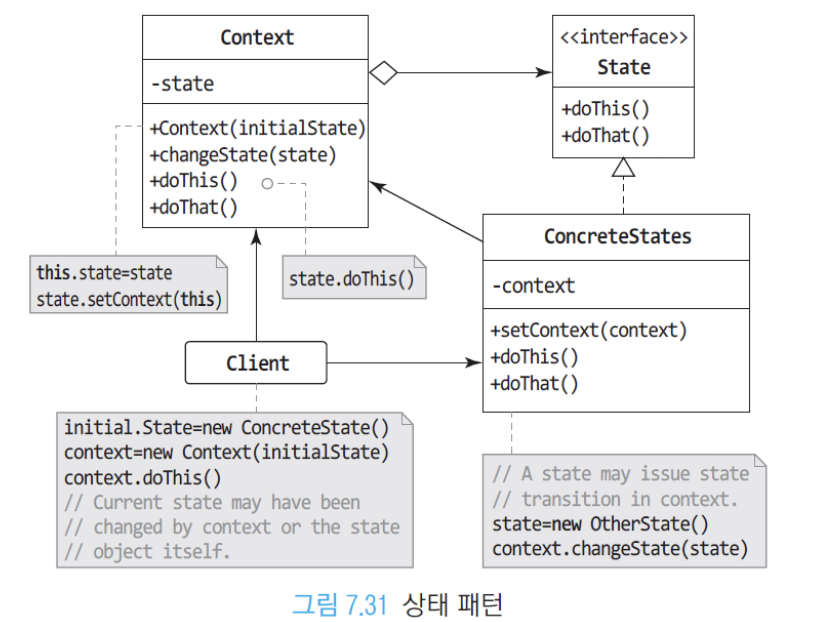
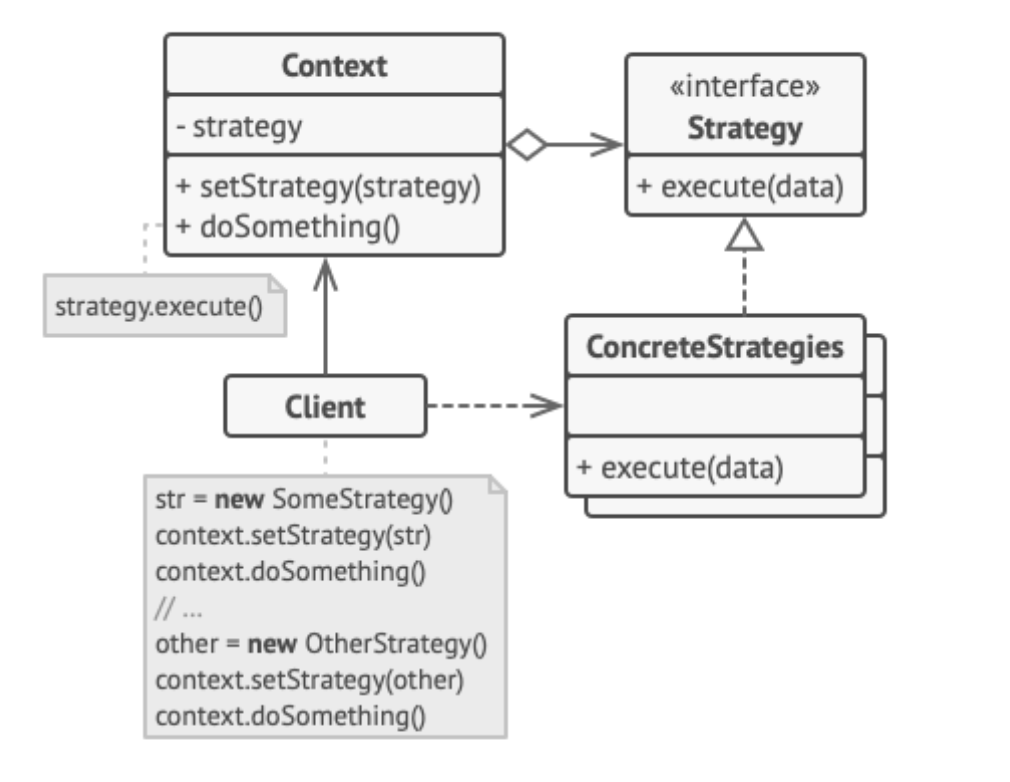
Context는 initialState로 시작하고, state에 따라 상태가 바뀐다.
클라이언트는 Context를 사용할건데, ConcreteState를 만든다.
State는 여러개의 상태로 이루어져 있고, 각각의 doThis와 doThat로 여러 액션을 할수가 있다.
ConcreteStates는 여러 개의 context로 이루어짐
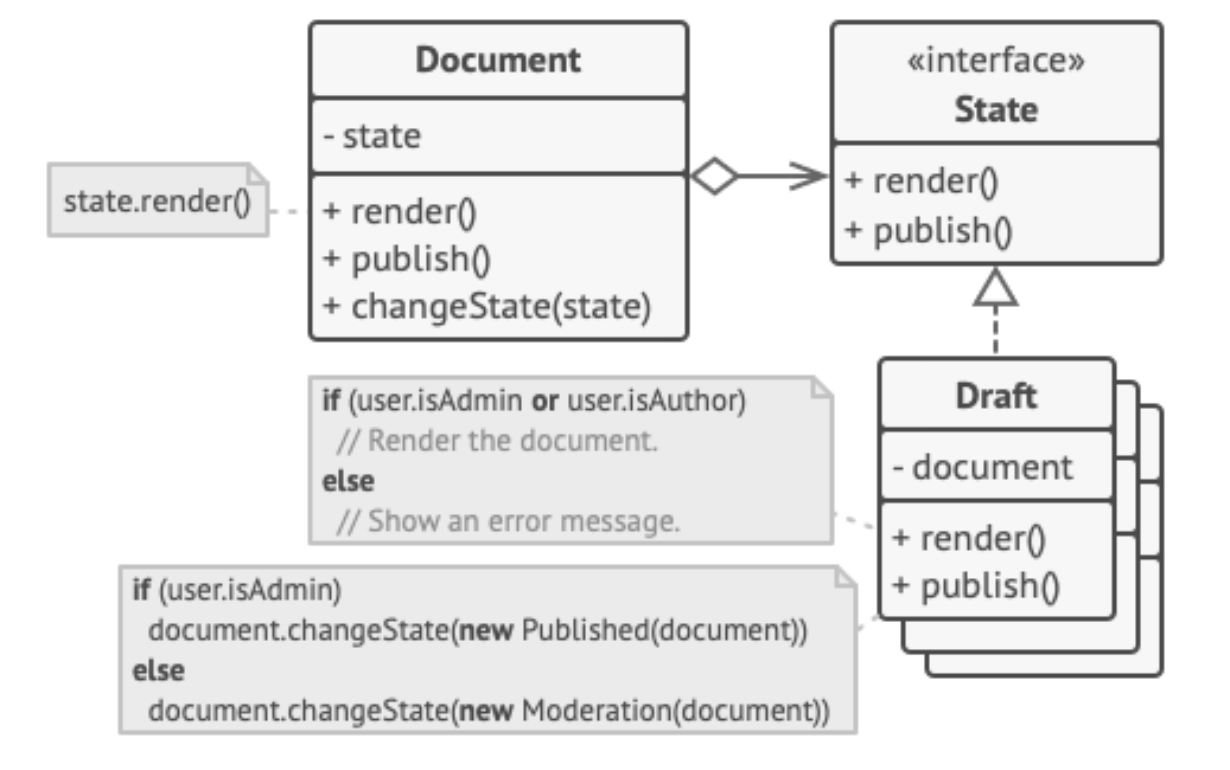
- 데스크탑 애플리케이션의 Document 클래스
- Document의 state : Draft(초안), Moderation(검토), Publish(출판)
- 초안인 경우 상태를 검토로 이동한다.
- 검토 상태에서는 현재 사용자가 관리자인 경우에만 문서를 출판할 수 있다.
- 게시에서는 아무것도 하지 않는다.
상태 패턴을 이용한 Document 사례
내가 스테이트를 넣으면 그 스테이트에 따라 내가 멀 할 수 있는지 정해진다.
즉, 복잡하게 스위치 문이나 케이스문을 사용안할 수 있다.
//1. 상태 패턴 적용 전: 문자열 + switch로 상태 관리
public class Document {
    private String state;

    public Document() {
        state = "draft";
    }

    public void publish() {
        switch (state) {
            case "draft":
                moveToModeration();
                break;
            case "moderation":
                approveForPublication();
                break;
            case "published":
                break;
        }
    }

    private void moveToModeration() {
        state = "moderation";
        System.out.println("Document moved to moderation status.");
    }

    private void approveForPublication() {
        state = "published";
        System.out.println("Document approved for publishable status.");
    }
}
//2. 상태 패턴 적용 후
interface DocumentState {
void publish(Document document);
}
class DraftState implements DocumentState {
@Override
public void publish(Document document) {
System.out.println("Document moved to moderation status.");
document.setState(new ModerationState());
}
}
class ModerationState implements DocumentState {
@Override
public void publish(Document document) {
System.out.println("Document approved for publishable status.");
document.setState(new PublishedState());
}
}
class PublishedState implements DocumentState {
@Override
public void publish(Document document) {
System.out.println("The document has already been published.");
}
}
public class Document {
private DocumentState state;
public Document() {
this.state = new DraftState();
}
public void publish() {
state.publish(this);
}
public void setState(DocumentState state) {
this.state = state;
}
}상태 패턴은 객체의 현재 상태에 따라 같은 요청이라도 다르게 동작하도록,
상태를 별도의 클래스로 분리해서 관리하는 패턴이다.상태 패턴 연습
예제: 스마트폰의 미디어플레이어
상태:
- PLAY
- PAUSE
- STOP
역할 매핑
- MediaPlayer → Context
- State → PlayerState
- ConcreteState → PlayingState, PausedState, StoppedState
1. State 인터페이스
interface PlayerState {
    void play();
    void pause();
    void stop();
}
2. ConcreteState 구현
class PlayingState implements PlayerState {
    @Override
    public void play() {
        System.out.println("Already playing");
    }

    @Override
    public void pause() {
        System.out.println("Pausing music");
        // Pause playback logic
    }

    @Override
    public void stop() {
        System.out.println("Stopping music");
        // Stop playback logic
    }
}
class PausedState implements PlayerState {
@Override
public void play() {
System.out.println("Resuming playback");
// Resume playback logic
}
@Override
public void pause() {
System.out.println("Already paused");
}
@Override
public void stop() {
System.out.println("Stopping music");
// Stop playback logic
}
}class StoppedState implements PlayerState {
@Override
public void play() {
System.out.println("Starting playback");
// Start playback logic
}
@Override
public void pause() {
System.out.println("Can't pause when stopped");
}
@Override
public void stop() {
System.out.println("Already stopped");
}
}3. Context 클래스
class MusicPlayer {
    private PlayerState currentState;

    public MusicPlayer() {
        this.currentState = new StoppedState();
    }

    public void play() {
        currentState.play();
    }

    public void pause() {
        currentState.pause();
    }

    public void stop() {
        currentState.stop();
    }

    public void setState(PlayerState newState) {
        this.currentState = newState;
    }
}
4. Client 코드
public class Client {
    public static void main(String[] args) {
        MusicPlayer player = new MusicPlayer();

        player.setState(new PlayingState());

        // Play music
        player.play();

        // Pause music
        player.pause();

        // Stop music
        player.stop();
    }
}
- MusicPlayer는 현재 상태 객체(PlayerState)를 가지고 있다.
- play(), pause(), stop() 요청이 들어오면 현재 상태 객체에 위임한다.
- 현재 상태가 PlayingState인지, PausedState인지, StoppedState인지에 따라 동작이 달라진다.관련 패턴: 전략(Strategy) 패턴
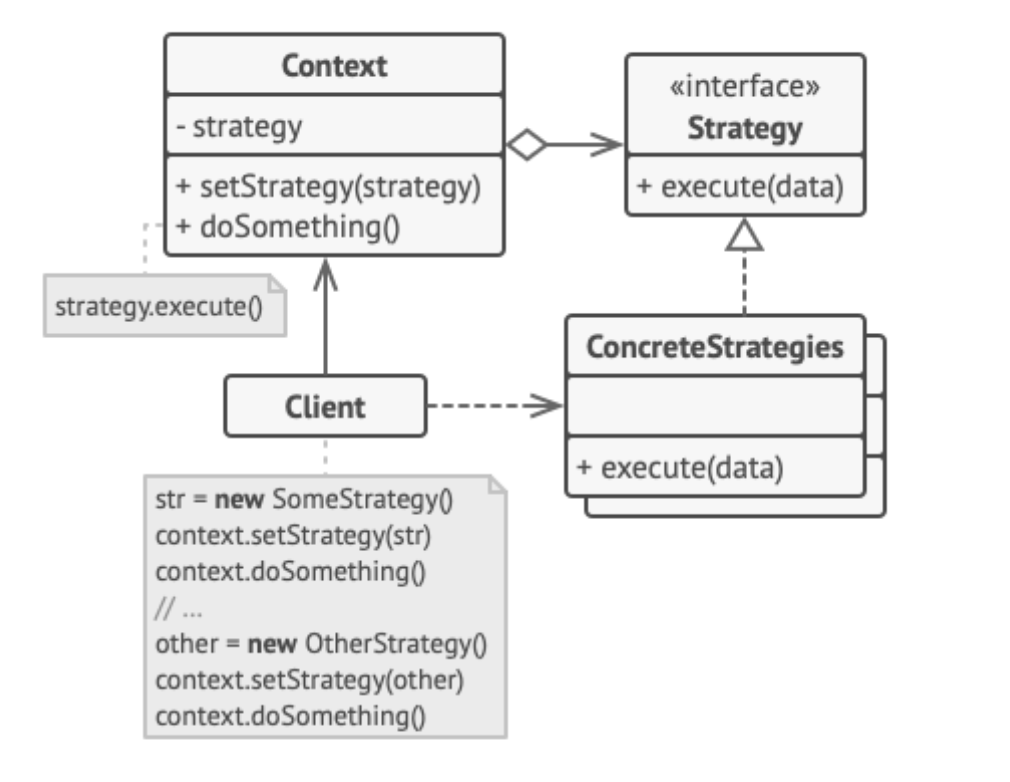
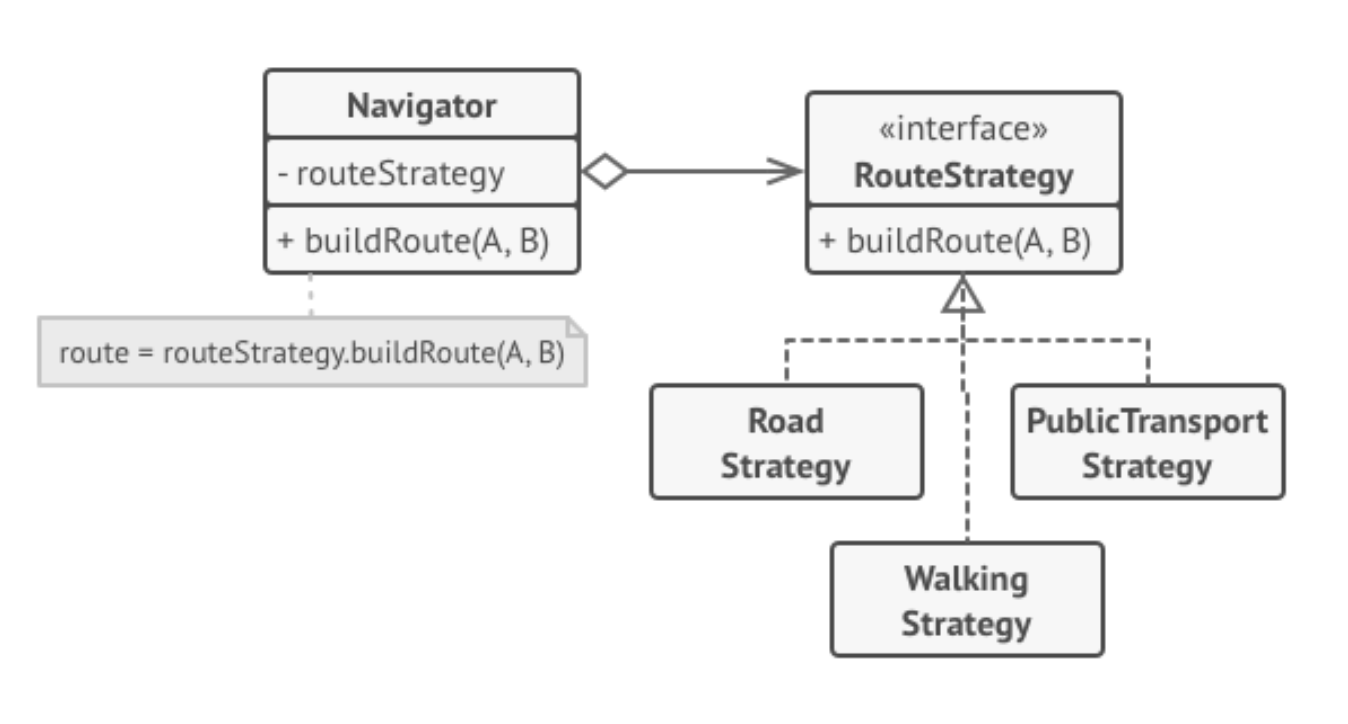
- 알고리즘(전략)을 분리하고 상황에 따라 선택 가능
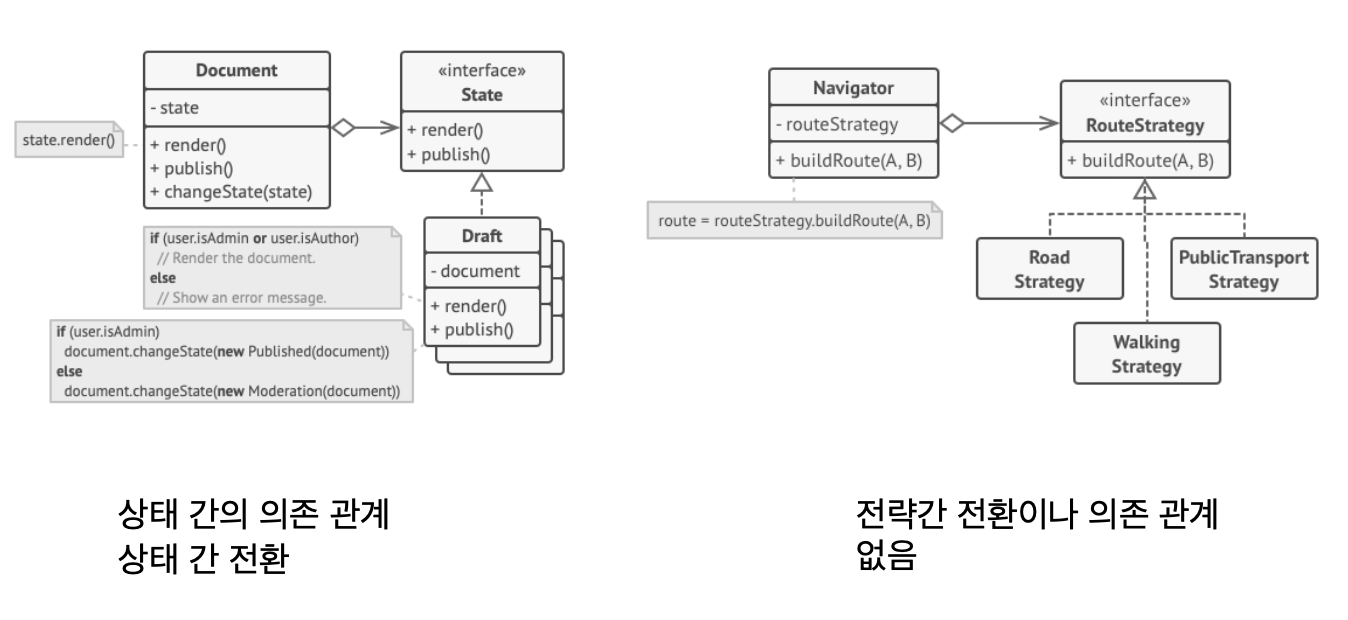
- 각 전략 간에는 전환이 가능한 것이지, 연관 관계가 있는건 아니다.
- 장점: OCP 적용 가능, 알고리즘 분리, 동적 선택
- 단점: 전략이 소수면 구조가 과해질 수 있음, 클라이언트가 적절한 전략을 알아야 함
상태 vs 전략
- 상태: 상태 간 의존/전환 관계가 존재
- 전략: 전략 간 전환/의존 관계 없음
3.10 옵서버(Observer) 패턴
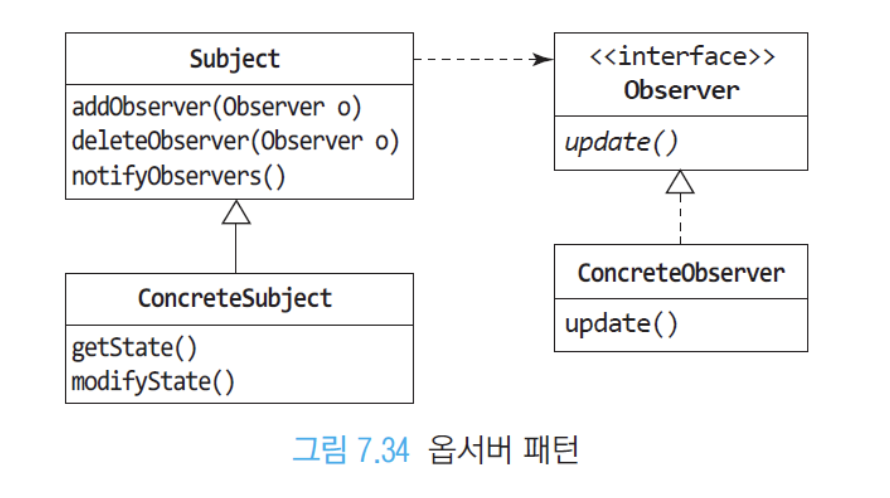
- 데이터를 보관하고 있는 Subject가 그 데이터를 이용하는 옵서버와 효과적으로 통신하면서 느슨하게 결합
- Subject 클래스
- 옵서버 목록을 유지, 변경을 고지
- 옵서버를 보고 있고, 옵서버가 변경이 있으면 알아채림
- Observer 클래스
- 변경을 통지 받고 접근을 요청
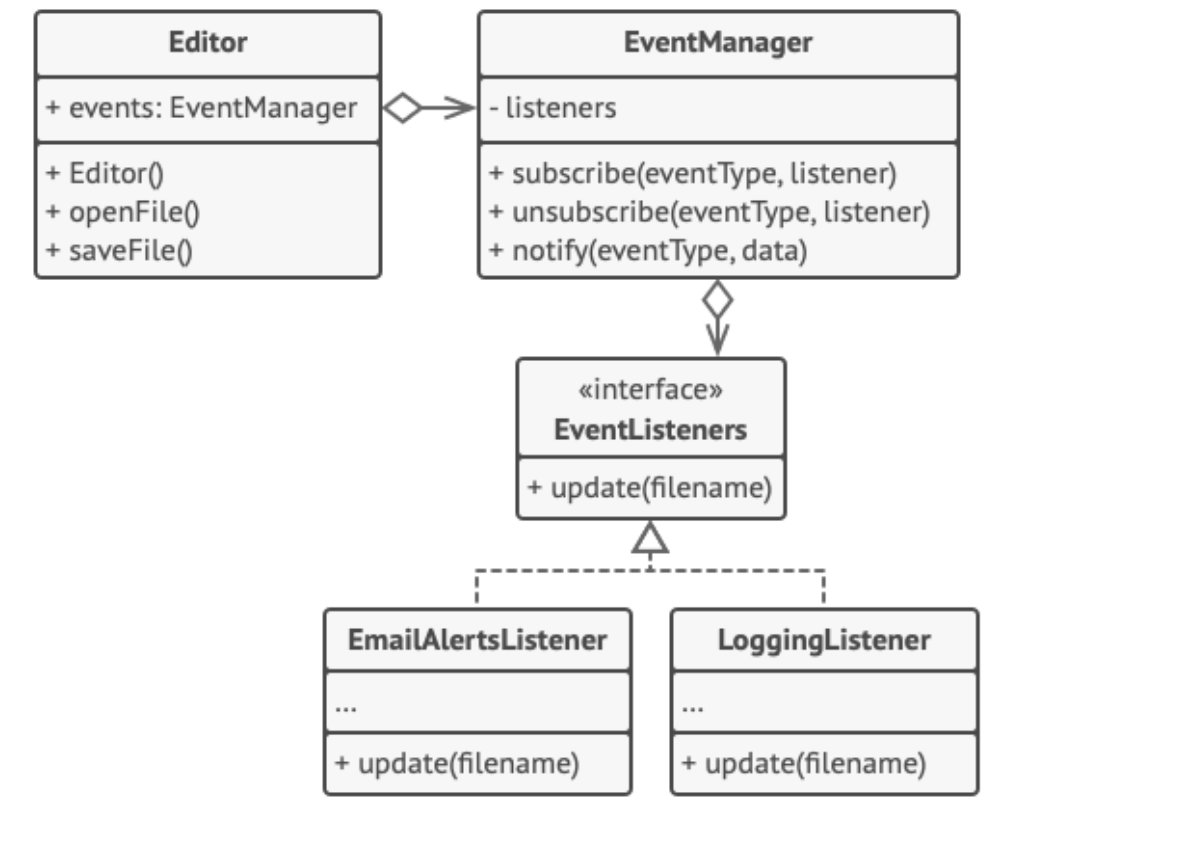
Editor는 Manager로 구성되고,
EventManager는 여러 Listener로 구성된다.
Editor는 파일을 열고 저장하는 본래 기능에 집중하고,
이벤트와 관련된 처리는 EventManager에 일임한다.
EventManager는 등록된 EventListener들에게 알림을 보내고,
각 Listener는 update()를 통해 실제 작업(이메일 전송, 로그 기록 등)을 수행한다.
즉, 이런 구조를 통해 객체들이 느슨하게 연결된다.
4 아키텍처 평가(Architecture Evaluation)
아키텍처 평가란?
- 아키텍처/패턴의 속성, 강점, 약점을 결정하는 방법
- 선택한 아키텍처가 기능·비기능(품질) 요구를 충족함을 보증
- 방법: SAAM, ATAM
SAAM
- 시나리오 기반 평가
- 아키텍처가 시나리오를 실행 가능한지 판단
- 불가능하면 시나리오를 지원하도록 아키텍처 변경
- 시나리오 유형
- 직접: 시스템 변경 불필요한 시나리오
- 간접: 시스템 변경 필요한 시나리오(기능 추가/원하지 않는 기능 삭제)
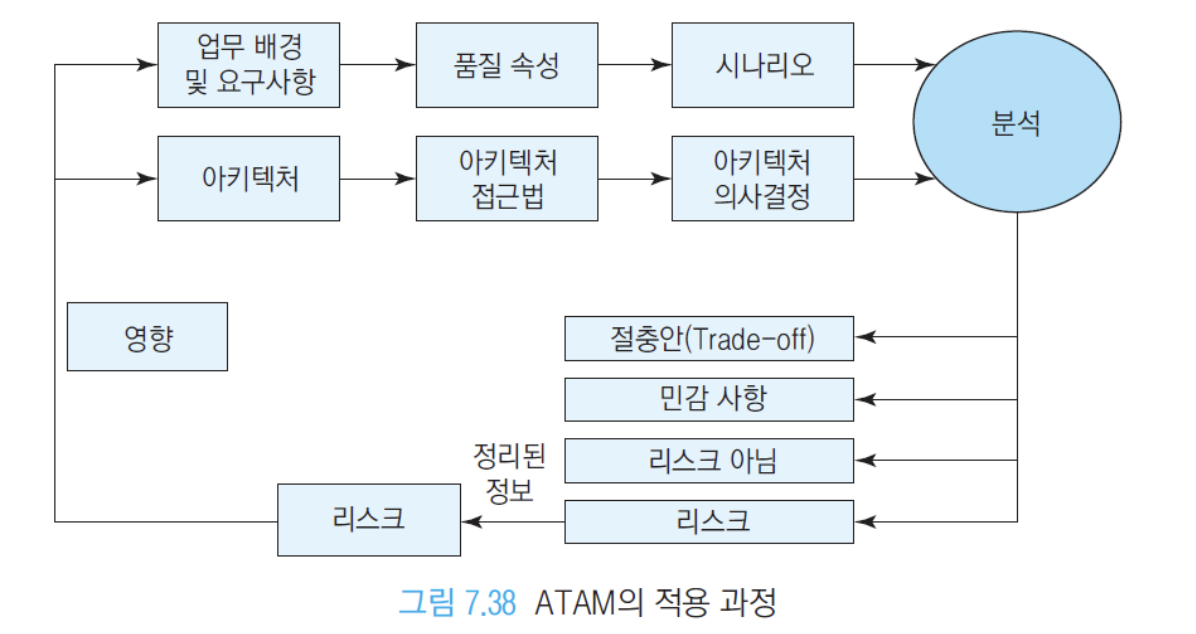
ATAM
- 여러 품질 속성에 초점을 맞춰 평가하여 아키텍처 Trade-off(타협점)을 찾아냄
“중간고사 범위는 여기까지”
절대평가: 95점 A+/90점 A0