📝 Thymeleaf
🖥️ 1. 표준 표현식 구문
1-1. 지역 변수 - (th:with)
th:with를 사용하면 지역 변수를 선언해서 사용할 수 있다. (선언한 태그 안에서만 사용)
	<h1>지역 변수 - (th:with)</h1>
	<div th:with="first=${users[0]}">
		<p>
			처음 사람의 이름은 <span th:text="${first.username}"></span>
		</p>
1-2. 유틸리티 객체와 날짜
- format을 이용하면 날짜를 원하는 형식으로 출력 가능
- format 외에도 일을 출력하는 day, 월을 출력하는 month 등 다양한 형식을 지원
<body>
	<h1>LocalDateTime</h1>
	<ul>
		<li>
			default = <span th:text="${localDateTime}"></span>
		</li>
		<li>yyyy-MM-dd HH:mm:ss =
			<span th:text="${#temporals.format(localDateTime, 'yyyy-MM-dd HH:mm:ss')}"></span>
		</li>
	</ul>

	<h1>LocalDateTime - Utils</h1>
	<ul>
		<li>${#temporals.day(localDateTime)} =
			<span th:text="${#temporals.day(localDateTime)}"></span>
		</li>
		<li>${#temporals.month(localDateTime)} =
			<span th:text="${#temporals.month(localDateTime)}"></span>
		</li>
		<li>${#temporals.monthName(localDateTime)} =
			<span th:text="${#temporals.monthName(localDateTime)}"></span>
		</li>
		<li>${#temporals.year(localDateTime)} =
			<span th:text="${#temporals.year(localDateTime)}"></span>
		</li>
		<li>${#temporals.dayOfWeek(localDateTime)} =
			<span th:text="${#temporals.dayOfWeek(localDateTime)}"></span>
		</li>
		<li>${#temporals.dayOfWeekName(localDateTime)} =
			<span th:text="${#temporals.dayOfWeekName(localDateTime)}"></span>
		</li>
		<li>${#temporals.hour(localDateTime)} =
			<span th:text="${#temporals.hour(localDateTime)}"></span>
		</li>
		<li>${#temporals.minute(localDateTime)} =
			<span th:text="${#temporals.minute(localDateTime)}"></span>
		</li>
		<li>${#temporals.second(localDateTime)} =
			<span th:text="${#temporals.second(localDateTime)}"></span>
		</li>
		<li>${#temporals.nanosecond(localDateTime)} =
			<span th:text="${#temporals.nanosecond(localDateTime)}"></span>
		</li>
	</ul>
</body>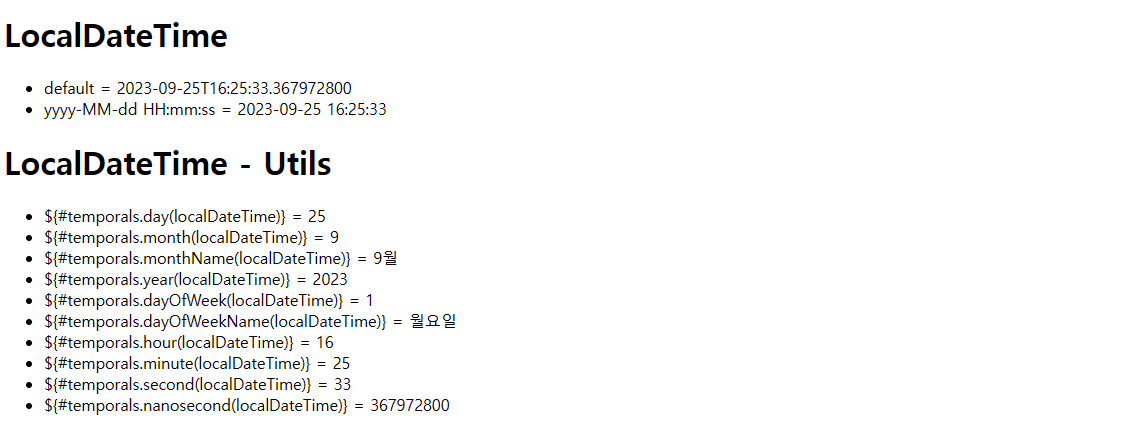
1-3. 링크 URL
th:href="@{}"
<body>
<h1>URL 링크</h1>
<ul>
<li>
// http://localhost:9090/hello
<a th:href="@{/hello}">basic url</a>
</li>
<li>
// http://localhost:9090/hello?param1=data1¶m2=data2
<a th:href="@{/hello(param1=${param1},param2=${param2})}">hello query param</a>
</li>
<li>
// http://localhost:9090/hello/data1/data2
<a th:href="@{/hello/{param1}/{param2}(param1=${param1},param2=${param2})}">
path variable
</a>
</li>
<li>
// http://localhost:9090/hello/data1?param2=data2
<a th:href="@{/hello/{param1}(param1=${param1},param2=${param2})}">
path variable + query param
</a>
</li>
</ul>
</body>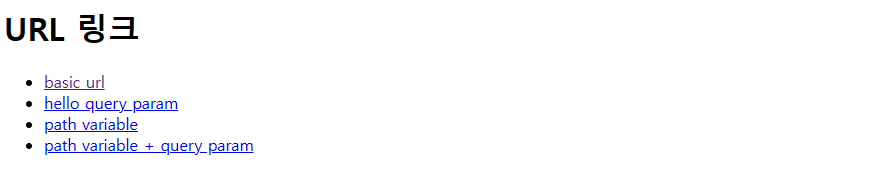
1-4. 리터럴
- 타임리프에서는 문자 리터럴을 항상 ' 작은 따옴표로 감싸줘야 한다.
- 문자열이 공백없이 이어질 경우 하나의 토큰으로 인지하여 작은따옴표를 생략할 수 있다.
- 공백이 있다면 타임리프가 하나의 토큰으로 인지하지 못하기 때문에 에러가 발생 (작은따옴표로 감싸면 정상적으로 작동)
- 변수와 함께 사용할 수 있다.
- 리터럴 대체 문법을 사용하면 작은따옴표도 더하기도 필요 없이 대체 문법 안에 있는 리터럴과 변수들을 편리하게 사용할 수 있다. (
| |)
<body>
	<h1>리터럴</h1>
	<ul>
		<!-- 주석 풀면 예외 발생 -->
<!--		<li>"hello world!" =-->
<!--			<span th:text="hello world"></span>-->
<!--		</li>-->

		<li>
			'hello' + ' world!' =
			<span th:text="'hello' + ' world!'"></span>
		</li>
		<li>
			'hello world!' =
			<span th:text="'hello world!'"></span>
		</li>
		<li>
			'hello ' + ${data} =
			<span th:text="'hello ' + ${data}"></span>
		</li>
		<li>
			리터럴 대체 |hello ${data}| =
			<span th:text="|hello ${data}|"></span>
		</li>
	</ul>
</body>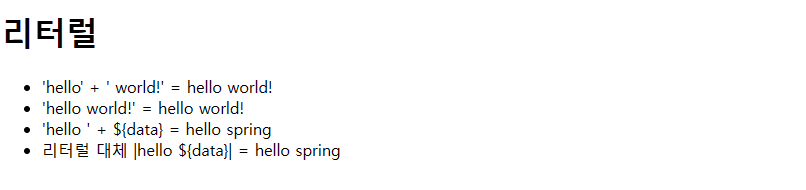
1-5. 연산
- 비교연산 : HTML 엔티티를 사용해야하는 부분을 주의
>(gt),<(lt),>=(ge),<=(le),!(not),==(eq),!=(neq, ne)
<body>
<ul>
<li>산술 연산
<ul>
<li>10 + 2 =
<span th:text="10+2"></span>
</li>
<li>10 % 2 == 0 =
<span th:text="10%2==0"></span>
</li>
</ul>
</li>
<li>비교연산
<ul>
<li>
1 > 10 =
<span th:text="1 > 10"></span>
</li>
<li>
1 gt 10 =
<span th:text="1 gt 10"></span>
</li>
<li>
1 >= 10 =
<span th:text="1 >= 10"></span>
</li>
<li>
1 ge 10 =
<span th:text="1 ge 10"></span>
</li>
<li>
1 == 10 =
<span th:text="1 == 10"></span>
</li>
<li>
1 != 10 =
<span th:text="1 != 10"></span>
</li>
</ul>
</li>
<li>조건식
<ul>
<li>(10 % 2 == 0)?'짝수':'홀수' =
<span th:text="(10 % 2 == 0)?'짝수':'홀수'"></span>
</li>
</ul>
</li>
<li>Elvis 연산사
<!-- 조건식의 축약 버전 -->
<ul>
<li>${data}?'데이터가 없습니다.' =
<span th:text="${data}?:'데이터가 없습니다.'"></span>
</li>
<li>${nulldata}?'데이터가 없습니다.' =
<span th:text="${nulldata}?:'데이터가 없습니다.'"></span>
</li>
</ul>
</li>
<li>No-Operation
<ul>
<li>${data}?:_ =
<span th:text="${data}?:_">데이터가 없습니다!</span>
</li>
<li>${nulldata}?:_ =
<span th:text="${nulldata}?:_">데이터가 없습니다!</span>
</li>
</ul>
</li>
</ul>
</body>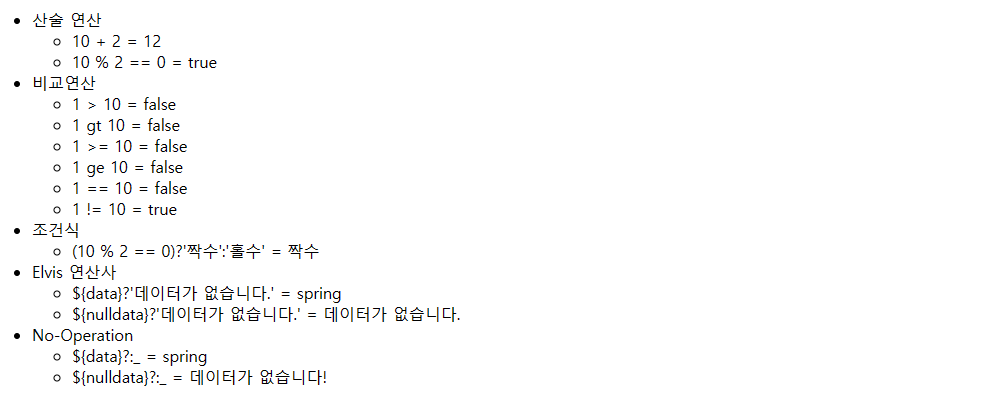
🖥️ 2. 속성값 설정
[Thymeleaf] Attribute (속성)
[Thymeleaf] 속성값 설정
- 타임리프 태그 속성
- 타임리프는 주로 HTML 태그에
th:*속성을 지정하는 방식으로 동작한다.th:*로 속성을 적용하면 기존 속성을 대체한다. 기존 속성이 없으면 새로 만든다.
th:attrappend
속성 값의 뒤에 값을 추가
th:attrprepend
속성 값의 앞에 값을 추가
th:classappend
클래스 속성에 자연스럽게 값을 추가
th:checked="true"/th:checked="false"
타임리프의 th:checked는 값이 false인 경우 checked 속성 자체를 제거
checked="false"
HTML에서 checked 속성은 checked 속성의 값과 상관없이 checked라는 속성만 있어도 체크가 된다.
<body>
	<h1>속성 설정</h1>
	<input type="text" name="mock" th:name="userA" />

	<h1>속성 추가</h1>
	- th:attrappend =
	<input type="text" class="text" th:attrappend="class='large'" /><br>
	- th:attrprepend =
	<input type="text" class="text" th:attrprepend="class='large'" /><br>
	- th:classappend =
	<input type="text" class="text" th:classappend="large" />

	<h1>checked 처리</h1>
	- checked O
	<input type="checkbox" name="active" th:checked="true" /><br>
	- checked X
	<input type="checkbox" name="active" th:checked="false" /><br>
	- checked=false
	<input type="checkbox" name="active" checked="false" /><br>
</body>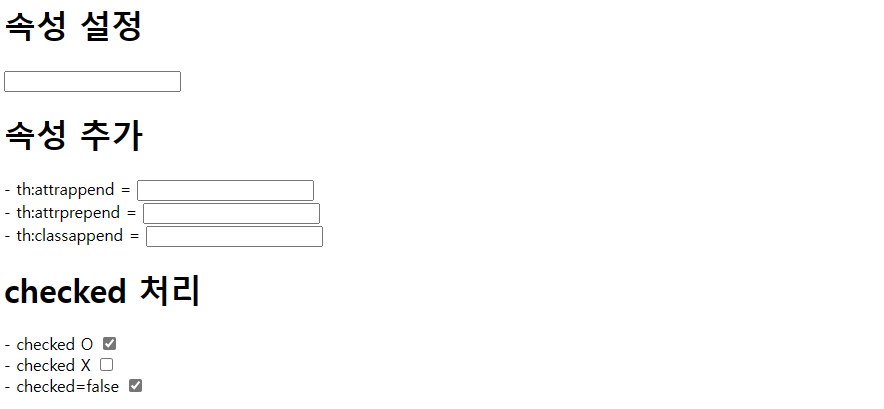
🖥️ 3. 반복문
Spring MVC - 타임리프(Thymeleaf) 반복 기능(th:each), 조건부 기능(th:if, th:unless, th:switch)
- 반복 상태 유지
<tr th:each="user,userStat :${users}">- 반복된 두 번째 파라미터를 설정해서 반복의 상태를 확인할 수 있다.
- 지정한 변수명(user) + Stat -> userStat => (두 번째 파라미터) 생략 가능
<body>
	<h1>기본 테이블</h1>
	<table border="1">
		<tr>
			<th>username</th>
			<th>age</th>
		</tr>
		<tr th:each="user :${users}">
			<td th:text="${user.username}">username</td>
			<td th:text="${user.age}">age</td>
		</tr>
	</table>

	<h1>반복 상태 유지</h1>
	<table border="1">
		<tr>
			<th>count</th>
			<th>username</th>
			<th>age</th>
			<th>etc</th>
		</tr>
		<!-- userStat : 현재 loop에 대한 상태를 알려준다. -->
		<tr th:each="user,userStat :${users}">
			<td th:text="${userStat.count}">count</td>
			<td th:text="${user.username}">username</td>
			<td th:text="${user.age}">age</td>
			<td>
				index = <span th:text="${userStat.index}"></span>
				count = <span th:text="${userStat.count}"></span>
				size = <span th:text="${userStat.size}"></span>
				first = <span th:text="${userStat.first}"></span>
				last = <span th:text="${userStat.last}"></span>
				current = <span th:text="${userStat.current}"></span>
			</td>
		</tr>
	</table>
</body>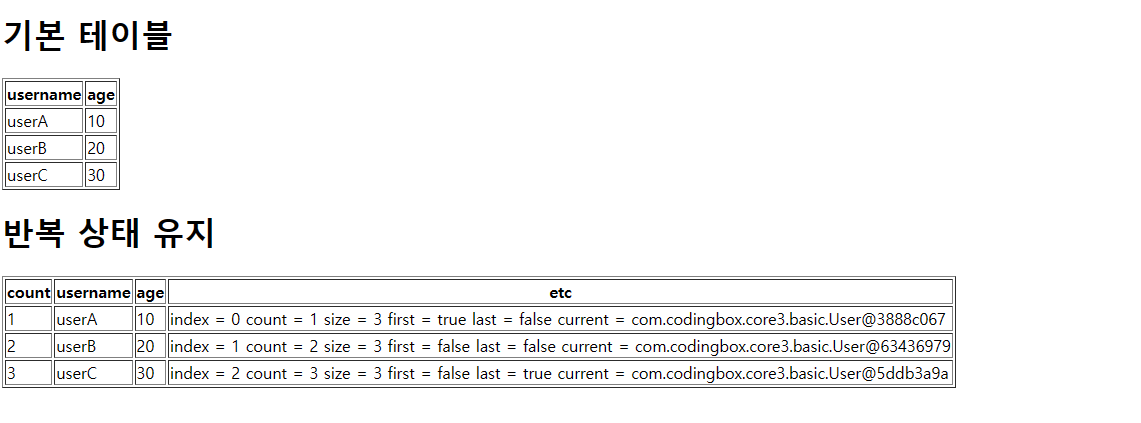
🖥️ 4. 조건부 평가
- 타임리프의 조건식 if, unless (if의 반대)
- 타임리프는 해당 조건이 맞지 않으면 태그 자체를 렌더링 하지 않는다.
- 해당 조건이 false인 경우
<span>..</span>부분 자체가 렌더링 되지 않고 사라진다.
<body>
	<h1>if, unless</h1>
	<table border="1">
		<tr>
			<th>count</th>
			<th>username</th>
			<th>age</th>
		</tr>
		<tr th:each="user,userStat :${users}">
			<td th:text="${userStat.count}">count</td>
			<td th:text="${user.username}">username</td>
			<td>
				<span th:text="${user.age}"></span>
				<span th:text="'미성년자'" th:if="${user.age lt 20}"></span>
				<span th:text="'미성년자'" th:unless="${user.age ge 20}"></span>
			</td>
		</tr>
	</table>

	<h1>switch</h1>
	<table border="1">
		<tr>
			<th>count</th>
			<th>username</th>
			<th>age</th>
		</tr>
		<tr th:each="user, userStat : ${users}">
			<td th:text="${userStat.count}"></td>
			<td th:text="${user.username}"></td>
			<td th:switch="${user.age}">
				<span th:case="10">10살</span>
				<span th:case="20">20살</span>
				<span th:case="*">기타</span>
			</td>
		</tr>
	</table>
</body>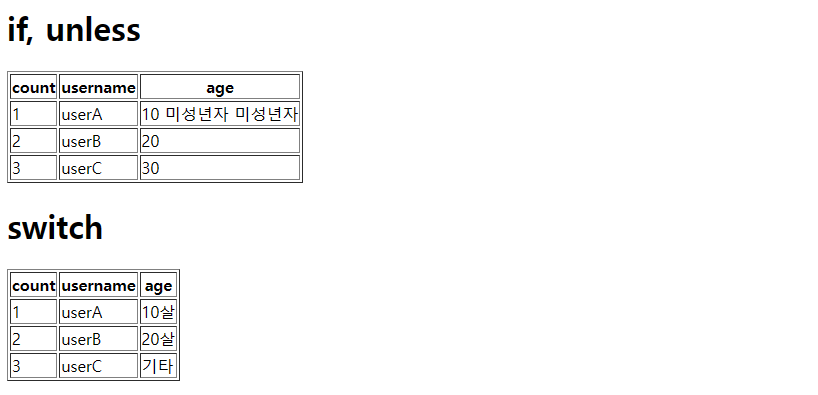
🖥️ 5. 주석 및 블록
5-1. 블록
📌 표준 HTML 주석
- 자바스크립의 표준 HTML 주석은 타임리프가 렌더링 하지 않고, 그대로 남겨둔다.
📌 타임리프 파서 주석
- 타임리프 파서 주석은 타임리프의 진짜 주석이다. 렌더링에서 주석 부분을 제거한다.
📌 타임리프 프로토타입 주석
- 타임리프 프로토타입 주석은 HTML 주석에 약간의 구문을 더했다. HTML 파일을 웹 브라우저에서 그대로 열어보면 HTML 주석이기 때문에 이 부분이 웹 브라우저가 렌더링 하지 않는다.
- 타임리프의 렌더링을 거치면 이 부분이 정상 렌더링 된다.
- 쉽게 이야기 하면, HTML 파일을 그대로 열어보면 주석 처리가 되지만 타임리프를 렌더링 한 경우에만 보이는 기능이다.
<body>
	<h1>예시</h1>
	<span th:text="${data}">html data</span>

	<h1>1. 표준 HTML 주석</h1>
	<!-- <span th:text="${data}">html data</span> -->

	<h1>2. 타임리프 파서 주석</h1>
	<!--/* [[${data}]] */-->

	<!--/*-->
	<span th:text="${data}">html data</span>
	<!--*/-->

	<h1>3. 타임리프 프로토타입 주석</h1>
	<!--/*/ <span th:text="${data}">html data</span> /*/-->
</body>
5-2. 블록
- HTML 태그가 아닌 타임리프의 유일한 자체 태그이다.
<th:block>
- 사용빈도가 높지는 않고 어쩔 수 없이 사용 될 때가 있다.
<body>
	<th:block th:each="user : ${users}">
		<div>
			사용자 이름 : <span th:text="${user.username}"></span>
			사용자 나이 : <span th:text="${user.age}"></span>
		</div>
		<div>
			요약 : <span th:text="${user.username}+'/'+${user.age}"></span>
		</div>
	</th:block>
</body>
🖥️ 6. 자바스크립트 인라인
[Thymeleaf] JavaScript Inlining (자바스크립트 인라인)
<body>
	<!--
		자바스크립트 인라인 사용 전, thymeleaf에 순수 자바 스크립트 넣음
	-->
	<script>
		let username = "[[${user.username}]]";
		let age = [[${user.age}]];

		// 객체
		let user = [[${user}]];
	</script>

	<!--
		자바스크립트 인라인 사용 후
		자바스크립트 영역에 thymeleaf가 관여해줌
	-->
	<script th:inline="javascript">
		let username2 = [[${user.username}]];
		let age2 = [[${user.age}]];

		// 객체
		let user2 = [[${user}]];
	</script>

	<!--
		자바스크립트 인라인 each
	-->
	<script th:inline="javascript">
		[# th:each="user, stat : ${users}"]
			let user[[${stat.count}]] = [[${user}]];
		[/]
	</script>
</body>
🖥️ 7. 템플릿 레이아웃
Spring MVC - 타임리프(Thymeleaf) 템플릿 조각과 레이아웃 (th:fragment, th:insert, th:replace)
th:insert: 현재 태그를 유지하면서 템플릿 조각을 가져오는 방법th:insert="~{ [ 템플릿 조각 경로 ] :: 조각명}"
th:replace: 현재 태그를 템플릿 조각에 있는 태그로 대체하는 방법th:replace="~{ [ 템플릿 조각 경로 ] :: 조각명}"
템플릿 조각은 파라미터를 전달하여 동적으로 렌더링을 할 수 있다.
th:replace="~{ [ 템플릿 조각 경로 ] :: 조각명 ('파라미터1', '파라미터2', ...)}
<body>
	<h1>부분 포함</h1>

	<h2>부분 포함 insert</h2>
	<div th:insert="~{template/fragment/footer :: copy}"></div>

	<h2>부분 포함 replace</h2>
	<div th:replace="~{template/fragment/footer :: copy}"></div>

	<h1>파라미터 사용</h1>
	<div th:replace="~{template/fragment/footer :: copyParam('데이터1', '데이터2')}"></div>
</body>