개발 정보
앱 이름 : [현재 날씨는]
앱 설명 : 날씨 데이터와 URLSession API를 사용해서, 전 세계 도시의 날씨를 출력하는 앱
개발 언어 : Swift
개발 환경 : Xcode, StoryBoard, AutoLayout
활용 기술
-URLSession
-CurrentWeatherAPI
-UIAlertControllergithub : https://github.com/heyksw/Swifting/tree/main/iOS앱%20만들기/현재%20날씨는%3F
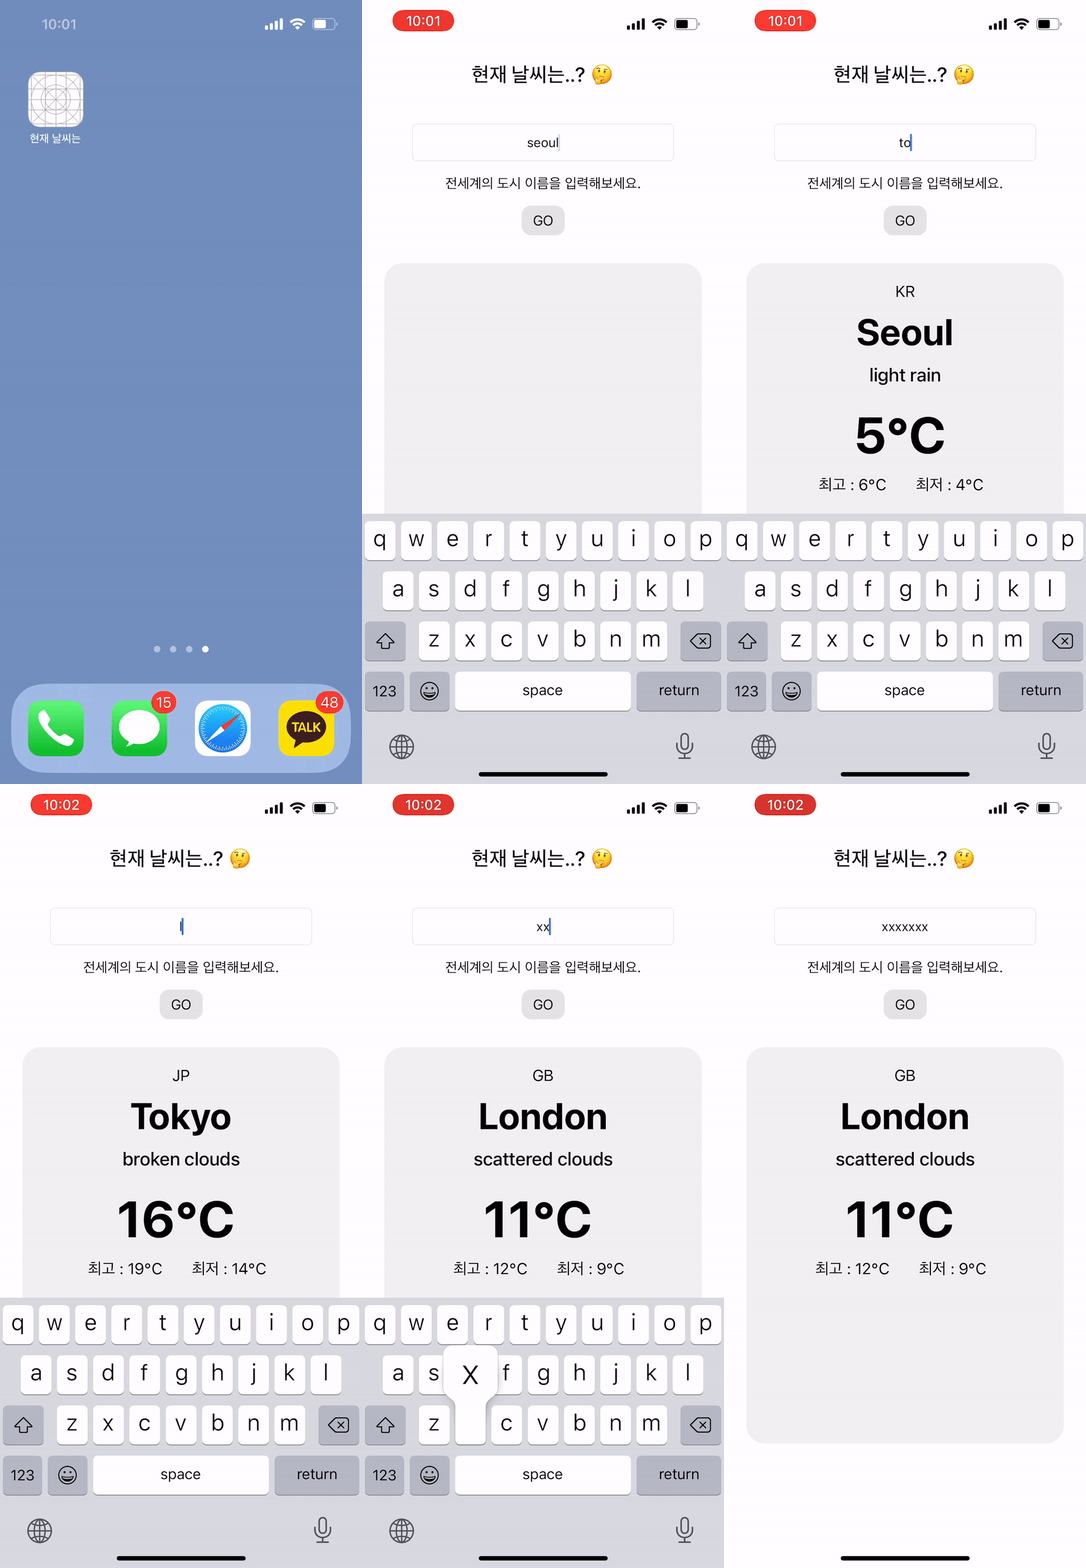
앱 실행 화면 gif
- 현재 내가 알고싶은 도시 이름을 입력하면, 서버와 소통하여 날씨 정보를 출력해줍니다.
- 잘못된 도시 이름을 입력하면 오류 Alert을 띄워줍니다.
날씨 데이터 서버와의 통신
- URLSession 을 사용하여 (iOS 앱 - 날씨 데이터 서버) 통신을 다뤘습니다.
- 서버에서 json 형식의 날씨 데이터를 받아와 앱에 출력합니다.
https://openweathermap.org/api
사이트에 회원가입하고 API key를 발급 받으면 도시 별로 현재의 날씨 정보를 json 형태로 받을 수 있게 됩니다.
웹에서 API call 호출해 json 데이터를 받은 모습.
View 구성
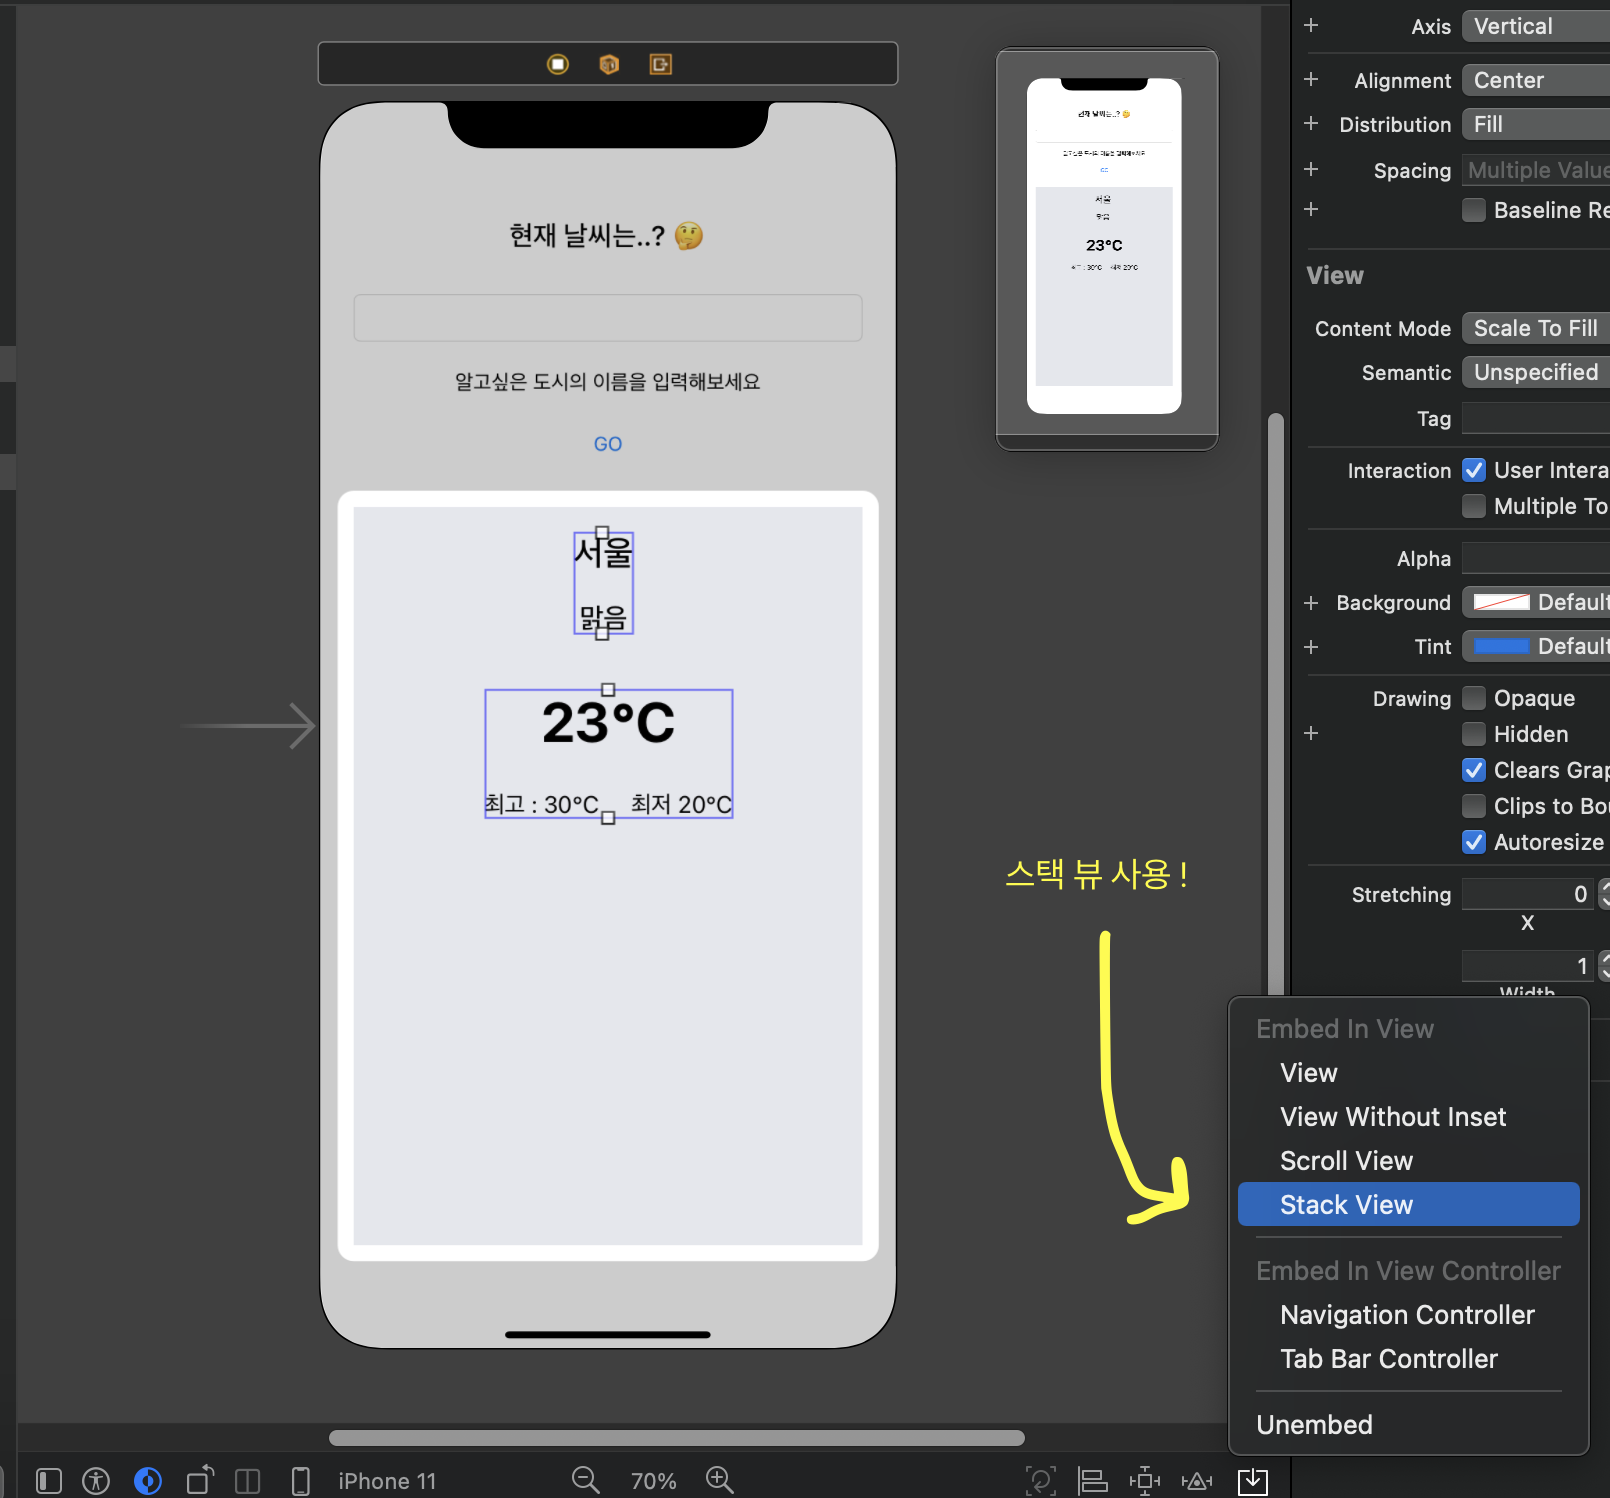
- 스택 뷰 활용
스택 뷰를 활용해서 라벨간의 간격을 조정했습니다.
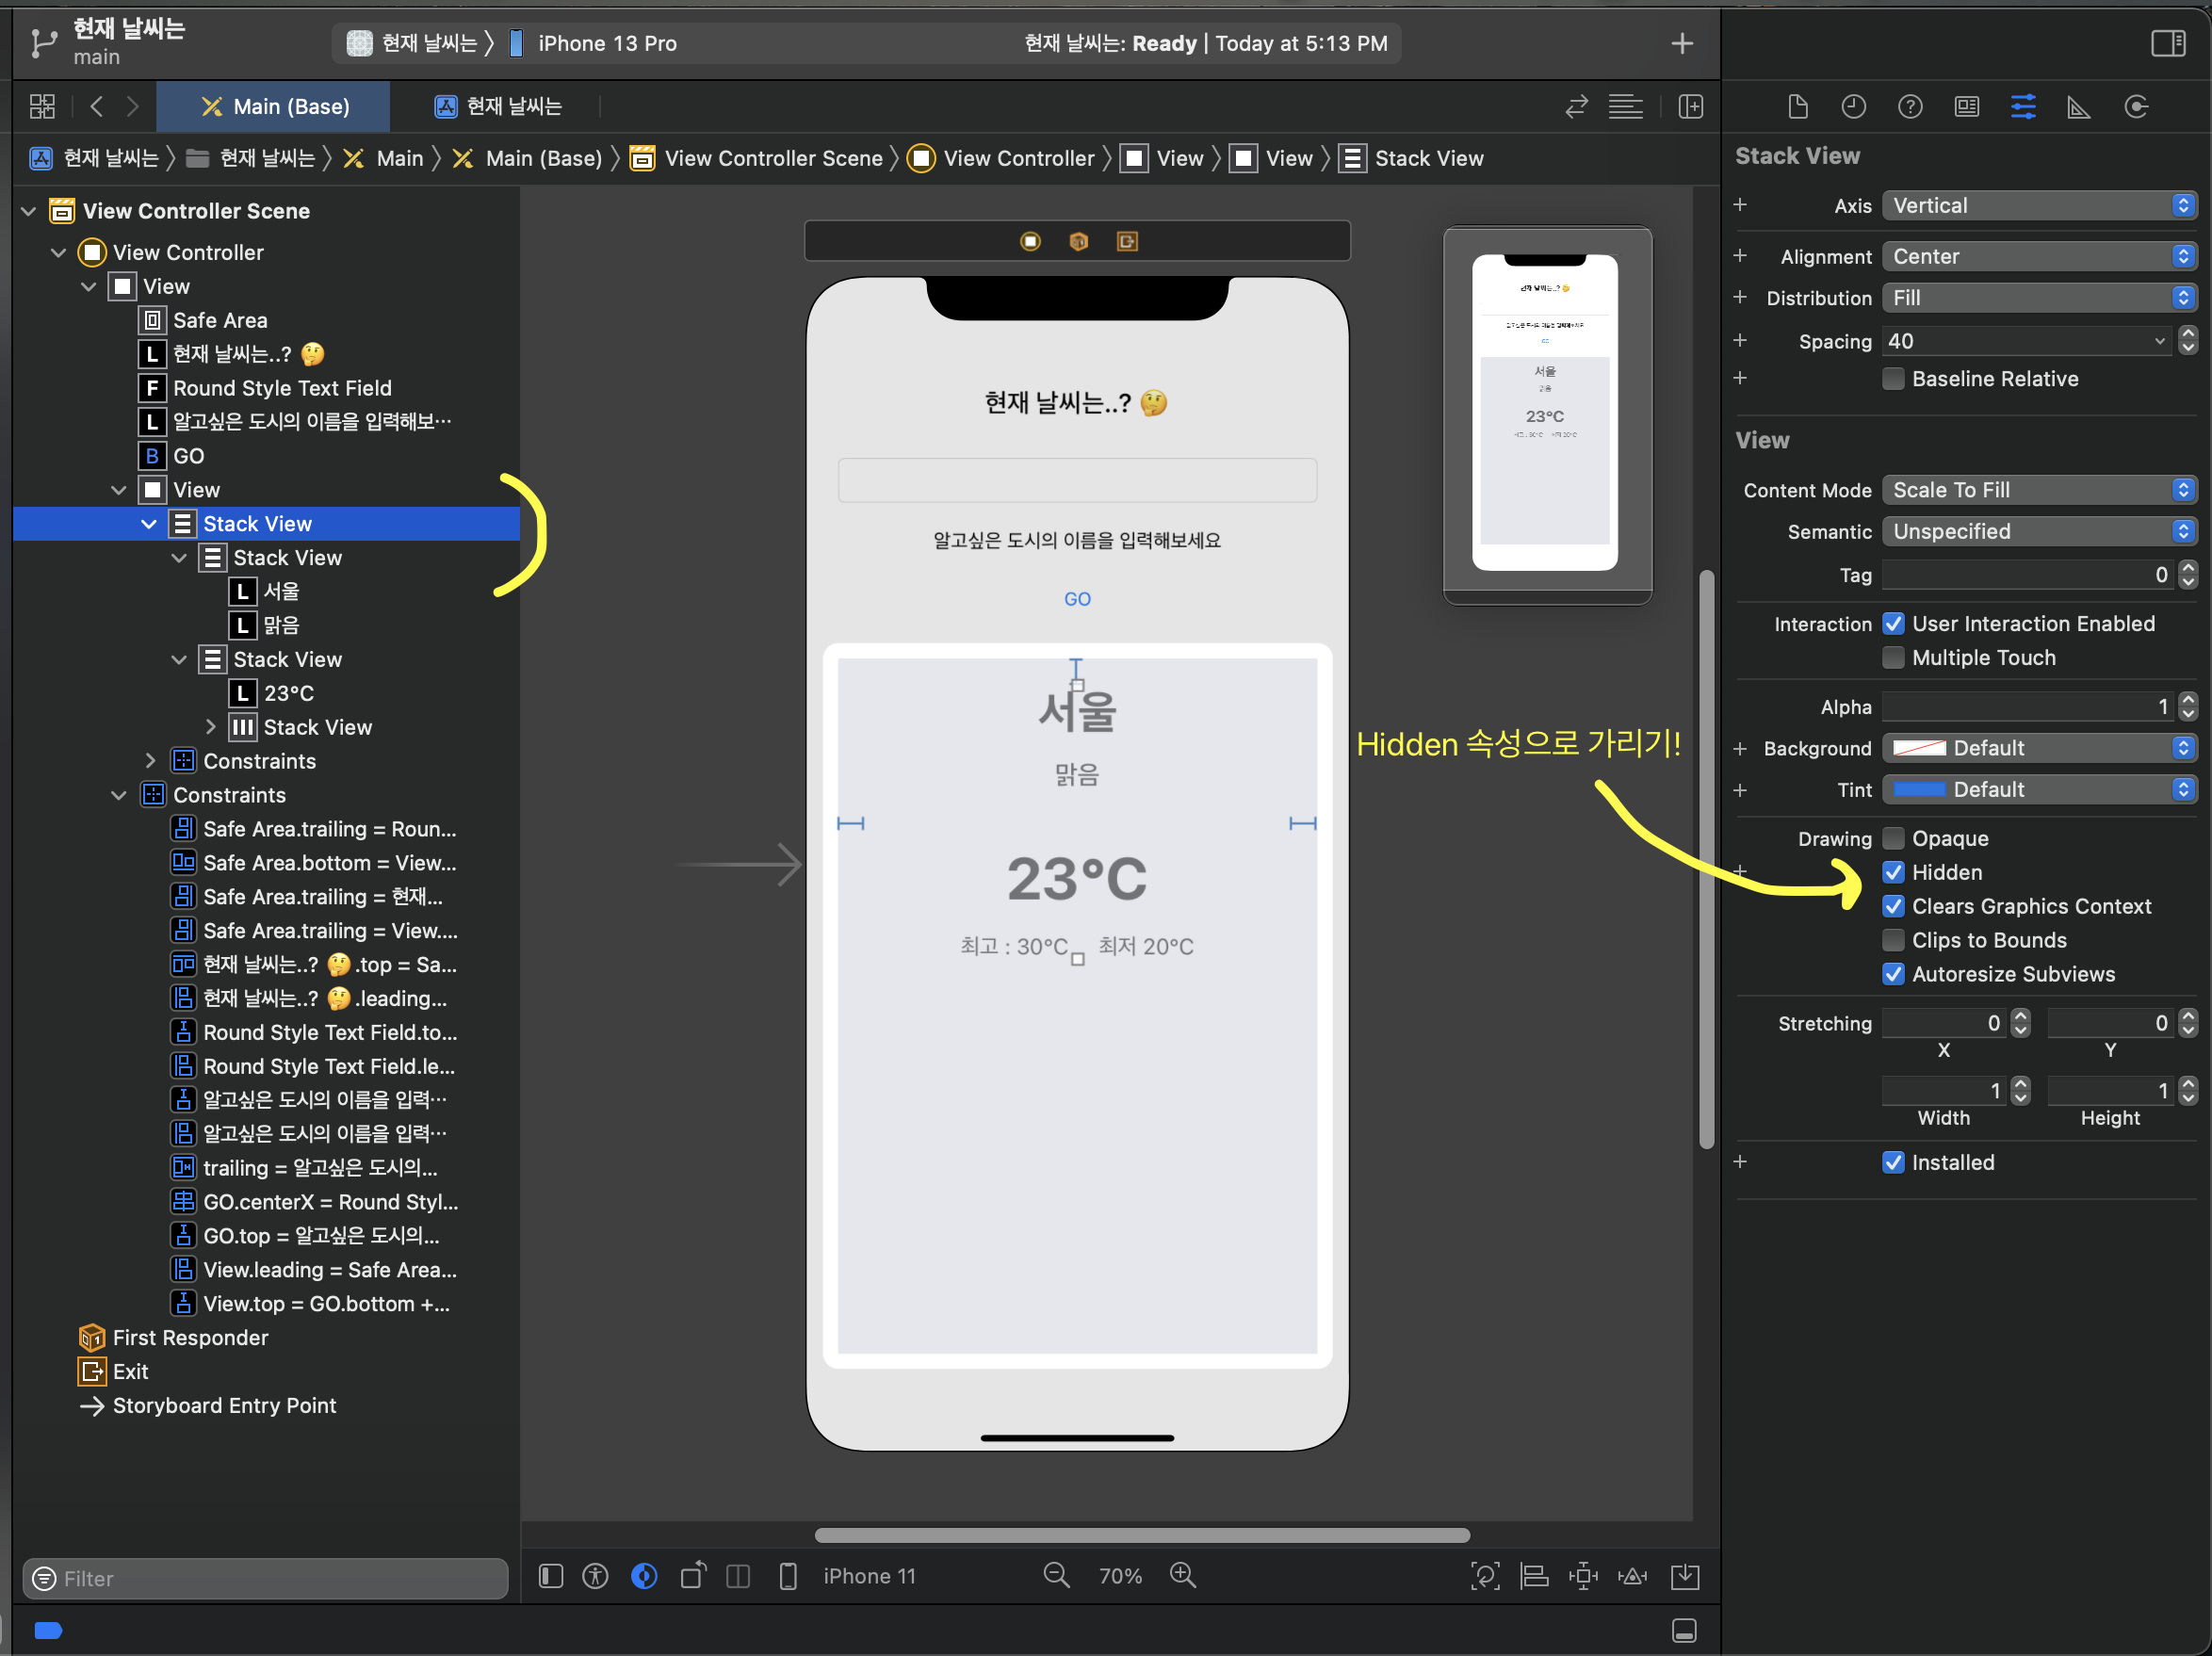
- 히든 속성 사용
부모 스택뷰의 속성에 Hidden을 주어, 도시를 검색하기 전에 미리 날씨 정보가 뜨게 되지 않도록 설정하였습니다.
날씨 데이터 - Codable 프로토콜
- Swift JSONDecoder 에는 Codable 프로토콜을 채택한 구조체가 필요합니다.
- WeatherInformation.swift 파일을 생성해서 날씨 데이터 구조체를 선언하였습니다.
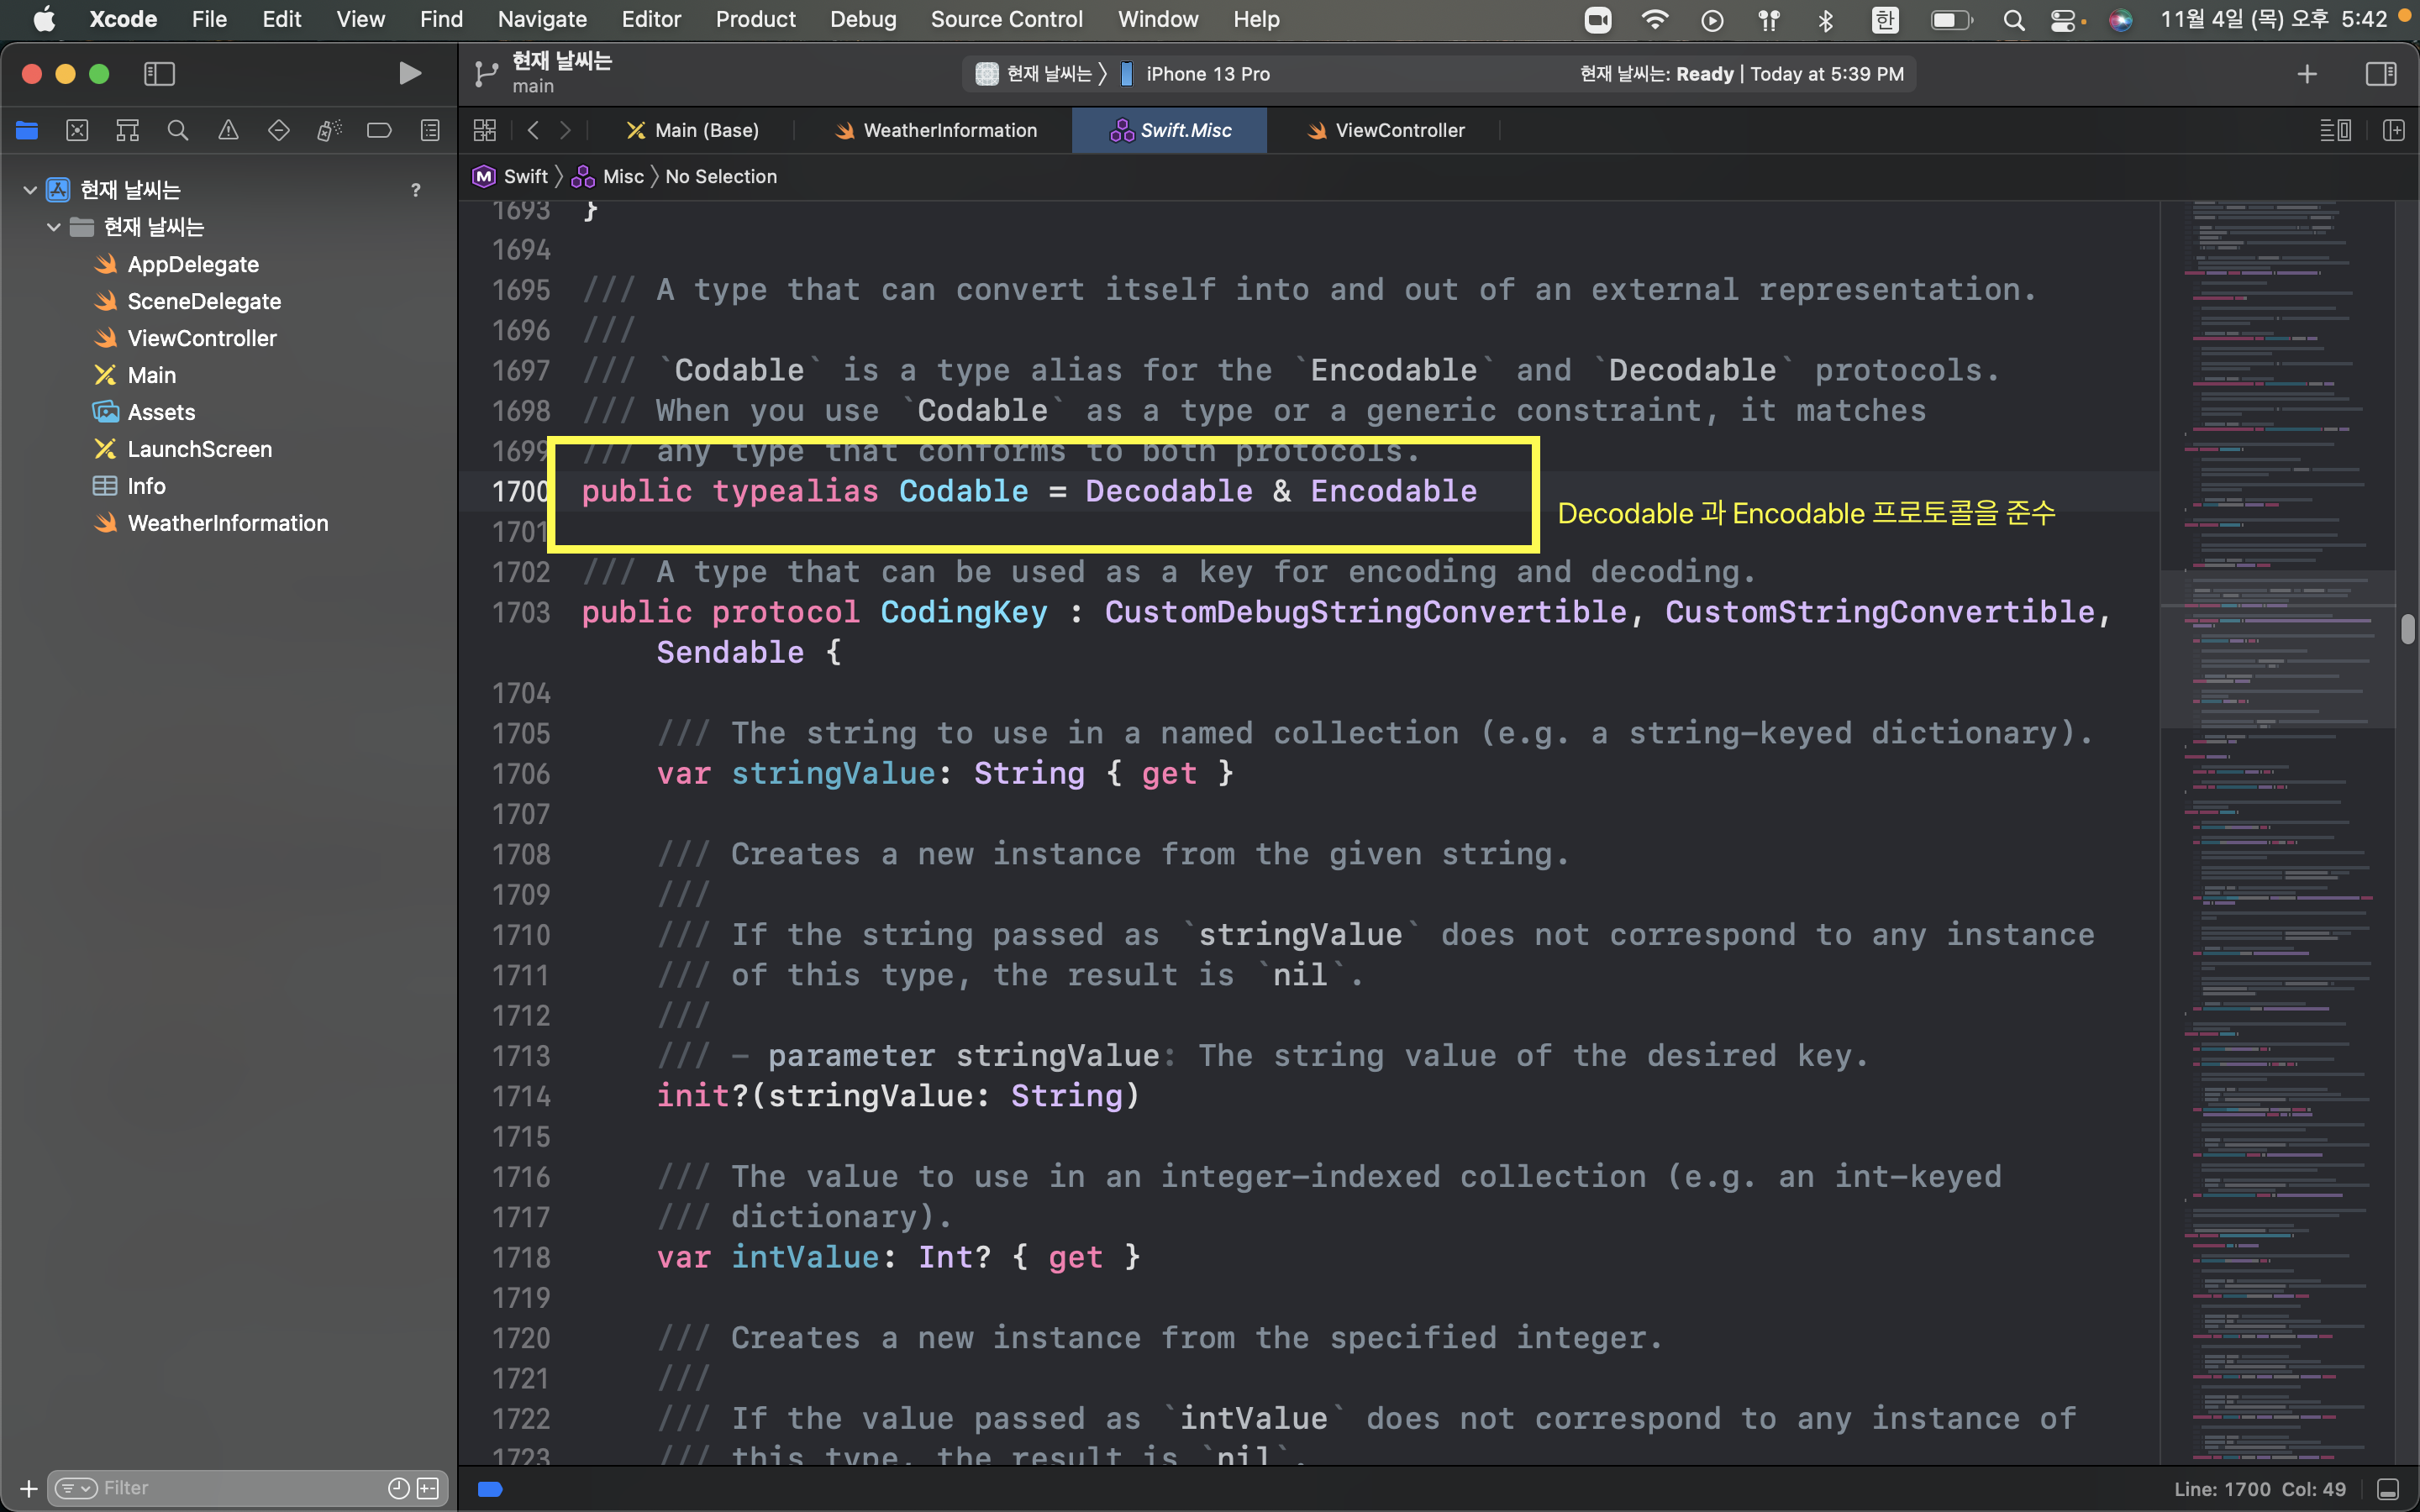
- Codable 프로토콜을 채택했는데, Codable의 내부 구조는 이렇게 생겼습니다.
내부에 Decodable과 Encodable 프로토콜을 준수하고 있습니다.
Decodable : 자신을 외부 표현에서 디코딩 가능하게함
Encodable : 자신을 외부 표현에서 인코딩-> Codable : json 디코딩과 인코딩이 모두 가능
- Codable 프로토콜을 채택하면 WeatherInformation 객체를 json 형태로 만들 수 있고, json 형태를 WeatherInformation 형태로 만들 수 있게 됩니다.
Swift 코드 작성 예시
// JSON Decoder 선언
let decoder = JSONDecoder()

// json 매핑을 위해서 사용자 정의 구조체 타입을 미리 선언해야 합니다.
guard let weatherInformation = try? decoder.decode(WeatherInfromtation.self, from: data) else { return }
문제 해결 경험 1
- 문제 : 데이터를 받아오지 못하고 weatherInformation 이 자꾸 nil 이 반환 됨.
- 해결 : guard let 문을 사용하여 옵셔널, 에러 가능성 있는 곳에 로그 표현 -> URL, Session, dataTask 에는 문제가 없음을 확인 -> JSONDecoder 에서 디코딩 실패가 문제라는 것 파악 -> json key 이름과 swift 구조체 변수 이름 매핑이 잘못 되었음 -> 해결
- json 데이터 중 "weather" 의 key와 property의 형태 확인
URLSession.dataTask 의 Completion Handler 후행 클로저
- URLSession 의 task를 마치게 되면 Completion Handler 클로저를 호출합니다. 마치 C++ 클래스의 소멸자와 비슷한 느낌이라고 생각합니다.
Closure 에서의 Weak Self 사용
ref : https://greenchobo.tistory.com/3
weak reference(약한 참조)는 애플의 WWDC 영상에 따르면 Strong Reference Cycle(강력 순환 참조)를 벗어나기 위해 사용한다고 설명하고 있습니다. Closure를 사용하면서 closure 내부에 self를 사용하는 경우가 존재하는데, 이렇게 할 경우 일반적인 상황에서는 물론 문제가 없겠지만 특수한 상황에서는 문제가 될 소지가 있다고 합니다.
따라서 Completion Handler 에서 [weak self] 를 적용하는 것이 안전하다고 판단하였습니다.
문제 해결 경험 2
메인 쓰레드와 네트워크 작업 쓰레드
- 문제 : Completion Handler 에서 UI 작업을 했지만 적용이 되지 않음.
- 해결 :
네트워크 작업은 별도의 쓰레드에서 진행되고, 응답이 온다해도 자동으로 메인 쓰레드로 돌아오지 않습니다.
따라서 Completion Handler 에서 UI 작업을 한다면 네트워크 작업 후 따로 메인쓰레드에 접근해서 UI 작업을 처리해줘야 합니다.
// 네트워크 작업을 진행중인 함수 내부
// UI 작업은 메인쓰레드에서 별도로 작업
DispatchQueue.main.async {
  // 날씨 데이터를 가져오면, hidden 속성이 풀리면서 정보를 보여주도록 함.
  self?.weatherStackView.isHidden = false
  // 미리 구현해둔 configureView 함수로 데이터를 뷰에 표시
  self?.configureView(weatherInformation: weatherInformation)
비판적 클론코딩
- 도시를 기반으로 한 날씨 앱이지만, 어느 나라인지 정보가 API 데이터에 포함 되어있습니다. 국가 데이터도 따로 받아와서 표시해봤습니다.
// json decoder 에 들어갈 사용자 정의 타입 구조체
struct WeatherInformation: Codable {
    let weather: [Weather]
    let temp: Temp
    let name: String
    // sys 안의 "country" key 값에 국가 데이터가 들어있음.
    let sys: Sys

    enum CodingKeys: String, CodingKey {
        case weather
        case temp = "main"
        case name
        case sys
    }

}

// 어떤 나라인지에 대한 데이터.
struct Sys: Codable {
    let country: String
}
개발을 통해 얻어갈 것
- Http
hyper text 를 전송하기 위한 프로토콜입니다.
http 프로토콜을 사용해서 현재 도시 날씨 정보를 서버에 요청을 하면, 서버가 정보 응답을 해주고, 앱에서 사용자에게 정보를 볼 수 있도록 표시 했습니다.
- URLSession
URLSession 은 애플에서 http, https 프로토콜을 통해 서버와 데이터를 주고받기 위해 만든 API 입니다.
- Codable
Encodable과 Decodable이 합쳐진 프로토콜 입니다.
Encodable -> data를 Encoder에서 변환해주려는 프로토콜로 바꿔주는 것
Decodable -> data를 원하는 모델로 Decode 해주는 것
한마디로 나의 데이터 형태를 json데이터로 변환할 수도 있고, json 데이터를 나의 데이터 형태로 변환할 수 있게 해줍니다.
- UIAlertController / UIAlertAction
이 둘을 사용해서 Alert의 형태, 메시지 / Alert로 어떤 행동을 취할 것인지에 대한 코드를 작성할 수 있습니다.
- Navigation / Present
기본적으로 화면을 전환하는 방법 2 가지입니다. Alert에는 present 형식이 더 어울립니다. present 에는 뒤로 가기 버튼이 따로 생기기 않습니다.
- CodingKey 프로토콜
CodingKey 프로토콜을 채택함으로써 json key 이름과 swift 변수 이름을 다르게 지정해주고 싶을 때 매핑 가능// json 데이터 중 main 에서 필요한 key, property // json key 이름과 swift 변수 이름을 다르게 지정 했지만 매핑 시킴 struct Temp: Codable { let temp: Double let feelsLike: Double let minTemp: Double let maxTemp: Double // pressure와 humidity는 사용하지 않음. // CodingKey 프로토콜 준수 -> 매핑 enum CodingKeys: String, CodingKey { case temp case feelsLike = "feels_like" case minTemp = "temp_min" case maxTemp = "temp_max" } }
- contains
Python 의 in 과 비슷한 역할을 한다고 생각합니다.value = 250 let myRange = (200..<300) if let myRange.contains(value) { print("TRUE") } else { print("FALSE") }(value 가 200에서 300 사이의 값을 가지는 지 판단하는 코드 예시)
Swift 코드
- ViewController.swift
import UIKit

class ViewController: UIViewController {

    @IBOutlet weak var countryLabel: UILabel!
    @IBOutlet weak var bigView: UIView!
    @IBOutlet weak var cityNameLabel: UILabel!
    @IBOutlet weak var cityNameTextField: UITextField!
    @IBOutlet weak var tapButton: UIButton!
    @IBOutlet weak var weatherDescriptionLabel: UILabel!
    @IBOutlet weak var temperatureLabel: UILabel!
    @IBOutlet weak var maxTempLabel: UILabel!
    @IBOutlet weak var minTempLabel: UILabel!
    @IBOutlet weak var weatherStackView: UIStackView!

    override func viewDidLoad() {
        super.viewDidLoad()
        self.bigView.layer.cornerRadius = 20
        self.cityNameTextField.layer.cornerRadius = 20
        self.tapButton.layer.cornerRadius = 10
        // Do any additional setup after loading the view.
    }

    @IBAction func tapTouchDown(_ sender: Any) {
        self.tapButton.backgroundColor = UIColor.lightGray
    }

    // 날씨 가져오기 버튼을 눌렀을 때
    @IBAction func tapFetchWeatherButton(_ sender: UIButton) {
        self.tapButton.backgroundColor = UIColor(displayP3Red: 227/255, green: 227/255, blue: 227/255, alpha: 1)

        if let cityName = self.cityNameTextField.text {
            self.getCurrentWether(cityName: cityName)
            self.view.endEditing(true)
            // 버튼이 눌리면 키보드가 사라지도록 함.
        }
    }

    // 받아온 json 데이터를 뷰에 표시
    func configureView(weatherInformation: WeatherInformation) {
        self.cityNameLabel.text = weatherInformation.name
        // json 형식에서 weather가 배열 형태 [] 였기 때문에 first 로 첫번째 값을 받아옴.
        if let weather = weatherInformation.weather.first {
            self.weatherDescriptionLabel.text = weather.description
        }
        self.temperatureLabel.text = "\(Int(weatherInformation.temp.temp - 273.15))℃ "
        self.minTempLabel.text = "최저 : \(Int(weatherInformation.temp.minTemp - 273.15))℃  "
        self.maxTempLabel.text = "최고 : \(Int(weatherInformation.temp.maxTemp - 273.15))℃  "
        self.countryLabel.text = "\(weatherInformation.sys.country)"

    }

    // 잘못된 도시 이름이 입력될 경우, alert 생성
    func showAlert(message: String) {
        let alert = UIAlertController(title: "에러", message: message, preferredStyle: .alert)
        alert.addAction(UIAlertAction(title: "확인", style: .default, handler: nil))
        self.present(alert, animated: true, completion: nil)
    }


    // API에서 현재 날씨 가져오기
    func getCurrentWether(cityName: String) {
        // api url 연결
        guard let url = URL(string: "https://api.openweathermap.org/data/2.5/weather?q=\(cityName)&appid=1290787ef5eb584060b11b43e201a9fc") else
        { print("url error")
          return }

        let session = URLSession(configuration: .default)
        // weak self
        session.dataTask(with: url) { [weak self]
            // Completion Handler 후행 클로저
            // data : 서버에서 응답 받은 json 데이터
            // response : http 헤더 및 상태 코드 메타 데이터
            // error : 요청 실패 에러 객체. 성공하면 nil.
            data, response, error in
            // http status가 200번대 이면 응답받은 json 데이터를 weatherInformation 객체로 디코딩
            // 200번대 가 아니라면 에러 상황. 응답받은 json 데이터를 에러 메시지 객체로 디코딩 함.
            let successRange = (200..<300)
            // 데이터를 잘 받아오고, 에러가 없다면 다음 코드 수행
            guard let data = data, error == nil else {
                print("session error")
                return }

            // json 객체에서 data 유형의 인스턴스로 디코딩
            let decoder = JSONDecoder()

            // response를 HTTP URLResponse 형태로 다운 캐스팅 하고,
            // successRange에 status code를 넘겨줘서 200번대 인지 확인
            if let response = response as? HTTPURLResponse, successRange.contains(response.statusCode) {
                // status code가 200번대 인 경우 (json 데이터를 성공적으로 받아왔을 경우)

                // json 을 매핑 시켜줄 사용자 정의 타입
                guard let weatherInformation = try? decoder.decode(WeatherInformation.self, from: data) else { return }
                // 콘솔에 데이터를 잘 받았는지 출력
                debugPrint(weatherInformation)

                // UI 작업은 메인쓰레드에서 작업
                DispatchQueue.main.async {
                    // 날씨 데이터를 가져왔으면, hidden 이 풀리면서 정보를 보여주도록.
                    self?.weatherStackView.isHidden = false
                    // configureView 함수를 통해 json 데이터를 뷰에 표시.
                    self?.configureView(weatherInformation: weatherInformation)
                }
            } else { // status code가 200번대 가 아닌경우 에러
                guard let errorMessage = try? decoder.decode(ErrorMessage.self, from: data) else {return}

                // 에러 메시지를 띄우는 Alert UI 작업은 메인쓰레드에서 작업
                DispatchQueue.main.async {
                    self?.showAlert(message: errorMessage.message)
                }

            }


        }.resume()  // resume 까지 해줘야 작업 실행
    }


}
- 나머지 구조체 정의 코드는 github에 커밋했습니다.


