출처 : https://medium.com/@almalehdev/high-performance-drawing-on-ios-part-1-f3a24a0dcb31
- 지금 하고 있는 프로젝트를 위해 정리한 글.
실시간 카메라에서 문자를 인식하고, 문자를 인식하면 화면에 그 문자를 감싸는 박스를 그리고 싶다. AVFoundation 의 PreviewLayer 위에다가, image Buffer 의 인식 결과 Sub Box Layer 들을 Add 해주고 Remove 해주는 작업을 빠르게 반복하면서 구현에 성공하긴 했지만, 그림이 그려지고 사라지는 속도를 더 빠르게 해보고 싶어서 여러가지 공부를 하게 됐다.
UIKit > Core Animation > Core Graphics > Open GL 의 순서로 이뤄진 iOS 계층구조도 같이 생각해두면 좋을 것 같다.
CPU vs GPU
- CPU 는 중앙처리 장치로, 복잡한 연산을 처리한다. 직렬 처리.
- GPU 는 그래픽 처리 장치로, 그래픽 연산에 특화돼있다. 그래픽 카드에 내장된다. 병렬 처리.
- 한마디로 둘의 용도, 목적성이 다르다. 그런 의미에서, 내가 지금 하고 있는 프로젝트는 빠르게 사각형을 그리고 지우는 과정을 반복하기 때문에 아무래도 GPU 에 더 의존한 작업을 할 것 같다.
iOS 에서 4가지 그리기 방식
- Low performance CPU-based drawing
- High performance CPU-based drawing
- Sublayer GPU-based drawing
- Draw(layer:ctx:) GPU-based drawing
1. Low performance CPU-based drawing
- UIGraphicsImageRenderer 를 사용한 방식
let renderer = UIGraphicsImageRenderer(size: bounds.size)
image = renderer.image { ctx in
 image?.draw(in: bounds)
 lineColor.setStroke() // any color
 ctx.cgContext.setLineCap(.round)
 ctx.cgContext.setLineWidth(lineWidth) // any width
 ctx.cgContext.move(to: previousTouchPosition)
 ctx.cgContext.addLine(to: newTouchPosition)
 ctx.cgContext.strokePath()
}
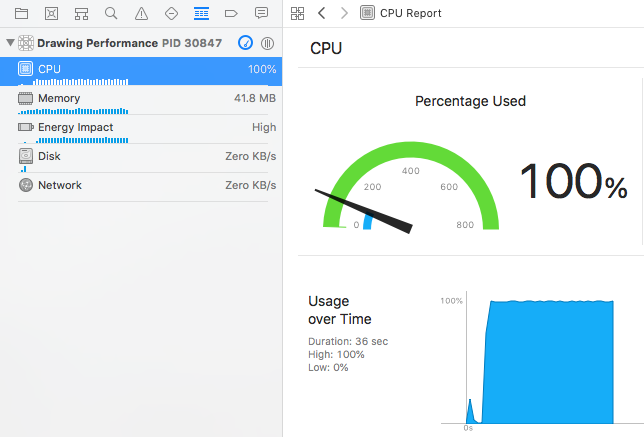
CPU 점유율 100%..
renderer 는 클로저 내부의 drawing 지시사항을 기반으로 UIImage 를 작성하는데, 이 작업은 CPU 가 많이 사용된다.
image?.draw(in: bounds) 에서도 전체 이미지를 해당 graphics context 로 그림을 그리는데, 이것도 CPU intensive operation 이다.
이제 이 두 가지 방법을 초당 수백 번 호출한다고 상상해보면.. 효율이 안좋은것은 당연하다.
2. High performance CPU-based drawing
- setNeedsDisplay 와 draw(_ rect:) 를 사용한 방식
override func touchesMoved(_ touches: Set<UITouch>, with event: UIEvent?) {
        guard let newTouchPoint = touches.first?.location(in: self) else { return }

        // use `indices` to safetly modify the last element
        if let lastIndex = lines.indices.last {
            lines[lastIndex].append(newTouchPoint)
        }

        setNeedsDisplay()
    }

    override func draw(_ rect: CGRect) {
        guard let context = UIGraphicsGetCurrentContext() else { return }

        context.setStrokeColor(UIColor.red.cgColor)
        context.setLineWidth(5)
        context.setLineCap(.round)

        lines.forEach { (line) in
            for (index, point) in line.enumerated() {
                if index == 0 {
                    context.move(to: point)
                } else {
                    context.addLine(to: point)
                }
            }
        }
        context.strokePath()
    }
setNeedsDisplay 는 다음 드로잉 사이클 (drawing cycle) 때 View를 업데이트 하라고 알려주는 메서드다.
정확히 어떤 내용을 업데이트 하는지를 draw() 에 담는다.
- drawing cycle 에 대한 문서 : https://developer.apple.com/library/archive/documentation/2DDrawing/Conceptual/DrawingPrintingiOS/GraphicsDrawingOverview/GraphicsDrawingOverview.html#//apple_ref/doc/uid/TP40010156-CH14-SW1
문서에 의하면 view update 를 유발하는 trigger action 대표 4가지는 다음과 같다.
- Moving or removing another view that was partially obscuring your view
- Making a previously hidden view visible again by setting its hidden property to NO
- Scrolling a view off of the screen and then back onto the screen
- Explicitly calling the setNeedsDisplay or setNeedsDisplayInRect: method of your view
setNeedsDisplay 를 직접 명시해서 호출하는 이 방식은 4번에 해당한다.
그리고 이 방식은 많이 그리면 많이 그릴수록 CPU 점유율이 늘어난다.setNeedsDisplay(_rect:) 라는 메서드를 대신 사용하면, 다음 드로잉 사이클에 전체를 다시 그리는 것이 아니라 새로 필요한 직사각형 영역 만큼만 그리게 한다. 이 방식을 사용하면 CPU 사용량을 많이 줄일 수 있게 된다.
- Core Graphics 의 Rendering = CPU 기반
- Core Animation 의 Rendering = GPU 기반
3. Sublayer GPU-based drawing
- UIBezierPaths 와 CALayers 를 사용한 방식
 func drawBezier(from start: CGPoint, to end: CGPoint) {
      // 1
      setupDrawingLayerIfNeeded()
      // 2
      let line = CAShapeLayer()
      let linePath = UIBezierPath()
      // 3
      line.contentsScale = UIScreen.main.scale
      linePath.move(to: start)
      linePath.addLine(to: end)
      line.path = linePath.cgPath
      line.fillColor = lineColor.cgColor
      line.opacity = 1
      line.lineWidth = lineWidth
      line.lineCap = .round
      line.strokeColor = lineColor.cgColor

      drawingLayer?.addSublayer(line)

      // 4
      if let count = drawingLayer?.sublayers?.count, count > 400 {
          flattenToImage()
      }
  }
 func flattenToImage() {
      UIGraphicsBeginImageContextWithOptions(bounds.size, false, Display.scale)
      if let context = UIGraphicsGetCurrentContext() {

          // keep old drawings
          if let image = self.image {
              image.draw(in: CGRect(x: 0, y: 0, width: image.size.width, height: image.size.height))
          }

          // add new drawings
          drawingLayer?.render(in: context)

          let output = UIGraphicsGetImageFromCurrentImageContext()
          self.image = output
      }
      clearSublayers()
      UIGraphicsEndImageContext()
  }
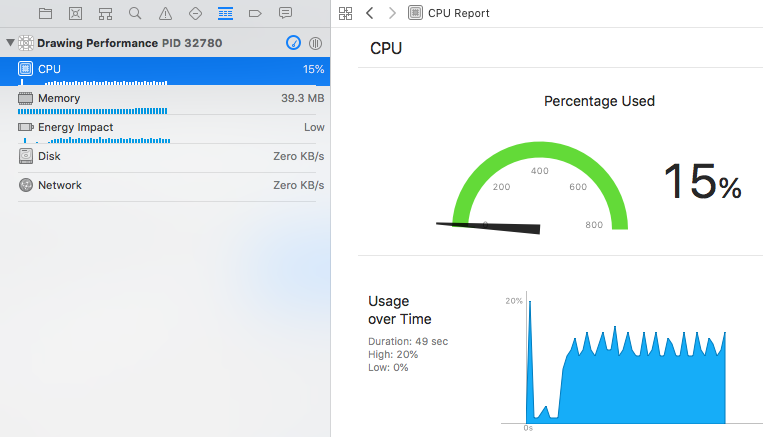
- CPU 점유율이 많이 개선 되었다.
4. draw(_layer:ctx:) GPU-based drawing
- 2번 방식과 비슷해 보이지만 이번엔 View 가 아닌 Layer 에서 setNeedsDisplay 를 호출한다.
- 여기서도 layer.setNeedsDisplay(rect:) 를 사용하면 조금 더 효율이 좋아진다.
override func touchesMoved(_ touches: Set<UITouch>, with event: UIEvent?) {
    guard let newTouchPoint = touches.first?.location(in: self) else { return }

    let lastTouchPoint: CGPoint = line.last ?? .zero
    line.append(newTouchPoint)
    let rect = calculateRectBetween(lastPoint: lastTouchPoint, newPoint: newTouchPoint)
    layer.setNeedsDisplay(rect)
}
override func draw(_ layer: CALayer, in ctx: CGContext) {
      // 1
      let drawingLayer = self.drawingLayer ?? CAShapeLayer()
      // 2
      drawingLayer.contentsScale = UIScreen.main.scale
      // 3
      let linePath = UIBezierPath()
      // 4
      for (index, point) in line.enumerated() {
          if index == 0 {
              linePath.move(to: point)
          } else {
              linePath.addLine(to: point)
          }
      }

      drawingLayer.path = linePath.cgPath
      drawingLayer.opacity = 1
      drawingLayer.lineWidth = lineWidth
      drawingLayer.lineCap = .round
      drawingLayer.fillColor = UIColor.clear.cgColor
      drawingLayer.strokeColor = lineColor.cgColor

      // 5
      if self.drawingLayer == nil {
          self.drawingLayer = drawingLayer
          layer.addSublayer(drawingLayer)
      }
  }
- 정리하고 느낀점 : 나는 CPU 점유율이 낮은 코드를 잘 쓰고 있었다.. ㅋㅋ 그래도 코드의 근거를 공부해서 좋다. 다른 부분에서 속도를 높여봐야겠다.