WebClient?
Spring WebFlux는 HTTP 요청을 수행하는 클라이언트를 포함하고 있습니다. WebClient 는 반응형 방식으로 설계되어 있고 비동기 및 Non-Blocking 통신을 효율적으로 처리할 수 있습니다.
- Spring 5.0 부터 지원
- 싱글 스레드 방식
- Non-Blocking 방식, 동기/비동기 모두 지원
- Reactor 기반의 Functional API (Mono, Flux)
WebClient는 요청을 나타내고 전송하게 해주는 빌더 방식의 인터페이스를 사용하며, 외부 API로 요청을 할 때 리액티브 타입의 전송과 수신을 합니다.
WebClient 이점
WebClient는 동기, 비동기 호출을 모두 지원합니다. WebClient는 Non-Blocking 방식으로, 호출된 시스템의 결과를 기다리지 않고 다른 작업을 처리할 수 있습니다.
블로킹/논블로킹은 제어권 반환에 중점을 두고, 동기/비동기는 결과를 바로 주는지에 중점을 둡니다.
동기는 작업 결과값을 직접 받아 처리하는 반면, 비동기는 결과값을 받으면 어떻게 할지의 콜백함수를 미리 정의해둡니다.
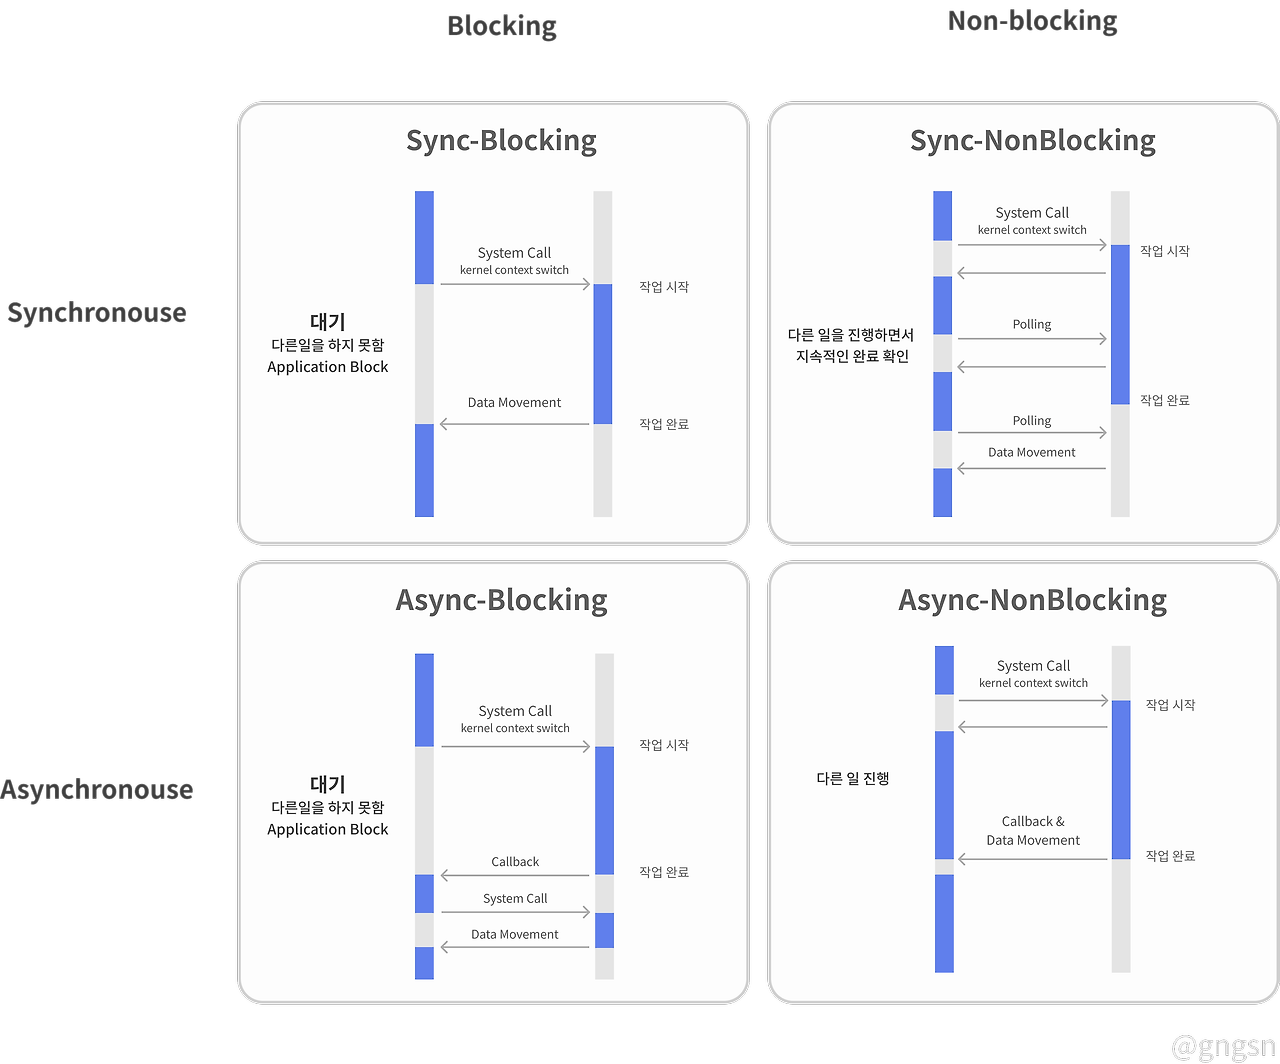
WebClient에서 가능한 비동기 방식의 Non-Blocking 방식은 각자 할 일을 수행하며, 필요한 시점에 각자 결과를 처리합니다.
Blocking 방식의 RestTemplate과 Non-Blocking 방식의 WebClient의 성능 비교
출처 : https://dzone.com/articles/raw-performance-numbers-spring-boot-2-webflux-vs-s
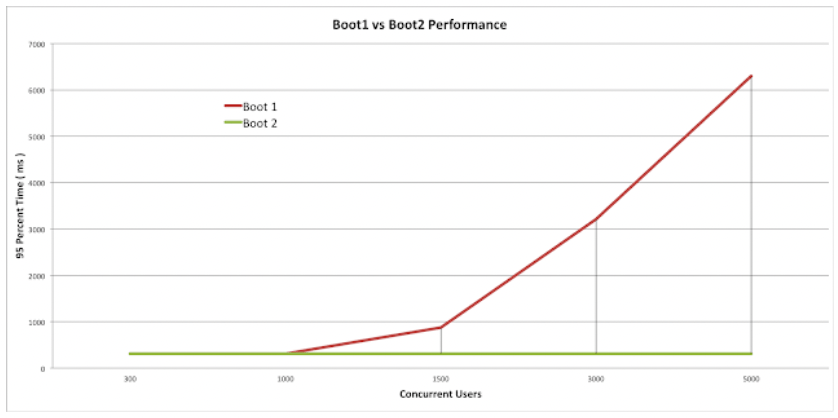
그래프의 Boot1은 RestTemplate을, Boot2는 WebClient를 사용했습니다.
동시 사용자 수가 1,000명 미만일 경우 Boot1과 Boot2 모두 비슷한 응답속도를 내지만, 동시 사용자 수가 늘어날수록 속도 차이가 벌어지는 것을 확인할 수 있습니다.
WebClient 생성
의존성 추가
build.gradle
implementation("org.springframework.boot:spring-boot-starter-webflux")dependency에 위 내용을 추가합니다.
WebClient를 생성하는 방법은 단순 create()하는 방법과, option을 여러가지 추가할 수 있는 Builder를 활요한 방법이 존재합니다.
create()
단순하게 WebClient의 Default Setting으로 생성할 수 있고, 요청할 URI와 함께 생성할 수 있습니다.
public void sample() {
	WebClient.create();
	WebClient.create("http://localhost:8080");
}
Builder()
Builder를 활용하여 여러가지 옵션을 추가하여 설정할 수 있습니다.
MaxInMemorySize 설정
WebClient.builder()
	.codecs(configurer -> configurer.defaultCodecs().maxInMemorySize(2 * 1024 * 1024)
	.build();
Spring Webflux는 어플리케이션 메모리 이슈를 방지하기 위해 메모리 버퍼 사이즈를 Default로 256KB로 제한하고 있습니다. 위 설정을 통해 최대 버퍼 사이즈를 조절할 수 있습니다.
TimeOut 설정
HttpClient httpClient = HttpClient.create()
  .option(ChannelOption.CONNECT_TIMEOUT_MILLIS, 5000)
  .responseTimeout(Duration.ofMillis(5000))
  .doOnConnected(conn ->
    conn.addHandlerLast(new ReadTimeoutHandler(5000, TimeUnit.MILLISECONDS))
      .addHandlerLast(new WriteTimeoutHandler(5000, TimeUnit.MILLISECONDS)));

WebClient client = WebClient.builder()
  .clientConnector(new ReactorClientHttpConnector(httpClient))
  .build();
Connect TimeOut과 Read TimeOut, Write TimeOut을 모두 지정해서 HttpClient 객체를 생성하여 주입할 수 있습니다.
Config
위 내용들을 적용하여 Config를 통해 Bean으로 만들면 다음과 같습니다.
@Configuration
public class WebClientConfig {
	@Bean
	public WebClient webClient() {
		return WebClient.builder()
			.baseUrl("http://localhost:8080")
			// 모든 요청에 사용할 쿠키
			.defaultCookie("Key", "Value")
			// 모든 요청에 사용할 헤더
			.defaultHeader(HttpHeaders.CONTENT_TYPE, MediaType.APPLICATION_JSON_VALUE)
			// MaxInMemorySize 설정
			.codecs(clientCodecConfigurer -> clientCodecConfigurer.defaultCodecs().maxInMemorySize(10*1024*1024))
			.build();
	}
}
Bean으로 등록했기 때문에 한 번 빌드한 뒤에 WebClient는 해당 옵션으로 고정되어 있습니다. 하지만 WebClient를 Default Setting과 다르게 사용하고 싶다면 mutate()를 사용할 수 있습니다.
mutate()
WebClient mutate = webClient.mutate().defaultHeader(...). build;Request
GET
Flux
Employee 객체 여러 개를 받는 메서드를 사용해보겠습니다.
public Flux<Employee> findAll() {
	return webClient.get()
		.uri("/employees")
		.retrieve()
		.bodyToFlux(Employee.class);
}
Mono
ID를 통해 Employee 객체 한 개를 조회하는 메서드를 사용해보겠습니다.
public Mono<Employee> findById(Integer id) {
	return webClient.get()
		.uri("/employees/" + id)
		.retrieve()
		.bodyToMono(Employee.class);
}
POST
public Mono<Employee> create(Employee empl) {
	return webClient.post()
		.uri("/employees")
		.body(Mono.just(empl), Employee.class)
		.retrieve()
		.bodyToMono(Employee.class);
}
.body(Mono.just(empl), Employee.class) 코드가 있습니다. 이 코드는 empl의 타입이 Employee라는 클래스임을 명시합니다.
만약, POST 후 받을 body가 없다면 bodyToMono(Void.class) 로 작성하면 됩니다.
Response
요청 한 후에는 응답을 받아서 처리해야 합니다. 응답을 받을 때에는 아래의 두 가지 메서드 중 적절한 것을 선택하면 됩니다.
- retrieve() : body를 받아 디코딩하는 메서드
- exchange() : ClientResponse를 상태값과 헤더를 함께 가져오는 메서드
exchange()를 통해 세세한 작업이 가능하지만, 메모리 누수 가능성 때문에 retrieve()를 권고합니다.
위의 Request 파트에서 Mono 객체는 0-1개의 결과를 처리하는 객체이고, Flux 는 0-N개의 결과를 처리하는 객체입니다.
retrieve()
retrieve를 사용한 후의 데이터는 두 가지 형태로 받을 수 있습니다.
toEntity()
status, headers, body를 포함하는 ResponseEntity 타입으로 받습니다.
Mono<ResponseEntity<Person>> mono = client.get()
	.uri("/persons/1")
	.accept(MediaType.APPLICATION_JSON)
	.retrieve()
	.toEntity(Person.class);
toMono(), toFlux()
body의 데이터로만 받고싶다면 다음과 같이 사용할 수 있습니다.
Mono<Person> mono = client.get()
	.uri("/persons/1")
	.accept(MediaType.APPLICATION_JSON)
	.retrieve()
	.bodyToMono(Person.class);
exchangeToXXXX()
Mono<Person> mono = client.get()
	.uri("persons/1")
	.accept(MediaType.APPLICATION_JSON)
	.exchangeToMono(response -> {
		if (response.statusCode().equals(HttpStatus.OK)) {
			return response.bodyToMono(Person.class);
		} else {
			return response.createException().flatMap(Mono::error);
		}
	});
Mono<>, Flux<> 사용
Mono<>, Flux<>는 Blocking 방식으로 처리하고자 하면 .block() , Non-Blocking 방식으로 처리하고자 하면 .subscribe() 를 통해 callback 함수를 지정할 수 있습니다.
Mono<Employee> mono = webClient.get()...
mono.block();

Mono<Employee> flux = webClient.get()...
flux.subscribe(employee -> { ...});
ErrorHandling
retrieve()
retrieve는 1XX, 2XX, 3XX StatusCode별로 처리할 수 있습니다.
Mono<Person> result = client.get()
		.uri("/persons/{id}", id).accept(MediaType.APPLICATION_JSON)
		.retrieve()
		.onStatus(HttpStatus::is4xxClientError, response -> ...)
		.onStatus(HttpStatus::is5xxServerError. response -> ...)
		.bodyToMono(Person.class);
참고
https://oliveyoung.tech/blog/2022-11-10/oliveyoung-discovery-premium-webclient/