회고..
What is Beacon ?!
비콘은 주기적으로 신호를 방출하며, 주변에 있는 스마트 디바이스(예: 스마트폰)는 이 신호를 감지하고 해당 비콘의 위치를 파악합니다. 이를 통해 스마트 디바이스는 특정 위치에서 어떤 일을 수행할 수 있게 됩니다.
장점
정확성 : 비콘은 정확한 위치 정보를 제공하며, 건물 내부와 같이 GPS 신호가 도달하지 않는 환경에서도 작동합니다.
저전력 : 비콘은 저전력 소비로 오랜 배터리 수명을 가지고 있습니다.
간편성 : 비콘을 설정하고 관리하기 쉽습니다.
종류
| 비콘 종류 | 바이트 수 | 주요 필드 | 설명 |
|---|---|---|---|
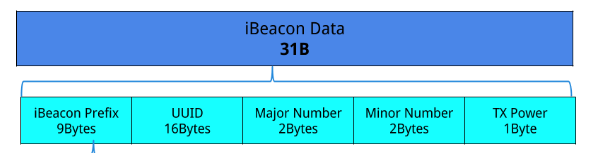
| iBeacon | 30 바이트 | UUID (16바이트), Major ID (2바이트), Minor ID (2바이트), TX Power (1바이트) | Apple에서 2013년에 발표한 비콘 표준으로, 실내 위치 추적, 근거리 마케팅, 매장 내 고객 맞춤형 알림 등에 널리 사용됩니다. 주로 상업용 솔루션에 많이 채택되며, Android와 iOS 모두에서 지원됩니다. |
| Eddystone | UID: 18바이트 URL: 가변 TLM: 14바이트 | UID (Namespace ID, Instance ID), URL (URL Scheme, Encoded URL), TLM (버전, 배터리 전압, 온도, 광고 수, 가동 시간) | Google이 2015년에 발표한 오픈소스 비콘 프로토콜로, 다양한 프레임을 통해 URL 전송, UID 기반 위치 식별, 텔레메트리 데이터 전송을 지원합니다. Android 환경에서 강력한 호환성을 가지며, IoT, URL 공유 및 모니터링에 많이 사용됩니다. |
| AltBeacon | 28 바이트 | Beacon ID (20바이트), Reference RSSI (1바이트), MFG Reserved (2바이트) | Radius Networks가 2014년에 개발한 오픈소스 비콘 표준입니다. iBeacon과 유사하지만, 비공식적인 제한 없이 누구나 자유롭게 사용할 수 있으며, Android 환경에 특히 적합합니다. 주로 상업적 환경이나 커스터마이징이 필요한 프로젝트에 사용됩니다. |
| Samsung BLE Beacon | 가변 (주로 20바이트 이상) | UUID, Major ID, Minor ID, TX Power | Samsung에서 BLE 기반으로 제공하는 비콘 프로토콜로, 주로 Samsung 기기와의 호환성에 최적화되어 있습니다. 특정 용도나 앱과 연계하여 사용되며, 표준화된 형태는 아니지만 특정 Samsung 기기에서의 비콘 기능을 지원합니다. |
| Kontakt.io | 25 바이트 | UUID, Major ID, Minor ID, TX Power | iBeacon 및 Eddystone 형식을 모두 지원하며, Kontakt.io에서 개발한 비콘입니다. 다양한 API 및 관리 도구를 제공하여 스마트 오피스, 물류 관리, 실내 내비게이션 등의 다양한 분야에서 사용됩니다. 플랫폼과의 통합이 쉬워 많은 기업들이 선택하고 있습니다. |
예시 :
🚨 물론 기본베이스의 종류이고 회사(제조사)마다 다를 수 있습니다~
Android 에서 사용하기 (2가지 방법)
base
<uses-permission android:name="android.permission.BLUETOOTH" />
<uses-permission android:name="android.permission.BLUETOOTH_ADMIN" />
<uses-permission android:name="android.permission.BLUETOOTH_SCAN" />
<uses-permission android:name="android.permission.BLUETOOTH_CONNECT" />
<uses-permission android:name="android.permission.ACCESS_FINE_LOCATION" />
권한을 AndroidManifest.xml에 추가
1. import android.bluetooth.* 사용하기
import android.bluetooth.*
import android.bluetooth.le.*
import android.content.Context
import android.os.ParcelUuid
import android.util.Log

class BluetoothManager(private val context: Context) {

   private var bluetoothAdapter: BluetoothAdapter? = null
   private var bluetoothLeScanner: BluetoothLeScanner? = null
   private var bluetoothGatt: BluetoothGatt? = null
   private val TAG = "BLE"

   private val bleScanCallback = object : ScanCallback() {
       // BLE 스캔 (성공)
       override fun onScanResult(callbackType: Int, result: ScanResult?) {
           super.onScanResult(callbackType, result)
           result?.device?.let { device ->
               connectToDevice(device) // 기기 연결
               bluetoothLeScanner?.stopScan(this)
           }
       }
       // BLE 스캔 (실패)
       override fun onScanFailed(errorCode: Int) {
           Log.e(TAG, "onScanFailed : \${errorCode}")
       }
   }

   //기기 연결 콜백 object
   private val gattCallback = object : BluetoothGattCallback() {
       override fun onConnectionStateChange(gatt: BluetoothGatt, status: Int, newState: Int) {
           if (newState == BluetoothProfile.STATE_CONNECTED) {
               discoverServices(gatt)
           } else if (newState == BluetoothProfile.STATE_DISCONNECTED) {
               Log.d(TAG, "GattCallBack : STATE_DISCONNECTED")
           }
       }

       //BLE 서비스 발견
       override fun onServicesDiscovered(gatt: BluetoothGatt, status: Int) {
           if (status == BluetoothGatt.GATT_SUCCESS) {
               readServices(gatt)
           } else {
               Log.e(TAG, "onServicesDiscovered failed $status")
           }
       }

       //기기 데이터 읽기
       override fun onCharacteristicRead(gatt: BluetoothGatt, characteristic: BluetoothGattCharacteristic, status: Int) {
           if (status == BluetoothGatt.GATT_SUCCESS) {
               val value = characteristic.value
               Log.d(TAG, " UUID: ${characteristic.uuid}, datas: ${value?.joinToString()}")
           } else {
               Log.e(TAG, "onCharacteristicRead failed $status")
           }
       }
   }

   //스캔 시작
   fun startScan() {
       Log.d(TAG, "startScan")
       val bluetoothManager = context.getSystemService(Context.BLUETOOTH_SERVICE) as BluetoothManager
       bluetoothAdapter = bluetoothManager.adapter
       bluetoothLeScanner = bluetoothAdapter?.bluetoothLeScanner

       val scanFilters = listOf(
           ScanFilter.Builder().setServiceUuid(ParcelUuid.fromString("특정 uuid")).build()

       val scanSettings = ScanSettings.Builder()
           .setScanMode(ScanSettings.SCAN_MODE_LOW_LATENCY)
           .build()

       bluetoothLeScanner?.startScan(scanFilters, scanSettings, bleScanCallback)
   }

   //기기 연결
   private fun connectToDevice(device: BluetoothDevice) {
       bluetoothGatt = device.connectGatt(context, false, gattCallback) //콜백 지정
   }

   // 서비스 검색
   private fun discoverServices(gatt: BluetoothGatt) {
       gatt.discoverServices()
   }

   // 서비스와 특성 읽기
   private fun readServices(gatt: BluetoothGatt) {
       gatt.services?.forEach { service ->
           Log.d(TAG, "service : \${service.uuid}")
           service.characteristics.forEach { characteristic ->
               if (isReadableCharacteristic(characteristic)) {
                   gatt.readCharacteristic(characteristic)
               }
           }
       }
   }

   // 특성이 읽을 수 있는지 확인
   private fun isReadableCharacteristic(characteristic: BluetoothGattCharacteristic): Boolean {
       return characteristic.properties and BluetoothGattCharacteristic.PROPERTY_READ != 0
   }

   // 스캔 그만하기
   fun stopScan() {
       Log.d(TAG, "stopScan")
       bluetoothLeScanner?.stopScan(bleScanCallback)
   }

   // 종료
   fun disconnect() {
       bluetoothGatt?.close()
       bluetoothGatt = null
   }
}
2. org.altbeacon:android-beacon-library 사용하기
AltBeacon 표준을 위한 오픈소스 Android Beacon Librar, 하지만 다른 iBeacon 등 다른 비콘도 감지가 가능하다 BeaconParser 를 추가한다면
beaconManager.beaconParsers.add(
    BeaconParser()
        .setBeaconLayout("해당 비콘 레이아웃")
)
| 비콘 종류 | Beacon Layout | 설명 |
|---|---|---|
| AltBeacon | m:0-3=beac,i:4-19,i:20-23,i:24-27,p:28-28 | AltBeacon 기본 레이아웃. Android Beacon Library에서 기본적으로 지원. |
| iBeacon | m:2-3=0215,i:4-19,i:20-21,i:22-23,p:24-24 | Apple에서 정의한 iBeacon 표준. UUID, Major ID, Minor ID, TX Power를 포함. |
| Eddystone-UID | s:0-1=feaa,m:2-2=00,i:3-10,i:11-18,p:19-19 | Google의 Eddystone UID 프레임. Namespace ID와 Instance ID를 포함. |
| Eddystone-URL | s:0-1=feaa,m:2-2=10,p:3-3 | Google의 Eddystone URL 프레임. 비콘을 통해 URL을 브로드캐스트. |
| Eddystone-TLM | s:0-1=feaa,m:2-2=20,p:3-3 | Google의 Eddystone TLM(텔레메트리) 프레임. 배터리 전압, 온도 등 상태 정보를 포함. |
| Eddystone-EID | s:0-1=feaa,m:2-2=30,p:3-3 | Google의 Eddystone EID 프레임. Ephemeral Identifier(일회용 식별자)를 전송. |
| Kontakt.io | m:2-3=0215,i:4-19,i:20-21,i:22-23,p:24-24 | iBeacon과 동일한 레이아웃을 사용하며, Kontakt.io 비콘에서 주로 사용. |
| Samsung BLE | (비표준, 사용자 정의 필요) | 삼성 기기에서 BLE 비콘 용도로 사용되며, 비표준이므로 데이터 레이아웃에 맞는 커스터마이징 필요. |
(기준: 2024-11-14)
manifiest.xml - 서비스 추가
<application>
    <!-- Foreground service permission (Android 9 이상) -->
    <service android:name="org.altbeacon.beacon.service.BeaconService" android:foregroundServiceType="location" />
</application>
build.gradle - 라이브러리 추가
dependencies {
    implementation 'org.altbeacon:android-beacon-library:2.19.5'
}
BeaconUtil
import android.content.Context
import android.util.Log
import org.altbeacon.beacon.*

class BeaconUtil(private val context: Context) : BeaconConsumer {

    private val beaconManager: BeaconManager = BeaconManager.getInstanceForApplication(context)

    init {
        // iBeacon 포맷 추가 (비콘 종류 결정)
        beaconManager.beaconParsers.add(BeaconParser().setBeaconLayout(BeaconParser.IBEACON_LAYOUT))
    }

    //바인딩
    fun bind() {
        beaconManager.bind(this)
    }
    //언바인딩
    fun unbind() {
        beaconManager.unbind(this)
    }

    // 비콘 서비스 연결 후 호출되는 콜백 함수
    override fun onBeaconServiceConnect() {
        beaconManager.addRangeNotifier { beacons, region ->
            if (beacons.isNotEmpty()) {
                for (beacon in beacons) {

                    Log.d("BLE", "UUID: \${beacon.id1}, Major: \${beacon.id2}, Minor: \${beacon.id3}")
                    Log.d("BLE", "Distance: \${beacon.distance} meters")
                }
            }
        }

        try {
          // 특정 영역에서 비콘 탐색 시작 (null로 설정 시 모든 비콘 탐색 UUID, Major, Minor)
          beaconManager.startRangingBeaconsInRegion(Region("BeaconUtil", null, null, null))
        } catch (e: RemoteException) {
          e.printStackTrace()
        }
    }
}
org.altbeacon:android-beacon-library 를 사용하면 거리도 구할 수 있다. 👍
비콘 정보 복호화 하기
제조사 by 제조사 이지만 uuid 를 제외하고는 암호화해서 보내는 경우가 종종 있다. 데이터를 확인하려면 복호화가 필요합니다 ⊙.☉
javax.crypto.Cipher 를 사용한 복호화
2-2-1(5)바이트를 복호화 하기
import android.util.Log
import javax.crypto.Cipher
import javax.crypto.spec.SecretKeySpec

object DecryptionUtil {

   private const val TAG = "decrypte"

   fun decrypt(input1: Int, input2: Int, input3: Int): IntArray {

       Log.d(TAG, "input1 = $input1, input2 = $input2, input3 = $input3")

       // 1. 주어진 int 값을 2바이트 배열로 변환
       val inputBytes = ByteArray(5)
       inputBytes[0] = ((input1 shr 8) and 0xFF).toByte()
       inputBytes[1] = (input1 and 0xFF).toByte()
       inputBytes[2] = (input2 and 0xFF).toByte()
       inputBytes[3] = ((input3 shr 8) and 0xFF).toByte()
       inputBytes[4] = (input3 and 0xFF).toByte()

       Log.d(TAG, "복호화 이전 = %02X,%02X,%02X,%02X,%02X".format(inputBytes[0].toInt() and 0xFF, inputBytes[1].toInt() and 0xFF, inputBytes[2].toInt() and 0xFF, inputBytes[3].toInt() and 0xFF, inputBytes[4].toInt() and 0xFF))

       val key = "암호키"
       val rc4Key = SecretKeySpec(key.toByteArray(), "암호화 알고리즘 이름")

       // 3. 암호화 객체 생성 및 초기화
       val rc4Cipher = Cipher.getInstance("")
       rc4Cipher.init(Cipher.DECRYPT_MODE, rc4Key)

       // 4. 복호화 실행
       val decryptedBytes = rc4Cipher.update(inputBytes)
       Log.d(TAG, "복호화 완료 = %02X,%02X,%02X,%02X,%02X".format(decryptedBytes[0].toInt() and 0xFF, decryptedBytes[1].toInt() and 0xFF, decryptedBytes[2].toInt() and 0xFF, decryptedBytes[3].toInt() and 0xFF, decryptedBytes[4].toInt() and 0xFF))

       // 5. 복호화된 바이트 배열을 각각 2바이트, 2바이트, 1바이트로 변환하여 배열로 반환
       val result1 = (decryptedBytes[0].toInt() and 0xFF shl 8) or (decryptedBytes[1].toInt() and 0xFF)
       val result2 = (decryptedBytes[2].toInt() and 0xFF shl 8) or (decryptedBytes[3].toInt() and 0xFF)
       val result3 = decryptedBytes[4].toInt() and 0xFF

       Log.d(TAG, "(Decryption)result1 = $result1")
       Log.d(TAG, "(Decryption)result2 = $result2")
       Log.d(TAG, "(Decryption)result3 = $result3")

       return intArrayOf(result1, result2, result3)
   }
}
소감..
회사에서 블루투스(BLE) 통신을 사용한 앱을 제작하기 위해 공부했는데 많은 앱들이 webView로 작업하기 때문에 네이티브 기능을 공부하는 것이 도움이 될거 같다.👻