어제에 이어서 rest-API에 대해 공부했다.
express는 Node에서 쉽게 웹 서버를 개발할 수 있도록 돕는 프레임워크로
yarn init
명령어를 입력하면 package.json파일이 생성된다.
{
  "name": "04-01-rest-api-with-express",
  "version": "1.0.0",
  "main": "index.js",
  "license": "MIT",
  "type": "module",
  "dependencies": {
    "express": "^4.17.2"
  }
}
"type": "module"
를 추가해준것이다.
yarn add express
를 입력해 설치할 수 있다.
"dependencies": {
"express": "^4.17.2"
}
가 추가된것을 볼 수 있다.
rest API
express를 사용하기 위해
import express from 'express'
를 추가해준다.
npm사이트에 나온 예시를 바탕으로
import express from 'express'

const app = express()

// GET 요청이 들어왔을 때
app.get('/', function (req, res) {
  res.send('Hello World') // 응답 보내기
})

app.listen(3000) // 3000번 포트에서 실행
라는 API의 틀을 받아 사용한다.
데이터를 받아오는 GET을 사용해서
app.get('/boards', (req, res) => {
    // 데이터 조회하는 로직

    res.send("조회에 성공하였습니다.")
})
라는 /boards 엔드포인트로 GET 요청이 들어왔을 때, '조회에 성공하였습니다'라는 문구를 발견할 수 있다.
.get대신해서 post도 사용한다.
express로 JSON받기
HTTP 메시지 바디 안에 JSON 형식으로 데이터를 넣어주는데 실제로 연결시키기 위해 필요한 코드이다.
app.use(express.json())
실습
import express from 'express'
const app = express()

app.use(express.json()) //실제로 연결시켜줌 잊지말기 ~~~

app.get('/boards', function (req, res) {
  //데이터 조회하는 로직(from DB)
// res.send('조회에 성공하였습니다.')
  res.send([{number:1, writer:'한결', title:'제목', contents:"내용"},
  {number:2, writer:'겨르', title:'제목1', contents:"내용11"},
  {number:3, writer:'유한결', title:'제목2', contents:"내용22"}])
})
app.listen(3001)
참고로 send 명령어는 하나밖에 들어갈 수 없다
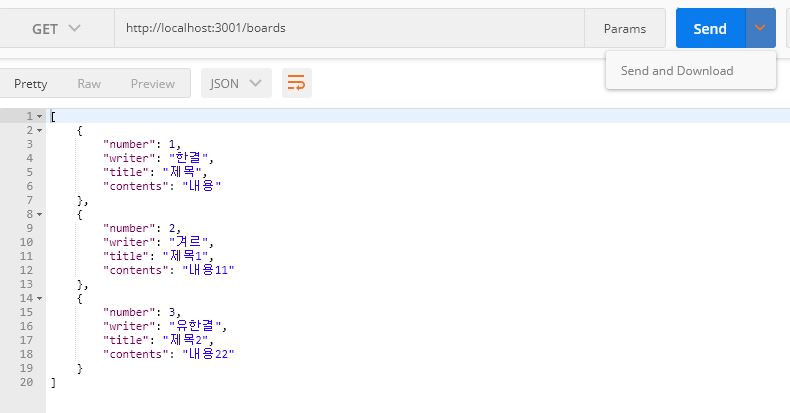
Postman을 통해 확인할 수 있다.
이전에 했던 핸드폰인증번호 보내는 API로 연습해보겠다.
import {checkValidationPhone, getToken, sendTokenToSMS} from './phone.js'

app.post('/tokens/phone',function(req, res){
  //폰인증api
  const myphone = req.body.myphone
  const isValid = checkValidationPhone(myphone)
  if(isValid){
    const mytoken = getToken(4)
    sendTokenToSMS(myphone,mytoken)
  }
  res.send('전송이 완료되었습니다.')
})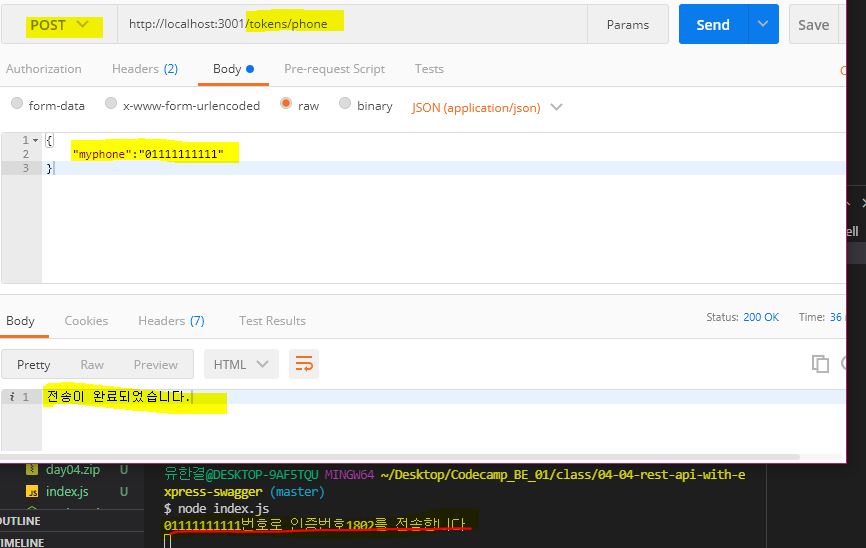
작동이 되는것을 볼 수 있다.
Swagger와 API-Docs
swagger-ui-express와 swagger-jsdoc를 설치해주어야 한다.
npm install swagger-ui-express swagger-jsdoc
swagger폴더를 만들어 따로 저장하도록 한다.
/**
 * @openapi
 * /boards:
 *   get:
 *     summary: 게시글 가져오기
 *     tags: [Board]
 *     parameters:
 *          - in: query
 *            name : number
 *            type : int
 *     responses:
 *          200:
 *              description: 성공
 *              content:
 *                  application/json:
 *                      schema:
 *                          type: object
 *                          properties:
 *                              number:
 *                                  type: int
 *                                  example: 1
 *                              writer:
 *                                  type: string
 *                                  example: 한결
 *                              title:
 *                                  type: string
 *                                  example: 제목부분
 *                              contents:
 *                                  type: string
 *                                  example: 내용부분
 */
/boards: 에서 엔드포인트 주소와
-
get/post도 입력한다.
그리고 API문서를 만드는 설정도 필요한데,
swagger폴더에config.js파일을 만들고
export const options = {
    definition: {
      openapi: '3.0.0',
      info: {
        title: 'Mini Project API 명세서',
        version: '1.0.0',
      },
    },
    apis: ['./swagger/*.js'], //swagger폴더 안의 모든js파일
  };
로 연결해준다.
마지막으로 index.js 파일에서 swagger ui관련 코드를 추가한다
import swaggerUi from 'swagger-ui-express'
import swaggerJSDoc from 'swagger-jsdoc'
import { options } from './swagger/config.js'

...

app.use('/api-docs', swaggerUi.serve, swaggerUi.setup(swaggerJSDoc(options)));
그 후 서버를 띄우고 http://localhost:3000/api-docs/에 접속하면
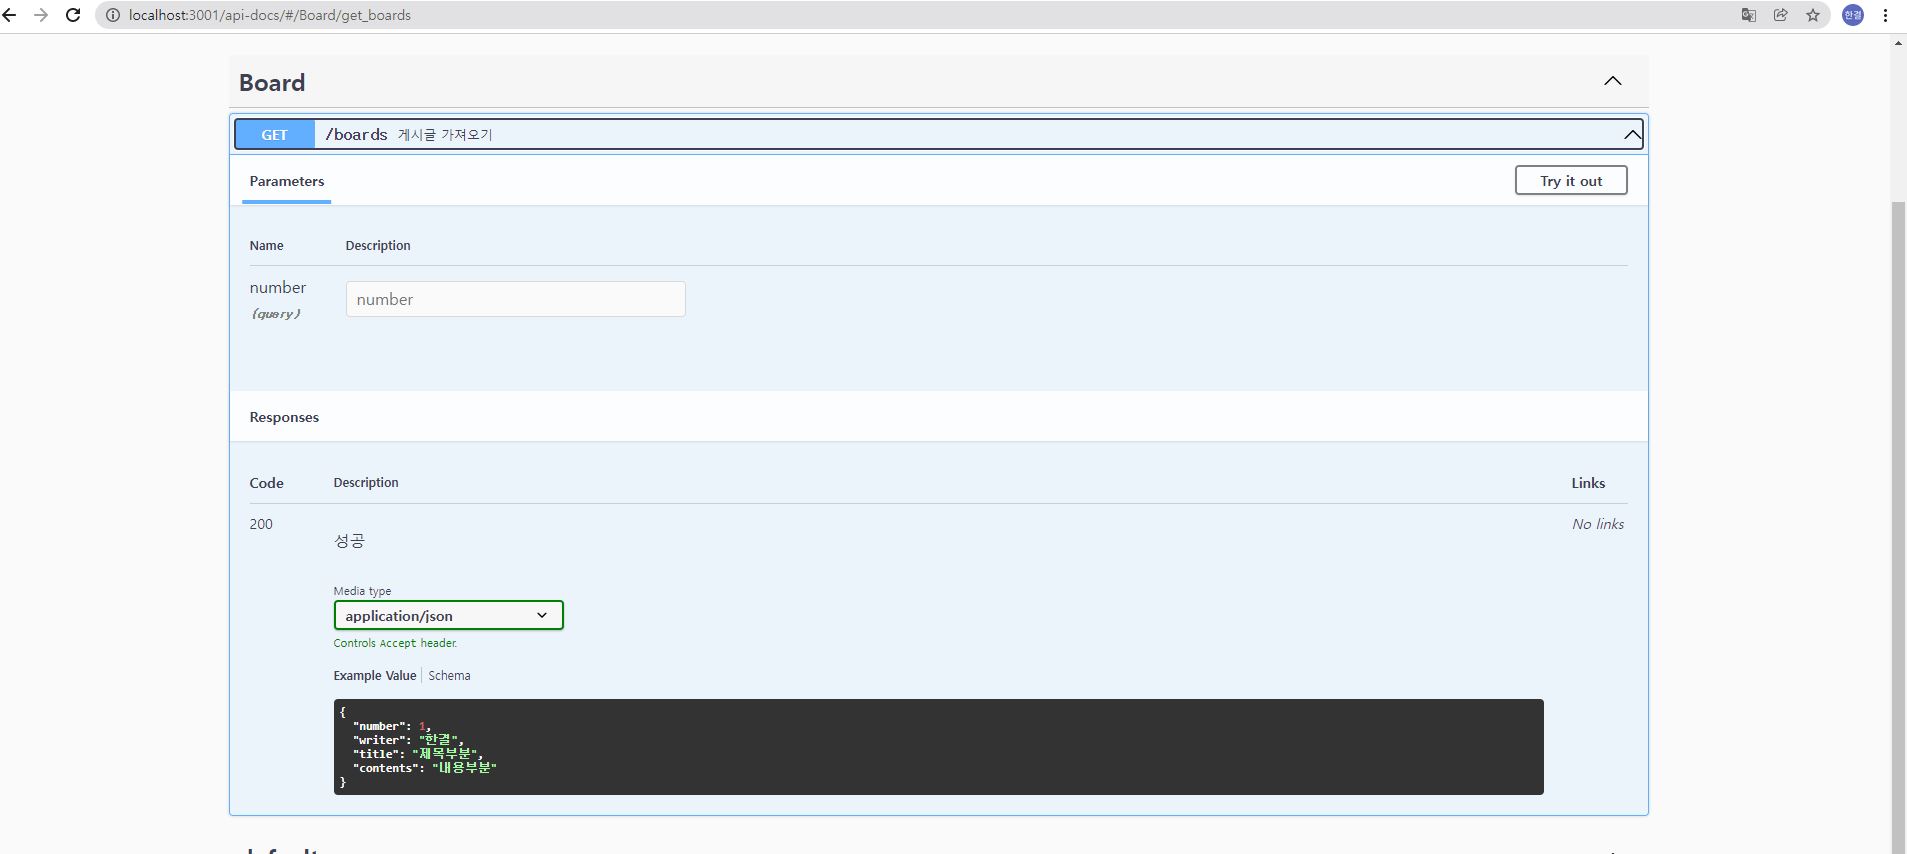
를 확인할 수 있다.
swagger는 프론트엔드 개발자와 공유하는 페이지로써 사용한다.
