대댓글 기능
하나의 댓글을 작성할 때, 하나의 댓글 하위에 또 다른 댓글을 작성하는 기능
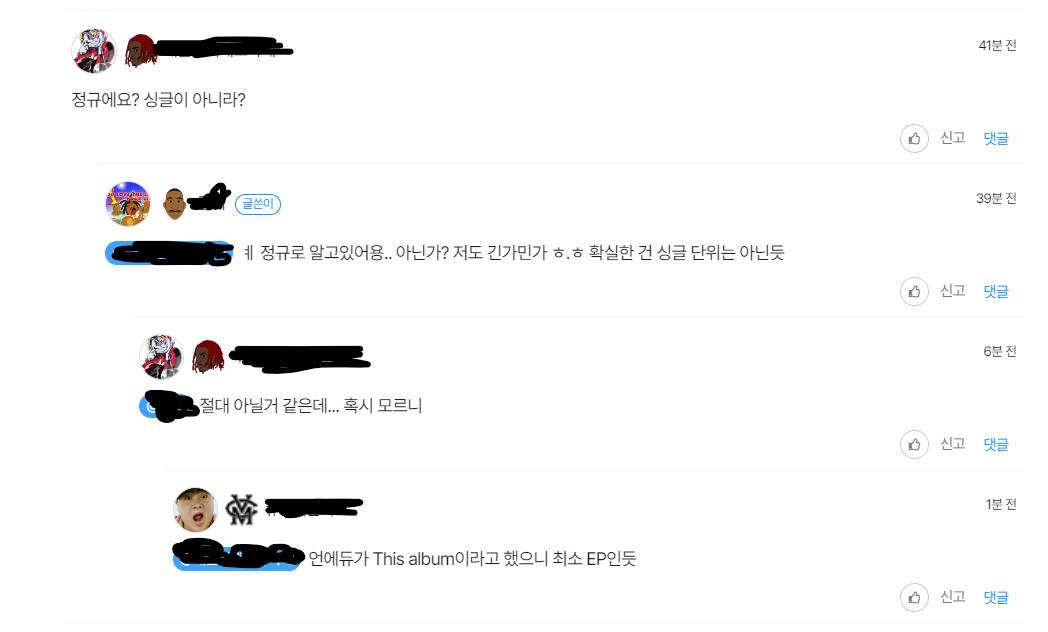
힙합엘이에서 제공하고 있는 대댓글 기능 예시
대댓글 기능을 위한 프로세스 개발
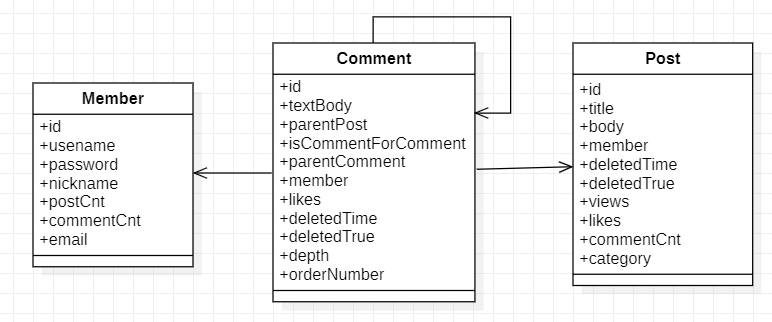
직접 구현해 본 구성도

직접 구현해 본 구성도 (DB)
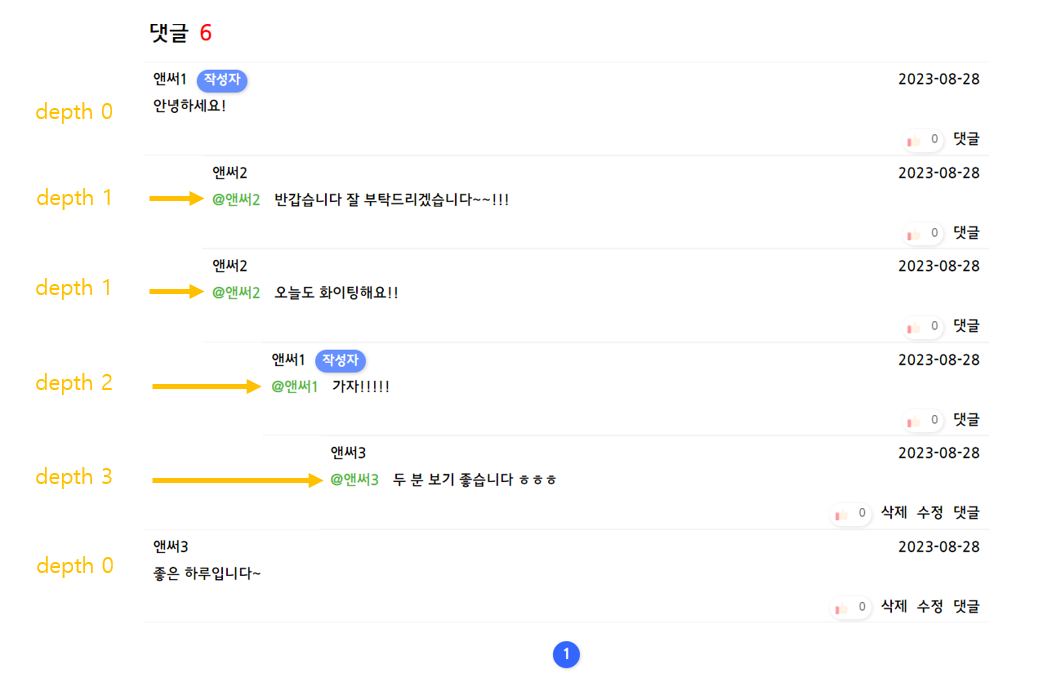
실제 화면

- 게시글이 먼저 존재해야 한다
- 모든 댓글은 자신이 존재하는 게시글에 대한 참조 정보를 가지고 있어야 한다
- 게시글 바로 밑에 달린 댓글(대댓글이 아닌 댓글)은 부모 댓글이 null이다
- 댓글 밑에 달린 댓글(대댓글)은 자신이 달린 부모 댓글의 참조 정보를 가지고 있다.
실제 Entity
@Entity
@NoArgsConstructor(access = AccessLevel.PROTECTED)
@Getter
public class Comment extends JpaBaseTimeEntity{
    @Id @GeneratedValue(strategy = GenerationType.IDENTITY)
    @Column(name = "comment_id")
    Long id; //id

  	@Column(length = 1000)
    String textBody; //댓글 본문

    @ManyToOne(fetch = FetchType.LAZY)
    @JoinColumn(name="parent_post_id")
    Post parentPost; // 댓글이 달린 게시글

    @ManyToOne(fetch = FetchType.LAZY)
    @JoinColumn(name="parent_comment_id")
    Comment parentComment; //댓글이 달린 댓글(부모 댓글)

    @OneToOne(fetch = FetchType.LAZY)
    @JoinColumn(name="member_id")
    Member member; // 댓글 작성자

    Long likes; //댓글 좋아요 수
	Boolean isCommentForComment; //대댓글 여부
    LocalDateTime deletedTime; // 삭제 시간
    Boolean deletedTrue; //삭제 여부
    Integer depth; //댓글의 깊이
    Long orderNumber; //댓글의 순서

    public Comment(String textBody, Post parentPost, Comment parentComment , Member member) {
        this.textBody = textBody;
        this.parentPost = parentPost;
        this.parentComment = parentComment;
        this.member = member;
        this.deletedTime = null;
        this.deletedTrue = false;
        this.likes = 0L;
        if(parentComment == null){ // 부모 댓글이 없을 때
            this.isCommentForComment = false; // 대댓글이 아니다
            this.depth = 0 ; // 깊이는 0
            this.orderNumber = parentPost.getCommentCnt(); //순서는 새롭게 지정
        }else{ // 부모 댓글이 존재할 때
            this.isCommentForComment = true; // 대댓글이 맞다
            this.depth = parentComment.depth+1; // 깊이는 부모의 깊이+1
            this.orderNumber = parentComment.getOrderNumber(); // 순서는 부모의 순서를 그대로 물려받는다.
        }
    }

    public void updateTextBody(String textBody) {
        this.textBody = textBody;
    }

    public void deleteComment() {
        this.deletedTrue = true;
        this.deletedTime = LocalDateTime.now();
    }

    public void increaseLikes() {
        this.likes++;
    }

    public void decreaseLikes() {
        this.likes--;
    }
}
depth 필드와 orderNumber 필드를 사용한 이유
depth 필드와 orderNumber는 웹 페이지가 화면 상에서 보여질 때 댓글칸의 위치와 댓글의 순서를 컨트롤하기 위해 별도로 추가한 필드이다.
depth 필드는 다음과 같이 화면상 댓글의 깊이를 컨트롤하기 위해 사용된다.
orderNumber는 다음과 같이 화면상 댓글의 순서를 보장하기 위해 사용된다. orderNumber 같은 경우 DB에서 댓글을 조회해올 때, orderBy절에 사용된다. 만약 댓글이 생성된 시간이나 댓글 아이디로만 댓글을 조회해올 경우, 화면에서 댓글이 보여질 때 순서가 뒤죽박죽이 될 수 있다. orderNumber을 통해 부모 댓글과 자식 댓글을 하나의 묶음으로 묶을 수 있고 다른 댓글 묶음과 구별될 수 있게 된다.

orderNumber을 어떻게 지정해주어야 할까?
먼저 첫번째 댓글, 즉 부모 댓글이 없는 댓글은 orderNumber는 해당 게시글의 전체 댓글 갯수를 부여받도록 하였다. 현재 댓글이 3개 존재한다면 다음 댓글 묶음의 orderNumber는 3이다.
반면 부모 댓글을 가진 대댓글인 경우 부모 댓글의 orderNumber을 물려받는다.
이렇게 orderNumber을 지정해주면, 각 댓글 묶음의 가장 첫번째 댓글의 작성 순서에 따라 댓글 묶음의 순서가 결정된다.
쿼리를 어떻게 작성해야 할까?
개인 프로젝트를 진행하면서 DB 접근 기술로 JPA와 Querydsl을 사용하고 있다.
조인 대상이 여러 개이기 때문에 그동안 만들어왔던 기본적인 CRUD 쿼리와는 다르게 조금 더 복잡한 쿼리가 필요했다
Querydsl을 통한 select문 작성
@Override
    public Page<Comment> findPureCommentListByPost(Long postId, Pageable pageable) {
        QComment parentComment = new QComment("parentComment");
        QMember parentMember = new QMember("parentMember");
        List<Comment> fetch = queryFactory
                .select(comment)
                .from(comment)
                .join(comment.parentPost, post).fetchJoin()
                .join(comment.member, member).fetchJoin()
                .leftJoin(comment.parentComment, parentComment).fetchJoin()
                .where(
                        comment.parentPost.id.eq(postId)
                )
                .offset(pageable.getOffset())
                .limit(pageable.getPageSize())
                .orderBy(comment.orderNumber.asc(), comment.createdTime.asc())
                .fetch();
        int size = queryFactory
                .selectFrom(comment)
                .where(
                        comment.parentPost.id.eq(postId)
                )
                .fetch().size();

        return new PageImpl<>(fetch, pageable, size);
    }
left outer join의 사용
- Comment를 select 할 때 Post 테이블과 Member 테이블은 inner join을 해주었다. 두 값은 항상 존재해야 되기 때문이다.
- 반면, 부모 댓글은 존재할 수도 있고 존재하지 않을 수도 있다. 따라서 left join을 통해 부모 댓글이 존재하지 않으면 null 값을 조회해오고, 부모 댓글이 존재하면 부모 댓글을 조회해오도록 하였다..
댓글의 좋아요 기능 ( on / off 토글 형식)
댓글의 '좋아요'를 제외한 세부 정보들은 게시글 본문과 함께 사용된다.
Thymeleaf를 사용하면서 기본적으로 SSR 방식대로 설계하였고, 따라서 댓글의 세부 정보들은 게시글의 정보들과 함께 하나의 DTO로 묶여 Thymeleaf에 제공된 후 렌더링 된다.
다음은 Thymeleaf에 PostDetailViewDto를 제공하기 위해 사용되는 메소드이다.
@Override
    public PostDetailDto findPostById(Long id, Pageable commentPageable) {

        // DB에 저장된 post 가지고 오기
        Optional<Post> postById = postRepository.findPostById(id);
        Post post = postById.orElseThrow(()->new NotExistedPostException());

        //  포스트에 달린 댓글들 가져오기
        Page<Comment> pureList = commentRepository.findPureCommentListByPost(id, commentPageable);
        Page<PureCommentViewDto> commentList = getCommentViewDtoPage(pureList);
        PageCustomDto<PureCommentViewDto> commentView = getPageCustom(commentList); // Page를 PageCustomDto로 변환한다
        commentView.setCurrent((int)(commentPageable.getPageNumber()+1)); // PageCustomDto에 필요한 정보를 담는다

        // 작성자의 최신글 가져오기
        Page<RecentPostByMemberDto> recent = postRepository.findRecentPostListByMember(post.getMember(), PageRequest.of(0, 5), id);
        PageCustomDto<RecentPostByMemberDto> recentView = getPageCustom(recent); // Page를 PageCustomDto로 변환한다

        // 포스트 정보와 댓글의 정보를 결합하여 Dto로 리턴하기
        PostDetailDto postDetailDto = new PostDetailDto(post, commentView, recentView);

        return postDetailDto;
    }
반면 댓글의 좋아요 갯수 조회와 on/off 기능은 RestApi를 사용한다.
사실 댓글 좋아요 기능은 초기 설계 과정에서 포함되어 있던 기능은 아니었고 추가적으로 도입된 기능이었다. 따라서 좋아요 기능을 추가하기 위해 서비스단의 로직과 DTO를 모두 변경하는 일은 큰 부담으로 다가왔다.
또한 댓글의 좋아요 기능을 적용하기 위해서는 꽤나 많은 작업들이 필요했는데, 게시글 DTO를 만드는 과정에서 이 작업들을 포함한다면 하나의 작업이 너무 비대해질 것 같다는 생각이 들었다.
댓글의 좋아요를 표시하기 위해서는 다음과 같은 정보들이 필요했다
1. 현재 댓글의 좋아요 갯수
2. 현재 사용자가 이 댓글에 좋아요를 눌렀는지 아닌지
2번 정보에 따라 다음과 같이 화면 상태가 변경된다
2번 정보를 가져오기 위해서는 우선 현재 사용자가 로그인 했는지 아닌지에 대한 상태부터 알아야 하며, 또한 로그인한 상태라면 각 댓글별로 현재 사용자가 좋아요를 눌렀는지 아닌지에 대한 정보를 가지고 와야된다.
한 페이지에 최대 20개의 댓글이 보여질 수 있도록 구성해놓았는데, 이런 정보들을 하나 하나 따지면서 DTO를 만드는 것은 하나의 작업을 너무 크게 만든다고 생각하였다.
따라서 댓글 좋아요 기능과 관련된 정보들은 하나의 DTO에 포함하지 않고, 각 댓글별로 RestApi를 요청하는 방식으로 만들게 되었다.
현재 댓글의 좋아요 개수를 조회
다음은 좋아요 정보를 전달하는 DTO이다. 하나의 댓글의 좋아요 개수(likes)와 현재 사용자가 현재 이 좋아요를 눌렀는지 아닌지에 대한 상태(isLiked)를 전달한다.
@Data
@AllArgsConstructor
public class LikesViewDto {
    Long likes;
    Boolean isLiked;
}
다음은 댓글의 좋아요 기능과 관련된 RestController의 일부로, 현재 댓글의 상태를조회해온다.
@GetMapping("/api/comment/likes")
    public DefaultResponse getCommentLikes(@RequestParam String comment){
        Long id = Long.parseLong(comment);
        LikesViewDto commentLikes = null;
        if(SpringSecurityMethod.checkLogin()) {
            commentLikes = commentLikesService.getCommentLikes(id, SpringSecurityMethod.getUsername());
        }else{
            commentLikes = commentLikesService.getCommentLikes(id);
        }
        return  DefaultResponse.res(20001, "성공", commentLikes);
    }
다음은 좋아요 버튼을 눌렀을 때 작동하는 api이다 .
이미 좋아요를 누른 상태였다면 좋아요가 취소되고, 아직 좋아요를 누르지 않은 상태라면 좋아요가 추가된다.
@GetMapping("/api/comment/likes/toggle")
public DefaultResponse likeComments(@RequestParam String comment){
Long id = Long.parseLong(comment);
String username = SpringSecurityMethod.getUsername();
LikesViewDto current = commentLikesService.getCommentLikes(id, username);
LikesViewDto changed = null;
if(current.getIsLiked() == true){
changed = commentLikesService.decreaseLikes(id, username);
}else{
changed = commentLikesService.increaseLikes(id, username);
}
return DefaultResponse.res(20001, "성공", changed);
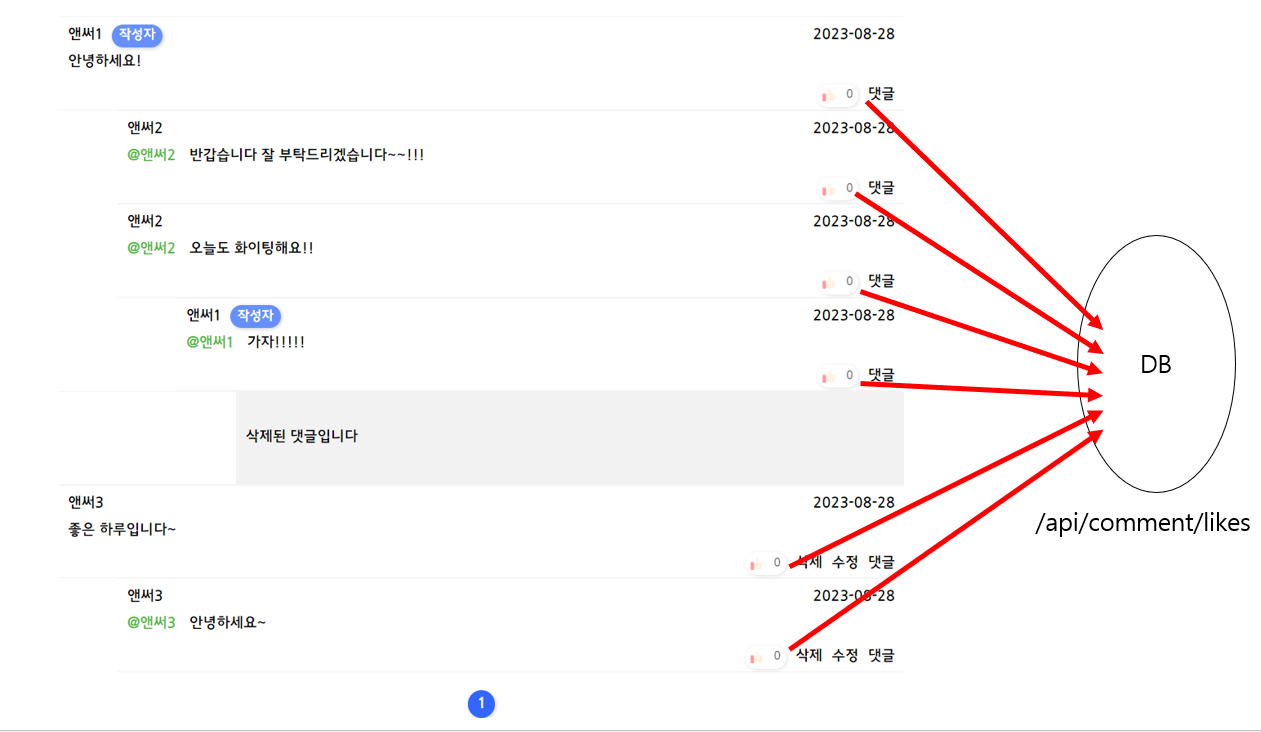
}한계
위와 같은 로직의 문제점은 최초 화면 렌더링 시 각 댓글의 현재 좋아요 상태를 가져오기 위해서 댓글의 총 개수만큼 DB에 접근해야 한다는 사실이다. 현재 하나의 화면에 최대 20개의 댓글이 보이도록 설정해놓았으므로, 하나의 화면을 렌더링할 때 DB에 최대 20번 추가적인 접근이 필요하다는 것이다.
이러한 문제를 해결하기 위해, 각 댓글별로 API로 요청하는 것이 아니라 현재 보여지는 댓글의 정보를 하나의 리스트에 묶어서 요청하는 방법을 사용할 수 있을 것 같다. 각 댓글이 따로 따로 좋아요 정보를 요청하는 것이라, 한 번에 요청에 모든 댓글의 좋아요 정보를 조회해오는 것이다.

4개의 댓글

good 99
it's good post
https://blog.dnevnik.hr/jeffhendricks/2024/09/1632460746/wall-printer-printheads-explained-types-features-and-selection-guide.html
https://blog.libero.it/wp/ericwest/2024/09/12/wall-printers-are-changing-the-decorating-industry-guide-to-the-benefits-and-applications-of-tanyu-wall-printers/
yes, it's good post
https://telegra.ph/How-to-Choose-a-Wall-Printer-A-Complete-Guide-to-Costs-and-Smart-Savings-09-09
https://plaza.rakuten.co.jp/mytoyamz/diary/202409100000/
https://blogg.alltforforaldrar.se/marking2020/2024/09/10/3d-wall-painting-machine-ink-unique-advantages-performance-and-traditional-ink-comprehensive-comparison/