
2021.06.24
ex16_event_key.html
key 이벤트
<!DOCTYPE html>
<html lang="en">
<head>
    <meta charset="UTF-8">
    <meta http-equiv="X-UA-Compatible" content="IE=edge">
    <meta name="viewport" content="width=device-width, initial-scale=1.0">
    <title>Document</title>
    <style>
        textarea{ width: 500px; height: 300px; resize: none; }
    </style>
</head>
<body>
    <!--
        키 이벤트
        - 키보드의 키와 관련된 이벤트
        - onkeyXXX
        - 주로 폼 관련 태그에게 적용한다.(포커스를 가지지 않으면 발생하지 않기 때문에)

        1. onkeydown (******)
            - 키를 눌렀을 때 발생
            - 물리적 키에 반응하는 이벤트
            - 현재 어떤 글자를 눌렀는지 중요하지 않음 -> 어떤 물리키를 눌렀는지가 중요함!!! -> 키를 구분하는 역할
                - a키를 눌렀을때 소문자인지 대문자인지 중요하지 않음. a키를 눌렀다는 자체가 중요함
            - 중요 : 현재 입력값과 상관없는 일을 할 때 keydown을 사용

        가이드
            - 우선 onkeydown을 기본으로 사용한다.
            - 지금 입력값 자체가 업무에 바로 사용된다. > onkeyup을 사용한다.

        2. onkeyup (******)
            - 키를 뗐을 때 발생
            - 중요 : 현재 입력한 값이 관계된 일이라면.. keyup을 사용

        3. onkeypress -> 제한적이라 잘 사용안함
            - 키를 눌렀을 때 발생
            - 문자키에 반응하는 이벤트(ASCII문자 - 영어 + 숫자 + 특수문자) -> 한글에 반응 안함.
            - 영어 대소문자를 구분할 수 있지만 아스키코드에만 사용할 수 있어서 제한적이다.

     -->

     <h1>키 이벤트</h1>
     <!--
         이름 붙일때

         텍스트박스 : txtName
         체크박스 : cbName
         라디오버튼 : rbName
         셀렉트박스 : selName

      -->

    <form name="form1">
        <textarea name="txt1">
        </textarea>

        <legend>키 이벤트</legend>
        <fieldset>
            <div>
                <input type="text" name="txtOrigin" size="50">
            </div>
            <div>
                <input type="text" name="txtCopy" size="50">
            </div>
        </fieldset>
    </form>

     <!-- <form name="form1">
         <img src="images/catty01.png"
         -- 이미지에는 키 이벤트 사용 불가

        >

         <input type="text"


         >
     </form> -->

     <script>
         var txt1 = window.document.form1.txt1;
         var txtOrigin = window.document.form1.txtOrigin;
         var txtCopy = window.document.form1.txtCopy;

         // 이벤트 함수
         txt1.onkeydown = function() {
            // alert();
            // console.log('keydown');

            // event 객체
            // - 이벤트가 발생할 때만 참조할 수 있는 객체
            // console.log(event.keyCode); // 누른 키의 문자 코드 값
            console.log(txt1.value); // 입력된 전체의 값 가져올 수 있음
        };

        txt1.onkeyup = function() {
            // console.log('keyup');
        };

         txt1.onkeypress = function() {
            // console.log('keypress');
            // console.log(event.keyCode);
        };


        // -------------------------------------


        txtOrigin.onkeydown = function() {
            // 한발짝 느리게 복사가 된다.
            // txtCopy.value = txtOrigin.value;
        };

        txtOrigin.onkeyup = function() {
            txtCopy.value = txtOrigin.value;
        };

     </script>
</body>
</html>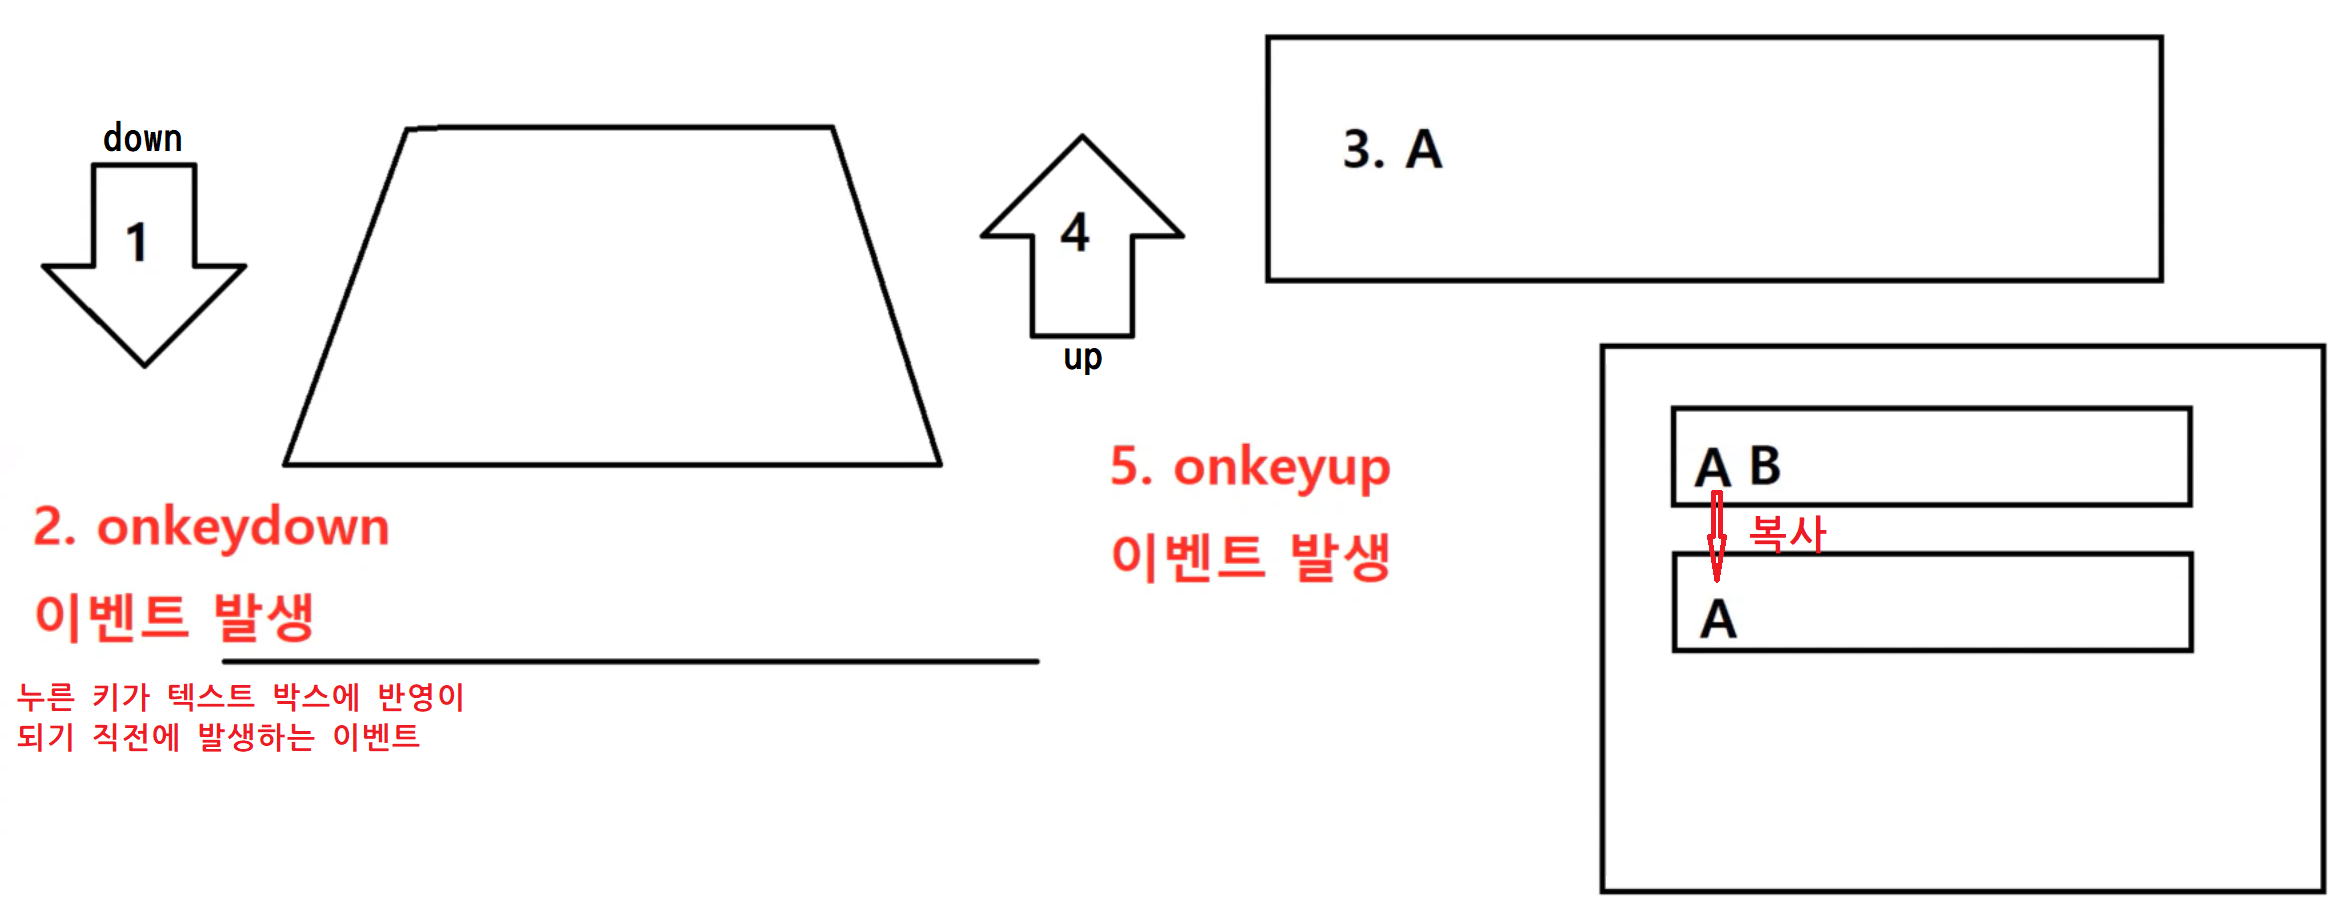
ex17_event_key.html
<!DOCTYPE html>
<html lang="en">
<head>
    <meta charset="UTF-8">
    <meta http-equiv="X-UA-Compatible" content="IE=edge">
    <meta name="viewport" content="width=device-width, initial-scale=1.0">
    <title>Document</title>
    <style>

    </style>
</head>
<body>
    <h1>키 이벤트</h1>

    <form name="form1">
        <input type="text" name="txt1">
    </form>

    <script>
        var txt1 = window.document.form1.txt1;

        // txt1.onkeydown = function() {
        //     // 방향키: 좌(37), 상(38), 우(39), 하(40)
        //     if (event.keyCode == 38) {
        //         // console.log(txt1.size);
        //         txt1.size++;
        //     } else (tvent.keyCode == 40) {
        //         txt1.size--;
        //     }
        // };


        //즉시 반영해야해서 onkeyup 사용
        txt1.onkeyup = function() {
            txt1.size = txt1.value;
        }

    </script>
</body>
</html>
ex18_event.html
<!DOCTYPE html>
<html lang="en">
<head>
   <meta charset="UTF-8">
   <meta http-equiv="X-UA-Compatible" content="IE=edge">
   <meta name="viewport" content="width=device-width, initial-scale=1.0">
   <title>Document</title>
   <script>
      // <script> 상단부, 하단부 양쪽 코딩
      // 상단부 : 함수 선언

      // 함수 선언
      // 자바스크립트는 HTML태그의 속성에 접근하기 위해서 똑같은 이름의 프로퍼티를 제공한다.
      // bgColor -> 합성어는 대문자로 연결해서 사용한다.(캐멀표기법)
      function m1() {
         window.document.body.bgColor = "red";
      }
      function m2() {
         window.document.body.bgColor = "yellow";
      }
      function m3() {
         window.document.body.bgColor = "blue";
      }

      // -----------------------------------------

      function m4(color) {
         window.document.body.bgColor = color;
      }

      // -----------------------------------------

      function m5(btn) {

         // this: 이벤트를 발생시킨 태그 자신
         // alert(btn.name);
         // alert(this); //window 객체

         window.document.body.bgColor = btn.value;
      }

      // ----------------------------------------

      function m6() {
         // 지금 나를 호출할 버튼이 누구???
         // event 객체 사용 가능

         // event.srcElement - 지금 이벤트를 발생시킨 태그
         // -> 3번에서 사용한 this와 동일한 표현
         // alert(event.srcElement.name);

         window.document.body.bgColor = event.srcElement.value;
      }

   </script>
</head>
<body>

   <h1>이벤트(***)</h1>

   <h2>7</h2>
   <form name="form7">
      <!--
         data-XXX 속성
         : 사용자 정의 속성(개발자 맘대로)
      -->
      <!-- 대외적으로는 value를 쓰고 내부적으로는 사용자 정의 속성을 쓴다. -->
      <input type="button" value="빨강" name="btn17" data-color="tomato">
      <input type="button" value="노랑" name="btn17" data-color="gold">
      <input type="button" value="파랑" name="btn17" data-color="cornflowerblue">
   </form>

   <h2>6</h2>
   <form name="form6">
      <input type="button" value="red" name="btn16">
      <input type="button" value="yellow" name="btn16">
      <input type="button" value="blue" name="btn16">
   </form>

   <h2>5</h2>
   <form name="form5">
      <input type="button" value="red" name="btn13">
      <input type="button" value="yellow" name="btn14">
      <input type="button" value="blue" name="btn15">
   </form>

   <h2>4</h2>
   <form name="form4">
      <input type="button" value="red" name="btn10" onclick='m6();'>
      <input type="button" value="yellow" name="btn11" onclick="m6();">
      <input type="button" value="blue" name="btn12" onclick="m6();">
   </form>

   <h2>3</h2>
   <form name="form3">
      <input type="button" value="red" name="btn7" onclick='m5(this);'>
      <input type="button" value="yellow" name="btn8" onclick="m5(this);">
      <input type="button" value="blue" name="btn9" onclick="m5(this);">
   </form>

   <h2>2</h2> <!-- 매개변수로 처리하는 방법 -->
   <form name="form2">
      <input type="button" value="red" name="btn4" onclick='m4("red");'> <!-- 자바스크립트에서 색깔은 문자열로 표시 -->
      <input type="button" value="yellow" name="btn5" onclick="m4('yellow');"> <!-- "", '' 둘 다 사용 가능 -->
      <input type="button" value="blue" name="btn6" onclick="m4('blue');">
   </form>

   <h2>1</h2> <!-- 코드 재사용성이 없어서 안좋은 코드. -->
   <form name="form1">
      <input type="button" value="red" name="btn1" onclick="m1();">
      <input type="button" value="yellow" name="btn2" onclick="m2();">
      <input type="button" value="blue" name="btn3" onclick="m3();">
   </form>

   <script>
      // 하단부 : 제어 코드
      var btn13 = window.document.form5.btn13;
      var btn14 = window.document.form5.btn14;
      var btn15 = window.document.form5.btn15;

      // 익명함수 - 재사용 불가
      // btn13.onclick = function() {
      //    window.document.body.bgColor = event.srcElement.value;
      // };

      // btn14.onclick = function() {
      //    window.document.body.bgColor = event.srcElement.value;
      // };

      // btn15.onclick = function() {
      //    window.document.body.bgColor = event.srcElement.value;
      // };

      // 실명함수
      function m7() {
         window.document.body.bgColor = event.srcElement.value;
      }

      btn13.onclick = m7;
      btn14.onclick = m7;
      btn15.onclick = m7;

      // -------------------------------------------------------

      var btn16 = window.document.form6.btn16; // name을 똑같이 여러개 주면 배열이 반환된다.
      // console.log(btn16.length);

      // btn16[0].onclick = m7;
      // btn16[1].onclick = m7;
      // btn16[2].onclick = m7;

      for (var i=0; i<btn16.length; i++) {
         btn16[i].onclick = m7;
      }

      // 향상된 for문
      btn16.forEach(function (item, index) {
         item.onclick = m7;
      });

      // ----------------------------------------------------------

      var btn17 = window.document.form7.btn17;

      btn17.forEach(function(item, index) {
         item.onclick = function() {
            window.document.body.bgColor = item.dataset["color"];
         };
      });

   </script>
</body>
</html>
ex19_attribute.html
<!DOCTYPE html>
<html lang="en">
<head>
   <meta charset="UTF-8">
   <meta http-equiv="X-UA-Compatible" content="IE=edge">
   <meta name="viewport" content="width=device-width, initial-scale=1.0">
   <title>Document</title>
   <style>

      .one {
         background-color: gold;
      }

      .two {
         background-color: cornflowerblue;
      }

   </style>
   <script>
      function m1() {

         // 모든 폼태그의 자식 태그들은 form이라는 프로퍼티를 가지고 있고, 부모 폼태그를 참조한다.
         // var txt1 = window.document.form1.txt1;
         var txt1 = event.srcElement.form.txt1;

         // Attribute 조작
         // - HTML 태그가 가지는 거의 대부분 속성은 자바스크립트에서 프로퍼티로 제공한다.(사용자 경험을 살리기 위해서)
         // - HTML 속성이 합성어(두단어 복합)라면 > 캐멀 표기법으로 표현

         // <input value> -> txt1.value
         // <input size> -> txt1.size

         // -------------------------------------------------

         // HTML 속성의 숫자값은 JavaScript에서도 숫자로 표시
         // txt1.size = 50;
         // txt1.size++;

         // -------------------------------------------------

         // HTML(boolean) -> JavaScript(boolean)
         // txt1.readOnly = true;
         // txt1.readOnly = !txt1.readOnly; //이런 버튼(역할) : Toggle Button

         // txt1.readOnly면 읽기만 가능.
         // if (txt1.readOnly) {
         //    event.srcElement.value = "읽기전용";
         // } else {
         //    event.srcElement.value = "쓰기가능";
         // }

         // -------------------------------------------------

         // HTML(열거형) -> JavaScript(문자열)
         // txt1.type = "checkbox"; // type 조작 금지!!! -> 근원이 되는 속성이기 때문에 혼동될 수 있다.

         // HTML(색상) -> JavaScript(문자열)
         // window.document.body.bgColor = "yellow";

         // HTML(문자열) -> JavaScript(문자열)
         // txt1.value = "문자열";
         // txt1.title = "하하하";
         // txt1.placeholder = "이름 입력";

         // ---------------------------------------------------

         //모든 속성명이 그대로 사용 가능하지만, 유일하게 class만을 사용 불가능 -> class 키워드 (예약어)
         txt1.className = "two";
      }

   </script>
</head>
<body>
   <h1>JavaScript를 사용해서 HTML의 Attribute를 조작하기</h1>

   <form>
      <input type="text" name="txt1" class="one">
      <input type="button" value="쓰기가능" name="btn1" onclick="m1();">
   </form>

</body>
</html>
ex20_collection.html
<!DOCTYPE html>
<html lang="en">
<head>
   <meta charset="UTF-8">
   <meta http-equiv="X-UA-Compatible" content="IE=edge">
   <meta name="viewport" content="width=device-width, initial-scale=1.0">
   <title>Document</title>
</head>
<body>

   <form name="form1">
      <input type="button" name="btn1" value="btn1" onclick="m1();">
      <input type="text">
      <input type="checkbox">
   </form>

   <h1>이미지</h1>

   <img src="images/catty01.png" name="cat1">
   <img src="images/catty02.png" name="cat2">
   <img src="images/catty03.png">

   <h1>링크</h1>

   <a href="http://naver.com" name="link1">네이버</a>
   <a href="http://naver.com" name="link2">구글</a>
   <a href="http://naver.com" name="link3">다음</a>

   <h1>앵커</h1>

   <a name="a1">아이템1</a>
   <a name="a2">아이템2</a>
   <a name="a3">아이템3</a>


   <script>

      //m1();
      //m1;

      // window.document.form1.btn1.onclick = m1; --> 함수 자체. 함수를 어딘가 넣을 때는 함수 이름을 직접 취급

      // window.document.form1.btn1.onclick = function m1() {
      //    alert();
      // };

      // function m1() {
      //    alert();
      // }

      /*
         JavaScript Built-in Collection
         - 브라우저가 HTML 문서를 로딩하는 과정에서 자동으로 만드는 배열

         1. window.document.images
            - 문서내의 모든 <img> 태그 배열
         2. window.document.links
            - 문서내의 모든 <a href=""> 태그 배열
         3. window.document.anchors
            - 문서내의 모든 <a name=""> 태그 배열
         4. window.document.forms
            - 문서내의 모든 <form> 태그 배열
         5. window.document.forms[index].elements
            - 해당 폼태그의 자식 태그 배열
         6. window.document.all
            - 문서내의 모든 name을 가지는 태그 배열
               - 예전: (images + links + anchors + forms + elements): 종합 선물 세트
               - 최근: 모든 태그 배열(name을 가지지 않은 태그까지 포함)
            - 비표준(MS) > 대다수 브라우저 지원

      */

      // 이미지
      // console.log(window.document.cat1);
      // console.log(window.document.images.length);
      // console.log(window.document.images[0].name); // 위치로 찾기
      // console.log(window.document.images['cat1'].name); // 이름으로 찾기


      // 링크
      // console.log(window.document.links.length);
      // console.log(window.document.link1); // X
      // console.log(window.document.links[0]);
      // console.log(window.document.links['link1']);

      // console.log(window.document.links.link1); // 멤버접근 연산자로 접근 가능
      // console.log(window.document.links['link1']); // hasmap형태로 접근 가능
      // console.log(window.document.links[0]); // index로 접근 가능


      // 링크와 앵커의 차이
      // <a> : href속성을 가지면 링크, name을 가지면 앵커 -> 속성의 차이


      //앵커(<a name="">)
      // console.log(window.document.anchors.length);
      // console.log(window.document.anchors[3]);


      //폼
      // console.log(window.document.forms.length);

      // console.log(window.document.form1); //v
      // console.log(window.document.forms[0]); //v

      // console.log(window.document.forms['form1']);
      // console.log(window.document.forms.form1);

      // console.log(window.document.form1.elements.length);


      console.log(window.document.all.cat1);
      console.log(window.document.all['cat1']);
      // console.log(window.document.all[23]); -- 위에 부터 세기 어렵다..

      console.log(window.document.all.link1);
      console.log(window.document.all['link1']);

      console.log(window.document.all.form1);
      console.log(window.document.all['form1']);

   </script>
</body>
</html>
ex21_window.html
window 객체
<!DOCTYPE html>
<html lang="en">
<head>
   <meta charset="UTF-8">
   <meta http-equiv="X-UA-Compatible" content="IE=edge">
   <meta name="viewport" content="width=device-width, initial-scale=1.0">
   <title>Document</title>
   <style>
      input[type='button'] { display: block; margin-bottom: 5px;}
   </style>
</head>
<body>

   <h1>window 객체</h1>

   <form name="form1">
      <input type="text" name="txt1">
      <input type="button" value="자식창 띄우기" name="btn1">
      <input type="button" value="자식창의 텍스트박스에 접근하기" name="btn2">
      <input type="button" value="" name="btn3">
      <input type="button" value="" name="btn4">
      <input type="button" value="" name="btn5">
   </form>

   <script>

      var txt1 = document.form1.txt1;
      var btn1 = document.form1.btn1;
      var btn2 = document.form1.btn2;
      var btn3 = document.form1.btn3;
      var btn4 = document.form1.btn4;
      var btn5 = document.form1.btn5;

      //window 객체
      // - 최상위 객체
      // - 브라우저 창 자체를 참조하는 객체

      var child; // 전역변수

      btn1.onclick = function() {
         //open(url, name, option)
         // - name: 자식 창의 중복 방지

         //반환값 -> child : 새창(자식창)의 window 객체
         child = window.open('child.html', 'child', 'width=300, height=300, left=0, top=0');
      };


      // 부모페이지 <-> 자식페이지에 접근해서 조작하기
      btn2.onclick = function() {
         // window.close();

         // 열려있는 자식창의 window객체를 얻어내기
         // (페이지를 조작할때는 페이지의 최상위 객체인 window객체를 얻어내면 밑에 있는 모든 것들을 조작할 수 있다.)
         // child.close();
         child.document.form1.txt1.value = "부모창에서 접근했습니다."; // -> 자식창의 텍스트 박스 조작
      };

      //사용자에게 허락 구함? > 팝업 광고
      //window.open('child.html', 'child', 'width=300, height=300');

   </script>

</body>
</html>
자식창
<!DOCTYPE html>
<html lang="en">
<head>
    <meta charset="UTF-8">
    <meta http-equiv="X-UA-Compatible" content="IE=edge">
    <meta name="viewport" content="width=device-width, initial-scale=1.0">
    <title>Document</title>
</head>
<body>
    <h1>자식창</h1>
    <form name="form1">
        <input type="text" name="txt1">
        <input type="button" value="창닫기" name="btn1">
        <input type="button" value="부모창의 텍스트 박스에 접근하기" name="btn2">
    </form>

    <hr>

    <form name="form2">
        아이디: <input type="text" name="txtID">
        <input type="button" value="중복검사">
        <br>
        <input type="button" value="사용하기" name="btnUse">
    </form>

    <script>
        var btn1 = document.form1.btn1;
        var btn2 = document.form1.btn2;
        var txt1 = document.form1.txt1;

        var txtID = document.form2.txtID;
        var btnUse = document.form2.btnUse;

        btn1.onclick = function() {
            window.close(); // 자기 자신을 닫음
        };

        btn2.onclick = function() {
            //부모창의 window 객체를 얻어내기(= opener)
            opener.document.form1.txt1.value = "자식창에서 접근했습니다.";
        };


        btnUse.onclick = function() {
            // 1. 아이디를 부모창에 복사하기
            // 2. 팝업창을 닫기

            opener.document.form1.txt1.value = txtID.value;

            window.close();

        };

    </script>
</body>
</html>
ex22_screen.html
<!DOCTYPE html>
<html lang="en">
<head>
   <meta charset="UTF-8">
   <meta http-equiv="X-UA-Compatible" content="IE=edge">
   <meta name="viewport" content="width=device-width, initial-scale=1.0">
   <title>Document</title>
</head>
<body>

   <!--

      screen 객체
      - window 객체의 자식 객체
      - 유일한 객체 > 예약어 제공
      - 화면 정보 제공

   -->
   <script>

      // 해상도(화면크기)
      // - 작업표시줄의 높이에 따라 화면 크기가 달라진다. > 작업 표시줄 영역 제외
      // 사용자들마다 어떤 해상도를 사용하는지에 따라 화면 구성을 달리 만들기 위한 객체.
      console.log(window.screen.availWidth); //***
      console.log(window.screen.availHeight); //***

      console.log(screen.colorDepth); // 24bit color. 사용하고 있는 디스플레이가 몇가지 색깔을 지원하는 지 알려줌

      // type: "landscape-primary"
      console.log(screen.orientation); // 모니터 가로로 보는지 세로로 보는지 확인


   </script>

</body>
</html>
ex23_location.html
<!DOCTYPE html>
<html lang="en">
<head>
   <meta charset="UTF-8">
   <meta http-equiv="X-UA-Compatible" content="IE=edge">
   <meta name="viewport" content="width=device-width, initial-scale=1.0">
   <title>Document</title>
</head>
<body>

   <!--
      location 객체
      - window 객체의 자식 객체
      - 현재 창의 URL과 관련된 정보를 제공/조작
      - 주소표시줄, 주소창에 접근해서 제어.

   -->

   <input type="button" value="버튼" name="btn1">

   <script>

      window.document.all.btn1.onclick = function() {

         // console.log(location.host); //127.0.0.1:5500 - 호스트
         // console.log(location.hostname); //127.0.0.1 - 호스트네임
         // console.log(location.port); //5500 - 포트번호
         // console.log(location.protocol); //http: - 프로토콜

         // console.log(location.href); //http://127.0.0.1:5500/ex23_location.html - 현재 페이지 주소

         // 자바스크립트를 사용해서 페이지를 이동하기(*****************************)
         // location.href = "http://google.com";


         //페이지 이동 메소드
         // location.assign('http://yes24.com');
         // location.replace('http://yes24.com');

         // 프로퍼티
         location.href = 'http://naver.com'; //*****************

         // 페이지 새로고침
         // location.reload(); //*

      };

      //window 객체에 키 이벤트를 걸면..
      // - 전역 키 이벤트 > 무슨 행동을 하던지 키보드가 눌리면 항상 발생
      window.onkeydown = function() {

         if (event.keyCode == 71) {
            location.href = "http://google.com";
         } else if (event.keyCode == 65) {
            location.href = "http://amazon.com";
         } else if (event.keyCode == 67) {
            location.href = "http://coupang.com";
         } else if (event.keyCode == 68) {
            location.href = "http://daum.net";
         }
      };

   </script>

</body>
</html>
ex24_history.html
<!DOCTYPE html>
<html lang="en">
<head>
   <meta charset="UTF-8">
   <meta http-equiv="X-UA-Compatible" content="IE=edge">
   <meta name="viewport" content="width=device-width, initial-scale=1.0">
   <title>Document</title>
</head>
<body>

   <!--
      history 객체
      - window 객체의 자식 객체
      - 브라우저의 방문 기록을 탐색
   -->
   <input type="button" value="뒤로가기(-2)" name="btn1">
   <input type="button" value="뒤로가기" name="btn2">
   <input type="button" value="앞으로가기" name="btn3">
   <input type="button" value="앞으로가기(+2)" name="btn4">

   <script>

      var btn1 = document.all.btn1;
      var btn2 = document.all.btn2;
      var btn3 = document.all.btn3;
      var btn4 = document.all.btn4;

       // 예제 -> 구글 -> 네이버 -> 예제(현재위치) -> 예스24 -> 쿠팡
       // -  탐색기록이 남아있는 상황에서 쓸 수 있는 이동 명령어
      btn1.onclick = function() {
         history.go(-2);
      };
      btn2.onclick = function() {
         //history.go(-1); //뒤로 가기
         history.back(); //뒤로 가기
      };
      btn3.onclick = function() {
         //history.go(1); //앞으로 가기
         history.forward(); //앞으로 가기
      };
      btn4.onclick = function() {
         history.go(2);
      };

   </script>

</body>
</html>
document의 자식
ex25_link.html
<!DOCTYPE html>
<html lang="en">
<head>
   <meta charset="UTF-8">
   <meta http-equiv="X-UA-Compatible" content="IE=edge">
   <meta name="viewport" content="width=device-width, initial-scale=1.0">
   <title>Document</title>
</head>
<body>
   <h1>링크 조작</h1>

   <form name="form1">
      <a href="http://google.com" name="link1">구글</a>
      <br>
      <input type="button" value="확인" name="btn1">
   </form>

   <script>

      // 새창으로 이동 불가능 > 현재창에서만 이동 가능
      // location.href = URL; // 현재창에서 이동하기
      // window.open(URL, name, '옵션X'); // 새창으로 이동하기


      var link1 = document.links['link1'];
      var btn1 = document.form1.btn1;

      btn1.onclick = function() {

         //<a> 태그 조작
         //1. <a> 태그 자체 조작 X
         //2. <a> 태그 속성 조작 O
         //3. <a> 태그 PCDATA 조작 O

         link1.href = "http://amazon.com";
         link1.target = "_blank";
         link1.title = "아마존으로 이동합니다.";

         //BOM -> PCDATA 조작 기능 없음
         //DOM -> PCDATA 조작 기능 있음
         link1.innerText = "아마존";

         //프로그램이 사용자 대신 클릭을 했다.
         // - 에뮬레이터 함수
         // - onclick -> on(X) -> click()
         link1.click();

      };

   </script>

</body>
</html>
ex26_image.html
<!DOCTYPE html>
<html lang="en">
<head>
   <meta charset="UTF-8">
   <meta http-equiv="X-UA-Compatible" content="IE=edge">
   <meta name="viewport" content="width=device-width, initial-scale=1.0">
   <title>Document</title>
</head>
<body>

   <h1>이미지</h1>

   <input type="button" value="확인" name="btn1">
   <hr>
   <img src="images/cat01.jpg" name="cat1">
   <hr>
   <img src="images/dog01.jpg" name="dog1">
   <hr>

   <img src="images/switch_on.png" name="sw">


   <!--
      1. window.onkeydown
      2. event.keyCode
      3. img.src
   -->

   <h3>문제1.</h3>
   <!--
      1. 방향키에 따라 이미지를 변경한다.
         a. 오른쪽 방향키: dog01.jpg -> dog02.jpg -> dog03.jpg
         b. 왼쪽 방향키: dog05.jpg -> dog04.jpg -> dog03.jpg
      2. 더 이상 이미지가 없다면 경고
         a. dog05.jpg 까지 -> "더 이상 이미지가 없습니다."
         b. dog01.jpg 까지 -> "처음 이미지입니다."
   -->
   <img src="images/dog01.jpg" name="dog2">

   <h3>문제2.</h3>
   <!--
      누른 숫자키에 해당하는 숫자 이미지로 변경하시오.
   -->
   <img src="images/0.png" name="num">


   <script>

      var btn1 = document.all.btn1;
      var cat1 = document.images['cat1'];
      var dog1 = document.images['dog1'];
      var sw = document.images['sw'];


      btn1.onclick = function() {

         // alert(cat1.src);
         // cat1.src = "images/cat02.jpg";

         // cat1.width = "500";
         // cat1.height = "500";

         // cat1.alt = "고양이"; // alt : 이미지 설명

      };


      //롤오버 이미지(Roll over image)
      cat1.onmouseover = function() {
         cat1.src = "images/cat02.jpg";
      };

      cat1.onmouseout = function() {
         cat1.src = "images/cat01.jpg";
      };


      // ------------------------------------

      var n = 1;

      dog1.onclick = function() {
         //dog01.jpg > dog02.jpg > dog03.jpg > dog04.jpg > dog05.jpg
         n++;
         dog1.src = "images/dog0" + n + ".jpg";

         if (n >= 5) n = 0; //loop

      };

      // ------------------------------------

      window.onkeydown = function() {
         // 똑같은 숫자지만 물리키가 다름.
         //상단 숫자키(1) -> 49
         //우측 키패드 숫자키(1) -> 97
         //alert(event.keyCode);

         if (event.keyCode >= 49 && event.keyCode <= 53) {
            dog1.src = "images/dog0" + (event.keyCode - 48) + ".jpg";
         } else if (event.keyCode >= 97 && event.keyCode <= 101) {
            dog1.src = "images/dog0" + (event.keyCode - 96) + ".jpg";
         }

      };

      // ------------------------------------

      // 토글 버튼
      sw.onclick = function() {

         // alert(sw.src);
         // alert(sw.src.endsWith('switch_on.png'));
         // endsWith : 패턴 검색
         if (sw.src.endsWith('switch_on.png')) {
            sw.src = "images/switch_off.png";
            document.body.bgColor = "#000";
         } else {
            sw.src = "images/switch_on.png";
            document.body.bgColor = "#FFF";
         }

      };

   </script>

</body>
</html>
모르면 괴롭고 알면 즐겁다.