CI/CD란?
CI(Continuous Integration)
지속적인 통합은 개발자들이 변경 사항을 자주, 최소 하루에 한 번씩 코드 베이스에 병합하는 방법론입니다. 주요 목표는 코드를 자주 통합함으로써 통합 문제를 조기에 발견하고 해결하는 것입니다.
주요 요소:
- 자동화된 빌드: 코드를 병합할 때마다 자동으로 빌드가 실행됩니다.
- 자동화된 테스트: 빌드 과정에서 자동으로 테스트가 실행되어 코드 변경으로 인한 버그를 조기에 발견합니다.
CD(Continuous Deployment)
지속적인 배포는 변경 사항을 자동으로 프로덕션 환경에 배포하는 방법론입니다. 이는 지속적인 전달(Continuous Delivery)의 확장으로, 모든 코드 변경이 자동으로 릴리스 준비가 되며, 수동 개입 없이 프로덕션에 배포됩니다.
주요 요소:
-
자동화된 배포: CI 파이프라인을 통과한 변경 사항이 자동으로 프로덕션 환경에 배포됩니다.
-
배포 파이프라인: 빌드, 테스트, 배포 과정을 정의한 파이프라인을 통해 변경 사항이 배포됩니다.
CI 설정하기
CI 과정에서 Lint와 Build를 설정했습니다. 버셀로 배포한 프로젝트여서 CI만 추가하였습니다.
빌드 또한 버셀이 진행하지만 CI에서 빌드하면 미리 오류를 잡을 수 있는 장점이 있습니다.
ESLint 설정은 아래에 따로 있습니다.
파일 생성 위치:
- 루트 다이렉트의
.github/workflows폴더를 생성합니다. 이는 규칙으로 정해진 네이밍입니다. - 하위의
(파일명).yml파일을 생성해 ci 로직을 작성합니다. - yml과 yaml은 같은 파일 형식입니다.
CI - Lint 설정하기
.github/workflows/ci.yml
lint:
  name: Lint
  runs-on: ubuntu-latest

  steps:
    - name: Checkout code
      uses: actions/checkout@v2

    - name: Set up Node.js
      uses: actions/setup-node@v2
      with:
        node-version: '14'

    - name: Install dependencies
      run: npm install

    - name: Run ESLint
      run: npm run lint
steps 하위의 name을 지정하지 않고도 간략하게 사용할 수 있습니다.
lint:
  name: Lint
  runs-on: ubuntu-latest

  steps:
    - uses: actions/checkout@v3
    - uses: actions/setup-node@v2
      with:
        node-version: '18'
    - run: npm install
    - run: npm run lint
코드를 설명하면 다음과 같습니다.
Trigger 설정:
on: [pull_request]: 모든 PR 이벤트가 발생할 때 이 워크플로우가 실행됩니다.
Lint 작업:
runs-on: ubuntu-latest: Lint 작업을 실행할 환경을 지정합니다.
steps:
actions/checkout@v2: 코드를 체크아웃합니다.
actions/setup-node@v2: Node.js 환경을 설정합니다.
npm install: 프로젝트 의존성을 설치합니다.
npm run lint: ESLint를 실행합니다.
Build 설정하기
빌드도 추가한 최종 코드입니다.
name: CI

on: [pull_request]

jobs:
  lint:
    name: Lint
    runs-on: ubuntu-latest

    steps:
      - uses: actions/checkout@v3
      - uses: actions/setup-node@v2
        with:
          node-version: '18'
      - run: npm install
      - run: npm run lint
  build:
    name: Build
    runs-on: ubuntu-latest

    steps:
      - uses: actions/checkout@v3
      - uses: actions/setup-node@v2
        with:
          node-version: '18'
      - run: npm install
      - run: CI='false' npm run build
run: CI='false' npm run build
- 빌드중에 발생하는 경고를 오류로 취급해서 빌드가 실패하는 경우 방지하기 위함
Lint 오류
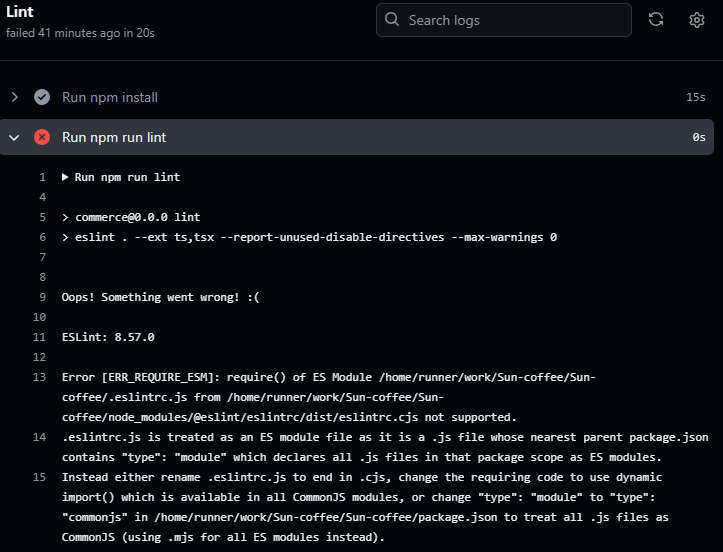
package.json 파일의 type이 module로 설정되어 있어, ESLint가 .eslintrc.js 파일을 ES Module로 인식하고 CommonJS로 처리하려 할 때 발생하는 문제입니다.
.eslintrc.js 파일을 .eslintrc.cjs로 변경하여 해결
ESLint 설정하는 방법
.eslintrc.cjs 파일만 만들면 ESLint가 제대로 동작하지 않습니다.
ESLint 규칙 알아보기 - eslint.org
라이브러리 설치하기
npm install eslint --save-dev
이 명령어는 ESLint를 프로젝트의 개발 의존성에 추가하여 프로젝트에서 ESLint를 사용할 수 있게 됩니다.
이후에는 .eslintrc.cjs 파일 직접 작성하기 또는 npx eslint --init 명령어로 파일을 생성할 수 있습니다.
이 두가지의 차이점은 파일 형식과 구성 방식, 설정 내용입니다.
eslintrc 파일 직접 작성하는 경우:
.eslintrc.cjs
- 기존 설정 방식으로, ESLint 설정을 CommonJS 형식으로 작성합니다.
- 다양한 플러그인과 규칙을 쉽게 추가할 수 있습니다.
예시 코드:
// .eslintrc.js

module.exports = {
  root: true,
  env: { browser: true, es2021: true },
  extends: [
    'eslint:recommended', // 기본 ESLint 규칙
    'plugin:react/recommended', // React 권장 규칙
    'plugin:@typescript-eslint/recommended', // TypeScript 권장 규칙
    'plugin:react-hooks/recommended', // React Hooks 권장 규칙
  ],
  ignorePatterns: ['dist', '.eslintrc.js'],
  parser: '@typescript-eslint/parser',
  plugins: ['react-refresh', 'react'],
  rules: {
    'react-refresh/only-export-components': [
      'warn',
      { allowConstantExport: true },
    ],
    'no-console': 'warn',
    // console.log 사용 시 경고
  },
}
npx eslint --init으로 파일 생성하는 경우:
npx eslint --init :
ESLint 초기 설정을 도와줍니다. 실행하면 몇 가지 질문을 통해 프로젝트에 적합한 ESLint 설정 파일(.eslintrc)을 생성합니다.
.eslint.config.js
- ESLint v8.21.0에서 도입된 새로운 구성 방식으로, ES 모듈 형식을 사용합니다.
- 최신 구성 방식으로, 플러그인과 설정을 가져오고 이를 확장하는 새로운 방식입니다.
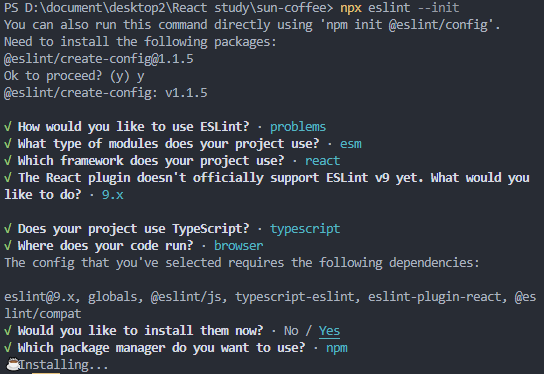
초기 설정 단계를 거치면 eslint.config.js 파일이 생깁니다.
prettier 충돌 방지하기
eslint와 prettier를 같이 사용할 때, 규칙이 다르다면 충돌이 발생할 수 있습니다.
라이브러리 설치
npm install --save-dev eslint-config-prettier eslint-plugin-prettier
.eslintrc.js 파일 설정
기존 설정에 eslint-config-prettier와 eslint-plugin-prettier를 추가합니다
예시코드
module.exports = {
  root: true,
  env: {
    browser: true,
    es2021: true,
  },
  extends: [
    'eslint:recommended', // 기본 ESLint 규칙
    'plugin:react/recommended', // React 권장 규칙
    'plugin:@typescript-eslint/recommended', // TypeScript 권장 규칙
    'plugin:react-hooks/recommended', // React Hooks 권장 규칙
    'prettier', // Prettier와 충돌을 방지하기 위해 추가
    'plugin:prettier/recommended', // Prettier 권장 규칙 및 eslint-plugin-prettier 활성화
  ],
  ignorePatterns: ['dist', '.eslintrc.js'],
  parser: '@typescript-eslint/parser',
  plugins: [
    'react-refresh',
    'react',
    'prettier' // Prettier 플러그인 추가
  ],
  rules: {
    'react-refresh/only-export-components': [
      'warn',
      { allowConstantExport: true },
    ],
    'no-console': 'warn', // console.log 사용 시 경고
    'prettier/prettier': 'error', // Prettier 규칙을 ESLint 규칙으로 추가
  },
};
eslint-config-prettier는 Prettier와 충돌할 수 있는 ESLint 규칙을 비활성화합니다.eslint-plugin-prettier는 Prettier의 규칙을 ESLint 규칙으로 적용해줍니다.plugin:prettier/recommended설정은 Prettier 규칙을 기본 ESLint 규칙으로 추가하고, Prettier 플러그인을 활성화합니다.
참고 - 협업을 위한 ESLint와 Prettier 환경설정하기
Lint 에러 수정하기
React를 스코프에 포함하지 않은 오류
'React' must be in scope when using JSX react/react-in-jsx-scope- 프로젝트 내 react의 버전은 18이상으로 import React from 'react';를 명시적으로 포함할 필요가 없음
- react/react-in-jsx-scope의 규칙을 비활성화로 변경
'.eslintrc.cjs'
module.exports = {
  // 다른 코드 생략
  rules: {
    'react-refresh/only-export-components': [
      'warn',
      { allowConstantExport: true },
    ],
    'react/react-in-jsx-scope': 'off', // import React from 'react' 필요 없음
  },
}
React Hook 조건부 호출 오류
- React Hook은 조건부로 호출해서는 안됨
- 모든 Hook은 컴포넌트가 렌더링될 때마다 동일한 순서로 호출되어야 함
- 조건부 로직 바깥에서 Hook을 호출할 것
PropTypes 오류
error 'className' is missing in props validation react/prop-types
- PropTypes를 사용하여 컴포넌트의 props를 정의하지 않은 경우 발생하는 오류
- PropTypes 대신 TypeScript 인터페이스를 사용하여 props를 정의할 것
no-explicit-any 오류
6:24  error    Unexpected any. Specify a different type  @typescript-eslint/no-explicit-any
22:52 error Unexpected any. Specify a different type @typescript-eslint/no-explicit-any- TypeScript에서 any 타입을 사용하는 것은 권장되지 않음
- 외부 라이브러리와 같이 any 타입을 사용해야 하는 경우 ESLint와 TypeScript에서 제공하는 주석 사용
// eslint-disable-next-line @typescript-eslint/no-explicit-any- 여러 줄의 경우는 아래 처럼 사용 가능
/* eslint-disable @typescript-eslint/no-explicit-any */
function handleExternalLibrary(data: any) {
  // ...
}
/* eslint-enable @typescript-eslint/no-explicit-any */

'특정 파일에서 규칙 비활성화하기'
/* eslint-disable @typescript-eslint/no-explicit-any */