캔버스 기본설정
const canvas = document.querySelector("#canvas");
const ctx = canvas.getContext("2d");

// 화면 크기에 맞춰서 캔버스 크기 설정하는 방법
canvas.width = innerWidth;
canvas.height = innerHeight;

// 캔버스에 그래픽 작업을 할 수 있게 해 주는 속성 및 메소드들이 들어있는 객체 불러오기
const ctx = canvas.getContext("2d");-
캔버스의 너비와 높이는 설정해주지 않으면 기본적으로 300px * 150px 로 자동 설정된다.
-
태그에 직접 width와 height를 추가하면 픽셀로만 인식하므로 좀 더 다양한 크기를 지정하고 싶다면 따로 빼서 정의해주어야 한다.
- 캔버스로 그리기 예시 코드
// 사각형 내부색상 지정
ctx.fillStyle = "gray";

// 선 굵기 지정
ctx.lineWidth = 5;

// 선 색상 지정
ctx.strokeStyle = "black";

// 사각형 그리기 (x좌표, y좌표, 가로길이, 세로길이)
ctx.fillRect = (10, 10, 100, 50)

// 지울 부분 지정 (x좌표, y좌표, 가로길이, 세로길이)
ctx.clearRect(20, 20, 80, 30)화면상 마우스 위치를 구하는 이벤트 객체의 속성

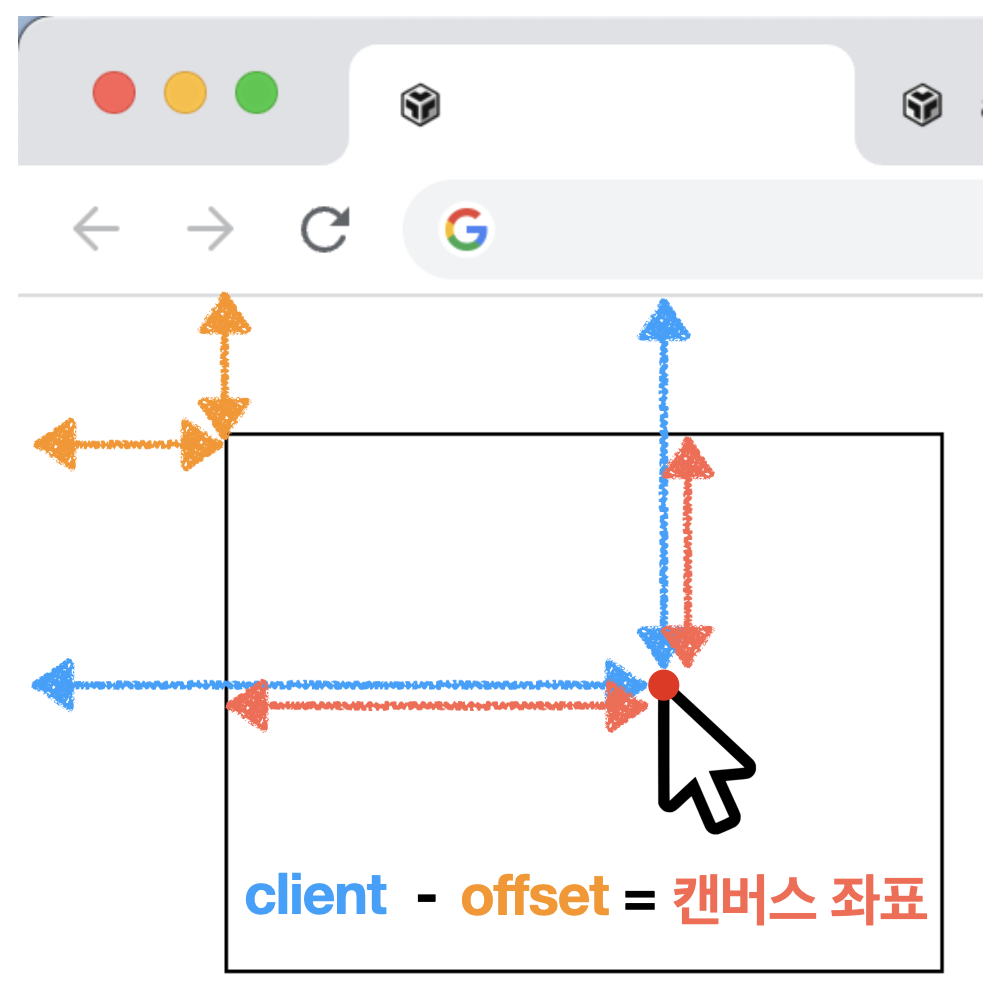
X좌표 : event.clientX
Y좌표 : event.clientY
화면상 캔버스의 위치를 구하는 속성
X좌표 : ctx.canvas.offsetLeft
Y좌표 : ctx.canvas.offsetTop
혹은 event.offsetX , event.offsetY 로 바로 구할 수도 있다.
canvas.onclick = function (event) {
  // x, y 변수에 방금 구한 좌표를 할당.
  const x = event.clientX - ctx.canvas.offsetLeft
  const y = event.clientY - ctx.canvas.offsetTop
}
그림판
const canvas = document.querySelector("#canvas");
const ctx = canvas.getContext("2d");
const width = innerWidth - 60;
const height = innerHeight - 170;

canvas.width = width;
canvas.height = height;
canvas.style.margin = "10px";
canvas.style.border = "3px double";

let painting = false;

function stopPainting(event) {
  painting = false;
}

function startPainting() {
  painting = true;
}

ctx.lineWidth = 3;
function onMouseMove(event) {
  const x = event.offsetX;
  const y = event.offsetY;
  if (!painting) {
    ctx.beginPath();
    ctx.moveTo(x, y);
  } else {
    ctx.lineTo(x, y);
    ctx.stroke();
  }
}

if (canvas) {
  canvas.addEventListener("mousemove", onMouseMove);
  canvas.addEventListener("mousedown", startPainting);
  canvas.addEventListener("mouseup", stopPainting);
  canvas.addEventListener("mouseleave", stopPainting);
}

document.querySelector("#palette").style.marginLeft = "20px";
const buttons = [
  "red",
  "orange",
  "yellow",
  "green",
  "blue",
  "navy",
  "purple",
  "black",
  "white",
  "clear",
  "fill"
];
let lineColor = "black";

buttons.forEach((content) => {
  let button = document.querySelector(`.${content}`);

  if (content === "clear" || content === "fill") {
    button.style.background = "rgba(100,100,100,0.2)";
  } else {
    button.style.background = content;
  }
  button.style.color = "white";
  button.style.display = "inline-block";
  button.style.textShadow =
    "1px 0 black, 0 1px black, 1px 0 black, 0 -1px black";
  button.style.lineHeight = "22px";
  button.style.textAlign = "center";
  button.style.width = "50px";
  button.style.height = "20px";
  button.style.borderRadius = "25px";
  button.style.border = "4px solid rgba(129, 101, 101, 0.151)";
  button.style.boxShadow = "1px 2px 2px gray";
  button.style.marginBottom = "10px";

  button.onclick = () => {
    ctx.strokeStyle = content;
    lineColor = content;
  };
});

document.querySelector(".clear").onclick = () => {
  ctx.clearRect(0, 0, width, height);
};

document.querySelector(".fill").onclick = () => {
  ctx.fillStyle = lineColor;
  ctx.fillRect(0, 0, width, height);
};
CSS 애니메이션 / @keyframes
/* '%' 단위로 시간 진행에 따른 상태를 작성. */

@keyframes 애니메이션이름 {
  0% {            /* from 이라고 작성해도 된다.*/
    CSS속성 : 속성값;
  }

  50% {           /* 애니메이션 진행도에 따른 스타일을 설정. */
                  /* 필요하다면 1부터 99까지도, 소수점까지도 모두 작성해도 된다.*/
      CSS속성 : 속성값;
    }

  100% {          /* to 라고 작성해도 됩니다.*/
    CSS속성 : 속성값;
  }
}
// 예시
// 시작 시점에선 0도, 50% 시점에선 180도, 완료 시점에선 360도 회전시키는 애니메이션.
@keyframes lotate {
0% {
transform : rotate(0deg)
}
50% {
transform : rotate(180deg)
}
100% {
transform : rotate(360deg)
}
}animation 속성
- animation : 띄어쓰기로 쭉 나열하면 아래의 속성들을 한 번에 지정할 수 있음
animation-name: 애니메이션의 중간 상태를 지정하는 이름. @keyframes 블록에 작성
animation-duration: 한 싸이클의 애니메이션이 재생될 시간 지정
animation-delay: 애니메이션이 시작을 지연시킬 시간 지정
animation-direction: 애니메이션 재생 방향을 지정(normal,reverse,alternate(순방향->역방향 반복재생),alternate-reverse(역방향->순방향 반복재생))
animation-iteration-count: 애니메이션이 몇 번 반복될지 지정(기본값: 1,infinite)
animation-play-state: 애니메이션을 재생 상태. 멈추거나 다시 재생 시킬 수 있음(기본값: running,pause)
animation-timing-function: 중간 상태들의 전환을 어떤 시간간격으로 진행할지 지정(기본값: ease,linear,ease-in,ease-out,ease-in-out)
animation-fill-mode: 애니메이션이 재생 전 후의 상태 지정(기본값: none(요소 스타일 유지),forwards(마지막 키프레임 스타일 유지),backwards(첫번째 키프레임 스타일 유지),both(재생 전: 첫번째 키프레임 스타일/재생 후: 마지막 키프레임 스타일 유지)
- 키프레임을 설정하면서 주는 중간값은 애니메이션 재생 시간을 기준으로 함을 알 수 있다.
.jpg)
