Best Practices for Creating Rebar Shop Drawings in Revit for Complex Concrete Structures

Creating accurate and detailed rebar shop drawings is crucial for the construction of complex concrete structures. The drawings become more efficient to create through Revit because the software enables precise work and team collaboration for all project stakeholders. This article explain best practices for creating rebar shop drawings in Revit which combine high efficiency with precise results and standard compliance.
Rebar shop drawings are essential for the successful execution of any concrete structure. These drawings present complete details about reinforcement layout, bar dimensions, bending patterns, and their placement inside the concrete structure. Complex Concrete structures require both precise and straightforward communication approaches for their operation.
Revit, a Building Information Modeling (BIM) software, provides a robust platform for generating accurate and highly detailed rebar shop drawings. The tools and features of Revit enable structural engineers and designers to create these drawings at higher speeds with reduced mistakes while achieving uniformity in drawings for all project stakeholders.
Why Revit is ideal for creating Rebar Shop Drawings
Revit offers several advantages for rebar detailing, especially in complex concrete structures. Some of the key reasons why Revit is an excellent choice for creating rebar shop drawings include:
-
BIM Integration: The software includes BIM Integration because Revit operates as a BIM-centric which enables design and analysis and drawing creation to work together seamlessly. This removes the need for individual drafting tools yet keeps all project stages looking uniform.
-
Automated Updates: When changes are made to the model, Revit automatically updates the rebar details in shop drawings. This prevents outdated or incorrect information from entering the final documents through this process.
-
Accuracy and Precision: Revit software provides exact rebar placement capabilities which allow users to add precise rebar dimensions and bending specifications and quantities to their drawings. The 3D visualization system helps designers identify potential design problems at the beginning of the development process.
-
Collaboration: The platform allows different users to work on the single model because of its collaborative features. The communication between structural engineers and architects and contractors becomes more effective which leads to reduce misunderstandings and improve shop drawing quality.
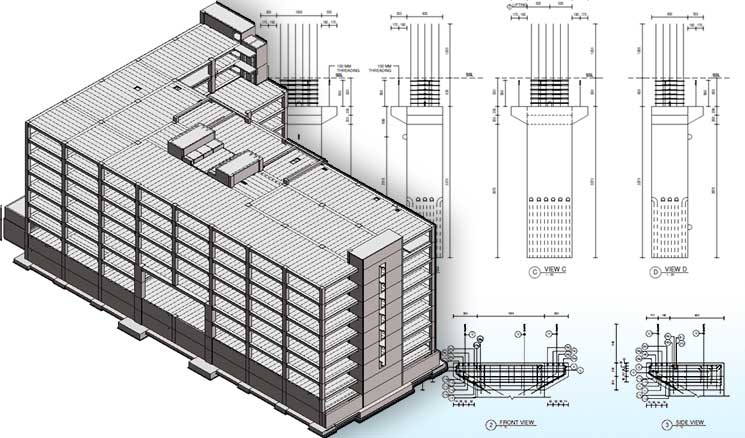
Case Study: Coordinated Revit Structural Model for an Office Building in India
A leading precast manufacturing company hired TrueCADD to develop a Revit structural model at LOD 450 for their office building project. The project required the team to create rebar models, bar bending schedules and generate shop drawings. The main difficulty involved uniting multiple 2D AutoCAD inputs from different structural consultants with architectural and MEP models from other stakeholders to achieve a clash-free model.
Our team built a complete Revit structural model with coordinated elements while running interdisciplinary clash detection and using RFIs and FYIs to handle issues effectively. The project completion occurred within six months through which we achieved these results:
The team created a Revit structural model that integrated all components without conflicts while including rebar elements.
- Delivered precise Bar Bending Schedules (BBS) and connection details.
- The project included all necessary shop drawings which maintained absolute precision.
- Achieved better team coordination and improved communication between different disciplines.
- Cost-efficient deliverables produced by the project resulted in higher return on investment (ROI).
7 Best Practices for creating Rebar Shop Drawings in Revit
1. Start with a well-defined model
Before diving into the creation of shop drawings, it’s essential to begin with a robust, well-defined model. The Revit concrete structure needs to be detailed precisely, with correct levels, dimensions, and structural elements. The model needs to be complete at the beginning to achieve efficient rebar detailing operations.
Tip: The model requires reference planes and grids to achieve correct rebar positioning and maintain exact placement throughout the entire model.
2. Revit provides users with Rebar Tools which enable them to create Detailed Rebar Designs
Revit has specialized tools designed for rebar detailing. These tools allow you to place rebar in the model and control its shape, length, and bend radius. The tools enable users to determine the exact rebar needs for complex concrete structures including slabs, beams, and columns.
Tip: Utilize Revit’s Rebar Shape Manager to create custom shapes that may be required for the specific needs of the project.
3. The process needs proper Rebar Scheduling and Labeling for its execution
Revit’s built-in rebar schedule functionality allows you to automatically generate schedules based on the rebar elements in your model. The bars need to receive essential markings that include their measurements, length, number, and bend radius information. The fabrication process requires exact and current data which needs to remain correct to prevent fabrication errors.
Tip: The system should have predefined schedules for consistency which will help in labeling all rebar elements according to project standards.
4. Utilize Revit’s visibility/graphics settings
The production of readable shop drawings depends heavily on the correct selection of visibility and graphics settings. Revit allows you to customize how rebar is displayed, from color coding to the thickness of rebar lines. Use this feature to control the appearance of rebar in plan views, sections, and elevations.
Tip: The multiple view templates for project stages from construction to fabrication allow contractors to see essential details at each development point.
5. Verify Rebar placement using 3D views
One of Revit’s most powerful features is its ability to create detailed 3D views of the model. These views are indispensable for verifying the placement and orientation of rebar in complex concrete structures. The three-dimensional representation of rebar allows users to identify positioning mistakes during the early stages of construction which leads to correct reinforcement placement.
Tip: The evaluation of rebar placement needs Section Boxes and Camera Views to study various structural sections. The process enables you to find any mistakes or misplaced elements before completing your drawings.
6. Coordinate with other trades using Clash Detection
Multiple disciplines need to work together for complex systems to achieve operational success. The clash detection tools in Revit enable users to detect when rebar intersects with other system elements including mechanical, electrical and plumbing (MEP) installations. Ensuring that rebar placement does not conflict with these systems reduces the risk of costly errors during construction.
Tip: The early detection of design conflicts through clash detection reports should occur before shop drawings production to enable designers to solve issues at that stage.
7. Maintain Rebar Detailing standards and codes
The creation of rebar shop drawings requires strict adherence to industry standards which include American Concrete Institute (ACI) and British Standards Institution (BSI) guidelines. Revit allows users to generate project details that follow the specific building codes which apply to their construction site or building type.
Tip: Revit users need to create templates that include pre-defined reinforcement types, bar schedules and dimensioning rules which follow the required building codes and standards.
Common mistakes to avoid when creating Rebar Shop Drawings in Revit
-
Overlooking Coordination: Failure to coordinate rebar placement with other trades leads to construction delays and additional expenses because of necessary changes. You should maintain continuous communication with architects and MEP engineers and contractors.
-
Inaccurate Sizing and Quantities: Checking rebar dimensions, quantities and bend shape will help prevent fabrication errors. Use schedule feature in Revit to maintain precise tracking of all details.
-
Neglecting to Use 3D Views for Verification: of 2D views for rebar placement verification can leads to errors because it does not provide complete accuracy. The 3D tools in Revit allow users to check rebar placement through visual inspection of the complete structure.
Conclusion
Creating accurate rebar shop drawings is essential for successful completion of complex concrete structures. The BIM features of Revit enable users to manage entire design process through its complete platform.
Engineers who work with Revit rebar detailing tools and follow standard coordination procedures and industry guidelines will generate high-quality, error-free shop drawings.
By leveraging these techniques, you not only improve the accuracy of your rebar shop drawings but also enhance the efficiency of entire construction process, from design through to fabrication.