
지금까지 함수를 호출한 뒤 함수가 끝나면 현재의 코드로 다시 돌아왔다. 예를들어, 다음의 함수를 보자.
def add(a, b):
    c = a + b    # add 함수가 끝나면 변수와 계산식은 사라짐
    print(c)
    print('add 함수')

def calc():
    add(1, 2)    # add 함수가 끝나면 다시 calc 함수로 돌아옴
    print('calc 함수')

calc()
calc() 안에서 add()를 호출했을 때 add 함수가 끝나면 다시 calc()로 돌아온다. 특히, add 함수가 끝나면 함수 안에 들어있던 변수와 계산식은 모두 사라진다. calc 함수를 메인 루틴, add 함수를 서브 루틴이라고 했을 때 동작은 다음의 그림과 같다.
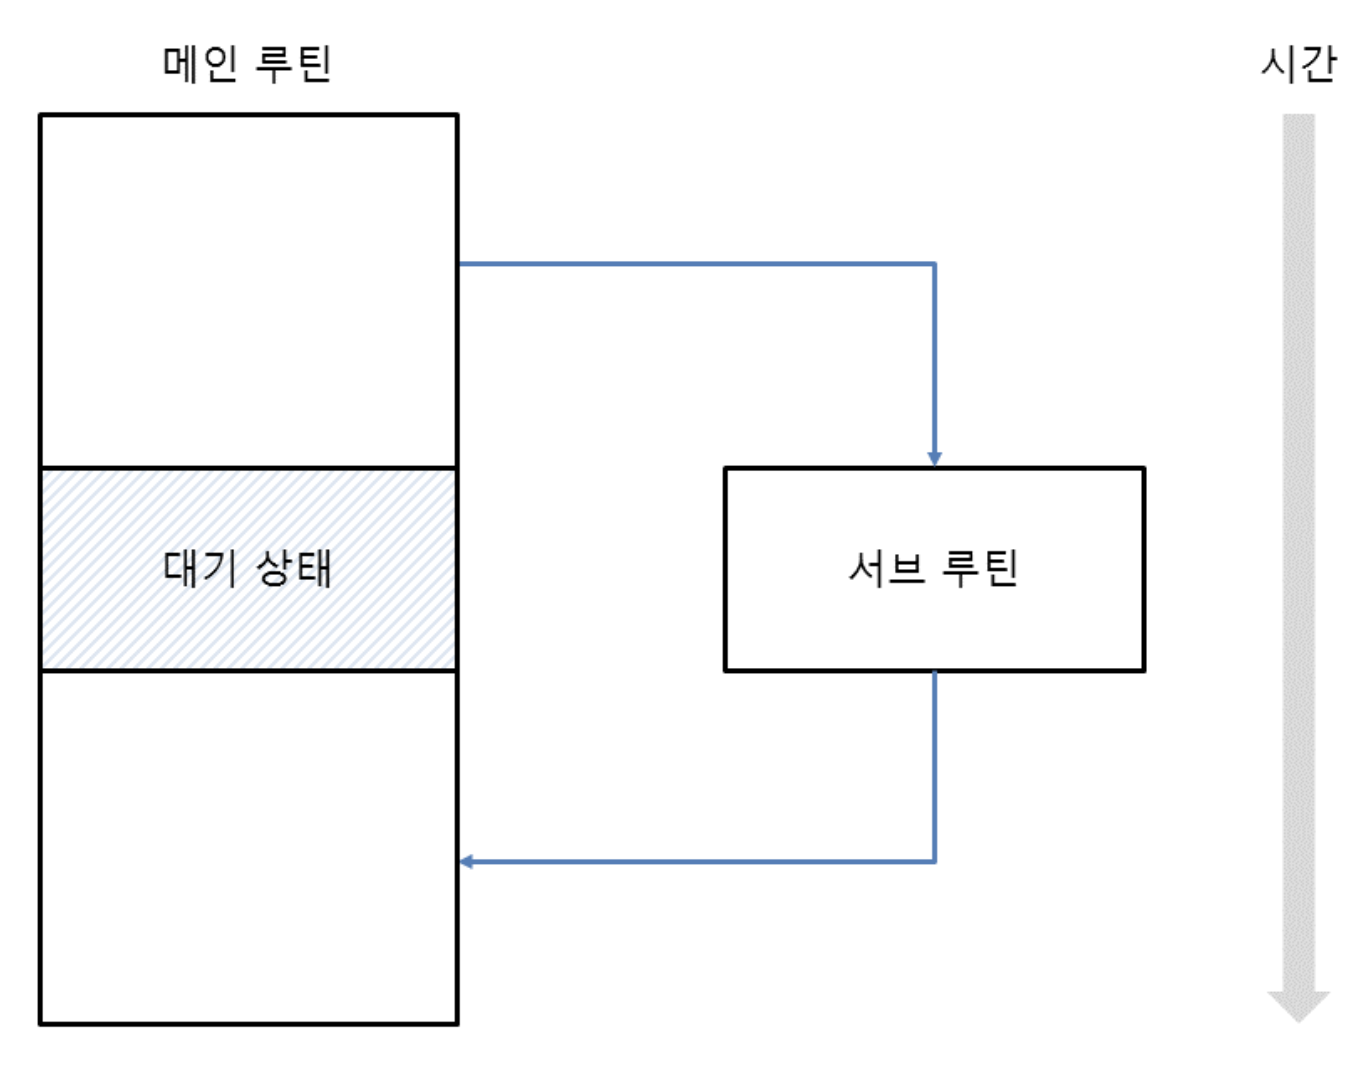
즉, 메인 루틴에서 서브 루틴을 호출하면 서브 루틴의 코드를 실행 한 뒤 다시 메인 루틴으로 돌아온다. 특히 서브 루틴이 끝나면 서브 루틴의 내용은 모두 사라진다. 즉, 서브 루틴은 메인 루틴에 종속된 관계이다.
하지만 코루틴은 방식이 조금 다르다.
Coroutine
코루틴은 cooperative routine을 의미하는데, 서로 협력하는 루틴이라는 뜻이다. 즉, 서로 종속된 관계가 아닌 대등한 관계이며 특정 시점에 상대방의 코드를 실행한다.
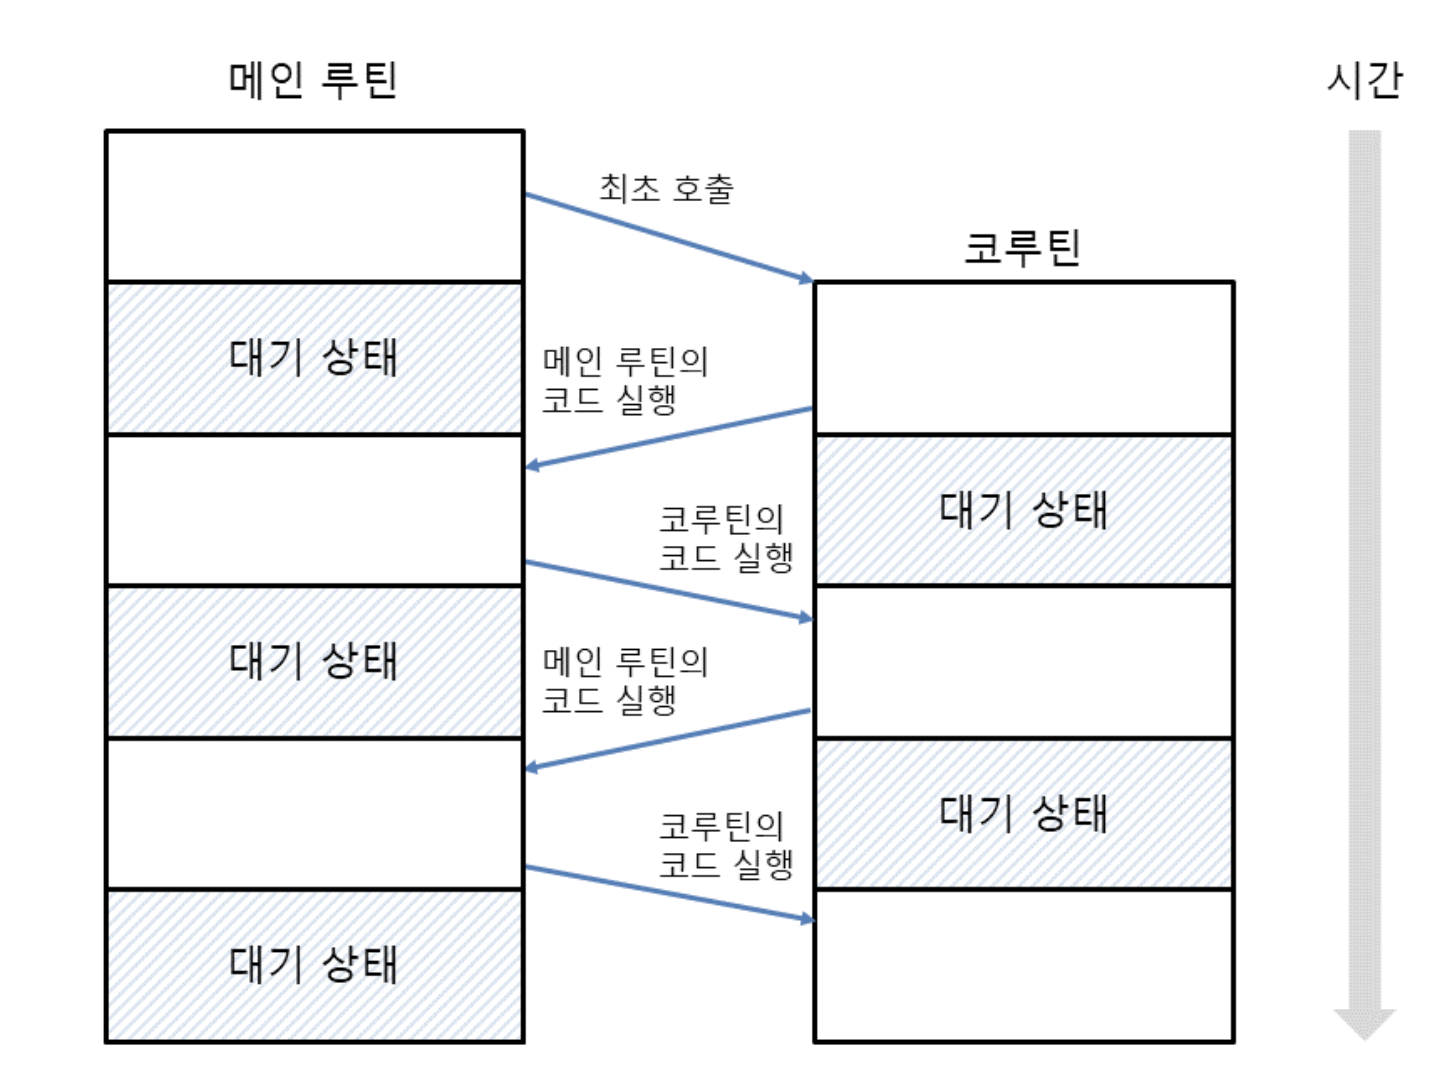
이처럼 코루틴은 함수가 종료되지 않은 상태에서 메인 루틴의 코드를 실행한 뒤 다시 돌아와서 코루틴의 코드를 실행한다. 따라서 코루틴이 종료되지 않았으므로 코루틴의 내용도 계속 유지된다. 일반 함수를 호출하면 코드를 한 번만 실행할 수 있지만, 코루틴은 코드를 여러번 실행할 수 있다. 함수의 코드 실행하는 지점을 진입점(entry point)라고 하는데 코루틴은 진입점이 여러개인 함수이다.
코루틴에 값 보내기
코루틴은 제너레이터의 특별한 형태라고 기억하자. 제너레이터는 yield로 값을 발생시켰지만 코루틴은 yield로 값을 받아올 수 있다.
다음의 예제와 같이 코루틴에 값을 보내면서 코드를 실행할 때는 send()를 사용한다. 그리고 send()가 보낸 값을 받아오려면 (yield)형식으로 yield를 괄호로 묶어준 뒤 변수에 저장한다.
- 코루틴 객체.send(값)
- 변수 = (yield)
def number_coroutine():
    while True:        # 코루틴을 계속 유지하기 위해 무한 루프 사용
        x = (yield)    # 코루틴 바깥에서 값을 받아옴, yield를 괄호로 묶어야 함
        print(x)

co = number_coroutine()
next(co)      # 코루틴 안의 yield까지 코드 실행(최초 실행)

co.send(1)    # 코루틴에 숫자 1을 보냄
co.send(2)    # 코루틴에 숫자 2을 보냄
co.send(3)    # 코루틴에 숫자 3을 보냄

>>>1
>>>2
>>>3- 먼저 코루틴을 종료하지 않고 계속 유지시키기 위해
while True:와 같은 무한루프를 사용한다. 그리고x=(yield)와 같이 바깥에서 보낸 값을 받아서x에 저장하고, print로x의 값을 출력한다. - 코루틴 바깥에서는
co = number_coroutine()과 같이 코루틴 객체를 생성한 뒤next(co)로 코루틴 안의 코드를 최초로 실행하여 yield 까지 코드를 실행한다. co.send()로 숫자 1,2,3을 보내면 코루틴 안에서 숫자를 받은 뒤 print로 출력한다.
즉, next()로 코루틴의 코드를 최초로 실행하고, send() 로 코루틴에 값을 보내면서 대기하고 있던 코루틴의 코드를 다시 실행한다.
+) 코루틴객체.send(None)과 같이 None을 지정해도 코루틴 코드를 최초로 실행할 수 있다.
코루틴 바깥으로 값 전달
코루틴 안에 값을 보내기만 했는데 이번에는 코루틴에서 바깥으로 값을 전달해보자.
다음과 같이 (yield 변수)형식으로 yield에 변수를 지정한 뒤 괄호로 묶어주면 값을 받아서 바깥으로 전달한다. 그리고 yield를 사용하여 바깥으로 전달한 값은 next()와 send()의 반환값으로 나온다.
- 변수 = (yield 변수)
- 변수 = next(코루틴객체)
- 변수 = 코루틴객체.send()
예제를 통해서 확인해보자.
def sum_coroutine():
    total = 0
    while True:
        x = (yield total)    # 코루틴 바깥에서 값을 받아오면서 바깥으로 값을 전달
        total += x

co = sum_coroutine()
print(next(co))      # 0: 코루틴 안의 yield까지 코드를 실행하고 코루틴에서 나온 값 출력

print(co.send(1))    # 1: 코루틴에 숫자 1을 보내고 코루틴에서 나온 값 출력
print(co.send(2))    # 3: 코루틴에 숫자 2를 보내고 코루틴에서 나온 값 출력
print(co.send(3))    # 6: 코루틴에 숫자 3을 보내고 코루틴에서 나온 값 출력

# 실행 결과
>>>0
>>>1
>>>3
>>>6- 코루틴에서 값을 누적할 변수
total를 만들고 0을 할당한다.x = (yield total)과 같이 값을 받아오면서 바깥으로 값을 전달하도록 만든다. 바깥에서 send가 보낸 값은 x에 저장되고, 코루틴 바깥으로 보낼 값은 total이 된다. 그리고 total에 x의 값을 누적해준다. - 코루틴 바깥에서는 코루틴 객체를 생성한 뒤 next(co)로 코루틴 안의 코드를 최초로 실행하여 yield까지 코드를 실행하고, 값을 print next(co)에서 반환된 값을 출력한다. 그 후 co.send()로 숫자 1,2,3을 보내고, print로 co.send()에서 반환된 값을 출력한다.
- co.send(1)로 1을 보내면 코루틴은 대기상태에서 풀리고,
x = (yield total)의 x= 부분이 실행된 뒤total += x로 숫자를 누적한다.이 코루틴은while True:로 반복하는 구조이기 때문에 다시 x = (yield total)의 yield에서 total을 메인 루틴으로 전달하고 대기한다. 그 다음에 메인 루틴에서 print(co.send(1))과 같이 코루틴에서 나온 값을 출력한다. 여기서는 total에 1이 들어있기때문에 1을 받아와서 출력한다.
+) next와 send의 차이는 next는 코루틴의 코드를 실행하지만 값을 보내지 않을 때 사용하고, send는 값을 보내면서 코루틴의 코드를 실행할 때 사용한다.
yield : 코루틴 바깥으로 값을 전달하면 next와 send의 반환값으로 받는다
P.S) generator vs coroutine
- generator : next 함수를 반복 호출하여 값을 얻어냄
- coroutine : next함수를 한번만 호출한 뒤 send로 값을 주고 받는 방식
코루틴의 종료
보통 코루틴은 실행 상태를 유지하기위해 while True:의 무한 루프 반복문으로 동작한다. 만약 코루틴을 강제로 종료하고 싶다면 close 메소드를 사용하면 된다.
- 코루틴객체.close()
def number_coroutine():
    while True:
        x = (yield)
        print(x, end=' ')

co = number_coroutine()
next(co)

for i in range(20):
    co.send(i)

co.close()    # 코루틴 종료

# 실행결과
>>>0 1 2 3 4 5 6 7 8 9 10 11 12 13 14 15 16 17 18 19
파이썬 스크립트가 끝나면 코루틴도 끝나기 때문에 close를 사용하지 않는것과 별반 차이는 없지만, close는 코루틴의 종료 시점을 알아야할 때 사용하면 편리하다.
GeneratorExit 예외 처리
코루틴 객체에서 close 메소드를 호출하면 코루틴이 종료될 때 GeneratorExit 예외가 발생한다. 따라서 이 예외를 처리하면 코루틴의 종료 시점을 알 수 있다.
def number_coroutine():
    try:
        while True:
            x = (yield)
            print(x, end=' ')
    except GeneratorExit:    # 코루틴이 종료 될 때 GeneratorExit 예외 발생
        print()
        print('코루틴 종료')

co = number_coroutine()
next(co)

for i in range(20):
    co.send(i)

co.close()

# 실행 결과
>>>0 1 2 3 4 5 6 7 8 9 10 11 12 13 14 15 16 17 18 19
>>>코루틴 종료
이렇게 하면 close 메소드로 코루틴을 종료할 때 원하는 코드를 실행할 수 있다.
코루틴 안에서 예외 발생시키기
코루틴 안에 예외를 발생시켜서 코루틴을 종료시켜보자.
코루틴 안에 예외를 발생 시킬 때는 throw메소드를 사용한다. 말 그대로 던지라는 뜻인데, 예외를 코루틴 안으로 던진다. 이 때, throw 메소드에 지정한 에러 메세지는 except as의 변수에 들어간다.
- 코루틴객체.throw(예외이름, 에러메세지)
def sum_coroutine():
    try:
        total = 0
        while True:
            x = (yield)
            total += x
    except RuntimeError as e:
        print(e)
        yield total    # 코루틴 바깥으로 값 전달

co = sum_coroutine()
next(co)

for i in range(20):
    co.send(i)

print(co.throw(RuntimeError, '예외로 코루틴 끝내기')) # 190
                                                      # 코루틴의 except에서 yield로 전달받은 값def sum_coroutine():
    try:
        total = 0
        while True:
            x = (yield)
            total += x
    except RuntimeError as e:
        print(e)
        yield total    # 코루틴 바깥으로 값 전달

co = sum_coroutine()
next(co)

for i in range(20):
    co.send(i)

print(co.throw(RuntimeError, '예외로 코루틴 끝내기')) # 190

# 실행 결과
>>>예외로 코루틴 끝내기
>>>190
코루틴 안에서 try - except 예외가 발생하면 print로 에러 메세지를 출력하고, yield를 사용하여 total을 바깥으로 전달하도록 한 예제다.
asyncio
asyncio(Asynchronous I/O)는 비동기 프로그래밍을 위한 모듈이며, CPU 작업과 I/O를 병렬로 처리하게 해줍니다.
- 동기처리 : 특정 작업이 끝나면 다음 작업을 처리하는 순차처리방식
- 비동기처리 : 여러 작업을 처리하도록 예약한 뒤 작업이 끝나면 결과를 받는 방식

Native Coroutine
asyncio를 사용하려면 async def로 네이티브 코루틴을 만든다. (제너레이터 기반의 코루틴과 구분하기 위해 async def로 만든 코루틴은 네이티브 코루틴이라고 한다.)
async def 함수이름():
    코드
import asyncio
async def hello():
print("Hello, World!")
loop = asyncio.get_event_loop() # 이벤트 루프를 얻음
loop.run_until_complete(hello()) # hello가 끝날 때까지 기다림
loop.close() # 이벤트 루프를 닫음
# 실행 결과
Hello, World!- async def로 hello를 만들고, asyncio.get_event_loop 함수로 이벤트 루프를 얻는다.
- loop.run_until_complete(hello())와 같이 run_until_complete에 코루틴 객체를 넣는다.(네이티브 코루틴을 호출하면 코루틴 객체가 생성된다.)
- 이벤트루프 = asyncio.get_event_loop()
- 이벤트루프.run_until_complete(코루틴객체 또는 퓨처객체)
- 3.7버전 이상부터는 asyncio.run(함수)와 같이 한줄로 실행시킬 수 있다.
비동기 처리
비동기로 두 개 이상의 작업(코루틴)을 돌릴 때는 asyncio.gather 함수를 이용한다. 이때, 각 task들은 unpacked 형태로 넣어주어야 한다.
즉, asyncio.gather(coroutine_1(), coroutine_2())처럼 넣어주거나 asyncio.gather(*[coroutine_1(), coroutine_2()]처럼 넣어주어야 한다.
코루틴이 아닌 함수를 비동기적으로 이용하기
await뒤에 오는 함수 역시 코루틴으로 작성되어 있어야 비동기적인 작업을 할 수 있다. 파이썬의 대부분의 라이버리르들은 비동기를 고려하지 않고 만들어졌기 때문에 비동기로 이용할 수 없다. 하지만, 이벤트 루프 run_in_executor 함수를 이용하면 가능하다.
asyncio.get_event_loop()를 사용해서 현재 이벤트 루프를 받아오고, loop.run_in_executor를 사용하면 된다.
.run_in_executor(None: default loop executor), func, *args 또는 concurrent.futures.Executor의 인스턴스)
Assignment
Q-1)
다음의 예제 코드는 greeting에 문자열이 send 보낼때 마다 계속 더해지는 문제가 있습니다.
다음과 같이 send 호출시마다 good morning, good afternoon, good evening 이 출력되도록 코드를 수정해보세요.
print(cr.send("morning")) → good morning
print(cr.send("afternoon")) → good afternoon
print(cr.send("evening")) → good evening
import time

def coroutine_test():
    greeting = "good "
    while True:
        text = (yield greeting)
        print("text = ",end=""), print(text)
        greeting += text


if __name__ == "__main__":
    cr = coroutine_test()
    print("cr=",end=""), print(cr)

    next(cr)
		time.sleep(2)

    print("send 1")
    print(cr.send("morning"))
    time.sleep(2)

    print("send 2")
    print(cr.send("afternoon"))
    time.sleep(2)

    print("send 3")
    print(cr.send("evening"))
    time.sleep(2)
A)
반복문에서 greeting의 누적된 부분이 계속 루프를 돌 때마다 초기화가 되도록 greeting = "good "부분을 추가해줬다.
import time

def coroutine_test():
    greeting = "good "
    while True:
        text = (yield greeting)
        print("text = ",end=""), print(text)
        greeting = "good "
        greeting += text


if __name__ == "__main__":
    cr = coroutine_test()
    print("cr=",end=""), print(cr)

    next(cr)
    time.sleep(2)

    print("send 1")
    print(cr.send("morning"))
    time.sleep(2)

    print("send 2")
    print(cr.send("afternoon"))
    time.sleep(2)

    print("send 3")
    print(cr.send("evening"))
    time.sleep(2)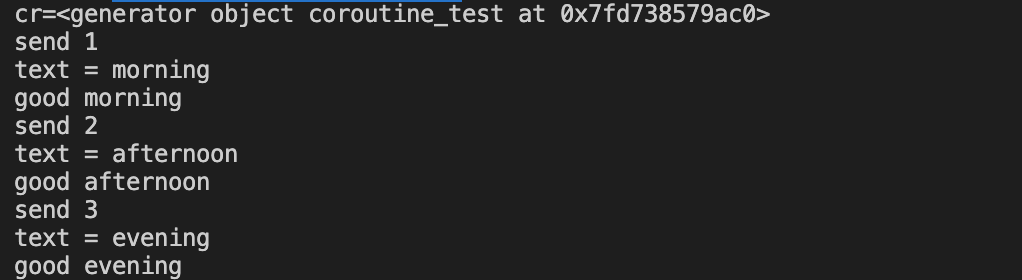
Q-2)
asyncio 라는 모듈은 파이썬에서 정식으로 제공하는 비동기 io를 위한 모듈 입니다. asyncio 를 사용해서 우리가 다뤘던 코루틴(coroutine)을 활용하여 동시성 프로그램을 쉽게 작성할 수 있습니다.
아래 공식문서에서 asyncio 에 대해서 학습한 후 두번째 코드를 coroutine 과 asyncio 를 활용하여 구현해 보세요. asyncio에는 비동기 처리를 위한 event loop가 존재하고 여기에 코루틴을 등록해서 사용하는 구조로 되어있습니다.
def coroutine_1():
    return_value = 0
    while True:
        input_value = (yield return_value)
        return_value = input_value + 1

def coroutine_2():
    return_value = 0
    while True:
        input_value = (yield return_value)
        return_value = input_value + 1


if __name__ == "__main__":
    ret_value = 0

    c1 = coroutine_1()
    c2 = coroutine_2()

    next(c1)
    next(c2)

    while ret_value < 100000000:

        ret_value = c1.send(ret_value)


        ret_value = c2.send(ret_value)

    print("ret_value =",end=""), print(ret_value)
    print("end of main")
asyncio 참고자료 : https://docs.python.org/3/library/asyncio-task.html
A)
import asyncio, time

async def coroutine_1():
    return_value = 0
    while return_value < 100000000:
        return_value += 1
    return return_value

async def main_async():
    co = await coroutine_1()
    print("ret_value =",end=""), print(co)
    print("end of main")

if __name__ == "__main__":
    start_time = time.time()
    asyncio.run(main_async())
    end_time = time.time()
    print(f'taken time : {end_time - start_time}')
사실 이 방법이 맞는지 확신은 없다. 정답은 없다고 하지만 문제의 의도가 이건 아니였을 것 같다는 생각은 든다.
async로 함수를 두가지 만들어줬다.
coroutin_1()은 return_value를 1씩 증가시켜 1억까지 증가시키는 함수이며, main_async()는 비동기 처리를 하는 함수가 된다. 그리고 asyncio.run()구문을 통해서 async의 이벤트 루프를 생성해주었다. main_async를 먼저 실행할 때 까지 기다렸다가, 실행이 되고 나면 coroutine_1()가 마저 실행되며 동작을 끝마친다.
- 실행 결과

내용이 확실히 쉽지 않아 많이 읽어봐도 크게 와닿지 않아 더 어렵게 느껴졌다. (Thread, Process, Coroutine) 공부를 해가면서 추가적으로 알게되는 내용들, 지금은 이해가 안갔지만 공부하면서 새롭게 이해가 될 내용들을 계속 추가해가면서 채워갈 예정이다.
Q-3)
위의 내용들로 블로깅했습니다. 😋
참고
https://sjquant.tistory.com/14
https://docs.python.org/ko/3/library/asyncio-task.html
https://www.daleseo.com/python-asyncio/
https://dojang.io/mod/page/view.php?id=2469