
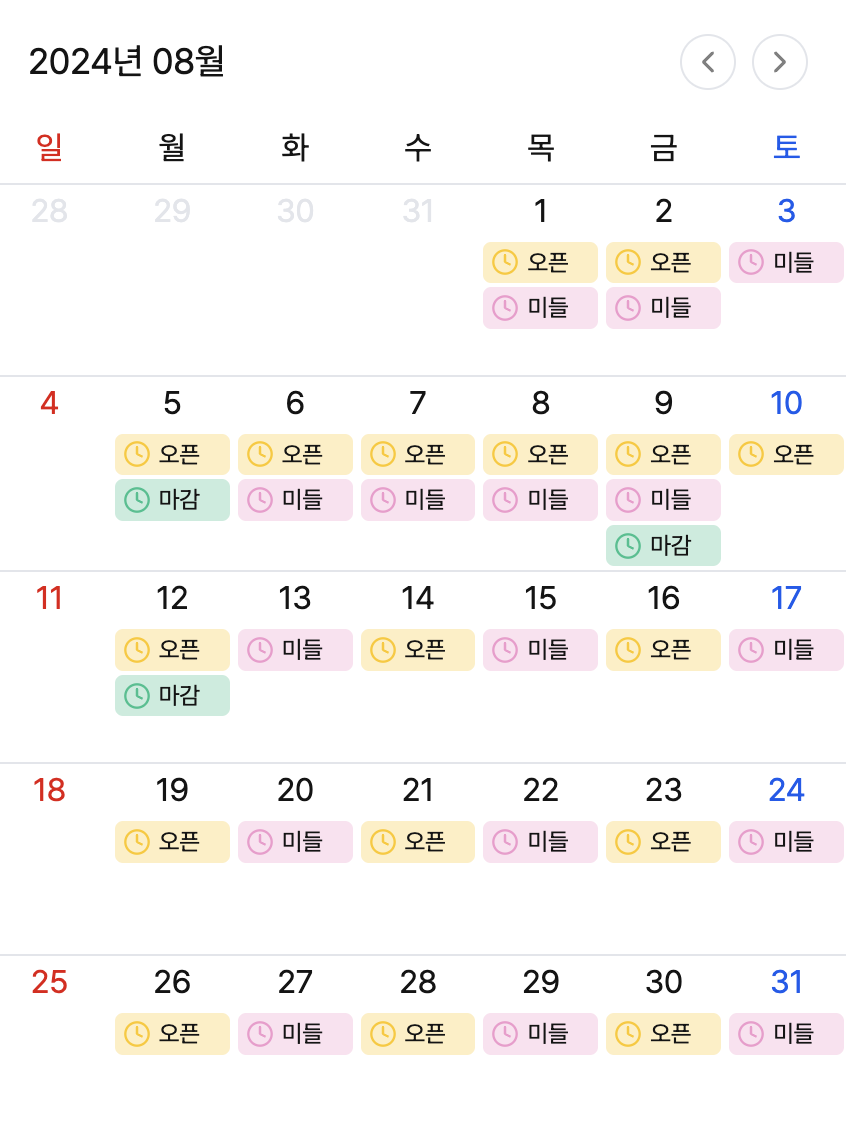
이렇게 생긴 캘린더 컴포넌트를 만들어 보려고한다.
깃허브에서 코드 보기
사용기술
1. React
2. Typescript
3. emotion styled component
4. firebase
주요기능
1. 년/월 넘기는 화살표 버튼
2. 월 랜더링
3. 이전 월 마지막날들, 다음월 처음날들 회색처리
4. 토요일,일요일 구분
1. Calendar
isOfficial은 개인용 달력인지, 공식 달력인지 구분하는 값이다.
개인용은 날짜를 클릭하여 상세페이지로 이동할 수 있지만, 공식은 이동할 수 없다.
nowDate는 현재 날짜를 담는 상태값이다. nowDate를 기반으로 특정 월을 렌더링할 것이다. nowDate를 ControlDate, CalenderContents에 넘겨준다.
import { FC, useState } from 'react';
import { Timestamp } from 'firebase/firestore';
import ControlDate from '@/components/common/Calendar/ControlDate';
import CalenderContents from '@/components/common/Calendar/CalenderContents';
import styled from '@emotion/styled';

export interface ICalendarProps {
	isOfficial: boolean;
}

const Calendar: FC<ICalendarProps> = ({ isOfficial }) => {
	const [nowDate, setNowDate] = useState<Timestamp>(Timestamp.now());

	return (
		<Container>
			<ControlDate nowDate={nowDate} setNowDate={setNowDate} />
			<CalenderContents nowDate={nowDate} isOfficial={isOfficial} />
		</Container>
	);
};

export default Calendar;

const Container = styled.span`
	margin-top: 12px;
	display: flex;
	flex-direction: column;
	gap: 12px;
`;
2. ControlDate

ControlDate라는는 달력의 월 조작 컨트롤을 구현한다. 현재 월을 표시하고, 화살표 버튼을 통해 이전 월과 다음 월로 이동할 수 있다.
- nowDate: 현재 표시 중인 날짜 (Timestamp 객체)
- setNowDate: 날짜를 변경하는 state 설정 함수
- changeMonth: 월을 변경하는 함수. 인자로 받은 숫자만큼 월을 이동 (-1: 이전 월, 1: 다음 월) 참고로 1대신 +1을 넣어도 동작은 같다.
- formatDate: Timestamp 객체를 'YYYY년 MM월' 형식의 문자열로 변환
import { FC } from 'react';
import { Timestamp } from 'firebase/firestore';
import { ChevronLeft, ChevronRight } from 'lucide-react';
import { fontSize } from '@/constants/font';
import styled from '@emotion/styled';
import IconButton from '../Button/IconButton';

export interface IControlDateProps {
	nowDate: Timestamp;
	setNowDate: React.Dispatch<React.SetStateAction<Timestamp>>;
}

const ControlDate: FC<IControlDateProps> = ({ nowDate, setNowDate }) => {
	const changeMonth = (date: number) => {
		const currentDate = nowDate.toDate();
		const newDate = new Date(currentDate.getFullYear(), currentDate.getMonth() + date, 1);
		setNowDate(Timestamp.fromDate(newDate));
	};

	const formatDate = (timestamp: Timestamp) => {
		const date = timestamp.toDate();
		return `${date.getFullYear()}년 ${(date.getMonth() + 1).toString().padStart(2, '0')}월`;
	};

	return (
		<Container>
			<div className="month-txt">{formatDate(nowDate)}</div>
			<ButtonContainer>
				<IconButton
					IconComponent={ChevronLeft}
					shape="line"
					onClick={() => changeMonth(-1)}
				/>
				<IconButton
					IconComponent={ChevronRight}
					shape="line"
					onClick={() => changeMonth(1)}
				/>
			</ButtonContainer>
		</Container>
	);
};

export default ControlDate;

const Container = styled.div`
	display: flex;
	justify-content: space-between;
	align-items: center;
	padding: 0 20px;

	.month-txt {
		font-size: ${fontSize.lg};
	}
`;

const ButtonContainer = styled.div`
	display: flex;
	align-items: center;
	gap: 8px;
`;
3. CalenderContents
CalenderContents는 달력의 전체적인 구조를 담당한다. 요일 헤더(CalendarWeek)와 날짜 셀들(CalendarDates)을 조합하여 완전한 달력 뷰를 생성한다. useSchedules 훅을 통해 가져온 일정 데이터를 각 날짜 셀에 전달하여, 해당 날짜의 일정 정보를 표시할 수 있게 한다.
monthList 유틸리티 함수를 사용하여 달력에 표시할 날짜 배열을 생성한다.
그리드 레이아웃을 사용하여 7일을 한 줄에 표시하는 전형적인 달력 레이아웃을 구현한다.
- date: 현재 날짜 정보 (날짜, 년도, 월)
- calendarDates: 달력에 표시할 날짜들의 배열 (Timestamp[])
- useSchedules: 현재 년도와 월에 해당하는 일정을 가져오는 훅
- useEffect: nowDate가 변경될 때마다 실행. 현재 날짜 정보 업데이트. monthList 함수를 사용하여 달력에 표시할 날짜들 계산
calendarDates 배열을 순회하며 각 날짜에 대한 CalendarDates 컴포넌트를 생성한다.
import { FC, useEffect, useState } from 'react';
import { Timestamp } from 'firebase/firestore';
import CalendarWeek from '@/components/common/Calendar/CalendarWeek';
import CalendarDates from '@/components/common/Calendar/CalendarDates';
import { monthList } from '@/utils/dateUtils';
import styled from '@emotion/styled';
import useSchedules from '@/hooks/useSchedules';

export interface ICalenderDateProps {
	nowDate: Timestamp;
	isOfficial: boolean;
}

interface IDateStateProps {
	date: Date;
	year: number;
	month: number;
}

const CalenderContents: FC<ICalenderDateProps> = ({ nowDate, isOfficial }) => {
	const [date, setDate] = useState<IDateStateProps>({} as IDateStateProps);
	const [calendarDates, setCalendarDates] = useState<Timestamp[]>([]);
	const schedules = useSchedules(date.year, date.month + 1, isOfficial);

	useEffect(() => {
		const currentDate = nowDate.toDate();
		setDate({
			date: currentDate,
			year: currentDate.getFullYear(),
			month: currentDate.getMonth(),
		});
		setCalendarDates(monthList(nowDate));
	}, [nowDate]);

	return (
		<div>
			<CalendarWeek />
			<CalendarDatesWrap>
				{calendarDates.map((day: Timestamp) => (
					<CalendarDates
						key={day.toMillis().toString()}
						date={day}
						currentYear={date.year}
						currentMonth={date.month}
						isOfficial={isOfficial}
						schedules={schedules}
					/>
				))}
			</CalendarDatesWrap>
		</div>
	);
};

export default CalenderContents;

const CalendarDatesWrap = styled.div`
	display: grid;
	grid-template-columns: repeat(7, 1fr);
	text-align: center;
`;
monthList(utils)
monthList는 주어진 날짜(nowDate)를 기준으로 달력에 표시될 전체 날짜 배열을 생성하는 함수들의 집합이다.
1) getDaysInMonth(year, month)
주어진 년도와 월의 총 일수를 반환한다.
다음 달의 0일(이전 달의 마지막 날)을 이용해 계산한다.
2) getFirstDayOfMonth(year, month)
주어진 월의 1일이 무슨 요일인지 반환한다 (0: 일요일, 6: 토요일).
3) getLastDayOfMonth(year, month)
주어진 월의 마지막 날이 무슨 요일인지 반환한다.
4) generateDateArray(start, end, year, month)
주어진 범위의 날짜들을 Timestamp 배열로 생성한다.
5) monthList(nowDate)
달력에 표시될 전체 날짜 배열을 생성한다.
5-1) 현재 월의 첫 날과 마지막 날의 요일을 구한다.
5-2) 이전 달, 현재 달, 다음 달에서 필요한 날짜 수를 계산한다.
5-3) 각 부분(이전 달, 현재 달, 다음 달)의 날짜 배열을 생성한다.
5-4) 모든 날짜 배열을 합쳐 반환한다.
monthList는 항상 42개의 날짜(6주)를 반환하여 일정한 크기의 달력을 구성한다. 현재 월의 날짜뿐만 아니라, 이전 달의 마지막 몇 일과 다음 달의 처음 몇 일도 포함한 달력 뷰를 제공한다.
const getDaysInMonth = (year: number, month: number): number => {
	return new Date(year, month + 1, 0).getDate();
};

const getFirstDayOfMonth = (year: number, month: number): number => {
	return new Date(year, month, 1).getDay();
};

const getLastDayOfMonth = (year: number, month: number): number => {
	return new Date(year, month + 1, 0).getDay();
};

const generateDateArray = (
	start: number,
	end: number,
	year: number,
	month: number,
): Timestamp[] => {
	return Array.from({ length: end - start + 1 }, (_, index) =>
		Timestamp.fromDate(new Date(year, month, start + index)),
	);
};

export const monthList = (nowDate: Timestamp): Timestamp[] => {
	const date = nowDate.toDate();
	const nowYear = date.getFullYear();
	const nowMonth = date.getMonth();

	const firstDayOfMonth = getFirstDayOfMonth(nowYear, nowMonth);
	const lastDayOfMonth = getLastDayOfMonth(nowYear, nowMonth);

	const prevMonthDays = firstDayOfMonth;
	const currentMonthDays = getDaysInMonth(nowYear, nowMonth);
	const nextMonthDays = 6 - lastDayOfMonth;

	const prevMonthEndDate = getDaysInMonth(nowYear, nowMonth - 1);

	const prevMonthDates = generateDateArray(
		prevMonthEndDate - prevMonthDays + 1,
		prevMonthEndDate,
		nowYear,
		nowMonth - 1,
	);
	const currentMonthDates = generateDateArray(1, currentMonthDays, nowYear, nowMonth);
	const nextMonthDates = generateDateArray(1, nextMonthDays, nowYear, nowMonth + 1);

	return [...prevMonthDates, ...currentMonthDates, ...nextMonthDates];
};
useSchedules(hooks)
useSchedules은 주어진 연도와 월에 대한 스케줄 데이터를 가져오는 hooks다.
useState를 사용하여 schedules 상태를 관리하며, useEffect를 사용하여 year, month, isOfficial 값이 변경될 때마다 스케줄을 가져오도록 했다.
isOfficial 값에 따라 getOfficialSchedule 또는 getPersonalSchedule API를 호출하고 가져온 데이터의 날짜 형식을 'YYYY-MM-DD' 형식으로 통일한다.
import { useState, useEffect } from 'react';
import getOfficialSchedule from '@/api/schedule/getOfficialSchedule';
import getPersonalSchedule from '@/api/schedule/getPersonalSchedule';

export interface IScheduleProps {
	date: string;
	workingTimes: string[];
}

const useSchedules = (year: number, month: number, isOfficial: boolean): IScheduleProps[] => {
	const [schedules, setSchedules] = useState<IScheduleProps[]>([]);

	useEffect(() => {
		const fetchSchedules = async () => {
			try {
				let fetchedData;

				if (isOfficial) {
					const { officialScheduleData } = await getOfficialSchedule(year, month);
					fetchedData = officialScheduleData;
				} else {
					const { personalScheduleData } = await getPersonalSchedule(year, month);
					fetchedData = personalScheduleData;
				}

				const formattedSchedules = fetchedData.map((schedule) => ({
					...schedule,
					date: `${year}-${month.toString().padStart(2, '0')}-${schedule.date.split('-')[2].padStart(2, '0')}`,
				}));

				setSchedules(formattedSchedules);
			} catch (error) {
				setSchedules([]);
			}
		};

		fetchSchedules();
	}, [year, month, isOfficial]);

	return schedules;
};

export default useSchedules;
4. CalendarWeek

CalendarWeek는 요일을 반환하는 컴포넌트로, 일요일은 빨간색을, 토요일은 파랑색을 반환하도록 했다.
import { colors } from '@/constants/colors';
import styled from '@emotion/styled';
import { FC } from 'react';

const weeks = ['일', '월', '화', '수', '목', '금', '토'];

const CalendarWeek: FC = () => {
	return (
		<Container>
			{weeks.map((weekName) => (
				<span key={weekName}>{weekName}</span>
			))}
		</Container>
	);
};

export default CalendarWeek;

const Container = styled.div`
	display: flex;
	border-bottom: 1px solid ${colors.lightGray};
	padding: 6px 0;
	text-align: center;

	span {
		flex: 1;
	}
	span:nth-of-type(1) {
		color: ${colors.red};
	}
	span:nth-of-type(7) {
		color: ${colors.blue};
	}
`;
5. CalendarDates
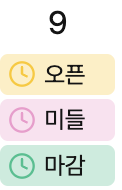
CalendarDates는 달력의 각 날짜 셀을 표현한다.
주요 기능
✅ 날짜 표시 및 스타일링 (주말, 현재 월 여부에 따른 색상 변경)
✅ 해당 날짜의 일정 필터링 및 오픈, 미들, 마감 순 정렬
	useEffect(() => {
		const filtered = schedules
			.filter((schedule) => schedule.date === formattedDate)
			.sort(sortByWorkType)
			.map((schedule) => ({
				...schedule,
				workingTimes: [...schedule.workingTimes].sort((a, b) => {
					const order = ['open', 'middle', 'close'];
					return order.indexOf(a) - order.indexOf(b);
				}),
			}));
		setFilteredSchedules(filtered);
	}, [schedules, formattedDate]);
✅ 개인 일정일 경우 클릭 시 상세 페이지로 이동
const handleDateClick = () => {
		if (isCurrentMonth && !isOfficial) {
			navigate(`/schedule/${formattedDate}`);
		}
	};
전체코드
import { FC, useEffect, useState } from 'react';
import { useNavigate } from 'react-router-dom';
import { Timestamp } from 'firebase/firestore';
import { colors } from '@/constants/colors';
import { formatDate, getDayType, sortByWorkType } from '@/utils/dateUtils';
import { IScheduleProps } from '@/hooks/useSchedules';
import CalendarBadge from '@/components/common/Calendar/CalendarBadge';
import styled from '@emotion/styled';

interface ICalendarDatesProps {
	date: Timestamp;
	isOfficial: boolean;
	schedules: IScheduleProps[];
	currentMonth: number;
	currentYear: number;
}

const CalendarDates: FC<ICalendarDatesProps> = ({
	date,
	isOfficial,
	schedules,
	currentYear,
	currentMonth,
}) => {
	const navigate = useNavigate();
	const [filteredSchedules, setFilteredSchedules] = useState<IScheduleProps[]>([]);
	const [isCurrentMonth, setIsCurrentMonth] = useState(false);
	const formattedDate = formatDate(date, true, 'line');

	const handleDateClick = () => {
		if (isCurrentMonth && !isOfficial) {
			navigate(`/schedule/${formattedDate}`);
		}
	};

	useEffect(() => {
		const filtered = schedules
			.filter((schedule) => schedule.date === formattedDate)
			.sort(sortByWorkType)
			.map((schedule) => ({
				...schedule,
				workingTimes: [...schedule.workingTimes].sort((a, b) => {
					const order = ['open', 'middle', 'close'];
					return order.indexOf(a) - order.indexOf(b);
				}),
			}));
		setFilteredSchedules(filtered);
	}, [schedules, formattedDate]);

	useEffect(() => {
		const cellDate = date.toDate();
		setIsCurrentMonth(
			cellDate.getMonth() === currentMonth && cellDate.getFullYear() === currentYear,
		);
	}, [date, currentMonth, currentYear]);

	return (
		<DatesContainer
			isOfficial={isOfficial}
			clickable={isCurrentMonth && !isOfficial}
			onClick={() => {
				handleDateClick();
			}}
		>
			<DayContainer dayType={getDayType(date)} isCurrentMonth={isCurrentMonth}>
				{date.toDate().getDate()}
			</DayContainer>
			{filteredSchedules.map((data) => (
				<DateListContainer key={data.date}>
					{data.workingTimes.map((workingTime, index) => (
						<CalendarBadge
							key={`${data.date}-${workingTime}-${index}`}
							workingTime={workingTime}
						/>
					))}
				</DateListContainer>
			))}
		</DatesContainer>
	);
};

export default CalendarDates;

const DatesContainer = styled.div<{
	isOfficial: boolean;
	clickable: boolean;
}>`
	display: flex;
	flex-direction: column;
	gap: 4px;
	border-bottom: 1px solid ${colors.lightGray};
	min-height: 96px;
	padding: 2px;

	&:nth-last-of-type(-n + 7) {
		border-bottom: 0;
	}

	cursor: ${({ clickable }) => (clickable ? 'pointer' : 'default')};
	${({ clickable }) =>
		clickable &&
		`
        &:hover {
            background-color: ${colors.lightestGray};
        }
    `}
`;

const DayContainer = styled.span<{
	dayType: 'weekday' | 'saturday' | 'sunday';
	isCurrentMonth: boolean;
}>`
	color: ${({ dayType, isCurrentMonth }) => {
		if (!isCurrentMonth) return colors.lightGray;

		switch (dayType) {
			case 'sunday':
				return colors.red;
			case 'saturday':
				return colors.blue;
			default:
				return colors.black;
		}
	}};
`;

const DateListContainer = styled.ul`
	display: flex;
	flex-direction: column;
	gap: 2px;
`;
dateUtils
1) formatDate 함수
날짜를 특정 형식의 문자열로 변환한다.
- date: Timestamp 객체 또는 날짜 문자열
- useLeadingZeros: 월과 일을 두 자리로 표시할지 여부
- type: 'dot' 또는 'line'으로 구분자 지정
2) getDayType 함수
매개변수에 따라 sunday, saturday, weekday를 반환한다.
3) sortByWorkType 함수
오픈, 미들, 마감순으로 정렬하는 함수
import { Timestamp } from 'firebase/firestore';
import { IScheduleProps } from '@/hooks/useSchedules';
import { ISchedule } from '@/pages/Schedule/ScheduleDetail';

export const formatDate = (date: string | Timestamp, useLeadingZeros: boolean, type: string) => {
	let dateObj: Date;

	if (date instanceof Timestamp) {
		dateObj = date.toDate();
	} else {
		dateObj = new Date(date);
	}

	if (useLeadingZeros) {
		if (type === 'dot') {
			return `${dateObj.getFullYear()}.${(dateObj.getMonth() + 1).toString().padStart(2, '0')}.${dateObj.getDate().toString().padStart(2, '0')}`;
		} else if (type === 'line') {
			return `${dateObj.getFullYear()}-${(dateObj.getMonth() + 1).toString().padStart(2, '0')}-${dateObj.getDate().toString().padStart(2, '0')}`;
		}
	} else {
		if (type === 'dot') {
			return `${dateObj.getFullYear()}.${dateObj.getMonth() + 1}.${dateObj.getDate()}`;
		} else if (type === 'line') {
			return `${dateObj.getFullYear()}-${dateObj.getMonth() + 1}-${dateObj.getDate()}`;
		}
	}
};

export const getDayType = (timestamp: Timestamp): 'weekday' | 'saturday' | 'sunday' => {
	const day = timestamp.toDate().getDay();
	if (day === 0) return 'sunday';
	if (day === 6) return 'saturday';
	return 'weekday';
};

export const sortByWorkType = (
	a: IScheduleProps | ISchedule,
	b: IScheduleProps | ISchedule,
): number => {
	const workTypeOrder = ['open', 'middle', 'close'];
	const aWorkType = 'workingTimes' in a ? a.workingTimes[0] : a.workTime;
	const bWorkType = 'workingTimes' in b ? b.workingTimes[0] : b.workTime;
	return workTypeOrder.indexOf(aWorkType) - workTypeOrder.indexOf(bWorkType);
};
6. CalendarBadge
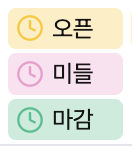
CalendarBadge는 근무 시간 유형(오픈, 미들, 마감)을 시각적으로 표현하는 배지를 생성한다. workingTime을 Props로 받아, 스타일링한다.
import { Clock4 } from 'lucide-react';
import { colors } from '@/constants/colors';
import { badgeColors } from '@/constants/badgeColors';
import { fontSize } from '@/constants/font';
import styled from '@emotion/styled';
import { FC } from 'react';

export interface ICalendarBadgeProps {
	workingTime: string;
}

const CalendarBadge: FC<ICalendarBadgeProps> = ({ workingTime }) => {
	const Badge =
		BadgeContainer[workingTime as keyof typeof BadgeContainer] || BadgeContainer.default;

	const workTypeLabels: { [key: string]: string } = {
		open: '오픈',
		middle: '미들',
		close: '마감',
	};

	return (
		<Badge>
			<Clock4 size={14} />
			{workTypeLabels[workingTime] || workingTime}
		</Badge>
	);
};

export default CalendarBadge;

const BaseBadge = styled.li`
	display: flex;
	align-items: center;
	border-radius: 4px;
	gap: 4px;
	padding: 2px 4px;
	font-size: ${fontSize.xs};
`;

const BadgeContainer = {
	open: styled(BaseBadge)`
		background-color: ${badgeColors.primaryYellow};
		color: ${colors.black};
		svg {
			color: ${colors.primaryYellow};
		}
	`,
	middle: styled(BaseBadge)`
		background-color: ${badgeColors.afternoonPink};
		color: ${colors.black};
		svg {
			color: ${colors.afternoonPink};
		}
	`,
	close: styled(BaseBadge)`
		background-color: ${badgeColors.nightGreen};
		color: ${colors.black};
		svg {
			color: ${colors.nightGreen};
		}
	`,
	default: styled(BaseBadge)`
		background-color: ${colors.veryLightGray};
		color: ${colors.black};
		svg {
			color: ${colors.black};
		}
	`,
};