
Spring DI 따라하기!
1. 변경에 유리한 코드(1) - 다형성
- 기존 코드보다 변경을 줄이기 위해 조상 타입의 참조 변수를 사용한다
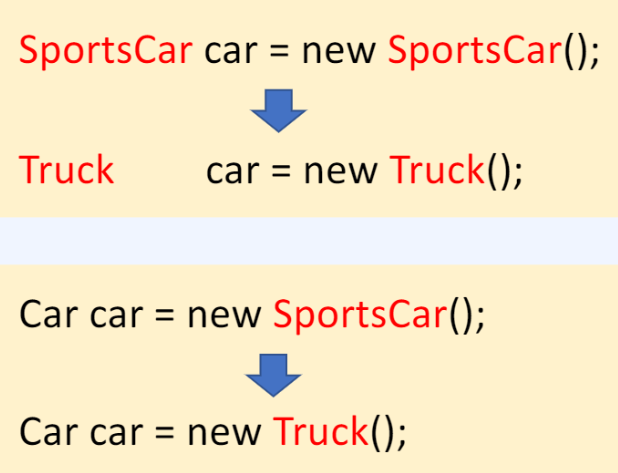
- 별도의 메서드로 객체를 생성하면 기능을 제공하는 쪽이 분리되어 있기 때문에 객체를 호출하는 쪽에서는 변경이 없다
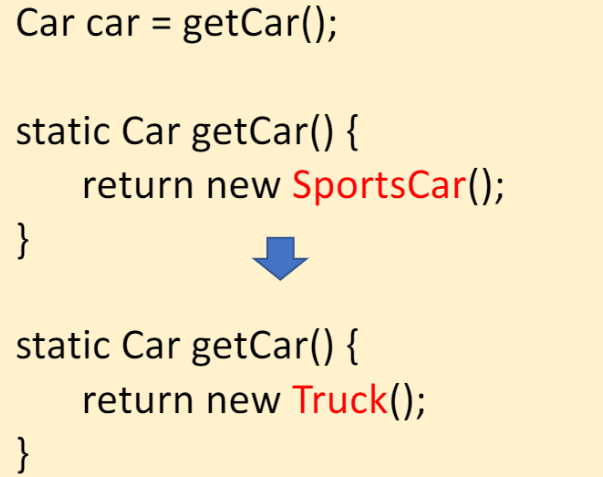
getCar()는 그대로
2. 변경에 유리한 코드(2) - Map과 외부 파일
-
Map이나 외부 파일을 이용한다면, 읽어올 파일에서의 변경이 실행하는 코드에서 나타나지 않기 때문에 변경에 유리하다
-
변하는 것과 변하지 않는 것을 분리함
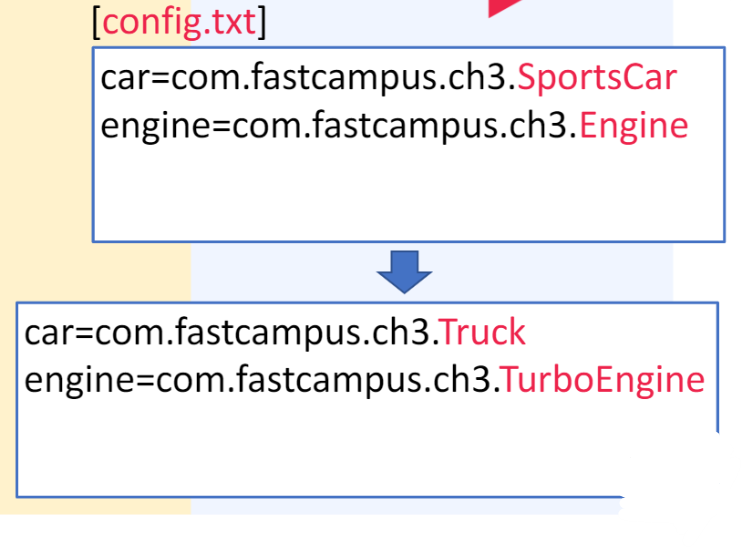
config.txt 파일을 읽어서 객체를 저장하는 코드는 변경되지 않는다
스프링에서는 XML이나 JAVA로 비슷한 설정을 할 수 있다 -
txt 파일에 저장된 값은 key=value 형태
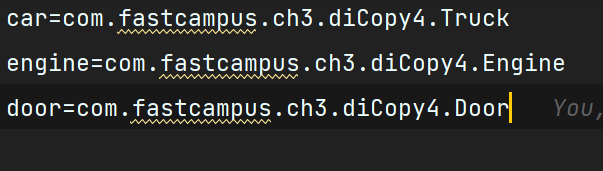
car=com.fastcampus.ch3.diCopy1.SportsCarcar 객체를 이 경로에 있는 SportsCar 클래스 객체로 하겠다는 의미
class Car{} class SportsCar extends Car{} class Truck extends Car {} public class Main1 { public static void main(String[] args) throws Exception { Car car = getCar(); //3. config.txt에서 car로 정의된 key의 value를 읽어와서 반환한다 System.out.println("car = " + car); } static Car getCar() throws Exception{ //Properties는 string-string으로 저장 Properties p = new Properties(); p.load(new FileReader("config.txt")); Class clazz = Class.forName(p.getProperty("car")); //1. p에서 car가 key인 value를 반환하고 //이를 클래스 이름으로 하는 클래스를 반환 //clazz는 사용하고자 하는 클래스가 되는 것 return (Car)clazz.newInstance(); //2. 클래스의 객체를 하나 생성하는 것, Object 형으로 반환되기 때문에 형변환 해야함 } } -
txt 파일에서 여러 객체를 가져오도록 변경
class Car{}
class SportsCar extends Car{}
class Truck extends Car {}
class Engine{} //1. 엔진 클래스 추가
public class Main1 {
   public static void main(String[] args) throws Exception {
       Car car = (Car)getObject("car");
       //3. Object로 반환받기 때문에 메서드를 사용하는 쪽에서 형변환
       Engine engine = (Engine)getObject("engine");
       //4. key에 따라 여러 개의 객체를 불러올 수 있음
       System.out.println("car = " + car);
       System.out.println("engine = " + engine);
   }
   static Object getObject(String key) throws Exception{
   //2. 이제는 car와 engine 둘을 가져와야하기 때문에
   //Object로 반환받는 getObject 메서드 생성
   //key를 매개변수로 입력받아 어떤 클래스를 가져올지 알려줌
       Properties p = new Properties();
       p.load(new FileReader("config.txt"));

       Class clazz = Class.forName(p.getProperty(key));

       return clazz.newInstance();
   }
}
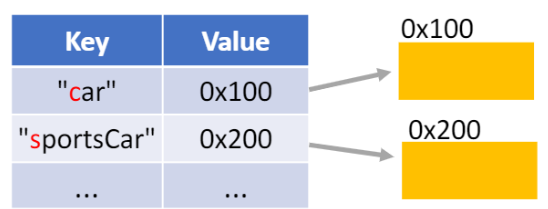
3. 객체 컨테이너 만들기
- 위에서 properties 파일을 만들어 객체를 생성했다
- properties 클래스는 파일을 읽어서 key value를 String, String으로 저장한다
- value에 클래스 등의 것을 저장하기 위해서 Object형을 value로 갖는 Map으로 변환한다
class AppContext{
Map map;//객체 저장소
AppContext() {
map = new HashMap();
try {
Properties p = new Properties();
p.load(new FileReader("config.txt"));
map = new HashMap(p);
//properties에 저장된 내용(String-String)을 map에 저장
for (Object key : map.keySet()){ //map에서 key를 하나씩 가져와서
Class clazz = Class.forName((String)map.get(key));
// key에 해당하는 value를 String으로 꺼내와서 class 객체로 만든다
map.put(key, clazz.newInstance());
// 클래스 객체를 다시 map에 key와 value로 저장한다
// 기존 String이었던 Value가 Class로 바뀜
}
} catch (Exception e) {
throw new RuntimeException(e);
}
}
Object getBean(String key){
return map.get(key); //key에 해당하는 value를 map에서 꺼낸다
}
}
public class Main2 {
public static void main(String[] args) throws Exception {
AppContext ac = new AppContext();
Car car = (Car)ac.getBean("car");
Engine engine = (Engine)ac.getBean("engine");
System.out.println("car = " + car);
System.out.println("engine = " + engine);
}
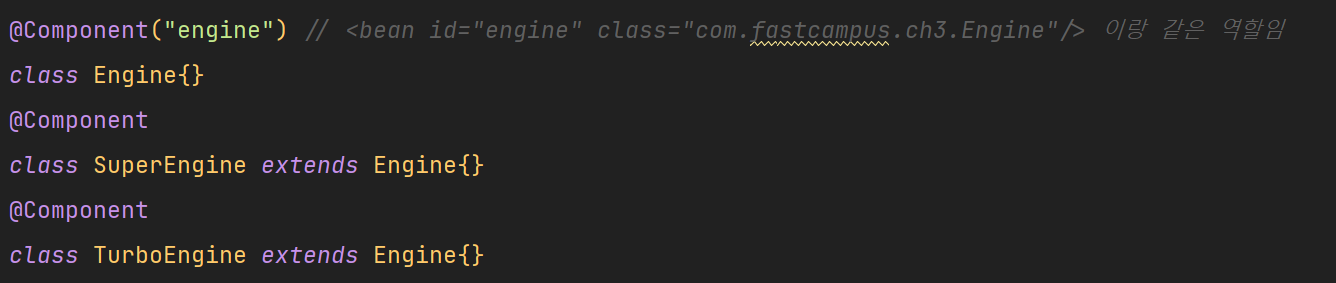
}4. 자동 객체 등록하기 - Component Scanning
-
클래스 앞에 @Component 애너테이션을 붙이고,
아래와 같이 수정하면 해당 클래스에서 애너테이션이 붙은 것들을 자동으로 등록해준다 -
패키지에 있는 모든 클래스를 읽어서 Set에 저장하고
반복문을 돌며 @Component가 붙은 클래스를 찾아서
붙었으면 클래스의 객체를 생성해서 map에 저장하는 과정
-
클래스 이름을 key로 하기 때문에, 클래스 명을 대문자로 시작하는 것에서 소문자로 바꿔서 key로 한다
@Component class Car{}
@Component class SportsCar extends Car{}
@Component class Truck extends Car {}
@Component class Engine{}

class AppContext{
    Map map;//객체 저장소

    AppContext() {
        map = new HashMap();
        doComponentScan();
    }

    private void doComponentScan() {
        try {
            //1. 패키지 내의 클래스 목록을 가져온다
            //2. 반복문으로 클래스를 하나씩 읽어와서 @Component 애너테이션이 붙어있는지 확인
            //3. 붙어있으면 객체를 생성해서 map에 저장

            ClassLoader classLoader = AppContext.class.getClassLoader();
            ClassPath classPath = ClassPath.from(classLoader);

            Set<ClassPath.ClassInfo> set = classPath.getTopLevelClasses("com.fastcampus.ch3.diCopy3");

            for (ClassPath.ClassInfo classInfo : set){
                Class clazz = classInfo.load();
                Component component = (Component) clazz.getAnnotation(Component.class);
                if (component!=null){
                    String id = StringUtils.uncapitalize(classInfo.getSimpleName());
                    map.put(id, clazz.newInstance());
                }
            }
        } catch (Exception e) {
            throw new RuntimeException(e);
        }
    }

    Object getBean(String key){
        return map.get(key);
    }
}

public class Main3 {
    public static void main(String[] args) throws Exception {
        AppContext ac = new AppContext();
        Car car = (Car)ac.getBean("car");
        Engine engine = (Engine)ac.getBean("engine");
        System.out.println("car = " + car);
        System.out.println("engine = " + engine);
    }
}
5. 객체 찾기 - by Name, by Type
- 객체를 찾는 방법은 두 가지다.
- 이름으로 찾을 수 있고, 타입으로 찾을 수 있다
이름으로 객체 찾기 - 기존 방법
	Object getBean(String key){ //이름으로 찾아서 객체 반환
        return map.get(key);
    }

    Car car = (Car)ac.getBean("car");
타입으로 찾기
	Object getBean(Class clazz) { //클래스를 받아서
        for(Object obj : map.values()){ //맵의 값을 읽으면서
            if (clazz.isInstance(obj)) //값이 클래스의 인스턴스면 반환
                return obj;
        }
        return null;
    }

	Car car2 = (Car)ac.getBean(Car.class);
6. 객체 자동 연결 - @Autowired
- by Type!
- 객체 저장소에서 객체를 가져온 후 다른 객체의 요소(인스턴스 변수)로 수동으로 넣어줘야 하는데
car.engine = engine ..
car.door = door .. - @Autowired를 붙이면 객체 저장소에서 value가 같은 타입인 객체를 iv 객체로 자동으로 넣어줌
7. 객체 자동 연결 - @Resource
- by Name!
- @Resource를 붙이면 객체 저장소에서 key가 같은 이름인 객체를 찾아서 연결해줌
- @Resource(name ="") 디폴트로 설정되어 있는 값이 있고 생략됨. 바꾸고 싶다면 설정 가능
객체 자동 연결 실습
- 기존에 수동으로 연결하는 방법
//객체 저장소에서 객체 가져오고
Door door = (Door)ac.getBean(Door.class);
Engine engine = (Engine)ac.getBean("engine");

// 수동으로 객체를 연결
car.engine = engine;
car.door = door;- 자동으로 연결하는 방법 : @Autowired
	private void doAutowired() {
        //map에 저장된 객체의 iv 중에 @Autowired가 붙어있으면
        //map에서 iv 타입에 맞는 객체를 찾아서 연결(객체의 주소를 iv에 저장)

        try {
            for(Object bean : map.values()){ //객체 저장소를 하나씩 살피면서
                for (Field fld : bean.getClass().getDeclaredFields()){ //갖고있는 필드(iv) 중에 @Autowired 붙은게 있는지 확인
                    if (fld.getAnnotation(Autowired.class)!=null) // 애노테이션이 붙어있으면
                        fld.set(bean, getBean(fld.getType())); // 타입으로 객체 찾아서 (getType()) 그 필드에 set하기
                }
            }
        } catch (IllegalAccessException e) {
            throw new RuntimeException(e);
        }
}- 자동으로 연결하는 방법 : @Resource
	private void doResource() {
        //map에 저장된 객체의 iv 중에 @Resource가 붙어있으면
        //map에서 iv 이름에 맞는 객체를 찾아서 연결(객체의 주소를 iv에 저장)

        try {
            for(Object bean : map.values()){ //객체 저장소를 하나씩 살피면서
                for (Field fld : bean.getClass().getDeclaredFields()){ //갖고있는 필드(iv) 중에 @Resource 붙은게 있는지 확인
                    if (fld.getAnnotation(Resource.class)!=null) // 애노테이션이 붙어있으면
                        fld.set(bean, getBean(fld.getName())); // 이름으로 객체 찾아서 (getName()) 그 필드에 set하기
                }
            }
        } catch (IllegalAccessException e) {
            throw new RuntimeException(e);
        }
    }
진짜 Spring DI 사용하기!
config 파일
-
기존에는 config.txt로 사용
-
config.xml로 변경

config.xml에 클래스들 정보를 설정해준 것!
객체 저장소
    ApplicationContext ac = new GenericXmlApplicationContext("config.xml"); //저장소에 맵 형태로 만들어짐

    //그 저장소에서 가져다가 사용 by Name!
    Car car = (Car) ac.getBean("car");

    //타입으로 하고 싶다면
    Car car2 = (Car) ac.getBean(Car.class);

    // 이름과 타입 정보를 동시에 주면 형변환 안해도 된다
    Car car3 = ac.getBean("car", Car.class);

    Engine engine = (Engine) ac.getBean("engine");
    Door door = (Door) ac.getBean("door");
    System.out.println("car = " + car);
    System.out.println("engine = " + engine);
    System.out.println("door = " + door);
bean으로 등록된 객체들은 모두 싱글톤으로 생성되어 관리되지만 getBean할 때마다 새로운 객체가 생성되게 하고 싶다면 config.xml 에서 scope="prototype"을 설정하면 됨
싱글톤은 기본값으로 생략되어있음<bean id="car" class="com.fastcampus.ch3.Car" scope="prototype"/> <bean id="engine" class="com.fastcampus.ch3.Engine" scope="singleton"/>
필드에 값 넣기
수동으로 값 넣기
        car.setColor("red");
        car.setEngine(engine);
        car.setOil(100);
        car.setDoor(new Door[]{ac.getBean("door", Door.class), ac.getBean("door", Door.class)});
config.xml 이용해서 값 넣기1 - property
- setter로 값을 넣기 때문에 setter 구현 필수
    <bean id="car" class="com.fastcampus.ch3.Car">
        <property name="color" value="red"/>
        <property name="oil" value="100"/>
        <property name="engine" value="engine"/>
        <property name="door">
            <array value-type="com.fastcampus.ch3.Door">
                <ref bean="door"/>
                <ref bean="door"/>
            </array>
        </property>
    </bean>
config.xml 이용해서 값 넣기2 - constructor-arg
- constructor로 값을 넣기 때문에 constructor 구현 필수
- 기본 생성자도 꼭 구현해야 한다
	<bean id="car" class="com.fastcampus.ch3.Car">
        <constructor-arg name="color" value="red"/>
        <constructor-arg name="oil" value="100"/>
        <constructor-arg name="engine" value="engine"/>
        <constructor-arg name="door">
            <array value-type="com.fastcampus.ch3.Door">
                <ref bean="door"/>
                <ref bean="door"/>
            </array>
        </constructor-arg>
    </bean>
component-scan 이용해서 빈 등록하기
- 패키지 설정하면 그 안에 있는 클래스들을 bean으로 등록한다
- 이름이 같은 클래스가 여러개라면 충돌이 일어나기 때문에 filter로 scan범위를 제한해준다
		<context:component-scan base-package="com.fastcampus.ch3">
                <context:exclude-filter type="regex" expression="com.fastcampus.ch3.diCopy*.*"/>
</context:component-scan>- 여기까지 하면 빈에 등록된 것이고, iv에 값을 넣는 것은 setter로 해야함
- 객체를 넣는 것은 @Autowired, @Resource 이용하고
값을 넣는 것은 @Value("") 이용하기
    @Value("red") String color;
    @Value("100") int oil;
    @Autowired Engine engine;
    @Autowired Door[] door;
- 만약 상속받은 클래스가 여러개고, 각각이 빈에 등록되어 있으면서 부모 클래스 타입으로 getBean 하면 오류 발생! 이름으로 찾아야함
- @Autowired도 내부적으로 타입으로 찾아서 연결하는 건데 이건 가능하다! 왜?
타입으로 먼저 검색을 하고, 여러개일 경우 이름으로 찾는다! 그래서 오류가 발생하지 않는다- 타입이 여러개인데 이름이 같은 객체가 없을 경우에는 에러 발생!
- @Autowired와 함께 @Qualifier("사용할객체이름")을 명시해줌 (by Type)
- 이는 @Resource(name="사용할객체이름")과 똑같다 (by Name)
이름이 없음면 에러 발생!

안녕하세요. Chat JooPT입니다.