
🧩Component 합성
component 합성은 여러 개의 component를 합쳐서 하나의 component를 만드는 것이다.
React에서는 component 안에도 다른 component를 사용할 수 있기 때문에 복잡한 화면을 여러 개의 component로 나눠서 구현할 수 있다.
function Welcome(props) {
return <h1>Hello, {props.name}</h1>;
}
function App(props) {
return (
<div>
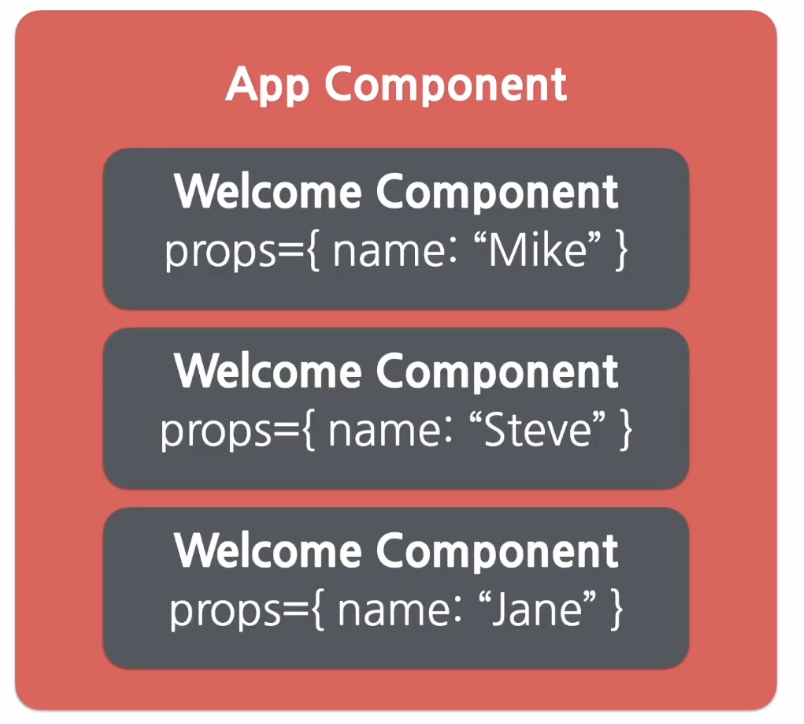
<Welcome name="Mike" />
<Welcome name="Steve" />
<Welcome name="Jane" />
</div>
)
}
ReactDOM.render(
<App />,
document.getElementById('root')
);위의 코드를 보면 props의 값을 다르게 해서 Welcome component를 여러 번 사용하는 것을 볼 수 있다. 이렇게 하면 App이라는 component는 Welcome component 3개를 포함하고 있는 component가 된다.
이렇게 여러 개의 component를 합쳐서 또 다른 component를 만드는 것을 component 합성이라고 한다.
✂️Component 추출
component 추출은 component 합성과 반대로 복잡한 component를 쪼개서 여러 개의 component로 나누는 과정이다. 큰 component에서 일부를 추출해서 새로운 component를 만드는 것이다.
component 추출을 잘 활용하면 component의 재사용성이 올라가게 된다. component가 작아질수록 해당 component의 기능과 목적이 명확해지고 props도 단순해지기 때문에 다른 곳에서 사용할 수 있을 확률이 높아지기 때문이다. 재사용성이 올라감으로써 동시에 개발 속도도 향상된다.
function Comment(props) {
	return (
		<div className="comment">
			<div className="user-info">
				<img className="avatar"
					src={props.author.avatarUrl}
					alt={props.author.name}
				/>
				<div className="user-info-name">
					{props.author.name}
				</div>
			</div>

			<div className="comment-text">
					{props.text}
			</div>

			<div className="comment-date">
					{formatDate(props.date)}
			</div>
		</div>
	);
}
위의 Comment라는 component는 댓글을 표시하기 위한 component로 내부에 작성자의 프로필 이미지와 이름, 댓글 내용과 작성일을 포함하고 있다. 이 component의 props는 아래와 같은 형태일 것이다.
props = {
	author: {
		name: "hjoo830",
		avatarUrl: "https://...",
	},
	text: "댓글",
	date: Date.now(),
}
이제 Comment component에서 하나씩 component 추출을 해보려고 한다.
👤Avatar 추출
Comment component에는 이미지 태그를 사용해 사용자의 프로필 이미지를 표시하고 있다. 이부분을 추출해 Avatar라는 별도의 component로 만들 수 있다.
기존의 author 대신 보편적인 user를 사용하였는데, 보편적인 단어를 사용하는 것은 재사용성 측면을 고려하는 것이다. 다른 곳에서 이 component를 사용할 때도 의미상 큰 차이없이 사용할 수 있게하기 위해서이다.
function Avatar(props) {
	return (
		<img className="avatar"
			src={props.user.avatarUrl}
			alt={props.user.name}
		/>
	);
}
추출한 Avatar component를 실제 Comment component에 적용하면 아래와 같다.
function Comment(props) {
	return (
		<div className="comment">
			<div className="user-info">
				<Avatar user={props.author} />
				<div className="user-info-name">
					{props.author.name}
				</div>
			</div>

			<div className="comment-text">
					{props.text}
			</div>

			<div className="comment-date">
					{formatDate(props.date)}
			</div>
		</div>
	);
}
ℹ️UserInfo 추출
아래 코드는 사용자 정보를 담고 있는 부분을 추출해 UserInfo라는 component로 추출한 것이다. 이전에 추출했던 Avatar component도 여기 함께 추출된 것을 볼 수 있다.
function UserInfo(props) {
	return (
		<div className="user-info">
			<Avatar user={props.user} />
			<div className="user-info-name">
				{props.user.name}
			</div>
		</div>
	);
}
추출한 UserInfo component를 실제 Comment component에 적용하면 아래와 같다. 코드가 처음에 비해 훨씬 더 단순해진 것을 볼 수 있다.
function Comment(props) {
	return (
		<div className="comment">
			<UserInfo user={props.author} />
			<div className="comment-text">
					{props.text}
			</div>
			<div className="comment-date">
					{formatDate(props.date)}
			</div>
		</div>
	);
}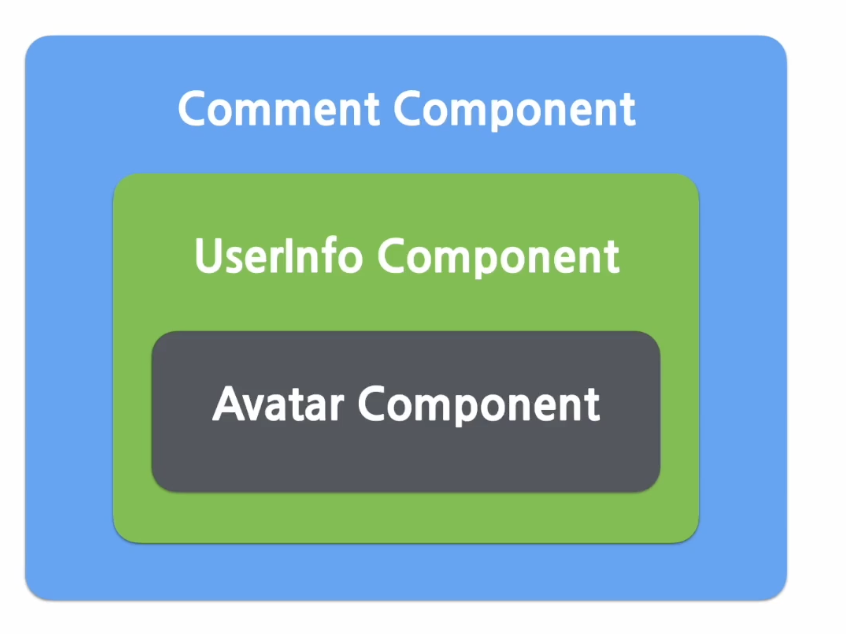
지금까지 추출한 component들의 구조를 그림으로 나타내면 위 그림과 같다. Comment component가 UserInfo component를 포함하고 있고 UserInfo component가 Avatar component를 포함하고 있는 구조이다.
지금까지 추출한 것 외에도 추가적으로 Comment의 글과 작성일 부분도 별도의 component로 추출이 가능하다.