SpringBoot + Next.js 복습
초기 세팅
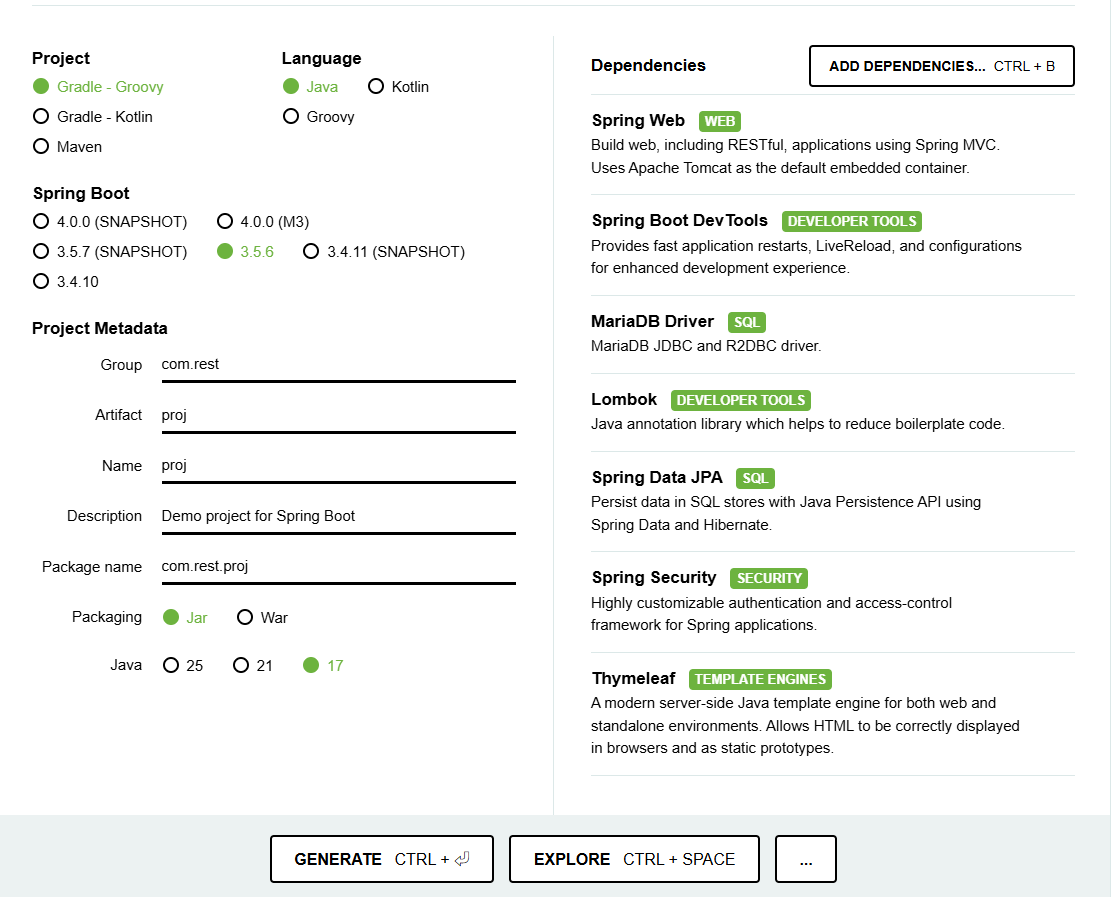
타임리프는 그냥 넣었다.
그리고 settings에서 build검색 -> Gradle 클릭 -> 빌드를 intellij로 바꾸고 jvm을 17버전으로 바꾸자!
다시 settings에서 compiler 검색 -> build project au tomatically 체크.
settings에서 fly 검색 -> optimaize import 어쩌구 체크 -> apply 적용하고나면 대충 끝나지만 마지막으로 sdk확인해보자!
상단 메뉴에서 File클릭 project structure클릭 sdk도 해당 프로젝트와 맞는버전(17버전)으로 바꾸자
깃허브 레파지토리에 업로드 하자
https://github.com/HwangJeongSeong/proj2510
yml 설정
application.properties의 확장자명을 yml로 바꾸자
spring:
  profile:
    active: dev
    include: secret
  jpa:
    hibernate:
      ddl-auto: create
    properties:
      hibernate:
        show_sql: true
        format_sql: true
        use_sql_comments: true
logging:
  level:
    root: INFO
    com:example.sksb: DEBUG
    org.hiernate.prm.jdbc.bind: TRACE
    ort.hibernate.orm.jdbc.extract: TRACE
기본적인 코드는 이렇다.
다음으로 application-dev.yml파일을 만들고
sever:
 port: 8090
spring:
 thymeleaf:
   cache: false
 output:
   ansi:
     enabled: always
   datasource:
     url: jdbc:h2:mem:db_dev;MODE=MYSQL
     username: sa
     password:
     driver-class-name: org.h2.Driver

custom:
 fileDirPath: /usr/file
현재 h2 db를 이용하고, 마리아db는 추후 추가예정이다.
기본 포트번호는 8090이다
custom: fileDirPath는 배포 할때 파일 디렉토리 설정과 파일 저장할때 디렉토리 설정이다
배포할 때 이용할 application-prod.yml은 단순하게
custom:
  fileDirPath: /usr/file
이것만 적고 시작하자.
이건 나중에 배포주소로 바꿀 예정이다.
application-test.yml에는 tdb할때 테스트로 만들어서 쓸건데 일단 만들어두기만 하고 내용은 비워두고 시작하자.
마지막으로 application-secret.yml을 만들어 보자
spring:
  security:
    oauth2:
      client:
        registration:
          kakao:
            clientId: CLIENT_ID
  mail:
    password: NEED_TO_INPUT
custom:
  security:
    oauth2:
      client:
        registration:
          kakao:
            devUser:
              oauthId: oauthId
              nickname: nickname
노출되면 안되는 정보들 위주로 넣어 놨다.
이건 깃허브에 올라가면 위험한 정보들이니 gitignore에
### application-secret
application-secret.yml
추가해서 해당 코드가 커밋할때 저장되지 않게 하자!
그럼 이것 들은 협업할때 형식이 없어 불편할 수 있으니까
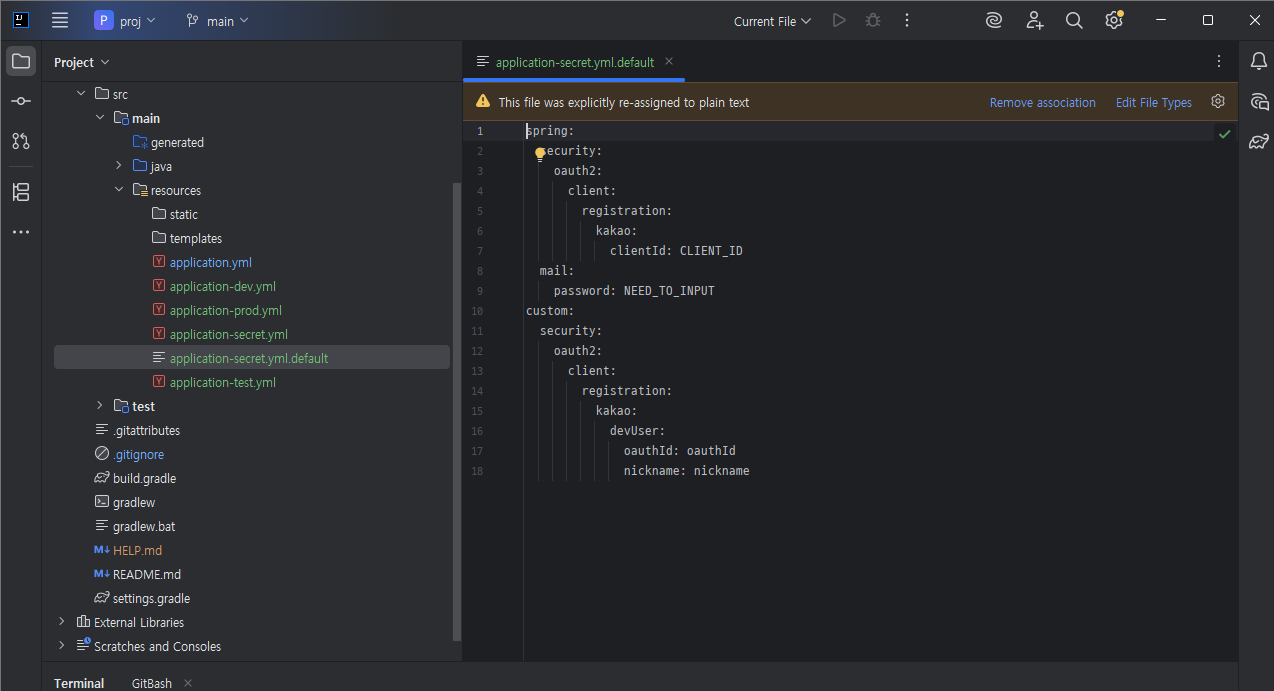
이렇게 디폴트파일을 만들어 형식만 저장하고 다시 클론 받았을때 디폴트 파일을 복사해서 default를 지우고 값을 넣어 시작하자
security 설정
일단 proj 패키지 안에 global과 domain 패키지를 각각 만들어 두자.
그리고 글로벌에 security.SecurityConfig.java 클래스를 만들자!
package com.rest.proj.global.security;

import lombok.RequiredArgsConstructor;
import org.springframework.context.annotation.Bean;
import org.springframework.context.annotation.Configuration;
import org.springframework.security.config.annotation.web.builders.HttpSecurity;
import org.springframework.security.config.annotation.web.configuration.EnableWebSecurity;
import org.springframework.security.web.SecurityFilterChain;
import org.springframework.security.web.header.writers.frameoptions.XFrameOptionsHeaderWriter;
import org.springframework.security.web.util.matcher.AntPathRequestMatcher;

@Configuration
@EnableWebSecurity
@RequiredArgsConstructor
public class SecurityConfig {
    @Bean
    SecurityFilterChain filterChain(HttpSecurity http) throws Exception {
        http
                .authorizeHttpRequests((authorizeHttpRequests) -> authorizeHttpRequests
                        .requestMatchers(new AntPathRequestMatcher("/**")).permitAll())
                .csrf(
                        csrf -> csrf
                                .ignoringRequestMatchers("/h2-console/**")
                )
                .headers(
                        headers -> headers
                                .addHeaderWriter(
                                        new XFrameOptionsHeaderWriter(
                                                XFrameOptionsHeaderWriter.XFrameOptionsMode.SAMEORIGIN
                                        )
                                )
                );
        ;
        return http.build();
    }
}
http 요청에 대한 인가 설정은 일단 모든 경로에 대해permitAll로 모두 허용했다.
기본적인 X-frame공격이나 CSRF공격에 대해 방어하는 코드를 작성했으니 읽어보면서 확인 해보자!
이제 실행해보면 실행이 안된다.
내가 직접 타자로 입력하다 보니 오타가 난거 같고 의존성을 추가 해줘야 할거 같다.
applicaiton-dev에서 sever라고 친거 같은데 server로 수정하고 빌드그래들 디펜던시에서 runtimeOnly 'com.h2database:h2' 을 추가하고 application.yml에서 profile에서 profiles로 수정하자!
Next.js install
React 기반 프레임워크임
일단 frontapp디렉토리를 만들자
터미널에서
mkdir frontapp을 입력하면 기본으로 설정되어 있는 경로가 프로젝트 이기 때문에 프로젝트 폴더 내에 frontapp 폴더를 만들어 준다.
다시
cd .\frontapp\이라고 입력하던가 cd frontapp까지만 입력하고 tab을 누르면 자동완성이 된다.
이 상태에서 code .을 입력해서 vsCode를 열자!
그리고 Ctrl + j를 눌러 터미널 창을 열고 설치를 진행할거다.
이미 나는 nodeJs가 설치 되어 있어 npm을 쓸 수 있지만 설치 안되어 있으면 알아서 설치해서 써라
이제 터미널에서 NextJs를 설치 해보자
npx create-next-app@latest .을 입력하면 되는데 마지막에 .은 안붙이면 알아서 디렉토리 설정을 해야되니까 현재 있는 해당 디렉토리에 설치를 하고싶으면 그냥 .을 붙이고 입력하자.
그러면 타입스크립트 뭐 어쩌구 lint뭐 어쩌구 있으면 그냥 웬만하면 기본설정대로 가고 lint하고 formatter 같이 쓰면 문법교정이 편하니까 쓰는 방향으로 가자!