
프론트엔드 서버를 배포하기 위해서 어떤식으로 구성하였는지 설명하고자 한다.
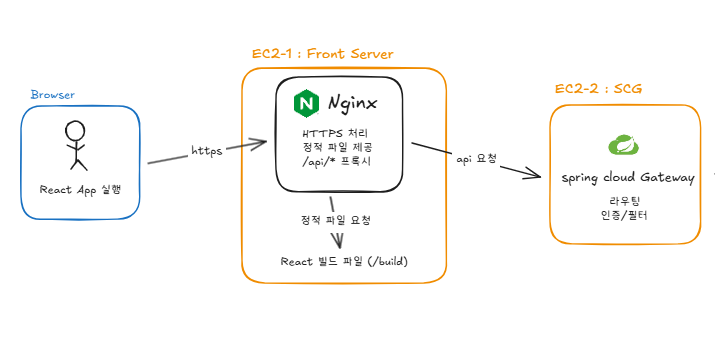
아키텍처의 일부분인데 여기서 Front Server를 구축하려고 한다.
Nginx는 도커를 이용해서 띄울 것이고, React 빌드 파일을 통해서 정적 파일을 가져오려고 한다.
Multi-stage Build
빌드된 정적 파일을 Nignx로 서빙
Dockerfile
# ============================================
# Build Stage
# ============================================
# Node.js 20 alpine 이미지를 빌드 스테이지로 사용
FROM node:20-alpine AS build

# 작업 디렉토리 설정
WORKDIR /app

# package.json과 package-lock.json을 먼저 복사 (캐시 최적화)
COPY package*.json ./

# 의존성 설치 (ci는 clean install로 package-lock.json 기준으로 정확히 설치)
RUN npm ci

# 소스 코드 전체 복사
COPY . .

# 프로덕션 빌드 실행 (dist 폴더에 생성됨)
RUN npm run build

# ============================================
# Production Stage
# ============================================
# 경량화된 Nginx alpine 이미지 사용
FROM nginx:alpine

# 빌드 스테이지에서 생성된 dist 폴더를 Nginx 서빙 디렉토리로 복사
COPY --from=build /app/dist /usr/share/nginx/html

# 커스텀 Nginx 설정 복사
COPY nginx.conf /etc/nginx/conf.d/default.conf

# HTTP 포트 노출
EXPOSE 80

# Nginx를 foreground 모드로 실행
CMD ["nginx", "-g", "daemon off;"]
nginx.conf
server {
    # HTTP 포트 80에서 수신
    listen 80;

    # 서버 이름 (필요시 수정)
    server_name www.corazyarcade.site corazyarcade.site;

    # 루트 디렉토리 설정
    root /usr/share/nginx/html;

    # 기본 인덱스 파일
    index index.html;

    # Gzip 압축 설정 (성능 최적화)
    gzip on;
    gzip_vary on;
    gzip_min_length 1024;
    gzip_types text/plain text/css text/xml text/javascript application/x-javascript application/xml+rss application/javascript application/json;

    # SPA를 위한 라우팅 설정
    # 모든 요청을 index.html로 리다이렉트 (React Router 지원)
    location / {
        try_files $uri $uri/ /index.html;
    }

    # 정적 파일 캐싱 설정
    location ~* \.(js|css|png|jpg|jpeg|gif|ico|svg|woff|woff2|ttf|eot)$ {
        expires 1y;
        add_header Cache-Control "public, immutable";
    }

    # HTML 파일은 캐시하지 않음 (항상 최신 버전 제공)
    location ~* \.html$ {
        expires 0;
        add_header Cache-Control "no-cache, no-store, must-revalidate";
    }

    # 에러 페이지 설정
    error_page 404 /index.html;

    # 서버 정보 숨김 (보안)
    server_tokens off;
}
정적 파일을 캐싱하지 않아서 항상 최신 버전을 보여주도록 하였고,
특정 도메인 명시를 통해서 보안을 향상하였습니다.
또한, Gzip 압축을 통해 성능 최적화를 해서 전송 속도를 향상하였습니다.
이 파일은 SSL 인증서 발급 전 동작 확인을 위한 HTTP 접속 테스트용 conf이다.
그렇게 이제 찐 nginx.conf (SSL)을 설정하자면
nignx-ssl.conf
# HTTP - HTTPS 리다이렉트
server {
    listen 80;
    listen [::]:80;
    server_name corazyarcade.site www.corazyarcade.site;

    # Let's Encrypt 인증용 (갱신 시 필요)
    location /.well-known/acme-challenge/ {
        root /usr/share/nginx/html;
    }

    # HTTPS로 리다이렉트
    location / {
        return 301 https://$host$request_uri;
    }
}

# HTTPS - 실제 서비스
server {
    listen 443 ssl http2;
    listen [::]:443 ssl http2;
    server_name corazyarcade.site www.corazyarcade.site;

    # SSL 인증서
    ssl_certificate /etc/letsencrypt/live/corazyarcade.site/fullchain.pem;
    ssl_certificate_key /etc/letsencrypt/live/corazyarcade.site/privkey.pem;

    # SSL 설정 강화
    ssl_protocols TLSv1.2 TLSv1.3;
    ssl_prefer_server_ciphers off;
    ssl_ciphers ECDHE-ECDSA-AES128-GCM-SHA256:ECDHE-RSA-AES128-GCM-SHA256:ECDHE-ECDSA-AES256-GCM-SHA384:ECDHE-RSA-AES256-GCM-SHA384;
    ssl_session_cache shared:SSL:10m;
    ssl_session_timeout 10m;

    # HSTS (HTTPS 강제)
    add_header Strict-Transport-Security "max-age=31536000; includeSubDomains" always;

    # 보안 헤더
    add_header X-Frame-Options "SAMEORIGIN" always;
    add_header X-Content-Type-Options "nosniff" always;
    add_header X-XSS-Protection "1; mode=block" always;
    add_header Referrer-Policy "no-referrer-when-downgrade" always;

    # 서버 정보 숨김
    server_tokens off;

    root /usr/share/nginx/html;
    index index.html;

    # Gzip 압축
    gzip on;
    gzip_vary on;
    gzip_min_length 1024;
    gzip_types text/plain text/css text/xml text/javascript
               application/x-javascript application/xml+rss
               application/javascript application/json;

    # 정적 파일 캐싱
    location ~* \.(js|css|png|jpg|jpeg|gif|ico|svg|woff|woff2|ttf|eot)$ {
        expires 1y;
        add_header Cache-Control "public, immutable";
        access_log off;
    }

    # HTML 파일은 캐시하지 않음
    location ~* \.html$ {
        add_header Cache-Control "no-store, no-cache, must-revalidate";
        add_header Pragma "no-cache";
        expires 0;
    }

    # SPA 라우팅
    location / {
        try_files $uri $uri/ /index.html;
    }

    error_page 404 /index.html;
}
HTTP 요청을 HTTPS 로 리다이렉트 시켜주면서 모든 통신을 암호화된 보안 연결로 강제하였다.
그렇게 Let's Encrypt에서 발급받은 SSL/TLS 인증서를 적용하여 HTTPS 보안 연결을 구축하였다.
1단계와 비슷하게 Gzip 압축을 통해 성능 향상, 캐싱 설정을 통해 진행하였다.
이제 SSL 인증서를 마운트 하여 Docker 빌드파일을 실행하게 되면 완료된다!
그래서 명령어가 귀찮아져서 docker-compose 파일까지 만들었다.
docker-compose.yml
version: '3.8'

services:
  frontend:
    image: corazyarcade-frontend
    build: .
    container_name: corazyarcade-frontend
    restart: unless-stopped
    ports:
      - "80:80"
      - "443:443"
    volumes:
      - /etc/letsencrypt:/etc/letsencrypt:ro

기록하고 공유하는 개발자