
지난 시간부터 MVC2 패턴을 이용해서 게시판을 만들고 있는 중이다.
사실 프레임워크만 있으면 훨씬 편하게 만들 수 있지만, 서블릿이랑 JSP가지고 만들려니까 아주 죽을 맛이다.
그렇지만 프레임워크는 공장이고..전반적인 설계를 직접 해볼 수 있다는 것은 매우 좋은 경험이라고 생각한다. 그럼 오늘은 게시글 수정과 조회수 기능을 구현해보자.
글 수정 기능
[ 구현 과정 ]
1) article.jsp의 수정 버튼을 누르면, 글 번호를 URL에 넣어 요청한다.
( 글을 출력하면서 session에 글 번호를 저장해둔 상태 )
<button id="update">수정하기</button>

<script>
	$("#update").on("click", function(){
		location.href="update.board";
	});
</script>
2) 컨트롤러는 DB에서 글 번호와 일치하는 데이터를 DB에 뽑아 Request에 담는다.
if if (uri.equals("/update.board")) {
	int seq = (int)request.getSession().getAttribute("seq");
	BoardDTO dto = bDAO.selectArticle(seq);
	}
3) 담은 내용을 update.jsp(view)로 넘겨준다.
request.setAttribute("dto", dto);
request.getRequestDispatcher("/board/update.jsp").forward(request, response);
4) update.jsp는 전달받은 값을 바탕으로, 수정 양식을 출력한다.
<form action="/updateArticle.board" method="post">
	<table border=1 align=center>
		<tr>
			<td align=center width=5% id="seq">${dto.seq}</td>
		</tr>

		<tr>
			<input type="text" placeholder="변경할 제목을 입력하세요"  name="title">
		</tr>

		<tr>
			<textarea placeholder="변경할 내용을 입력하세요." name="article"></textarea>
		</tr>

		<tr>
			<button> 수정 완료 </button>
			<button id="back" type=button> 수정 취소 </button>
		</tr>
	</table>
</form>

<script>
	$("#back").on("click", function(){
		location.href="/articleView.board?seq="+$("#seq").text();
	});
</script>
5) 입력된 데이터(제목, 글 내용)을 form으로 컨트롤러로 넘긴다.
6) 컨트롤러는 요청에 담긴 값을 꺼낸다.
if (uri.equals("/updateArticle.board")) {
	request.setCharacterEncoding("utf-8");
	int seq = (int)request.getSession().getAttribute("seq");

	String title = request.getParameter("title");
	String article = request.getParameter("article");

	int result = bDAO.updateArticle(seq, title, article);
	}
7) 해당 값을 DAO에 넣은 뒤, 쿼리문을 생성하여 DB에 반영한다.
public int updateArticle(int seq, String title, String article) throws Exception {

		String sql = "update board set title=?, content=?, write_date=sysdate where seq=?";

		try(
				Connection con = this.getConnection();
				PreparedStatement pstat = con.prepareStatement(sql);
				){
			pstat.setString(1, title);
			pstat.setString(2, article);
			pstat.setInt(3, seq);

			int result = pstat.executeUpdate();
			con.commit();
			return result;
		}
	}
8) 글 번호를 URL에 연결하여, article.jsp 요청으로 응답한다.
request.getRequestDispatcher("/board/update.jsp").forward(request, response);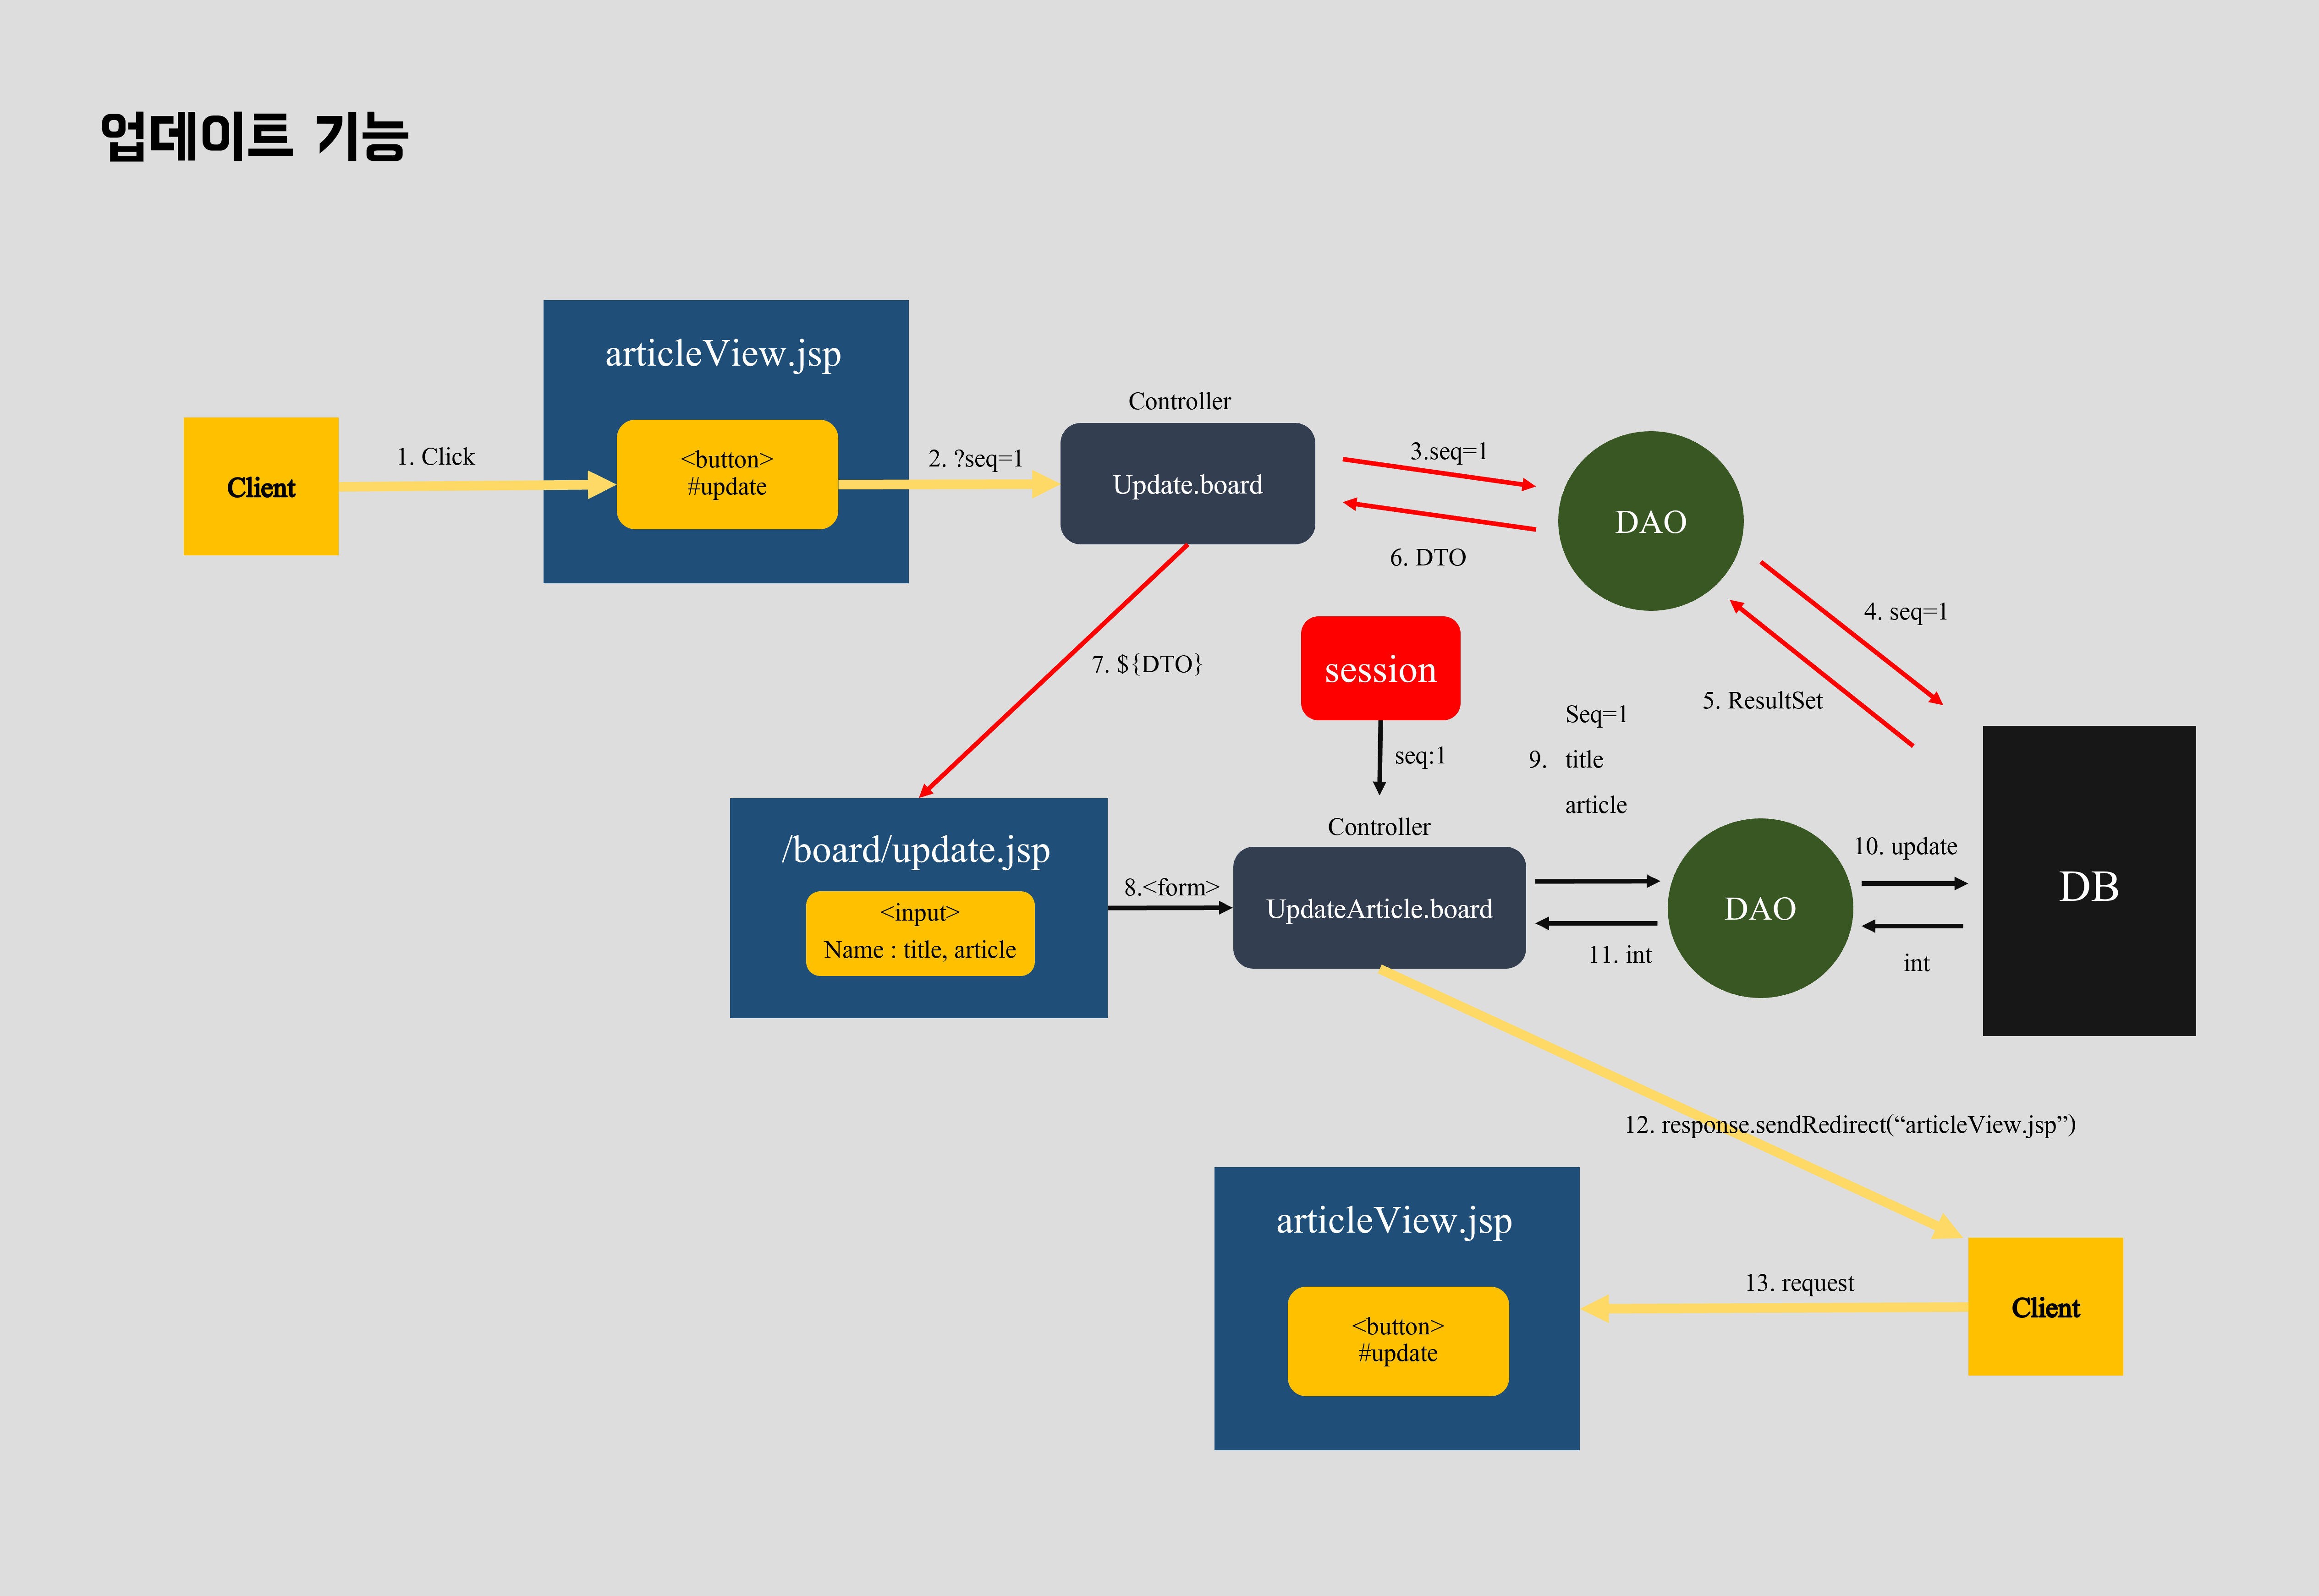
< 생각해볼 점 >
- 위 과정에서 굳이 수정 양식으로 넘어가지 않아도 된다.
<input type=“hidden>와contenteditable속성 + 제이쿼리 동적 바인딩으로 사용하면 된다.
조회수 기능
조회수 기능은 따로 서블릿이 필요없다. 게시글 출력 타이밍에 DAO로 테이블 내의 view_count 컬럼의 값을 올려주면 된다. 이를 위해서 다음 두 개의 포인트만 잡으면 된다.
1) DB 내의 조회수 값을 꺼낸다.
2) 꺼낸 조회수 값을 증가시킨 뒤, 다시 DB에 넣는다.
[ 구현 과정 ]
1) 조회수를 증가시키는 DAO 메서드를 만든다.
- 메서드 로직 : 글 출력 → view_count++; → 쿼리 입력
public int plusCount(int viewCount, int seq, boolean check) throws Exception {

		viewCount++;

		String sql = "update board set view_count=? where seq=?";
		// check : 작성자와 보는 사람이 일치하는지.
		if(!check) {
			try(
					Connection con = this.getConnection();
					PreparedStatement pstat = con.prepareStatement(sql);
					){
				pstat.setInt(1, viewCount);
				pstat.setInt(2, seq);


				int result = pstat.executeUpdate();

				con.commit();

				return result;
			}
		// 본인의 글을 조회할 경우, 조회수에 카운팅하지 않는다.
		} else {
			return 0;
		}
	}
2) 글 출력 시, DB에 쿼리를 날려 조회수(view_count)를 올려준다.
int viewCount = bDAO.viewCount(seq);
int result =bDAO.plusCount(viewCount, seq, check);
3) DB에 적용되면, int를 반환한다.
< 생각해볼 점 >
- 굳이 DB로부터 먼저 조회수를 뽑아올 필요가 없다.
- 쿼리문에서도 조회수를 자체적으로 올릴 수 있다.
update board set view_count=view_count+1 where seq=?