
위 글은 김성박선생님의 자바 강의를 바탕으로 쓰여졌습니다.
더 자세한 내용은 아래 링크를 통해 알아보실 수 있습니다.
IOExam 작성 예시
try(
            // IO인스턴스를 생성 - 자동으로 close
        ){
            // 원하는 입출력 작업을 수행한다.
        }catch(Exception ioe){
            // Exception처리를 한다.
            System.out.println(ioe);
        }
InputStream과 OutputStream을 이용해 IOExam 클래스 작성하기
InputStream(또는 Reader)
OutputStream(또는 Writer)
1byte 단위로 읽어들여서 1byte단위로 쓴다.
public class JavaIOExam03{
	public static void main(String[] args){

        // 1byte(또는 1char) 단위로 읽어들여서, 1byte(또는 char)단위로 쓴다.
        // InputStream의 자식, OutputStream의 자식을 이용해서, 어디에서 읽을 것인지, 어디에 쓸 것인지를 결정한다.
        try(
        	InputStream in = new FileInputStream("C:\\Users\\handa\\Desktop\\file\\example.txt");
            OutputStream out = System.out;
       ){
        byte[] buf = new byte[512]; // 512개를 담을 수 있는 배열
        int readCount = 0;

        while((readCount = in.read(buf) != -1){
        	System.out.println("readCount : "+ readCount);
            out.write(buf,0,readCount);
        }
        }catch(Exception ioe){
        	System.out.println(ioe);
        }
    }
}
코드를 분석 해보자.
이 글 처음에 작성되어있는 형식을 다시 보도록 하자.
try(
	Io인스턴스 생성 - 자동으로 close
)
{
	//원하는 입출력 작업을 수행한다.
} catch(Exception ioe){
	System.out.println(ioe);
}
필요한 코드들을 보자
1. try() - ()안에 Io인스턴스를 생성하자. 생성하면 자동으로 close된다.
작성코드
try(
	InputStream in = new File("file경로");
    OutputStream out = System.out;
)
2. try(){ }
원하는 입출력 작업을 수행할 코드를
{ }블럭 안에 작성하자.
{
	byte[] buf = new Byte[512];
    int readCount = 0;
    while((readCount = in.read(buf) != -1){
    	System.out.println("readCount : " + readCount);
        out.write(buf, 0, readCount);
}
byte[] buf = new Byte[512]
- byte 512개를 저장할 수 있는 배열을 만들었다.
int readCount = 0;
- 숫자를 세는 readCount변수를 선언하자
while(readCount = in.read(buf) != -1)
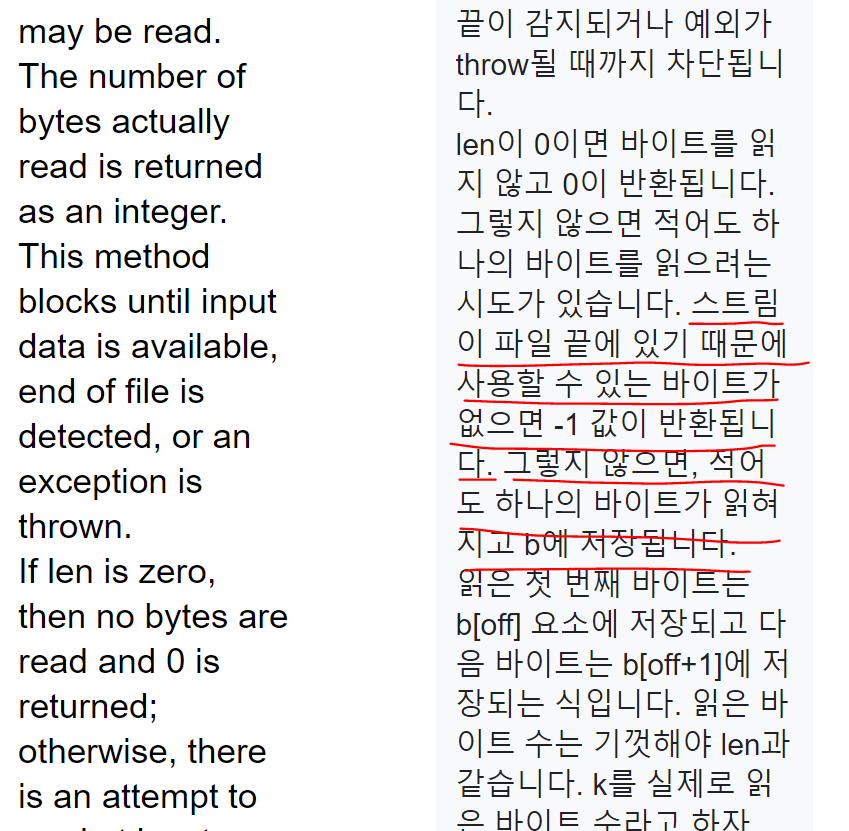
- InputStream의 객체 in을 통해 읽어들인 file을 read메소드를 통해 buf에 담는다.(InputStream의 read메소드는 int형을 반환한다)
- while문을 통해 파일끝에 사용할 수 있는 바이트가 없을때 반환되는 값 -1 되지 않을 때까지 반복한다.
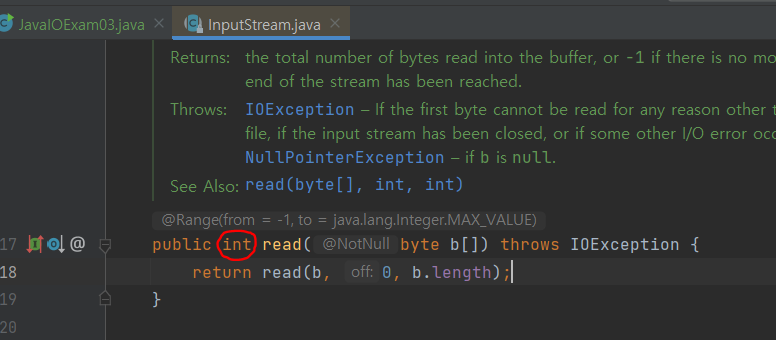
InputStream클래스의 read메소드의 API 및 번역
System.out.println("readCount : " + readCount)
- readCount를 출력한다.
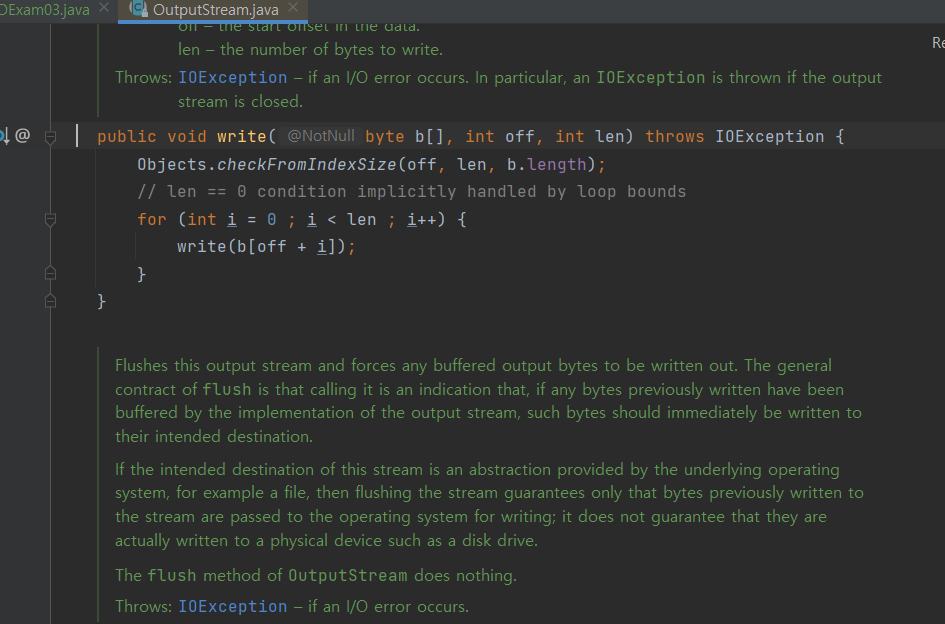
out.write(buf, 0,readCount);
- write(byte b[], int off, int len)
OutputStream의 write메소드를 통해 출력 할 수 있다.
OutputStream 클래스의 write메소드 API
3. catch(){}
catch를 통해 예외 처리를 해주자.
catch(Exception ioe){
	System.out.println(ioe);
}
마지막 단계
- 1,2,3번째 단계의 코드를 합치자
package totojava.com.example;

import java.io.*;

public class JavaIOExam03 {
    public static void main(String[] args){

    try(
    	InputStream in = new InputStream("파일경로");
        OutputStream out = System.out;
    ){
    	byte[] buf = new byte[512]; //512개를 담을 수 있는 배열
        int readCount = 0;

        while((readCount = in.read(buf)) != -1){
        	System.out.println("readCount : " + readCount);
        	out.write(buf, 0, readCount);
        }
    }catch(Exception ioe){
    	System.out.println(ioe);
    	}
    }
}
예제2 파일을 복사 후 다른 파일의 이름으로 만들기
package totojava.com.example;

import java.io.*;

public class JavaIOExam04 {
    public static void main(String[] args) {
        // byte[]단위로 읽어서, byte[]단위로 쓴다.
        // InputStream의 자식, OutputStream자식을 이용해서 어디에서 읽을 것인지, 어디에 쓸 것인지를 결정한다.
        // 어디에 쓸 것인지를 결정한다.
        try(
                InputStream in = new FileInputStream("파일 경로1");
                OutputStream out = new FileOutputStream("파일 경로2");
        ){
            byte[] buf = new byte[512]; //512개를 담을 수 있는 그릇
            int readCount = 0;

            while((readCount = in.read(buf)) != -1){
                System.out.println("readCount :" + readCount);
                out.write(buf,0,readCount);
            }

        } catch (Exception ioe) {
            //Exception 처리를 한다.
            System.out.println(ioe);
        }
    }
}
1번예제와 비교해 보면 try( )의 내용만 달라진 것을 볼 수 가있다.
file을 읽어들이고, 출력하는 것의 형식은 잘 익혀두고 사용하도록 하자.

그래야만 한다