언리얼3인칭 프로젝트 생성
먼저 언리얼3인칭 프로젝트 C++를 생성해줍니다.
GAS프로그래밍은 블루프린트보다 C++위주로 진행할 예정입니다.
모든 생성이 완료되면 프로젝트의 편집(Edit) > 플러그인(Plugins) 창에서 Gameplay Abilities 플러그인을 활성화합니다.
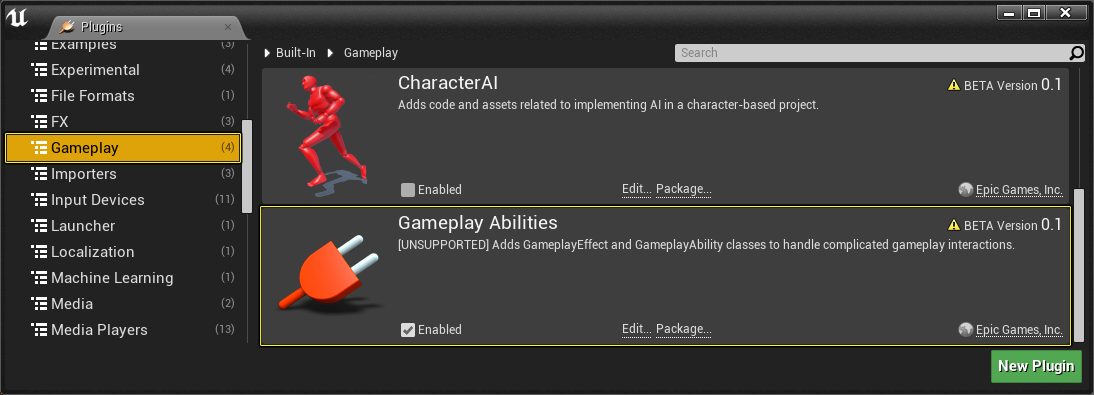
이 부분을 진행해주지 않으면 C++에서 GAS적용 후 실행시 오류가 나면서 꺼지게 됩니다.
그 뒤 프로젝트이름.build.cs파일에서
PublicDependencyModuleNames.AddRange(new string[] { "GameplayAbilities", "GameplayTags", "GameplayTasks", "Core", "CoreUObject", "Engine", "InputCore", "HeadMountedDisplay" });로 "GameplayAbilities", "GameplayTags", "GameplayTasks"를 추가해줍니다.
기본적인 시작을 위한 세팅이 완료되었습니다.
AbilitySystemComponent 생성 및 설정
- AbilitySystemComponent는 액터가 리스폰되고 스폰 사이에 Attribute 또는 GameplayEffect의 지속성이 필요한 경우 Character에 생성하는 것보다 PlayerState에서 생성 후에 사용하는 것이 이상적입니다..
ASoulPlayerState::ASoulPlayerState()
{
	ASComp = CreateDefaultSubobject<UAbilitySystemComponent>(TEXT("ASComp"));
	ASComp->SetIsReplicated(true);

	// GameplayEffect는 소유 클라이언트, GameplayTag와 GameplayCue만 모든 사람에게 Replicate
	ASComp->SetReplicationMode(EGameplayEffectReplicationMode::Mixed);

	// Set PlayerState's NetUpdateFrequency to the same as the Character.
	// Default is very low for PlayerStates ansd introduces perceived lag in the ability system.
	// 100 is probably way too high for a shipping game, you can adjust to fit your needs.
	NetUpdateFrequency = 100.0f;
}
- SetIsReplicated(true)를 통해 네트워크 통신이 가능하도록 설정해줍니다.
- NetUpdateFrequency = 100.0f로 설정해줍니다.ASC가 PlayerState에 있는 경우, PlayerState의 NetUpdateFrequency를 늘려야 합니다. 기본적으로 PlayerState에서 매우 낮은 값으로 설정되어 있어 클라이언트에서 Attribute 그리고 GameplayTag 등의 변경이 일어나기 전에 지연이 발생하거나 지연이 감지될 수 있습니다.
다음으로
void ASoulLikeCharacter::PossessedBy(AController* NewController)
{
	Super::PossessedBy(NewController);
	ASoulPlayerState* PS = GetPlayerState<ASoulPlayerState>();

	if (PS)
	{
		// 서버에서 ASC를 설정합니다. 클라이언트는 OnRep_PlayerState()에서 이 작업을 수행합니다.
        //서버가 없을 경우 PossesBy에서 해도 무관합니다.
		AbilitySystemComponent = Cast<UAbilitySystemComponent>(PS->GetAbilitySystemComponent());

		// AI에는 플레이어 컨트롤러가 없으므로 여기서 다시 초기화할 수 있습니다. 플레이어 컨트롤러가 있는 영웅은 두 번 초기화해도 나쁘지 않습니다.
		PS->GetAbilitySystemComponent()->InitAbilityActorInfo(PS, this);

	}

}
void ASoulLikeCharacter::OnRep_PlayerState()
{
	Super::OnRep_PlayerState();
	ASoulPlayerState* PS = GetPlayerState<ASoulPlayerState>();

	if (PS)
	{
		// 서버에서 ASC를 설정합니다. 클라이언트는 OnRep_PlayerState()에서 이 작업을 수행합니다.
		AbilitySystemComponent = Cast<UAbilitySystemComponent>(PS->GetAbilitySystemComponent());

		// AI에는 플레이어 컨트롤러가 없으므로 여기서 다시 초기화할 수 있습니다. 플레이어 컨트롤러가 있는 영웅은 두 번 초기화해도 나쁘지 않습니다.
		PS->GetAbilitySystemComponent()->InitAbilityActorInfo(PS, this);

	}
}
PossessedBy 및 OnRep_PlayerState 모두 AbilitySystemComponent을 설정하고 InitAbilityActorInfo(AActor InOwnerActor, AActor InAvatarActor)함수를 통해 ASC의 OwnerActor 및 AvatartActor를 초기화 해줍니다.
InitAbilityActorInfo를 자세히 알아보도록 하겠습니다.
void UAbilitySystemComponent::InitAbilityActorInfo(AActor* InOwnerActor, AActor* InAvatarActor)
{
	check(AbilityActorInfo.IsValid());
	bool WasAbilityActorNull = (AbilityActorInfo->AvatarActor == nullptr);
	bool AvatarChanged = (InAvatarActor != AbilityActorInfo->AvatarActor);

	AbilityActorInfo->InitFromActor(InOwnerActor, InAvatarActor, this);

	SetOwnerActor(InOwnerActor);

	// caching the previous value of the actor so we can check against it but then setting the value to the new because it may get used
	const AActor* PrevAvatarActor = GetAvatarActor_Direct();
	SetAvatarActor_Direct(InAvatarActor);

	// if the avatar actor was null but won't be after this, we want to run the deferred gameplaycues that may not have run in NetDeltaSerialize
	// Conversely, if the ability actor was previously null, then the effects would not run in the NetDeltaSerialize. As such we want to run them now.
	if ((WasAbilityActorNull || PrevAvatarActor == nullptr) && InAvatarActor != nullptr)
	{
		HandleDeferredGameplayCues(&ActiveGameplayEffects);
	}

	if (AvatarChanged)
	{
		ABILITYLIST_SCOPE_LOCK();
		for (FGameplayAbilitySpec& Spec : ActivatableAbilities.Items)
		{
			if (Spec.Ability)
			{
				if (Spec.Ability->GetInstancingPolicy() == EGameplayAbilityInstancingPolicy::InstancedPerActor)
				{
					UGameplayAbility* AbilityInstance = Spec.GetPrimaryInstance();
					// If we don't have the ability instance, it was either already destroyed or will get called on creation
					if (AbilityInstance)
					{
						AbilityInstance->OnAvatarSet(AbilityActorInfo.Get(), Spec);
					}
				}
				else
				{
					Spec.Ability->OnAvatarSet(AbilityActorInfo.Get(), Spec);
				}
			}
		}
	}

	if (UGameplayTagReponseTable* TagTable = UAbilitySystemGlobals::Get().GetGameplayTagResponseTable())
	{
		TagTable->RegisterResponseForEvents(this);
	}

	LocalAnimMontageInfo = FGameplayAbilityLocalAnimMontage();
	if (IsOwnerActorAuthoritative())
	{
		SetRepAnimMontageInfo(FGameplayAbilityRepAnimMontage());
	}

	if (bPendingMontageRep)
	{
		OnRep_ReplicatedAnimMontage();
	}
}

bool UAbilitySystemComponent::GetShouldTick() const
{
	const bool bHasReplicatedMontageInfoToUpdate = (IsOwnerActorAuthoritative() && GetRepAnimMontageInfo().IsStopped == false);

	if (bHasReplicatedMontageInfoToUpdate)
	{
		return true;
	}

	bool bResult = Super::GetShouldTick();
	if (bResult == false)
	{
		for (const UAttributeSet* AttributeSet : GetSpawnedAttributes())
		{
			const ITickableAttributeSetInterface* TickableAttributeSet = Cast<const ITickableAttributeSetInterface>(AttributeSet);
			if (TickableAttributeSet && TickableAttributeSet->ShouldTick())
			{
				bResult = true;
				break;
			}
		}
	}

	return bResult;
}
AbilityComponentSystem.h번역본
AbilityActorInfo가 지속적으로 나오는 것을 확인해 볼 수 있는데 AbilityActorInfo의 타입을 확인해보도록 하겠습니다.
TSharedPtr AbilityActorInfo로 정의되어 있으며 /능력이 자주 접근해야 하는 소유 액터에 대한 캐시된 데이터 (이동 컴포넌트, 메쉬 컴포넌트, 애니메이션 인스턴스 등) /라고 주석이 적혀있는 것을 확인할 수 있습니다.
그러면 FGameplayAbilityActorInfo가 무엇으로 구성되어있는지 확인해보도록 하겠습니다.
USTRUCT(BlueprintType)
struct GAMEPLAYABILITIES_API FGameplayAbilityActorInfo
{
	GENERATED_USTRUCT_BODY()

	virtual ~FGameplayAbilityActorInfo() {}

	/** 능력을 소유한 액터, null이 아니어야 합니다. */
	UPROPERTY(BlueprintReadOnly, Category = "ActorInfo")
	TWeakObjectPtr<AActor>	OwnerActor;

	/** 소유자의 물리적 표현, 타겟팅 및 애니메이션에 사용됩니다. 이는 종종 null일 수 있습니다. */
	UPROPERTY(BlueprintReadOnly, Category = "ActorInfo")
	TWeakObjectPtr<AActor>	AvatarActor;

	/** 소유 액터와 연관된 플레이어 컨트롤러. 이는 종종 null일 수 있습니다. */
	UPROPERTY(BlueprintReadOnly, Category = "ActorInfo")
	TWeakObjectPtr<APlayerController>	PlayerController;

	/** 소유 액터와 연관된 능력 시스템 컴포넌트, null이 아니어야 합니다. */
	UPROPERTY(BlueprintReadOnly, Category = "ActorInfo")
	TWeakObjectPtr<UAbilitySystemComponent>	AbilitySystemComponent;

	/** 아바타 액터의 스켈레탈 메시. 종종 null일 수 있습니다. */
	UPROPERTY(BlueprintReadOnly, Category = "ActorInfo")
	TWeakObjectPtr<USkeletalMeshComponent>	SkeletalMeshComponent;

 	/** 아바타 액터의 애니메이션 인스턴스. 종종 null일 수 있습니다. */
	UPROPERTY(BlueprintReadOnly, Category = "ActorInfo")
	TWeakObjectPtr<UAnimInstance>	AnimInstance;

	/** 아바타 액터의 무브먼트 컴포넌트. 종종 null일 수 있습니다. */
	UPROPERTY(BlueprintReadOnly, Category = "ActorInfo")
	TWeakObjectPtr<UMovementComponent>	MovementComponent;

	/** 이 컴포넌트가 몽타주를 재생할 애니메이션 인스턴스를 링크합니다. 주 애니메이션 인스턴스의 경우 NAME_None을 사용합니다. */
	UPROPERTY(BlueprintReadOnly, Category = "ActorInfo")
	FName AffectedAnimInstanceTag;

	/** SkeletalMeshComponent에서 영향을 받는 애니메이션 인스턴스를 가져오는 접근자입니다. */
	UAnimInstance* GetAnimInstance() const;

	/** 이 액터가 로컬에서 제어되는지 여부를 반환합니다. 클라이언트에서 플레이어가 소유한 경우에만 true를 반환합니다(APawn::IsLocallyControlled와 달리 컨트롤러가 필요하지 않습니다). */
	bool IsLocallyControlled() const;

	/** 이 액터가 로컬에서 제어되는 플레이어 컨트롤러를 가지고 있는지 여부를 반환합니다. */
	bool IsLocallyControlledPlayer() const;

	/** 소유한 액터가 네트워크 권한을 가지고 있는지 여부를 반환합니다. */
	bool IsNetAuthority() const;

	/** 소유한 액터로부터 정보를 초기화합니다. 소유자와 아바타를 모두 설정합니다. */
	virtual void InitFromActor(AActor *OwnerActor, AActor *AvatarActor, UAbilitySystemComponent* InAbilitySystemComponent);

	/** 새로운 아바타 액터를 설정하며, 동일한 소유자와 능력 시스템 컴포넌트를 유지합니다. */
	virtual void SetAvatarActor(AActor *AvatarActor);

	/** 모든 액터 정보를 지웁니다. 소유자와 아바타 모두를 제거합니다. */
	virtual void ClearActorInfo();
};
TWeakObjectPtr의 OwnerActor,AvatarActor,PlayerController,AbilitySystemComponent,SkeletalMeshComponent,AnimInstance,
AnimInstance,MovementComponent가 있는 것을 볼 수 있습니다.주석에 보이는 것처럼 자주 보이는 것을 선언해둔 것을 확인해 볼 수 있습니다.이거를 이제 어떻게 사용하는지 차차 알아가보도록 하겠습니다.
TWeakObjectPtr이 궁금하다면?
다시 InitAbilityActorInfo로 돌아와서 SetOwnerActor(InOwnerActor),SetAvatarActor_Direct(InAvatarActor)를 통해 OwnerActor와 AvatarActor를 초기화 해주는 것을 확인할 수 있습니다.
다음으로 HandleDeferredGameplayCues(&ActiveGameplayEffects);함수를 호출하여 지연된 게임 플레이 큐를 처리합니다.
ActiveGameplayEffects의 타입은 FActiveGameplayEffectsContainer 것을 확인해 볼 수 있습니다.
FActiveGameplayEffectsContainer는 현재 활성화 된 모든 GameplayEffect를 포함합니다.(이는 나중에 GameplayEffect를 적용할 때 더 자세히 알아보도록 하겠습니다.)
그 뒤 FGameplayAbilitySpecContainer타입의 ActivatableAbilities를 통해 만약 아바타가 바뀐다면 원래 있던 GameplayAbility에 다시 아바타를 세팅해주는 것을 알 수 있습니다.
TagTable->RegisterResponseForEvents(this)를 통해 테그테이블에 AbilitySystemComponent를 적용하는 것을 알 수 있습니다.
GAS디버그 모드 추가하기
C++ PlayerController를 추가해줍니다.
그 뒤 BeginPlay()에 ConsoleCommand(TEXT("showdebug abilitysystem"));를 추가해줍니다.
 void ASoulPlayerController::BeginPlay()
{
	Super::BeginPlay();
	ConsoleCommand(TEXT("showdebug abilitysystem"));
}
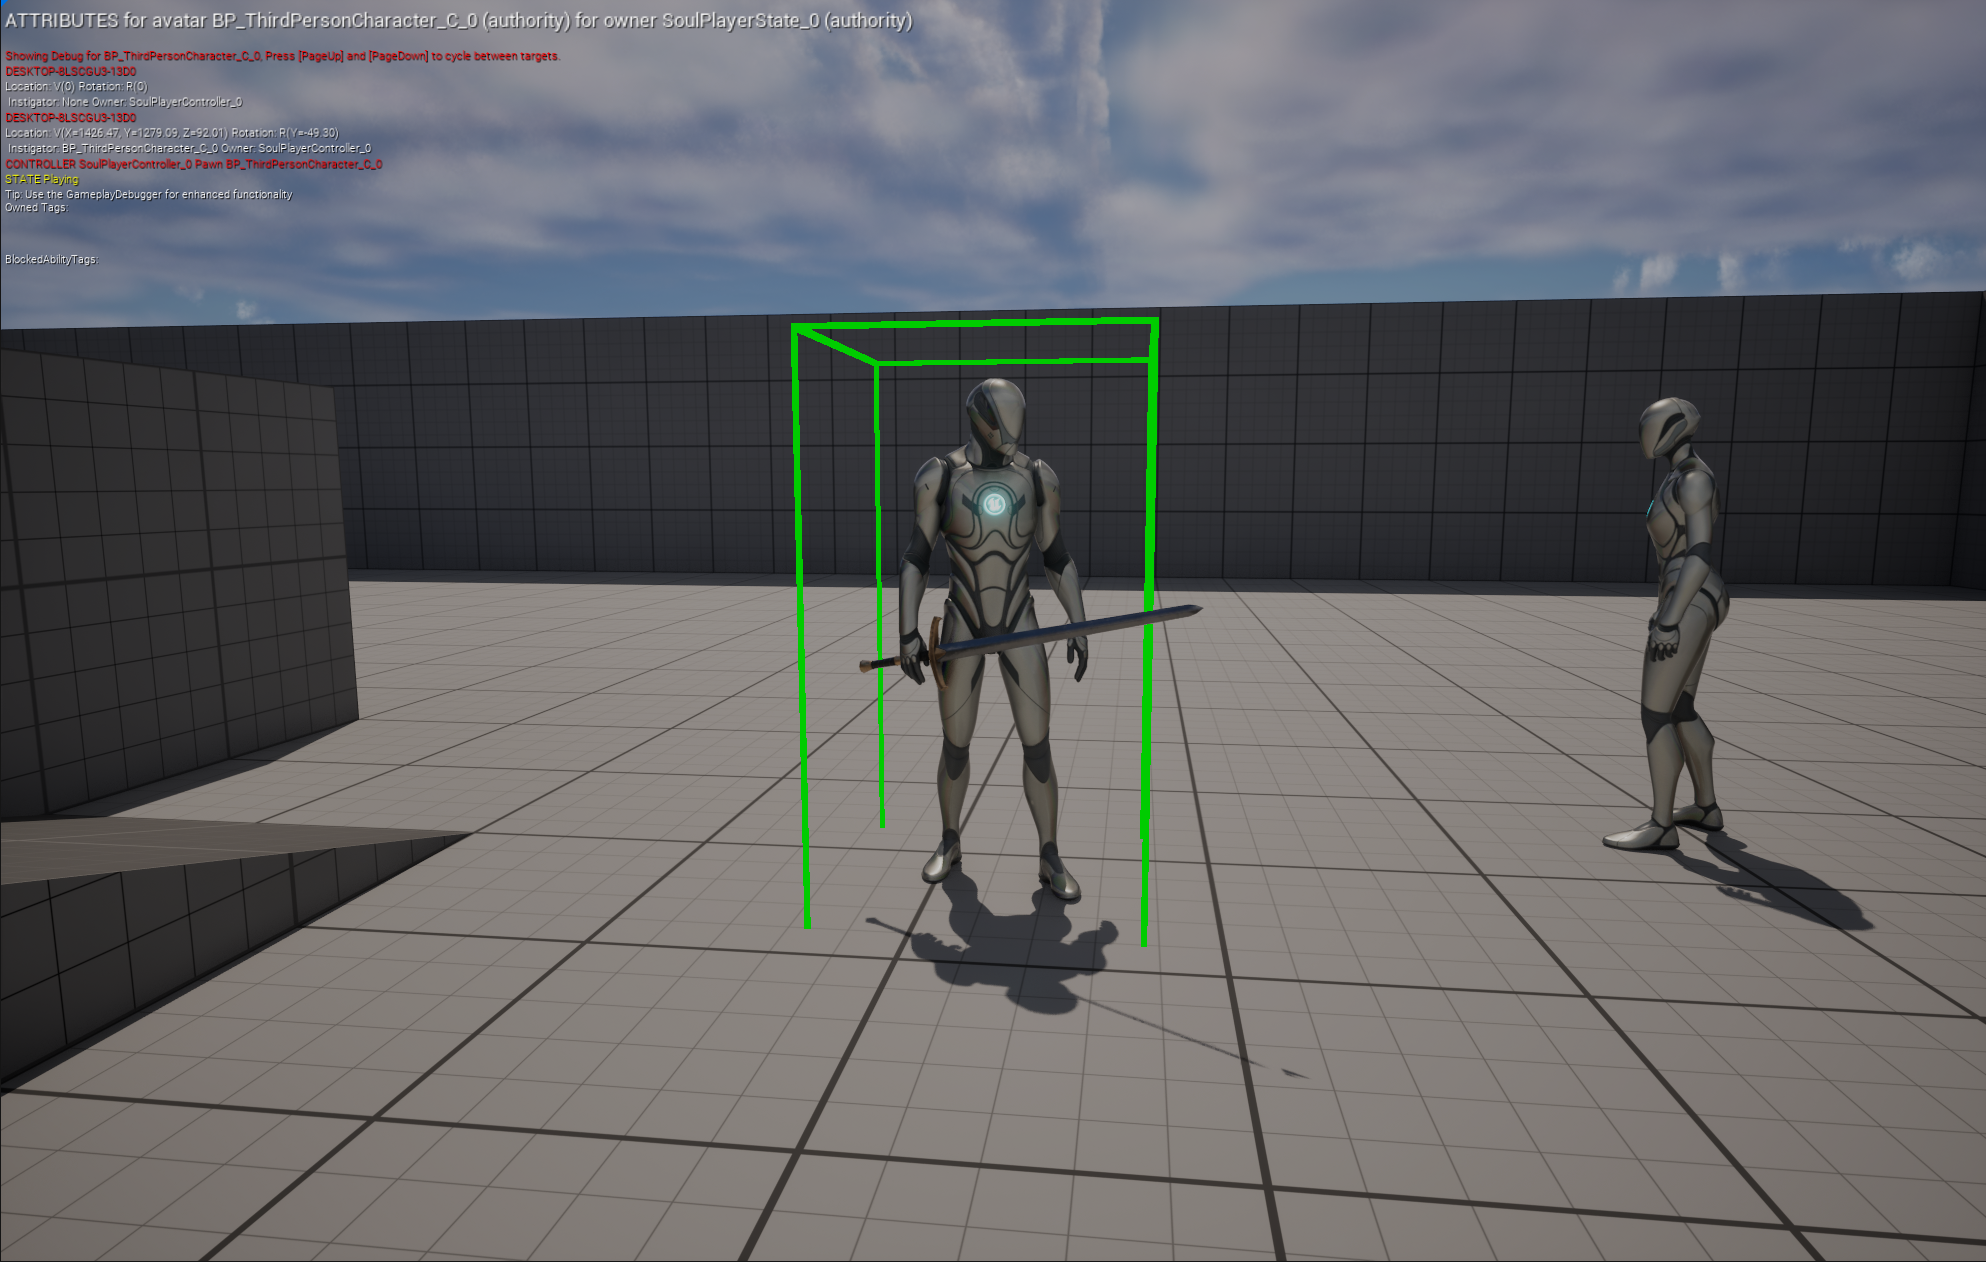
사진처럼 캐릭터에 칼을 붙이고 싶다면?
이로서 모든 기본 세팅을 맞추었습니다.
다음에는 GameAbility를 적용하여 칼을 휘둘러 보도록 하겠습니다.