
참고 : Part 1: Requests and responses | Part 2: Models and the admin site | Part 3: Views and templates | Part 4: Forms and generic views | Part 5: Testing | Part 6: Static files | Part 7: Customizing the admin site
1. 장고 프로젝트 시작하기
$ django-admin startproject mysite위 명령어를 입력하면 아래와 같이 파일들이 생성됨
mysite/
    manage.py (Django 프로젝트와 다양한 방법으로 상호작용 하는 커맨드라인의 유틸리티)
    mysite/ (디렉토리 내부에 프로젝트를 위한 실제 Python 패키지들이 저장)
        __init__.py (이 디렉토리를 패키지처럼 다루라고 알려주는 용도의 빈 파일)
        settings.py (현재 Django 프로젝트의 환경 및 구성을 저장)
        urls.py (Django project 의 URL 선언을 저장)
        asgi.py (현재 프로젝트를 서비스하기 위한 ASGI 호환 웹 서버의 진입점)
wsgi.py (현재 프로젝트를 서비스하기 위한 WSGI 호환 웹 서버의 진입점)-
WSGI는 ASGI이전의 Python의 표준
-
ASGI는 WSGI의 상위 호환으로 web server와 프레임워크(django), 애플리케이션을 연결 해주는 Python의 표준 API
+) 개발 서버 실행 명령어
/manage.py 가 있는 곳에서 아래 명령어를 실행하면 8000번 포트에서 실행됨
python manage.py runserver다른 포트에서 열고싶다면 맨 끝에 원하는 포트번호를 추가해주면 된다.
+) 대화형으로 실행할 수도 있음
$ python manage.py shell 2. 새로운 앱 만들기
※ 앱을 만드는 순서
1. 앱 기본 디렉토리 구조 생성하기
2. `/app/view.py` 에 요청에 대한 응답 구조 작성하기
3. `/app/urls.py` 에서 url에 뷰를 연결하기
4. `/mysite/urls.py` 에 새로 만든 앱의 url을 연결하기
1. 새로운 앱의 디렉토리 구조 생성
$ python manage.py startapp polls위 명령어로 polls 라는 디렉토리를 만들면 아래와 같은 구조가 생성됨
polls/
    __init__.py
    admin.py
    apps.py
    migrations/
        __init__.py
    models.py
    tests.py
    views.py
2. 요청에 대한 응답 구조 작성
polls/view.py 내부에 요청에 대한 응답 작성
from django.http import HttpResponse

def index(req):
	return HttpResponse("Hello, world. You're at the polls index.")
3. 뷰를 앱의 url에 연결
polls/urls.py 파일을 만들고 urlpatterns 를 작성
from django.urls import path

from.import views

urlpatterns = [
    path('', views.index, name='index'),
]
4. 뷰를 최상위(최초) urlConfig에 연결
mysite/urls.py 파일 내부 urlpatterns 에 새로 만든 앱의 url을 추가
from django.contrib import admin
from django.urls import include, path

urlpatterns = [
    path('polls/', include('polls.urls')),
    path('admin/', admin.site.urls),
]-
include:
include()함수는 다른 URLconf들을 참조Django가 함수 include()를 만나게 되면 URL의 그 시점까지 일치하는 부분을 잘라내고, 남은 문자열 부분을 후속 처리를 위해 include 된 URLconf로 전달
-
path(route, view, kwargs, name)
-
route : 연결될 url
-
view: 연결될 view
-
kwargs: 임의의 키워드 인수들이 view에 딕셔너리로 전달됨
-
name: url에 이름을 추가할 수 있고, 템플릿을 포함한 Django 어디에서나 이 이름으로 명확하게 참조 가능
3. 데이터베이스 연결하기
1. 데이터베이스 세팅
mysite/settings.py 에서 데이터베이스 설정
mysql 사용시 mysqlclient 설치 필요
DATABASES = {
    'default': {
        'ENGINE': 'django.db.backends.mysql',
        'NAME': 'test_db',
        'USER': 'root',
        'PASSWORD': 'root',
        'HOST': '127.0.0.1',
        'PORT': '3306',
    }
}
+) 타임존을 한국 기준으로 설정
When USE_TZ is False, this is the time zone in which Django will store all datetimes.
When USE_TZ is True, this is the default time zone that Django will use to display datetimes in templates and to interpret datetimes entered in forms.
데이터베이스에 저장할때 한국 기준시간으로 저장하려면 USE_TZ는 False 해주어야함
TIME_ZONE = 'Asia/Seoul'
USE_TZ = False
+) 세팅 파일을 보면 INSTALLED_APP이 있는데 다음의 앱들을 포함함
필요 없는 앱들은 지우거나 주석처리 해도 무관함
- django.contrib.admin – 관리용 사이트
- django.contrib.auth – 인증 시스템
- django.contrib.contenttypes – 컨텐츠 타입을 위한 프레임워크
- django.contrib.sessions – 세션 프레임워크
- django.contrib.messages – 메세징 프레임워크
- django.contrib.staticfiles – 정적 파일을 관리하는 프레임워크
이 앱들은 데이터베이스 테이블이 필요하므로 테이블들을 미리 만들어주어야 Django를 실행시켰을때 정상적으로 동작함.
따라서 아래의 명령어를 미리 실행.
$ python manage.py migrate2. 모델 작성
from django.db import models
import datetime
from django.utils import timezone

class Question(models.Model):
    question_text = models.CharField(max_length=200)
		# 첫번째 인수로 전달한 문자열로 읽기 쉬운 이름을 지정할 수 있음
    pub_date = models.DateTimeField('date published')
	def __str__(self):
	    return "%s, %s" % (self.question_text, self.pub_date )
	# 커스텀 메소드 추가(최근에 수정되었는지 여부 확인)
	def was_published_recently(self):
      return self.pub_date >= timezone.now() - datetime.timedelta(days=1)

class Choice(models.Model):
		# 연관관계 설정
    question = models.ForeignKey(Question, on_delete=models.CASCADE)
    choice_text = models.CharField(max_length=200)
    votes = models.IntegerField(default=0)
	def __str__(self):
	    return "%s, %s" % (self.choice_text , self.votes)
  class Meta:
      managed = False
      db_table = 'receivers' # 테이블 이름
verbose_name_plural = '받는 분' # 어드민 페이지 네비게이션 바에 나타나는 이름- 연관관계 설정
- 모델 생성 인자 설명 Model field reference | Django documentation | Django
def __str__(self)은str()실행시 해당 리턴값을 반환함. 따라서 읽기 쉬운 값을 반환할 필요가 있음
+) 이미 있는 모델 감지
python manage.py inspectdb3. 모델 활성화
만든 모델을 적용시키면 데이터베이스 스키마와 모델에 접근하기 위한 python 데이터베이스 접근 api 가 생성되는데, 그러기 위해서는 polls 라는 앱이 설치되어있다는것을 mysite/settings.py 파일에서 명시해주어야 함
- 앱의 설정 정보가 있는 클래스인
PollsConfig클래스는polls/apps.py파일 내에 존재. 따라서, 점으로 구분된 경로는'polls.apps.PollsConfig'
INSTALLED_APPS = [
    ...
    'polls.apps.PollsConfig',
]- polls의 모델을 마이그레이션 파일로 만들려면 다음 명령어를 입력
$ python manage.py makemigrations polls결과는 다음과 같음
Migrations for 'polls':
  polls\migrations\0001_initial.py
    - Create model Question
- Create model Choice- 마이그레이션을 실행해서 실제 모델을 데이터베이스에 생성
$ python manage.py migrate+) 다음 명령어를 실행하면 실제로 마이그레이션할때 사용되는 sql문을 볼 수 있음
$ python manage.py sqlmigrate polls 00013. 모델 조작
- 모델 생성
from polls.models import Choice, Question
from django.utils import timezone

q = Question(question_text="What's new?", pub_date=timezone.now())
q.save()- 모델 수정
q.question_text = "What's up?"
q.save()
여기까지는 save() 해야 저장됨
여기부터는 save() 안해도 저장됨
- 연관관계 값 생성
# 조회
q.choice_set.all()

# 생성
q.choice_set.create(choice_text='Not much', votes=0)
q.choice_set.create(choice_text='The sky', votes=0)
c = q.choice_set.create(choice_text='Just hacking again', votes=0)- 값 삭제
c.delete()
p.delete()5. 관리 페이지
1. 관리자 만들기
$ python manage.py createsuperuser

	Username: admin
	Email address: admin@example.com
	Password: **********
	Password (again): *********
	Superuser created successfully.
명령어 입력후 유저네임, 이메일, 비밀번호를 입력하면 생성 후 /admin 으로 접속
2. polls 앱을 어드민에 등록
polls/admin.py 파일을 변경
from django.contrib import admin
from .models import Question,Choice

admin.site.register(Question)
admin.site.register(Choice)
3. 어드민 내용 커스터마이징
-
속성 순서 변경
polls/admin.py파일을 변경from django.contrib import admin from .models import Question,Choice class QuestionAdmin(admin.ModelAdmin): fields = ['pub_date', 'question_text'] admin.site.register(Question, QuestionAdmin) admin.site.register(Choice)- 필드 순서를 변경 하는 클래스를 만들고 register에 두번째 인자로 전해주면 해당 클래스에 설정한대로 나타남
-
속성 분류
- 속성 분류 이름을 적고 그 안에 들어갈 속성을 나열해주면 수정/추가 페이지가 소분류된 화면으로 나타남
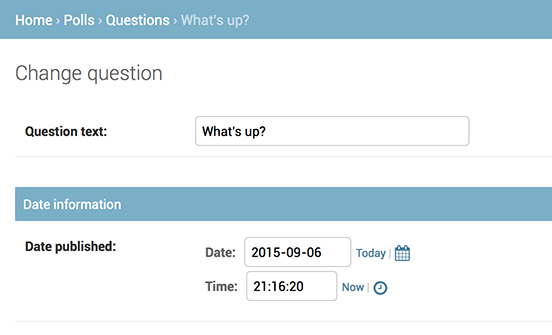
polls/admin.py파일을 변경from django.contrib import admin from .models import Question,Choice class QuestionAdmin(admin.ModelAdmin): fieldsets = [ (None, {'fields': ['question_text']}), ('Date information', {'fields': ['pub_date']}), ] admin.site.register(Question, QuestionAdmin) admin.site.register(Choice) - 속성 분류 이름을 적고 그 안에 들어갈 속성을 나열해주면 수정/추가 페이지가 소분류된 화면으로 나타남
-
참조되는 쪽에서 값을 추가하기 (인라인)
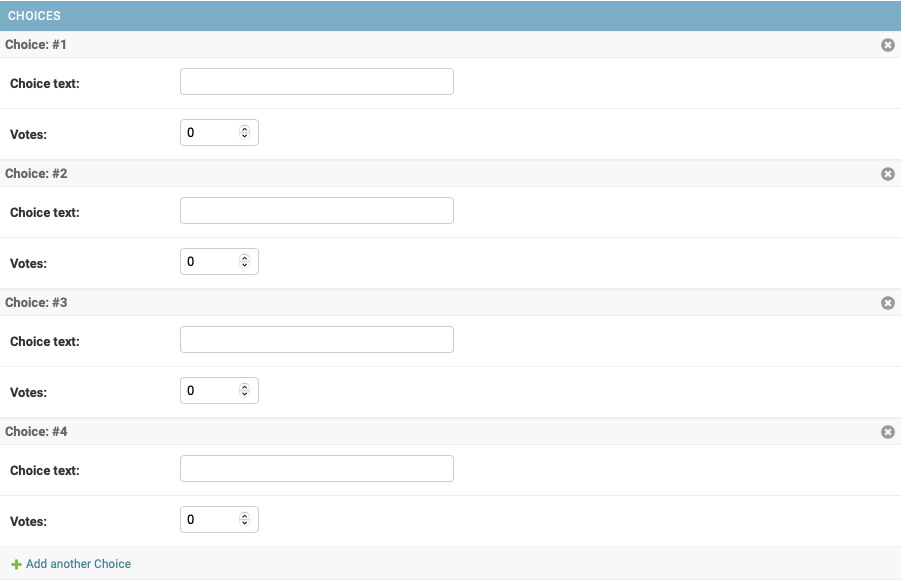
from django.contrib import admin from .models import Question,Choice # Question에 추가될 Choice 항목 구성 class ChoiceInline(admin.StackedInline): # 대상모델 model = Choice #기본으로 생성되는 항목 개수 extra = 0 class QuestionAdmin(admin.ModelAdmin): fieldsets = [ (None, {'fields': ['question_text']}), ('Date information', { 'fields': ['pub_date'], 'classes': ['collapse'] # 숨기기 옵션 추가 } ), ] # 인라인으로 Choice 모델 추가 inlines = [ChoiceInline] admin.site.register(Question, QuestionAdmin)- 표 형식으로 구성하려면
ChoiceInline의 부모를 바꿔주면 됨
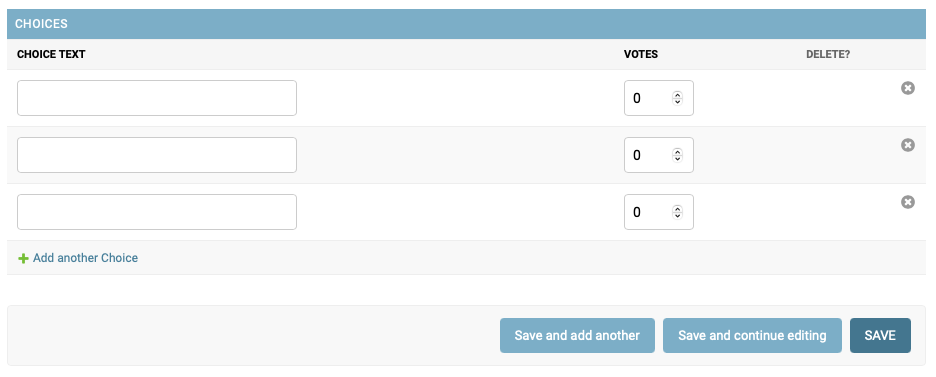
class ChoiceInline(admin.TabularInline):
	...
- 표 형식으로 구성하려면
-
row 형태 변경
.png)
- 기본적으로 str() 한 값이 표시되는데 표 형식으로 row를 표시하고 싶다면 display를 변경해주면 됨
class QuestionAdmin(admin.ModelAdmin): ... list_display = ('question_text', 'pub_date', 'was_published_recently') -
머리글을 클릭할 경우 정렬이 지원되나 커스텀 메소드 결과에 따른 정렬은 지원되지 않음
+) 커스텀 메소드 결과로 정렬하고 싶다면 모델에 display() 데코레이터를 이용해야함
# polls/models.py from django.contrib import admin class Question(models.Model): ... @admin.display( boolean=True, ordering='pub_date', description='Published recently?', ) def was_published_recently(self): now = timezone.now() return now - datetime.timedelta(days=1) <= self.pub_date <= now -
어드민 파일에 필터도 추가 가능
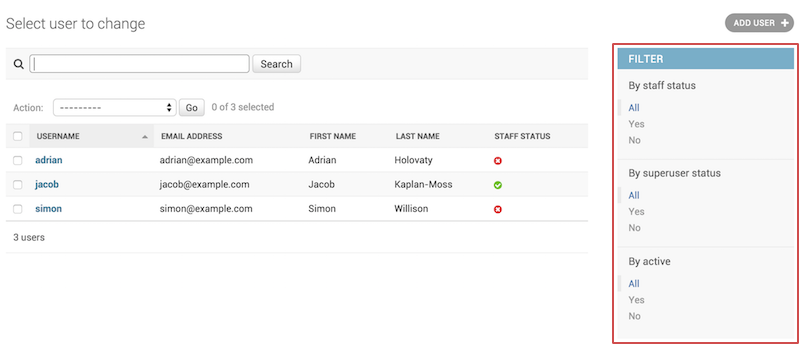
# polls/admin.py

class QuestionAdmin(admin.ModelAdmin):
		...
    list_filter = ['pub_date']
- 검색 추가
- 내부적으로 like 쿼리를 사용하여 검색됨
.png)
- 내부적으로 like 쿼리를 사용하여 검색됨
# polls/admin.py

class QuestionAdmin(admin.ModelAdmin):
    ...
    search_fields = ['question_text']
★ join으로 인한 속도 저하 문제 해결법
        class modelAdmin(admin.ModelAdmin):
        	list_select_related = ['column_name']
연관해서 가져올 항목을 제한해주면 됨3. 어드민 UI 커스터마이징
-
html 파일을 직접 변경
- 설정파일에 DIRS 옵션 추가 DIRS는 Django 템플릿을 로드 할 때 검사 할 파일 시스템 디렉토리 목록 (검색 경로)
TEMPLATES = [ { 'BACKEND': 'django.template.backends.django.DjangoTemplates', 'DIRS': [BASE_DIR / 'templates'], 'APP_DIRS': True, 'OPTIONS': { 'context_processors': [ 'django.template.context_processors.debug', 'django.template.context_processors.request', 'django.contrib.auth.context_processors.auth', 'django.contrib.messages.context_processors.messages', ], }, }, ]-
templates/admin에django/contrib/admin/templates/admin/base_site.html파일을 복사 -
Django 소스파일 위치:
$ python -c "import django; print(django.__path__)"
- 설정파일에 DIRS 옵션 추가 DIRS는 Django 템플릿을 로드 할 때 검사 할 파일 시스템 디렉토리 목록 (검색 경로)
-
AdminSite오브젝트를 이용해 변경
4. 커스텀 액션
- 체크한 값들에 대해 일괄적으로 무언가를 수행해야 할 때 유용한 기능
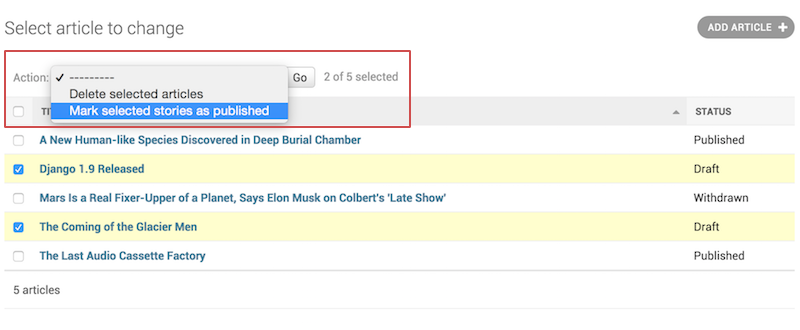
admin.py
from django.contrib import admin
from .models import *
from .resources import *

@admin.action(description='Chage To Draft')
def ChangeToDaft(modeladmin, request, queryset):
    queryset.update(status='Draft')

class BrandAdmin(ImportExportMixin, admin.ModelAdmin):
    list_display = ('title', 'status')
    actions = [ChangeToDaft]


admin.site.register(Article, ArticleAdmin)

Django 프로젝트와 Admin 페이지 초기 세팅방법 배워갑니다. 좋은 글 감사합니다!