이번 글에서는 노마드 코더 expo 기반 어플리케이션을 expo없이 typescript로 다시 만들어 볼 것이다.
노마드코더 react-native 강의:
https://nomadcoders.co/react-native-for-beginners
1. 앱 시작하기
npx react-native init weather --template react-native-template-typescript 위 코드로 타입스크립트 템플릿이 적용된 react-native를 세팅한다.
완료된 후 디렉토리로 이동한다.
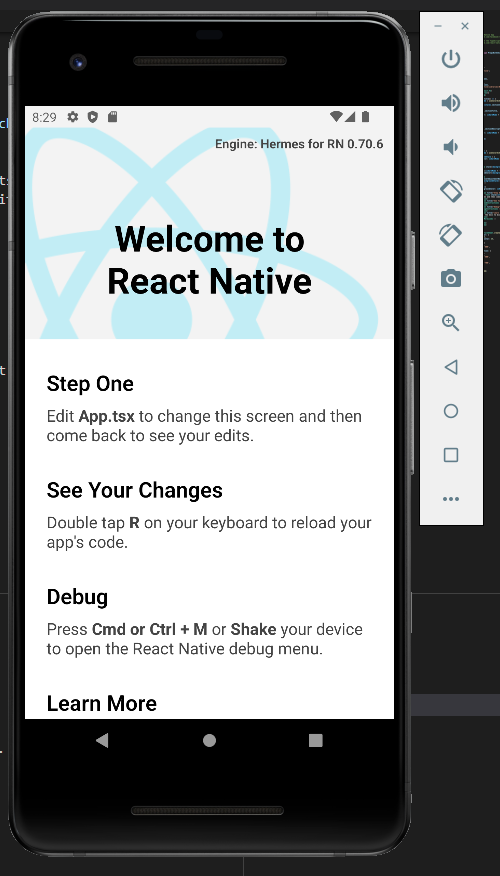
cd weather아무것도 건드리지 않고npx react-native start으로 시작하고 npx react-native run-android으로 안드로이드 앱을 돌리면 다음과 같은 기본 화면이 나타난다.
2. 기본 구조 만들기
뼈대부터 만든다.
만들어야 하는 구조는 다음과 같다.

// weather/App.tsx

import React from 'react';
import {StyleSheet, ScrollView, Text, View, Dimensions} from 'react-native';

const {width: SCREEN_WIDTH} = Dimensions.get('window');

const App = () => {
  return (
    <View style={styles.container}>
      <View style={styles.city}>
        <Text style={styles.cityName}>도시명</Text>
      </View>
      <ScrollView
        style={styles.weather}
        horizontal
        pagingEnabled
        showsHorizontalScrollIndicator={false}>
        <View style={styles.day}>
          <Text style={styles.temp}>23</Text>
          <Text style={styles.desc}>맑음</Text>
        </View>
        <View style={styles.day}>
          <Text style={styles.temp}>23</Text>
          <Text style={styles.desc}>맑음</Text>
        </View>
        <View style={styles.day}>
          <Text style={styles.temp}>23</Text>
          <Text style={styles.desc}>맑음</Text>
        </View>
      </ScrollView>
    </View>
  );
};

const styles = StyleSheet.create({
  container: {
    flex: 1,
    backgroundColor: 'tomato',
  },
  city: {
    flex: 0.5,
    flexDirection: 'row',
    marginHorizontal: '10%',
    marginTop: '5%',
    justifyContent: 'center',
    alignItems: 'center',

    borderBottomColor: 'white',
    borderBottomWidth: 2,
  },
  cityName: {
    color: 'white',
    fontSize: 38,
    fontWeight: '500',
  },
  weather: {flexGrow: 1, marginBottom: '15%'},
  day: {
    width: SCREEN_WIDTH,
    alignItems: 'center',
    justifyContent: 'center',
  },
  temp: {
    fontWeight: '600',
    fontSize: 120,
    color: 'white',
  },
  desc: {
    fontSize: 60,
    color: 'white',
  },
});

export default App;
style은 css와 유사하게 작성하면 된다.
스크롤뷰
리액트 네이티브는 상당히 편리한 스크롤 뷰를 제공한다.
<ScrollView></ScrollView>내부의 각 아이템을 스크롤로 보여줄 수 있는데, 옵션을 통해 원하는 동작을 간편하게 추가할 수 있다.
위에서 사용된 옵션을 하나씩 살펴보자
1.horizontal
스크롤이 세로가 아니라 가로로 동작하도록 한다.
2.pagingEnabled
스무스한 스크롤링이 아니라 페이지가 넘어가는 것처럼 보이게 만든다. 페이지를 일정 수준 이하로 움직이면 페이지가 넘어가지 않고 본래 페이지로 돌아온다.
3.showsHorizontalScrollIndicator
스크롤바를 보이게 할지말지를 결정한다.
여기에 좌우 스크롤이라 스크롤뷰 내부의 각 뷰의 width를 screen 사이즈로 해야하는데,
리액트 네이티브에서 제공하는 Dimensions을 이용하면 스크린 사이즈를 얻을 수 있다.
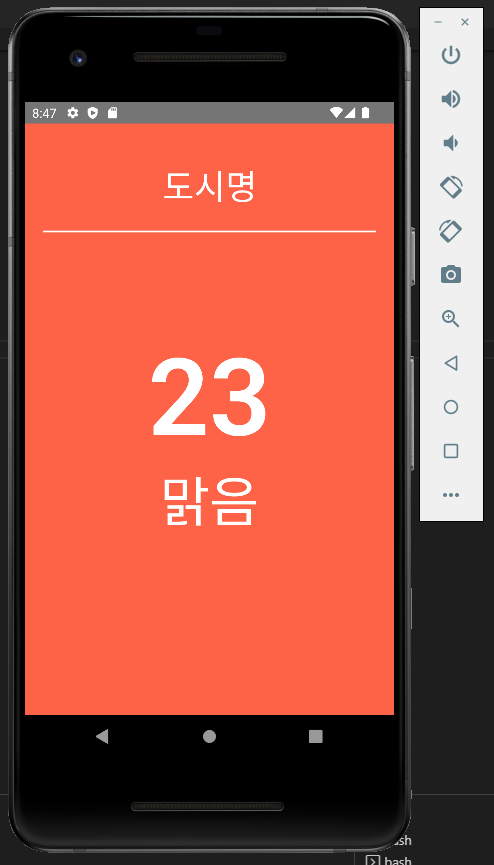
이렇게 작성하면 다음과 같은 결과를 얻을 수 있다.
3. 위치 정보
3-1. 위치정보 사용 동의 받기
사용자의 위치 정보에 접근하려면 권한을 받아야 한다.
안드로이드에서 위치정보는 ACCESS_FINE_LOCATION 권한을 받아야 한다.
이 항목은 안드로이드 매니페스트에서 직접 추가해야한다.
<!-- weather/android/app/src/main/AndroidManifest.xml -->
	...
    <uses-permission android:name="android.permission.INTERNET" />
    <uses-permission android:name="android.permission.ACCESS_FINE_LOCATION"/>
	...
다시 App.tsx로 돌아와서, 동의 받아오는 부분을 작성한다.
// weather/App.tsx
import React, {useEffect} from 'react';
import {
...
PermissionsAndroid,
} from 'react-native';
...
const App = () => {
const CheckPermission = async () => {
try {
const result = await PermissionsAndroid.request(
PermissionsAndroid.PERMISSIONS.ACCESS_FINE_LOCATION,
);
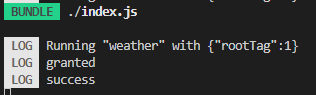
if (result === 'granted') {
console.log('success');
}
} catch (e) {
console.log(e);
}
};
useEffect(() => {
CheckPermission();
}, []);
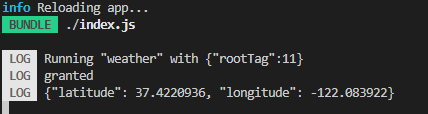
...권한을 얻어오는 부분도 react native에서 PermissionsAndroid로 제공하고 있다.
이렇게 하면 다음과 같이 정보를 요청하는 화면을 얻을 수 있다.

첫번째 while using the app을 선택하면 로그도 정상적으로 나타나는 것을 확인할 수 있다.
3-2. 위치정보 가져오기
expo를 사용할 경우 expo-location을 쓰면 되지만, expo기반이 아니므로 다른 모듈을 사용해야한다.
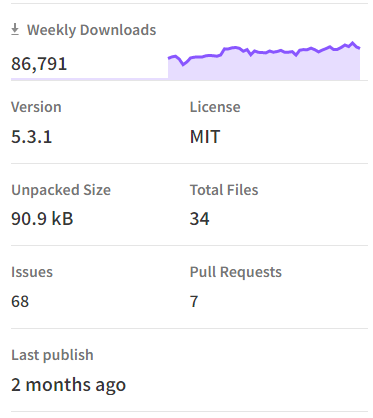
찾아보니 다양한 모듈이 있었는데, 최근에 업데이트 했고 주간 다운로드 수도 많은 react-native-geolocation-service를 선택했다.
모듈을 설치한다.
npm i react-native-geolocation-service위치 정보를 가져오는 함수를 추가한다.
// weather/App.tsx
...

import Geolocation from 'react-native-geolocation-service';

...

const GetLocation = async () => {
  Geolocation.getCurrentPosition(
    position => {
      const {
        coords: {latitude, longitude},
      } = position;

      console.log({latitude, longitude});
    },
    error => {
      console.log(error);
    },
    {
      accuracy: {
        android: 'high',
        ios: 'best',
      },
      enableHighAccuracy: true,
      timeout: 15000,
      maximumAge: 10000,
    },
  );
};

const App = () => {
  const CheckPermission = async () => {
    try {
      const result = await PermissionsAndroid.request(
        PermissionsAndroid.PERMISSIONS.ACCESS_FINE_LOCATION,
      );
      if (result === 'granted') {
        // 이 부분에서 함수 사용하도록 변경
        GetLocation();
      }
    } catch (e) {
      console.log(e);
    }
  };

  useEffect(() => {
    CheckPermission();
  }, []);
  ...
이렇게 하면 콘솔에서 위치 정보가 찍힌다.
4. API 호출하기
이제 받아온 위치정보를 이용해 날씨 API를 호출한다.
4-1. dotenv
먼저 키가 코드와 함께 업로드 되지 않도록 react-native-dotenv를 설치한다.
npm install -D react-native-dotenv.babelrc에 플러그인을 추가한다.
{
	...
  "plugins": [
    ["module:react-native-dotenv"]
  ]
}
프로젝트 루트에 .env 파일을 추가한다.
WEATHER_KEY=이렇게 하면
import {WEATHER_KEY} from '@env';으로 불러올때@env에 빨간 줄이 뜬다.
이는 타입 선언을 해주지 않아서 그런 것이다.// weather/@types/env.d.ts declare module '@env' { export const WEATHER_KEY: string; }위 파일을 추가하면 오류가 사라진다.
+) 이렇게 했는데
Unable to resolve module @env오류가 발생한다면 metro의 캐시를 지워줘야 한다.react-native start --reset-cache이렇게 한번 다시 시작해주면 해결된다.
4-2. 날씨 정보 호출하기
API 불러오는 부분을 추가한다.
import {WEATHER_KEY} from '@env';
...
const GetLocation = async () => {
Geolocation.getCurrentPosition(
position => {
const {
coords: {latitude, longitude},
} = position;
// 이 부분을 getWeater 호출하도록 변경
GetWeater(latitude, longitude);
},
error => {
console.log(error);
},
{
accuracy: {
android: 'high',
ios: 'best',
},
enableHighAccuracy: true,
timeout: 15000,
maximumAge: 10000,
},
);
};
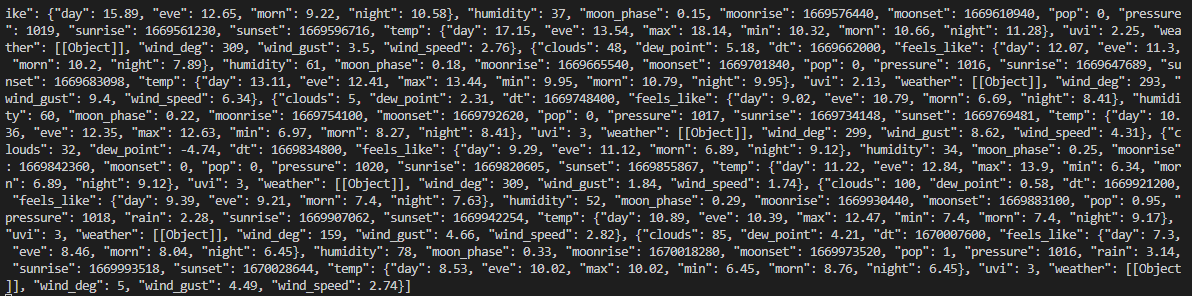
const GetWeater = async (latitude: number, longitude: number) => {
const res = await fetch(
`https://api.openweathermap.org/data/2.5/onecall?lat=${latitude}&lon=${longitude}&exclude=alerts&appid=${WEATHER_KEY}&lang=kr&units=metric`,
);
const {daily} = await res.json();
console.log(daily);
};
프로젝트를 리빌드 한다.
이렇게 하면 API 호출 결과가 콘솔창에 출력된다.
4-2. 날씨 정보 보여주기
이제 받은 결과를 화면에 출력해보자.
그러기 위해서는 코드를 약간 수정해야한다.
API 응답이 오면 그 값을 useState에 저장해서 화면에 띄우도록 수정할 것이다.
일단 API 응답 타입을 만들자
// @types/WeatherMap.d.ts
export declare type WeatherMap = {
  clouds: number;
  dew_point: number;
  dt: number;
  feels_like: {
    day: number;
    night: number;
    eve: number;
    morn: number;
  };
  humidity: number;
  moon_phase: number;
  moonrise: number;
  moonset: number;
  pop: number;
  pressure: number;
  sunrise: number;
  sunset: number;
  temp: {
    day: number;
    min: number;
    max: number;
    night: number;
    eve: number;
    morn: number;
  };
  uvi: number;
  weather: {
    id: number;
    main: string;
    description: string;
    icon: string;
  }[];
  wind_deg: number;
  wind_gust: number;
  wind_speed: number;
};
이제 이걸 이용해서 useState를 추가한다.
1)권한을 확인하고 (CheckPermission)
2)Location을 가져오는 함수를 호출하는데 (RunLocationFunction)
3)이 함수에 API 호출과 setDays를 하는 콜백함수 (GetWeater)
를 넘겨주어 결과를 성공적으로 받아오는 경우 콜백함수를 실행시킬 것이다.
4)그리고 days 가 세팅되면 내용에 맞춰 스크롤뷰 내부의 날씨 정보 view를 추가할 것이다.
import React, {useState, useEffect} from 'react';
import {WeatherMap} from './@types/WeatherMap';
...- Location을 가져오는 함수를 호출
const RunLocationFunction = async (
  Func: (lat: number, lon: number) => void,
) => {
  return Geolocation.getCurrentPosition(
    position => {
      const {
        coords: {latitude, longitude},
      } = position;
      Func(latitude, longitude);
    },
    error => {
      throw new Error('Geolocation ERR:' + error);
    },
    {
      accuracy: {
        android: 'high',
        ios: 'best',
      },
      enableHighAccuracy: true,
      timeout: 15000,
      maximumAge: 10000,
    },
  );
};- 권한을 확인할때
RunLocationFunction에GetWeater전달
const App = () => {
  const [days, setDays] = useState<WeatherMap[]>();

  const GetWeater = async (latitude: number, longitude: number) => {
    const res = await fetch(
      `https://api.openweathermap.org/data/2.5/onecall?lat=${latitude}&lon=${longitude}&exclude=alerts&appid=${WEATHER_KEY}&lang=kr&units=metric`,
    );
    const {daily} = await res.json();
    if (daily === undefined) {
      throw new Error('openweathermap ERR: result not Found');
    }
    setDays(daily);
  };

  const CheckPermission = async () => {
    try {
      const result = await PermissionsAndroid.request(
        PermissionsAndroid.PERMISSIONS.ACCESS_FINE_LOCATION,
      );
      console.log(result);
      if (result === 'granted') {
        RunLocationFunction(GetWeater);
      }
    } catch (e) {
      console.log(e);
    }
  };

  useEffect(() => {
    CheckPermission();
  }, []);
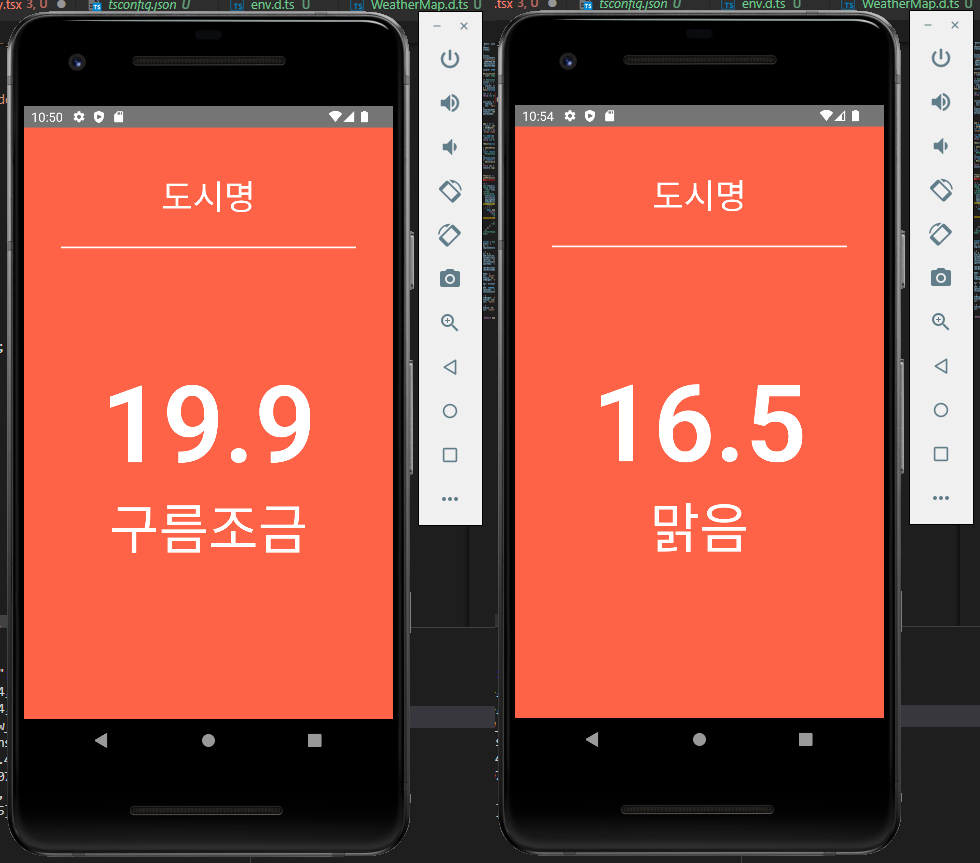
days가 있으면 view 추가
  return (
    <View style={styles.container}>
      <View style={styles.city}>
        <Text style={styles.cityName}>도시명</Text>
      </View>
      <ScrollView
        style={styles.weather}
        horizontal
        pagingEnabled
        showsHorizontalScrollIndicator={false}>
        {!days || days.length == 0 ? (
          <></>
        ) : (
          days.map((day, i) => {
            return (
              <View key={i} style={styles.day}>
                <Text style={styles.temp}>{day.temp.day.toFixed(1)}</Text>
                <View style={{flexDirection: 'row', alignItems: 'center'}}>
                  <Text style={styles.desc}>{day.weather[0].description}</Text>
                </View>
              </View>
            );
          })
        )}
      </ScrollView>
    </View>
  );
};
이렇게하면 날씨 정보가 페이지로 잘 나타나는 것을 확인 할 수 있다.
5. 도시명 받아오기
expo에는 reverseGeocodeAsync가 있어서 편하게 도시명을 가져왔는데, 이번에 쓴 모듈에는 그런 기능이 없다. 다른 모듈을 살펴봤는데 구글 API를 쓰고 있어서 그냥 구현하기로 했다.
5-1. 구글 API 키 발급받기
먼저 키를 발급받는다.
https://cloud.google.com/maps-platform/
맨처음 들어가면 약관 동의를 해야한다.
프로젝트를 만든다.
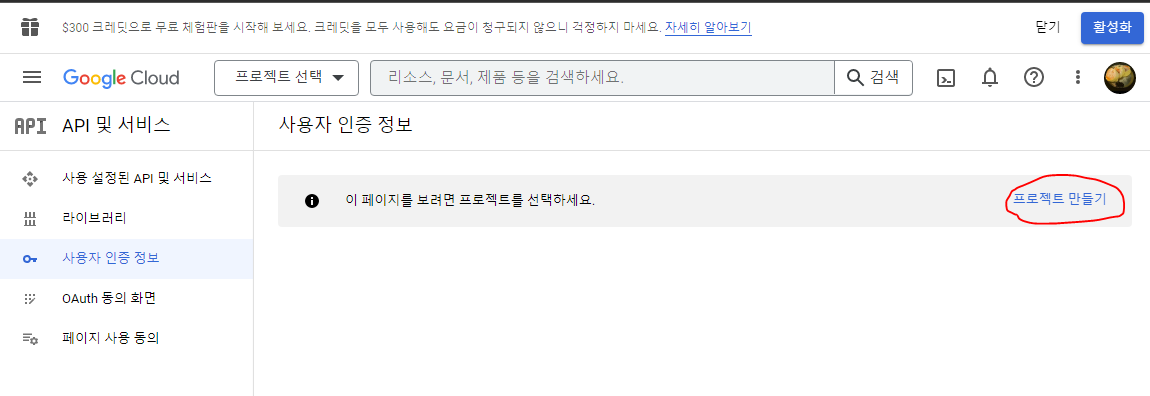
이름은 대충 지어도 무관하다.
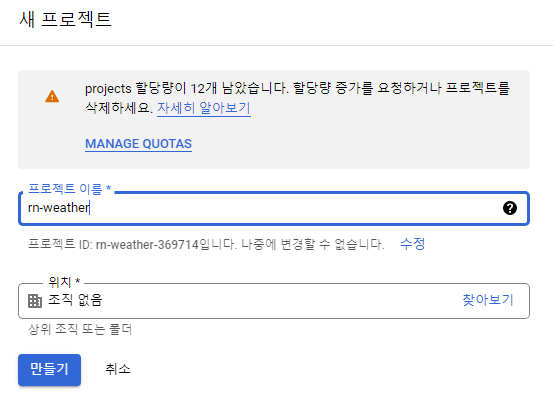
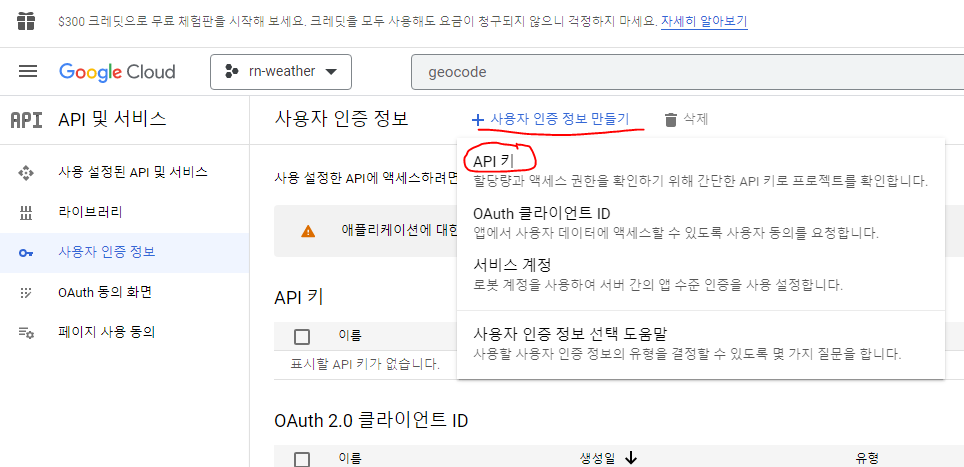
프로젝트가 만들어지면 자동으로 사용자 인증 정보 페이지로 이동된다.
사용자 인증 정보를 추가한다.
키를 복사해서.env에 추가한다.
WEATHER_KEY=
GOOGLE_KEY=
.env 수정 후에는 앱을 리빌드 해야한다는 걸 잊지 말자.
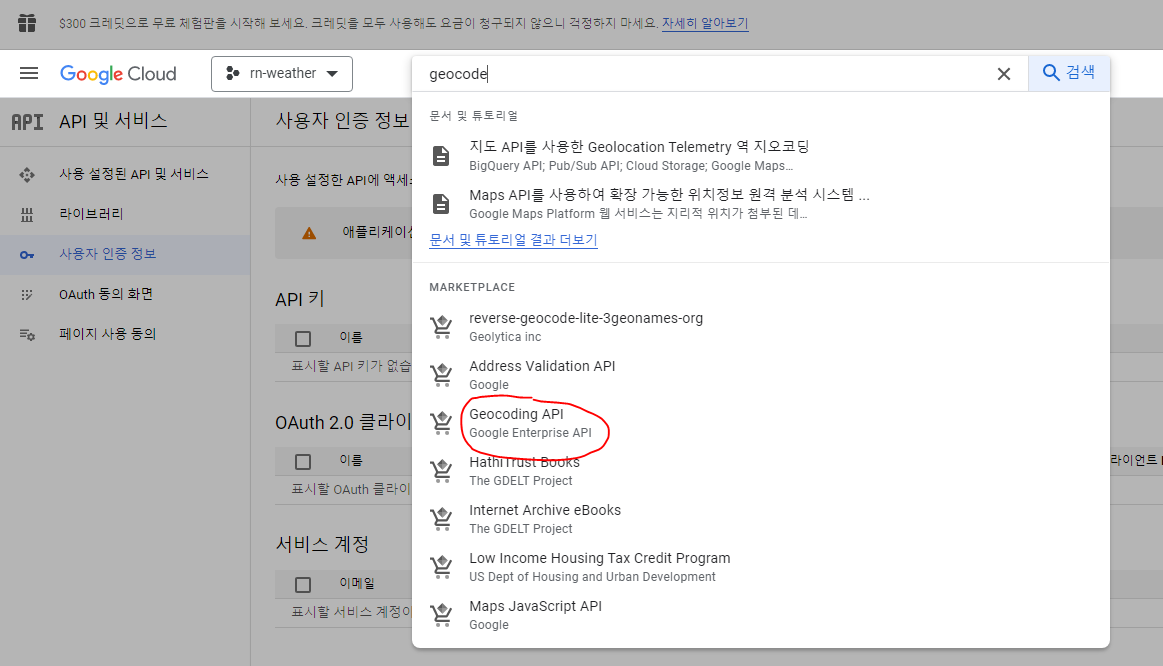
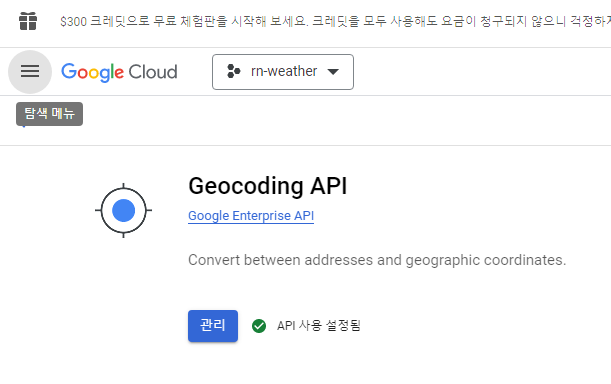
geocoding API를 검색해 사용 버튼을 눌러 활성화한다.
활성화 된 상태면 다음과 같이 나타난다.
5-2. 구글 API 구성하기
api 구성 방법은 다음 링크를 참조했다.
https://developers.google.com/maps/documentation/geocoding/requests-reverse-geocoding?hl=ko
  const GetWeater = async (latitude: number, longitude: number) => {
    const res = await fetch(
      `https://api.openweathermap.org/data/2.5/onecall?lat=${latitude}&lon=${longitude}&exclude=alerts&appid=${WEATHER_KEY}&lang=kr&units=metric`,
    );
    const {daily} = await res.json();
    if (daily === undefined) {
      throw new Error('openweathermap ERR: result not Found');
    }

    // --- 이 부분 추가 ---
    const googleResult = await fetch(
      `https://maps.googleapis.com/maps/api/geocode/json?latlng=${latitude},${longitude}&key=${GOOGLE_KEY}&language=ko`,
    );
    const {results} = await googleResult.json();
    console.log(results[0]);
	// ---

    setDays(daily);
  };
그런데 다음과 같은 오류가 떴다.
보니까 결제 정보를 반드시 입력해야 하는 것 같다.
화면 상단에 계속 떠있던 무료 체험판을 활성화한다.
카드를 등록해야한다.
이렇게 하고나서 정보를 다시 띄워보면...
미국이 뜬다.
뭔가 이상해서 크롬-지도로 들어가보니 여기도 미국이다.
안드로이드 에뮬레이터 기본 세팅이 미국으로 되어있었던 것이다.
세팅에 들어가서 위치를 바꾸고 저장한다.
api를 다시 불러본다.
설정한 위치가 잘 떴다!
여러 정보가 한번에 오는데, 00구 정보가 필요하므로 api를 부를때 result_type=sublocality_level_1 옵션을 추가한다.
    const googleResult = await fetch(
      `https://maps.googleapis.com/maps/api/geocode/json?result_type=sublocality_level_1&latlng=${latitude},${longitude}&key=${GOOGLE_KEY}&language=ko`,
    );
    const {results} = await googleResult.json();
    console.log(results[0].address_components[0].long_name);
이렇게 뽑으면 원하는 값만 깔끔하게 뽑을 수 있다.
5-2. 위치 보여주기
위치 정보를 보여주기 위해 useState를 하나 더 쓴다.
...
const App = () => {
  const [days, setDays] = useState<WeatherMap[]>();
  const [city, setCity] = useState<string>();
...
위치를 역 지오코딩 해오는 부분에서 setCity해준다.
    const googleResult = await fetch(
      `https://maps.googleapis.com/maps/api/geocode/json?result_type=sublocality_level_1&latlng=${latitude},${longitude}&key=${GOOGLE_KEY}&language=ko`,
    );
    const {results} = await googleResult.json();
	setCity(results[0].address_components[0].long_name);
Text에서 도시명 대신 city 변수를 띄우도록 변경한다.
  return (
    <View style={styles.container}>
      <View style={styles.city}>
        <Text style={styles.cityName}>{city}</Text>
      </View>
		...
    </View>
  );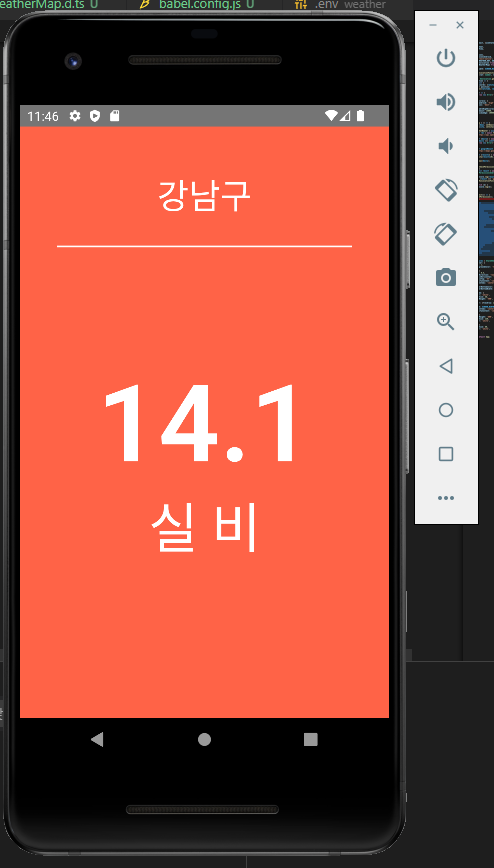
날씨 앱이 완성되었...긴한데 아무리 봐도 날짜가 있어야 할 것 같다.
dt로 타임스탬프가 오니까 그걸 이용해서 날짜를 추가하자.
const App = () => {
  ...
  const GetDate = (dt: number) => {
    const date = new Date(dt * 1000).toISOString().split('T')[0].split('-');
    return `${date[1]}월 ${date[2]}일`;
  };

  return (
    <View style={styles.container}>
	...
          days.map((day, i) => {
            return (
              <View key={i} style={styles.day}>

    			// --- 이 부분 추가 ---
                <Text style={styles.desc}>{GetDate(day.dt)}</Text>
    			// ------

                <Text style={styles.temp}>{day.temp.day.toFixed(1)}</Text>
                <View style={{flexDirection: 'row', alignItems: 'center'}}>

                  <Text style={styles.desc}>{day.weather[0].description}</Text>
                </View>
              </View>
            );
          })
        )}
    </View>
  );
};

진짜 완성되었다!
상세 코드는 다음을 참조:
https://github.com/hokim2407/react-native-weather/tree/3582ef6495987009068b477f964789d99395d8cc