Spring
View 환경설정
웹 페이지 만들기
- 모든 웹 페이지는 src>main>static 폴더 안에서 작업이 이루어진다.
- Spring boot 에서는 Welcome page 기능으로 static 폴더안에 index.html 폴더를 만들면 해당 페이지를 서버 실행시에 바로 보여지는 페이지이다.

thymeleaf 사용하기
- thymeleaf 엔진은 웹 어플리케이션의 사용자 인터페이스 만들기 위해 사용되는 Java 템플릿 엔진이다. 이를 사용하여 HTML,XML,JS 같은 정적인 템플릿과 동적으로 생성되는 데이터를 결합하여 동적인 웹 페이지를 만들 수 있다.
controller 생성하기
- 컨트롤러를 생성하기 위해서는 src>main>java ~~>controller>controller.java를 만들어준다.
- 이때 controller라는 파일은 controller라는 패키지를 만들어서 사용하면 된다.
package Portfolio.PortfolioSpring.controller;

import org.springframework.stereotype.Controller;
import org.springframework.ui.Model;
import org.springframework.web.bind.annotation.GetMapping;

@Controller
public class HelloController {
    @GetMapping("hello") // 주소창에서 hello 라는 주소가 들어오면 실행되는 메서드
    public String hello(Model model){
        model.addAttribute("data" , "Hello!!"); //  data를 hello 라고 넘긴다.
        return "hello"; // hello를 리턴
    }
}- 컨트롤러 코드를 작성하면 templates 폴더 안에서 해당 메서드를 실행 시킬 html 파일을 만들어 주면 된다.
<!DOCTYPE html>
<html lang="en" xmlns:th="https://www.thymeleaf.org">
<head>
    <meta charset="UTF-8">
    <title>Hello</title>
</head>
<body>
    <p th:text="'안녕하세요'+${data}" >안녕하세요. 손님</p>
</body>
</html>- 타임리프 템플릿 엔진을 사용하기 위해서는 html 태그에 타임리프에 대한 정보를 입력해줘야 한다.
- p 태그 안에 data는 controller 에서 명시한 data와 같은 의미이다.
- 해당 value에 hello 치환이 된다.
model.Attribute
- HTML 문서에 data를 전달할때 사용하는 메서드
- model.addAttribute("html 에서 사용할 변수 이름" , 그 변수에 들어갈 데이터)
템플릿 엔진 동작 과정
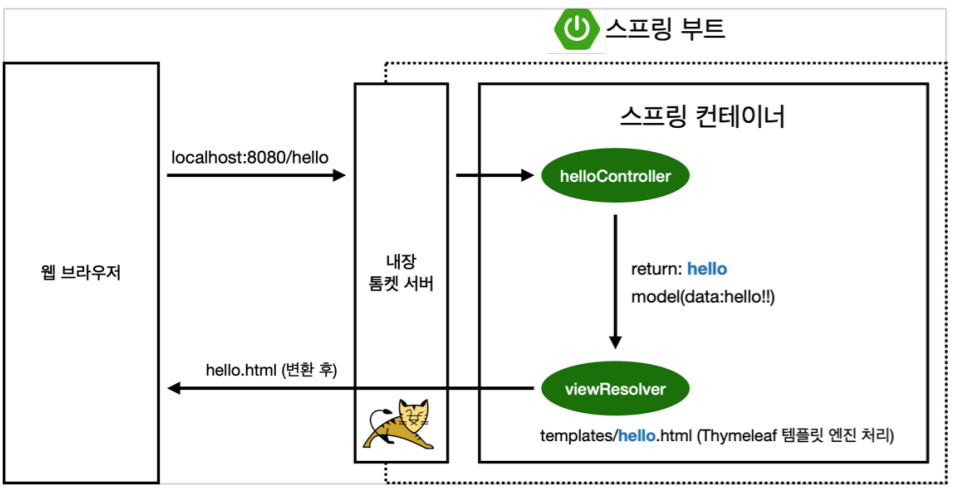
- Spring boot는 톰켓이라는 내장 서버를 사용하고 있다.
- 톰켓이 hello를 확인한다음 해당 컨트롤러로 url에 매칭이 된 다음 해당 메서드를 실행한다.
- 해당 데이터를 return 시킨다.
- 스프링 부트가 해당 템플릿을 찾아서 랜더링을 해준다.
- return 으로 명시한 "hello" = template/hello.html과 같아야 찾을 수 있다.?
- spring 에서는 ViewResolver가 해당 템플릿을 처리해준다.
- resources:templates + (ViewName) + .html
Spring-boot-devtools
- 해당 라이브러리는 추가하면 파일을 컴파일 만으로도 서버를 재 실행 시킬수가 있다.

개발자 되고 싶어요