개념
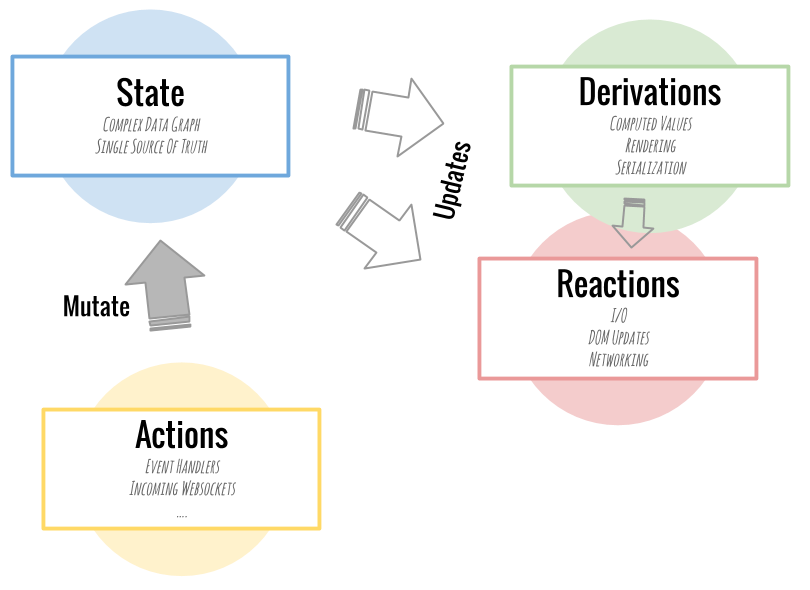
➡️ MobX는 3가지 개념으로 나눌 수 있다.
- State
- Actions - state를 변화 시키는 것
- Derivations(Computed Values) - state로 부터 계산된 값
constructor() {
    makeObservable(this, {
      todos: observable,
      pendingRequests: observable,
      completedTodosCount: computed,
      report: computed,
      addTodo: action,
    });
    autorun(() => console.log(this.report));
}-
observable을 지정함으로써 값의 변화를 감지할 수 있다. -
makeObservable를 통해서 각 value 나 함수가 어떤 역할을 하는지 명시적으로 지정해줄 수 있다. -
autorun은 reaction을 생성하고 만약 observable 데이터가 변경되면 다시 re-run 한다.
- Use the
observabledecorator orobservable(object or array)functions to make objects trackable for MobX. - The
computeddecorator can be used to create functions that can automatically derive value from the state and cache them. - Use
autorunto automatically run functions that depend on some observable state. This is useful for logging, making network requests, etc. - Use the
observerwrapper from themobx-react-litepackage to make your React components truly reactive. They will update automatically and efficiently. Even when used in large complex applications with large amounts of data.
<모벡스의 상태 관리>

MobX 핵심
1. Observable State
makeObservable
- 형태 :
makeObservable(target, annotations?, options?)
함수 형태:
import { makeAutoObservable } from "mobx"

function createDoubler(value) {
    return makeAutoObservable({
        value,
        get double() {
            return this.value * 2
        },
        increment() {
            this.value++
        }
    })
}
makeAutoObservable
- 형태:
makeAutoObservable(target, overrides?, options?)
observable
- 형태:
observable(source, overrides?, options?)
import { observable, autorun } from "mobx"

const todos = observable([
    { title: "Spoil tea", completed: true },
    { title: "Make coffee", completed: false }
])
todos의 상태 변화를 감지할 수 있다.
2. Actions
- 상태를 변경하는 코드
- actions는 이벤트에 항상 반응한다. (버튼 클릭, 인풋 변화, 메세지 도착 등)
import { makeObservable, observable, action } from "mobx"

class Doubler {
    value = 0

    constructor(value) {
        makeObservable(this, {
            value: observable,
            increment: action
        })
    }

    increment() {
        // Intermediate states will not become visible to observers.
        this.value++
        this.value++
    }
}
action.bound
➡️ 자동으로 인스터스를 바인딩 해준다.
따라서 this 가 항상 함수 안에 바인딩되어 있다.
💡 arrow function을 쓰면 더 간편하게 this를 바인딩할 수 있다.
runInAction
➡️ 비동기 프로세를 처리할 때 유용하다.
비동기적으로 상태 값을 변화하면 action이라고 표시를 해주어야 한다.
async apiRequest(){
        try{
            const response = await axios.get(URL, {
                headers:{

                    'X-Naver-Client-Id':Id,
                    'X-Naver-Client-Secret':Secret,

                },
                params:{
                    query : this.searchInput,
                }
            });
            console.log(response);

            runInAction(()=>{
                this.data = response.data.items;
                this.state = "done";
            });

        }catch(e){

            console.log(e);
        }
flow
➡️ flow 를 사용하면 간결하게 비동기적인 코드를 작성할 수 있다.
- Wrap
flowaround your asynchronous function. - Instead of
asyncusefunction *. - Instead of
awaituseyield.
async apiRequest(){
        try{
            const response = await axios.get(URL, {
                headers:{

                    'X-Naver-Client-Id':Id,
                    'X-Naver-Client-Secret':Secret,

                },
                params:{
                    query : this.searchInput,
                }
            });
            console.log(response);

            runInAction(()=>{
                this.data = response.data.items;
                this.state = "done";
            });

        }catch(e){

            console.log(e);
        }
그냥 하자